I tried the reflector. It gave me a very ugly donut hole (maybe I grinded too much or too little.. dont know, but the medium frosted Carclo lens produces such a beautiful uniform beam.. the LED you use is very important, too. ;)
Actually, the optic wont be centered in the head at all. Some people put an O-ring around the optic to center it, imo the O-ring in the bezel and a little care when screwing the bezel on is enough if you throw out the original lens. But it also works if you decide to keep the lens in order to protect the optic.. I mean, how often do you take the head apart. :)
What do you mean by "clean up"? I used a small file to make the bent thread-ends smooth. Works really fine. Tho my project isnt done yet.. btw, I wrapped the pill in aluminium foil for better heatsink and better fit.
Just worried that the head won't start correctly on the body if I shorten the body tube. I don't have a problem with drilling out the flat on top, but if I go down into the thread then it seems I will risk thread damage.
I've previously mashed one side of the threads a bit with a grinder accident while working on a Nite Ize module which was in there once; threads look flattened but still work smooth. I've not worked with metal much beyond gorilla grinding, but I guess a file on aluminum may cure problems with a little care. Thanks!
I just used a file to remove the top of the body, till I was just at the edge of the threads. Didn’t touch or hurt the threads at all. That Aluminum is very soft and it only took a couple minutes to remove it.
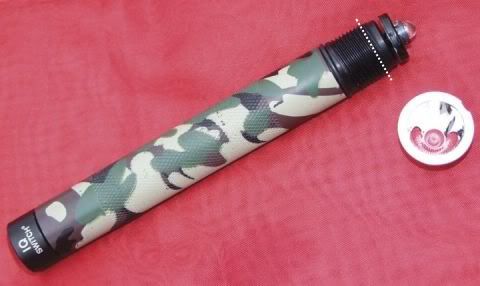
I cut off the end of the threads at the dotted line then clean and square it up with a file. With the battery tube inserted until the threads on the body meet the threads in the head the o-ring on the body should just disappear inside the head. Cutting at the dotted line will remove the unthreaded portion as well as the tapered threads leaving only the working threads that will allow you maximum turns with the minimum threads in the head after boring.
It is, they used to sell it at Walmart; but now you can get it from eBay and amazon as well. Numerous stores specialised on hunting equipment and outdoor/hiking/survival carry the stuff as well. And last, but not least, some automotive parts stores in Germany, specialised on American imports, sell a vewwy similar 2K epoxy from the master/ permatex brand.
> this mini mag mod could also benefit from one of the Battery Vampire (Joule Thief) circuits
Definite yes!! that would be splendid. I have too many old M@gAAs around in the earthquake cache -- and that would be the perfect time for us to have a bunch of them to squeeze the last use out of dying batteries.
We'll need them while we're chainsawing the fallen telephone poles and digging out collapsed buildings after the next big quake.
JB Weld is a modern miracle, I patched a cracked case on my dirt bike after a crash and it held oil for over an hour until I got back to the truck. It would have taken me all day to hike out of the woods without it.
I like the idea of a fitted, smaller heatsink, but I also like the idea of using the 20mm optics, so maybe a "hybrid" solution would work best in this case.
When you do that, now the AA cells can fall out the front of the light, right, I mean, only when the heads is off (off course), but nevertheless there is nothing keeping the cells in there when the head is off, right? If that is the case, technically speaking we don't need a tailcap anymore as we can simply remove the head and load cells from the head side, right?
That is what I am trying to do - find a way to make them fit/work in old AA Mags. That is why I was trying the idea of the P60 (threaded portion) as a possible way to use the small Battery Vampire boards).
1st attempt at this mod is a complete and unqualified success.
Construction notes:
- Used an old 3/4" masonry bit with peck drilling (a nibble at a time) and test fitting till I got to final depth. The old bit blades were worn in some when I started, but it worked out perfect for width 0f the pill I got from DX on Monday.
- Used a thin file to cut the shoulder off the top of the body . . the hard way but this gave me more comfort for the through cut . . no thread issues at all . . though I may still square it out a bit more with grinder.
- Used a Nite Ize reflector . . drilled out center so that the reflector base sits alongside the edge of the optic . . no longer FTT, but it is very comparable to the P60 reflector beam . . new beam spot is similar size and flood is maybe 2' wider at 6' distance.
This makes for an awesome light because you can pick a brightness anywhere from a few to 200 lumens of a really nice warm white that is really pretty neutral.
A brand new mini-mag in your choice of color and the drop-in are only $20.00! This one is an old platinum but the next one will be green, orange, or blue.
I thought about using that dropin, too, but after reading that it stopped working for several people, I decided not to do that.. well, and I wanted to use eneloops. :)
I ran it for a couple days on an 18650 for short-term testing. If it blows, the repair will just be the next learning experience. Worth it to try having a light with variable brightness at BUDGET price.
I also got a SF low voltage + Duraloops to swap in or use alkys when wanted/needed but I wanted to try 8v brightness first. My holder for the spares is likely to soon be a new MiniMag. :)