My thermal pads being used in Audi A8 and Q7 and Q8 Bang & Olufssen amplifiers ![]()
Under the MOSFETs? I wonder why they didn’t use thermal paste like other amps.
Did you buy extra from them? Why do you have them? So many questions.
I don’t know where they put them in exactly.
Don’t know maybe easier to apply thermal pads in exact same amount than paste.
Didn’t bought them.
I work in an automotive electronics manufacturing company where we produce so many type of electronics for cars. B&O is one of our buyers. We make electronics also for Harman Kardon, Delphi, Valeo, Aptiv, Honda, Porsche, Mercedes… But I don’t work at that area just asked collegues for thermal pads and they got me a few.
many devices use thermal pads now a days in production, its more consistent in application, and is easier and cleaner to work with.
in most cases that outweighs the minor differences in thermal conductivity, especially in production gear that has a large tolerance on the thermal characteristics.
i would wonder however if there would be manufacturing tolerances on this light that are so great that there would be measurable differences in the clearance between the copper sink and the chips themselves.
it would probably not be known until a large number of devices have had the copper sink in them.
What thermal paste did you use in your experiments man of ligjt? You obviously worked with heatsinks a lot, what paste (brand type) do you think would be best for this application? I could use professional opinion.
I’ve built plenty of PCs in the past and never had any issues with thermal transfer from CPU to heatsink, so I think I’ll just use thermal paste for mine. Just means I’ll need to get a new tube of Arctic Silver as the one I have must be well over ten years old, and I think the shelf life is probably a lot less than that.
For my tests I used Arctic MX-4, but only because I have a lot of it. Its a good one with relatively good thermal conductivity value of 8.5 W/mK, its not that budget.
Just for comparison, most common basic thermal grease/paste (white) have a value of 1-2 W/mK, but it will do the job also good enough.
So just use any kind you already have at home. And put only as much as necessary and as less as possible to the surfaces.
I’d suggest IC Diamond 24karat. Had a lot of pastes in the past and this one is the only that won’t dry out in a month or two.
Also all components i’ve used with this paste got noticably warm much faster than any other thermal solution.
or maybe it’s just me... but i can recomend it 100%
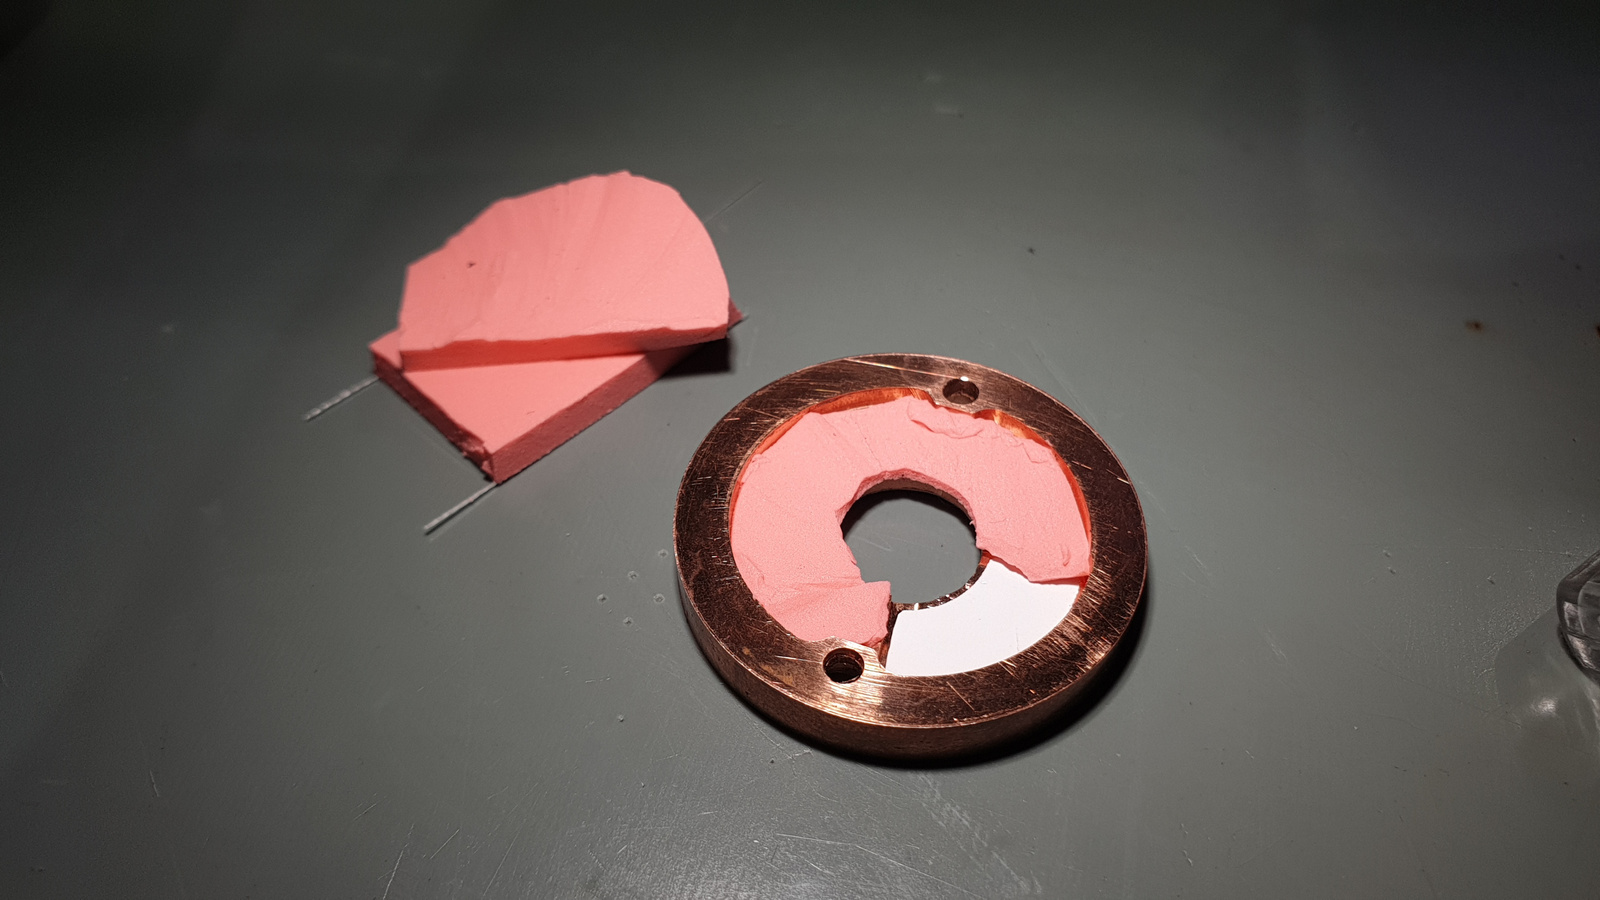
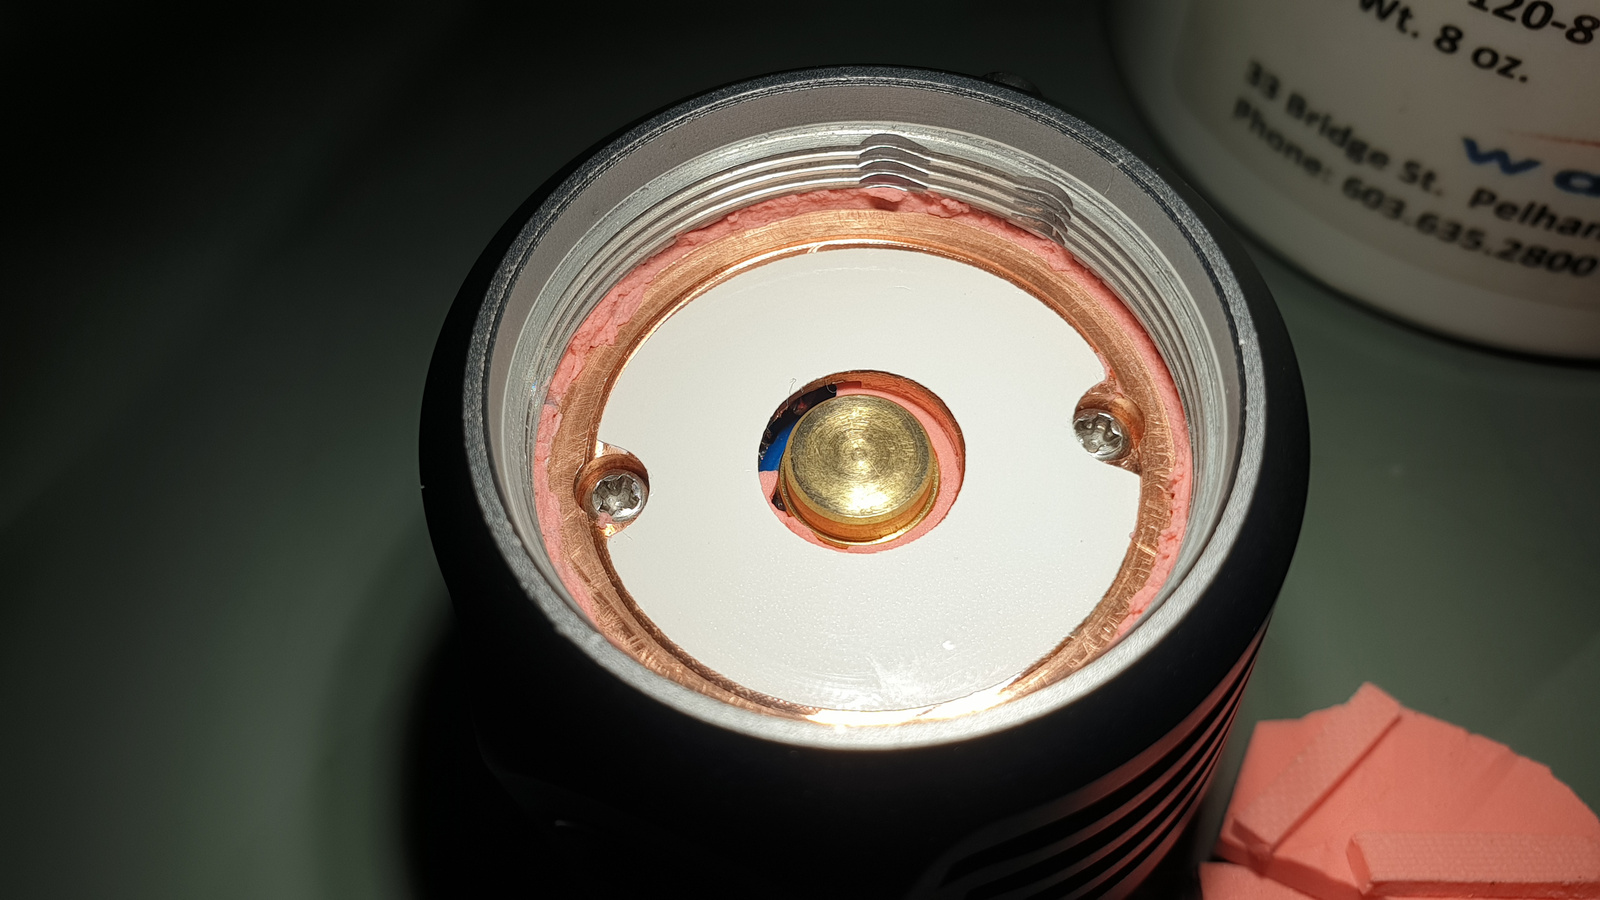
Now made an update. removed copper and made a mix with thermal pads and grease. Where the gaps bigger I used silicone and at smaller or almost no gaps I used grease.
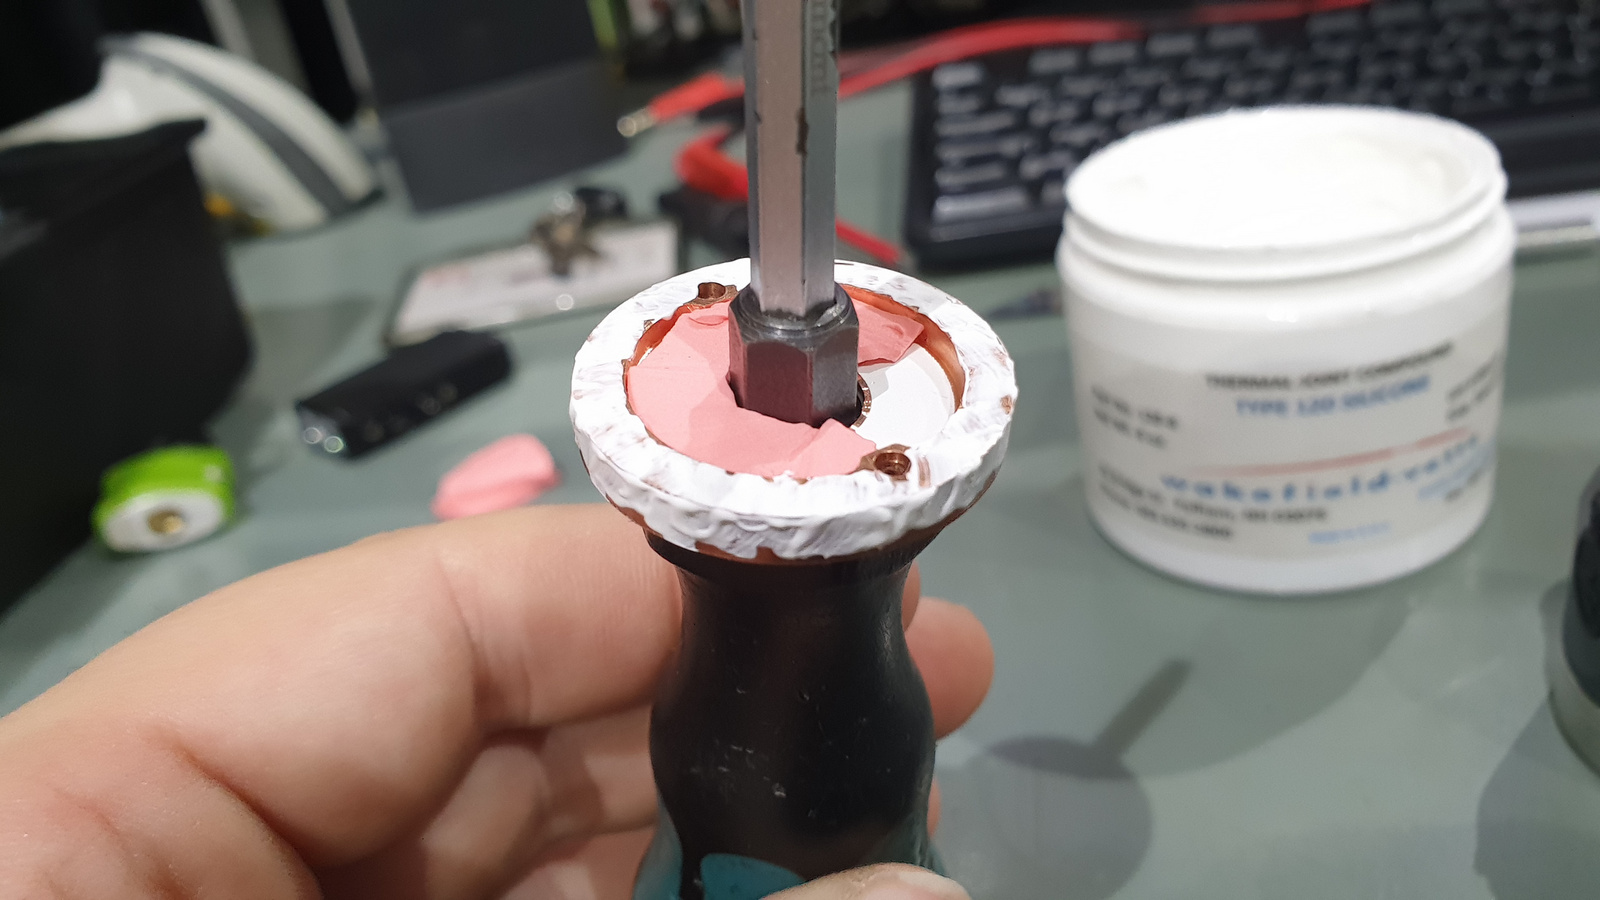
When removed yesterday’s work I saw that pads worked well but on the side colse to driver pcb I did not manage to tuck them deep enough.
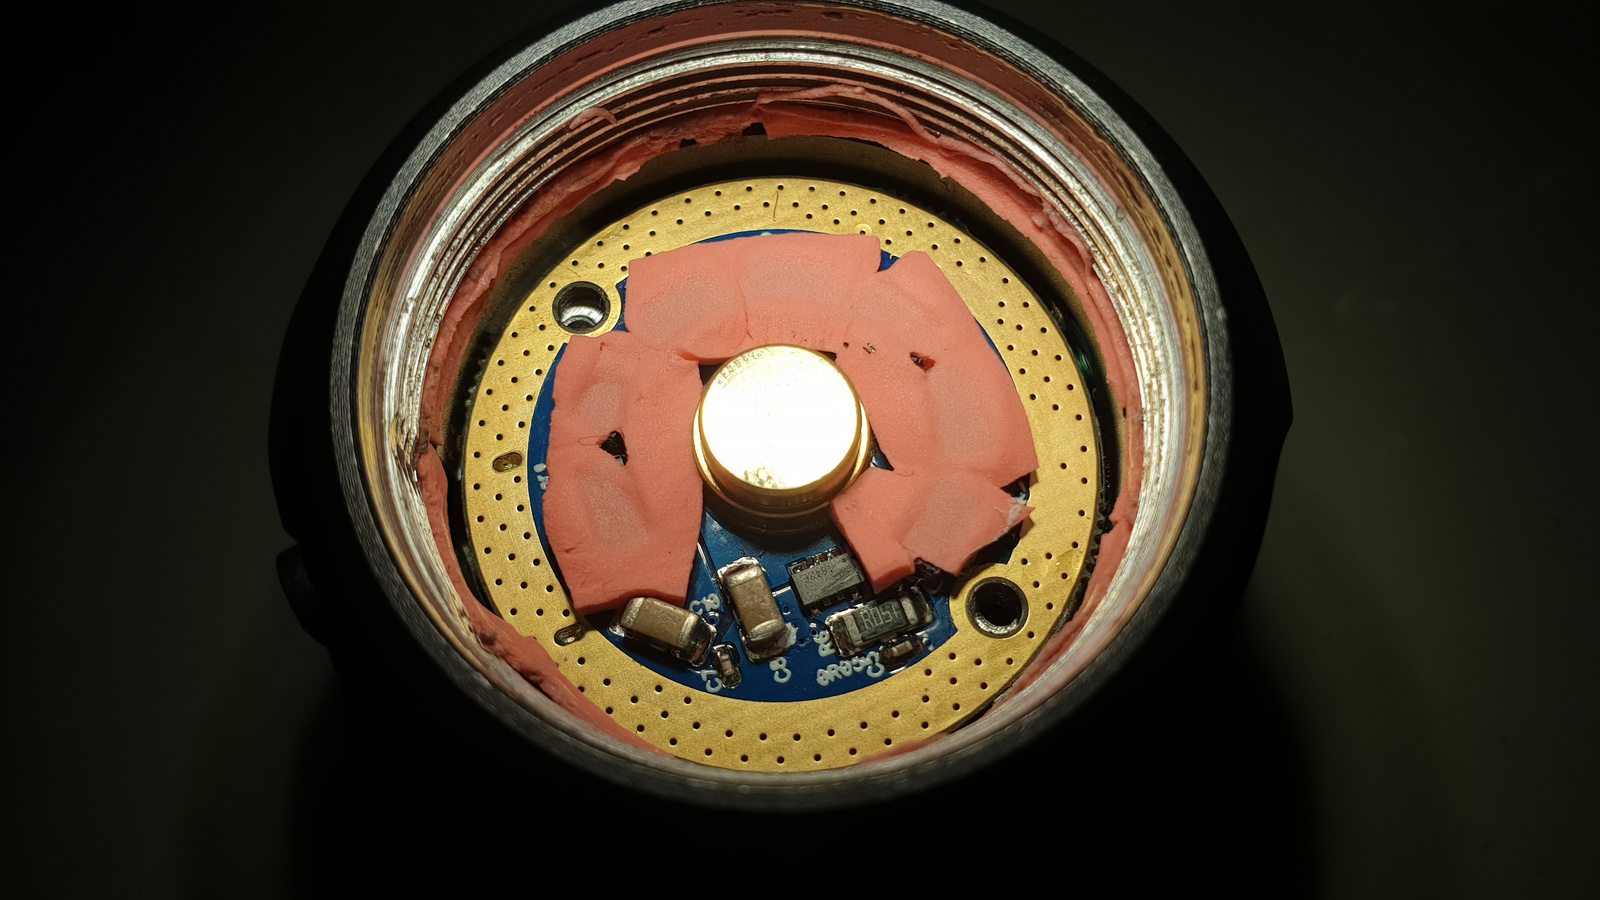
Now made a better shaped thermal pad.
And for driver and side contact I used thermal grease.
Stuff needed:
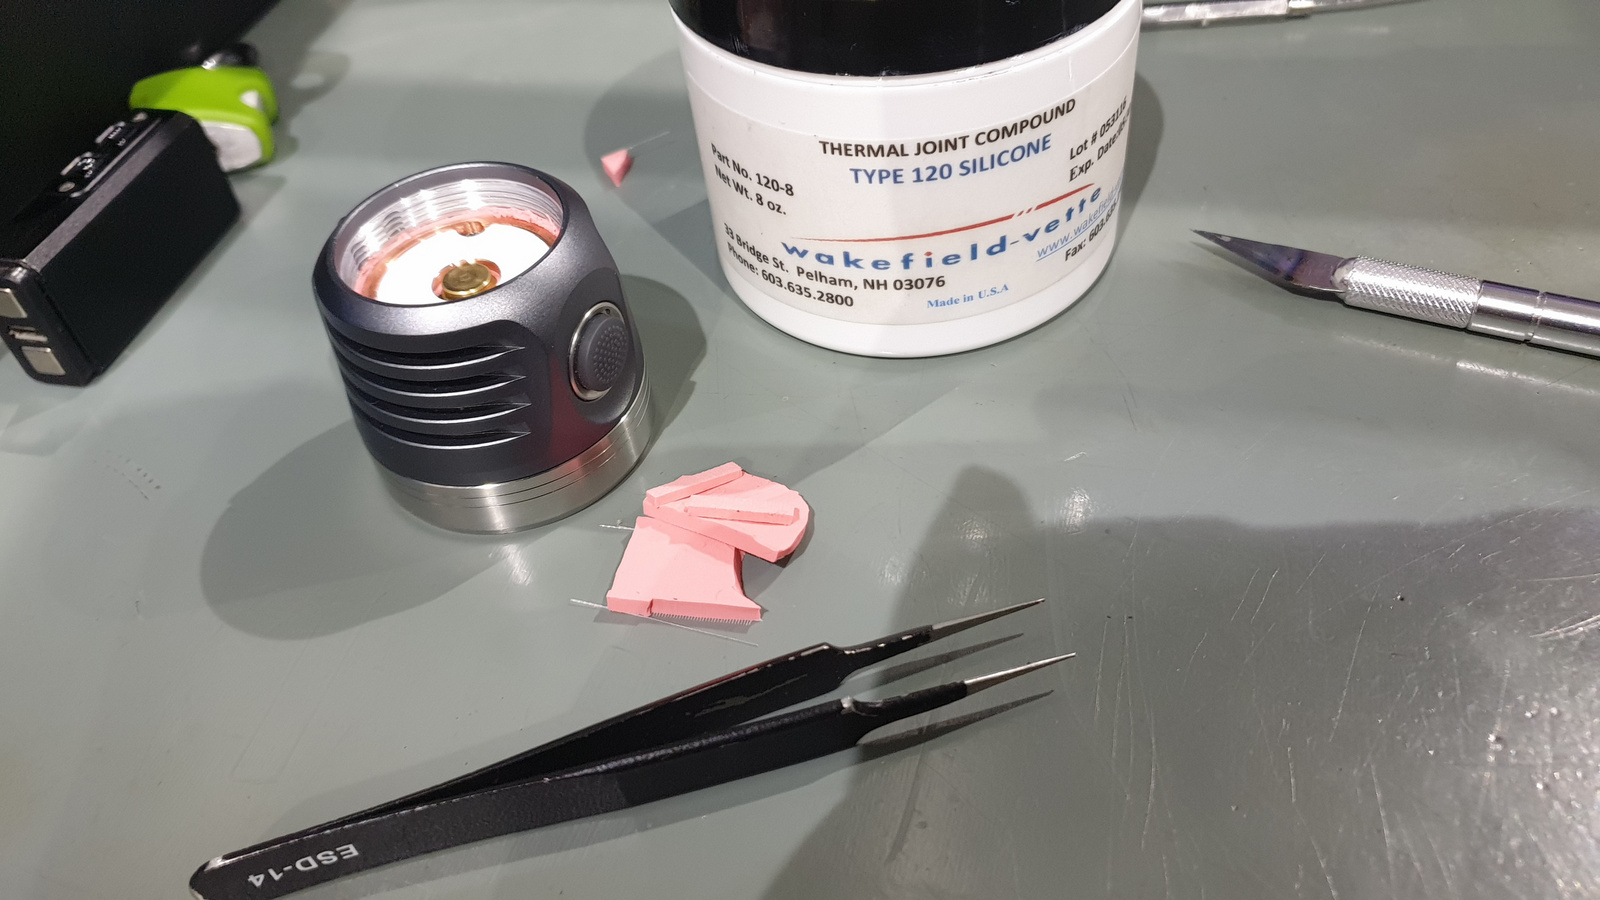
And after assembly I also tucked in thermal pad slices to the side as many I could to heatsink the hell out of it:
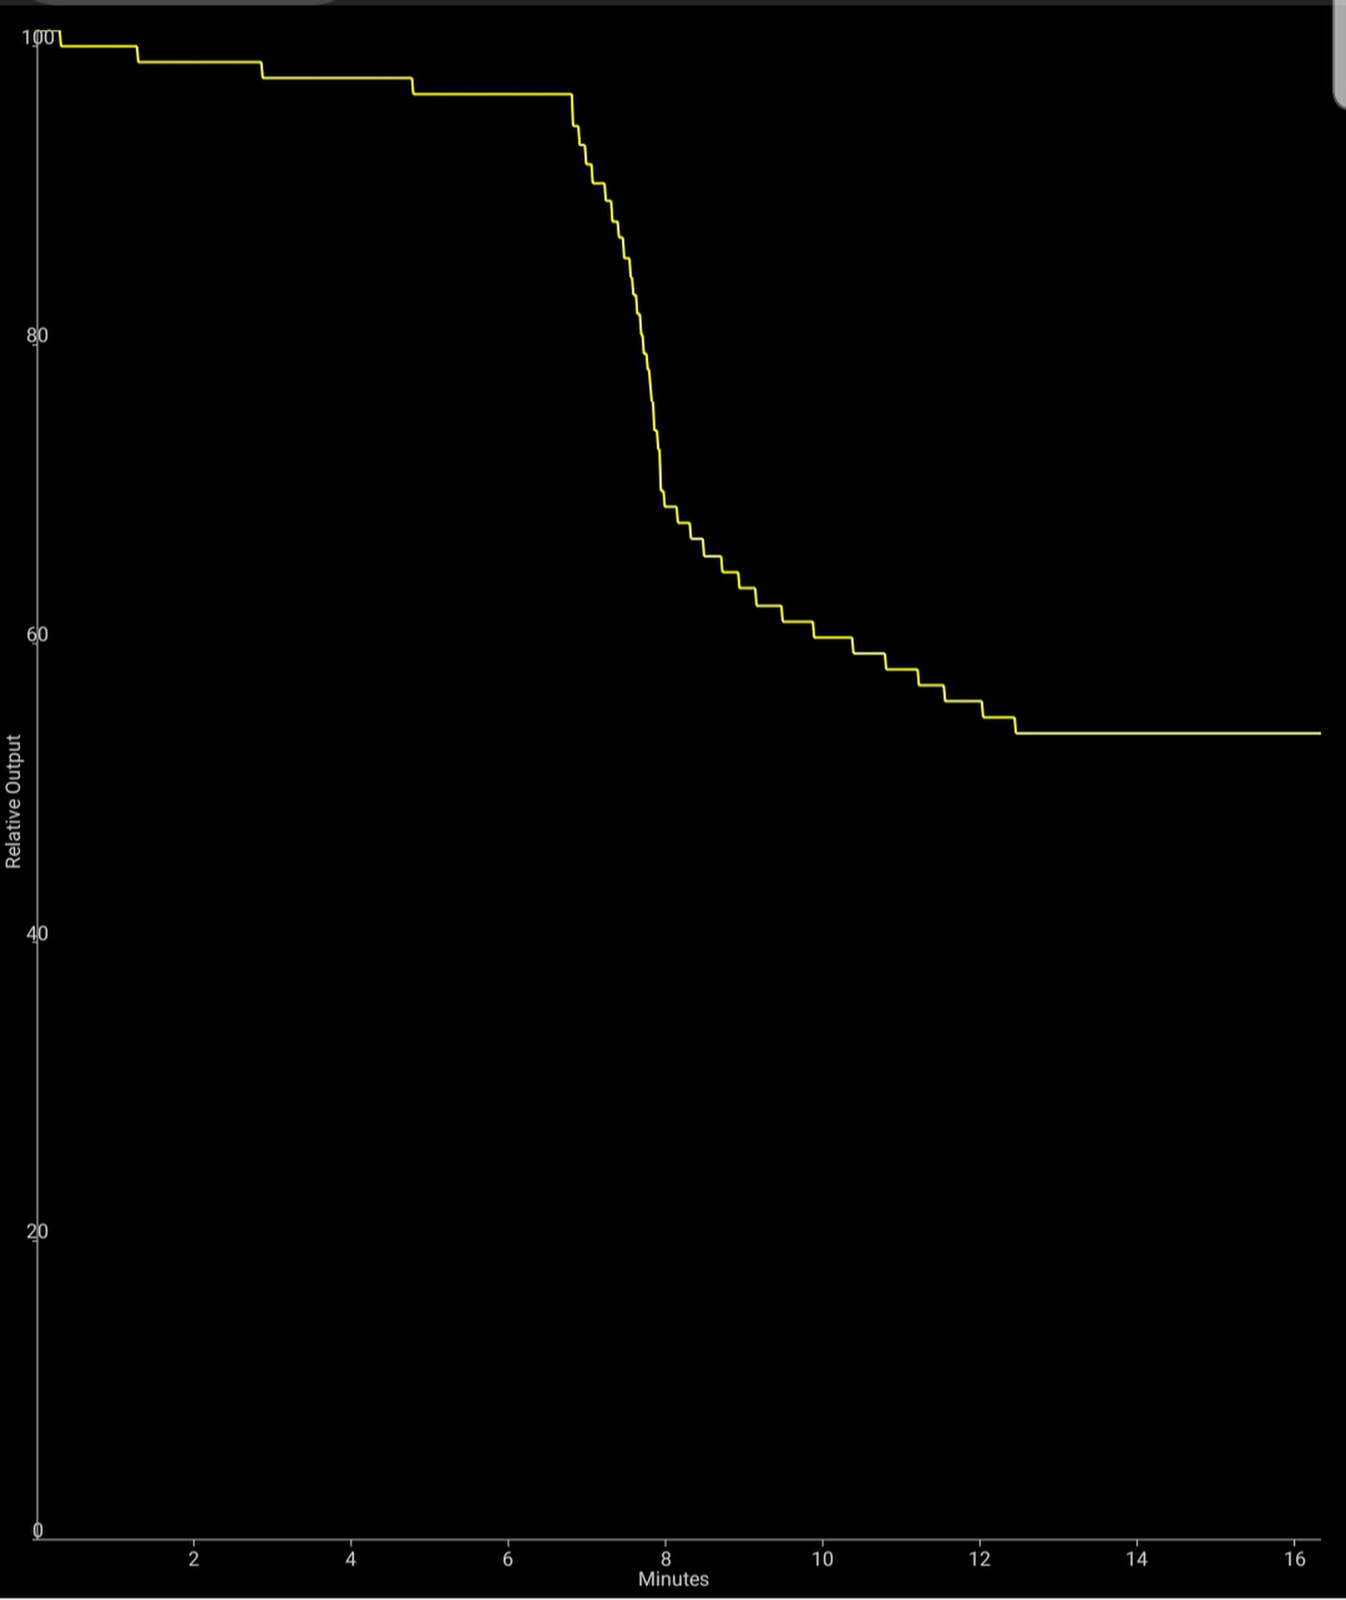
And first run with 35 click ramp max setup (1367 lumens) Head temp was topped at 46°C and stayed within 1-2°C moving. You see the step down but the flashlight was tailstanding in a half open drawer in my desk so absolutely no air movement around it. In colder enviroment it can hold longer the output.
You can see there is absolutely no drop at start just a little stepping down caused by heating up for around 7-8 minutes. After that it stepped down because of the complete light was very warm. At end of test the light blinked out 48°C (Temp reading calibrated at home so it is pretty accurate.)
So you need to make sure you use enough thermal transfer materials and I suggest using 0,5-1mm silicone thermal pads cutted shape on the 7135 top.
1 Thank
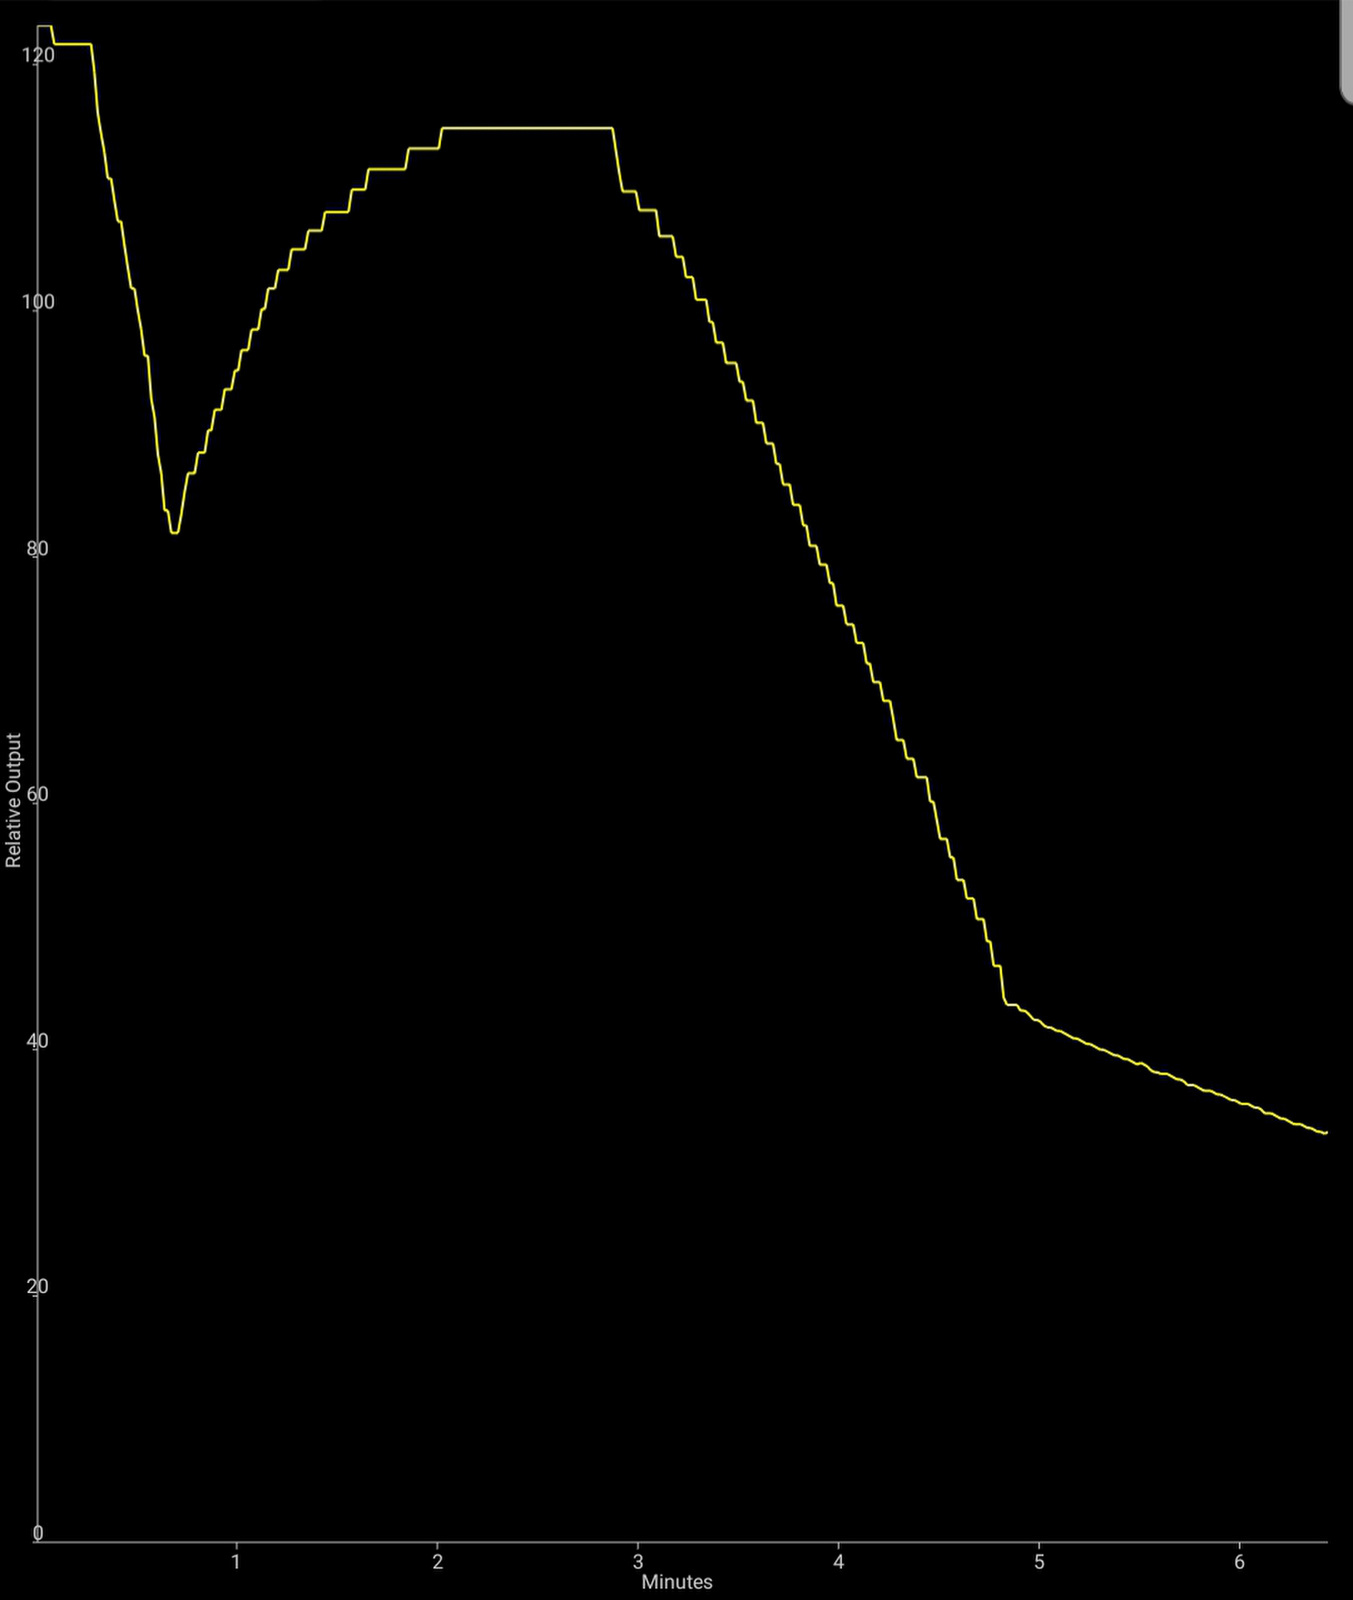
With factory ramp max setting which is above 2400 lumens you still have the drop.
I think you can’t do much more for this issue. Only one I can think of that removing one 7135 which is exactly the opposite side on the driver as MCU but that may cause a bump when ramping. I usually set ramp max to a level what a flashlight can hold for at least 5-6 minutes so I am ok with around 1300-1400 lumen setting where it works great. That output is plenty enough for daily use.
1 Thank
Played with Ramp max config. at 27 clicks ramp max you have no drop but at 25 clicks you have. I setted it to 35 clicks because 1360-70 lumens is enough for most tasks and it can handle for 7-8 minutes steady. If I ramp down a bit from ramp max I can use it for longer time.
1 Thank
Thanks for this results and your work ![]()
Thanks for making the copper mod ![]()
Im intersted in a second batch, i thought i was in on the first one but i guess i wasnt clear in my comment that i lefr in this thread.
I let you mine, I will finally not get a MF01 mini.
In for 1 if 2nd batch will happen.
Cheers!
Any new info on tests or production?
Got it and will update the list accordingly ![]()
Well tests from my site are done so far, don’t know if ZozzV6 will do any further tests, I thought he will do a video review for the MF01 mini on his Youtube channel with the mod mentioned. Although I thinks it should be clear how this mod/heatsink work, or are there some questions?
The production is still on going, but had a little delay. The Supplier confirmed that the full Batch will be ready after Christmas days, end of next Week. I had previously hoped for an earlier completion date, but that’s how it is around Christmas.
I will send PMs to all on the first list with payment information as soon as I have the completed notification from the supplier.
I will also update post # 1 with the current status.
Thank you. The timing seems reasonable to me. Merry Christmas all!