Yes. In the manual (toykeeper.net/anduril/manual), try a search for “voltage config menu”. There is a detailed description in the main part of the manual, and a quick reference table at the bottom.
In short, check Batt Check → 7H → Options 3 and 4.
Edit: If you are referring to Off -> 3C to access the actual battery check mode (blinks out the voltage), the brightness of those blinks is not configurable. However, you can (on most lights) choose whether the blinks happen on the main LEDs or the aux LEDs, and which color of aux LED it uses. Use 3C while in Batt Check mode to choose a color for the blinks.
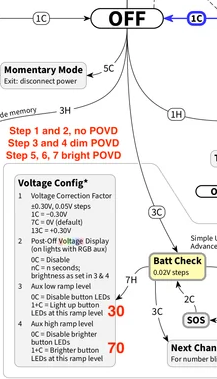
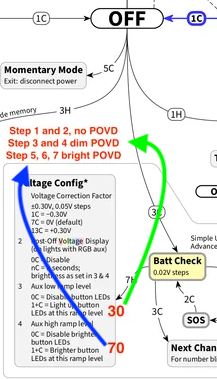
The config options determine the duration and brightness of “POVD”, the Post-Off Voltage Display. That’s when it displays an approximate charge level by color, after turning the main LEDs off and going to “Off” mode. The default is 4 seconds, the color represents a voltage range, and it chooses low or high aux based on what ramp level you were using before you turned off the light.
On my kr1AA, running the first v-2 firmware without the blip correction, I don’t have such an option. The low aux option might only apply to the POVD and not necessarily the 3C batt check? Maybe I’m doing something wrong, or some other setting i have is overriding it.
No,
the brightness of batt check blinks when using 3C from off, can not be changed:
correct
when using 3C from off, batt check brightness,can not be changed
only POVD brightness can be changed, to off, dim, or bright, depending what brightness the light gets turned off at, by using Option 3 and Option 4 on the POVD menu:
Sorry basic questions - I haven’t followed this discussion. 1. Number 2: N seconds - is this duration of the POVD? 2. Number 3: n clicks means brightness is 30 + n? Is that why there’s a number 30 there? 3. Where do I download best/most complete etc. version of latest Anduril chart? TIA
fwiw, this is an extremely complicated topic, you may find it confusing to understand.. feel free to PM me for more details.. but here is the explanation:
that Red 30 is the Option I personally use, so that at level 30/150, Dim POVD comes on (that is not the firmware default).
If I turn the light off below level 30/150 (5 lm), POVD is OFF (off for stepped ramping 1 and 2 of the 7 stepped modes). That is for my nightstand use, when I use very low outputs to go the bathroom. When I go back to bed and turn the light off, I want No POVD.
from Level 30 to level 69/150 Dim POVD comes on. (ramping step 3 and 4 of 7 uses Dim POVD)
the red 70 is the Option I personally use so that at that level (120 lm) or above, Bright POVD comes on. (ramping step 5, 6, 7 use bright POVD)
my complete personal settings for KR1AA are here along with a blank chart you can download…
no, it is not a default, (sorry for causing confusion)
the Red 30 and Red 70 are my Personal POVD Options (for my KR1AA)..
Default POVD options uses Dim Aux for ramping step 1 of 7
and Bright Aux for ramping step 2,3,4,5,6,7
I dont know where the specs are that define what level (x/150) POVD dim and bright defaults are set to. My guess is option 3 is set to 1/150, and Option 4 is set to 20/150.
It’s not well documented. The low level (option 3) is set to 0 or 1 by default. The high level (option 4) varies per light depending on how bright that light’s main vs aux LEDs are. If unset, I think the default is 25.
Here’s what I get if I grep for the default value for each light…
… so the default is anywhere from 5 to 50, depending on the light. I tried to tune each one so the aux brightness will approximately match the main LED brightness.
But to make things more complicated, some older lights don’t have RGB aux (just a single color), so they don’t have POVD, which means the Voltage Config Menu has 3 items instead of 4. On those, option 2 (POVD duration) is removed, and options 3+4 get moved down to 2+3.
… and on those older lights with no RGB, the default value (the point where the button goes from dim to bright) is the ramp’s “DEFAULT_LEVEL”, usually the point where the ramp goes from “7135 only” to “FET + 7135”. And that varies per light. I see values anywhere from 46 to 100.
TL;DR: It’s just one of those really hardware-specific details that I’ve tried to tune so the user doesn’t have to care about it. But if the user does care, it can get pretty complicated.
agree its complicated, but also very useful for my Nightstand sublumen and low lumen uses, when I dont want POVD Aux to turn On, or only want Dim Aux for POVD..
Im a big fan of the new POVD Options 3 and 4, because they let me control when POVD Aux will be Off, or On Dim, or On Bright, based on the last used brightness.
And those POVD Options also let me control when the Amber button light on my D3AA is Off, Dim, or Bright, when main LEDs are On.
your Anduril feature set development is amazingly full featured, and configurable, for a low light nerd like me
Thanks Jon. Agreed that it’s complicated, but glad that I now know. Let me digest it over the next couple months and surely will ask if I have more questions.
Is Jackson’s version the same as the latest version that Hank is selling? I don’t own the light yet so it’s hard to follow all the points discussed here, but mainly I don’t want a spinning captive clip and a mushy button (and prefer not to modify the light).
In the past Jackson had a different version, that we call V1. It had no physical lockout.
We wont know until Jackson receives the shipment.
In the past Jackson exclusively had a version we call V1, with NoPhysical Lockout, Hank’s version, which we call V2, has YesPhysical Lockout.
The clip does not spin anymore, Hank added a second O ring to prevent that (some call it V2.5). All Hanks current stock has YesPhysical Lockout, and the clip does not spin.
A couple of people had concerns that the buttons have too light an activation pressure or too much pretravel. And that the button must be pressed in the center, not just on the edge..
I dont share those concerns. The button works fine for me, without modification.
Here is a more extensive rundown on the perceived concerns about the KR1AA design. Personally, all the issues are solvable or not a concern. Im extremely happy with my KR1AA lights..
I was referring to the actual voltage check with the blinks. I wish it wasn’t so bright in either the main LEDs that blink or even the Aux colors that blink. Both seem higher than I’d prefer but it seems this isn’t configurable through software updates. At least setting the voltage check to Aux colors is tolerable as it isn’t as jarring as the main LED blasting away. I have my ceiling set to way lower than what the main LEDs would blast out the voltage blinks. Ceiling on all of my Anduril lights are 150-130 or Level 20.
I agree with the retina blasting of the battcheck…I had to set mine to red, and cover the head when triple clicking to prevent eyeblasting with the blip brightness as memorized. (In practice, the A2 boot logic priority seems similar to zebralights; 1H, then 1C, then 2C, then timer to determine 2h, 3c, or 3h. However, A2 is more heavily reliant on preactivation timing for a better result, as in NOT cycling the modes until the logic timing has taken effect.)
**even without being literate in the programming, some who sits down and analyzes the practical application of can begin to appreciate the amount of work and refinement that went into it. I surmise that the reference of Anduril being reforged from the shards of Narsil isn’t lost on anyone here.
I really like the pink, but it’s almost as harsh as light blue or the main LED…besides the “pure” colors, it might take alot of work to rebalance the brightnesses for proper color blending on a lower mode..but even so, being able to force the battcheck into a lower bightness mode would be great. Set to “memory” but with a max cap of level 40 might suffice? **Aux either high or low, as per driver limitations
You might want to try using POVD instead of 3C Batt Check.
You gain the ability to have Dim Aux produce the Voltage blinks. Plus there is No Flash of white light that you get when you do the first clic of 3C Batt check.
here is a suggested POVD Options configuration for you to try on your KR1AA, that might work better for you than 3C Batt check:
set POVD Option 3 to 10 clics (single long hold equals 10 clics). This will keep POVD Off if the light is turned off below 0.20 lumens
set POVD Option 4 to 30 clics (3x 1H). This will make POVD only use Dim Aux unless the light is turned off above 5 lumens.
Don’t have a KR1AA yet but will once polished silver and brown are back.
I like POVD on my lights as I have it set for only 1 second. It’s always on low so I never worry about that being too bright. I just like voltage check for more accuracy than POVD
My review sample button requires good effort to press and activate and jas okay feel. About the same as the FWAA, maybe a bit firmer.
The clip doesn’t spin (a thin o-ring was added under the main tail o-ring). My sample also included a spacer if you wanted to omit the clip ao there’s no gap.
Also on my sample, there’s a slight flicker when turning off in Moon. It flickers for a second. Also, I’ve had commectivity issues unless really cranking the tail down hard, and the threads aren’t thr smoothest.
agree
I have seen a brief dim flash when I turn my KR1AA off on floor level 1/150. It happens on LiIon but not on Eneloop. When I raise the floor to 5/150 I can not see the post off flash on LiIon either.
Mine have become Much smoother after wearing them in, wiping off all the blackened lube, and relubricating (I use Nyogel 760g, and the action is Very Smooth now)
Yeah, after I cleaned and lubed the threads on my KR1AA, it’s really smooth. Would definitely recommend.
I also lubed the O-rings so they’ll last longer. Those things tend to break when not lubed. The clip can spin now, with some force, due to the lube there… but it doesn’t spin easily.