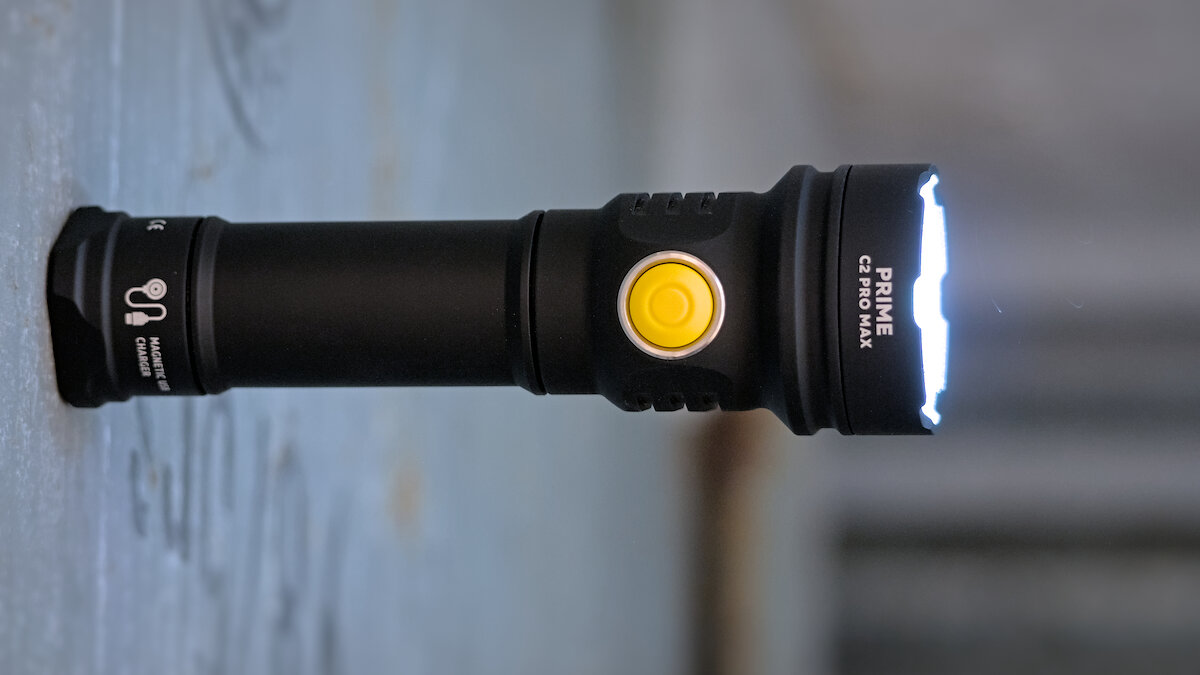
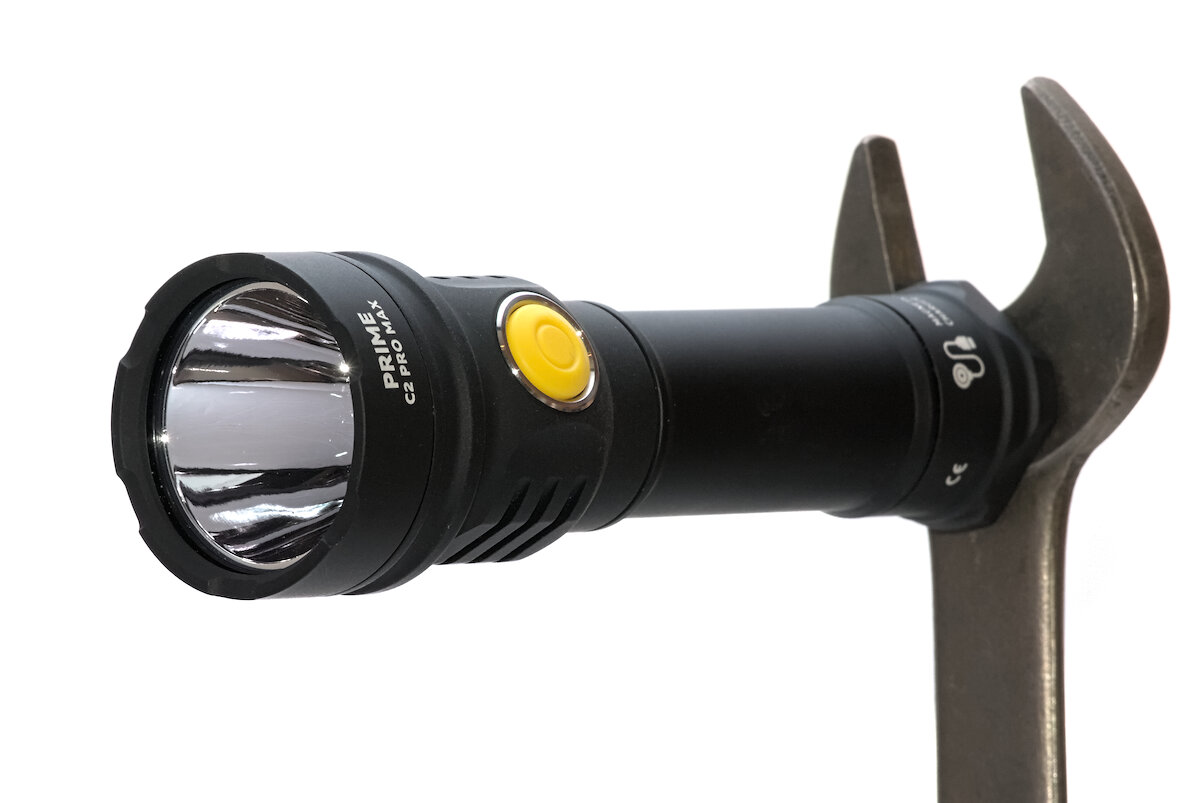
The Prime C2 Pro Max – the new flagship of the Prime series by Armytek. The Cree XHP70.2 HD gives you 4000 lm, the large 21700 battery a long runtime. In addition it has the typical design and quality that Armytek is known for.
The flashlight was provided by Armytek for this review, without any obligations. Thank you very much!
You can find the German version of this review on my website: SammysHP Blog › Armytek Prime C2 Pro Max
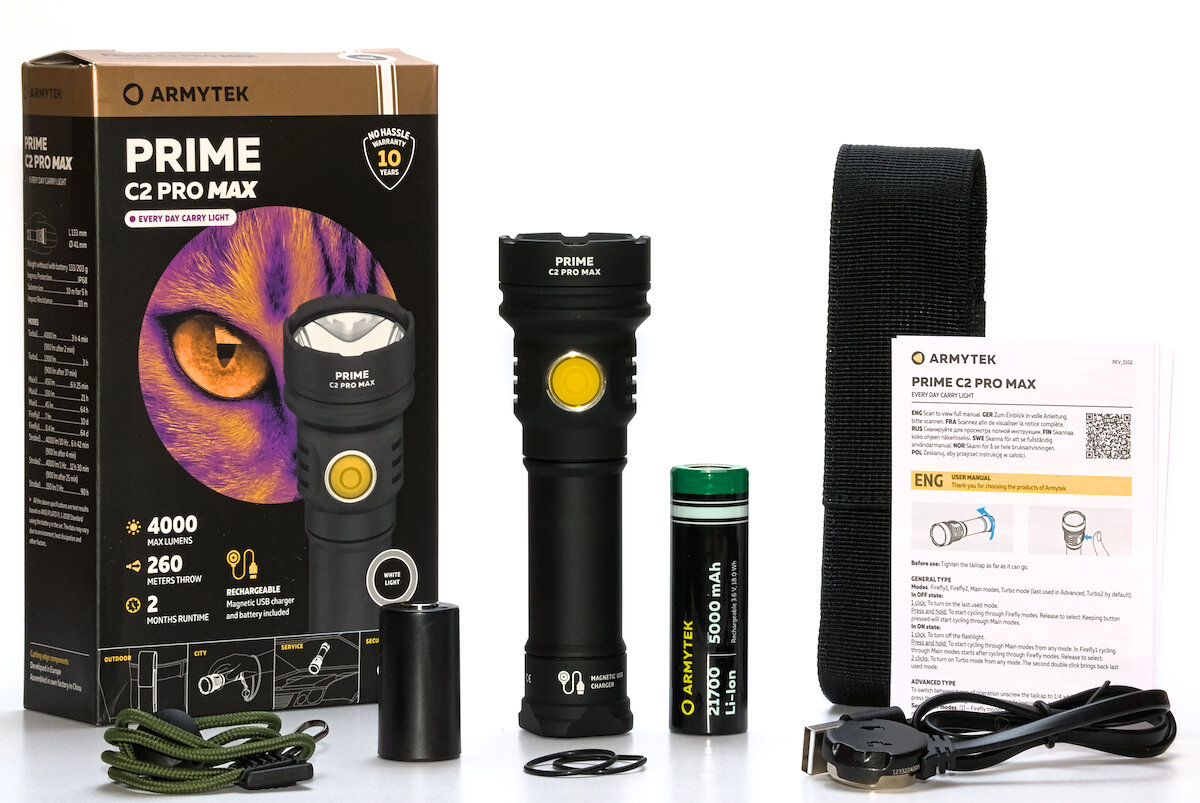
Supplied parts and hardware
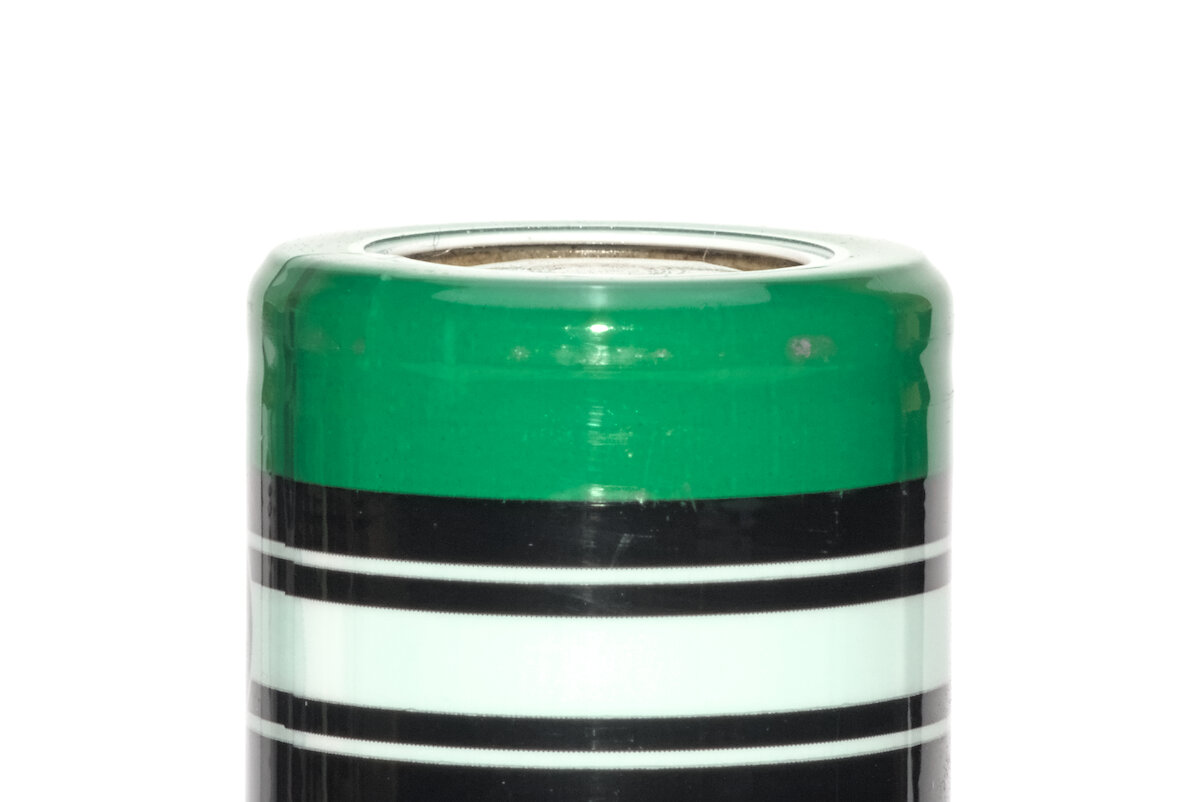
- 21700 Li-ion battery with 5000 mAh (3.40 V at arrival)
- Magnetic charger
- Lanyard
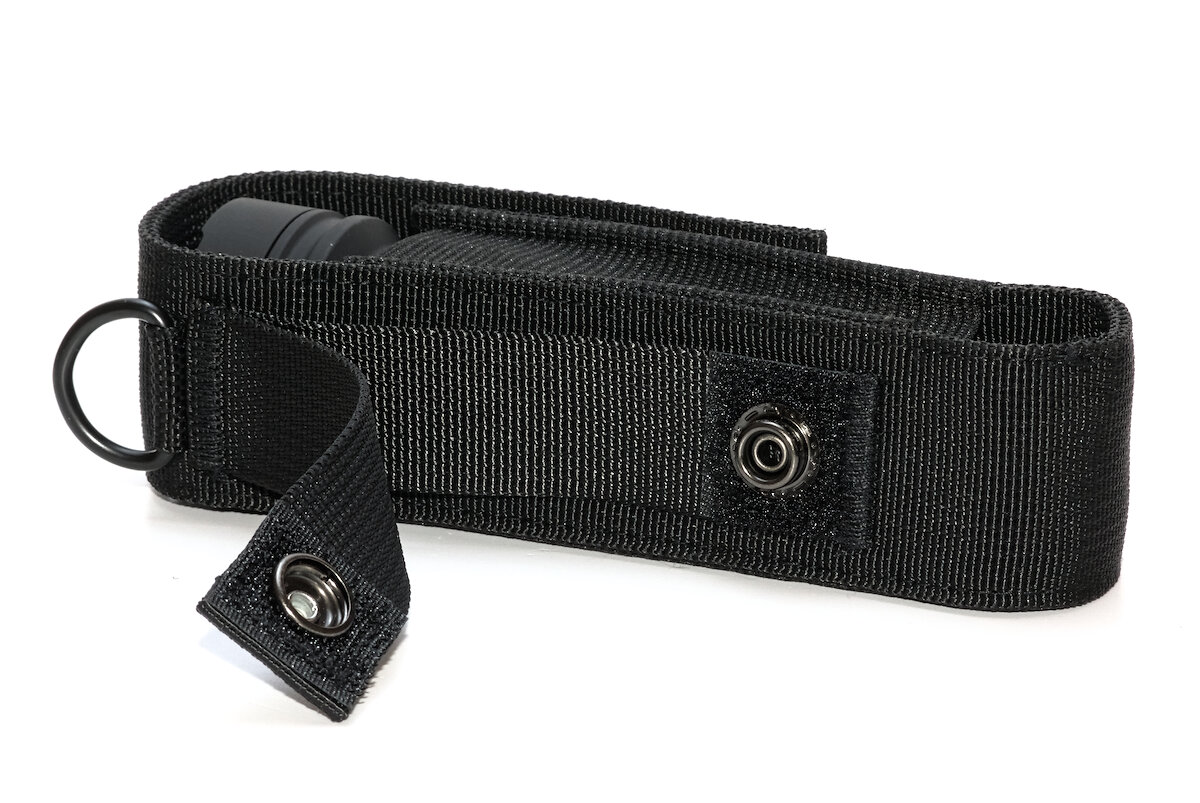
- Holster
- Adapter for 18650 batteries
- 2x replacement o-rings
- Quick start guide (EN, DE, FR, RU, FI, SE, NO, PL)
In the past there was a QR code in the quick start guide which linked to a PDF of a comprehensive manual with all details. Unfortunately this isn’t available so far. Thus some important details about the usage stay unknown for the regular user.
Length: 133.0 mm
Diameter (head): 40.9 mm
Diameter (battery tube): 25.4 mm
Diameter (tailcap): 31.0 mm
Weight (without battery): 130.0 g
Weight (21700 battery): 69.4 g
This sets it at the top of all Prime models. It’s more similar to the more throwy Dobermann and Predator (which come with a 18650 battery).
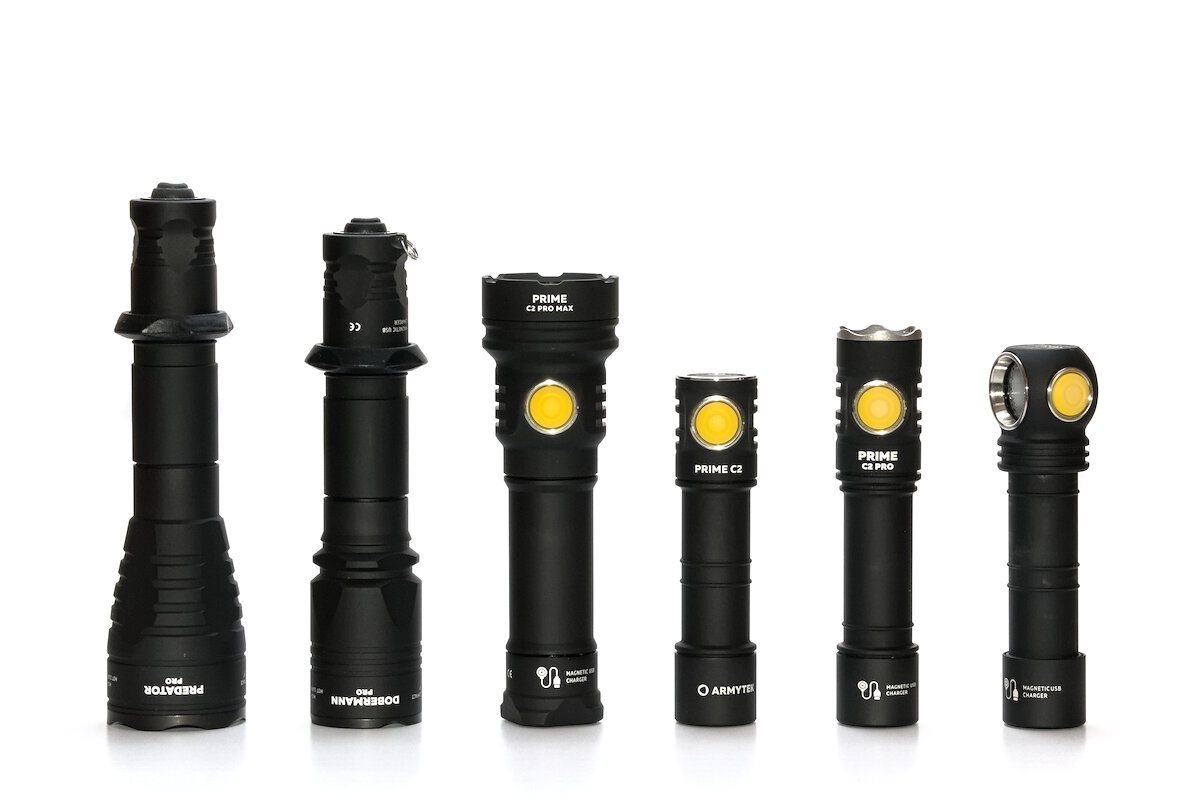
Predator Pro | Dobermann Pro | Prime C2 Pro Max | Prime C2 | Prime C2 Pro | Wizard C2 Pro
In comparison to some other flashlights with XHP70 LED the Prime C2 Pro Max is more in the middle. But its thin body makes it feel much smaller.
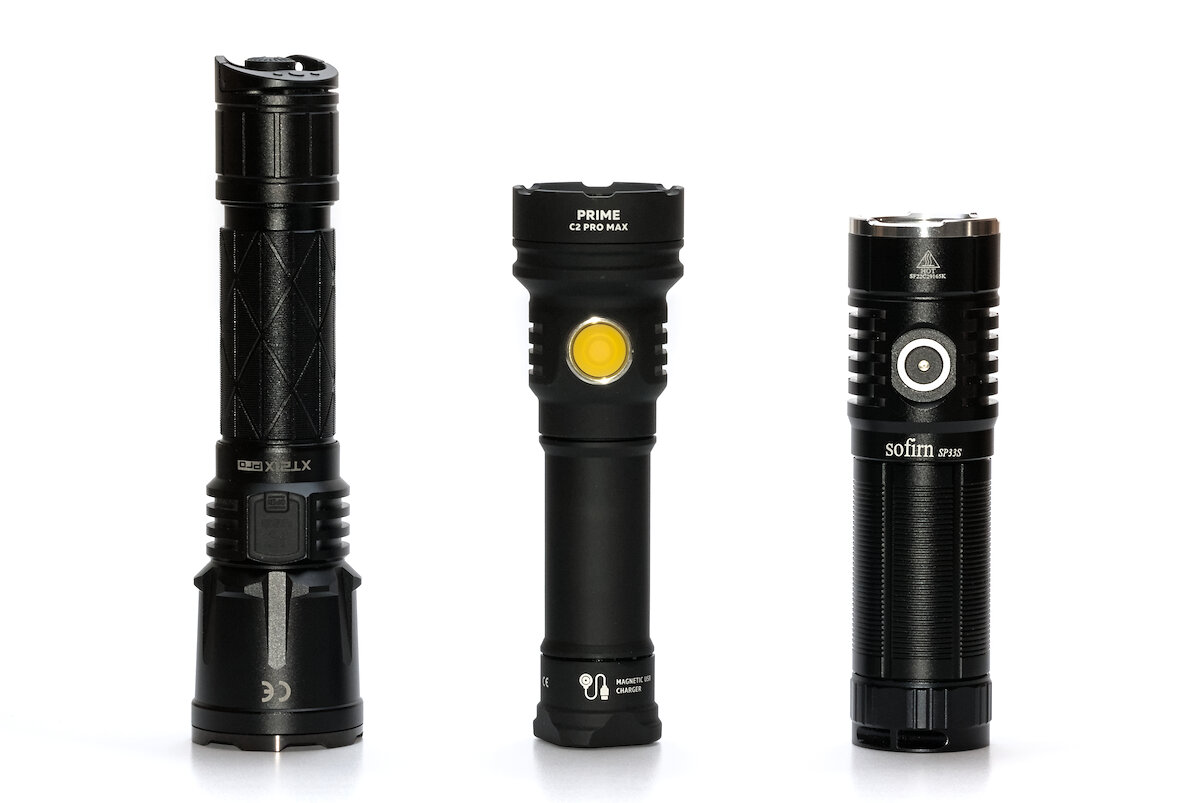
Klarus XT21X Pro | Armytek Prime C2 Pro Max | Sofirn SP33S
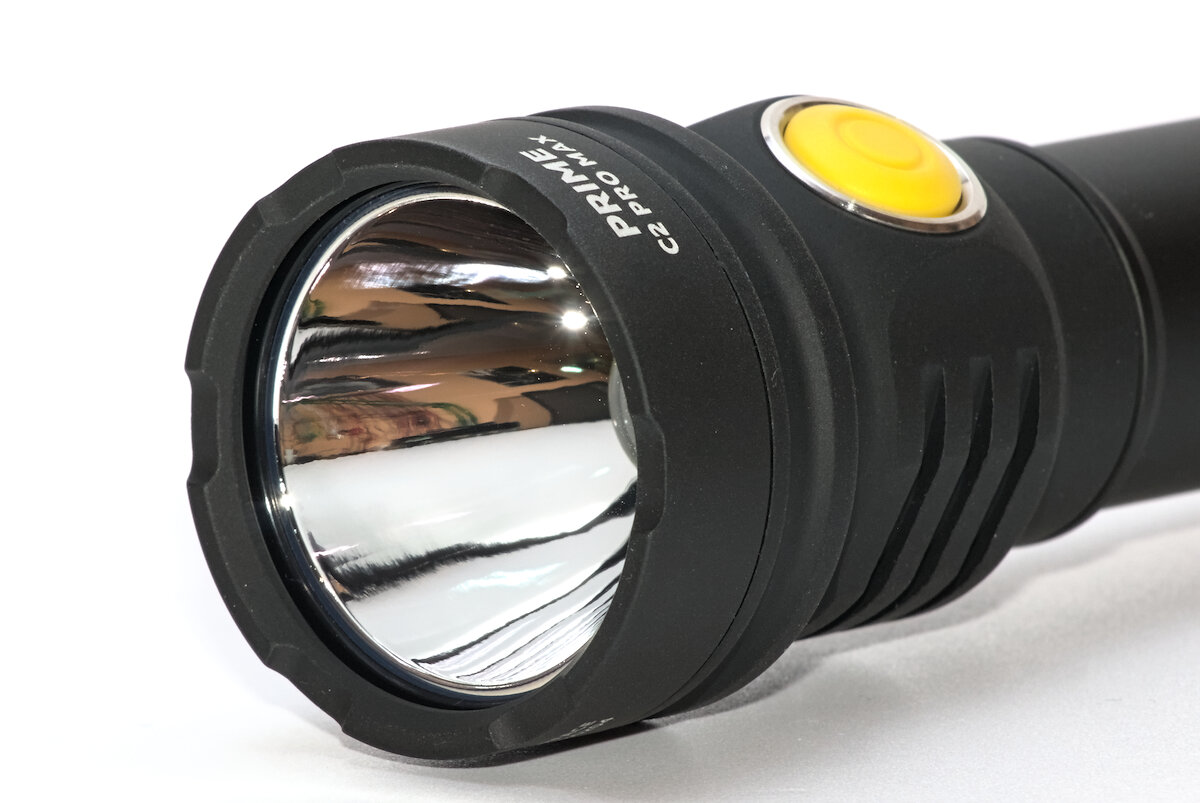
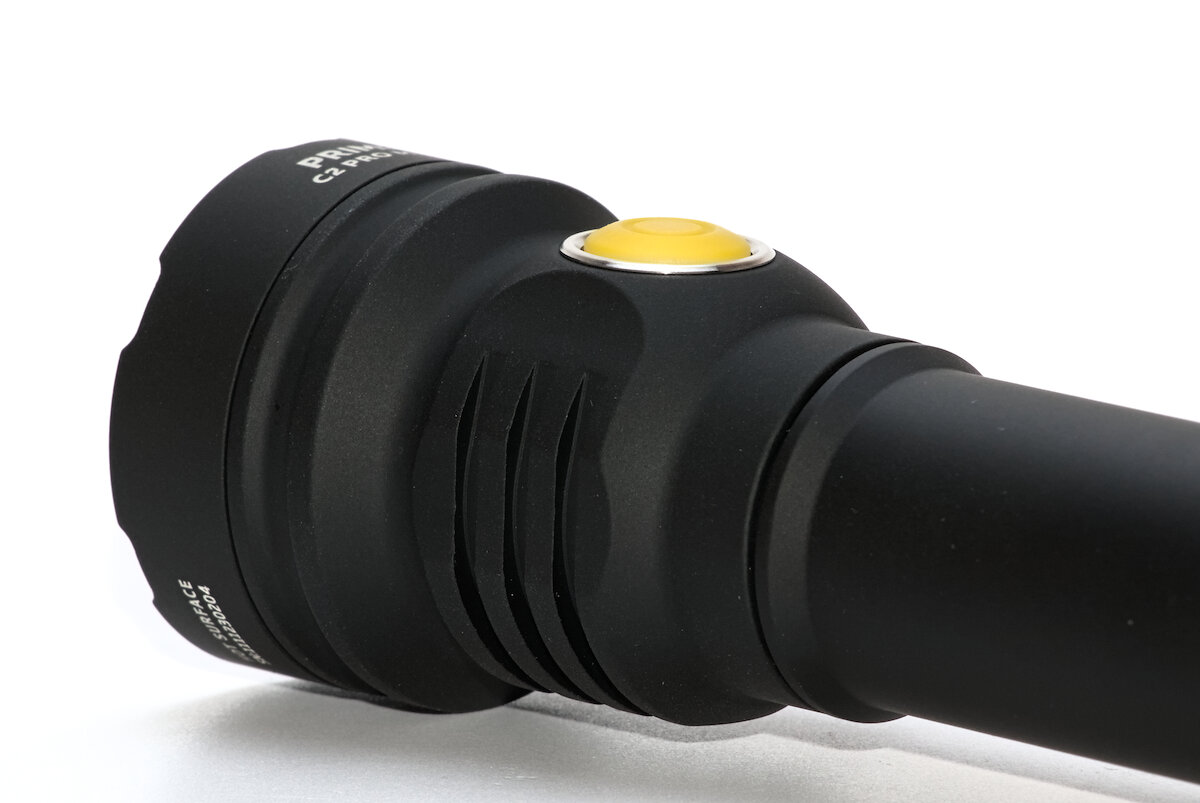
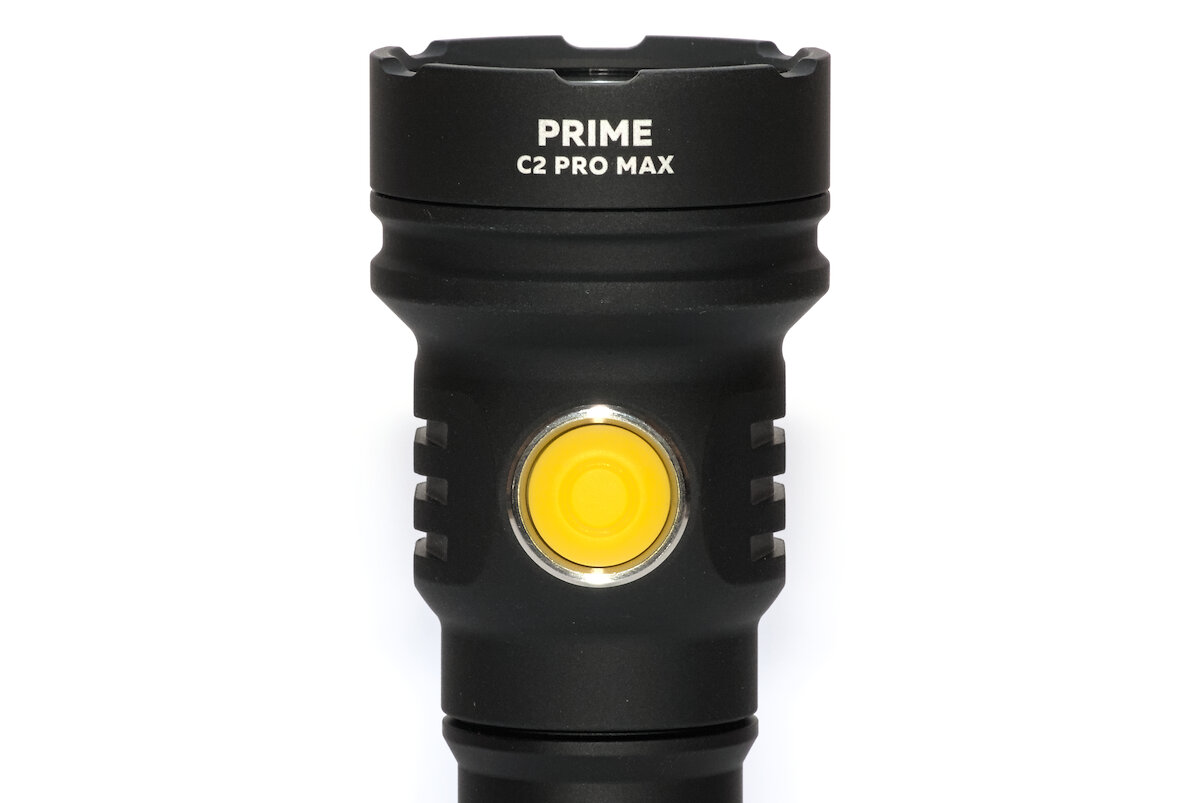
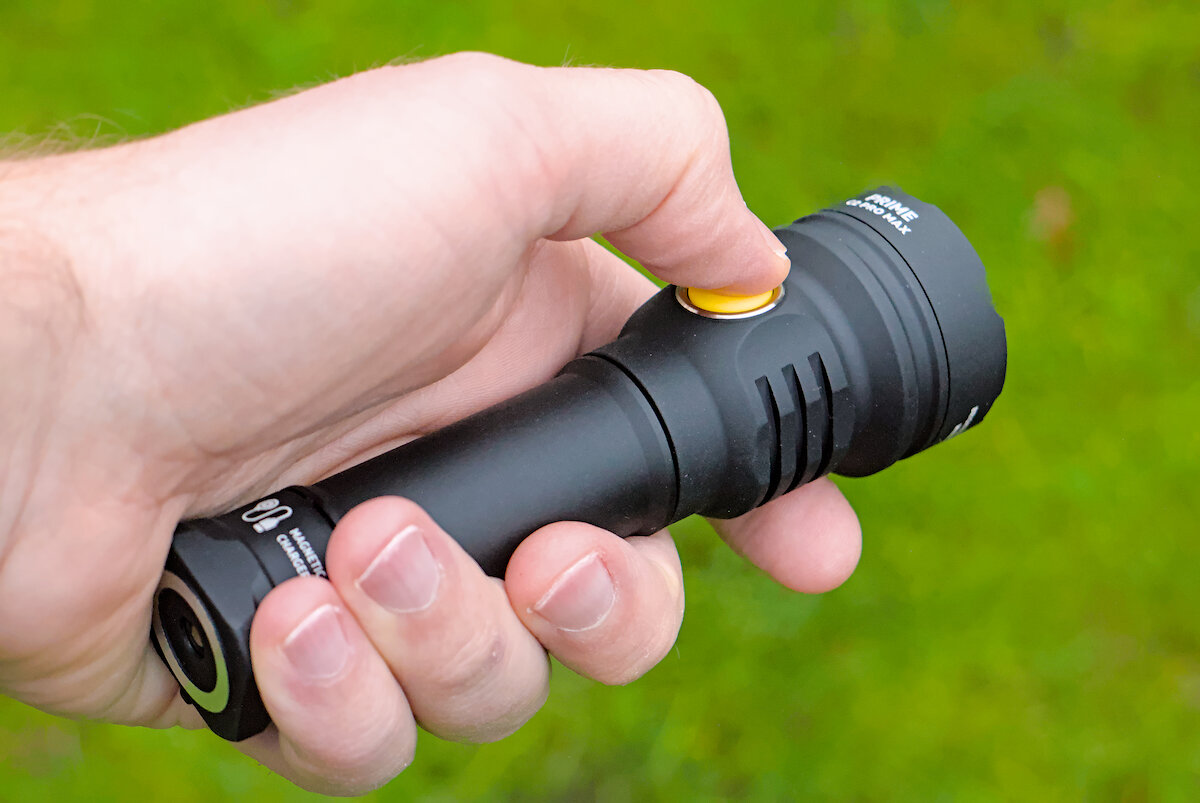
It’s definitely a Prime in its design. Especially the prominent, yellow switch. The rough anodization allows for a secure handling even without knurling, but makes it harder to clean. It’s almost like a chalkboard.
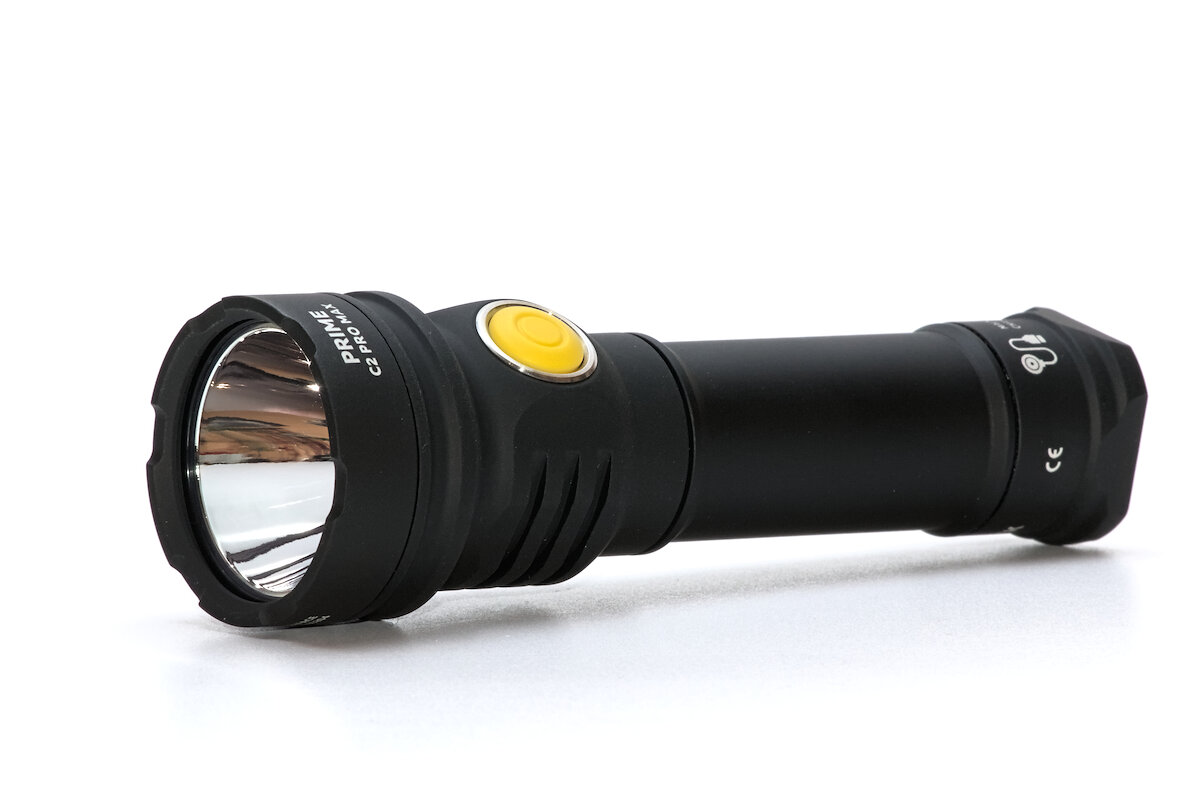
The black bezel has minimal crenelation, just enough to be able to see if it is turned on when standing on its head.
The cooling fins near the switch are more for look than for cooling. But they improve the grip in the head section.
Simple battery tube without any extras. Not even a place to attach a clip. Usually I don’t need clips, but it has the perfect size to hang it from your backpack strap with a clip.
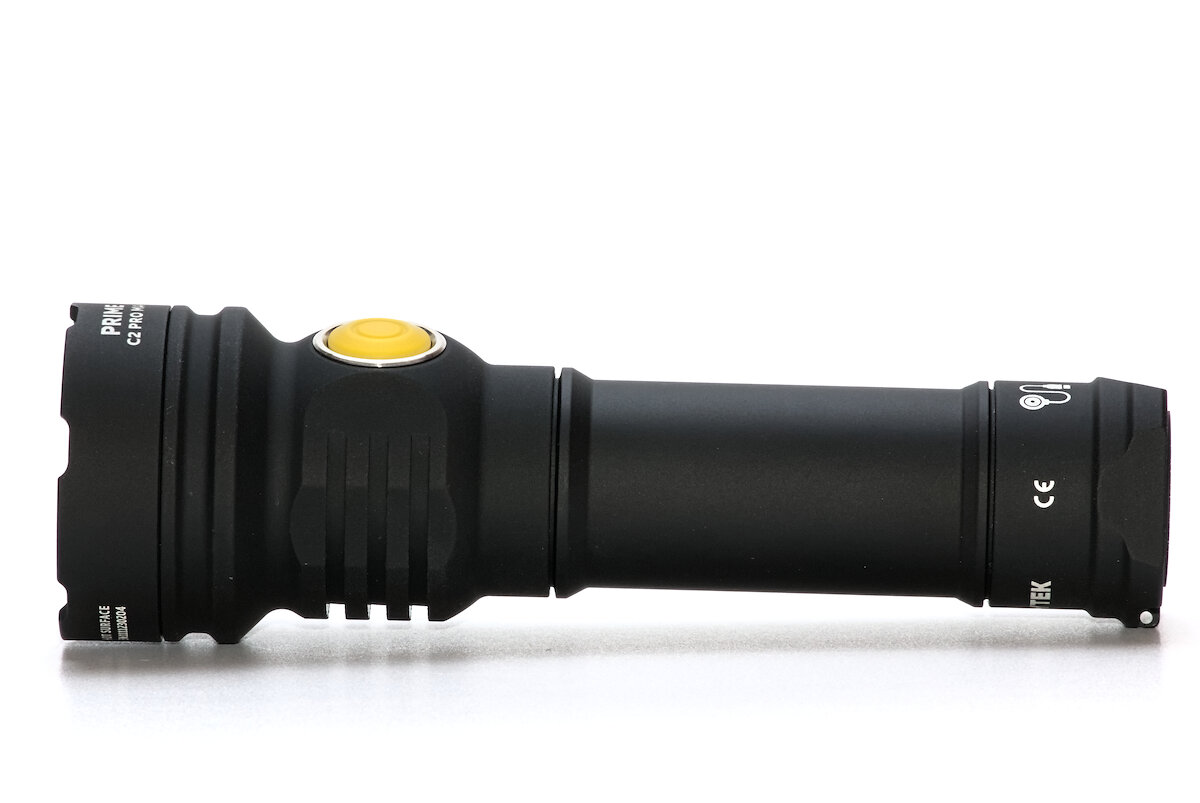
The tailcap got flat sides to stop the flashlight from rolling away on a flat surface.
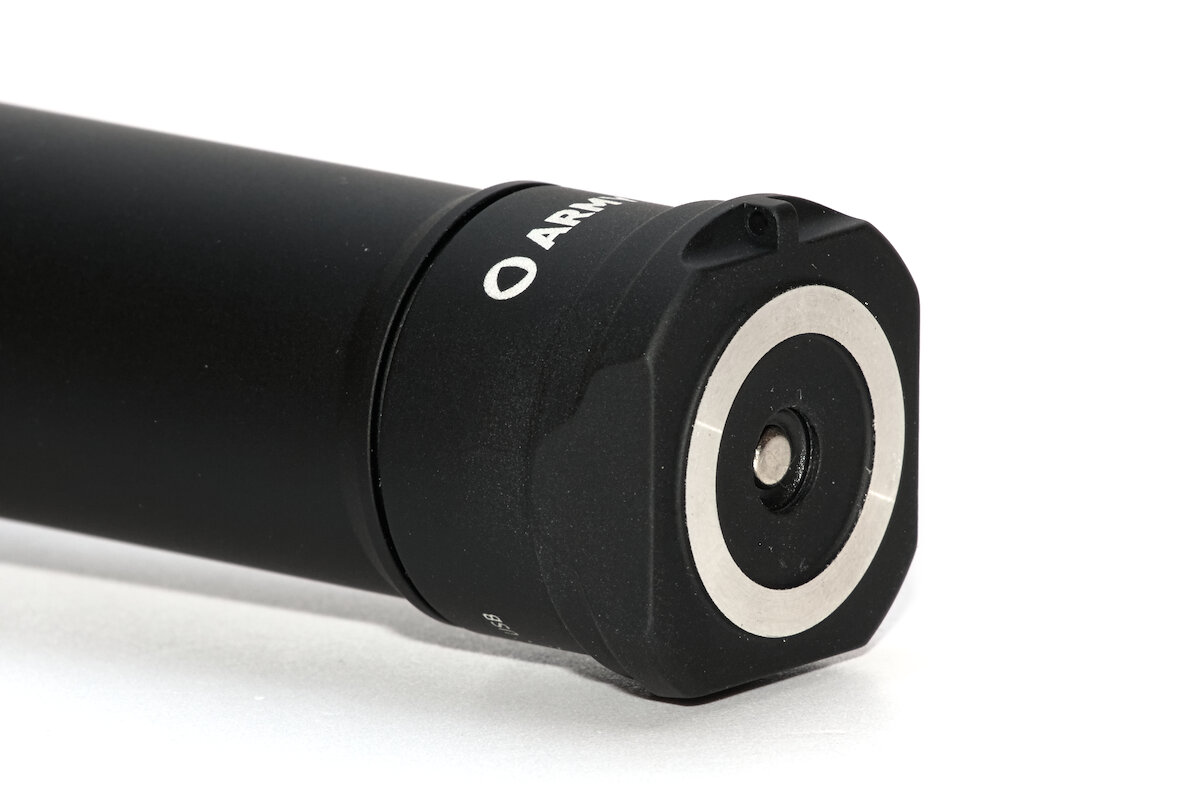
The lanyard hole on the tailcap is… awesome. Its pointy shape stabs into your hand, the diameter is only 1.5 mm and it has a wall thickness of only 0.4 mm. Should I file it off? Hmm…
For storage or carrying it comes with a nice holster made of a thick webbing and Velcro to close it.
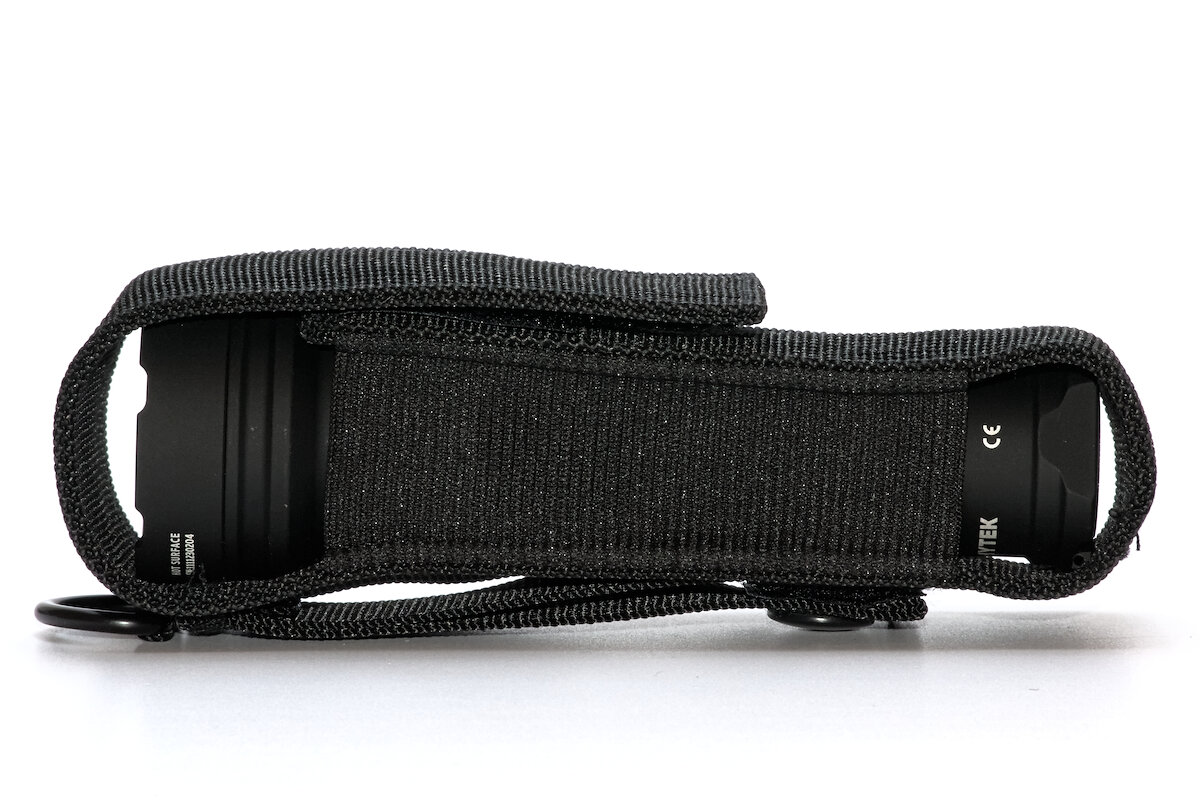
It can be attached either with a closed loop or with an open loop with a snap button, which makes it compatible with your MOLLE/PALS system. There’s also a D-ring.
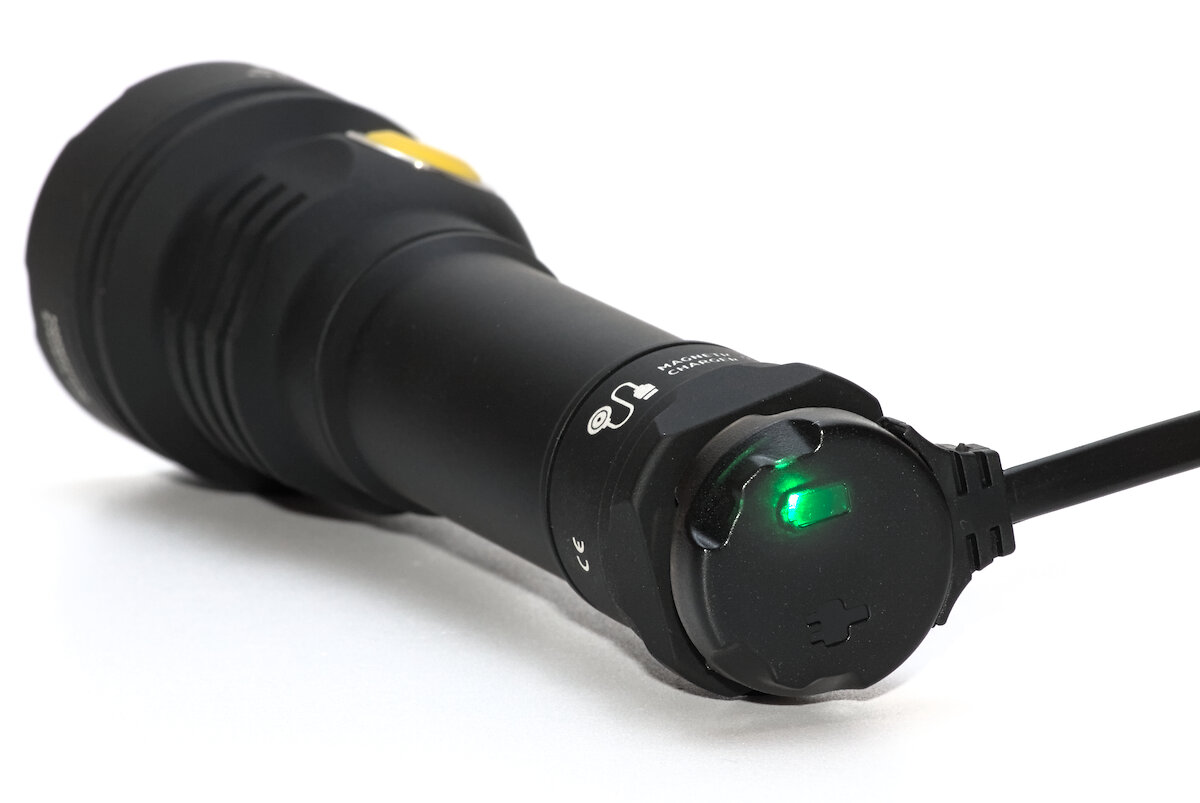
The contacts on the tailcap make it possible to charge the battery inside the flashlight. A very good system to make it more robust against water and dirt compared to a USB port, but it requires the special magnetic charger.
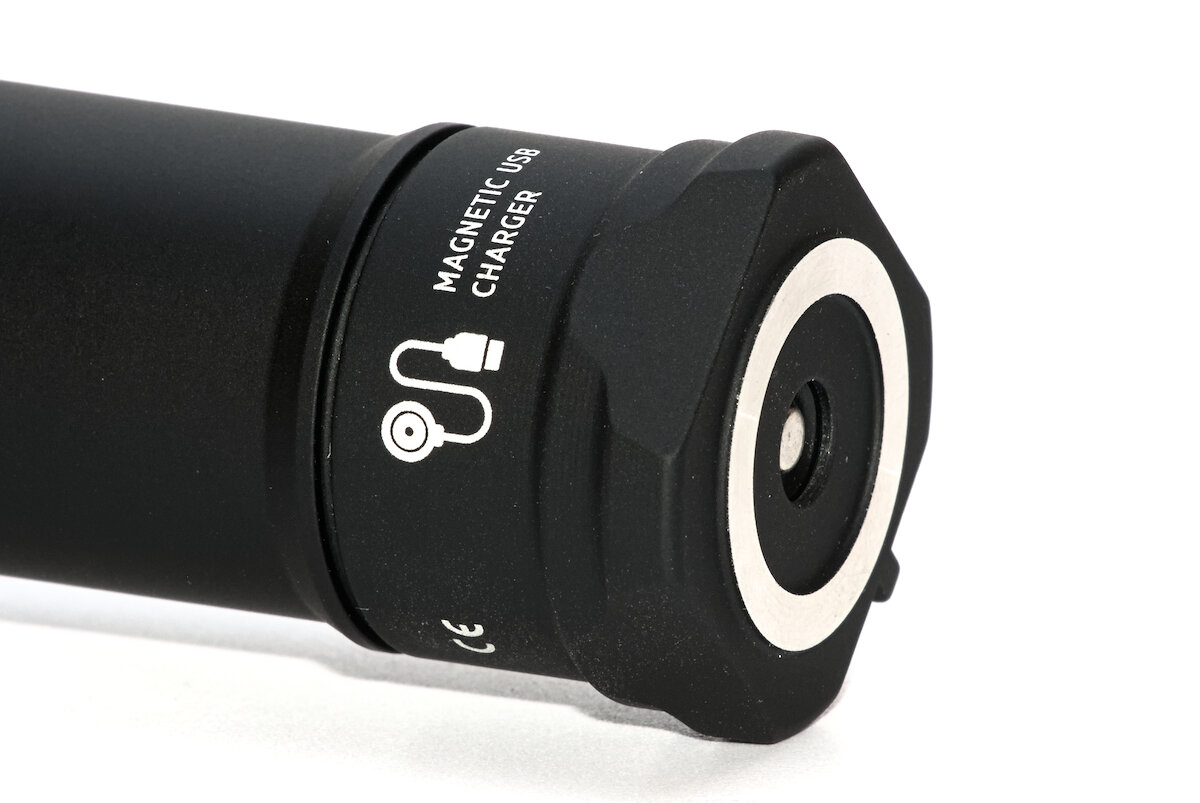
For charging, first loosen the tailcap a bit. Then bring the charger close to the contacts and it will snap in place automatically.
LEDs in the charger tell you the current charging status. Neat: After 30 seconds the LEDs will slowly fade to a low level to be less annoying in the dark.
| Color | Meaning |
|---|---|
| green | standby / charging finished |
| red blinking | loosen tailcap |
| orange blinking | input voltage too low or dirty contacts |
| red | charging (1 A) |
| orange | charging with reduced current (0.5 A) |
Charging is started only when the battery voltage is below 4 V. Otherwise the green LED indicates a full battery. During charging the flashlight cannot be used.
It charges with up to 1.2 A in a very special way. Instead of the common CC/CV method it charges mostly with constant current only. Every now and then the charging is interrupted for a short moment, maybe to measure the open circuit voltage. From my knowledge this isn’t a recommended way of charging Li-ion batteries and it could shorten the battery life.
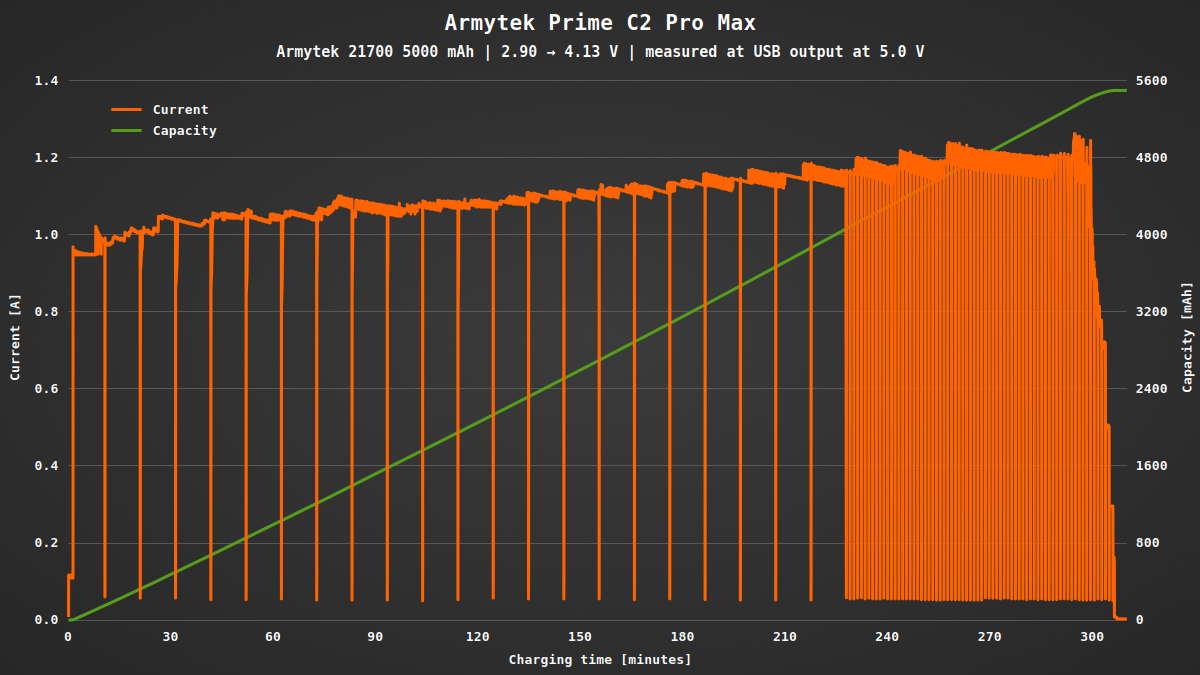
The magnetic tailcap works also to hold the flashlight horizontally on a metal surface. There’s no risk of shorting the contacts: The center contact is recessed, while the tailcap is tightened the two contacts are bridged and when it is loosened there’s also no current while the flashlight is off.
Two o-rings in the tailcap protect it against water. It is rated for five hours at ten meters depth under water (IPX8). It has also an impact resistance of 10 m. Tightening the tailcap takes 5½ turns.
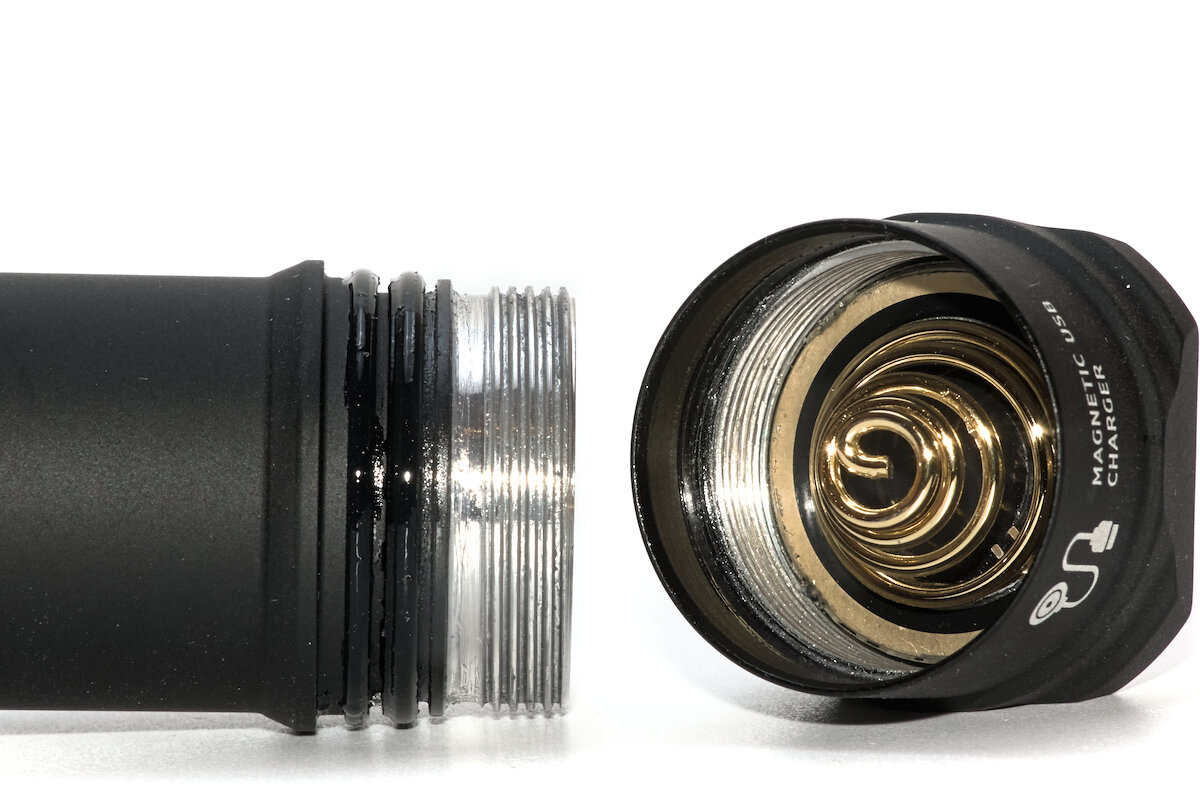
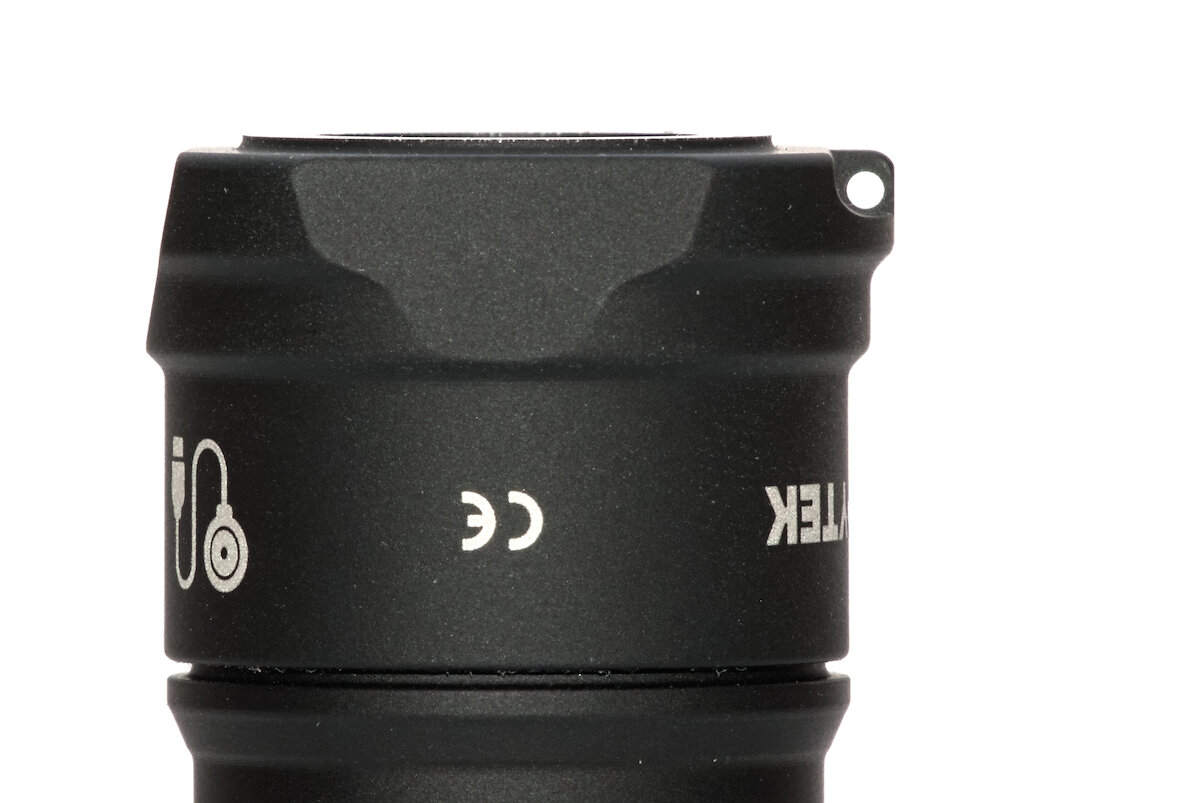
The head is glued and cannot be removed. There’s a little spring as well.
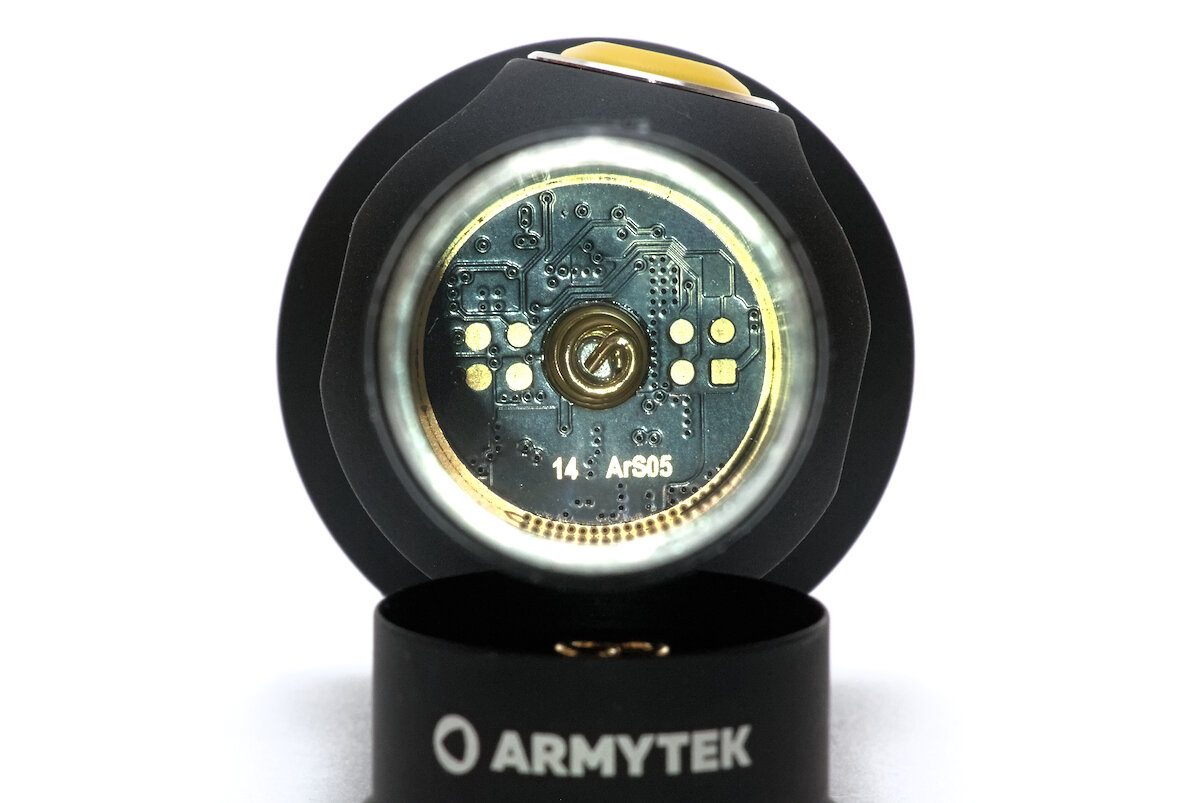
I wasn’t able to charge the included battery in any of my chargers without a little magnet as an extension for the positive contact. It’s recessed too much.
Overall the manufacturing quality is awesome. It feels very robust and has no defects. Only some edges like the cooling fins or the ring of the charging contact are a bit sharp.
User interface and features
(Almost) everything is done with the large, yellow switch at the head of the flashlight.
You have the choice between two UIs. In the “general UI” some levels and features like strobe are omitted.
General UI:
| State | Action | Function |
|---|---|---|
| Off | 1 click | Turn on (last used mode) |
| Off | Hold | |
| On | 1 click | Turn off |
| On | 2 click | Turbo (last used in Advanced UI) or back to previous level |
| On | Hold |
All features are available in the “advanced UI”. To switch between both UIs, slightly unscrew the tailcap, keep the button pressed, tighten the tailcap and release the button.
Advanced UI:
| State | Action | Function |
|---|---|---|
| Off | 1 click | Turn on (last used mode) |
| Off | 2 click | Turn on (main group) |
| Off | 3 click | Turn on (turbo group) |
| Off | 4 click | Turn on (strobe group) |
| Off | Hold | |
| On | 1 click | Turn off |
| On | 2 click | Switch between firefly and main group |
| On | 3 click | Turbo group |
| On | 4 click | Strobe group |
| On | Hold |  |
The strobe has a frequency of 10 Hz with a duty cycle of 50%. The beacon flashes with 200 ms pulse length at 1 Hz.
The switch includes a backlight that shows the approximate state of charge when the flashlight is on.
| Voltage | Color |
|---|---|
| > 3,4 V | green blinking (every four seconds) |
| 2,7 – 3,4 V | yellow/orange/red blinking (every four seconds) |
| < 2,7 V | flashlight turns off |
When the temperature rises due to high power, the switch indicated the temperature.
| Color | Temperature |
|---|---|
| 3x orange flashes (every two seconds) | Warning, flashlight gets warm |
| 3x red flashes (every second) | Too hot, output will be reduced |
You can configure the switch backlight to blink every five seconds when the flashlight is off. To change the setting, slightly unscrew the tailcap, hold the button pressed, tighten and loosen the tailcap, then release the button.
While it switch is pressed, it lights up red. Feedback in addition to the loud and solid click. The switch is easy to find because of it’s exposed location. It’s also protruding some millimeters, so be careful while carrying it in your pocket. Mechanical lockout is possible.

While handling the light, it feels a little top heavy, although the actual center of gravity is in the middle. There was never a risk of slipping out of hands, but it feels like the end is missing. After some time I switched to a tactical grip with the thumb near the tail and the ring finger to press the switch.
Illumination
If you want sheer power, the Cree XHP70.2 HD is a good candidate. Great efficiency, high brightness, large surface. You can get the Prime C2 Pro Max either in a cool white or a warm white variant. Both of them have a low CRI, though.
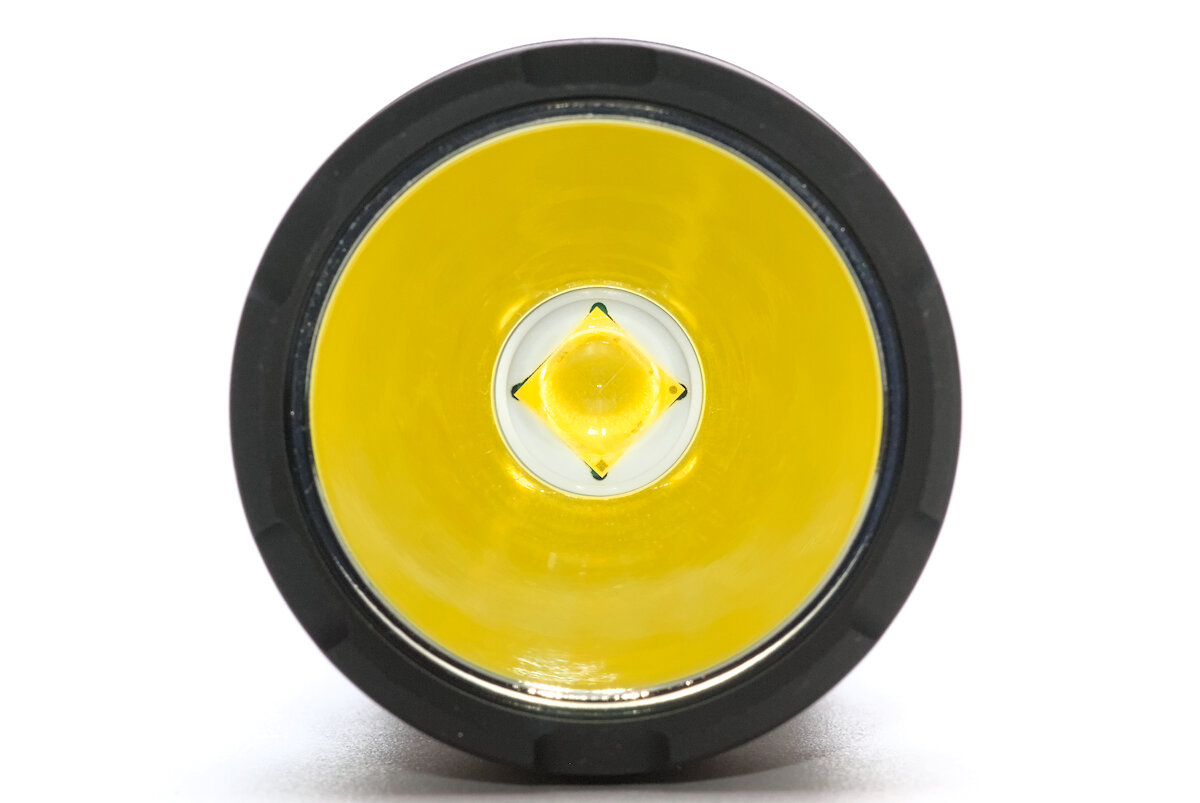
The LED is behind a glass with green anti-reflective coating in a smooth reflector. That reflector is rather big, but appears much smaller with the large LED.

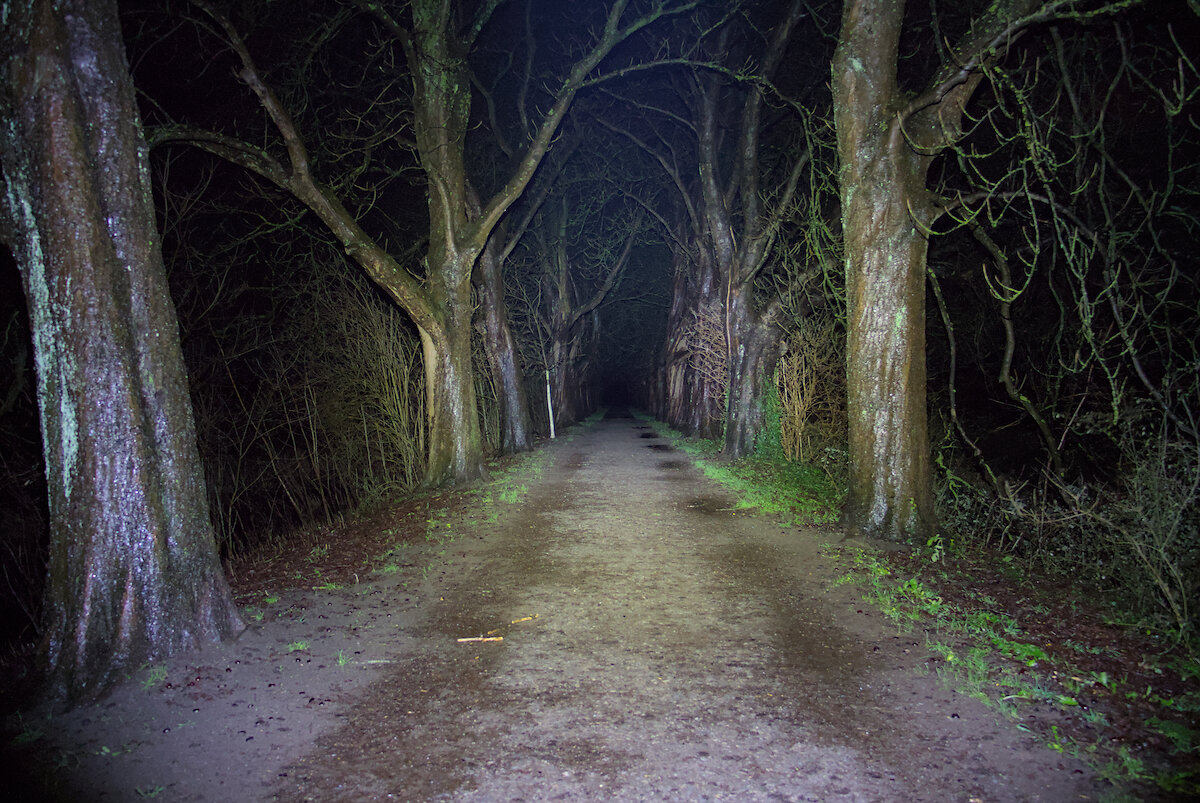
The reflector focuses the light into a tight spot, surrounded by a smooth corona. The bright spill makes this light rather floody overall.

Very noticeable: a tiny purple spot in the middle that is visible even at higher distance (on a uniform surface). It is caused be the little hole between the four dies of the LED. In practice it shouldn’t be much of a concern, sometimes it might be even helpful as a pointer / aiming device.
The tint shift between spot and spill is very common with domed XHP LEDs. The domeless XHP70.3 HI would be a good alternative with less tint shift and slightly more throw.
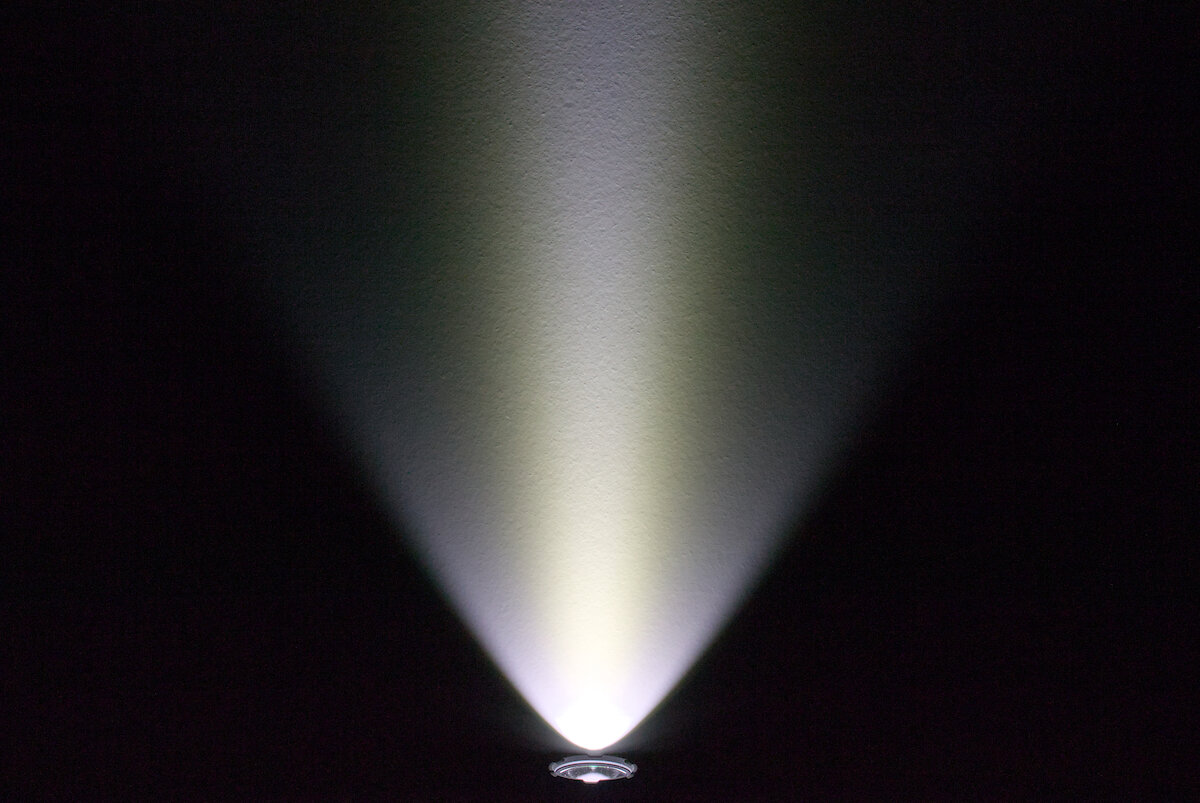
With the floody beam there’s some risk of blinding yourself from nearby objects, but due to the spot the beam is more universally usable.
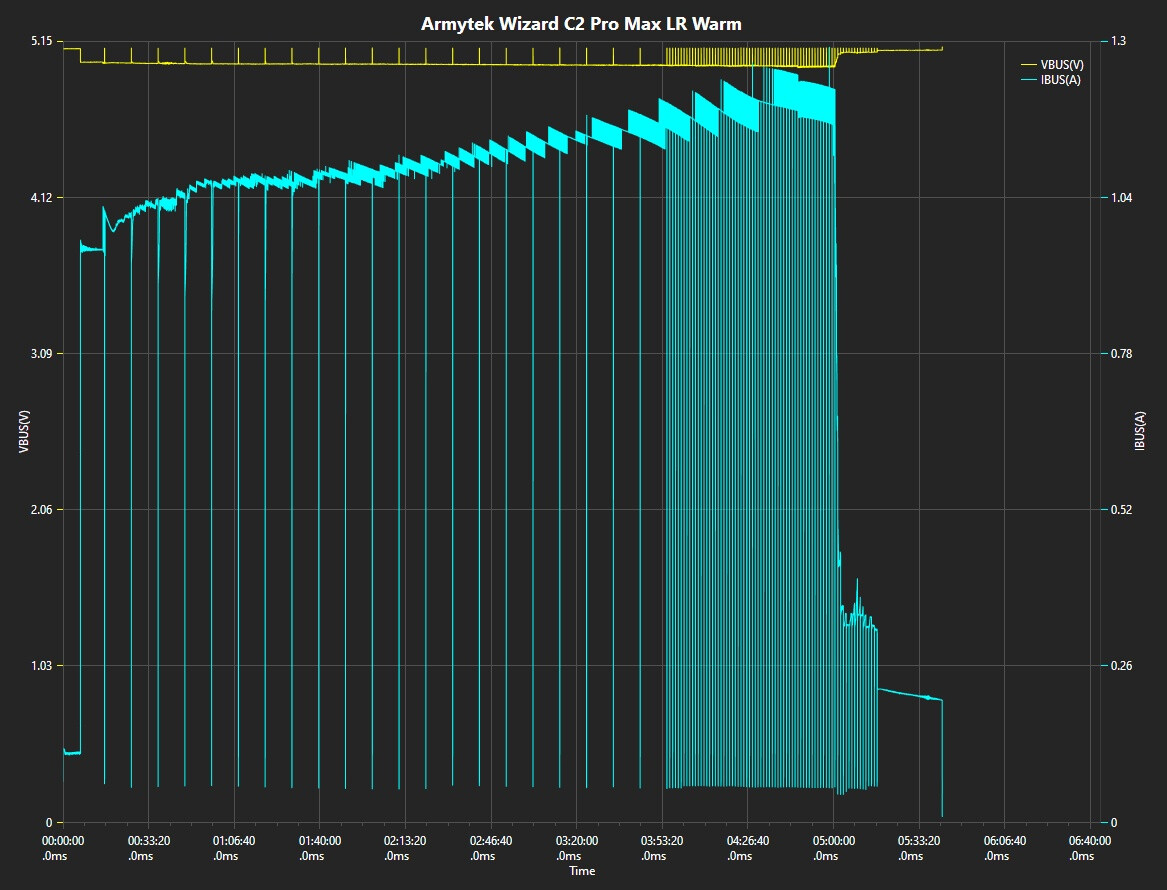
Driver and runtime
The powerful Cree XHP70.2 HD can handle 4000 lm easily. This allows it to be used at a better efficiency with less heat.
Runtime length from the manufacturer mostly match my measurements. Some differences might also be caused by the cooling.
| Mode | Brightness¹ | Runtime¹ | Intensity¹ (Throw²) | Current³ |
|---|---|---|---|---|
| Turbo 2 | 4000 lm / 900 lm | 2 min + 3 h 2 min | 16 900 cd (260 m) | 8.50 A |
| Turbo 1 | 1300 lm / 900 lm | 37 min + 2 h 23 min | 2.05 A | |
| Main 3 | 450 lm | 6 h 25 min | 0.68 A | |
| Main 2 | 150 lm | 21 h | 0.26 A | |
| Main 3 | 45 lm | 64 h | 0.12 A | |
| Firefly 2 | 7 lm | 10 d | 0.02 A | |
| Firefly 1 | 0.4 lm | 64 d | 0.01 A | |
| Off | 14 µA |
¹ According to manufacturer ² ANSI FL1 ³ Measured
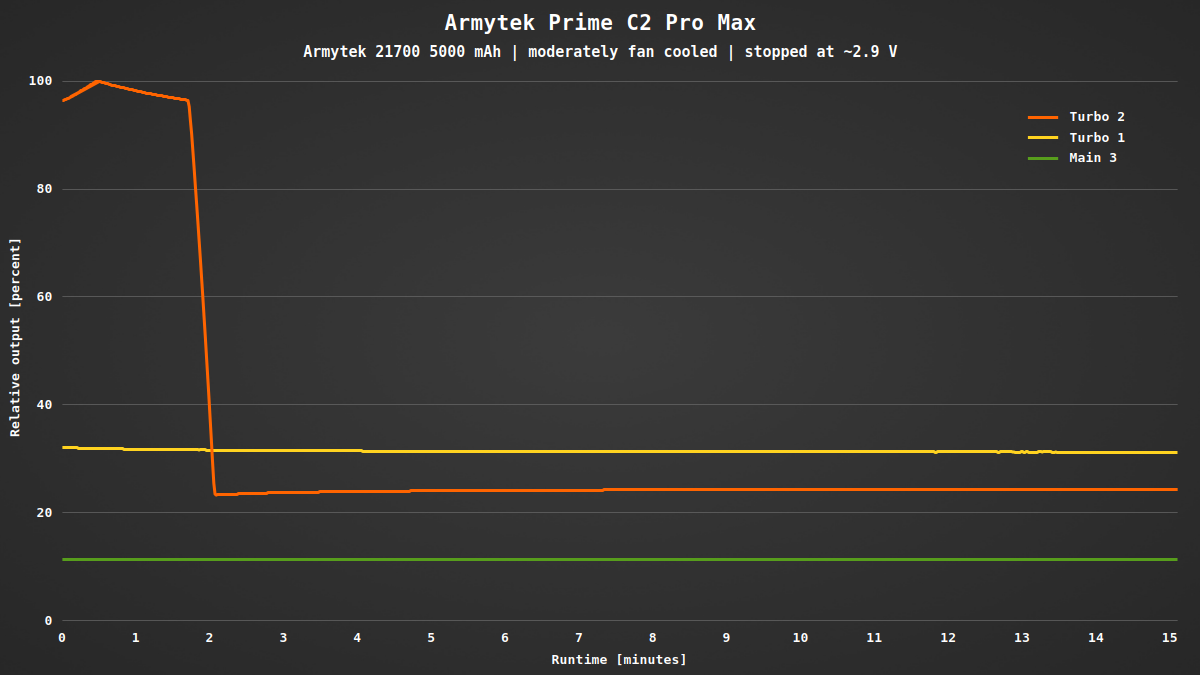
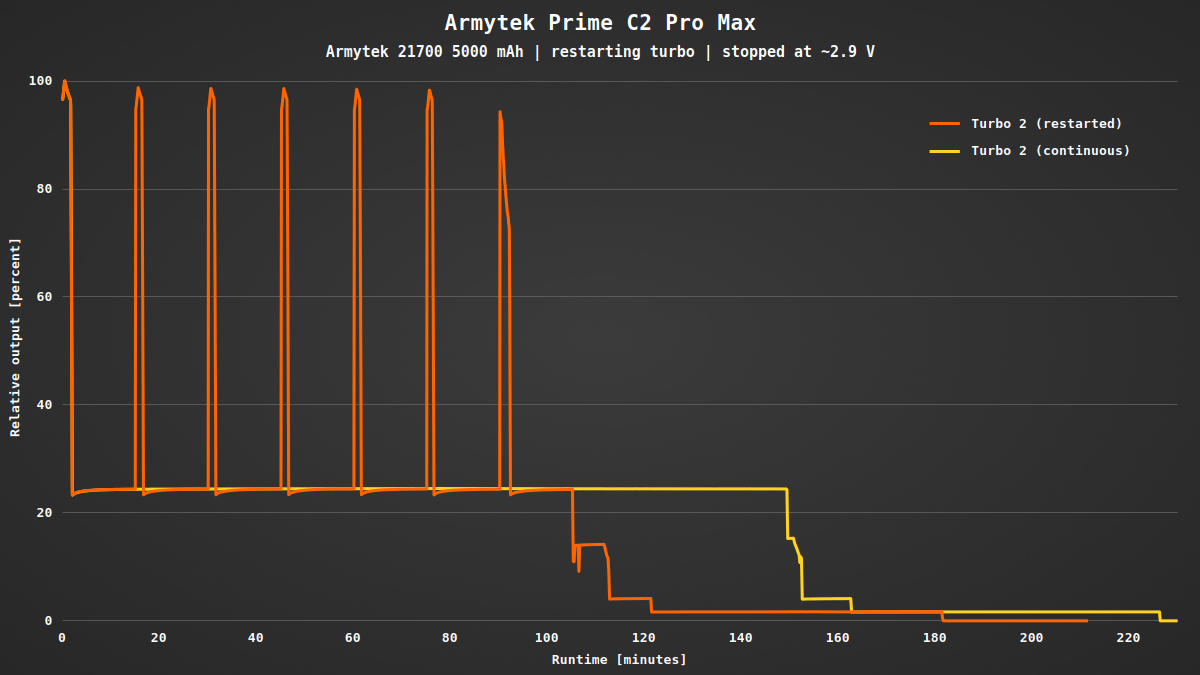
At the highest turbo (T2) the brightness is reduced after two minutes. The flashlight reached 42 °C at that time. All other levels have a stable output almost to the end, even the second highest level (T1) which is brighter than T2 after the stepdown.
I stopped my measurements after the flashlight was at its lowest level for some time. The battery voltage was still 2.9 V. The flashlight turns off at 2.7 V to protect the battery from deep discharge.
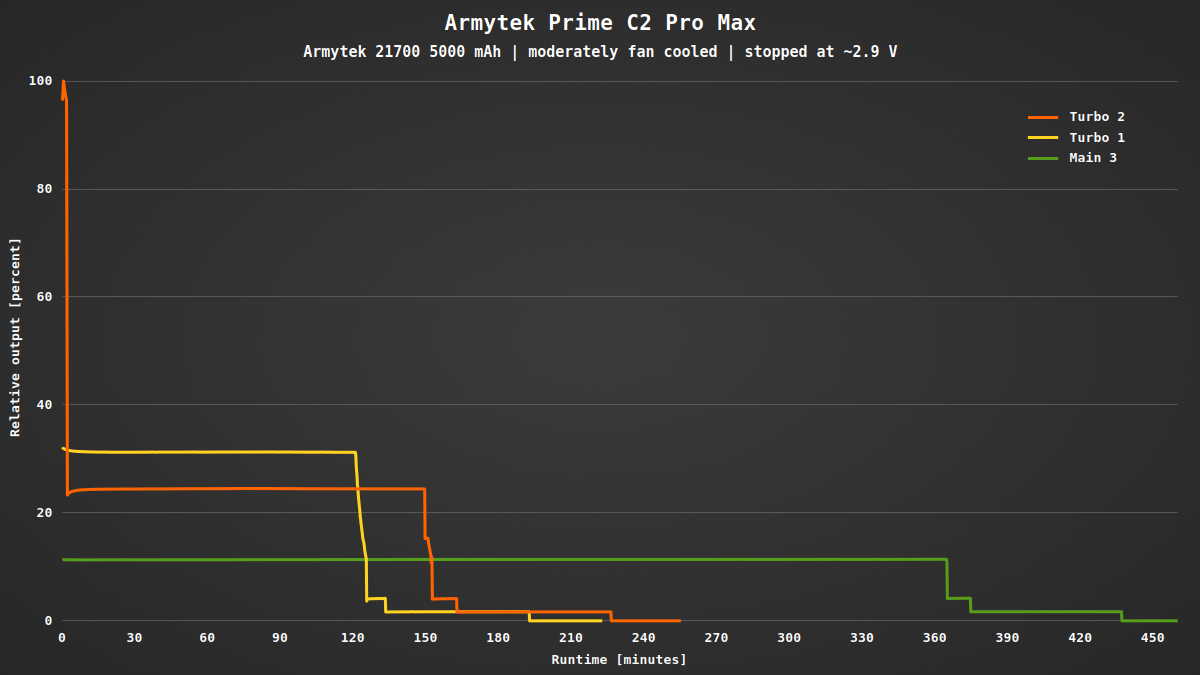
Many flashlights aren’t able to provide the full brightness in turbo when the battery isn’t fully charged. The Prime C2 Pro Max is different. Full turbo is available almost till the end. At minute 105 I tried to enable it again, but failed because the flashlight already reduced its output and didn’t allow to increase the brightness.
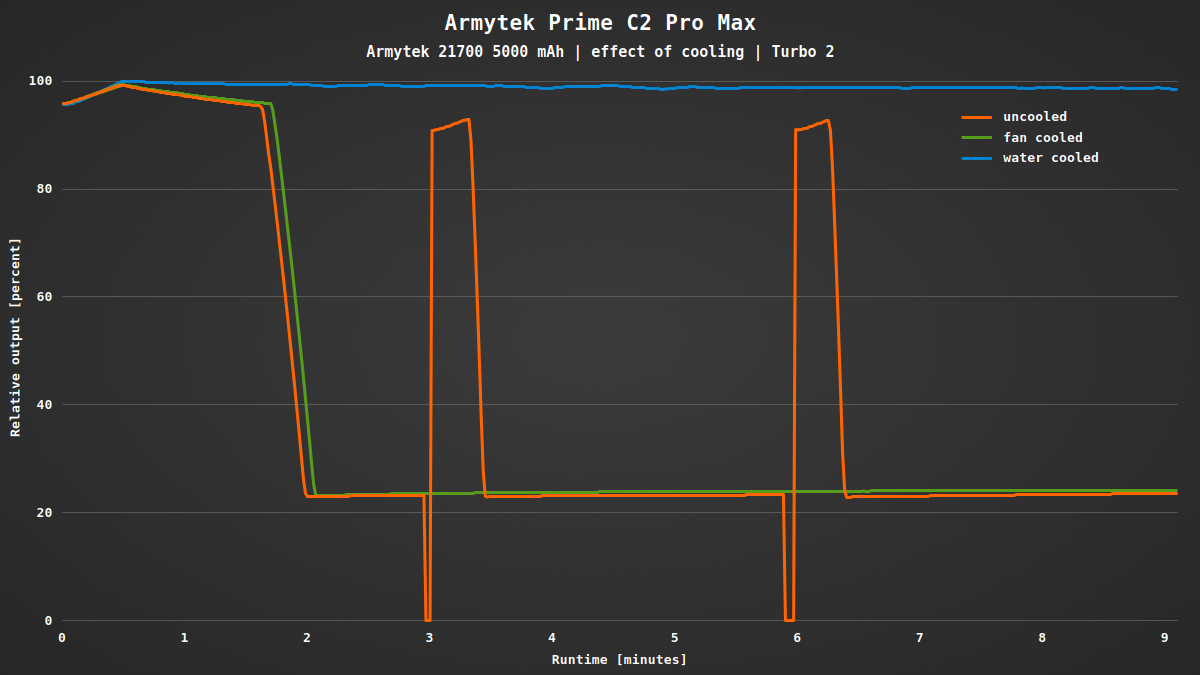
I also checked the effect of cooling. Fan cooled and uncooled both resulted in a stepdown after about two minutes. If you restart turbo, the time will depend on the cooling. On the other hand, when being water cooled the brightness wasn’t reduced at all (small fluctuations are from the moving water and uneven circulation).
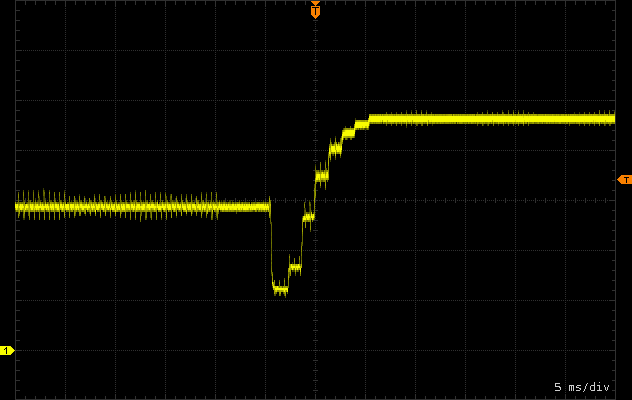
My measurement with an oscilloscope has shown no sign of PWM. All levels are regulated perfectly smooth. One interesting detail: While the switch is pressed, the output has very short pulses (invisible to the eye). Switching between levels takes about 10 ms for the driver to stabilize.
Btw, the magnetic charging in the tailcap doesn’t contain any magic. The center contact is connected to the negative pole of the battery, the outside with the host. When the tailcap is tightened, the battery tube presses against the tailcap PCB and both contacts are bridged. When it is loosened, the connection is broken and the body becomes the positive pole for charging.
Conclusion
With the Prime C2 Pro Max, Armytek managed to make a robust and powerful flashlight that fits perfectly into the Prime series. Its slightly floody beam and up to 4000 lm in turbo – even without a fully charged battery – makes it a perfect partner for your adventures and gives you a great overview of your environment.
There are just a few things I would have liked to see: a better lanyard hole, a clip and maybe a domeless LED. Just minor details, overall the Armytek Prime C2 Pro Max is a great flashlight.
Got curious? You can get the Armytek Prime C2 Pro Max in the cool white and the warm white version at armytek.com. The code “SAMMYSHP15” gives you a 15% discount.