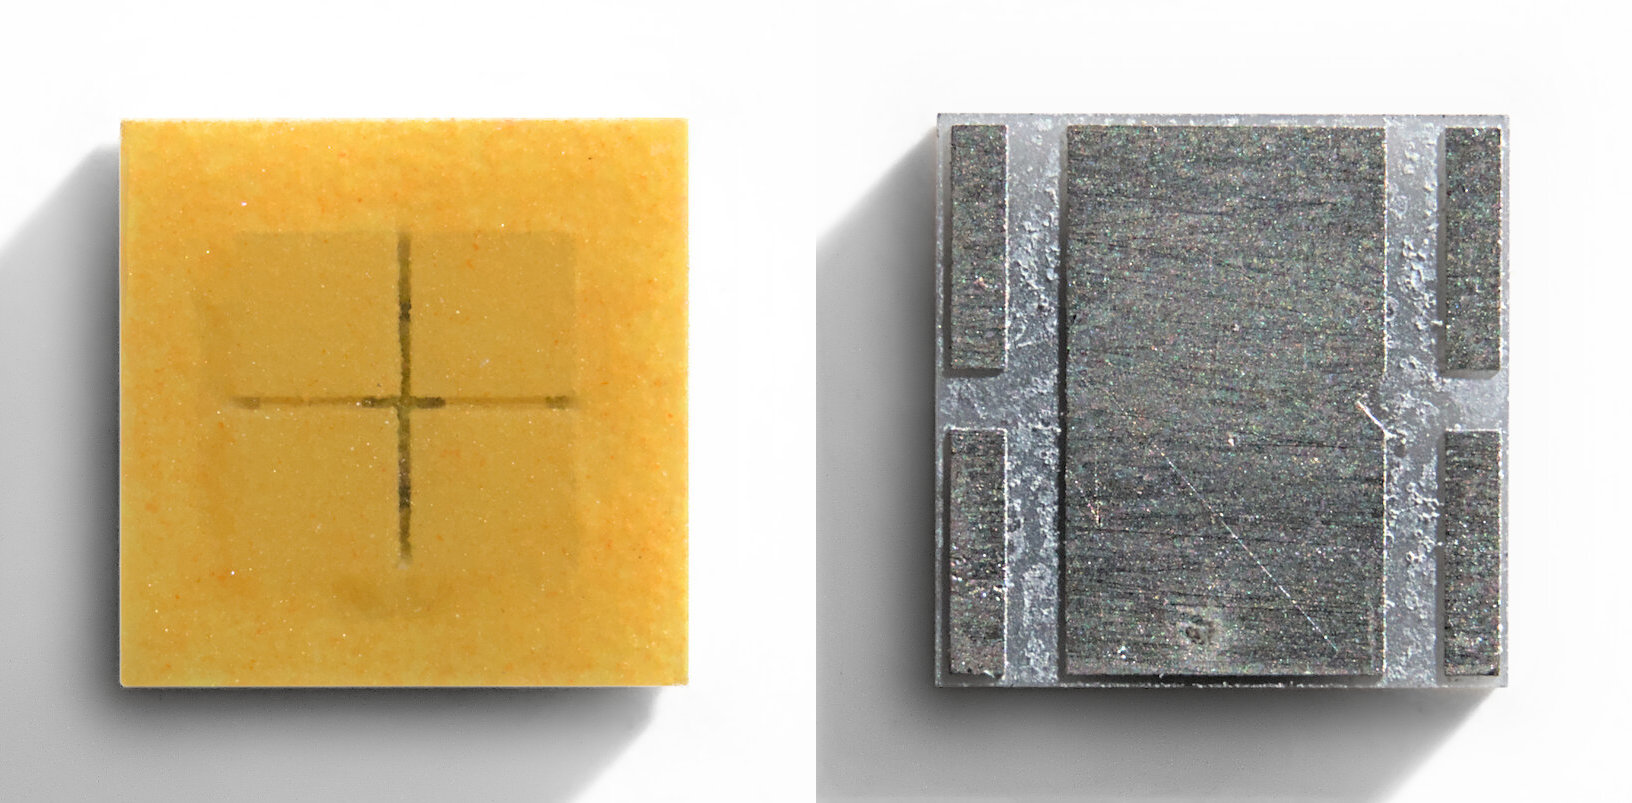
I’m always happy when a flashlight manufacturer doesn’t focus solely on maximum brightness or efficiency, but also pays attention to light quality. In this case, Skilhunt has even selected a custom LED for the H300, specifically made for them.
This LED, called the “SL-F50S,” delivers exceptionally high color rendering with a neutral tint at around 5000 K. In the updated headlamp, it is paired with either a TIR optic (H300) or a reflector (H300R).
You can find the German version of this review on my website: SammysHP Blog › Skilhunt H300 V4 mit SL-F50S
The flashlight was provided by the manufacturer for this review. Thank you very much!
If you are interested in more details about the SL-F50S, you should check out @Koef3’s detailed review of the SL-F50S!
Overview
The H300 comes in colorful retail packaging with a sticker indicating the specific variant. The accessories are stored in a separate box inside.
- Skilhunt “BL-135” 18650 Li-ion battery (3500 mAh, protected, button-top, length 69 mm, 3.54 V at arrival)
- Lanyard
- Dual-way clip (separate)
- 2x replacement o-ring
- Rubber disc as a replacement for the magnet
- “MC-20” magnetic charging adapter
- Manual (EN, CN, DE, ES, FR, IT, NL, PL, RU)

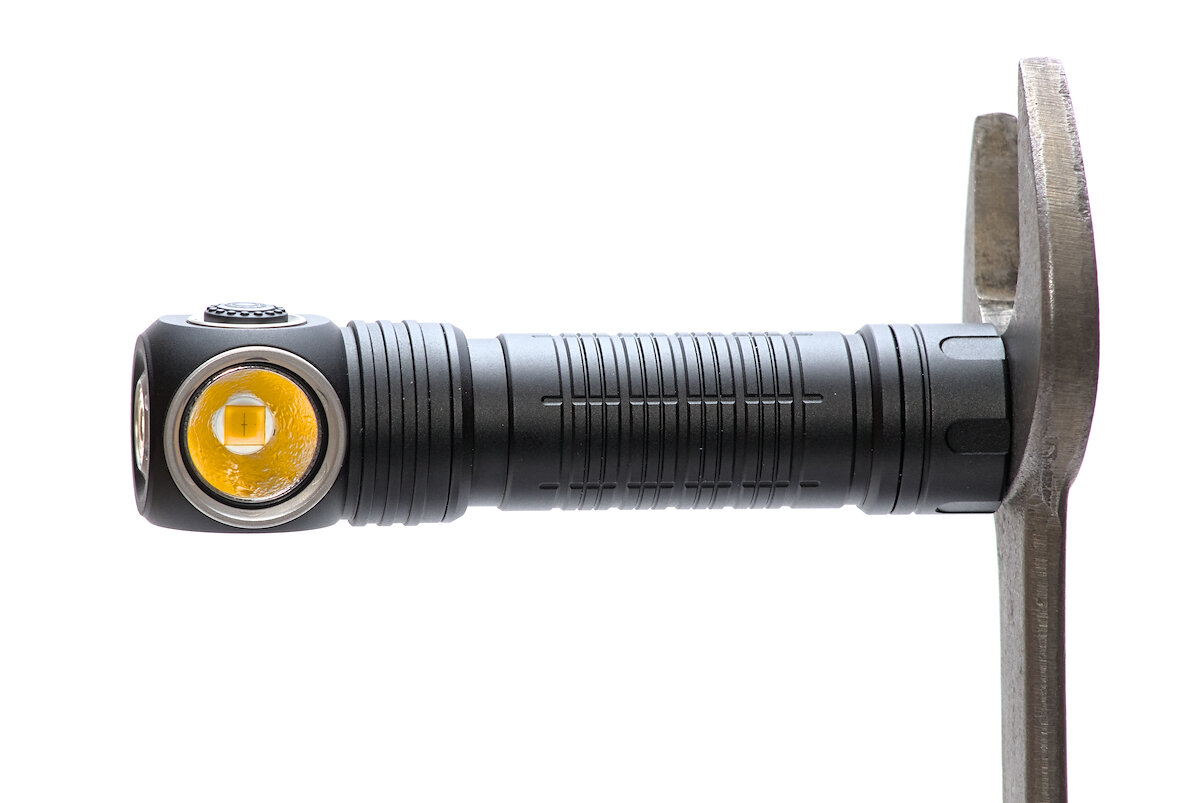
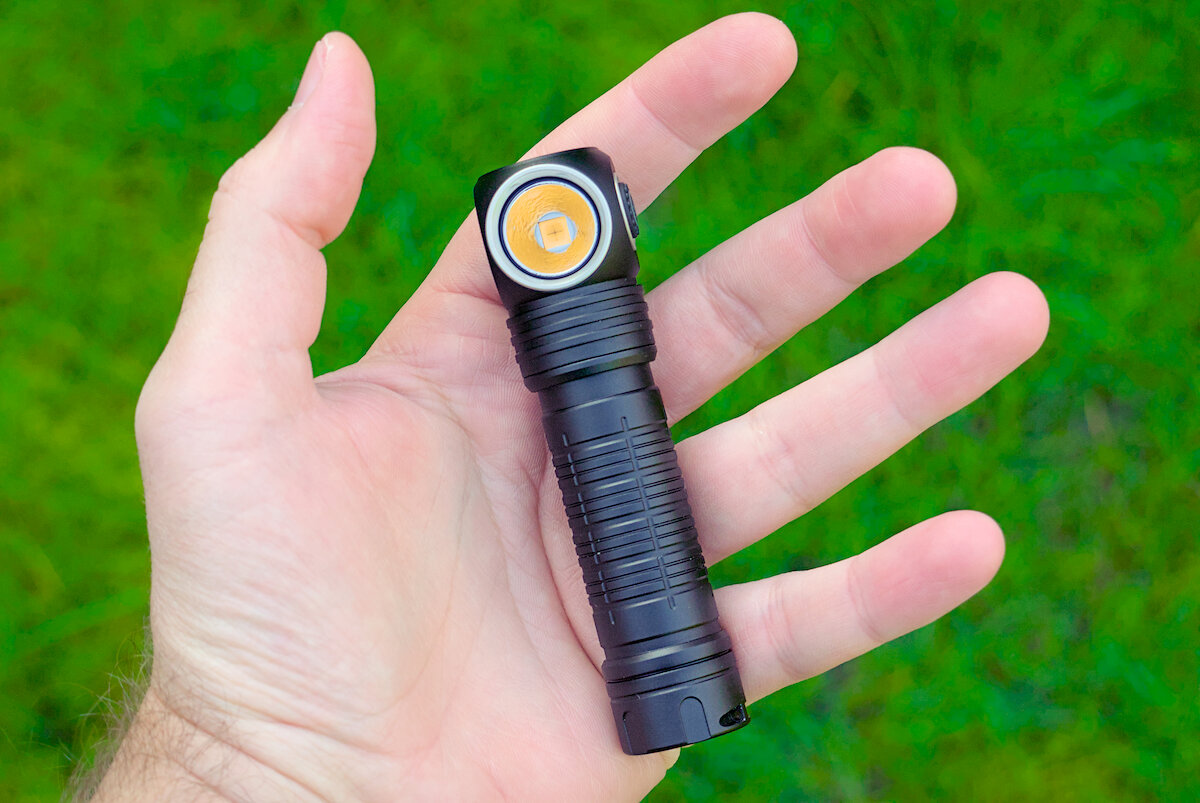
Because of the boost driver, the H300 is a few millimeters longer than the otherwise similar H04 or H200, but still smaller and lighter than, for example, the Armytek Wizard C2 Pro. The light and battery together weigh just 107 g.
Length: 105.5 mm
Diameter (head, diagonally): 30.0 mm
Diameter (battery tube): 21.8 mm
Diameter (tailcap): 23.5 mm
Weight (flashlight): 56 g
Weight (18650 battery): 51 g
Weight (head mount): 47 g
Weight (total): 154 g
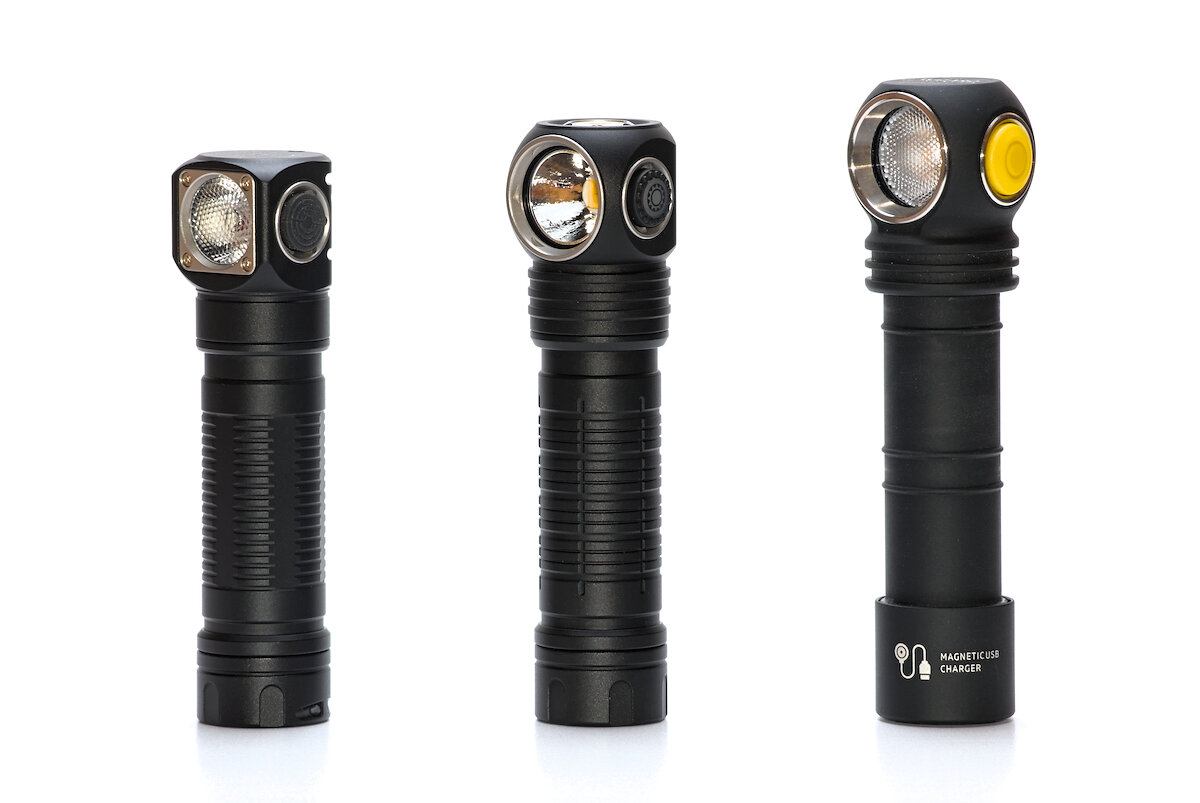
Skilhunt H04 | Skilhunt H300R | Armytek Wizard C2 Pro
The design of the H300 is characterized by narrow rings that run from the head to the tailcap. On the battery tube, they provide improved grip, ensuring the light stays secure in the hand even when wet. In addition to black, the light is also available in gray, green and orange. The slightly matte anodization prevents fingerprints from showing on the surface.
Cooling fins are located on the back of the head – right behind the LED.
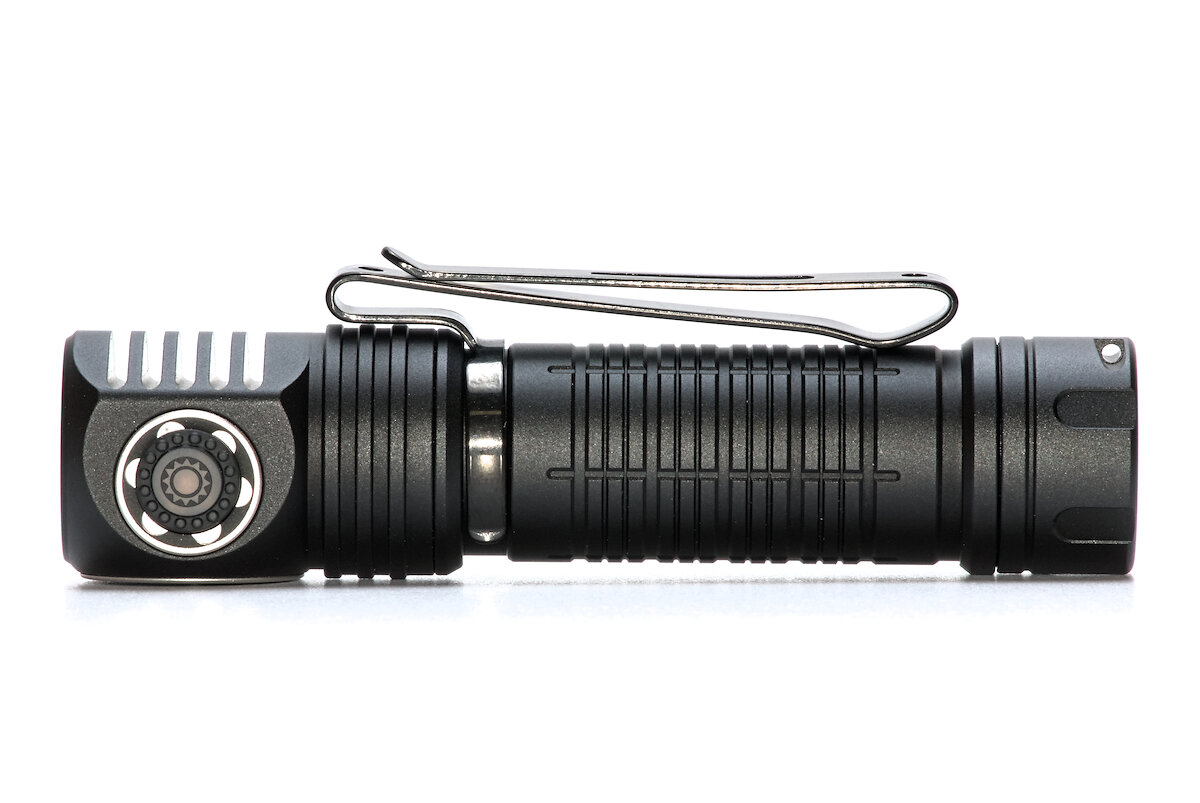
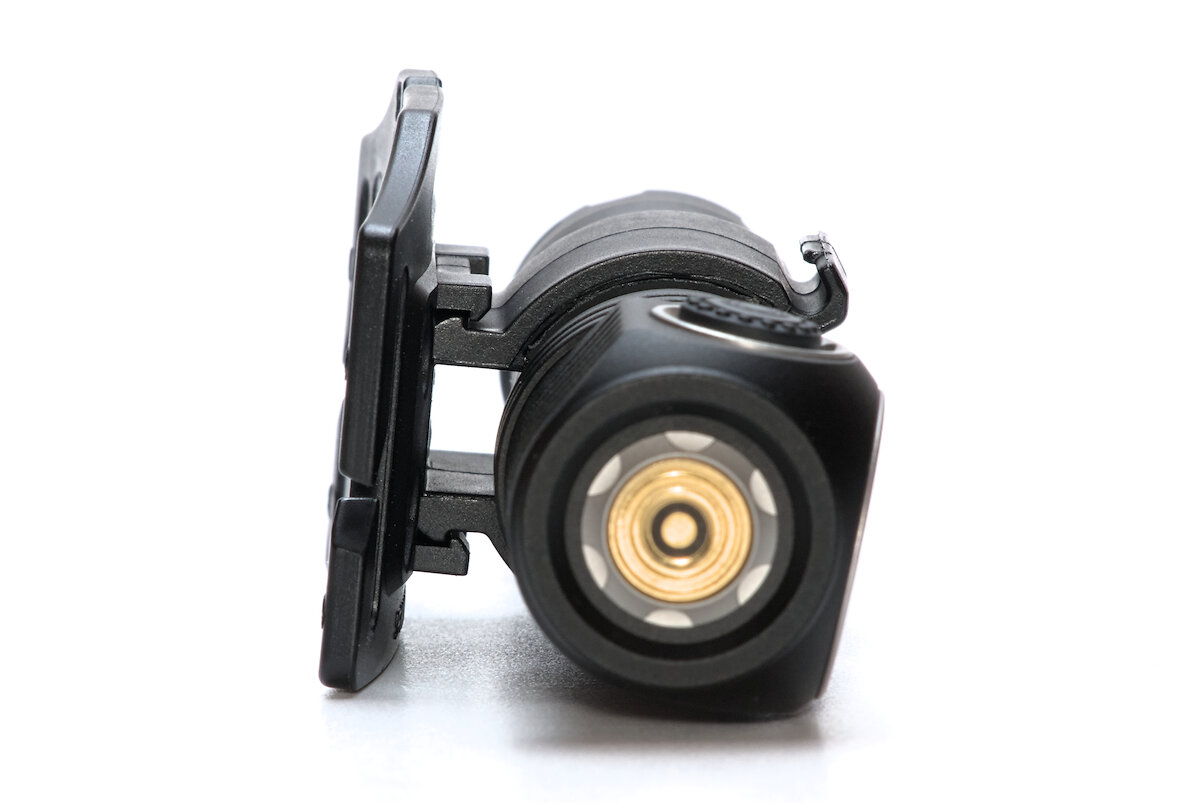
The included dual-way clip can only be attached at the middle of the flashlight on this model. While this gives the light good balance, it can’t be carried deep in a pocket with the clip – though that shouldn’t be much of an issue for a headlamp.
A lanyard can be attached to the hole on the tailcap. Thanks to the hole’s design, there are no sharp corners that could press uncomfortably into the hand. However, the inner edge is somewhat sharp and may cut through the lanyard quickly. I therefore recommend using a small key ring between the light and the lanyard.
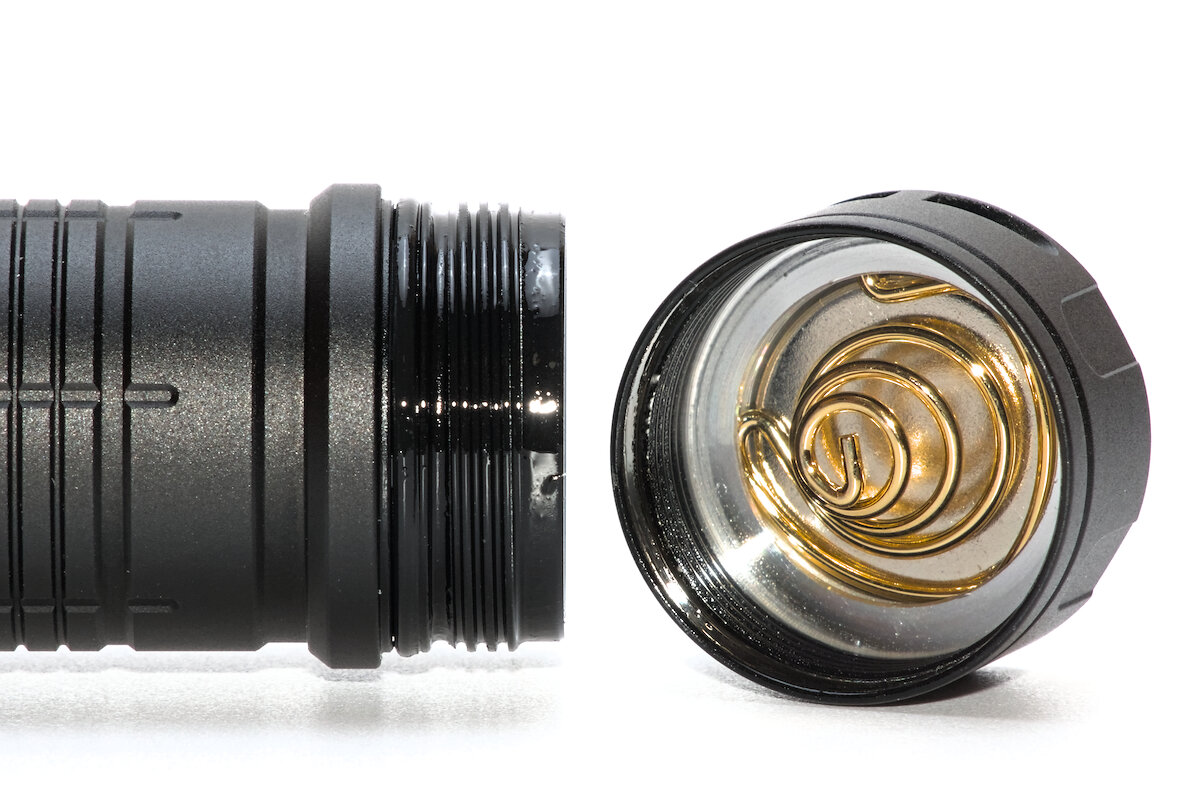
A strong magnet in the tailcap allows the H300 to be attached to magnetic surfaces. It can be easily removed if needed by unhooking the spring. The resulting gap is then filled with a silicone pad included in the package to support the spring.
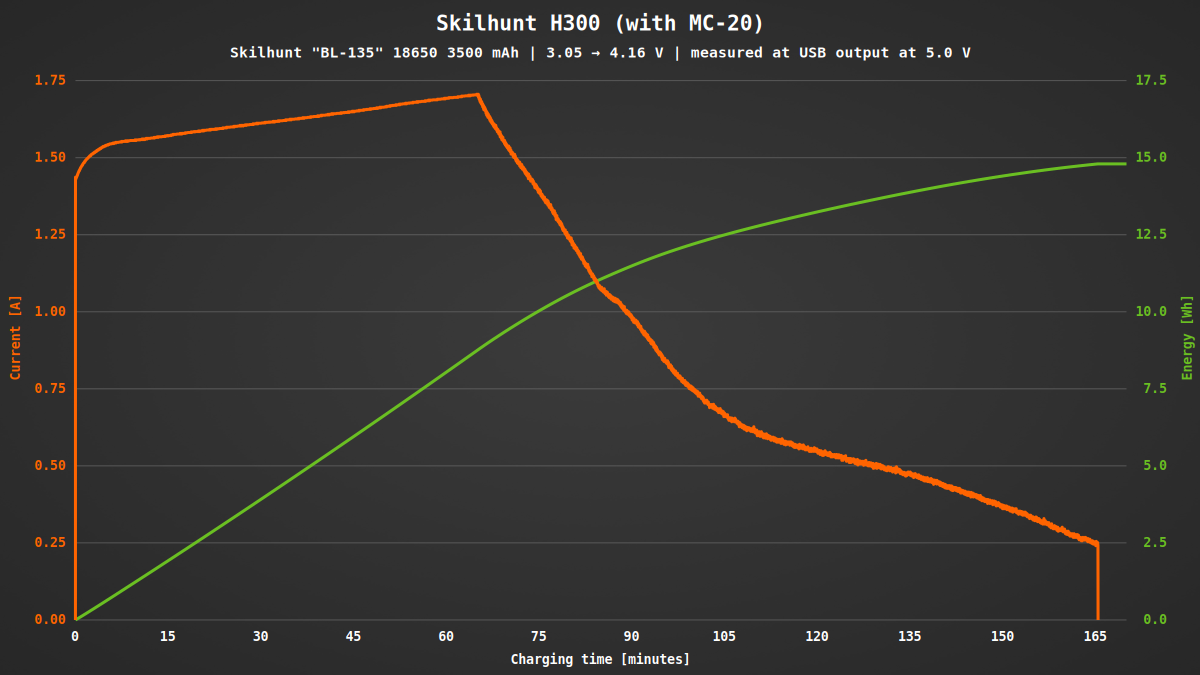
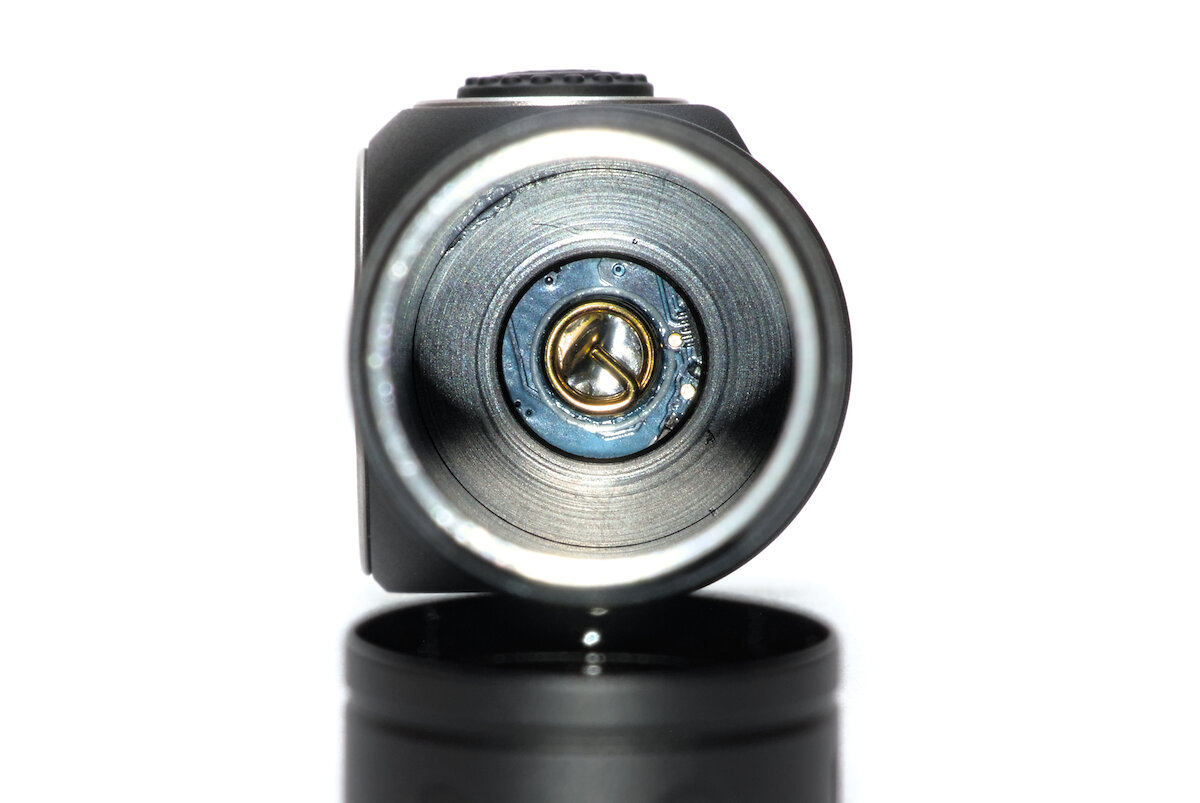
The head has a magnetic charging terminal that allows you to charge the battery directly in the flashlight. This requires a special charging adapter (“Skilhunt MC-20”), which is included, but can also be purchased separately.
A USB port is susceptible to water and dirt. It is therefore usually protected by a silicone cover, which is not only inconvenient to use, but can also easily be opened accidentally. Although there are also sealed USB ports, they are difficult to clean.
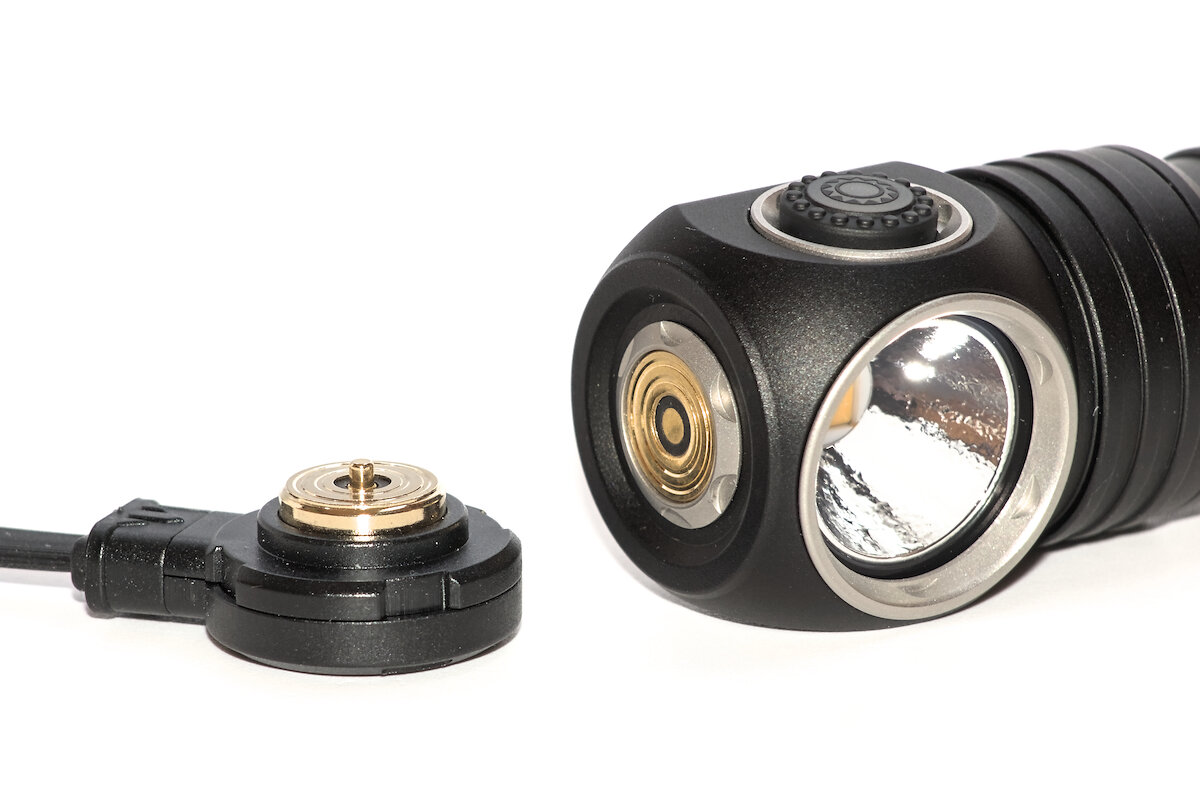
With a magnetic charging port, there’s no need for a cover and dirt can usually be wiped off easily. Only metal shavings can be difficult to remove and may cause issues. Earlier versions of Skilhunt’s magnetic charging port were prone to leakage currents and could occasionally produce sparks in case of a short circuit. These issues have been completely resolved in the current models: the contacts now only have an insignificant voltage of a few millivolts.
Of course, you always need the special charging adapter. On the other hand, it is also compatible with the other flashlights from Skilhunt and the convenience gain is great: you only need to bring it close to the contacts, where it automatically snaps into the correct position. If you get caught on the cable, it releases automatically and does not pull the flashlight off the table.
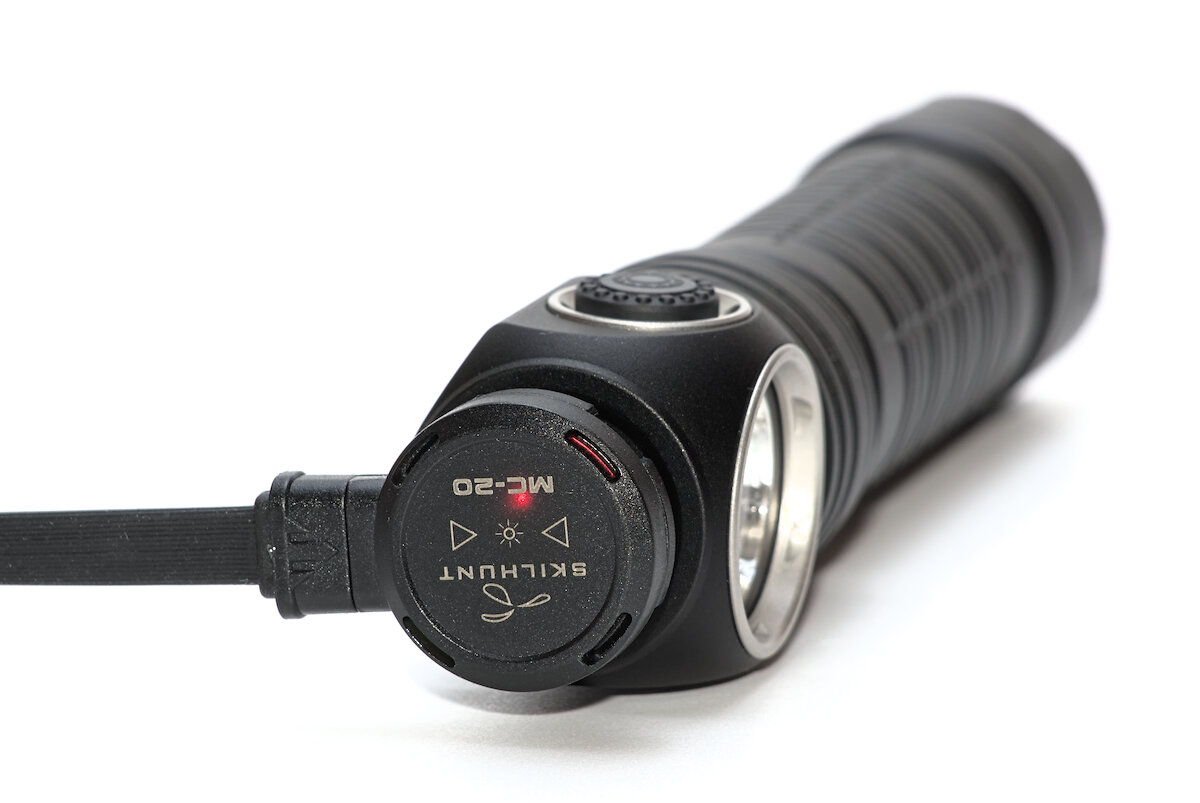
A red LED in the adapter indicates that charging is in progress and switches to blue when charging is complete. Charging only begins when the battery voltage is below approximately 4.0 V. This check can be bypassed by briefly turning the light on at high output after connecting the charging adapter. The light can be used without restrictions while charging.
The charging current is reduced relatively early, which makes the charging process a bit longer. This may be related to the protection of the charging port.
The H300 supports almost all types of 18650 Li-ion batteries, from unprotected flat-top batteries up to protected button-top batteries (like the included BL-135). Springs on both ends provide the necessary flexibility. Additionally, two CR123A batteries can also be used. With short flat-top batteries, the contact may be briefly interrupted during strong vibrations, causing the light to turn off.
The components on the driver are covered by a black insulator, leaving only the spring visible. The head and battery tube are glued together. This is partly a precaution by the manufacturer, as the driver is held in place only by the battery tube. It also prevents the head from accidentally coming loose when the light is rotated in a mount. In practice, the parts can be separated with sufficient force.
According to the manufacturer, the H300 is rated IPX8, providing “protection against continuous submersion up to one meter deep.” It is also supposed to withstand drops from a height of up to one meter.
User interface
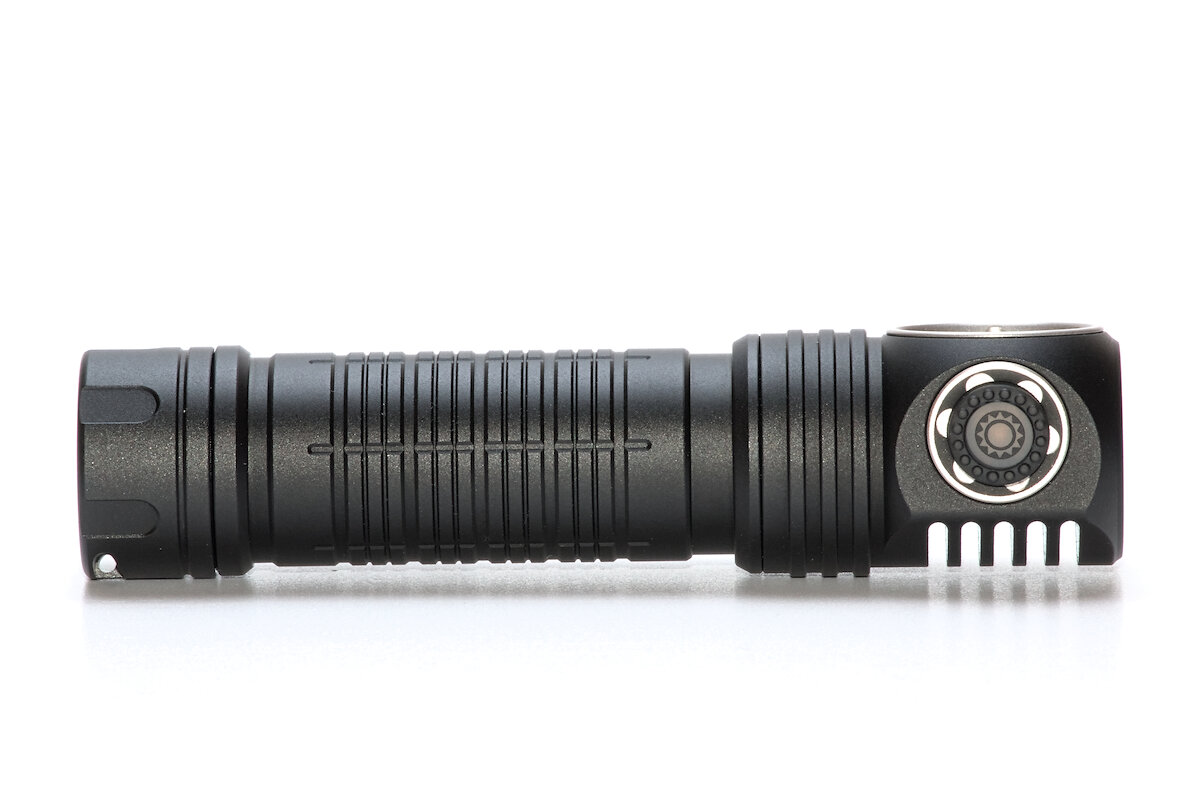
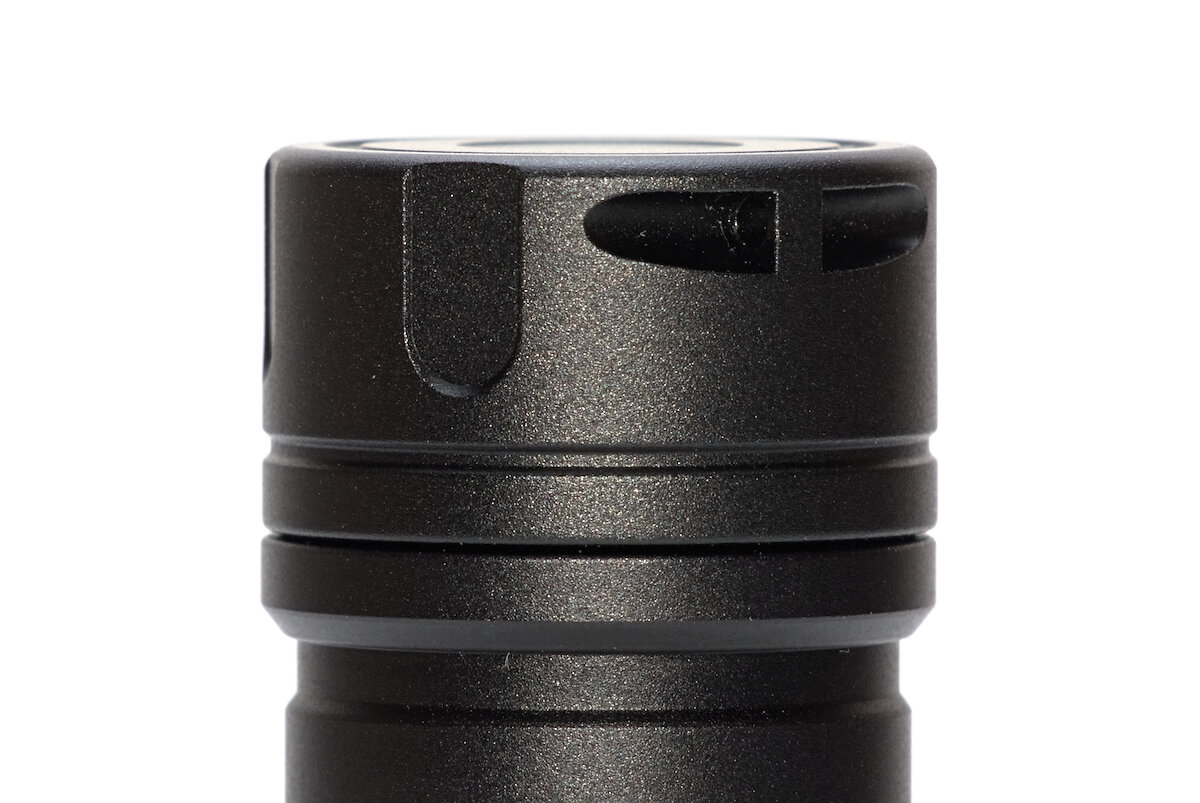
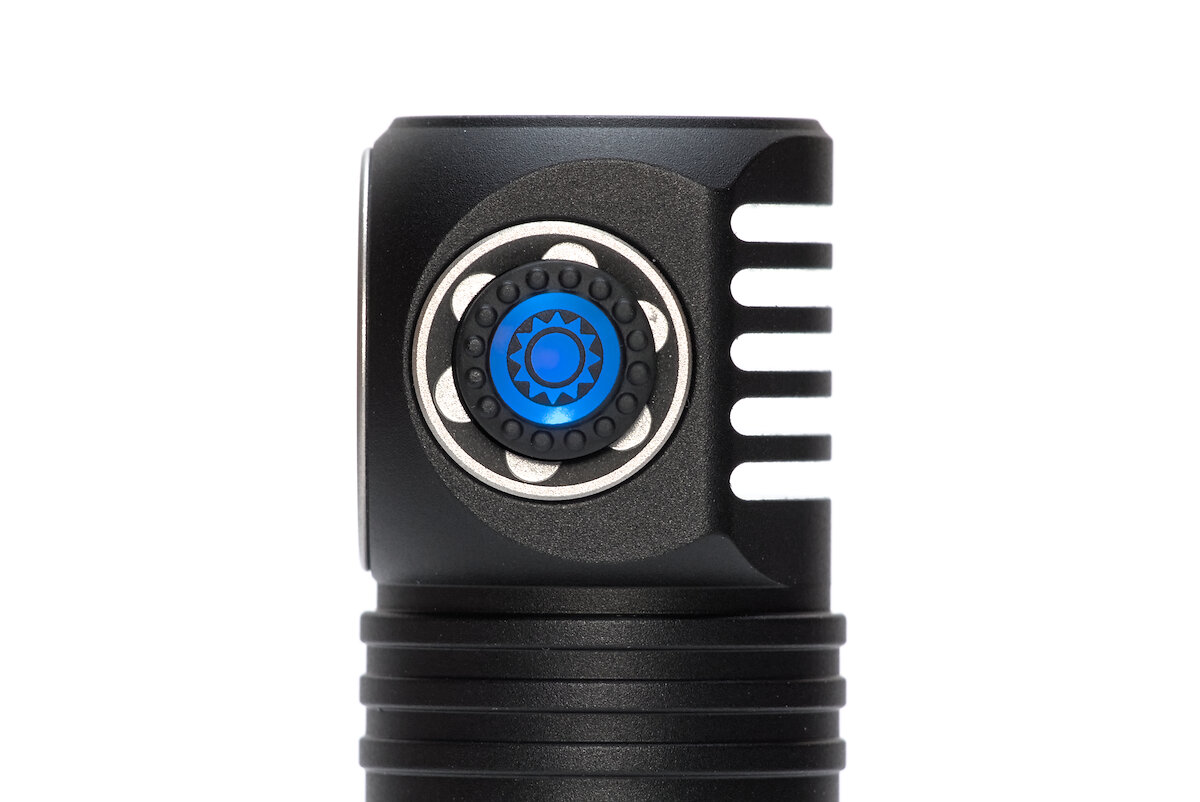
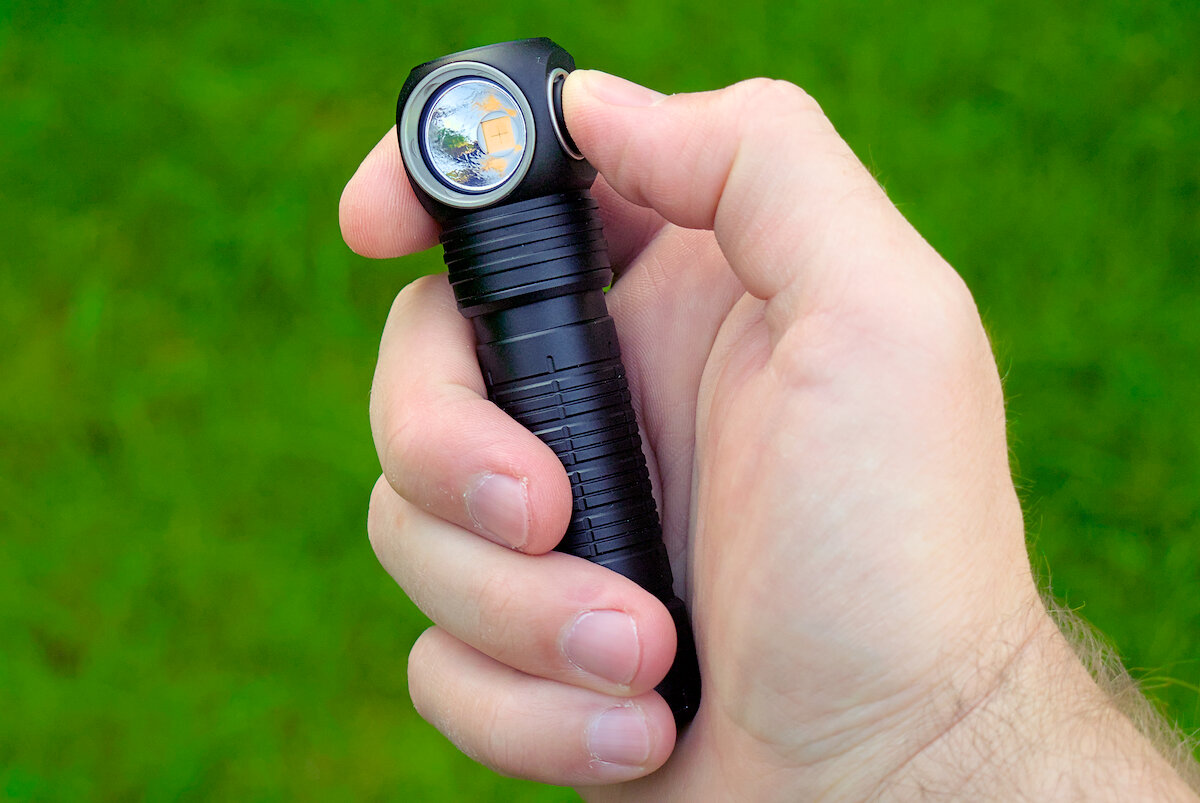
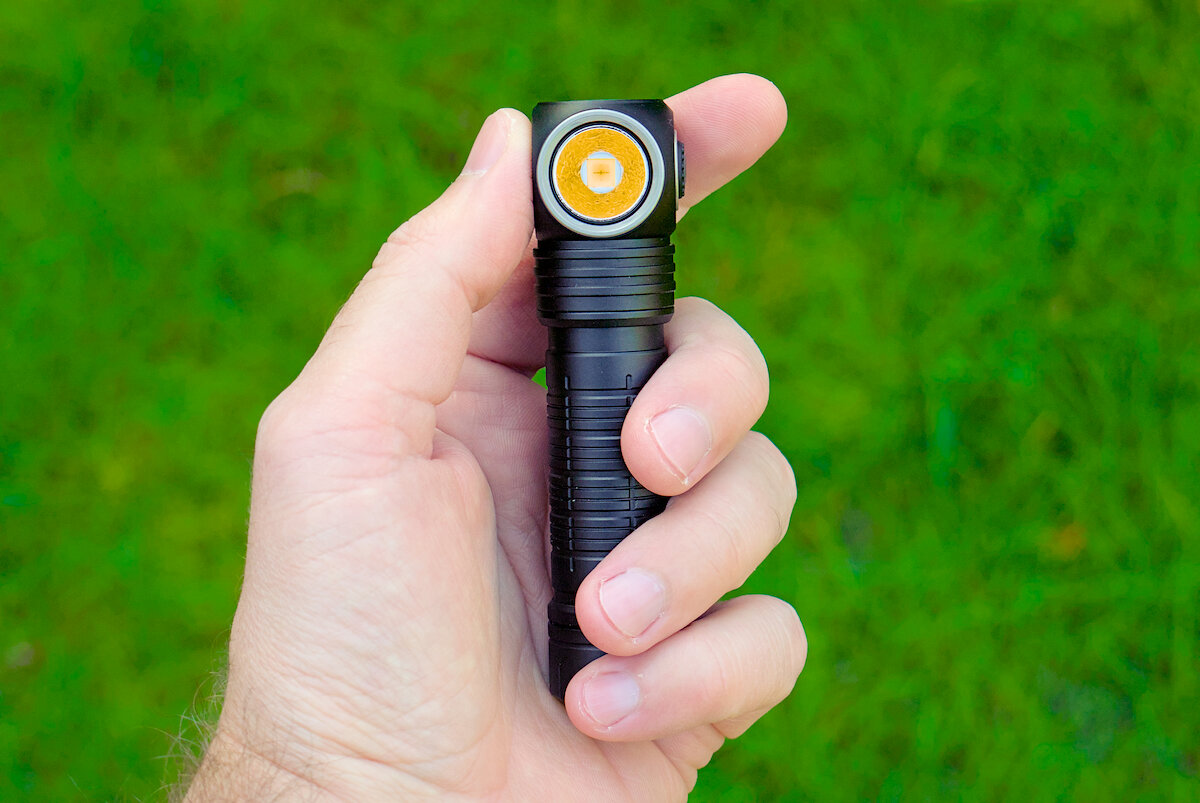
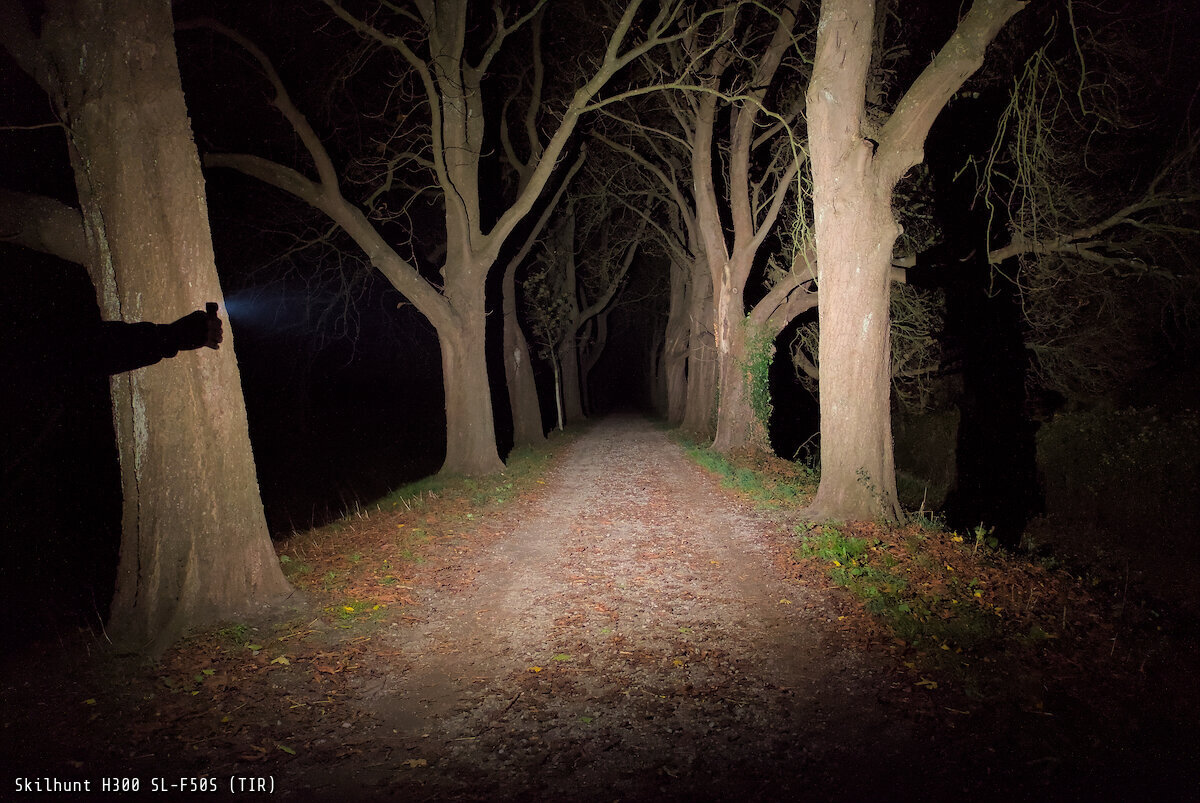
The switch for controlling the light is located on the side of the head. This allows it to be conveniently operated by “pinching” the head with two fingers. The advantage is that the light doesn’t twist or shift when worn in a head mount.
The switch cover is made of soft plastic and has a fairly smooth surface. Small nubs along the edge and a stylized sun or light source add some visual highlight. Pressing it produces a distinct click. I personally preferred the previous design made of soft silicone, as it felt somewhat more premium.

The UI follows Skilhunt’s usual scheme: one group each for low, medium and high brightness and one group for the blinking modes. There are several levels in each of these groups, which can be switched by holding the button. The selection is memorized separately for each group.
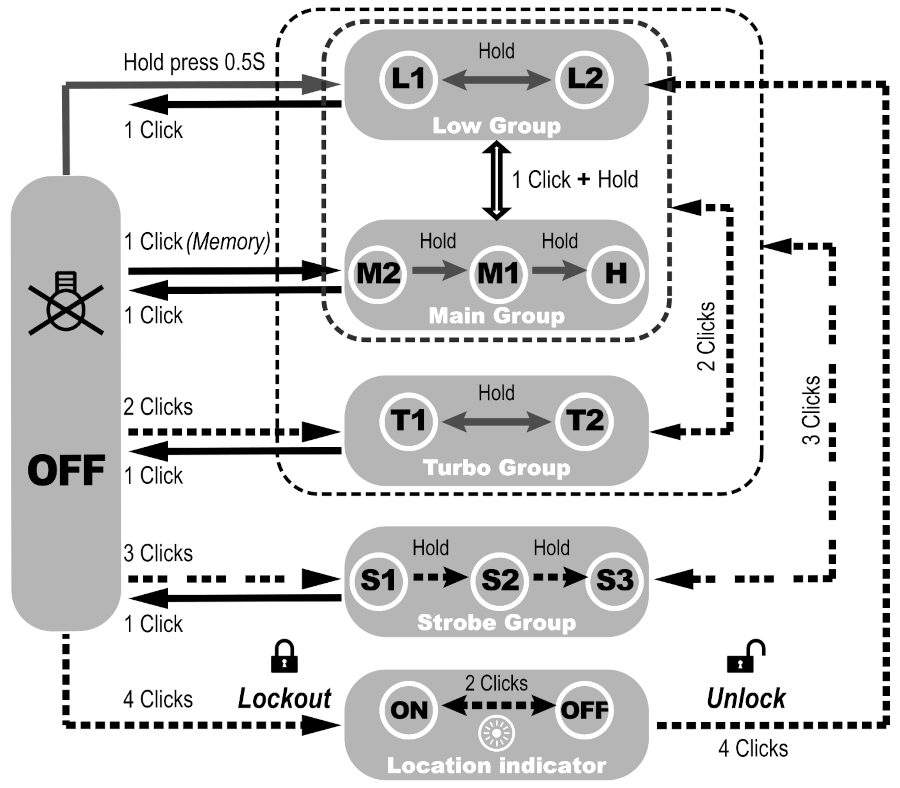
| State | Action | Function |
|---|---|---|
| Off | 1C | Turn on (previously used in H1/M1/M2) |
| Off | 2C | Turn on (previously used in T1/T2) |
| Off | 3C | Turn on (previously used in S1/S2/S3) |
| Off | 4C | Lockout |
| Off | 1H | Turn on (previously used in L1/L2) |
| L1/L2 | 1C | Turn off |
| L1/L2 | 2C | Switch to previously used in T1/T2 |
| L1/L2 | 3C | Switch to previously used in S1/S2/S3 |
| L1/L2 | 1H | Switch between L1/L2 |
| L1/L2 | 2H | Switch to M2 |
| H1/M1/M2 | 1C | Turn off |
| H1/M1/M2 | 2C | Switch to previously used in T1/T2 |
| H1/M1/M2 | 3C | Switch to previously used in S1/S2/S3 |
| H1/M1/M2 | 1H | Switch between M2 → M1 → H1 |
| H1/M1/M2 | 2H | Switch to previously used in L1/L2 |
| T1/T2 | 1C | Turn off |
| T1/T2 | 2C | Switch to previously level |
| T1/T2 | 3C | Switch to previously used in S1/S2/S3 |
| T1/T2 | 1H | Switch between T1/T2 |
| S1/S2/S3 | 1C | Turn off |
| S1/S2/S3 | 3C | Switch to previously level |
| S1/S2/S3 | 1H | Switch between S1 → S2 → S3 |
| Lockout | 2C | Turn button indicator on/off |
| Lockout | 4C | Unlock and turn on in L2 |
| Lockout | Hold | Momentary L1 |
This is the current version of the Skilhunt’s UI, which includes the latest improvements: switching between the blinking modes now also works by holding the switch instead of double-clicking. Additionally, when switching from the low group to the main group using the 2H command, it no longer uses the previously used brightness in the main group, but its lowest level (M2).
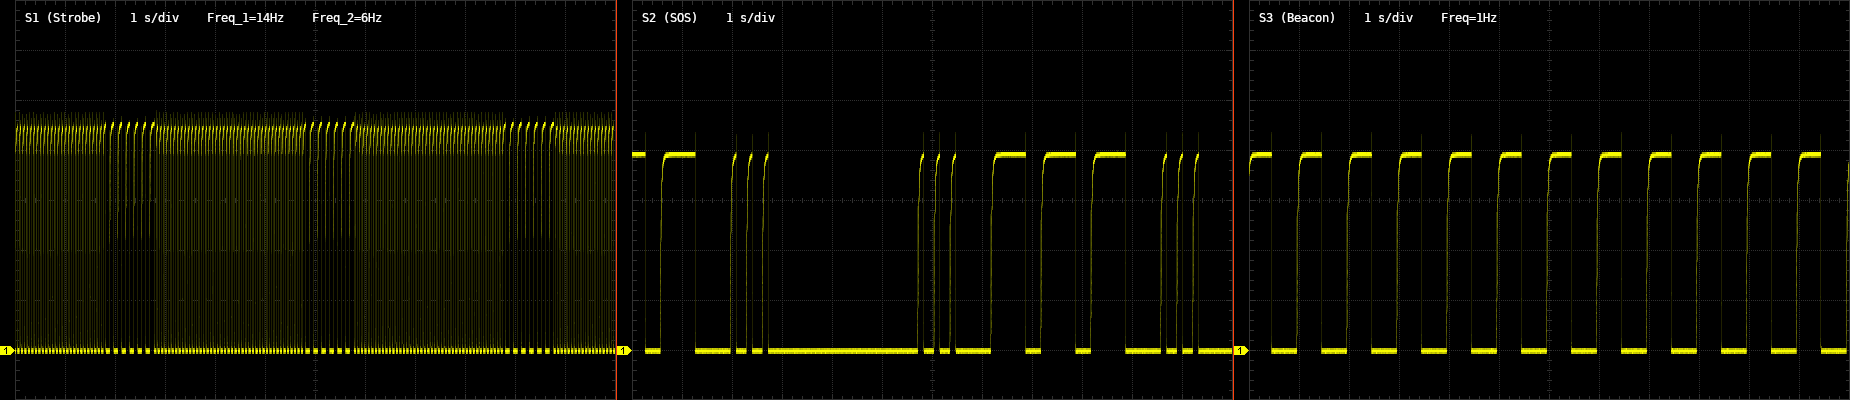
The blinky group contains a strobe alternating between 6 and 14 Hz, an “SOS” (more of an “S-O-S”) and a beacon with 1 Hz. The nice beacon with a short flash every two seconds, as found on some earlier models, is unfortunately no longer included.
After turning on the flashlight, an indicator LED in the switch shows the approximate state of charge of the battery for five seconds. On very low voltage, the indicator will blink in red as long as the light is turned on.
| Color | State of charge |
|---|---|
| Blue | 80% – 100% |
| Blue blinking | 50% – 80% |
| Red | 20% – 50% |
| Red blinking | < 20% |
When locked, the button blinks every two seconds in red. This makes it easier to find the flashlight in the dark. The indicator light can be switched off and on with a double-click, but is reactivated each time the flashlight is locked. Of course, the flashlight can also be locked by loosening the tailcap.
In all levels except L1 and L2, a critical battery level is also indicated by a brief blink of the main LED every two minutes. This allows you to notice a depleted battery even when the light is worn on the head and the status LED is not visible.
If this function is not desired, it can be disabled: turn on the light in the Low group (L1/L2) and hold the switch until the light starts blinking. If it then turns off, the battery warning is deactivated; if it stays on, the battery warning is active.
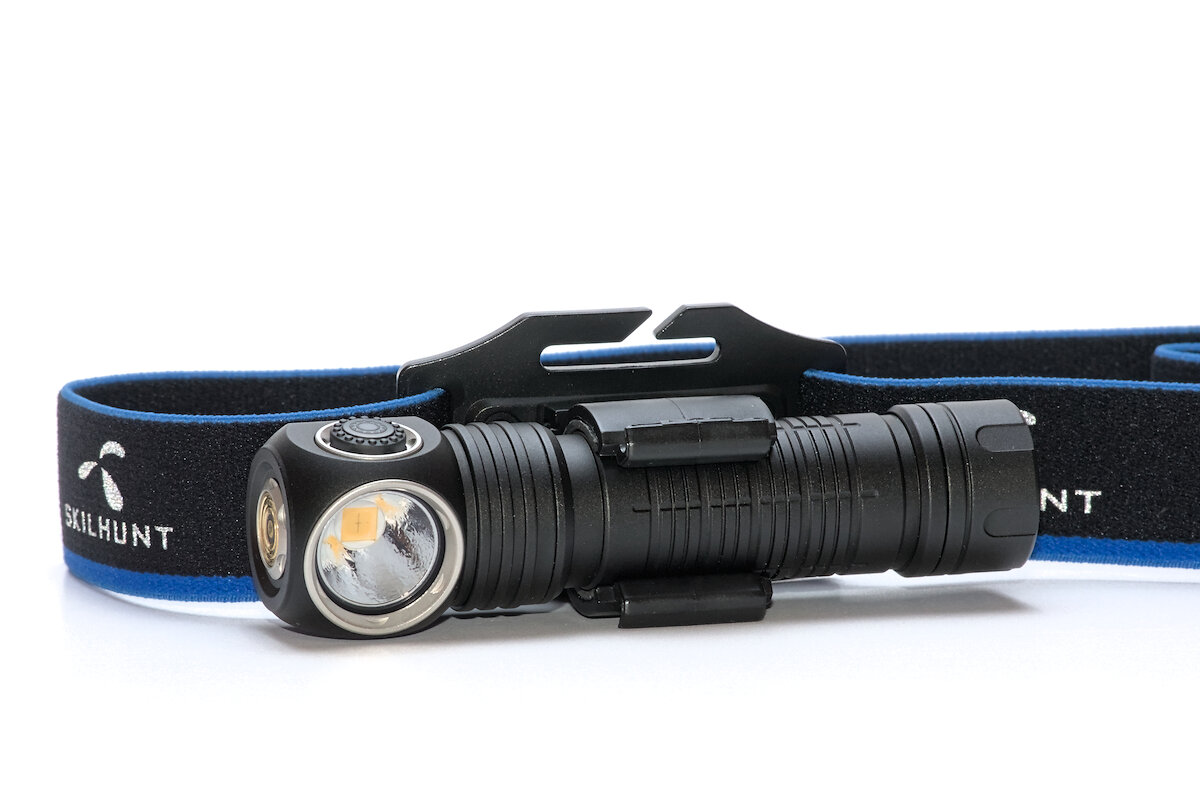
The headband with Skilhunt’s “HB3” mount is a true classic and is also often used with other lights. The light is inserted into the mount from the front and can be removed just as easily. Rubber inserts hold the light securely in the desired position.
The elastic strap has a soft surface with reflective elements on the outside. A silicone strip on the inside provides better grip, especially when used with a helmet. For additional stability, a second elastic strap can be added, running over the top of the head. This video shows how to assemble the headband:

Thanks to its slightly curved shape, the mount fits snugly against the forehead. The slots for the strap are one inch wide, making it compatible with MOLLE/PALS. Compared to earlier versions, the plastic feels somewhat softer.
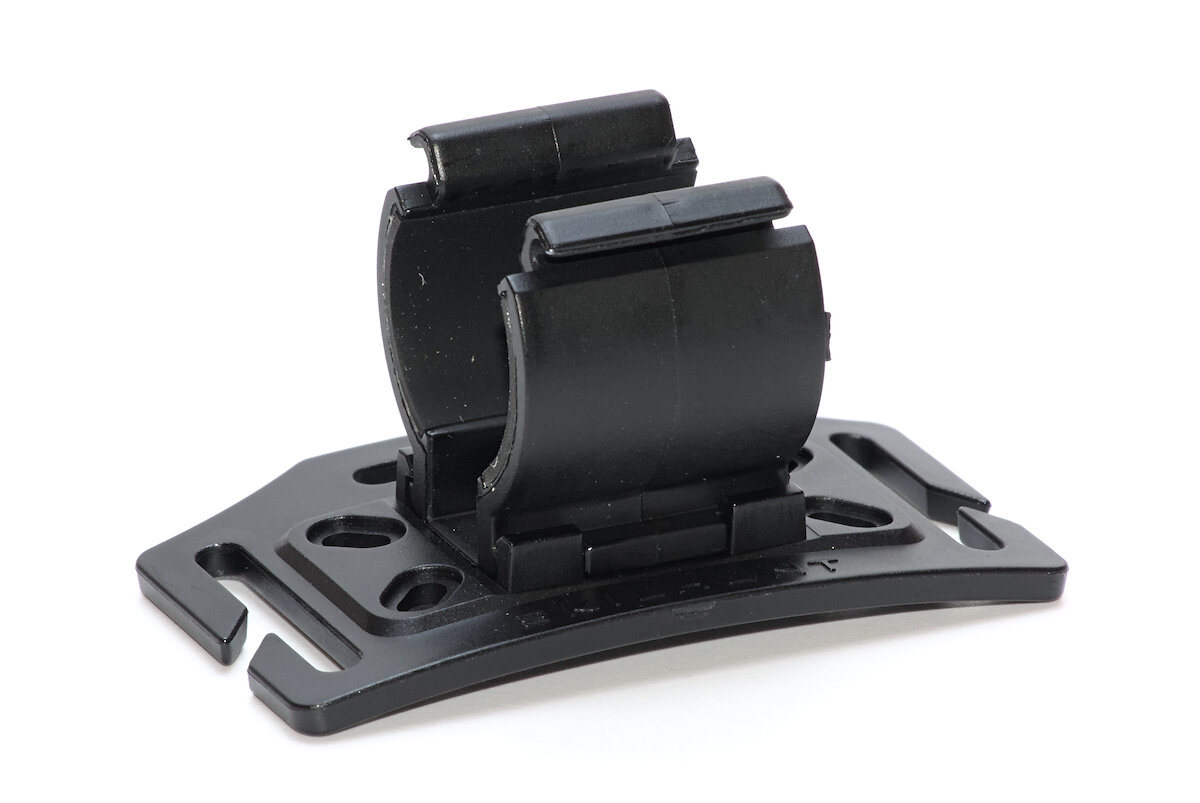
Thanks to some empty space behind the light, the clip can remain attached while using the head mount. An optional O-ring provides additional security to prevent the light from falling out, but in practice, it is usually not necessary.
The H300 performs great not only as a headlamp but also as a handheld light. Compared to a standard flashlight, an angled light offers significantly more flexibility. The switch is easy to locate due to the flashlight’s asymmetrical shape, but its exposed position also makes it easy to press accidentally. In a pocket, the H300 should therefore be locked, for example by loosening the tailcap.
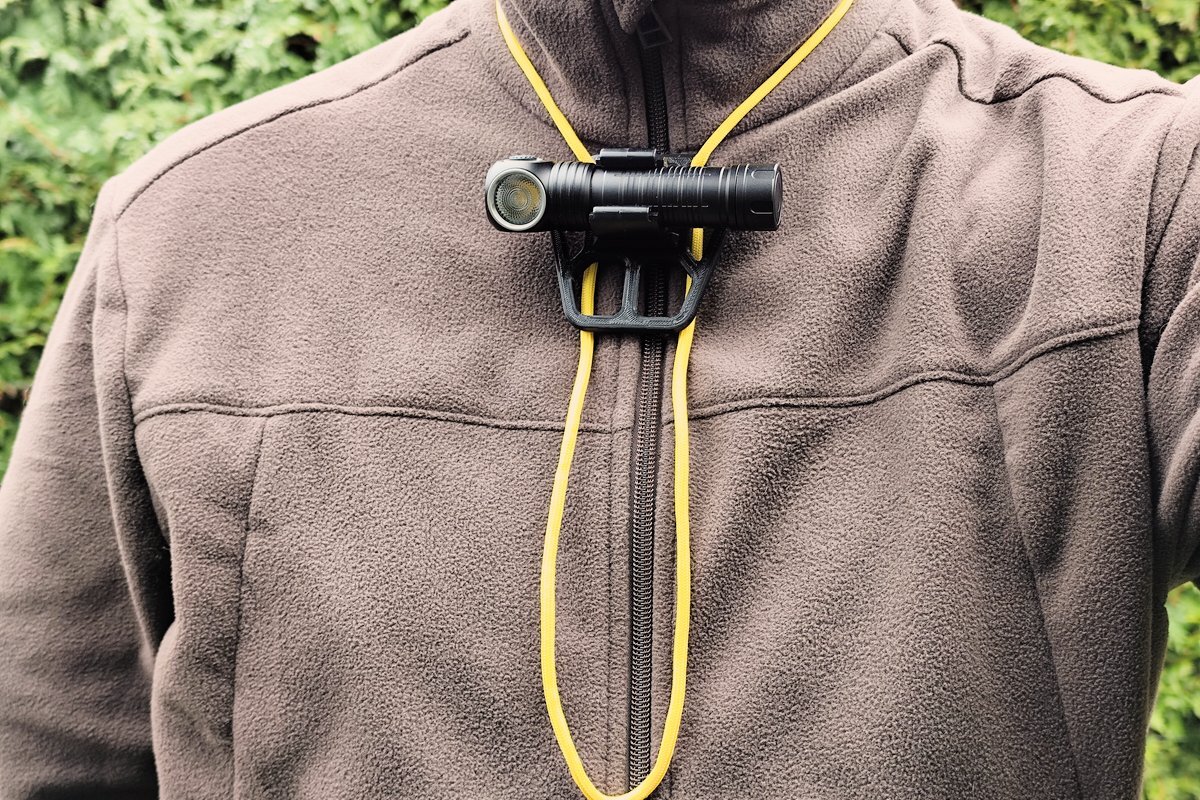
When walking, I now prefer a slightly modified way of carrying it: instead of wearing it on my head, I hang the light around my neck. This reduces glare in rain or snow and also prevents blinding others when looking in their direction. While this method works with the standard head mount, I designed a special mount for greater comfort.
Illumination
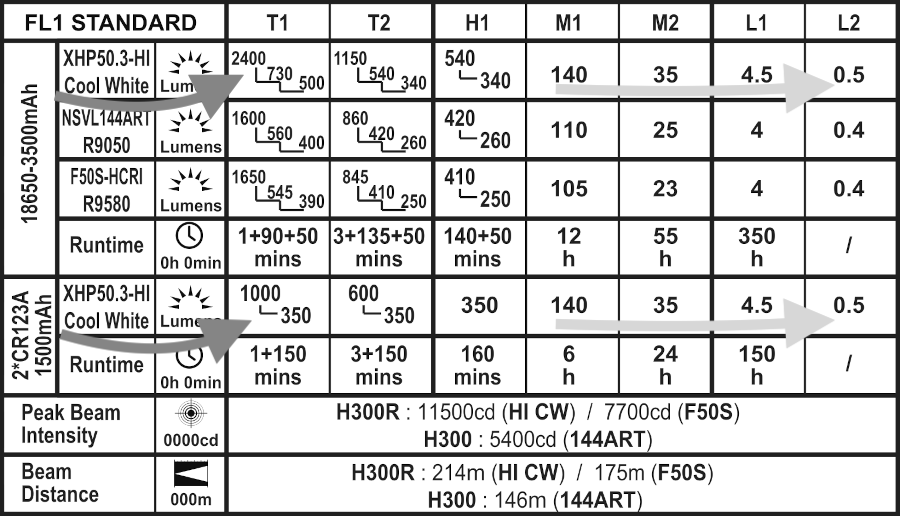
So far, the H300 has been offered in two versions: one with the Cree XHP50.3 HI, which provides the highest brightness and throw, but at the expense of light quality (cold white light with low color rendering) and one with a Nichia 144ART, which at 4500 K is not only significantly warmer but also offers much better color rendering.
| Cree XHP50.3 HI | Nichia 144ART | SL-F50S | |
|---|---|---|---|
| Color temperature | 6500 K | 4500 K | 5000 K |
| Brightness | 2400 lm | 1600 lm | 1650 lm |
| Intensity | 11500 cd | 5400 cd | 7700 cd |
| Throw | 214 m | 146 m | 175 m |
| CRI | R70 | R9050 | R9580 |
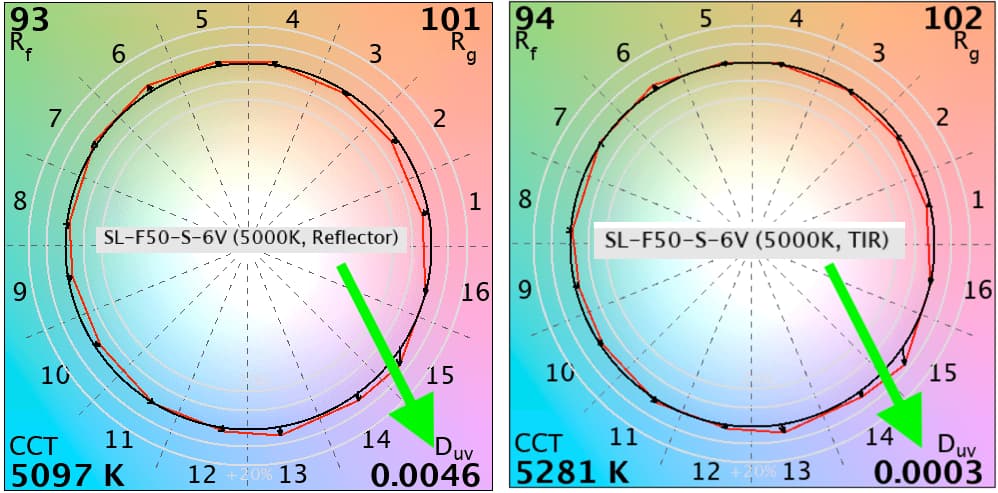
A new addition is the SL-F50S, specifically made for Skilhunt. This LED has the focus on excellent light quality – with impressive results. Its color temperature is around 5000 K, slightly cooler than the Nichia 144ART, but with perfect tint (duv 0.000). Additionally, its color rendering is nearly flawless.
Our LED expert @Koef3 took a closer look at the SL-F50S and summarized his findings in a detailed review:
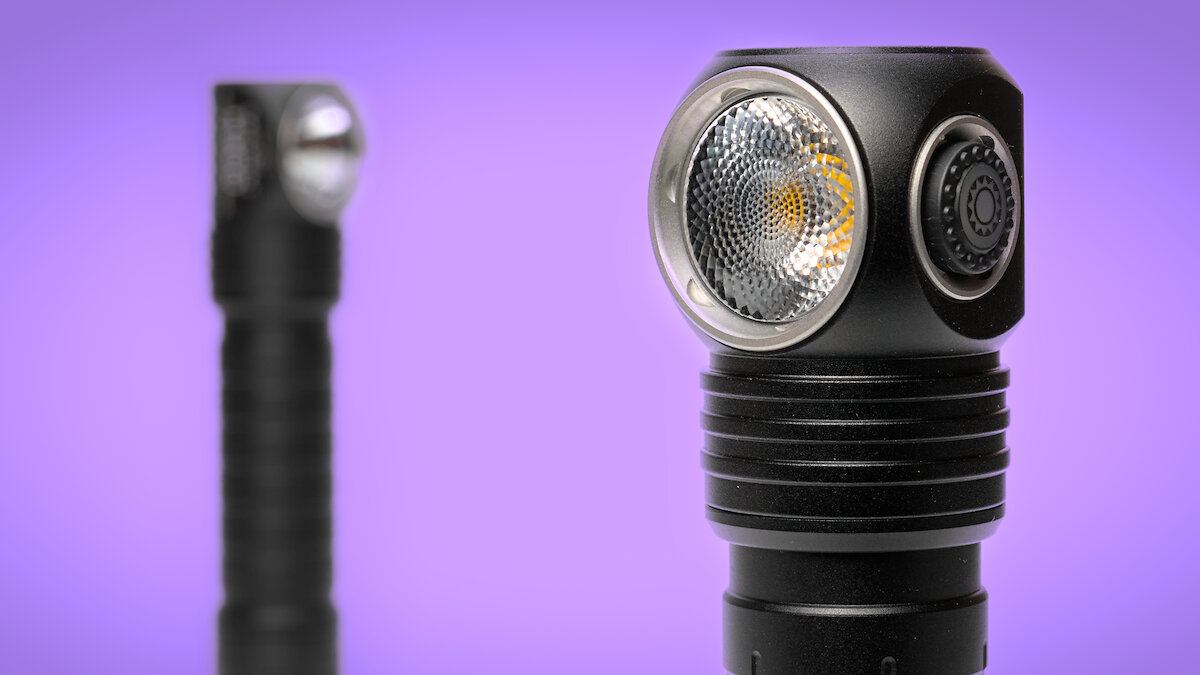
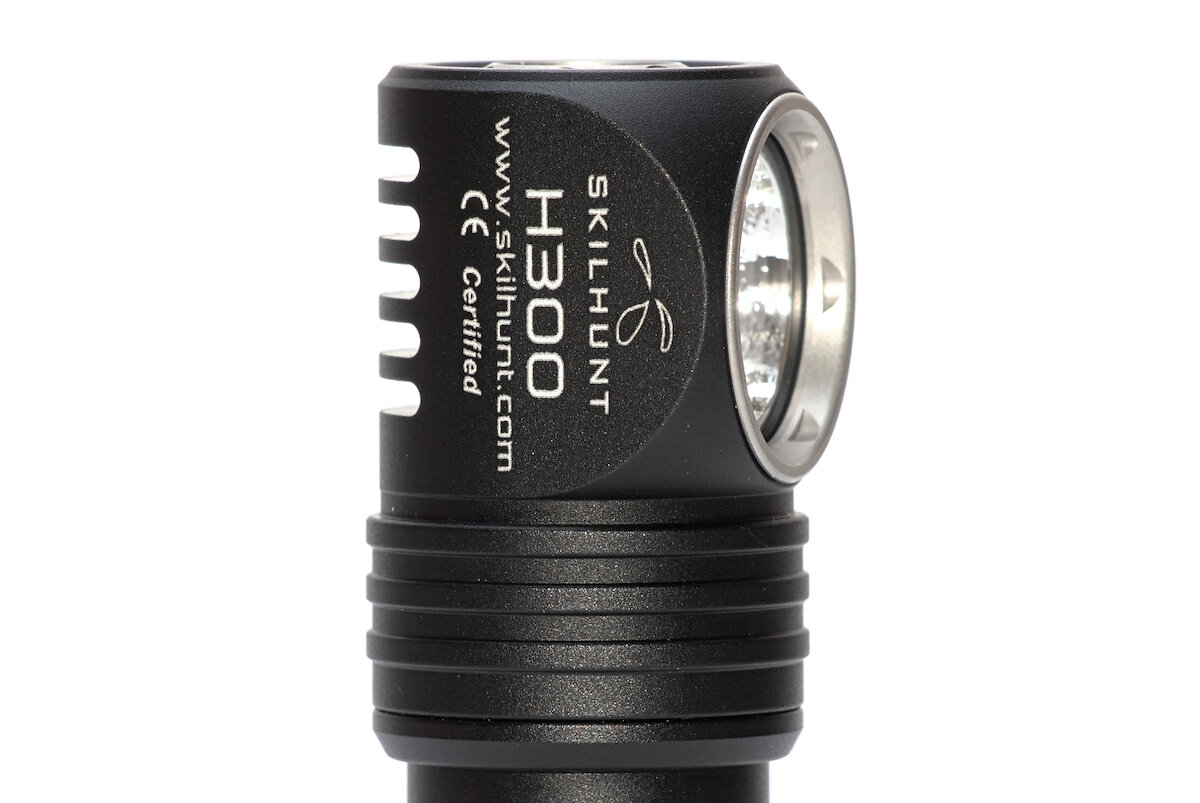
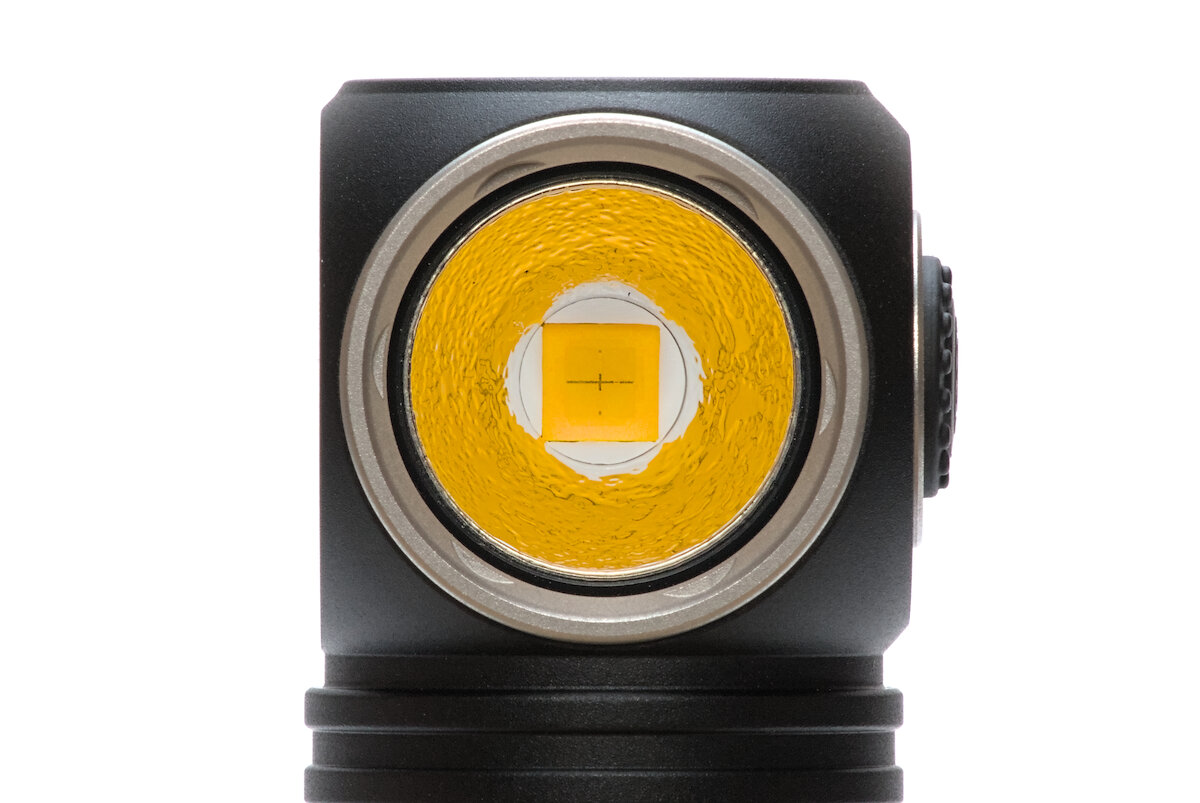
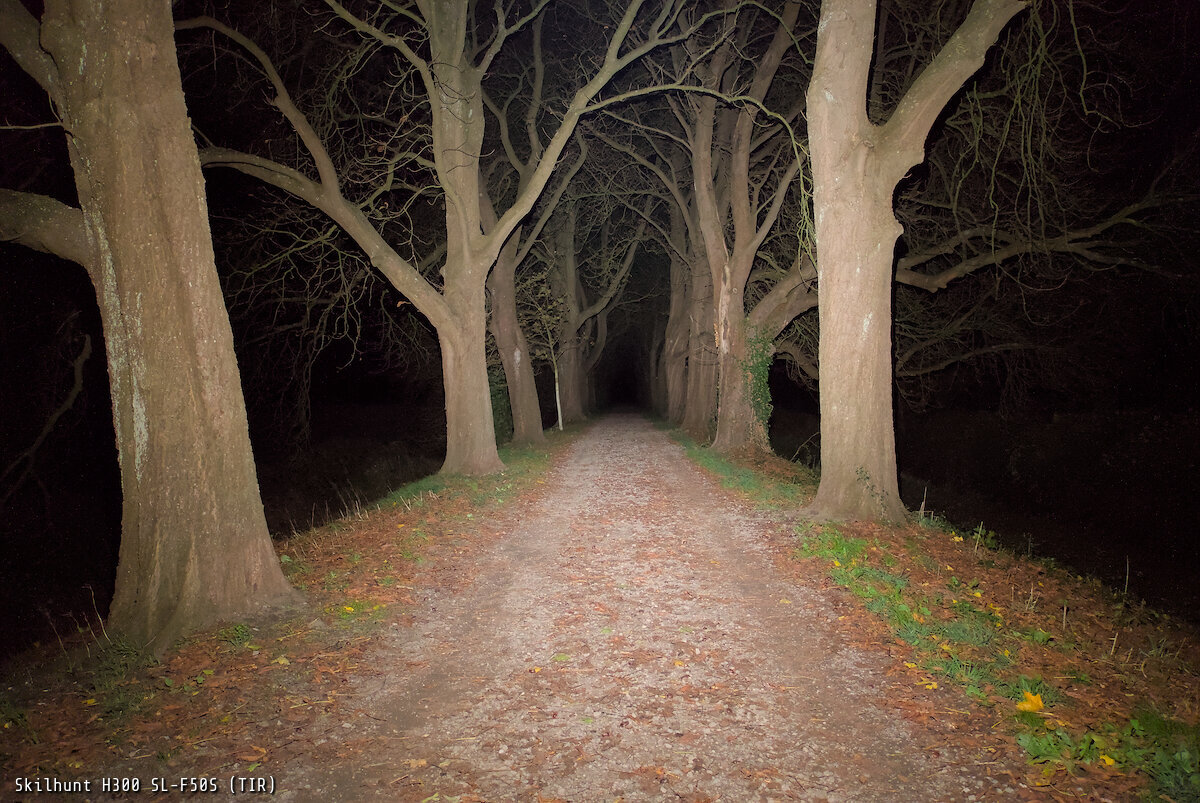
The H300 uses a “beaded” TIR optic with a microlens structure. This version is available with all three LEDs. The optic is not protected by a glass, but it is fairly resistant to breaking. Small scratches also won’t significantly affect the beam.
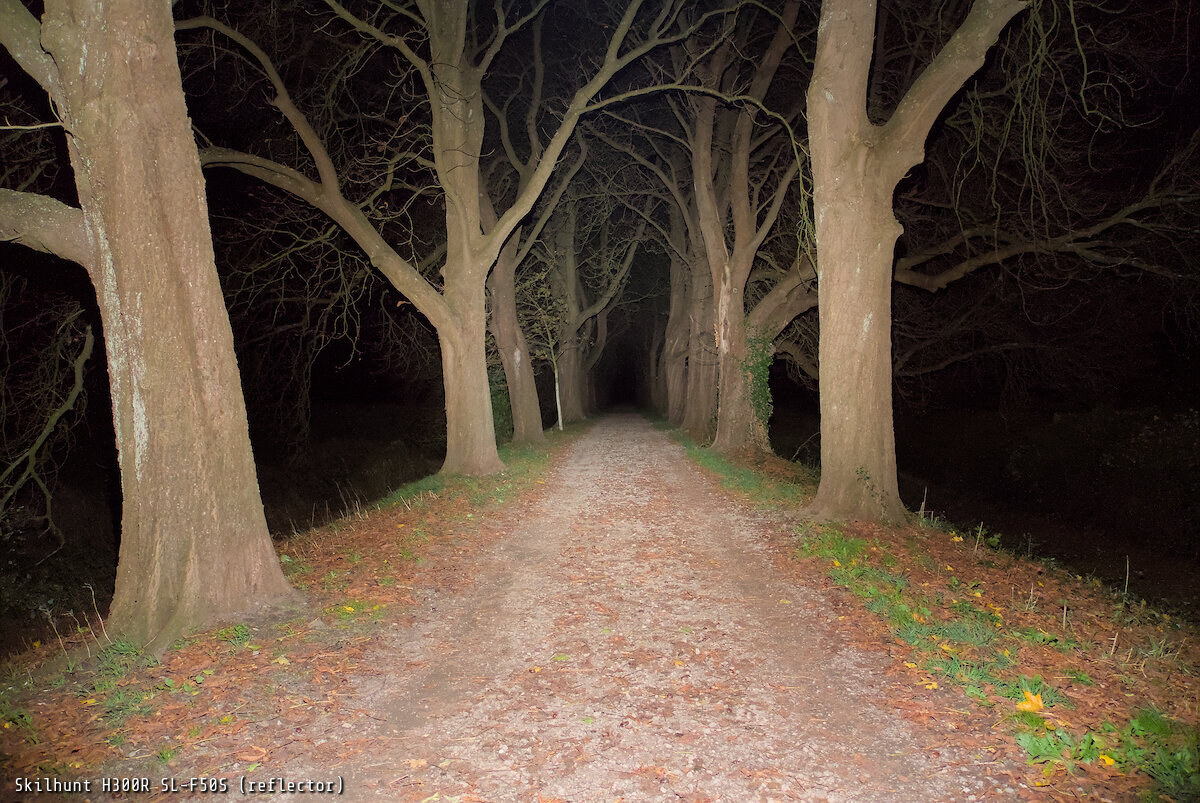
The H300R uses a reflector with a slight orange-peel texture. This version is currently available only with the Cree XHP50.3 HI or the SL-F50S. The reflector is protected by a glass without anti-reflective coating.

Choosing between the two versions isn’t easy. I had expected a tight beam with high throw from the reflector and a more floody beam from the TIR optic. In practice, however, the intensity – and therefore the range – of the two models is almost identical.
The H300R has a bright spill with a fairly sharp edge. Its spot is slightly more compact than that of the H300. In contrast, the H300 with TIR optic offers a center-weighted beam with a softer gradient.


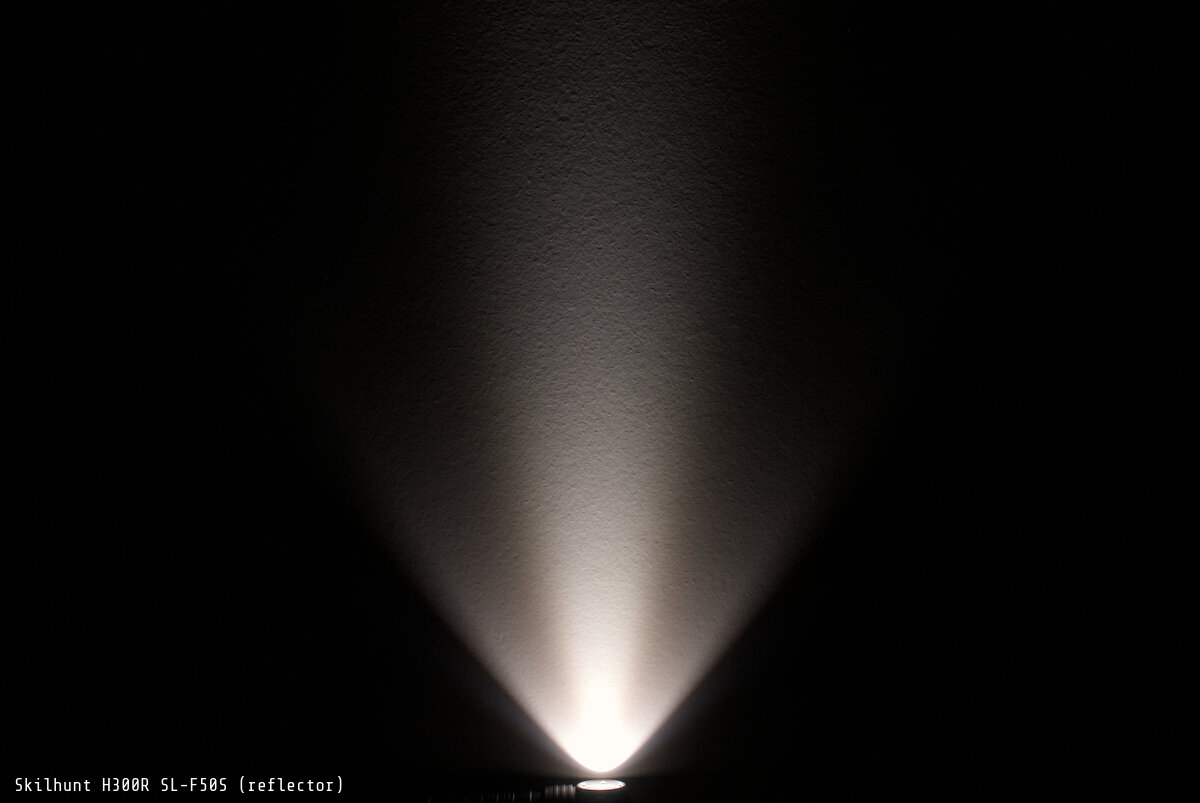
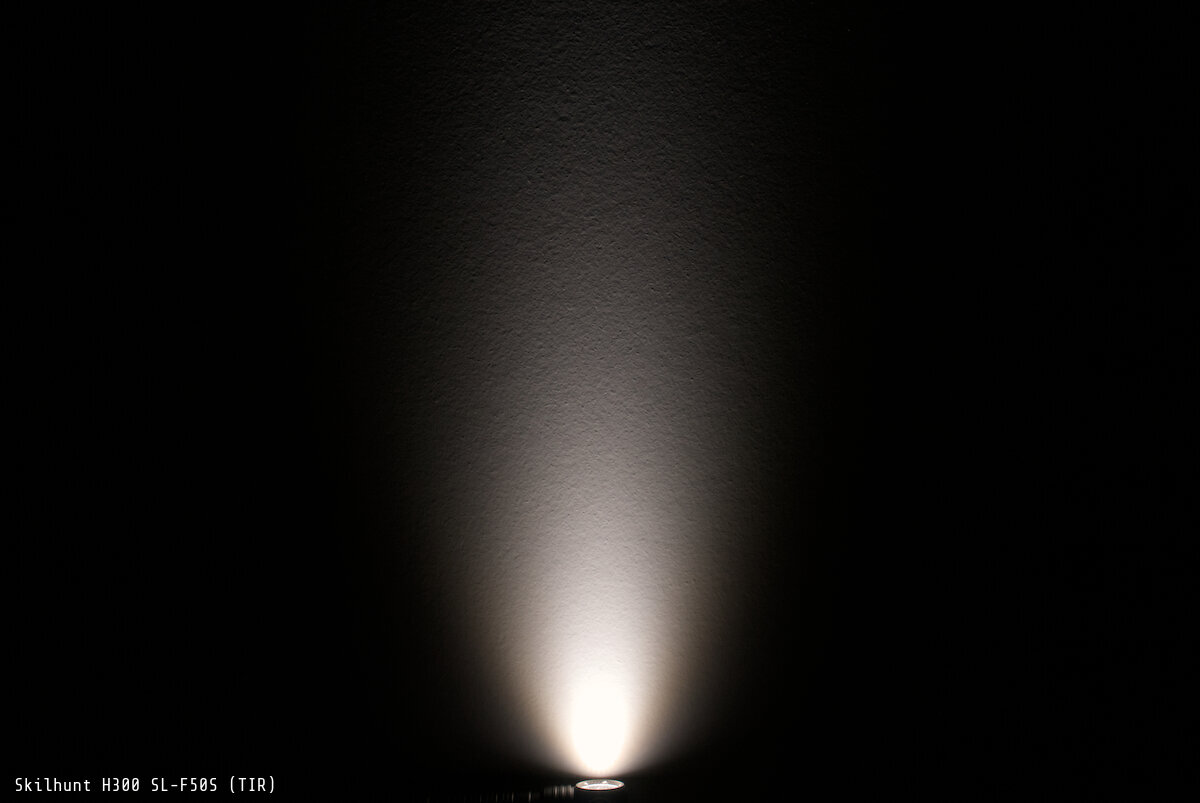

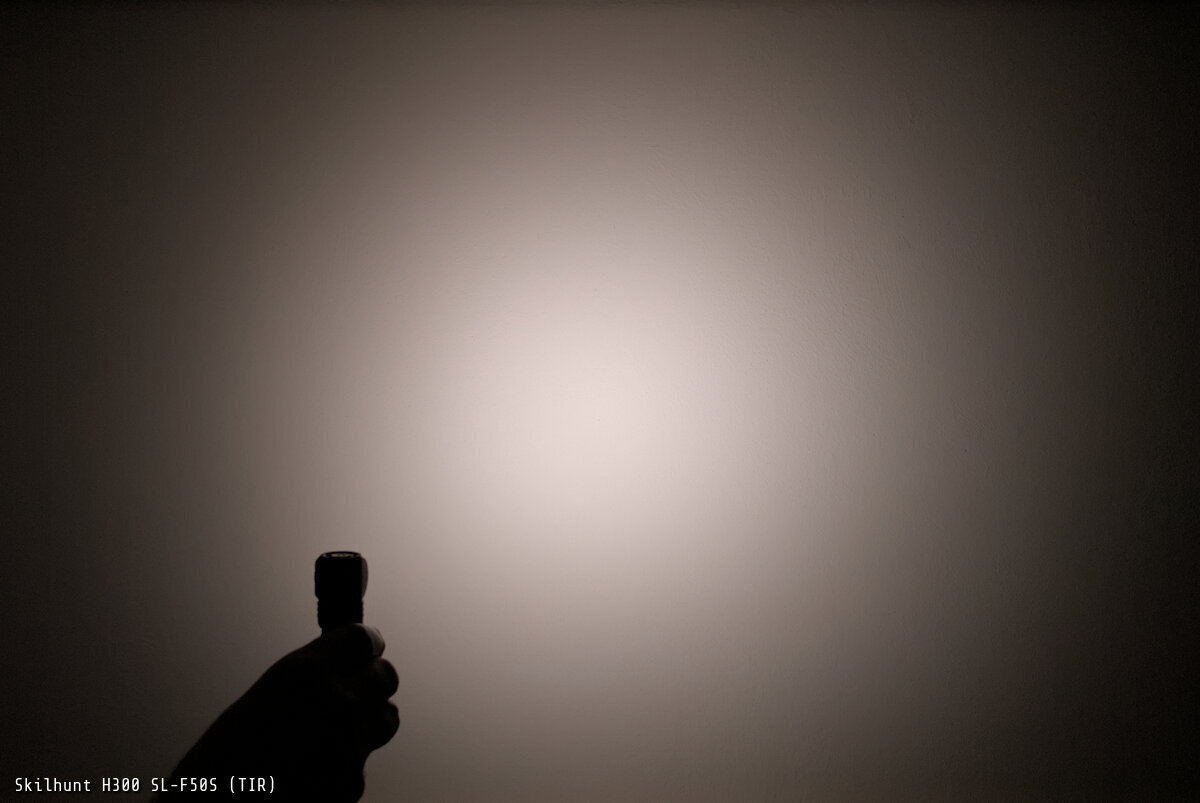
Overall, I prefer the version with the TIR optic, as its spot is slightly wider and less sharply defined. Still, the beam is fairly narrow and could be a bit floodier for my taste. Especially with headlamps, I prefer a floody beam to avoid tunnel vision. If needed, an additional handheld light can provide the required range.
Both versions are versatile and perform well both indoors and outdoors. In the end, choosing between the TIR optic and the reflector comes down to personal preference.

Driver and runtime
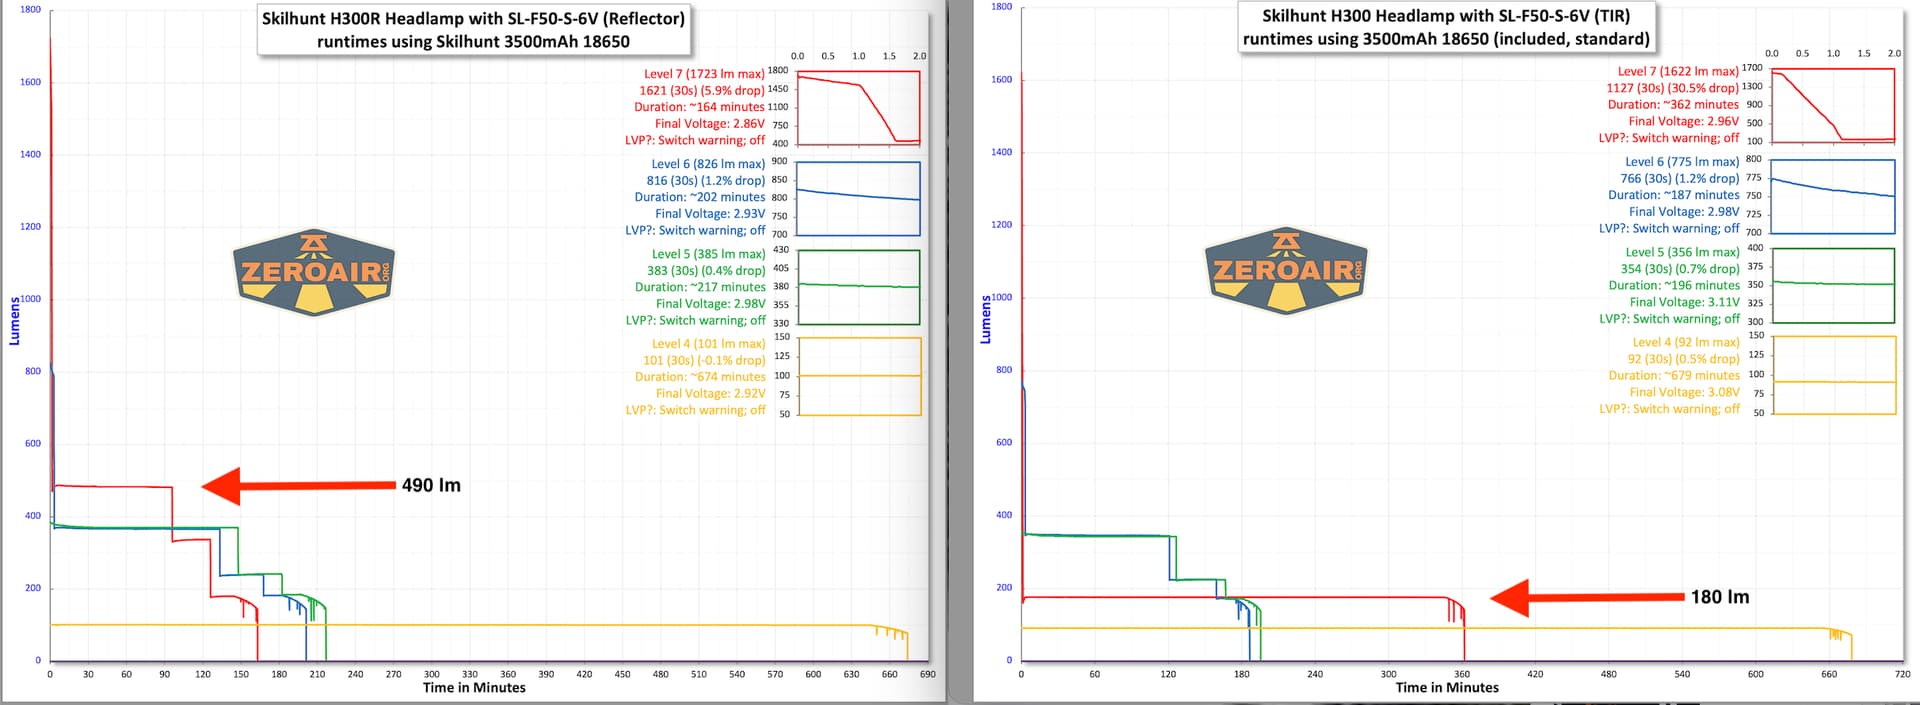
The H300 uses a boost driver, which powers the LED at a higher voltage than the battery provides. This allows for mostly consistent brightness.
Brightness and range vary depending on the LED used. However, since all LEDs are operated at the same power, runtime remains mostly the same. The current was measured with a fully charged battery. To maintain consistent output, the current increases as the battery voltage drops.
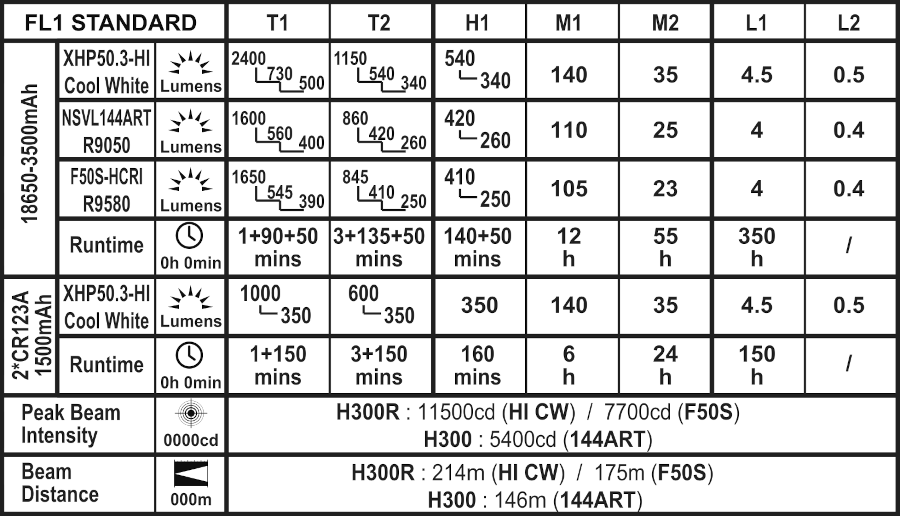
| Mode | Brightness¹ (SL-F50S) |
Runtime¹ | Intensity¹ (Throw²) | Current³ |
|---|---|---|---|---|
| T1 | 1650 lm / 545 lm / 390 lm | 1 + 90 + 50 min | 7700 cd (175 m) | 6.66 A |
| T2 | 845 lm / 410 lm / 250 lm | 3 + 135 + 50 min | 2.43 A | |
| H1 | 410 lm / 250 lm | 140 + 50 min | 0.97 A | |
| M1 | 105 lm | 12 h | 0.25 A | |
| M2 | 23 lm | 55 h | 0.08 A | |
| L1 | 4 lm | 350 h | 0.03 A | |
| L2 | 0.4 lm | 0.01 A | ||
| Off | 32 µA |
Starting with the medium level, brightness remains constant throughout the runtime. At the end, the battery warning is visible, indicated by a brief blink every two minutes. This function was disabled for the test of the TIR version.
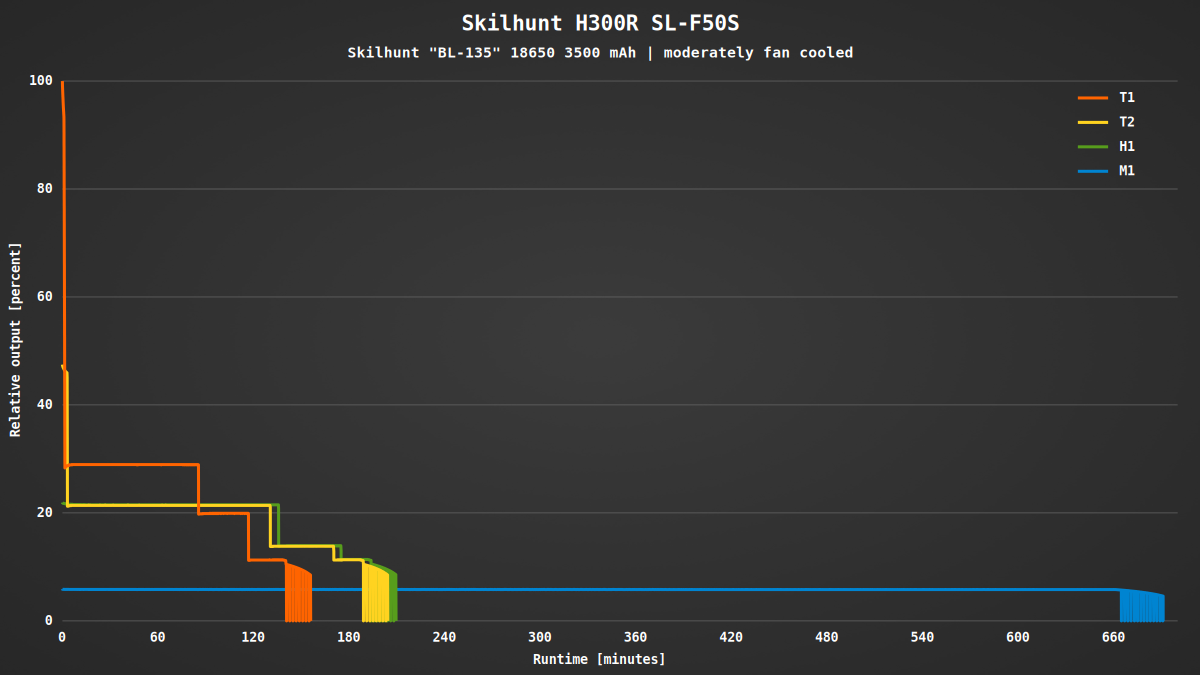
The reflector and TIR versions behave almost identically. Only the highest level shows a difference: in the TIR model, brightness is immediately reduced to H1, whereas the reflector version maintains higher output for a longer period. This also affects the total runtime.
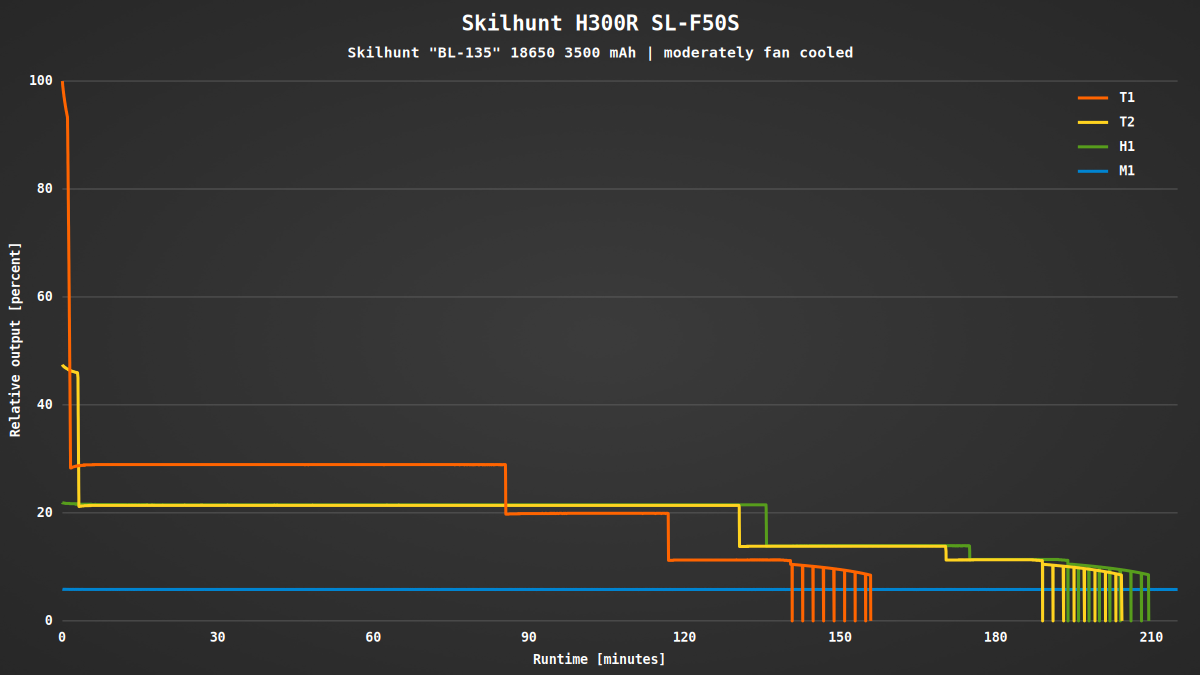

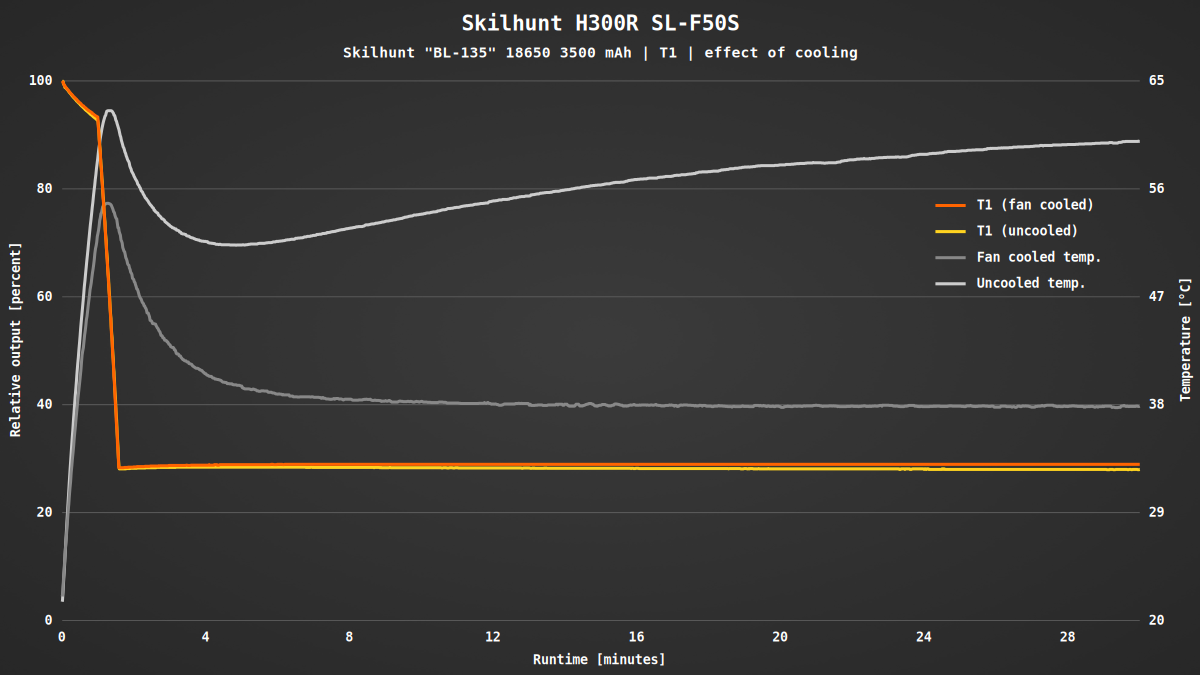
The time before brightness is reduced is also different. Both versions maintain the second-highest level (T2) for exactly three minutes. However, while the reflector version holds the maximum brightness (T1) for 60 seconds, the TIR model reduces it after just 15 seconds, even though the flashlight heats up at the same rate.
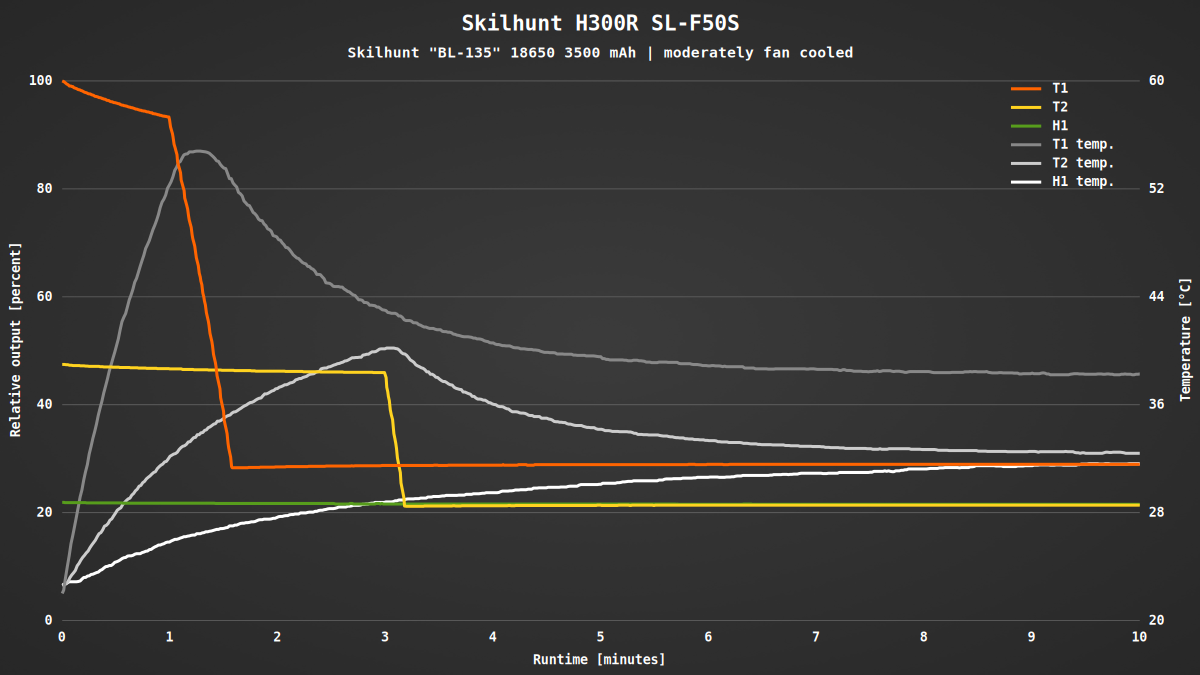

The comparison between cooled and uncooled tests clearly shows that the stepdown is not temperature-dependent but occurs after a fixed time. Without cooling, the temperature even briefly exceeds 60 °C. Therefore, the highest level should not be activated repeatedly in quick succession to prevent the light from overheating.
Almost all levels are regulated by the constant-current driver without PWM. Only in L1 and L2 short pulses at a frequency of about 2 – 3 kHz can be detected with an oscilloscope, which are generally not noticeable to the eye.
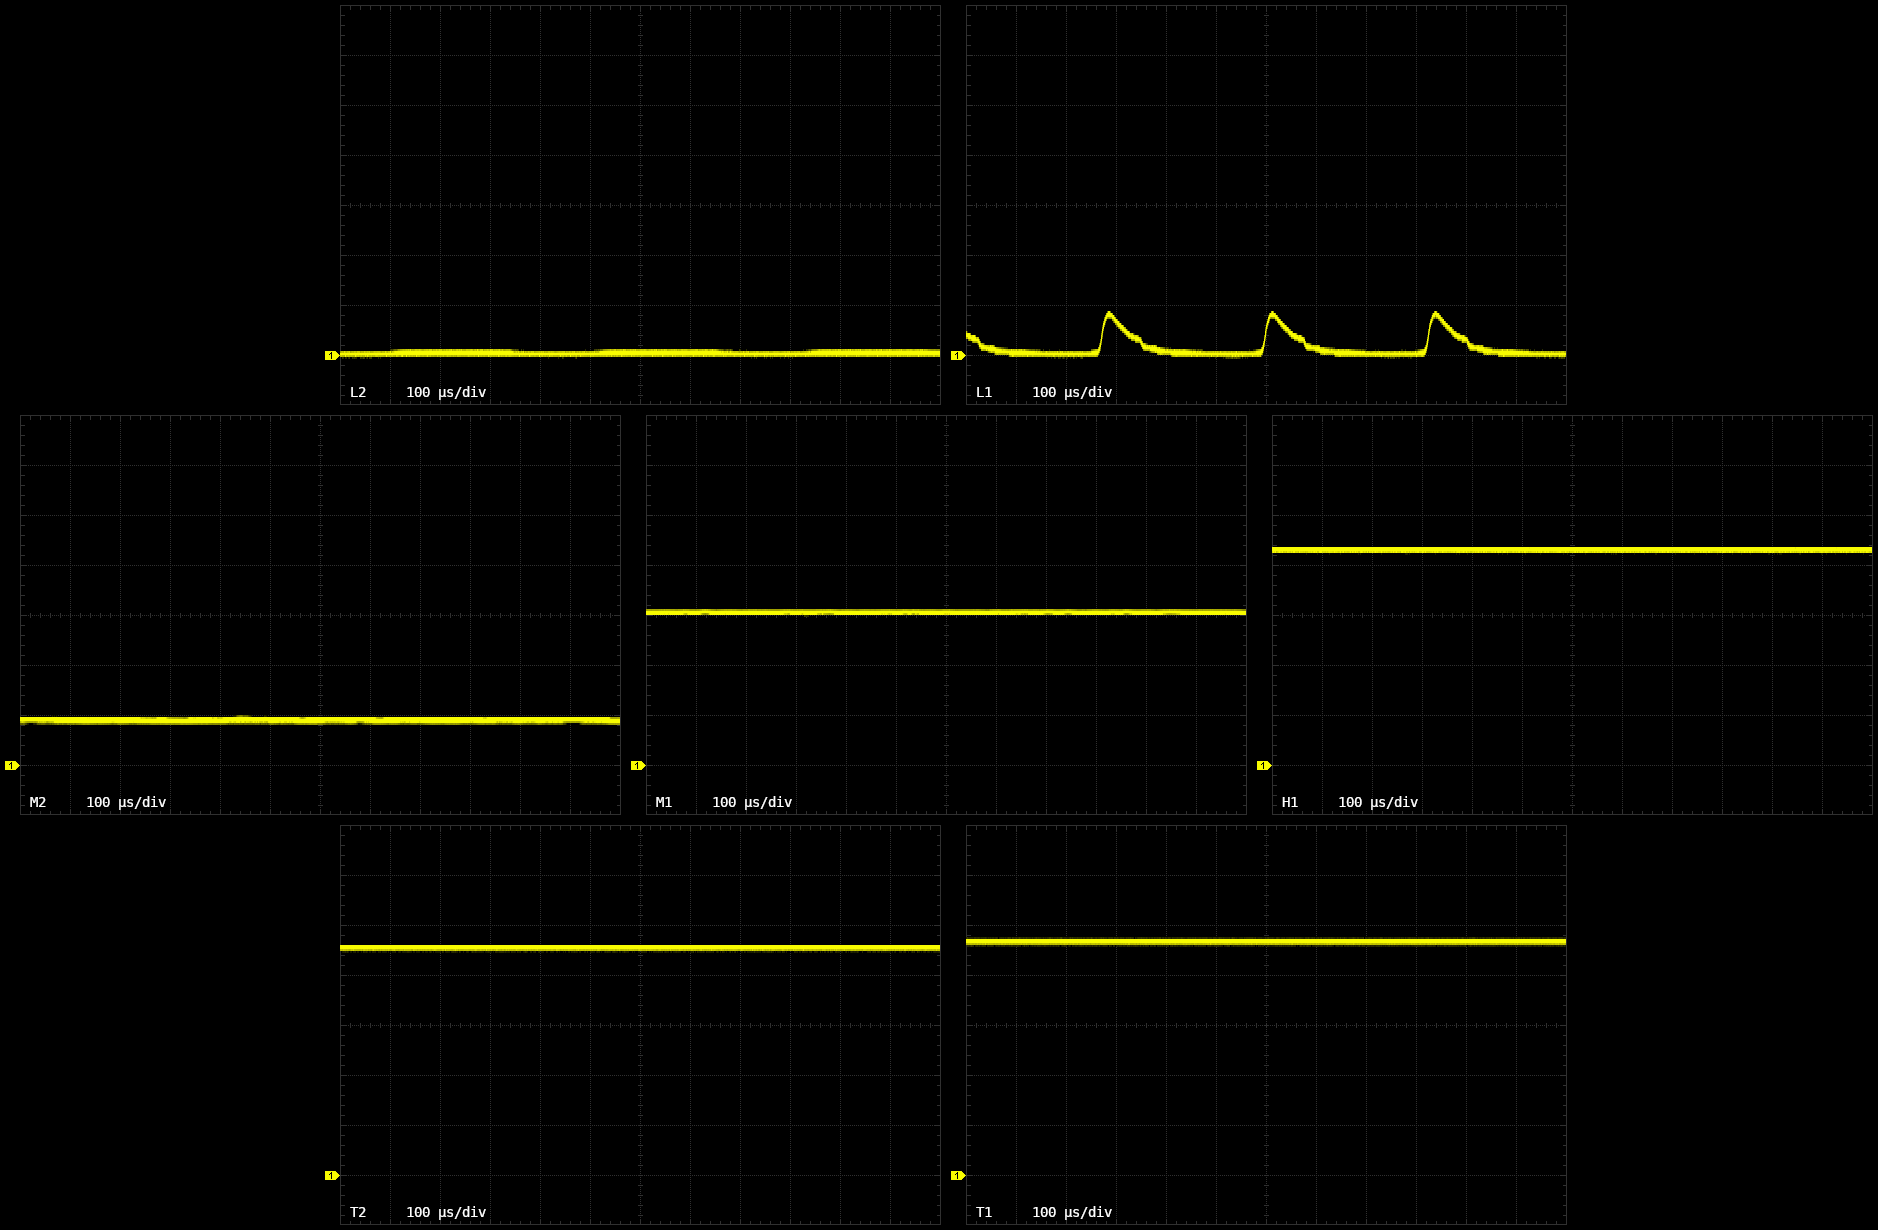
A faint whine can be heard on the two lowest levels, with frequency and volume depending on brightness and battery voltage. This can be somewhat annoying, especially for a headlamp worn close to the ears.
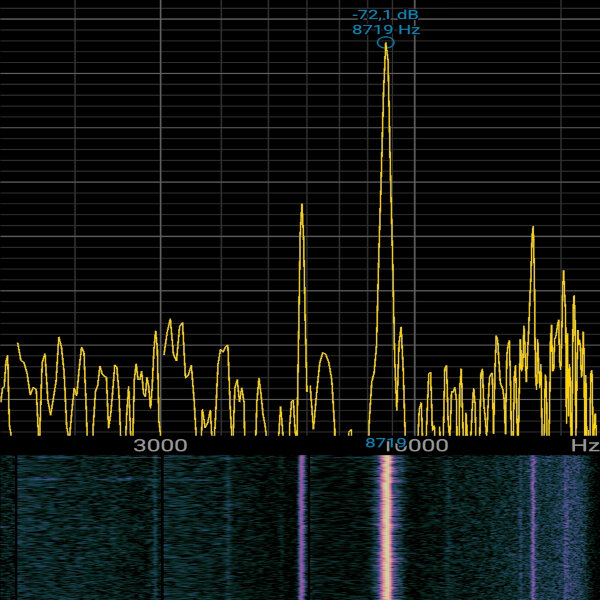
Whine in L1
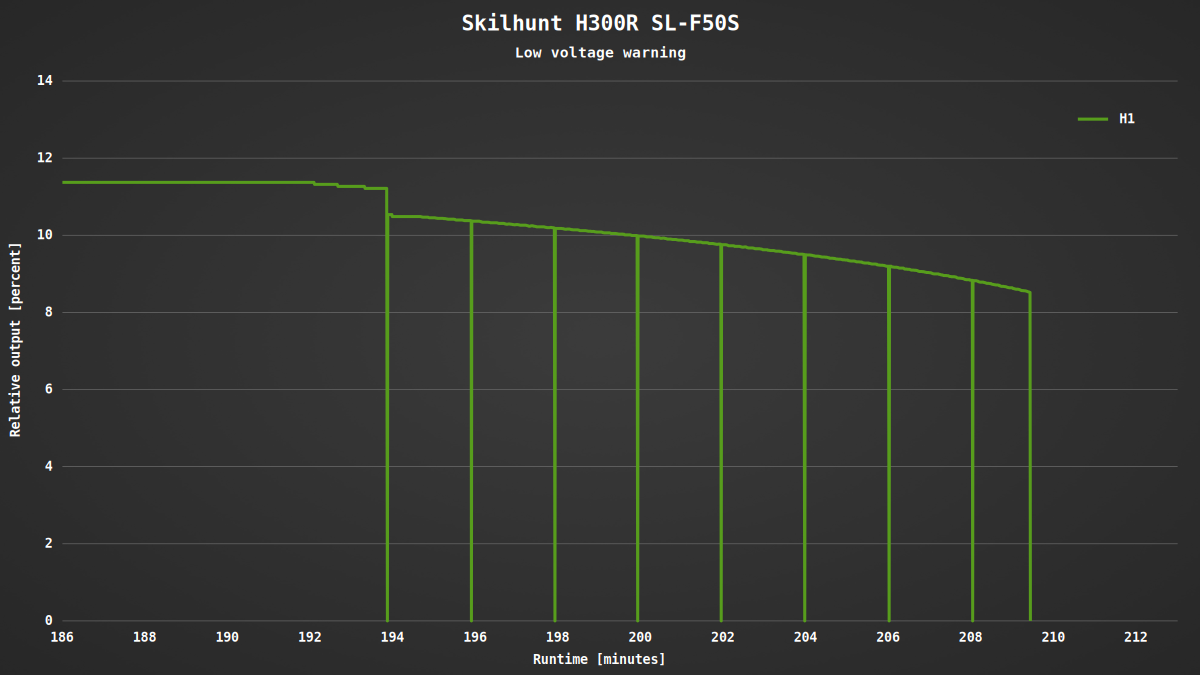
Below a battery voltage of about 3.0 V, the battery warning is started: the status LED in the switch blinks red continuously and optionally the main LED briefly flashes every two minutes. At around 2.65 V, the light automatically turns off to protect the battery from deep discharge.
Conclusion
The highlights of the Skilhunt H300 are the boost driver providing constant brightness and the new SL-F50S LED, which was specifically developed for Skilhunt and impresses with exceptionally high color rendering and a neutral tint around 5000 K. In addition it has a convenient magnetic charging system and a comfortable head mount.
You can choose between the H300 with a TIR optic and the H300R with a reflector. Both versions have similar throw and mainly differ in beam pattern. However, the brightness on the highest level drops more quickly in the TIR version for some reason.
On the two lowest levels, the driver may emit a faint whine. If you are sensitive to such noises and often use the light in quiet environments, it could become annoying.