UltraOK Technologies
300lm Cree Q5 3-Mode 18650 Zoom
Be-Seen Triker's Overall Rating: ★★★★☆

Summary:
Battery: |
18650 (protected okay) |
Switch: |
Tail Clicky |
Modes: |
3 - High/Low/Strobe |
LED Type: |
Cree Q5 |
Lens: |
Dome - Plastic |
Tail stands: |
Yes |
Price Paid: |
$8.44 (ebay – topofking) |
From: |
|
Date Ordered: |
15-Jan-2011 |
Pros:
- Cheap
- Bright
- Strobe (no SOS)
- Super tight thrower and insane flood
- Good fit of the battery, including protected cells
- 18650 specific; no adapters, dedicated driver
- Good heat dissipation
- PWM on Low mode
- Light weight
- Reliable under rugged conditions (fixed to an unsuspended bike frame at the wheel)
- Reliable threads on tail cap
Cons:
- Driver ground termination questionable (how do you terminate the PCB to aluminum anyway?)
- Threads cut after anodize
- Delivered very greasy
- Lock-rings loose on delivery
- Fit and finish lower quality than higher priced torches
- Tactical crown unnecessary
- No seals at lens
- It rolls away
Features / Value: ★★★★★
For a sub-$10/USD torch, you get a nice collection of parts. It –is- a Q5 Cree; it has a solid clicky switch engineered for the tail-cap with a molded plastic holder; the pill is well integrated with the body making for good heat distribution; and of 4 units purchased, they all worked right out of the bubble pack. The fact that it has only 3 modes makes it easy to use even without memory. 1 click and 2 light pushes and I’m in strobe mode which I use these for most of the time. Memory might be nice. Thankfully, one could easily change the driver to one’s favorite driver. I definitely got my money’s worth for exactly the functions I needed for my cycling application.
Design / Build Quality: ★★★☆☆
The design is a bit different form the drop in designs mostly due to the fact that there is no need for a reflector in a zoomy. That may not be totally true but the standard 22mm domes lens does most of the work on these. There is an attempt to reflect light out of the torch by adding a reflective disk at the emitter. I’m sure other high quality zoom torches provide a little extra effort in this area but UltraOK does get a few browny point for their effort.
Although heat dissipation path is well designed for the Q5 emitter, it is not a host for a XM-L or much else over a 1000ma. As seen in the images, the emitter is clamped between a lock-nut and the pill, and the pill is open to the driver. Although the manufacturer went nuts with heat-sink compound, the overall contact area is limited. With the Q5 this solution works. The lens-head is isolated from the heat because it moves for the zoom mode by floating on o-rings, and the rest of the body seems to warm up evenly. Temperature during the pictures was very touchable. Nothing I would worry about.
As for build, rebuild! The torch came in very greasy and all the lock-rings and the pill were loose. I didn’t have to do anything to the solder joints, only the final assembly details. No big deal as long as you know to do it. Also in the pictures, you can see that the solder joints could be better and cleaner. I’m very tempted to take the soldering iron to the driver’s spring. I also want to find a better way to terminate the driver PCB to the aluminum pill housing. They use an interesting technique, but I want something more –connected-, if you know what I mean. This driver is essentially press-fit into the housing.
And another thing to note; no seal on the lens! Seems they went for simplicity. I wouldn’t worry about it in the rain but I wouldn’t throw it in the swimming pool.
Battery Life: ★★★★☆
What can I say, it is a Q5 driven by an 18650. I haven’t done a tail-cap current measurement simply because I don’t have a current meter. If someone can identify the driver, I think we’ll know what to expect from this torch. I’ve run the strobe up to 4 hours already without issue. Since I carry 4 of these on my recumbent trike; 2 forward and 2 rearward, in theory I have 8 hours of runtime if I alternate. This is a lot of runtime for my purpose. I’ve also done several hours in low mode at night, again, quite impressive output for seeing the fog-line …in the fog.
Light Output: ★★★☆☆
For my purposes the light output is superb! But by general standards, these are utilitarian more than throwers. As a general torch, knowing the limitations of zoom capable torches, I will de-rate these to a 3-star rating. Even for my purposes, being a wide angle flood, the tactical crown gets in the way. A more clever head design and a more optimized reflector could really bring out the full capability of the Q5 while still offering the superb run-time.
Summary: ★★★★☆
Seriously, these were purpose bought lights. I order 2/each twice form the same eBay reseller. That should say something about how well I like this utilitarian torch. And as you can tell later, a simple mod makes this unit perfect for bicycle tail lights as well. They take the punishment of the suburban pothole riddled chip-sealed roads and just keeps on blinking. I know people see me coming because I see people slow down, move around, and even stop to let me pass. –That- is the beauty if the super wide flood properties of the zoomies. And I simply cannot pass up a good deal, spending less on 4 lights them most people spend on 1. The only ding I will give this light is the overall build quality. You have to take them apart and just go through it.
Now for the innards:

A size comparison: Left - UltraOK being reviewed : Mid – no-brand SolarForce R2-M 2x16340 : Right – Suburban road find LED Lenser 3x AAA

The =Package= w/ pill assembled

The switch details. Nice solid click to the switch. Note the torch body contact on the left of the switch. I’m still reserved about the dome contact vs. a spring contacting the battery. Springs allow more battery movement without intermittent contacts risking vibration induced mode shifts. Tail stands and lanyard holes (lanyard provided).

The switch sub-assembled. I didn’t see any markings on the switch other than the “A” visible in the image.

…and assembled with the lock-ring. Overall, a nice solid design.

This is the extent of the optical elements. Nothing impressive here except the lack of seals to keep out the elements. Seems the aluminum tactical ring is nickel plated. The bezel definitely has enough heft to allow for some machining. It will still be too deep to share the dome’s light form a side view. For me, this is “lost light” although it does get reflected back into the beam… somewhere.

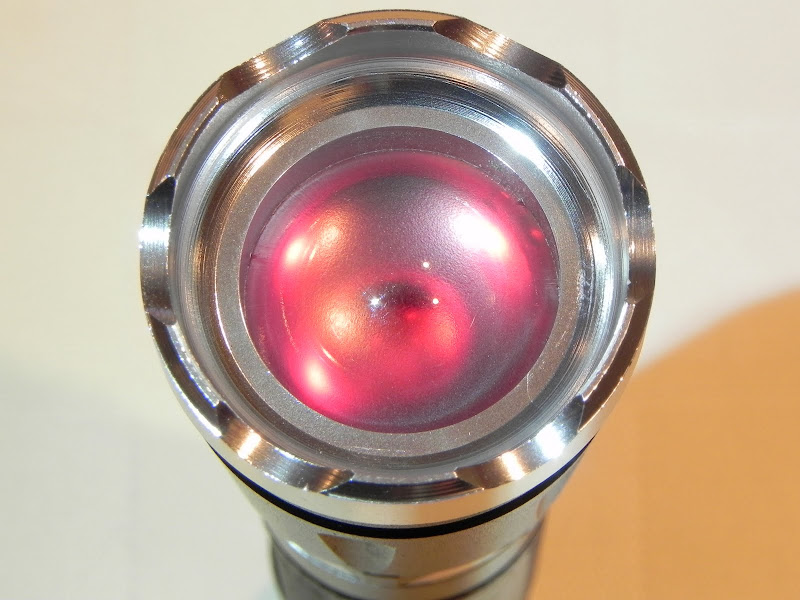
This is what it looks like when delivered at maximum flood. If you look carefully, you can see all the bits: Cree emitter’s metal ring; flat “reflector”; lock-nut; domed lens; and bezel.

The –pill-! A lock-ring holds the emitter on a shoulder in the housing and the “reflector” sits on top of the metal band around the emitter. You want to be careful here as the center hole in the reflector can interfere with the emitter dome. It took a little effort to get all centered up this nicely.

And here is the heart of this torch. Like I said, a bit messy but they are well soldered leads. Also note the excessive heat-sink compound. That is a Q5, isn’t it?
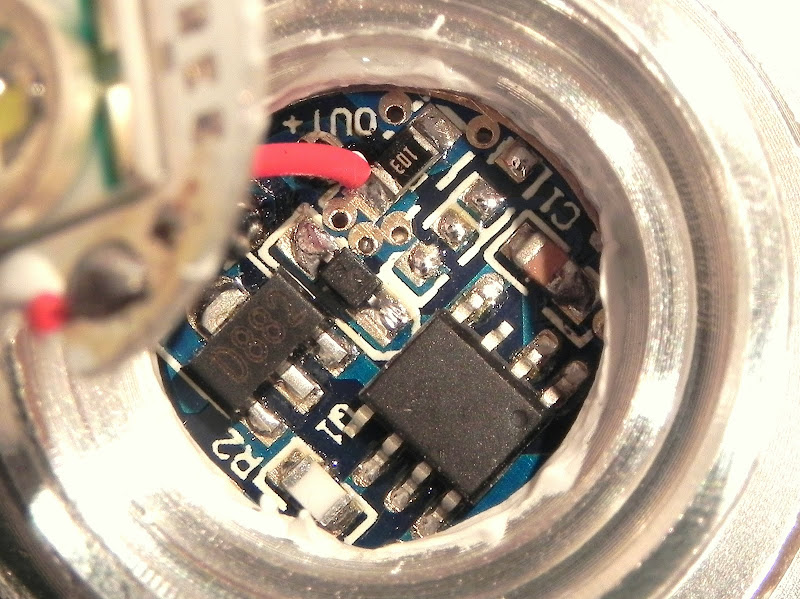
As for the driver, I don’t recognize it. I was surprised to see the “D882” regulator, and also noted the unterminated pins on the 8-pin DIP. It is kind of convenient that you can get to the driver from under the emitter. Someone care to help me out and ID this driver? I’m seriously considering a NINJG 101 AK in there since it has 2 very useful slow strobe modes available.

This is the area I am still concerned about… actually, I am in awe that this is making contact at all. I have to think that the other side of the board is actually making the contact with the pill body. The driver was press-fit into the housing and you can see some deformation of the PCB. It is in there very tight and I left it be for the time being. Anyone have a good idea on how to assure contact between the driver and an aluminum body? There is no shoulder in the torch body to make contact with the driver board.

On a final note, remember to clean the body and parts with some alcohol wipes. O-rings are easily removed so the grooves too can be cleaned too. I used a light oil on the o-rings for the slide action. This –really- freed up the zoom action. Not sure why it was sticky before I cleaned it… it had plenty of grease. As for order of assembly, this step is done before putting the pill back in. The pill keeps the lens assembly in place.

High at a couple of feet away at full flood. Strobe is the same intensity.

Low at the same camera settings. I think it is much better in real life. Notice how dark the chair is in both beam pictures.
And a bonus section:
As droned so often in my posts; I do have a specific purpose for my light quest. This light just works perfectly for one of those: bicycle tail lights. This is how I converted the white lights to red without changing the emitters.

High beam at full flood through the film from a pair of 3D glasses inserted on the flat side (inside) of the lens. Blue can be achieved the same way.
…and a frosted lens replaces the stock clear lens. I got the frosted lenses in a previous eBay buy and am happy to put them in service here. It helps diffuse the light all across then lens.

…this mod produces this fantastic reddish amber tint.

Less than useful tight beam pattern with red film mod.
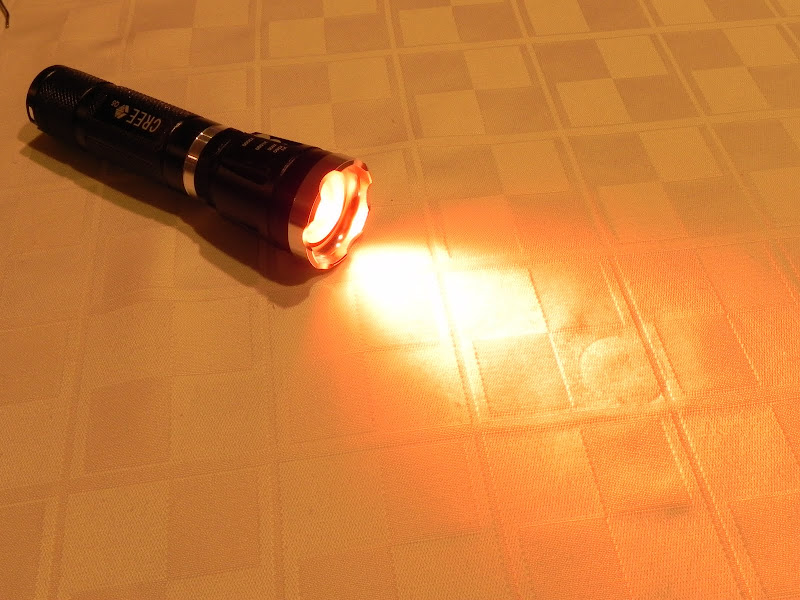
…and then at full flood. Notice how the red affected the camera image too. This is exactly what I want. Most rear bike lights have very poor spread making them easy for drivers to ignore. This light draws attention at much broader angles. …hence the overkill on lumens.
That’s all I got guys and gals. Hope you enjoyed this and maybe an UltraOK Technologies light may not look as bad as it once did… or maybe worse. You decide.

