What did you mod today?

Yeah yours looks totally different to any of mine. The one in my photos comes from the BORUIT Official Store on AliExpress - but each unit I’ve bought has had differences in a few ways. My older one is micro-USB as well, and the newer ones are USB-C. But all the ones I got have at least 1/2" to 2/3" of space to fit the driver. I haven’t yet seen one like yours before where the ridges go all the way to the edge - that’s wild. Where did you get yours from?

If you had access to a dremel tool or something you might try boring out the ridges yourself.

I guess you can’t really expect much when it’s a sub-$10 headlamp. I understand having QC issues (I mentioned this on the D10 thread). I suspect that even on the Boruit Store, they may have different OEMs/Factories manufacturing the same blueprint of the D10, but some are changing the design based on their own needs.

1 Thank

Thats not D10, Its H10

I have both and agree. Vers pleasing tint and no tint-shift on either. 5700K R90 in Sofirn SP33S, 4000K R70 in M21B with orange peel reflector.

Yes, rest of the light is original. I was thinking about a driver swap as well, but for now I am happy with the results. But even if the original driver is broken, I think I still have a replacement driver of another PD40 1st gen somewhere lying around :smiley:
The Turbo lasts longer tho, I think due to much lower Vf compared to MT-G2. I was still able to activate Turbo even after 20 min on highest mode (around 1200 lm).

The turbo now can be used until the battery is down to around 50 % (3.7 to 3.8 V), which is quite good, even for a light from 2014.

Yeah, that is quite a mystery to me: why does Nichia such things like designing a high power LED without thermal pad? I think I will never get their point on this.

Yes, I am currently making the test of XHP70.3 HI 4000 K (the bin “5D” from Simon). The tint is very nice (below duv), but the CRI is still low tho (which is also clearly visible even in comparison with 80 CRI 4000 K emitters).

1 Thank

My first attempt at modding was a transplant of a Lume1 driver into my FW3S: here.

In a second session, I added AUX to the FW3S: here.

Having learned how to do that, I repeated the procedure with a grey, aluminium FW3A: here.

I was quite happy with the two lights, but not completely. On both lights, the green AUX being too bright was bothering me. On both, but especially on the aluminium FW3A, the AUX wiring was a bit of a mess. Not visible, but I knew about it, so it bothered me.

So this weekend, I decided to fix things. Firstly, I wanted to try the resistor shuffle on the lume AUX boards and secondly, I wanted to redo the AUX board wiring.

While I was at it, and dismantling everything anyway, I decided to take the opportunity to reflow 4500K dedomed 519As for the stainless steel light (my favourites and the same emitters I had put in the aluminium FW3A).

After completing the stainless steel light, but before starting on the aluminium one, the improvement from the AUX board resistor swap is obvious.

Here are the two lights with AUX set to yellow (shuffled resistors in the FW3S on the right):

Here is the comparison with cyan (shuffled resistors in the FW3S on the right):

Finally, here’s the comparison with white - i.e. R, G, and B on simultaneously (shuffled resistors in the FW3S on the right):

After that, I went ahead with the resistor shuffle on the AUX board in the aluminium FW3A and also the remaining AUX boards I have waiting for installation in future mods.

I am now happy with both lights…

…including the soldering:

8 Thanks

As I was on a bit of a roll, I also decided to attempt something new and upgrade a 1+7+FET driver with Anduril2 and an AUX channel. I’d been working on the firmware part already: here.

The software side was ready (as far as possible without having tested it), so now the hardware part also needed doing. A black aluminium FW3A (not an FW3X) had arrived during the week, so I decided this would be the light to mod.

The mod turned out to be less difficult than I’d thought. The 1+7+FET driver flashing was straightforward, following the instructions here. The driver mod for AUX was also easier than I’d expected, following this.

I used an RGB lume AUX board, wiring the single AUX channel across both green and blue to have cyan AUX on the light:

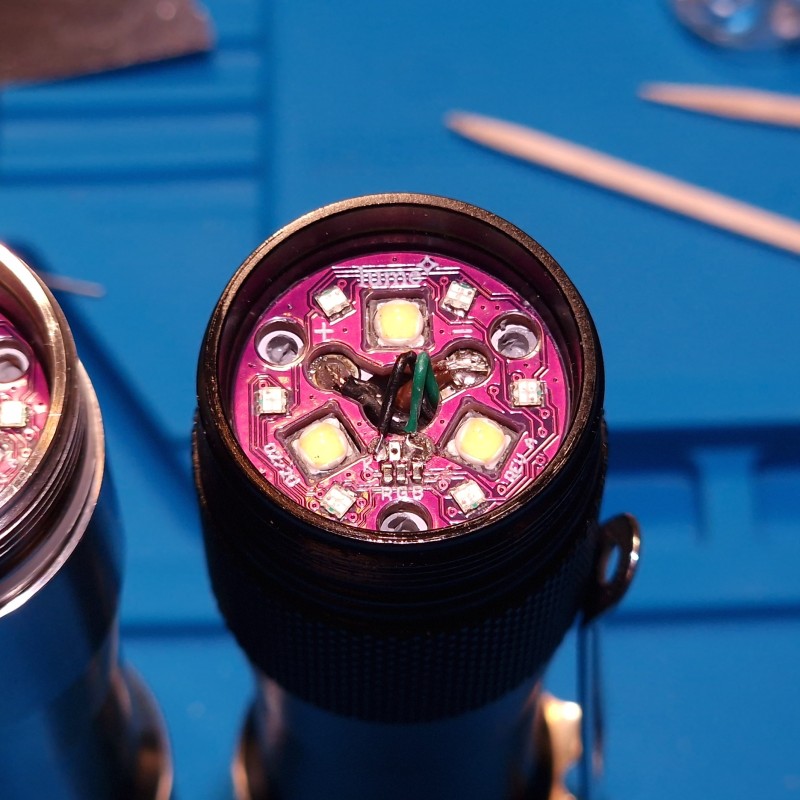
After flashing, putting the driver in and wiring up the AUX board, the moment of truth arrived to see if my custom Anduril 2 build would work.

Success!

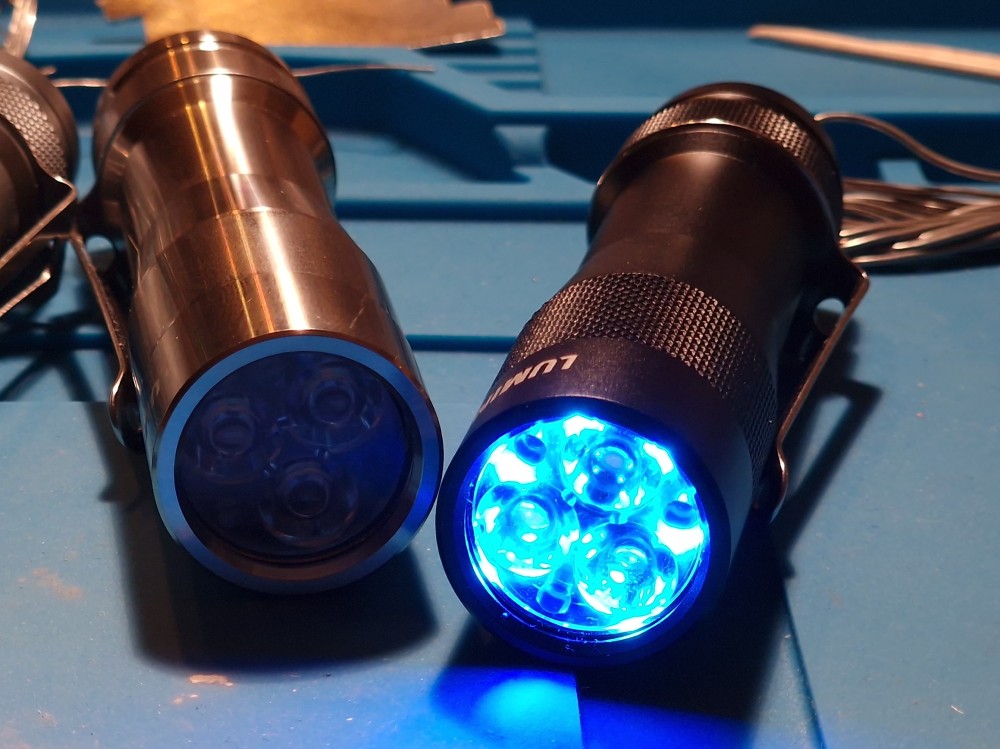
On this one, the cyan colour is much brighter than the cyan on the lume1 lights. I suppose the resistors (after shuffling around) are set up for the lume1 driver. With the 1+7+FET driver, the AUX is much brighter, so I may have to try some different resistors at some point. Here they are side-by-side:

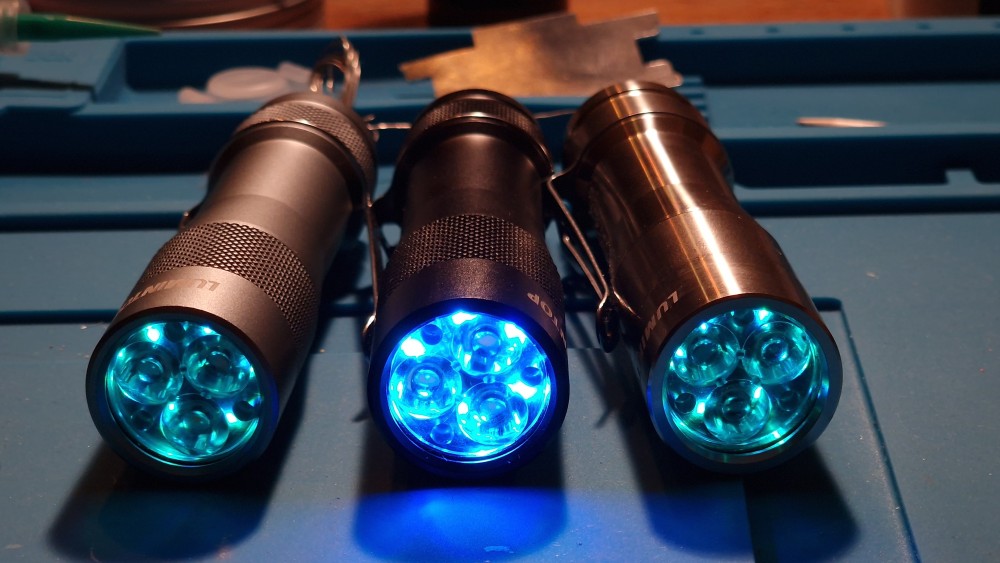
If anybody could recommend resistor values for the blue and green to bring the brightness down to a similar level as with the lume1 drivers, then that would be appreciated.

4 Thanks

Thanks for the info. I got this one from Amazon some years ago. It’s the brand ‘Slonik’ and basically clones of D10s, but a bit higher quality? It came with an xp-g2 led not the typical xm-l2 clone. Anyway it doesn’t seem like its following the exact same pattern as the others. There’s a white plastic holder between the battery and driver and another on the cap with the switch boot. I don’t really want to go grinding away on it sonce it would be hard to get things to line up good and there’s not much room before you get into the battery tube. I’ll buy another one from Boruit in AE with the USB C. Which one did you get? I added this one to my cart D10
I’d like to get the same ine so I can mod it since i have the parts.

I’ve never heard of a H10?

For my PD40 1st gen, adapter 26650 to 21700 for avoiding noise while using the light with 21700 :smiley:

The color is intentionally white so that the tube can be quickly identified by the contrast even in dark surroundings and to make it easier to change the battery without losing the adapter. The grooves at each end make it easier to remove the battery tube with a fingernail.

4 Thanks

This one is the one in my photos.

1 Thank

Made me a 16P holder for 21700 charging — With this I can get 16 cells to the same state of charge before discharging in 4 Opus — I’ve used a common inline MAH meter to come up with a correction factor for each Opus slot – I finally feel like I’m getting some accurate test results ( my packs reflect this / stay in balance)


2 Thanks

:+1: May I ask what the 16P packs are powering?

I’m just using the 16P holder to batch charge to all the same state of charge – I try to take out as many variables when testing individual cells – every charger stops a slightly different state — every discharger reads different-- one of my Opus correction on the same charger varies from .985 to 1.016 while another is much closer to itself (if it was the only one I used )

Watch out when paralleling cells - if they are not at the exact same state of charge before connecting them in parallel already, you get (very) high currents between cells.

1 Thank

That’s some good advise ---- Fortunately I have plenty of experience with cells — Just this week testing and grading 200 / VTC6As

3 Thanks

Oh, I did not know - sorry for telling you things you were already aware of!

Typical mod, nothing unusual with this 1.2mm sliced 5000K 519A triple. :slightly_smiling_face:

But wanted to show what I did with the “universal” clip in order to match it to the stonewashed Ti S2+.

First I removed the black paint. I tried various thinners, but it didn’t do much. So I used sandpaper to remove most of it, but that also made the stainless steel shiny.

So I put it in a rock tumbler for several days, which also removed some more of the black paint.

It turned into a nice matte gray. I think it matches very nicely with the stonewashed Ti. The original black would’ve been fine too, but I like how this looks better.

4 Thanks

I used a SS wire wheel on my dremel to remove the black paint from the clip, after multiple thinners failed.

I’ll post a picture when I find a good one.

2 Thanks

That looks great. Nice idea with the rock tumbler. I’ve thought about getting one of those for my kiddos but it never occurred to me I could tumble parts like that.

Edit: did you tumble it with sand, gravel, etc. or just the clip by itself?

I used some small gravel from under the deck, along with sand and water at first. Then just used the gravel in order to make it more matte.

It’s actually my son’s tumbler. He’s really into rocks!!!

3 Thanks