Yeah, I’ve done that before. In fact, that’s what gave me the idea for using this wall-wart to do the same thing. My NimH charger didn’t have slots big enough to stick a 18650 into, so I had to cobble something together with wires and magnets to make it work. This, I just held in my hand, holding the bare leads to each end of the cell. If it hadn’t jumped up in voltage so quickly doing that, I wouldn’t have bothered with them any further. But, to go from 0.26v up to 2.5v in less than a minute made me think it might be worth trying to get a real charge into it, especially since they are supposed to be new, never used. I still have yet to get a full charge, though. I put them back into my charger last night for a few hours, but again had to pull them before finishing, because I’m not going to leave them charging overnight at this point. After last night’s charge, they measured around 4.0v each. I wish I had a hobby charger to test capacity and run-time.
All the 18650 cells I have are pulls from DEAD laptop batteries. The highest any of them tested when I pulled them was around 4.0v, IIRC. But, a lot of them tested below 3v, and some tested below one volt. I even had a really old pack in which none of the cells tested above 0.9v, and I was able to get a charge into most of them. Did I happen to mention I’m partially insane? When I was a kid, my favorite things to play with were the dangerous things. I liked fire, electricity, strong chemicals, and sharp knives. I’m only a little less crazy these days. J) But, let me reiterate that I thought these cells would be NEW and that’s the only reason I bought them. I can’t return them, because I tore the pack apart, so I’m trying to see if there is any hope for them.
I bought a ‘New’ generic laptop pack off eBay and it was completely dead. All 6 (unbranded) cells were reading 0.4v or less. Luckily the seller gave me a full refund without question. Just as well as I had already ripped the pack apart.
As I had nothing to lose I s l o w l y got them up to 3v using the NiMH setting on my hobby charger, then a normal LiPo charge at 0.5A. All 6 got to 4.2V without getting even warm and all have been working fine in low-amp lights ever since. Capacity is about 60-70% what it should be but as they were free and I have 6 to play with, I’m happy.
Do you know if there’s some place that I can check
to find out the actual Brand name and mah info of
any batteries based on the numbers & symbols that
are printed on them , when no Brand name is ?
Correct this if it is not right but in considering testing/charging laptop pulls in order to get an idea if they are safe or not it would be good to
1) Check if the battery has about 2.5V minimum first. If under 2.5V-toss into the recycle bin.
2) Attempt charging and check the temperature while charging so it does not get too hot. If too hot take off charge and toss into recycle bin (after it cools down).
3) Take out of the charger after at least three hours and measure voltage having let the battery sit about two hours to see if it has retained at least 4.1V. If the voltage has dropped under 3.9 V then toss into recycle bin.
This is considering one does not yet have a charger/tester that can measure internal resistance or capacity (mAh). Later when a charger/tester is obtained that can measure internal resistance and capacity how and where in this example would these fit in?
Also if the new capacity in mAh is not available what should be done?
Does this about sum it up safety-wise?
One other thing is that the flashlight to be used if the batteries turn out all right is a single 18650 light.
The charger will be some simple 18650 charger with one slot and not digital.
I don’t know where you come up with 3.9v as the cut-off for resting voltage after a charge. 4.1-4.15v is probably more like it. Anything that has dropped to 3.9V is in really bad shape.
Internal resistance measurements from most chargers aren’t very precise/repeatable, and certainly aren’t easily compared to values using other test equipment and techniques. Once you get something that can give you a reading, you should keep track of the results you get and compare it to other results you get, like discharge testing to get a sense of good and bad. Also, for most lithium ion cells the internal resistance is supposed to be pretty consistent over the useful life of the cell, so its not a great fine-grained indicator of cell health.
As for discharge testing results, thats sort of up to you. A cell with less than 70% original rated capacity may not have much useful life left in it, but it may be fine for your purposes. I’ve put a few of them in cheap USB power bank cases and use them to power little USB LED lights.
One thing that I’ve found useful is to use an Arduino + the PackProbe sketch I wrote to dump the data out of laptop packs before I decide tear into them. Once you have it set up, it takes less than 5 minutes to use PackProbe to get manufacture date and cycle count, and often, the voltage of each bank of cells, which can be useful information before deciding to rip apart a pack and subject the cells to more extensive testing. It also adds context to the results of more time-intensive testing.
I don’t recall seeing any, but someone else may chime in.
High voltage cells tend to be focused on capacity, while tool packs tend to use cells optimized for discharge rate. For a given chemistry, cell designers trade discharge rate for capacity by changing the ratio between electrode material, and electrolyte. Moreover, different chemistries lend themselves to one application or another, and the cells used in tool packs tend to use a different chemistry than high capacity cells. I’m not sure, but the specific chemistry may also influence whether high-voltage is a viable technique for increasing capacity, but even if it is, it comes at the expense of durability.
Panasonic and now LG have lithium nickel cobalt aluminum oxide cells that deliver high capacity and moderate discharge rates (~10A) but I think they all have 4.2v charge termination.
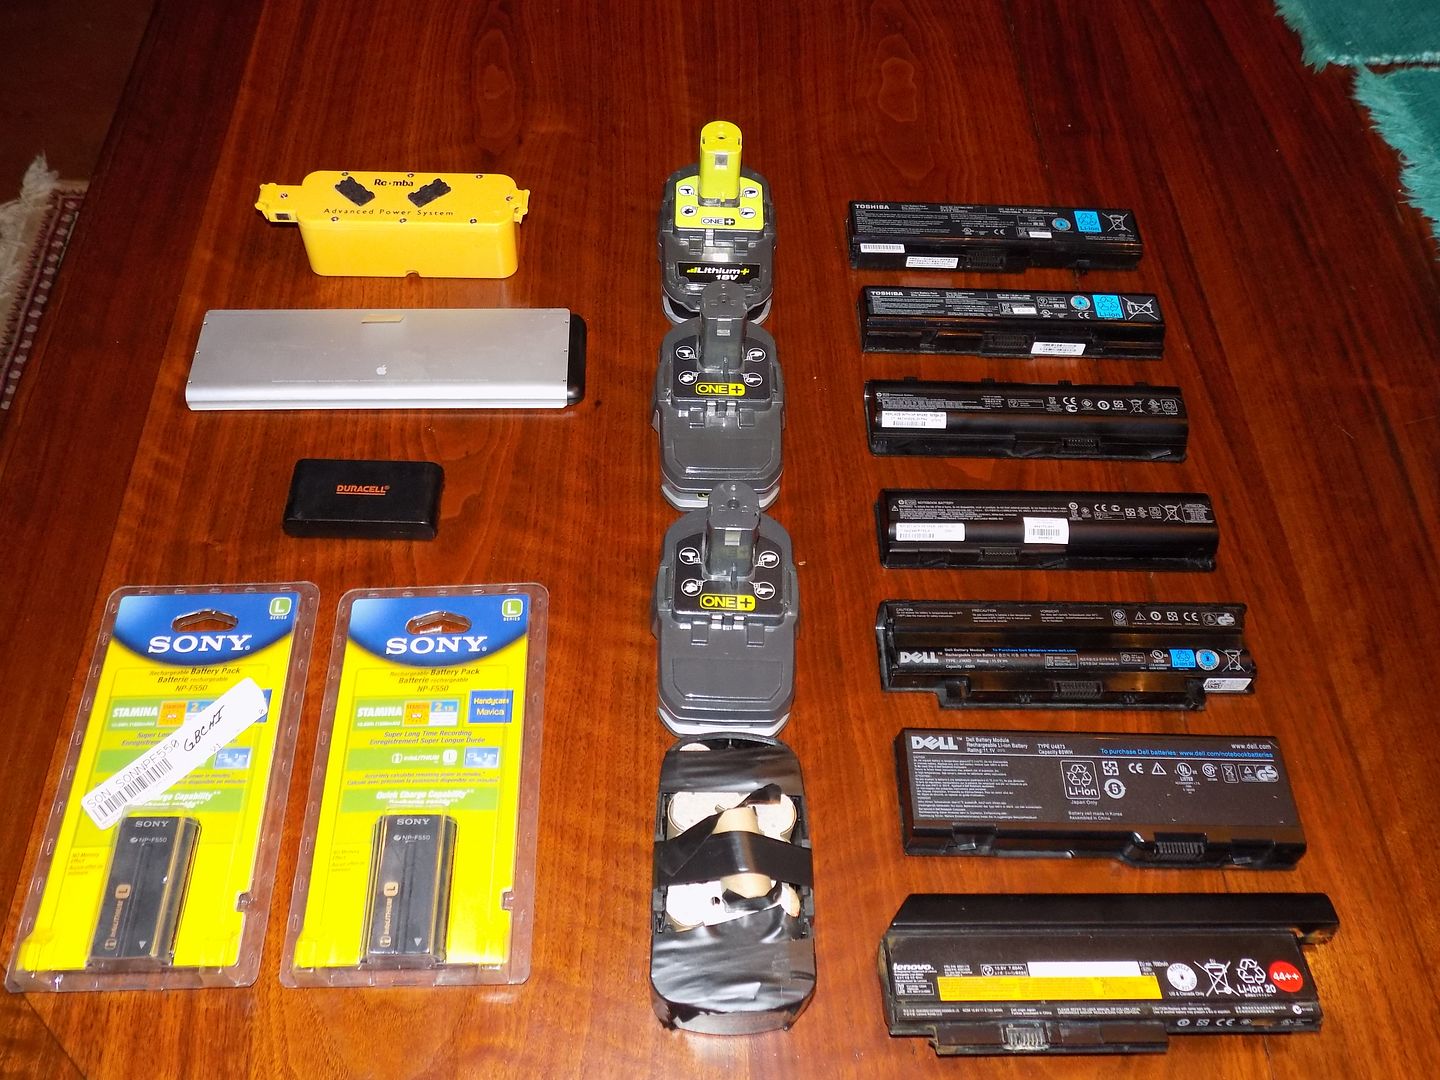
I scored at the Best Buy today…16 different battery packs, including a few non-laptop packs, which have non-tamper screws on them. What type of tool do y’all use to remove them??? I’ll update this post as I tear them apart. Here is what I have:
1 x Roomba 14.4V Ni-MH
1 x Apple 10.8V Li-ion Polymer Mac Book Pro M/N A1281
1 x Duracell 6V Ni-MH DR10 camera battery
2 x Sony 7.2V Li-ion L Series Infolithium NP-F550 for Mavica HandyCam
2 x Ryobi 18V LI-ION drill battery P103
1 x Ryobi 18V LI-ION drill battery P107
1 x Craftsman 18V Ni-Cad drill battery 130260001(This one will probably go back in the bin)
1 x Toshiba 10.8V Li-ion battery pack PA3780U-1BRS
1 x Toshiba 10.8V Li-ion battery pack PA3534U-1BRS
1 x HP 10.8V Li-ion battery pack MU06 (593554-001 replacement no.)
1 x HP 10.8V Li-ion battery pack EV06 (474170-001 replacement no.)
1 x Dell 11.1V Li-ion battery pack Type J1KND
1 x Dell 11.1V Li-ion battery pack Type U4873
1 x Lenovo 10.8V Li-ion FRU P/N 45N1175 ASM P/N 45N1026
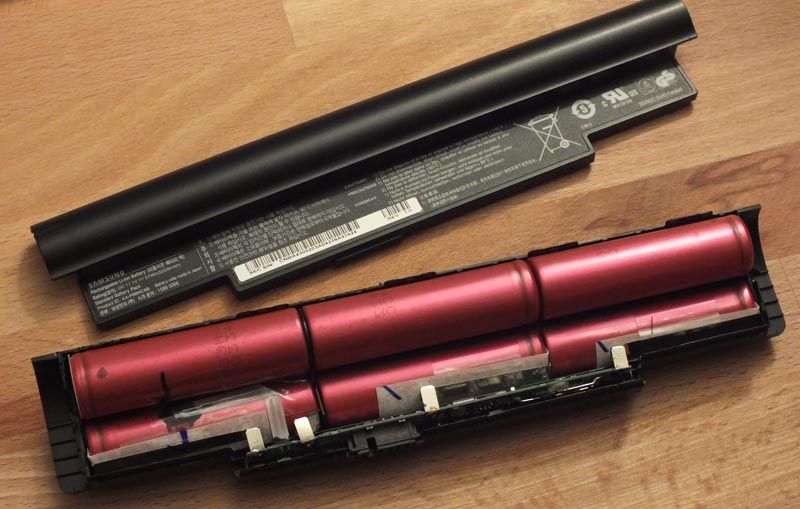
I expected something along the lines of Samsung 26F or so.
But inside were Sanyo UR18650FM N30B, stating so, embossed and as always barely readable, on the translucent red wrapper.
Never saw this translucent wrapper on a Sanyo cell before, but the ring on the plus side is light blue as usual. In addition I’m pretty sure the battery I opened is genuine Samsung. I have 2 NC10 which I had bought new at the time and their batteries are identical to this one, which I had sourced from eBay. Opening was difficult, to say the least. I had to crack the casing but the real pain was the glue-tape inside, which was sticking terribly to everything it was attached. I had to rewrap the cells as some of the wrapping did not survive the disassembly.
The cells were down to 2.4V - 2.6V. I carefully charged them, temperature was not rising. As they held 4.2V pretty good for a day, I made several cycles with low charge and discharge current. They sat for a week and went from 4.21V to 4.18V. That convinced me to use them.
Capacity is between 2200 and 2300 mAh. That’s pretty cool for cells this age (N30B means 2009, week 30). But that’s only for lower current. At 3A voltage sag seems to be higher than it usually already is with these LiCo cells.
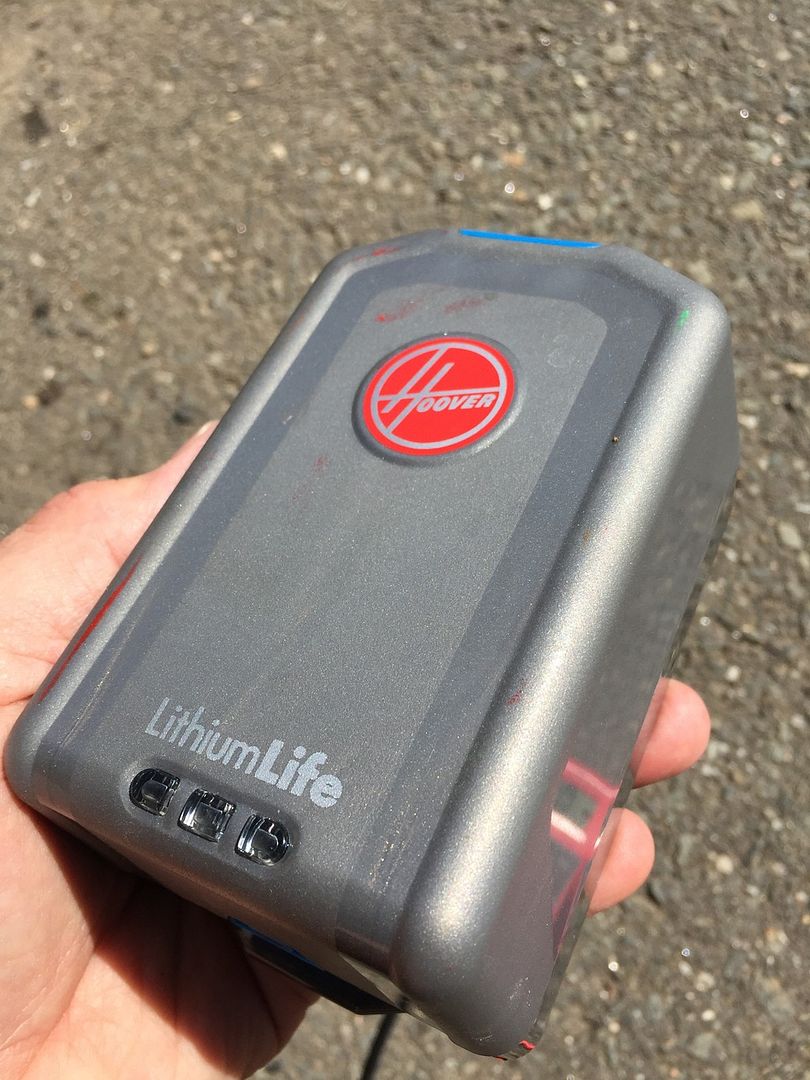
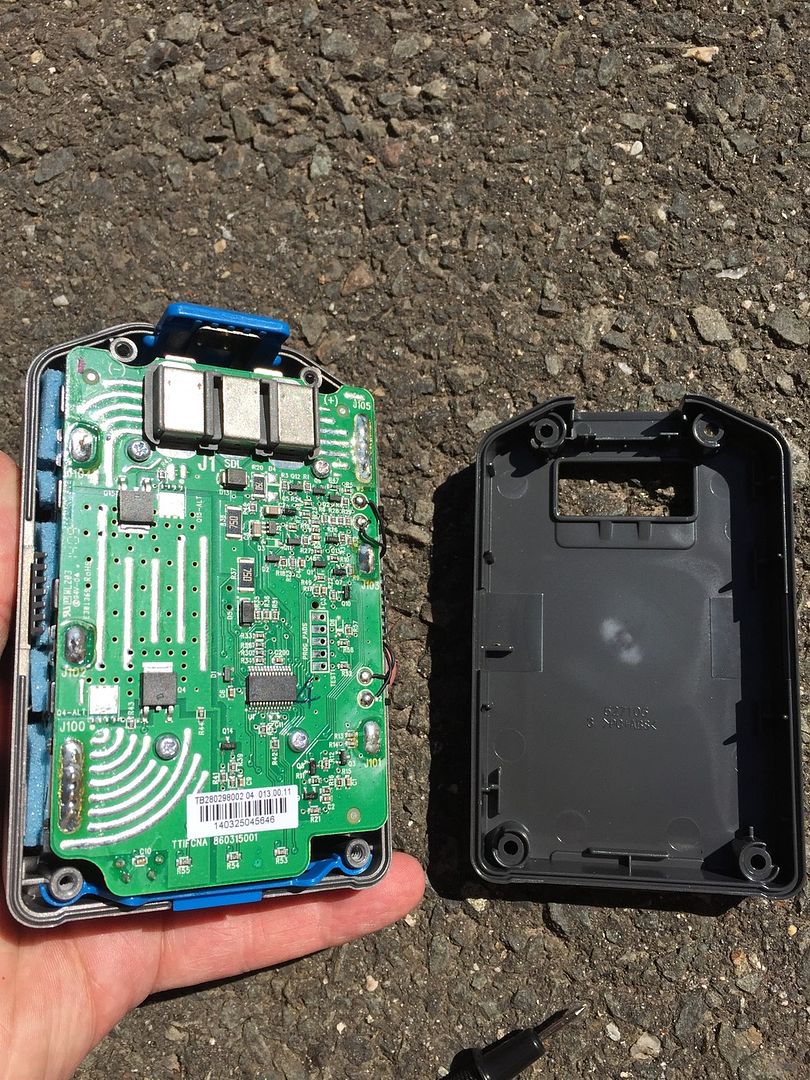
I found this battery pack in the recycle bin yesterday. It seems to be for some sort of portable Hoover vacuum. It was strange to see the old-fashioned Hoover logo on a modern battery pack. It had to be modern, it says Lithiium Life”.
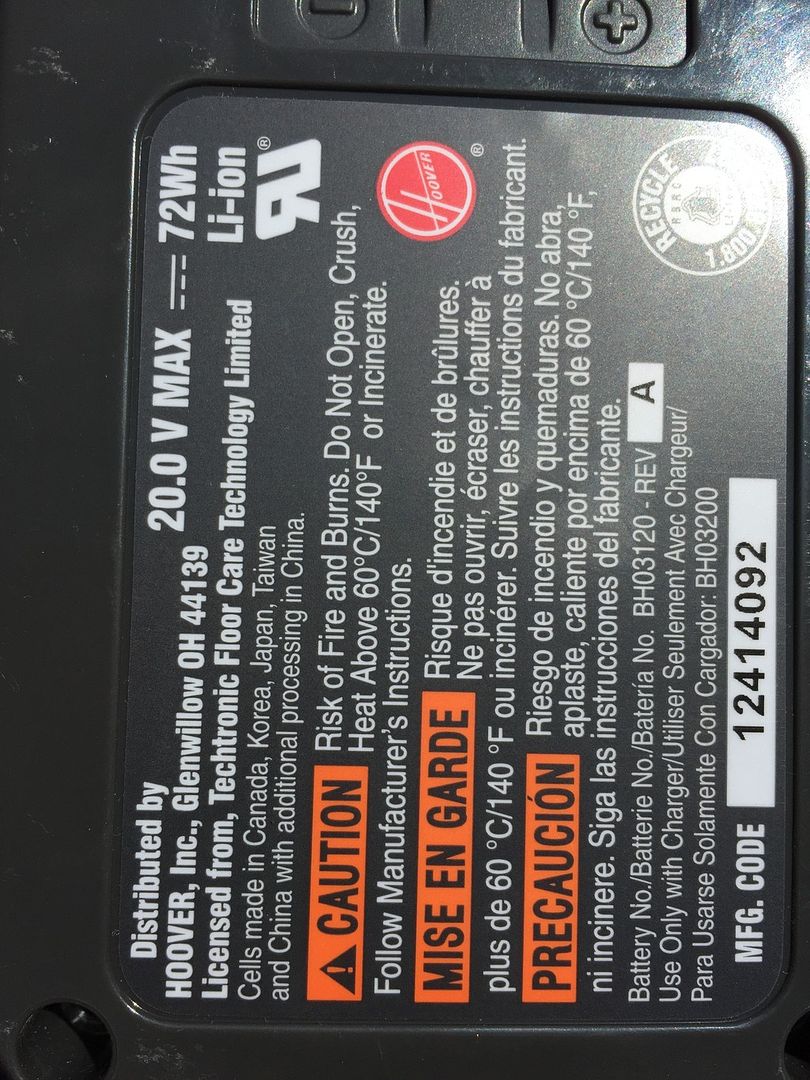
Checking the back of the pack, it claims “20.0V MAX and 72Wh”
The 20V max probably means that it contains 5 cells in series. Most tool packs would call this an 18V pack, although some companies would call it a 20V pack, for example DeWalt.
But a rating of 72Wh means that this pack is rated at 4Ah and multiplying that by the “standard” rating of 18V for this type of pack would give the 72Wh rating. Can’t wait to see what’s inside!
There is a sophisticated BMS board with controller chip and 2 FET’s. I presume 1 FET acts as a switch to shut the pack down when any cell reaches 4.2V during charging, and the other FET acts to switch the pack down when any cell discharges to less than around 2.75V.
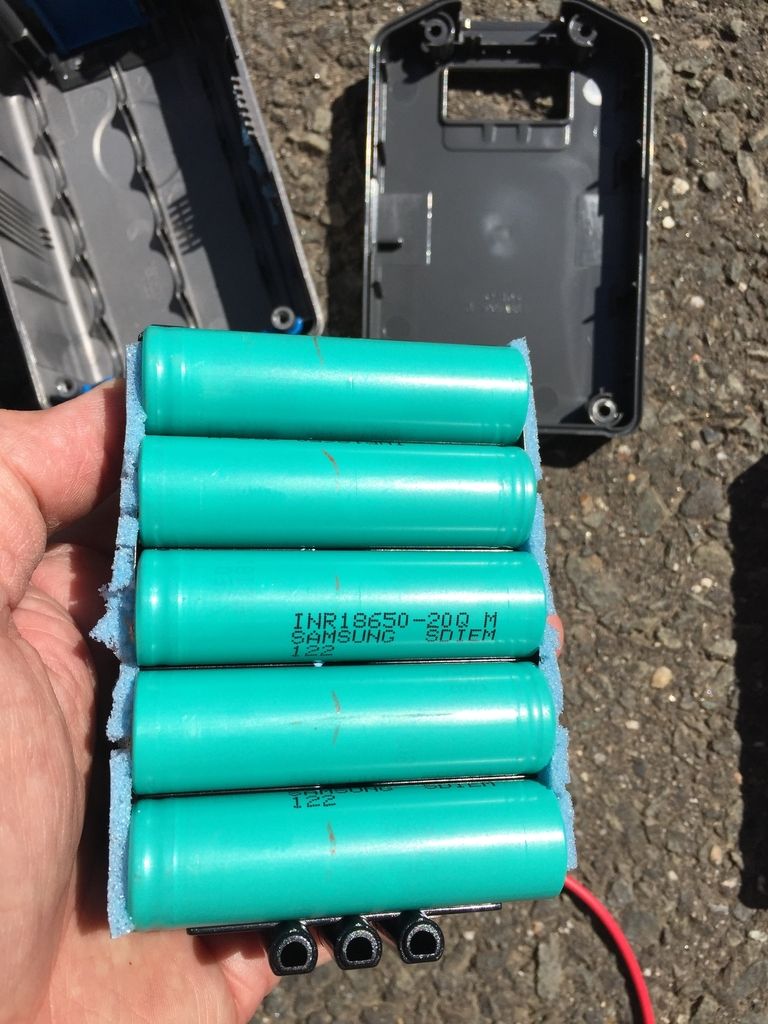
Now to see what the cells are!
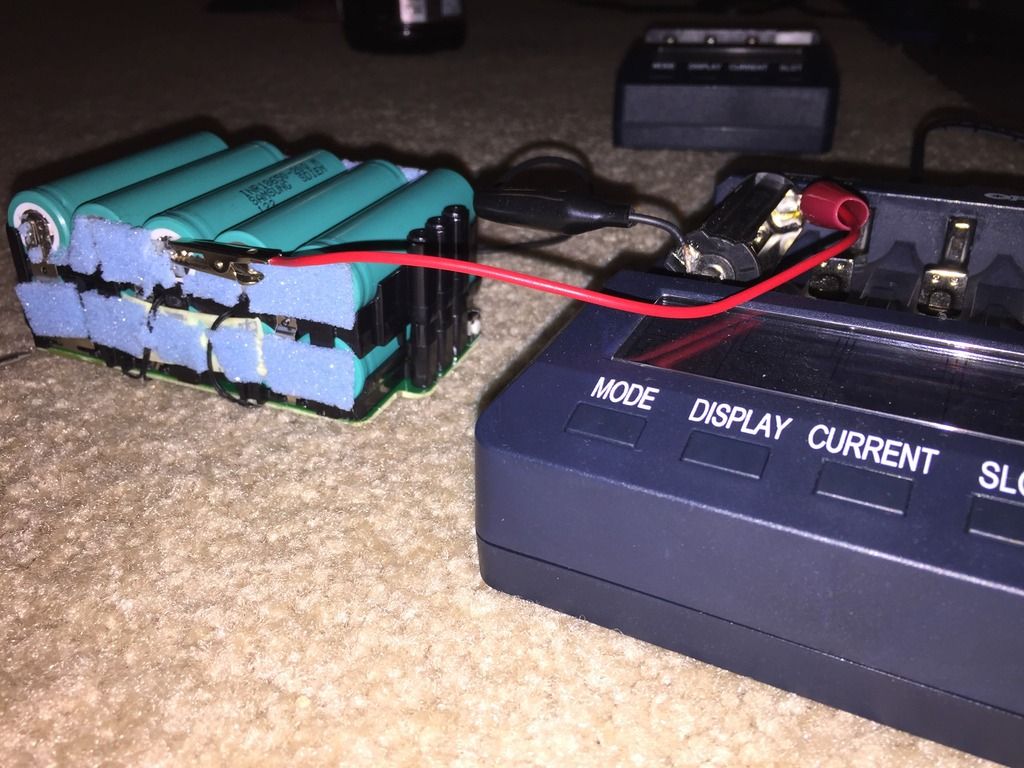
There they are, this pack contains 10 - Samsung 20Q (20R), 2Ah cells (2000 mAh)! All cells were sitting at around 2.4V when I measured them. First thing I did was trickle charge them all up to 3.0V, It only took a about 10 seconds (a good sign). Now I am in the process of individually charging them up with my OPUS. Each cell-pair (5S2P configuration) so far has soaked up 4000mAh of charge (another good sign). I will report the final results later
I think this pack was a VERY good find, as it likely will yield 10 good Samsung 2000mAh IMR’s
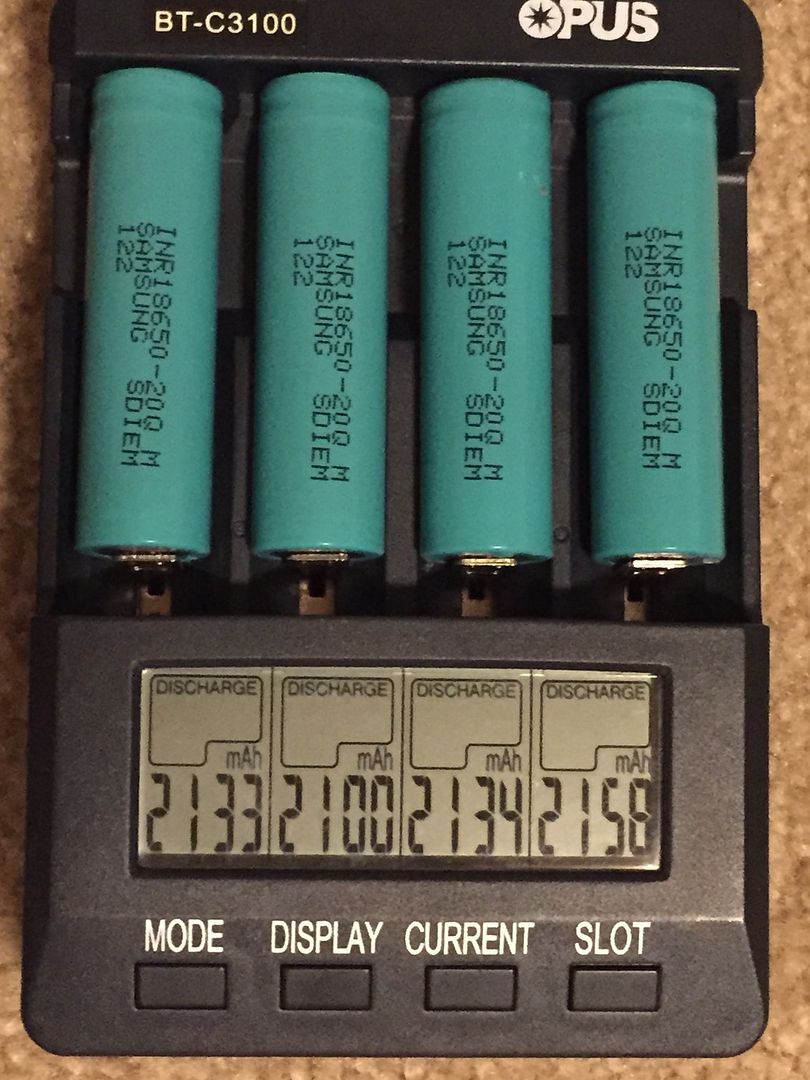
EDIT: May 7, 2015
Turns out this IS a very good find. All 10 cells discharge to over 2100mAh. Most likely the reason this pack was tossed in the first place was because the included BMS board was bad. Even though the cells are good, the pack could not output through the board.
Samsung IMR 20Q’s are rated at 2000mAh, all of these cells test out at slightly over that. So all 10 cells are in “like new” condition.