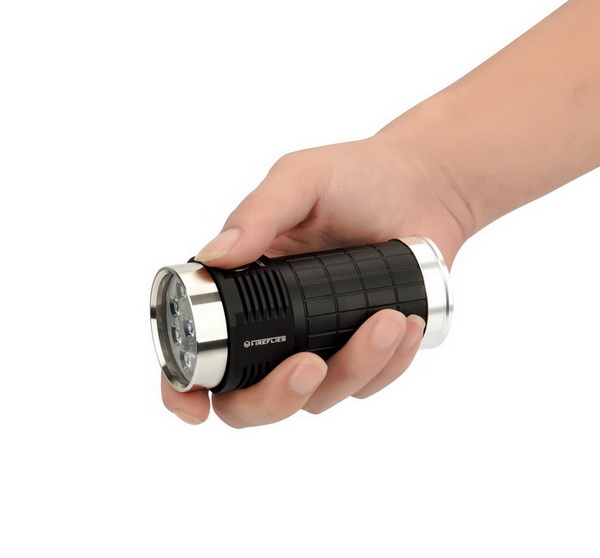
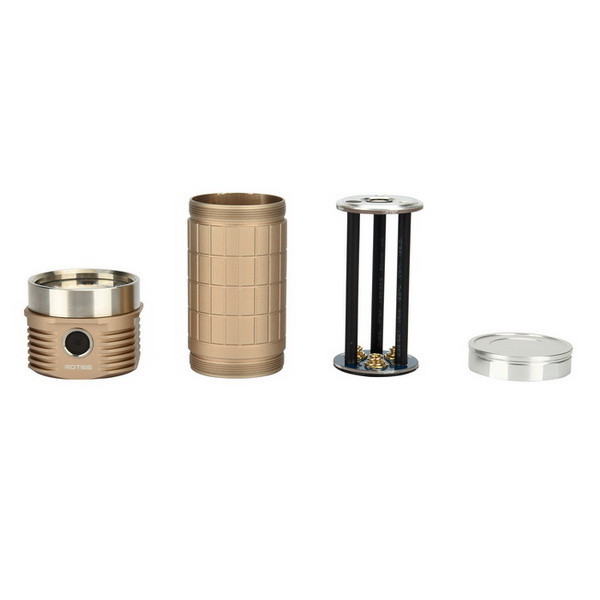
One more question: can I open the switch bezel to get access to the switch board without scratching it?
The switch bezel looks to have the little notches on the inside edge. So it looks like it’s threaded. Whether or not you can unscrew it without scratching it depends on your snap ring pliers and your skill.
As far as it being glued as well, maybe someone can tell us.
—
Texas Ace Lumen Tube and JoshK Sphere calibrated with Maukka lights
I’ve got a light with what may be a press fit bezel. I was thinking of sliding a dull razor blade under the edge to try and lift it. It may scratch the finish, so I haven’t tried yet.
—
Texas Ace Lumen Tube and JoshK Sphere calibrated with Maukka lights
The black ROT66 has a black switch bezel though, painted, I guess. Probably more chances to scratch that one. I’ll try to print some plastic tool for removal when necessary.
Or I simply might remove the paint from the bezel, if scratched.
Driver’s bezel fixed by some glued.
You can disassemble the MCPCB first.
Then use the Needle-nose pliers to open.
Will leave some scratches on bezel.
Thanks!
Just to check if I understand correctly:
1.) The lens bezel is screwed without glue?
If yes I would still like to see a statement of Fireflies if this remains true also with the production units.We have seen problems with glued bezels on later production units with other lights in the past.
2.) The driver board is retained by a screwed and glued ring?
But why do I have to disassemble the MCPCB first?
Would you mind to remove the driver boards retaining ring once more and make a picture of the board only (board can stay in place)? And what’s the inner diameter of the driver boards retaining ring? I intend to design my own board and would like to know if I can place the vias for a programming interface between spring and retaining ring.
Thanks again, Steel!
10.8 mm is narrow, might fit with a small spring, but I guess I can widen the inner diameter by 1 or 2 mm. The opening of the insulation ring has to be widened anyway.
I think I can start designing this board now. But there is also our first 3d printer waiting for launch, and the kids are pushing …
How is the beam profile compared to the Astrolux MF01 Maukka? Is it a nice broad hotspot where all the lumens concentrated in that hotspot with minimal spill? Or is it slightly different?
Also when you do the review can you tell us what the highest fully regulated output is and if the light gets hot at all on it?
I’ll take beamshots comparing it to the MF01 for sure. Highest fully regulated output would be the 7×7135 level, which should be somewhere around 500-600 lumens. However, you would have to switch to the mode groups from the ramping UI to reliably select that level. I ramped the light to ~600 lumens and I’ve been running it for over an hour and it is regulated.
The original driver designed by Lexel had much more of the 7135s, I wonder why Fireflies decided to use less of them? My guess was either to cut costs or they thought it wasn’t necessary to have the higher regulated output levels because the host couldn’t take the heat.
Can’t wait to see beamshots!
The ramping table is the same on both, on the Nichia they decided to use less AMCs total number after their tests
the XPL HI should be fully equipped
Thank you for confirming for us! Looking forward to your review! Good to know that the CCT is 4200k to 4300k. I was afraid the ultra low duv might make it overly magenta but lower CCT should make it more rosy than magenta. I might still get one to swap in 4000k 9080 though in the future.
BTW, how did you get it so early? Did you buy it or did they send you one for a review?
maukka wrote:
ROT66 received. SW45K R9080 confirmed, very pretty beam confirmed. Review coming up hopefully early next week.
Maukka, you have good and similar Flashlights for comparison. But I think the Manker MK 34 would be the next similar Flashlight, not the next to the ROT but next to all the Flashlights on your picture.
The MK34 was such a disappointment that I sold it.
My ROT66 encountered some waterproof problem so I returned it to Fireflies for a replacement. The O-ring right between the lens and the SS bezel seems slightly too small and thus not really waterproof.
Just noticed that on my ROT66, the lens O-ring is different from that on maukka’s (translucent vs. red).
I’ll take beamshots comparing it to the MF01 for sure. Highest fully regulated output would be the 7×7135 level, which should be somewhere around 500-600 lumens. However, you would have to switch to the mode groups from the ramping UI to reliably select that level. I ramped the light to ~600 lumens and I’ve been running it for over an hour and it is regulated.
Wow, on my ROT66, after Turbo (ramping) is activated, the default thermal step-down will kick-in in ~30 seconds (down to ~1500 lumens). And then within 1 minute it will step-down again to ~700 lumens and keep this output regulated. Maybe my reading is on the higher side?
You can configure the step down tenperature in the BarsilUI
Of course, but IMHO its default setting is good enough (short Turbo though). The max temperature around the side switch is ~45°C, which is fairly good. And after stepping down to the highest regulated brightness level, the max temperature is ~43°C after two hours.
Just FYI, the default mode set group (4) with (moon) – 0.25 – 3 – 33 – full FET have both the 1×7135 and 7×7135 selectable. They are the middle modes 3 and 33. Makes testing the runtimes and efficiency easier since theyre’s no way to activate those in ramping mode. No default 1×7135 like on the D4.
edit: this is from the Q8 quick manual. On the NarsilM reference manual the modes are called moon – 2 – 10 – 40 – full.
The switch bezel looks to have the little notches on the inside edge. So it looks like it’s threaded. Whether or not you can unscrew it without scratching it depends on your snap ring pliers and your skill.
As far as it being glued as well, maybe someone can tell us.
Texas Ace Lumen Tube and JoshK Sphere calibrated with Maukka lights
Click this to go to signature links. I'm still around, just not reading many new threads.
BLF Q8 Janus --- Emisar D4 RGBW --- Green Lantern and HAL 9000
6th Annual Light Contest Entry --- 7th Annual Light Contest Entry
We were refering to the side bezel around the switch.
Wait, you are the one who asked about the side switch bezel.
On the Q8:
From etex
Texas Ace Lumen Tube and JoshK Sphere calibrated with Maukka lights
Click this to go to signature links. I'm still around, just not reading many new threads.
Switch bezel, No notches, not easy to open
Looks like interference fit
Driver’s bezel fixed by some glued.
You can disassemble the MCPCB first.
Then use the Needle-nose pliers to open.
Will leave some scratches on bezel.
Sorry for my poor english.
Well that is great. I guess I was seeing little shadows on the ring that looked like notches.
So what do you do if the switch goes bad? Throw the light away?
Maybe with the driver out, the switch bezel can be pushed from the inside?
Texas Ace Lumen Tube and JoshK Sphere calibrated with Maukka lights
Click this to go to signature links. I'm still around, just not reading many new threads.
No, can not pushed from the inside too. Very small hole.
I will try the leverage……
Sorry for my poor english.
I’ve got a light with what may be a press fit bezel. I was thinking of sliding a dull razor blade under the edge to try and lift it. It may scratch the finish, so I haven’t tried yet.
Texas Ace Lumen Tube and JoshK Sphere calibrated with Maukka lights
Click this to go to signature links. I'm still around, just not reading many new threads.
Leverage principle, not difficult, but be careful
Will not hurt the rubber press, bezel
Sorry for my poor english.
Thanks.
Texas Ace Lumen Tube and JoshK Sphere calibrated with Maukka lights
Click this to go to signature links. I'm still around, just not reading many new threads.
Same principle as Emisar D4.
The black ROT66 has a black switch bezel though, painted, I guess. Probably more chances to scratch that one. I’ll try to print some plastic tool for removal when necessary.
Or I simply might remove the paint from the bezel, if scratched.
BLF Q8 Janus --- Emisar D4 RGBW --- Green Lantern and HAL 9000
6th Annual Light Contest Entry --- 7th Annual Light Contest Entry
Just to check if I understand correctly:
1.) The lens bezel is screwed without glue?
If yes I would still like to see a statement of Fireflies if this remains true also with the production units.We have seen problems with glued bezels on later production units with other lights in the past.
2.) The driver board is retained by a screwed and glued ring?
But why do I have to disassemble the MCPCB first?
Would you mind to remove the driver boards retaining ring once more and make a picture of the board only (board can stay in place)? And what’s the inner diameter of the driver boards retaining ring? I intend to design my own board and would like to know if I can place the vias for a programming interface between spring and retaining ring.
BLF Q8 Janus --- Emisar D4 RGBW --- Green Lantern and HAL 9000
6th Annual Light Contest Entry --- 7th Annual Light Contest Entry
1.) Mine is not glue on the lens bezel.
2.) Yes
The wires connecting to the MCPCB are very short.
The inner diameter of the driver boards retaining ring is:10.8mm
Here put a black plastic insulation ring
I re-solder the (+)spring so I removed it
Sorry for my poor english.
Thanks again, Steel!
10.8 mm is narrow, might fit with a small spring, but I guess I can widen the inner diameter by 1 or 2 mm. The opening of the insulation ring has to be widened anyway.
I think I can start designing this board now. But there is also our first 3d printer waiting for launch, and the kids are pushing …
BLF Q8 Janus --- Emisar D4 RGBW --- Green Lantern and HAL 9000
6th Annual Light Contest Entry --- 7th Annual Light Contest Entry
ROT66 received. SW45K R9080 confirmed, very pretty beam confirmed. Review coming up hopefully early next week.
Nice!
How is the beam profile compared to the Astrolux MF01 Maukka? Is it a nice broad hotspot where all the lumens concentrated in that hotspot with minimal spill? Or is it slightly different?
Also when you do the review can you tell us what the highest fully regulated output is and if the light gets hot at all on it?
I’ll take beamshots comparing it to the MF01 for sure. Highest fully regulated output would be the 7×7135 level, which should be somewhere around 500-600 lumens. However, you would have to switch to the mode groups from the ramping UI to reliably select that level. I ramped the light to ~600 lumens and I’ve been running it for over an hour and it is regulated.
The original driver designed by Lexel had much more of the 7135s, I wonder why Fireflies decided to use less of them? My guess was either to cut costs or they thought it wasn’t necessary to have the higher regulated output levels because the host couldn’t take the heat.
Can’t wait to see beamshots!
The ramping table is the same on both, on the Nichia they decided to use less AMCs total number after their tests
the XPL HI should be fully equipped
[Reviews] Miboxer C4-12, C2-4k+6k, C2, C4 / Astrolux K1, MF01, MF02, S42, K01, TI3A / BLF Q8 / Kalrus G35, XT11GT / Nitefox UT20 / Niwalker BK-FA30S / Sofirn SF36, SP35 / Imalent DM21TW / Wuben I333 / Ravemen PR1200 / CL06 lantern / Xanes headlamp
[Mods] Skilhunt H03 short / Klarus XT11GT, XT12GTS / Zebralight SC50+ / Imalent DM21TW / colorful anodisation
[Sale]
Drivers: overview of sizes and types
DD+AMC based drivers Anduril or Bistro OTSM 12-24mm, S42, 24-30mm L6, Q8, MF01(S), MT03, TN42
Anduril or Bistro 8A buck driver for 20-30mm, MF01/02/04, TN40/42, Lumintop GT, MT09R
UVC and UVC+UVA drivers
programming key
Remote switch tail DD board with FET
Aux boards:
Emisar D1, D1S, D4, D4S, D18, Lumintop FW3A, Fireflies ROT66, Astrolux MF01, Tail boards like S2+
Thank you for confirming for us! Looking forward to your review! Good to know that the CCT is 4200k to 4300k. I was afraid the ultra low duv might make it overly magenta but lower CCT should make it more rosy than magenta. I might still get one to swap in 4000k 9080 though in the future.
BTW, how did you get it so early? Did you buy it or did they send you one for a review?
Maukka, you have good and similar Flashlights for comparison. But I think the Manker MK 34 would be the next similar Flashlight, not the next to the ROT but next to all the Flashlights on your picture.
The MK34 was such a disappointment that I sold it.
My ROT66 encountered some waterproof problem so I returned it to Fireflies for a replacement. The O-ring right between the lens and the SS bezel seems slightly too small and thus not really waterproof.
Just noticed that on my ROT66, the lens O-ring is different from that on maukka’s (translucent vs. red).
Wow, on my ROT66, after Turbo (ramping) is activated, the default thermal step-down will kick-in in ~30 seconds (down to ~1500 lumens). And then within 1 minute it will step-down again to ~700 lumens and keep this output regulated. Maybe my reading is on the higher side?
You can configure the step down tenperature in the BarsilUI
[Reviews] Miboxer C4-12, C2-4k+6k, C2, C4 / Astrolux K1, MF01, MF02, S42, K01, TI3A / BLF Q8 / Kalrus G35, XT11GT / Nitefox UT20 / Niwalker BK-FA30S / Sofirn SF36, SP35 / Imalent DM21TW / Wuben I333 / Ravemen PR1200 / CL06 lantern / Xanes headlamp
[Mods] Skilhunt H03 short / Klarus XT11GT, XT12GTS / Zebralight SC50+ / Imalent DM21TW / colorful anodisation
[Sale]
Drivers: overview of sizes and types
DD+AMC based drivers Anduril or Bistro OTSM 12-24mm, S42, 24-30mm L6, Q8, MF01(S), MT03, TN42
Anduril or Bistro 8A buck driver for 20-30mm, MF01/02/04, TN40/42, Lumintop GT, MT09R
UVC and UVC+UVA drivers
programming key
Remote switch tail DD board with FET
Aux boards:
Emisar D1, D1S, D4, D4S, D18, Lumintop FW3A, Fireflies ROT66, Astrolux MF01, Tail boards like S2+
Of course, but IMHO its default setting is good enough (short Turbo though). The max temperature around the side switch is ~45°C, which is fairly good. And after stepping down to the highest regulated brightness level, the max temperature is ~43°C after two hours.
Just FYI, the default mode set group (4) with (moon) – 0.25 – 3 – 33 – full FET have both the 1×7135 and 7×7135 selectable. They are the middle modes 3 and 33. Makes testing the runtimes and efficiency easier since theyre’s no way to activate those in ramping mode. No default 1×7135 like on the D4.
edit: this is from the Q8 quick manual. On the NarsilM reference manual the modes are called moon – 2 – 10 – 40 – full.
Good mode spacing!
Yeah, the default mode-set is:
Moon (7135 ×1, PWM)
7135 ×1,
20%~10% (PWM)7135 ×1, 100%
7135 ×7, 100%
FET only, 100%
right?
Exactly.
What I don’t particularly like is that changing the batteries resets the light back to ramping mode.
Pages