This might be a stupid question, but are the boost driven D4/D4K/D4Sv2 going to get their own build target or just always be 273 aka DM11-Boost?
Ah, sorry about that. The flashing scripts are still a mess. I’ve been meaning to clean that up, and keep forgetting.
The FW3X uses an external temperature sensor. I added some minor new mechanisms to handle better that when I updated the FW3X code late last year. The MCU’s built-in sensor is definitely easier though.
Anyway, for new lights, I’m recommending avr32dd20 for the MCU. It’s like an attiny1616, but better in pretty much every way. The DAC in particular is nicer, which helps a lot for controlling a regulator. It also has dual voltage capabilities and built-in voltage dividers, to reduce driver component count.
For a digital signal, the exact voltage doesn’t really matter. It’s either on or off. This is the case for a simple FET+1 driver, because both of the power channels are digital. In this case, the MCU can connect VCC directly to BAT+ and measure the battery through VCC.
But sometimes it’s necessary to hold the MCU’s power at a steady voltage. For example, take an original Noctigon KR4. It controls a regulator by outputting PWM through a lowpass filter to generate analog control voltage. The PWM signal is on or off, 100% or 0, where 100% is the MCU’s input voltage… and that digital signal gets lowpass filtered to generate an output voltage somewhere between 0 and VCC.
If the output voltage needs to be constant, the input voltage also needs to be constant. So it uses a voltage regulator on the input.
But then it can’t measure the battery by looking at VCC, because VCC never changes. It needs to connect a different pin to BAT+ so it can measure voltage there. However, the MCU’s analog measurement peripheral can only measure up to about 1V… so it needs the voltage divided down into that range.
The most common voltage dividers used at the moment effectively divide by 4.3. That lets it measure a full 4.2V li-ion cell, while keeping the gain staging as close as possible to maximum. But for a 2S or 3S or 4S battery, it would need a different divider value.
Yeah. I’m tempted to change 2C because I don’t really like the “re-turbo” function either. But I’m not sure what it ideally should do, or how many people would get mad about changing it. I don’t really use turbo, so I’m not sure what people want it to do.
We’ve got a few factors to account for though…
- memorized level: Whatever brightness the user last ramped to without a shortcut.
- current level: The actual brightness right now.
- target level: The brightness it wants to be at, if it wasn’t overheating.
- ceiling level: The top of the current ramp. May be lower than turbo.
- turbo level: The currently configured maximum. May be at or above the ceiling.
So it can end up in a situation like the following…
- memorized: 50
- target: 150
- ceiling: 130
- turbo: 150
Then the question is what to do on a double click if the current level is 140, or 110. At the moment, 2C would bump it back up to level 150 in both cases. But it could instead drop back to level 50 in one or both cases, maybe. Or maybe 150 and 130, or 50 and 130, or maybe something else?
I’ve been wanting an option somewhere to set a default sunset timer. I’m not sure where to put it, but I really like the idea of having an automatic timer on the main ramp mode and candle mode, if the user has enabled the option for it.
Also, I’ve been thinking about adding a “child mode” where the options are even more limited than usual and it shuts itself off after ~10 minutes.
Sorry, I’m planning to keep smooth steps enabled by default in factory builds. However, I also intend to make personalized builds easier to create and maintain, so people can bake their personal settings in to the firmware.
If you have a single channel D4S with lighted switch and 0135 (emisar-2ch) or 0136 (emisar-2ch-fet) firmware, you should be able to use the new 0137 (emisar-2ch-fet-joined) firmware on it. It should work a little better than the non-joined firmware.
It uses linear ch1 + DD FET by default, which is channel mode 2. If you don’t want the DD FET, enable channel mode 1, switch to it, then disable channel mode 2. That puts it in linear-only mode.
The second linear regulator isn’t connected to any LEDs, so it isn’t used. The firmware sort of supports it, but only far enough to turn it off.
There are no plans to add extra build targets for those. The dm11-boost firmware was originally written for a DM11, but it works fine on several other models too, so it’s simplest to keep it at just one build target for the entire set.
If I knew it was going to be used that way though, I would have given it a more generic name. ![]()
There are some other models which changed over time too… like, it looks like Hank stopped using the original kr4-boost driver and switched to one which is compatible with dm11-boost instead. I only found out about it when I was trying to help some confused users, and got Hank to send me hardware to figure out the problem… only to discover that there was no problem. Hank simply changed the hardware, and it meant using different firmware too.
I can’t really complain though. As a side effect of all that, he sent me a nice new KR4-boost with 219B sw45k + sw35 mixed. It’s a really nice light… great-looking beam and an efficient driver.
I think my D4K-boost (w/ 519A 5700K dedomed) is probably still more practical though. The beam is a little nicer, and the battery lasts longer. Both lights weigh 139 g with battery and clip, but one has a 3000 or 3500 mAh cell while the other has a 5000 or 5500 mAh cell.
4 Thanks
Good stuff TK. I hopefully came of as just asking, not complaining.
I’m excited to see what new builds bring considering what you said about easier user modifications to FW.
1 Thank
Well, was playing around with the code and noticed I can’t compile it in Windows Subsystem for Linux anymore.
I’m not well versed with Linux scripting so any help would be appreciated.
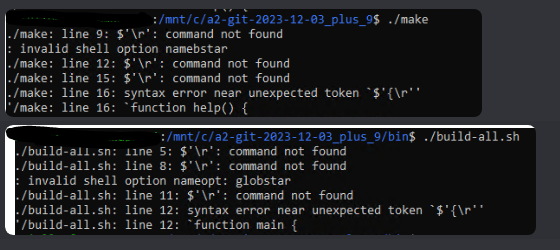
EDIT: Turns out that Github did something with the line breaks when I cloned the repo from windows. Manually downloading and extracting the zip to my WSL instance seems to have worked.
By default git converts the line endings automatically when running under Windows. When those files are then used in WSL, they will cause problems. So better stick to one environment for everything. (The behavior can be changed with the core.autocrlf preference.)
1 Thank
I guess I’m going to be forced one way or another to learn cli git. Oh well, better late than never.
Yes, emisar-2ch is regulated up to 150 on both channels, while emisar-2ch-fet will use the FET from 131-150 on the FET channel.
Yeah, that would be reflashable, both of those channels would be able to take FET.
1 Thank
Hello everybody. What controls the speed of Disco Mode? I would love to make it a bit slower.
(I see RGB_RAINBOW_SPEED, but not like an RGB_DISCO_SPEED ?)
Looks like it’s just based on the MCU’s clock speed. Specifically, the colour gets randomised every time rgb_led_update() is called, which is called every EV_tick (approximately every 16ms) - what I would do is add a variable that counts the number of ticks that have passed, and when it hits a specific threshold, reset the variable and only randomise the aux colour then rather than on every call.
1 Thank
Wasn’t there a delay added to the code a while back that prevented voltage aux from going back and forth when it was on the edge of two “zones”? I have a D4Sv2 I just noticed it on after flashing vanilla A2 12.03.2023 +9 commits
It’s like a Disco for the post off voltage check too
The stability was improved but it wasn’t entirely prevented, which would be more complex in terms of space requirements, so there is still a window it can happen in as voltage measurement will never not fluctuate at all. Just turbo the light for a few seconds if it bothers you.
Ok, thanks. But if I have the k9.3 firmware, no go? Its 0261
Upgrading from k9.3 is fine too, k9.3 is the firmware Hank uses on D4S builds using the dual channel driver with all the LEDs on a single channel for the lighted switch, because it has 100% power on the FET channel while the older d4sv2 build targets were only 50% power.
1 Thank
I just got Hanks 9.3 light and i can not get white and uv lights run separately, I tried 9h, got strobe, than 1c, but it still turns both colors on.
Sounds like you’re running multichannel. When on, 3C to change channel modes. First two should be ch1/ch2, then both, ramping, and autotint. You can disable the extra modes with 9H from on - stop on the channel you want to configure, then 1C to enable or 0C to disable.
1 Thank
Thanks, I was able to switch modes, 3c changes modes, so i tried to disable ranping, both, autotint, i did 9h while on, strobe came on, i did nothing, but all modes are still there, every time i need to turn uv only i have to 3c several times, i cannot seem to figure out to to swap between modes with 3h, I only get mom. turbo, is my driver ok, or what am i doing wrong. I mean I can get to uv by 3c several times, same for white, but i do not think this is how it supposed to work.
You’re almost there.
To disable or enable the different modes, it sounds like you’re pretty close - 9H while the light is on will start the configuration menu.
You’ll see one pair of your emitters “buzz” (you’re referring to this as strobing in your comments) first, then the other, followed by three sets of BOTH emitters flashing together.
Here’s a deeper explanation:
- start the 9H menu
- ignore the first pair of emitters when they buzz (Channel 1 Only Mode)
- ignore the next pair of entered when they buzz (Channel 2 Only Mode)
- when you get to the first buzz with BOTH emitters, release the button and then do nothing! (This is you turning off that mode with “0C”)
- restart the 9H menu
- ignore the first 3 modes and when you get to the buzz for the 2nd mode with BOTH pairs of your emitters (this is actually Mode 4, btw) again release the button and then do nothing! to turn it off.
- repeat one more time for the last Mode (Mode 5, the 3rd buzz with both emitters), release & 0C to turn it off
This will leave you with only 2 Channels active - Channel 1 Only Mode and Channel 2 Only Mode so now when you have the light on and 3C, you’ll simply switch between the two.
1 Thank
Thanks but unfortunately it did not seem to work, if i do 9h while on and keep holding, it flashes once in each mode, with leds that are active in that mode, if i let go it starts buzzing, if I do 1c it continues to buzz, and than stays on in that mode, same thing happens if I do no clicks, nothing seems to be disabling or removing modes. Should anything else be done in order for this 9h option to work?
I don’t think you need to do anything else.
You have to set each Mode to ON or OFF one at a time… When you first get the light, or after you do a reset, all 5 Modes are ON by default.
When you access the 9H menu and release the button for the Mode you want to either activate or deactivate, the emitters will continue to buzz for a few seconds, waiting for one of these inputs:
- 1H will turn that Mode ON
- 0H will turn that Mode OFF
Either way, the buzzing will stop after the light accepts your entry. Each Mode you don’t want to see in the 3C Mode selection cycle needs to be turned off one at a time.
Seems like I do exactly what you told me, and not just you, i looked youtube videos, read posts on reddit, but it does not seem to work out, oh well,. i’ll figure it out one day hopefully, Thanks for the help to both of you
1 Thank