Anduril ... 2?

I’m probably not going to do that. NarsilM worked that way, using a big global menu for config options, and it was a design style I specifically avoided in Anduril.

Instead, I’ve tried to map config options to button presses (or sometimes small menus) inside of the modes they configure. I try to keep each mode and its config options as close together as possible, and avoid menus when possible… especially long or nested menus. Like, Bistro had 8 menu options and they didn’t change over time… and even that was hard for people to remember which option was which. With Anduril there are like ~30 to ~60 options at the moment, depending on the version and specific build target, and the set has changed dozens of times over the years… so it would be extremely difficult for the user if those were all kept in one big nested menu.

Ideally, each mode’s primary option can be adjusted simply by holding the button while that mode is active. Other options use progressively longer inputs, with the most-often-used having the shortest inputs. Menus are used only for things which didn’t fit into a more convenient input, typically for settings the user likely won’t need to change after the initial setup is done.

For menus, it also tries to keep the contents pretty consistent across different builds and versions, so the user won’t have to remember a bunch of different variations. This is much easier when the menus are small and context sensitive.

A big global menu’s use looks something like this…

  1. Exit the mode you want to configure. Click to turn off.
  2. Press the menu shortcut.
  3. Wait for the Xth blink to select an option group.
  4. Wait for the Yth blink to select an option. (and maybe again to select the Zth blink for a sub-option)
  5. Click N times to enter a value, then wait a few seconds.
  6. Press the mode shortcut to return to the mode you configured.

The user would be expected to refer to the manual during configuration, and keep a specific version of the manual around for each light, since the menu order and contents would probably change pretty frequently.

What Anduril does instead is a little shorter…

  1. While in the mode you want to configure, press the menu shortcut.
  2. Wait for the Yth blink to select an option.
  3. Click N times to enter a value, then wait a few seconds.

People still use a manual here, but not as often, and the menu contents are generally more stable.

It would be better to have an interface which doesn’t need a manual at all, but it’s limited by having only one pixel and one button. A genuinely intuitive interface would probably require connecting the light to a computer or phone, to get an actual screen with widgets to click on.

If lights ever get upgraded to a MCU with more power, particularly with USB support built in, I’d like to add support for XAP, the QMK keyboard firmware’s protocol for configuration from a host computer. Or something similar. Then you could just plug it in and use a standard application to configure stuff. But that’s not happening in Anduril 2. That’s more of a “maybe in Anduril 3” sort of thing for the more distant future… and it would be a complete rewrite with zero backward compatibility.
5 Thanks

Hey there, welcome back! Glad you’re doing OK.

3 Thanks

Oh, man, I hate moving.
I hope you get everything settled, TK! :+1:

2 Thanks

This reminds me of my Walkies that don’t use a USB port, but the jacks used for the microphone and headset.

It is convenient for initial setup you can put in all the settings and frequencies with their names and copy them to more walkies.

Then as you say using the buttons you enter the settings which is more tedious and always with the manual.

But I see it still far away in something as small as flashlights.

That extra space is better to use it for another channel or auxiliary led.

But that does not mean that the same charging port is connected to the three pad and use a cable with the adapter already included as is done in the walkies.

This way you don’t add extra circuitry.

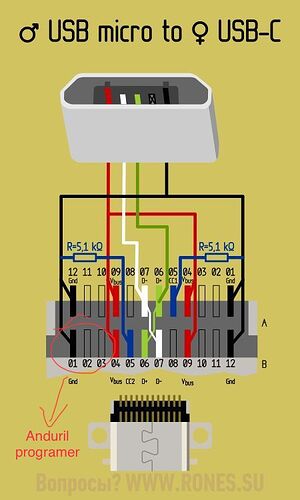
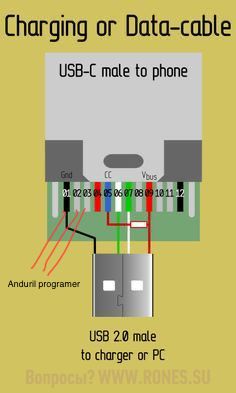
Only the charging terminals are used in the usb-c port, as the three pads or 5 pads depending on the model are jumpered to non-standard free terminals and use a cable only for flashlights with the warning not to connect directly to the usb port of the pc without its 3 pads or 5 Pads cable.

These are only assumptions.

Thanks for your work I hope the translator makes it understandable :man_facepalming:t2:

————————————————————————

Edit: I just had an idea I’m going to connect the 3 pads to the usb-c free and so I don’t have to hold the programmer.

And I built myself a usb-c to dupon connector cable to connect it to the Gchart programmer!

With this I have the 3 pads out of the flashlight and a more stable connection.

I have to use the ones that are free, maybe the data I don’t have connection and that I never use connected to a pc, I will look at it.

There are no schematics in the driver group I only found one and old, I don’t see schematics of the Sofirn convoy drivers etc. they would be helpful.

Perhaps for only one programming every so often it is not worth the work.

This system would be for constant testing.

I will keep you posted.

You could use:

1-GND
2-xx
3-xx

Also any three free ones.

The reason is so that in the event that someone connects the flashlight to a PC by mistake or to load, the driver will not load.

The 2 and 3 are TX+ and TX- others could be used.

I will look at which one a PC would never use. This is complicated because they are used depending on the port it has. If it is a USB-C, all the pins will be connected to USB-C.

There is the problem.

Or never connect it to a pc.

In this way, with only two fine breadboard wires we would solder the + and the signal since we will have GND on the cable, I have not verified it but the pad - will be the ground of the flashlight.

But I repeat, perhaps for many it is easier to put the programmer than to modify the flashlights.

I only indicate that it could already be done without much effort.

The ideal is direct to usb but it requires hard that does not enter a driver like the one of the SC31Pro.

I’m always involved with circuits :hugs::sweat_smile:


image

I just encountered that too, yesterday. My M44 was right on the threshold between green and cyan voltage ranges… so it kept flipping back and forth every second or two.

While cyan, it would turn on blue+green LEDs and the voltage would drop from like 3.701V to 3.699V. So the next voltage reading would be in the green range, and it’d shut off the blue LEDs. This apparently reduced power use by enough to recover back to 3.701V, which is in the cyan range… so it’d turn the blue LEDs back on. And then the cycle would repeat.

This went on for about a day before it finally settled on green-only. I didn’t turn the light on during that time, but manually using a little bit of power would have pushed it over that threshold pretty quickly.

I’m not sure what would be a good solution. I want it to respond quickly to changes, but not use much power while asleep, and not oscillate at boundaries. So it checks voltage once per second and turns the ADC off immediately afterward, which accomplishes 2 of those goals but is a bit iffy on the 3rd.

While the light is on, it measures many times per second and runs the values through a pretty strong lowpass filter to get a stable reading even while power draw is fluctuating wildly from PWM and other noise. But it bypasses the lowpass while asleep, because it’s too slow and uses too much power. And the lowpass doesn’t actually solve the issue; it’s great at filtering out high-frequency high-amplitude noise, but fails to remove low-frequency low-amplitude oscillations like what happens at the green-cyan threshold.

Anyway, I guess all that is a long way of saying… it’s a known issue, but I’m not sure how to fix it without causing other issues.

4 Thanks

So I’m not entirely sure if there’s an issue. There definitely was for a while, but it should be fixed ever since 2023-05-30.

Thanks for reporting this, and thanks for isolating the cause! It’s patched now.

In short: While shuffling some code around to investigate the previous issue, one line got removed by accident… and it was a pretty important line.

2 Thanks

I haven’t updated the original LT1 to use the new channel modes yet. The LT1S Pro is supported though, and is one of the main lights I use for testing multi-channel stuff.

The original LT1 uses an older MCU which isn’t entirely compatible with some of the newer features. I hope it will still be able to use the new multi-channel code, but it isn’t able to get the extra low lows on the LT1S Pro because the older MCU doesn’t have the waveform generation features the newer model uses for dynamic PWM.

Lower lows are technically still possible on it, but it would require much deeper changes.

Anyway, it’s not updated yet. I’m still refactoring code at a structural level before I plan to finish updating the rest of the builds.

1 Thank

I think the LT1 might be shipping with the T1616 now and so would work with the new multi channel code/dyn PWM, of course most of them in the wild use the T85.

What about a simple hysteresis? Doesn’t need much computation or memory.

2 Thanks

2023.05.17_Andurilv2.noctigon-dm11-boost.hex has been working fine on my D4v2-12v for a good while now as far as I can tell.
That same target was used on my D4K and it has the ramping down/low temp issue.

I just gave it another shot and it did the same thing. Warmed up ever so slightly, then heavily ramped down. Just to try it, I flashed it again with the erase eeprom setting (-e I believe) let it settle to room temp, then factory reset/calibration. Seems to work correctly now.

I have no idea what the problem was, but it seems good now.

1 Thank

I just got my first Narsil light, and I can vouch for this thinking. I understand how it might seem good in theory, but it’s very confusing in practice. Configuring it feels luck-based (I’m probably going to build anduril for it and reflash it soon).

2 Thanks

Allocate a structure for medium-term samples (say, one per minute. Could be a single byte with a, moving window of 8 mins which might be enough. Measure if it’s above or below the cutover point, and apply a little extra smoothing (or just hold it low?) when it is? No proof of concept but you’ll probably do a better job of that sort of code than me anyway. Just applying a bit of infrastructural thinking in terms of the way load balancers work.

In addition to what TK said, the attiny85 only has 8kb of flash where even a light-ish on features build comes in at 10-11kb with multichannel. There definitely is space to be saved, but it’d be an enormous effort and probably a somewhat stripped-down version, but is theoretically doable. Just probably not a priority any time soon.

Sorry I forgot to do this, stuff has been hectic, but here’s the latest multichannel builds for all currently supported lights including the D1 (the D1 build targets currently don’t work, but it’s a one line change to fix so I included it). Definitely update if you’re running the KR4 firmware (D4, etc.)

3 Thanks

Thank you Wolfgirl

Can I ask you one question.
Are your builds also based on the latest Toykeeper Multi-Channel branch or do you have your own repository?

If you have your own bracnh/repository, is this available online as well?

Probably everybody else but me knows this already, so sorry to ask :smiling_face:

The reason why I ask is that I created my own config files with pre settings for the Toykeeper branch. Could I do the same and build .hex files with your repository?

Those builds are based on TK’s, but I have my own repo too that I use for my own lights as well as custom builds for other people: GitHub - SiteRelEnby/anduril2: modded anduril2

It has a lot of different mods included in it, they’re all behind feature flags so by default it will build an image that has stock-like settings (not entirely, couple of small differences for some lights just due to necessary code changes to support some of it). There’s a readme with the features but it’s a bit out of date and could do with updating but covers most changes, but I have an example config file that I use for my custom builds here: anduril2/spaghetti-monster/anduril/button-mapping-siterelenby.h at main · SiteRelEnby/anduril2 · GitHub, while anduril2/spaghetti-monster/anduril/button-mapping-defaults.h at main · SiteRelEnby/anduril2 · GitHub is the default that replicates the same featureset as unmodified.

e.g. on my lights, they flash aux fast 3x when clicked while locked, some of the blink_once() calls have been changed to use aux instead of main emitters (with different colours for different actions), I have 5/6/7C/H be shortcuts to channel 1/2/200% turbo, I’ve moved a couple of features I don’t use much to higher button combinations to make room for my custom stuff (e.g. aux config to 8C/H, momentary and candle mode to 12C/H) and I’ve removed a few features I don’t use at all (e.g. 4C to lock from on, which I replaced with previous channel to go with next on 3C, and I bake my config into the .hex so I can go back to my normal settings with a factory reset without having to go through config menus a load if I ever need to change anything for whatever reason. I also like to add configurability, e.g. I have RGB voltage aux available on lights it isn’t by default (mostly ones with forward facing aux because I really don’t mind it being on in the main optic), and able to be switched on/off at runtime as well as having configurable brightness thresholds

3 Thanks

Thank you so much, Wolfgirl!

I didn’t get to check it all out yet, but I definitely will :slight_smile:

Made some builds of the latest version: 556.1 KB folder on MEGA

Includes a refactor of how channel modes are defined, so far has only been tested by me on emisar-2ch and did the appropriate fixes to my mod code, other build targets do not work yet; I’ll try to get some of them fixed tomorrow if I have the time.

The flashlights I have without anduril all or almost all have the 55°C ceiling setting.

But anduril has it at 45° I see it too low.

Do you have the hex modified with a higher max °C?

Then anyone can change it.

But I always change them and it is very tedious to set the temperature ceiling and the ambient temperature which automatically does not detect it correctly.

It takes a lot of keystrokes to change those two values.

Another thing that happens to me is that I change from soft ramp to step ramp without realizing it.

When I want to use a mode like candle mode I end up with a different ramp.

Even without realizing it or when I want to lock or another option that involves pressing several times the ramp is changed.

I don’t like that accidental ramp change, it happens to me quite a bit.

Thanks for your work.

Why not just change it when the light is on? (7H from tempcheck). Or do you factory reset/reflash too often to make that convenient?

In order to have temperature calibrated from flash, because of how it works for the t1634, it’s not that practical to do (not impossible, but means first of all you need to get it set right and then read the EEPROM back to a computer to get the calibration value). I still haven’t really looked too far into the details, but it seems the t1634 has a “calibration” memory area, so the easiest way to get temperature accurate would probably be to disable autocalibration on first boot, and write the correct temperature calibration factor there.

If you want a build with a higher default thermal limit, that’s easy to do. What limit and for which lights?