There ya go, problem solved!
If you decide later to upgrade the LED’s, heat up the mcpcb with your soldering iron then pry it out with a screwdriver. ![]() Once good and hot, the Arctic Alumina Thermal Adhesive will release.
Once good and hot, the Arctic Alumina Thermal Adhesive will release.
There ya go, problem solved!
If you decide later to upgrade the LED’s, heat up the mcpcb with your soldering iron then pry it out with a screwdriver. ![]() Once good and hot, the Arctic Alumina Thermal Adhesive will release.
Once good and hot, the Arctic Alumina Thermal Adhesive will release.
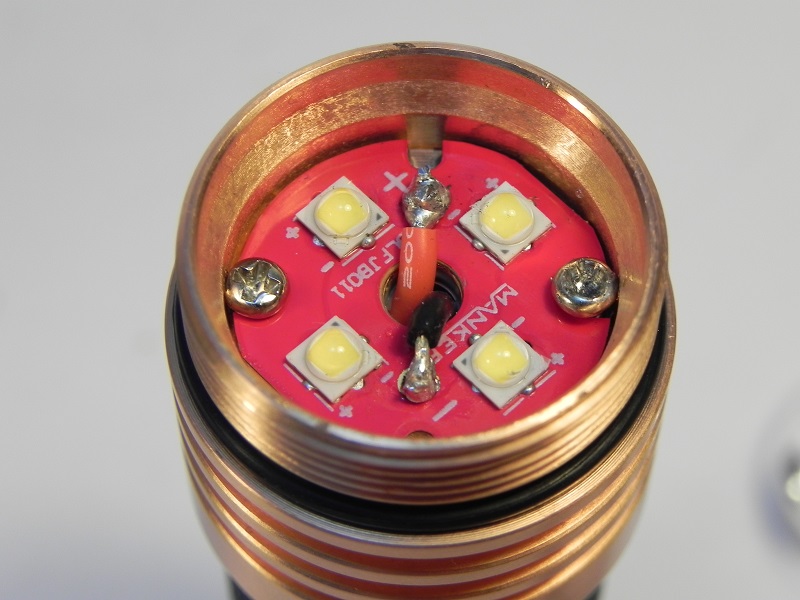
What’s under the board - thermal paste or adhesive?
If thermal paste - without the pressure of screws or optic, will the thermal path be sufficient?
In the photo it looks like one of the screws is still there.
Can you please clarify?
And still waiting to progress past the “processing” stage :cry:
:person_facepalming: :person_facepalming: :person_facepalming:
I didn’t remove the board, everything under the board is as it was from the factory. I’m no expert on thermal adhesive… it is though rock solid hard with no board movement side to side or up and down. Before I removed the screws I first applied the epoxy along the outer edges I’m thinking pressure should be as it was with the screws.
The two screw holes are filled, the other two are optic leg holes.
@Stevedog: did you notice any difference in heating up? I am no expert either but I could imagine that - even if it is working now - in the future the board and pill will move away from each other a tiny bit, such lowering the thermal contact.
I using a 7 amp Nitecore, no noticeable heat difference. The epoxy is rated to 150C, and it’s in there pretty tight (especially in the screw holes)… I’m not so sure it’s going to move at all, even in time.
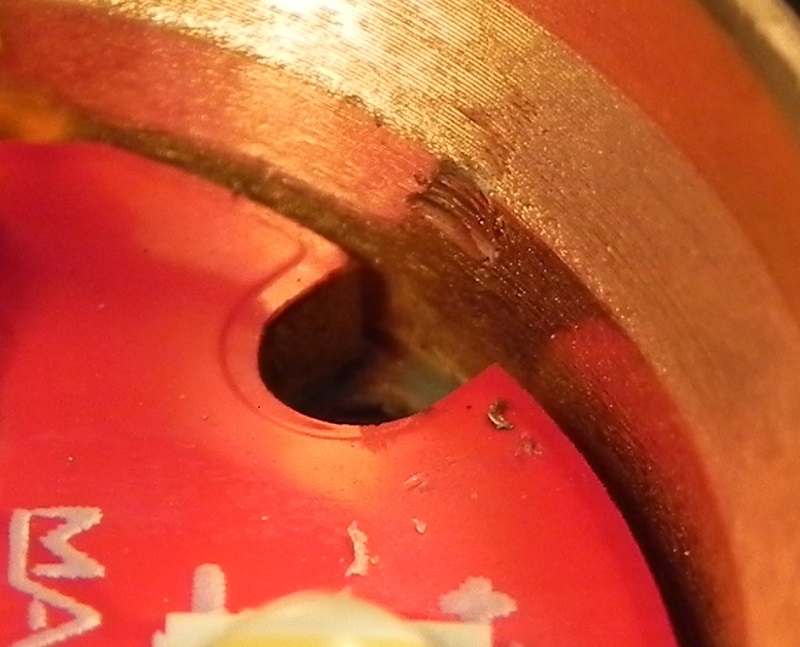
There is obviously a stand off to the trace that holds it shy of the hole’s edge, so it’s a virtual impossibility the trace could be touching inside the screw hole. The only real concern was the screw cutting through the mask layer and touching the trace. A smaller head screw would fit inside the stand off and solve the problem anyway.
ONLY AFTER KENJII messed with it. ![]()
Removing and replacing the screw caused the issue, it worked prior to that. Virtual impossibility still stands.
Good idea.
If visual inspection reveals the punch was correctly aligned then all you need for security are little plastic washers under the screw heads.
On the other hand, if inspection reveals the punch was misaligned and the traces touch the screw holes, then additional precautions may need to be taken.
A safety inspection may cause the problem :laughing:
Kenjii’s light…
Ok, several points here. I have sanded down more than a few mcpcbs. There is a dielectric layer between the copper and the trace, as well as on top of it. The trace is not inside the laser cut hole for the screw, it is not shorting out in that way.
If you look at the screws on there, especially the one that’s buggered up, there are more than one tell-points. The screw is not in the hole properly or the hole was not threaded properly to begin with, hence the mangled phillips head. Also, there is insufficient clearance between the screw head and the side of the pill, which pushes the screw towards center. Ok? So when a new screw goes in, the side pushes the screw over towards the trace that is off center and close to the edge. The thread cuts through the mask, into the trace, thereby causing a short. The fault lies with replacing the screw… or actually that’s when the damage was done, the fault lies in shoddy design that allowed these things to align for an issue in the first place.
Still, a tight screw here is not a good thing, the ramping effect of the sharp thread can cut into the trace and therefore, issue. It seems to me that in all or almost all of the over 300 lights I’ve disassembled, the screws in the mcpcb, when present, are not snugged down to begin with. They are there to place the mcpcb and prevent it from twisting, I don’t recall ever seeing a manufacturer use those screws to smash the mcpcb against the shelf in the head or pill. That distorts the copper or aluminum mcpcb and causes more trouble than it solves.
So that’s what I think happened there, as calculated by extensive experience.
I could be and may very well be wrong.
I would like to fix the problem by placing some plastic washers under the screws. Does anyone know what size washers to use and if their commercially available ? And would putting a dab of Liquid Tape work as well ?
Thanks,
Mike
Stevedog’s photo shows the actual screw holes covered in epoxy, can’t see if they’re close or not and can’t assume anything based on the optic leg holes.
I guess I’ve been wanting to think that these weren’t as horribly messed up as they seem to be. Trying to cut Neal and Manker some slack I guess. My bad. The ensuing Manker/Banggood drama I suppose. sigh.
It has been said that Manker’s own products are of higher quality, I wonder if those have proper mcpcbs?
Sheet’s of mcpcb’s are laser cut by OshPark and any other manufacturer I’ve seen information on. It’s been said that a punch or die cut-out would deform the inherently soft copper, and/or leave burrs on the bottom edge preventing a lay-flat placement. Soooooo…… but I guess assuming anything when dealing with some manufacturer’s is a mistake.
Seems I can’t win for losing, so I’m out. Good luck with these…
I am hoping manner and or banggood come through with some kind of resolution for these lights. My hopes aren’t high though. Mine currently had a protected cell in it. Not sure if I’ll run anything else. Have a load of 18350s I’d love to use if I could without risk.
Schrödinger’s cat …
Curiosity killed the cat.
Also, please don’t let any pets operate these lights unsupervised! :laughing:
Hi,
you´re right both. Prior to changing the screws there was no short. So potentially no damage on the mask and not on the inside of the cut-out on the MCPCB. After changing the screws i got that short. I checked that using the continuity check of my DMM. The contact was clearly found on the inside of the cut-out - not on the mask on top. This tells me the trace is extremely/too close to the cut-out. That´s because a washer did not do the job in my case and i had to lay a piece of insulator over the edge of the cut-out. So the damage there seems to have happened when i screwed in the new screws and the threads got in contact with the inside of the cut-out taking that last ~1/10mm that prevented the short. So that was my fault. But I changed several MCPCBs which are screwed in in my life as well (~40-50/year) and this never happened. Not with Noctigons, Sinkpads or even the cheapest stars from chinese lights - even filed/modded ones. So i was just not expecting that the traces could become a problem. I am not an electritian but you can see in the image that the traces are extremly close to the cut-out. Even only on one side of the cut-out. So the cut-out seems to be not done properly but they still remain much too close to the cut out in my opinion.
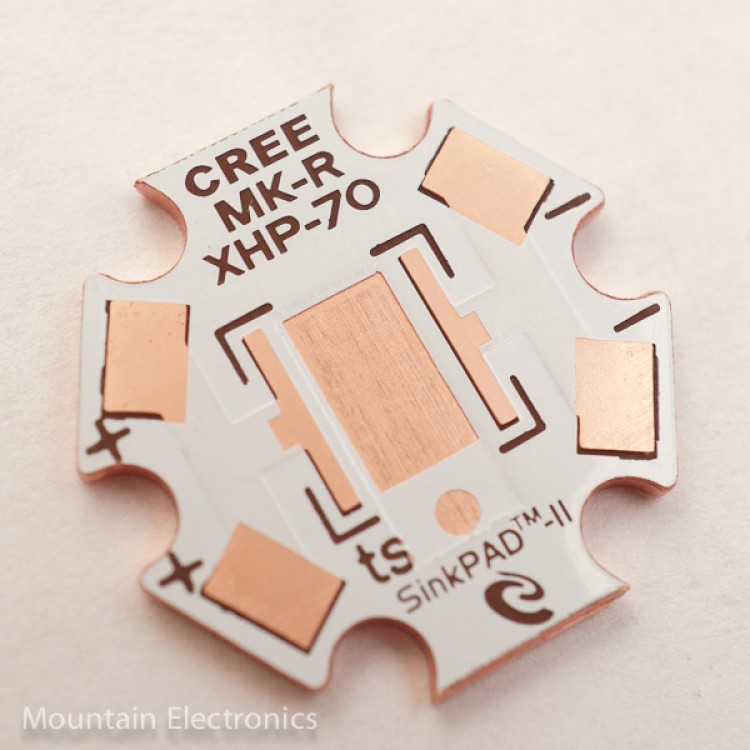
Here for comparison a Maxtoch, Noctigon and Sinkpad MCPCB. The traces are in a more safe distance to the cut-outs.


My light works and I can handle this issue but i think what happened is worth mentioned, even if it was my fault.
Regards
Kenjii
i ordered one of each but the nichia isnt in stock so is delaying my order :cry: