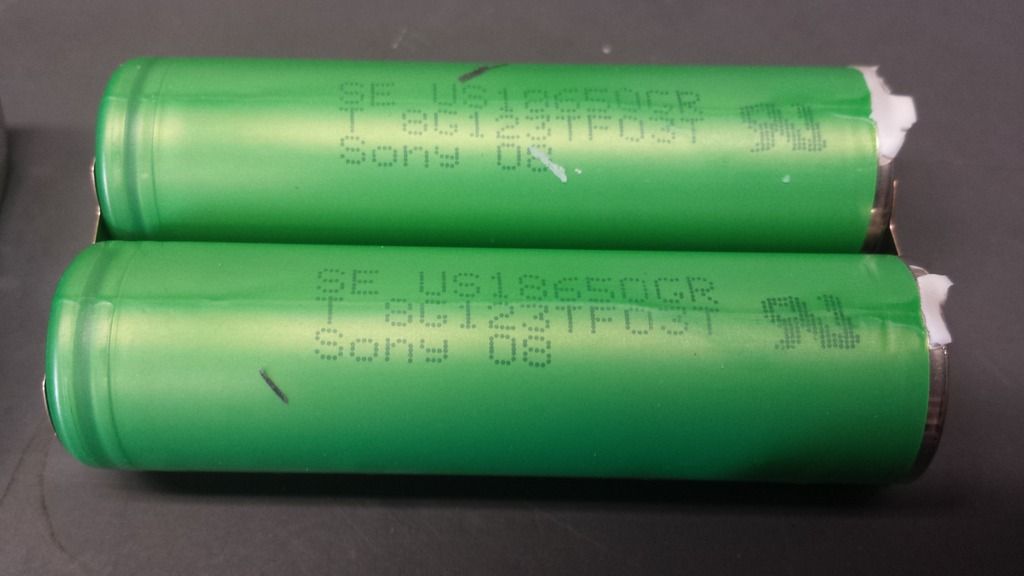
A friend tore apart a netbook battery pack and discarded the remains without writing down the pack info. He sent me this picture of the cells, but they look like Chinese Samsung wannabes.
Any idea what they are?

A friend tore apart a netbook battery pack and discarded the remains without writing down the pack info. He sent me this picture of the cells, but they look like Chinese Samsung wannabes.
Any idea what they are?
I have never seen those in my teardowns, I will see if I can find anything on them
Pulled apart a thinkpad battery pack 42t4801 and it came with 9 panasonic 2900mAh 18650s. According to thinkpad forums, this is what will come according to the model #:
ThinkPad Battery 55+ (6 Cell) 42T4797 (LGC)
42T4793 (Panasonic)
42T4791 (Sanyo)
42T4795 (Sony)
ThinkPad Battery 55 (9 Cell) 42T4803 (LGC)
42T4801 (Panasonic)
42T4799 (Sanyo)

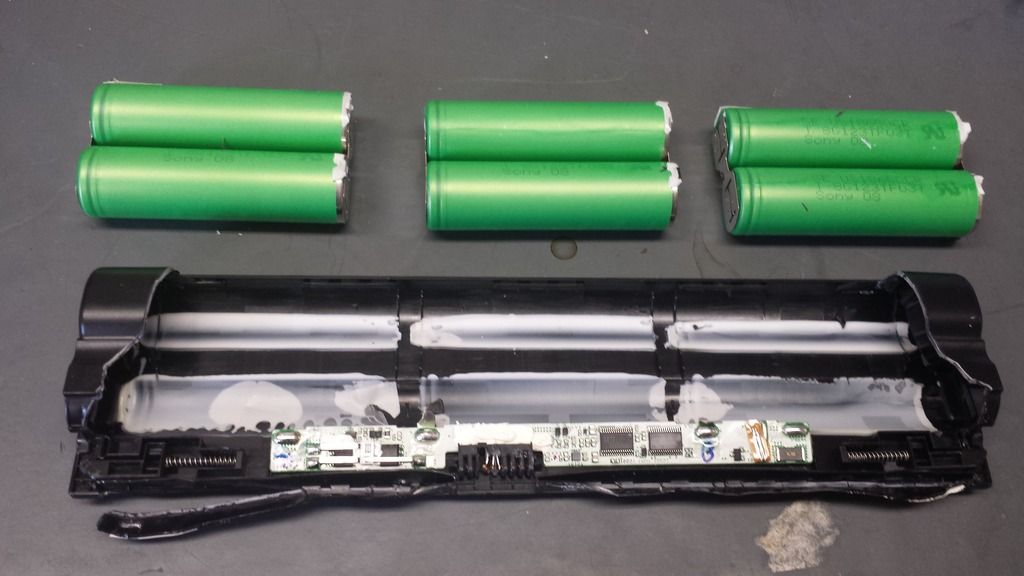
I opened up a power bank I bought from the retail chain “Five BeLow” All items in the store cost either $1 or 2 or 3 or 4 or $5. Nothing higher. This was a so called 6600mAh power bank. It contained 3 18650 cells in parallel and to have been 6600 mAh each cell should have had to have been 2200mAh each. Or least they should have had a wrapper that said as much. Of course I didn’t actually believe this power bank to test that high, it only cost $5. Here is a pic of the guts.
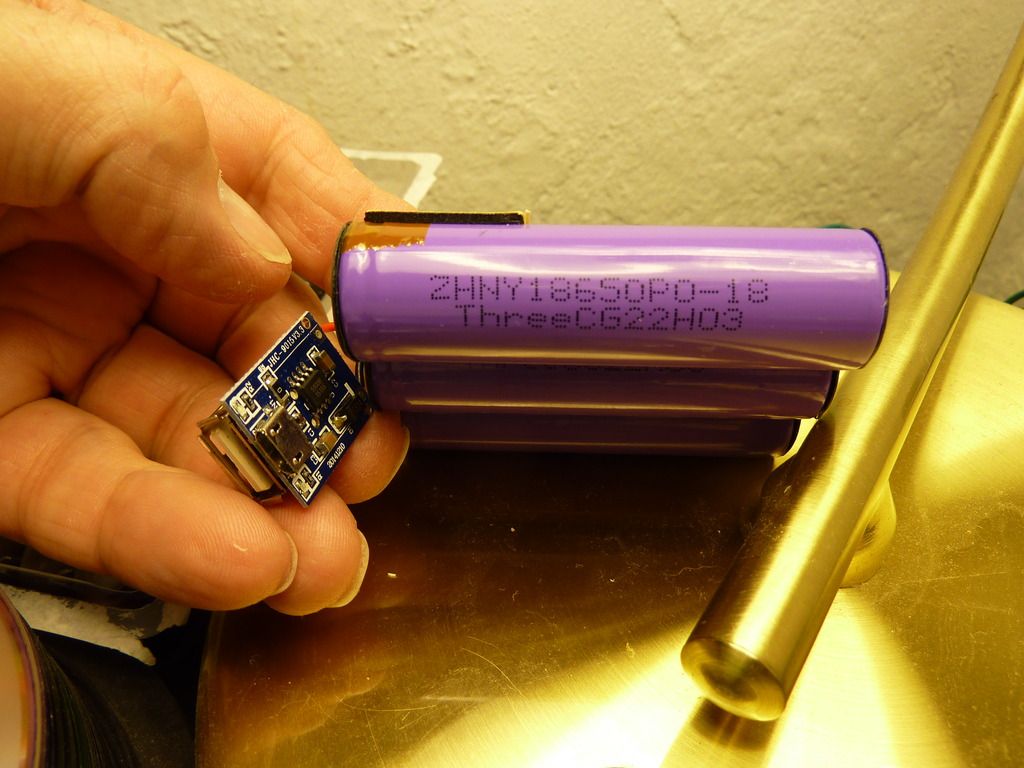
It would appear that the cells are “called” 1800 mAh cells? I tested them on my OPUS 3100 and they test out at 1650mAh. Surely not 2200, but not THAT bad either. This power bank will put out a sustained 1000mA at 5V. Once the pack shuts down it will not recover on its’ own and output a little more before charging. Only after hitting it with a charge does it turn back on. For $5 I was happy with it. My 3 cell ENB will NOT output as much as this and the vacant box without any cells cost twice the price. Once things hit mainstream retail, and powerbanks are on their way, the value is hard to beat.
Does anybody recognize these cells?
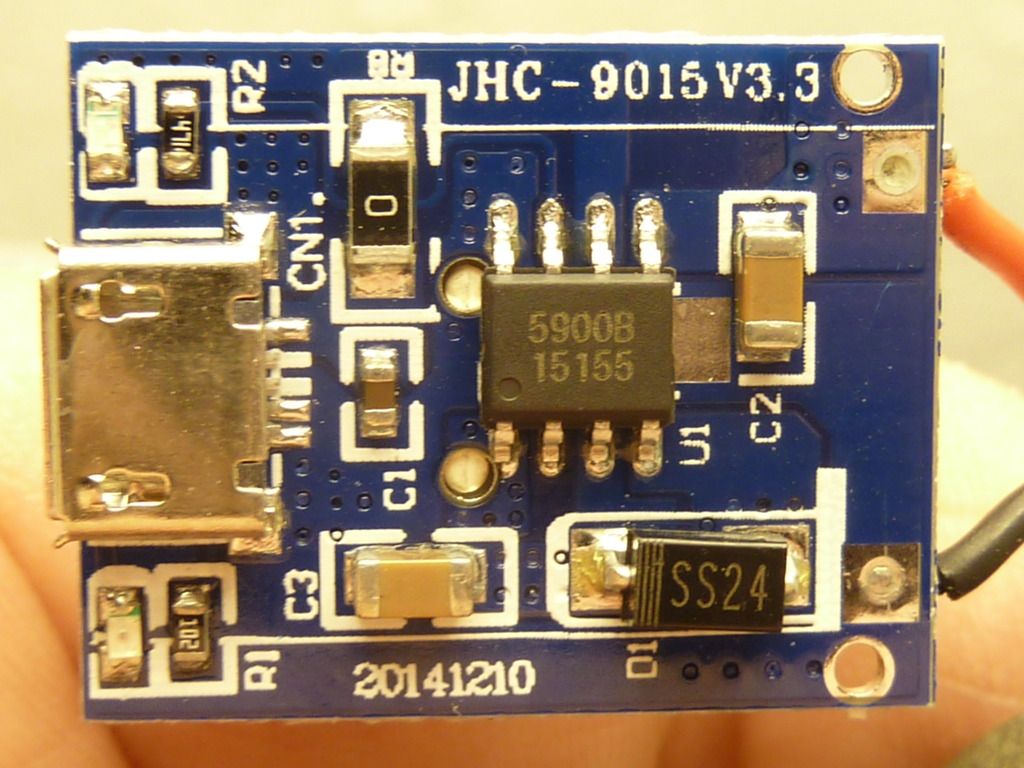
Also, here is a shot of the charge-discharge board,
I work in IT so I end up with a lot of old tech. Recently, I joined BLF and CPF and learned about Li-Ion battery pulls, which piqued my interest.
I have an old iBook 15 which hasn’t run in quite some time. I pulled the battery and took it apart. This is what I found inside:

The text on the cell says: US18650GR/SET TMLD27R/SONY FUKUSHIMA and I’m fairly certain that there were 8 cells in the pack.
I wired up a temporary battery carrier in a fire retardant box and connected it via leads to a new Nitecore D2 charger and closely monitored each of the batteries as I charged them individually. 4 of them failed to charge. I believe the charger read “error” so I wrapped them individually and placed them in a bin for future disposal.
4 of them charged properly and appear to be working properly. From what I understand, as long as I’m using them as single units (not in series or parallel) basically the biggest risk is when the battery is being charged. I tested them in a Klarus AR10 and they ran fine. I did not attempt to charge them in the AR10.
From what I’ve read in various forums, if an ICR cell is allowed to discharge below a certain level, copper shunts can form in the cell which can cause internal shorts, which in turn can cause a very bad day when the cell is charged. I’m guessing that the laptop battery packs have internal electronics which disable the pack should a cell be deemed bad. Regarding the batteries which did charge, would it be safe to assume that they are shunt free or could they still be at risk?
Mahalo
Major score for me yesterday. Two 5 cell Ryobi packs in working condition, took them apart and cells were balanced. The major score was a like new fully charged 40v Ryobi 20 cell pack. Used 10 cells to rebuild a dead 10 cell Ryobi tool pack scored about 6 months ago that was ratholed. It will be used on my dedicated 1/2” drill with a Bridgeport adapter for raising and lowering the knee.
Congrats! I found one of those very same packs a year and a half ago.
Recently the 40V Ryobi String Trimmer went on clearance, I bet that pack you found went to the display model.
Sounds like you’re right on top of things.
Welcome to the world of Free 18650 Batteries!
Your triage process should safely cull any bad 18650s, and if they pass that & hold a charge for a few days (unused, of course), and deliver ~the nominal capacity, I’d tend to trust them.
Please allow me to politely provide you with a means to RTFM. The inventors of the technology were pretty thorough, IMNERHO. This, combined with your process, should help you answer your own questions.
Dim
Wow! Thanks so much for the warm welcome and the link the the manual. Nice to have access directly to the source, so to speak. Going to take some effort to wrap my brain around it, but the safety portion seems to be quite understandable to the layperson.
I also just scored some (6) NOS 12” iBook battery packs. Haven’t cracked any open yet, so no news on what’s inside, however I did place one in an iBook and it took the charge fine, reporting full charge and ran the iBook for a few hours on full power mode, so I’m pretty optimistic. Based on form factor and output voltage, it should have 6 18650s per pack. Now I just need to decide what to do with them. ![]()
Thanks again, Dim. A pleasure to be here and thanks to everyone who’ve contributed to this valuable community resource.
Mahalo
I finally got around to disassembling the NOS 12” iBook pack my previous post. BTW, I see a lot of people using dremel tools, etc… to break into these cases. I haven’t read through the whole thread to see if anyone else is using the method I use, but for the most part, I’m able to get into these packs with my bare hands and just a few hand tools in the end (leatherman and diagonal pliers), applying very minimal forces on the packs.
Table Data and pics before disassembly:
Apple, M9337G/A, mAh not listed but calculated as 5100 mAh (2x2550)@10.8 v (3x3.6), SF (Sony Fukushima?) US18650GR, 2550Mah


Based on the output voltage (10.8v) I’m expecting 3 cells (3 x 3.6v). Based on the dimensions of the pack, I’m expecting 6 18650s, so 3 pairs (3x3.6v), each pair welded in parallel (2x2550mAh). Volts and Amps multiplied gives us wattage (Power), so total power output in the range of 18.4 watts (18.36 rounded up).
Disassembly:
Most of the battery packs (HP/Apple/Dell/Asus/Acer/Toshiba) that I’ve examined to date are built in this fashion: Basically the main frame is a skeletonized plastic clamshell with a large window (ribbed or not) which is sealed by a thin, stick-on plastic or metallic plate. In the picture below, if you look at the upper right corner of the cell, you can see where I’ve folded back the corner of the plate, revealing the green battery inside the pack. Funny coincidence, in the youtube video by Ol-Lumen in the OP, he disassembles what looks to be an Acer Netbook battery which does NOT have the plate I spoke of.

Peeling back the plastic plate completely reveals:

Using my fingers, I was able to pry open one side of the ribs, tear it free, then work the remaining ribs off, revealing the batteries below:

Flipping the pack over, by flexing the pack slightly, I was able to remove the cover on the bottom of the pack:

With the inner ribs removed, I then pried off one of the long side retainers, which then allowed me to carefully extract the two pairs of inner cells.

I used the diagonal pliers to trim the leads to avoid shorts and then removed the last 2 cells. I used the needle nose of my leatherman to remove as much of the welded battery tabs as possible. I then used a sanding drum on my cordless drill to remove the remnants (because I couldn’t find my dremel). In this battery pack, Apple uses a silicone based compound as an adhesive, which made clean up a breeze. A little spit and elbow grease and we have the finished product:

Note that the battery pairs are welded in parallel, positive to positive, negative to negative. This doubles the current capacity, basically turning two 3.7 v x 2550 mAh cells into effectively a 3.7 v x 5100 mAh cell. 3 of these paired cells are then wired in series (positive to negative) which then triples (3 cells) the pack voltage (Apple uses 3.6 volts in their calculation, apparently, so 3 x 3.6) to 10.8 v.
Imprinting on the cells:
SF US18650GR
T G7141OI12I
Based on the 20th post in this link, I’m assuming these are 2400 mAh batteries, build date 2006, September 12.
Charged the individual cells via leads connected to my Opus charger, then ran a capacity test which yielded the following mAh/internal resistance results:
2544/103 2535/97 2501/116 2569/98 2549/96 2507/90, with all batteries charging up to between 4.17-4.19 volts, so I’m pretty happy with the results.
BTW, I’ve been doing this for a few weeks now so still very wet behind the ears. Initially, I was recording data directly onto the batteries, however I was noticin a couple of issues. It was difficult to write on the round batteries. I could only record limited data. The permanent marker I was using was rubbing off easily.
To address these issues, I created a google sheet into which I recorded what I considered to be pertinent information. I wiped down each battery with rubbing alcohol to remove any possible grease, and then I assigned a 2 digit hexadecimal code for each battery which I wrote on each battery using metallic permanent marker. I then covered the marking with a piece of clear tape. You’d be surprised how long that will protect such markings.
Anyway, I made a copy of my spreadsheet and it’s available to the public for comment here. I would appreciate any comments or feedback. Also, if anyone else finds it is useful, by all means, feel free to make a copy for yourself and distribute it freely.
For now, the batteries go into a holding plastic container, placed in a firesafe. In 5 days time, I’ll check the voltages against my data table to compare losses.
Mahalo
Latest project, my dead Ryobi One 18v Li-Ion battery pack.


This pack yielded 10 Sanyo UR18650SA L38A, which apparently is an IMR cell w/ 1300 mAh capacity
I haven’t had the opportunity to check the cells yet.
Mahalo
I want suggest to eveybody this amount of laptop batteries, they are too many for me, I have 2 x 18650 single cell flashlight and 18 Sammy 28A
Just wanted to say thanks for the detailed writeup and pictures! Very helpful for those of us who are also relatively new to this game. (I’ve dissembled one pack from an old Asus for 6 good Samsung cells, and have another Lenovo at home that I haven’t cracked open yet.)
I bought a laptop bat pack that proved to be defective with my laptop so I harvested the cells. At first, they looked good… decent initial voltage, charged to 4.2V (w/XTAR SP-1) and capable of delivering 4+ amps with a DD Ultrafire C2-T6 but over a week, it looks like they self-discharged 0.04V. Please take a look at the pics to see if you’ve seen these cells before but the data table may help make the conclusion to ‘Discard or Keep’. Thank you for your experience/opinion!
!
http://s1007.photobucket.com/user/broodmasterpb/embed/slideshow/FP%2018650%202000mAh%20150924
!
You are very welcome, sir. Still pretty green here myself and hoping to learn more as I go forward.
Good luck with your pulls.
Mahalo!
Model: 2x Dell XX237
3S2P 11.1v 60Wh (5400mAh)
12x Samsung ICR18650-28A. All cells good :)
I made a very good friend at work the other day, the electronics disposal guy. He picks up old laptops and desktops/monitors/keyboards and disposes of them. I chatted a little bit and told him I was looking for laptop batteries, he said he would keep an eye out for some. Today was the first delivery: 3 Dell packs Type T54FJ, 60Wh, 11.1V. Tore one apart at lunch and found these NCR18650. Will see what voltages are when I get home.
UPDATE: All 6 cells in one pack tested at 3.96V, so hopefully these are still pretty healthy!
Tearing them apart is a bit addicting .I liken it to opening christmas presents.
just remember to always peel the labels first .
happy hunting
Opened my second-ever pack today.
From a ThinkPad X120e, pack is part number 42T4787 / 42T4786, labeled 10.8V, 5.2Ah, 57 Wh.
Cells are Sony US18650GR (review here ), spot-welded in a 3S2P arrangement. There’s a little bit of glue or sealant around the cells, but it didn’t stick them hard to the pack casing. The back and sides of the pack are stuck tight together (plastic-welded or glued?), but the front (near the contacts that plug into the computer) was easy enough to pry apart, starting at the spring-loaded tabs on each side.
Exact text on cell:
This pack was giving an error on the computer when it was under warranty, so Lenovo sent a new one. Haven’t tested or attempted charging any individual cells yet, but I’m hoping there’s only one or a couple that are bad. Current plan (after an initial voltage check) is to take my charger outside for the initial charge attempt. As I understand it, the first charge (after cells have been sitting a while) is riskiest, so if they survive that and hold a charge, I’ll put them into rotation with my lights.
Hope this is helpful,
Andy