DIY S2+ Host and Review

I recently purchased a set of S2+ hosts from AliExpress to mod.
For this DIY, I used the following components…
1. 7* AMC7135 Nanjg105c - 2450mA (17mm)
2. XM-L T6 1A (16mm)
3. Convoy S2+ Host
4. SinkPad for XM-L
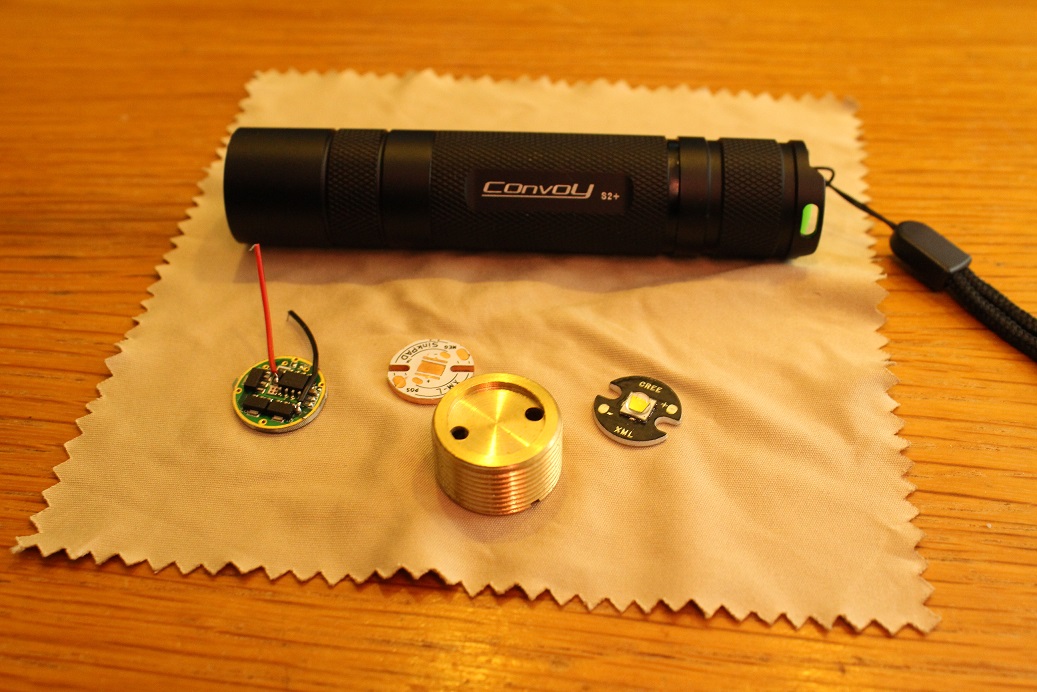
Total Cost ~ $18
First up, I transferred the emitter onto a SinkPad via the saucepan method.
The saucepan method involves heating a stainless steel saucepan on the stove, plopping the LED onto the pan and then plucking the emitter off when it gets hot enough. (Thanks WarHawkAVG!)

Next was the thermal pasting of the LED onto the pill and the soldering of the driver on the underside. A spring was also soldered onto the driver and the retaining ring was screwed on top of it to ensure continuity.


The pill was then screwed in from the underside of the head - major issue discussed later.

All completed!

Discussion
I chose to use a 2450mA driver solely because of the size of this host. It is an EDC, pocket-able torch, thus heat dissipation is a huge issue.
Running it at 2450mA on a Sinkpad allows longer use of the light on High mode without accumulating too much heat too quickly. There is a notable difference in using Sinkpads in comparison to the stock aluminium base they provide.
The driver, by default, has 5-modes. Since I screwed on the retainer ring over the driver, without shorting any of the stars, I can cycle through the different modes; Low - Medium - High - Strobe - SOS. For those that don’t like the last two modes, you can short the 3 star from the left to achieve
a Low - Medium - High programmed setting. Note that there is a soft whine on both Low and Medium modes.
The XM-L T6 1A is a cool white tint. It is very much more white than blue. I recommend this emitter if you like a nice white tint to your lights.
It is sufficiently bright for such a small host.
Review of the S2+ Host
The S2+ host is a slick looking EDC light, perfect for those that want a simple looking pocket light whether it be for work or for dog-walking. I prefer the way it looks over the S3 host which I previously reviewed.
It is all black and anodized, well machined threads and light (but sufficient) knurling on the handle. It comes with a reverse clicky switch - however both of my S2+ hosts had stiff switches.
The reflector is relative shallow and is OP. It has decent throw but is very clearly for flood with plenty of spill.
Pros
- Pocketable and portable
- Compact and light
- Looks simple and discrete
- Well machined
- Good spill/flood (not a thrower)
Cons
- Slightly costly for a host of that size (compare it to Convoy C8 host which is also $10)
- Stiff tail-switch
- Difficulty accessing head compartment!
This was the biggest issue I encountered. Since you cannot open the flashlight from the head, you must insert everything from the back. That means when placing the gasket, you must either glue/tape it down to the emitter so that when you screw it in, it doesn’t move along with the motion of turning. This is extremely troublesome. I did it by trial and error until I managed to turn the pill so that the gasket aligned with the soldering joints. It might not sound like a huge issue but if it isn’t done properly, you will encounter voltage drop issues and shorts.
Anyway, that concludes this DIY build. I’m not exactly what I will be building next as I am yet to decide what might be interesting to do.
Thanks for checking out this build and review!
