I’ve found that my dremel collects metal dust under the variable speed switch and that burns the two strips and leaves a residue behind when you move the switch side to side over the two metal strips that give variable speed, this is what has usually stopped mine in the past. If you get the body apart you can lift out and unplug the switch and just scrape those two strips and the prongs that touch them with some fine sand paper so you have bare metal again, and that might fix your breakdown, Good luck hope it helps.
Bucket, that looks pretty good to me. I can definitely see how the cutting relief would be hard to cut with the curvature of the cutting edge. The cutter you are making reminds me of a countersink bit. This is about the best picture I could find that illustrates the cutting relief behind the cutting edge. http://www.ebay.co.uk/itm/3PC-COUNTERSINK-DRILL-BIT-SET-CARBON-STEEL-COUNTER-SINK-BITS-12-16-19mm-DIY-/400619839436?pt=UK_Home_Garden_PowerTools_SM&hash=item5d46cd9fcc
I know you probably already know what it needs, the problem is just getting it there. It will probably always take some pressure to push into the cut, the whole length of the cutting edge is taking material with ever rotation. It might improve with more cutting relief but I would say its always going to take a bit of pressure to remove material.
I might be interested in buying one of these reflector cutters when you get it perfected. Looks good. ![]()
Have you tried any of the mothers aluminum polish yet?
Do you drill a center bore for the cutter to follow? That flat bottom cut might be the issue. If the cutter had a pilot pin to follow a matching bore it might help. Starting with a step drill to create a rough cone and finishing with the parabolic bit might also help. I’m no machinist but those are two things I might try.
Nah. It goes in the middle.
007, no mothers yet. My buffing compound seems to be doing the job. As to selling them, I'm wondering if I'll ever get it "perfected" at this point. Regarding the cutting edge relief, I found that if I am careful I can get it pretty close by hand with my disc sander with it's table angled at about 10 degrees. I just have to be very careful not to go too far with it.
Rufus, I did drill a center bore. My next bit will have a pilot tip on it so that it follows the bore better. The step drill is a great idea!
styXSIS, my Dremel's coupling between the motor output shaft and the outer shaft disintegrated. It's just a splined piece of plastic. I used some heat shrink to get it back together for now. We'll see how long it lasts. I wonder if I can buy that little coupler. I'm probably better off just getting a new Dremel.
I've hung it up for the day and will be going skiing tomorrow with my nephew home on leave from the Marine Corps. I'll be back to work on Prototype #4 Monday.
Thanks for all of the encouragement.
Buck
You might try a Proxxon. Its easier to give the link than to go into all the details.
You might want to make one of these for it too. Works great mounted on the lathe.
Before buying a new Dremel, you should look at this. Everything I can find on it information wise says it’s hands down better, stronger, quieter than a Dremel. Proxxon IBS/E
This will be my next rotary tool. The old Sears Rotary I have has worked well, but the bearings are on the way out. It’s only 19 years old. Pity.
Wow! Two posts for Proxxon in the same minute. I'm looking right now. Do either of you have the flexishaft for yours?
I have had my Proxxon for about 1 1/2 years now and I ported a head the other day with it. I’m not what you say your normal user. I have one more to do so I went ahead and purchased the flexishaft with the keyless chuck from amazon, showed up today. Took her out for a spin, It does appear to be of good quality like the rotary tool. Waiting on some carbide burr’s to come in to speed things up a little.
.
I bought the keyless chuck flexishaft, to many bad reviews with the collect chuck flexishaft. Free shipping and 3 days to the door. http://www.amazon.com/Proxxon-28622-Micromot-Flexishaft-Rotary/dp/B0029VQO58
I’ve got a jewelers drill for that, the motor hangs from the ceiling, powered with speed control via a foot feed. Zero Jacobs chuck can chuck up a hair, lol, not that I’ve tried to bore anything with a hair, but I do have some itsy bitty carbide burs that have like a 1/32” shaft on em. Dental burrs, bulk purchases for cheap. Down to my last ones, need to find a supplier again.
Put some new bearings in it. http://bearingsdirect.com/Ball-Bearing.html They have metric and inch sizes in miniatures.
I’ll look into that, I’m also ruining my $200 Makita Cordless drill by using it as a mini lathe, the side pressure is causing issues. Need to reinforce the bearings or put new ones in it and it’s only a couple of years old with very little use. Years ago I bought a commercial black and decker corded drill to polish my S&W .357 Mag. The side pressure ate it up pretty quick, but I opened it up and put brass shims in the casing that holds the bearings and I still use that drill to this day! That was ’91. So perhaps like treatment to my Makita cordless will give it a chance to last as well.
Bucket, that’s such a good picture that I was able to plot angles to within a degree. Overall, it’s much better but if you make the focal point at the flat, the beam will be darker in the center because no light will be reflected directly forward. The focal point should be further back.
All images are saved in an uncompressed, lossless format.
I used a higher resolution parabola to get more precise points and angles.
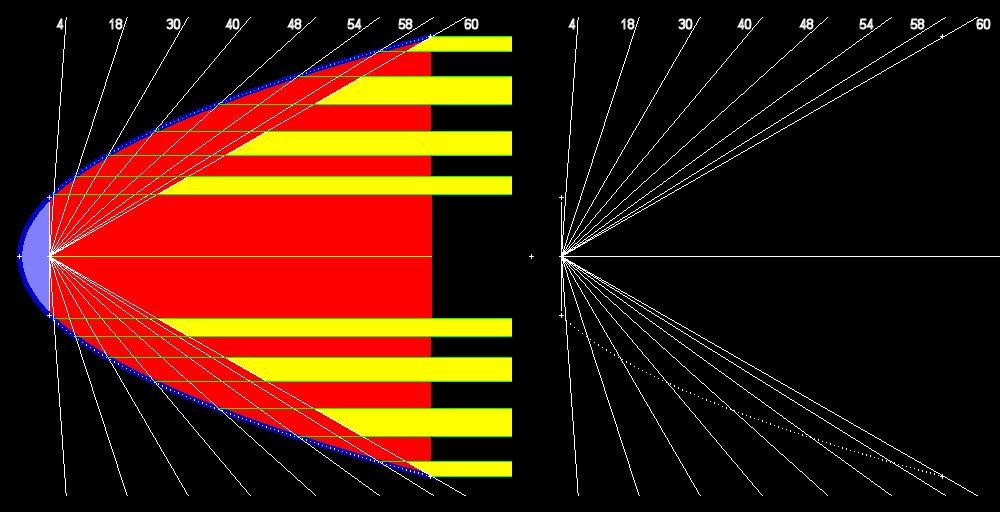
And here’s how your’s should perform. It shows the “spot” direction only, not size. The dotted line on the bottom is a parabola’s contour.
Bucket will stand no chance to empirically find out how his reflectors will work, everything is predicted 
 . nice work lightme! :-)
This is a fantastic thread, great machining and technical demonstrations! Learning a lot here ![]()
I'm sore all over from trying snowboarding for the first time. I thought I broke my whole chest and face once.
Anyway, I did some machining despite the pain. I made this one almost full length since my focus point calculations seem to really suck. I also got a spindexer from the men in brown today which will really help me out on the mill.
Here is a pic of the beginning of bit attempt #4. I made one mistake on it, but it should'nt be too much trouble to fix. You might also notice that I have abandoned using the parting tool and instead am using a regular facing / turning insert rotated a few degrees.

Looks good to me, I’d really love it if you could link the larger pic for detail. But appreciate the effort it takes to stop and take pics at all. ![]()
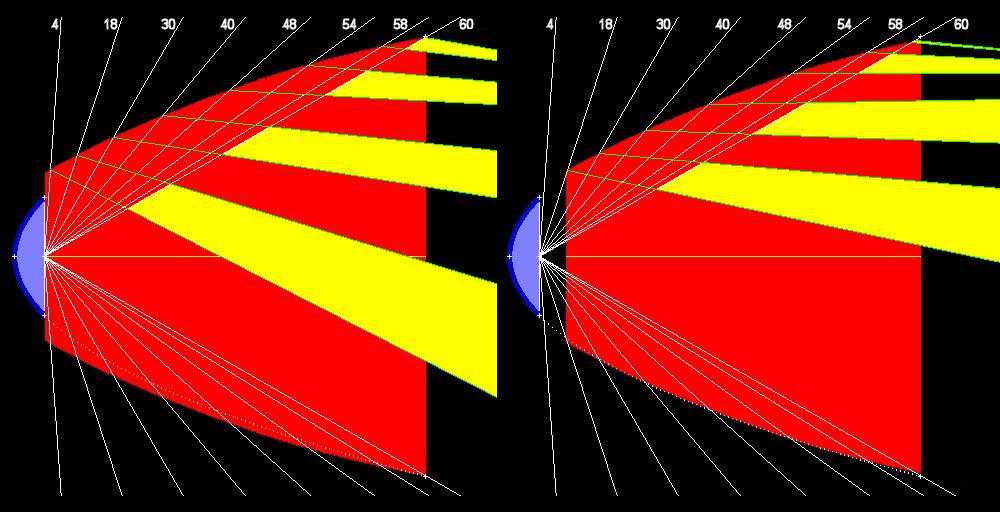
To be fair, this is a small reflector and if it’s under a inch in diameter, the LED’s best focal point would be less than 1/16” off. Shimming should be easy.
Cooler colors represent the areas of narrow beam production while warmer colors show areas that produce wide beams. It’s important to get somewhere between the blue and green areas focused to infinity to make the center of the spot (or flood) brighter than the rest.

Your wish..

Here it is after filing and sanding. I fear that the filing and sanding stage is where most of the error in this process is. It is imprecise. I basically file until the machining lines start to disappear, then I sand.

On to the mill.