Yeah I agree, that’s always bothered me when that is where it’s reported from. Measuring at the emitter for A reading is “cheating”, since you are never going to see it in RL, who cares? What you see through the tail cap is more close to the result you get in actual use, so thats where it should to be measured and reported. ![]() Now if you are going to use the measurement for data on where to improve the light, that’s a different story…
Now if you are going to use the measurement for data on where to improve the light, that’s a different story…
Uh, don’t you have it backward? The tailcap is analogous to “the crank” and the emitter is analogous to “the wheels”. Of the two of them, the emitter is where the real world results are seen.
Could I ask a favor??
Some of you who have already received this BLF version. Could I possibly get you to measure the internals of the head? I need to know the dimensions in order to make a heat sink for a 3up while I am on board this ship and have access to a lathe. But I will not be able to make the measuring before I get home.. Doh!
So. Inside diameter. Inside diameter of recess where mcpcb sits. Height up to the underside of lens when assembled.
Please :-)
My flashlight arrived today. I ordered Nov 8th, immediately after the codes were released for the second group of buyers. Also my black giftbox was taped all around |(
Thx guys for coordinating this groupbuy & testing, it’s a nice designed light. At first sight, the spread & intensity of this flashlight seems comparable to my Convoy C8 The Neutral White color of the EE-X6 is much different compared to the Cool White XML2 U2-1A of the C8. Don’t know yet what tint I prefer.
Yup you are right I didn’t complete the idea, (in a hurry between tasks as usual) I meant measuring at the emitter WHILE bypassing the spring or a direct line from the driver side is “cheating” since nobody will get that current in RL without mods and the light shouldn’t be “rated” that way, not DBCstms recent post of soldering in a line to measure at the emitter. I think this is part of why many expected higher Amps through the X6, though its “our fault” for not realizing this and neglecting to account for modifications.
I measured the sample light at the emitter, and at the tail, before spring bypass, and after.
Measuring at the emitter is exemplary of what you are getting when you use the light. It’s fully assembled Except the bezel and reflector are removed to get at the emitter. This tells you real world exactly what the light is doing, spring losses, driver losses, all things taken into account.
I cannot create electricity. I cannot make a light show more than it is actually doing. All we can do is lose efficiency with our methods and lose truth.
Ledsmoke, if you base on the 20mm diameter of the pocket at the shelf where the emitter sits, you can figure 2mm in height from that point, then 5.6mm to the copper mcpcb of the Noctigon triple board. The diameter inside the head is ~31mm for a snug fit. The 32mm Noctigon has to be filed down somewhat to get it to fit in. It’s about 31.7mm on the ones I tested and built.
So, overall height between shelf and large Noctigon is 7.6mm. Overall diameter is ~31.7mm. Stepped down to 20mm for 2mm to fit on the shelf for optimum surface contact inside the head.
Maybe this will help. This is what mine measured, AS BEST I CAN RECALL…the vertical measurement and side to side were measured, but this is in my individual light. This should get you very close…
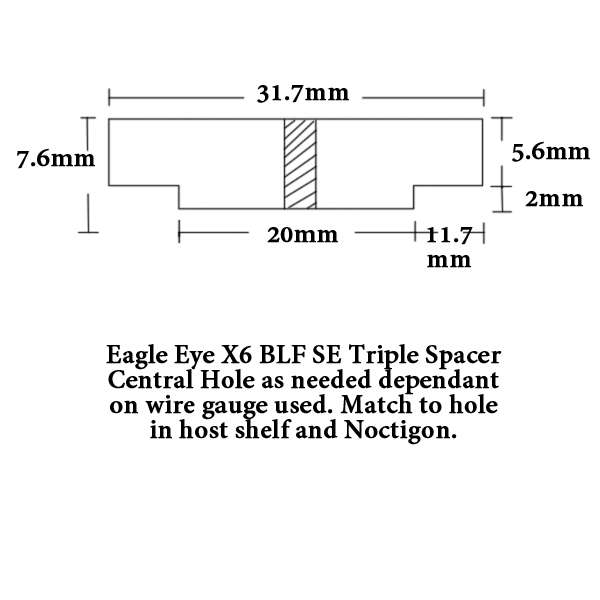
This is specifically to make a 32mm 4 emitter Noctigon fit in conjunction with the Ledil CUTE-3 SS Triple 35mm optic. The independent central footprint will need a hole drilled through it for the leads to come through.
This one is using copper bits and pieces I had, combined with a 20mm SinkPAD, to raise the Noctigon into the right position. As such, there’s a lot of air space under this Noctigon and I used that to bring the leads in from the outer edges. With a full contact heat sink, like I drew above, a hole will need to be drilled through the un-used center portion where you see the bare XP footprint.

Ah, I thought some of “measured at emitter” measurements included some of your mods and confused us newbies as to what Amps we were getting and may be part of the problem of our expectations vs reality is all. ![]() Maybe I was the only one mixing the two. But, I’m not so sure you can’t create electricity with some of your measurements
Maybe I was the only one mixing the two. But, I’m not so sure you can’t create electricity with some of your measurements ![]()
![]()
BTW, with that setup, do we know what temperature things become dangerous for melting components inside and how quickly you would get there?
Mine get’s hot pdq, but not critically so. With a tail amperage of 11.25A the 2500mAh cell isn’t going to go for long, so it’s kind of a race to see if the light can heat up as fast as the cell can be discharged.
This is why I’m wanting full contact inside the head under the copper star, to get heat out to the air everywhere possible, throughout the head and into the nice deep fins. Me? I’d prefer copper all the way. But it’s been said it doesn’t really matter after the star, so, with all the weaklings in todays world being worried about a few additional ounces of weight I’m having the machinist look at doing it in aluminum. I LIKE my lights having some heft, love how they feel when you grab a smaller light and the thought flashes through your mind that it’s glued down or stuck because it’s heavier than you would think. Don’t know if that makes sense or not, but a small light with a big chunk of copper inside is very deceptive.
Anyway, giving it a try and am considering having him make a prototype in copper as well as aluminum and doing some comparisons to find out if there’s any real world gain to using the more expensive and heavier metal.
Mine doesn’t even fill the 20mm column with copper. It’s a couple of scrap pieces of thick copper with a star on top, all re-flowed together while in the head to ensure the big Noctigon is centered. The one that hit Cali today has the 5 20mm stars in a column, again all re-flowed in place while in the head of the light. As you can see by the diagram, this leaves a lot of space where the heat sink isn’t in contact with the light, only allowing heat to flow through the edges of the copper star and the base of the sink. If this design works well, it should be much more efficient, Al or Cu either way.
I would have guessed its cost difference that is most significant? I can’t imagine that much copper being too significant in weight anyways.
If I was worried about that, I wouldn’t alternate carrying a small light around with carrying my J18 and my 15x 4x26650 light while hiking. And, if that tiny light was even one whole pound heavier, I might not even notice while walking my 225lbs of pulling dogs.
Either way, nice that you are testing both, I’d say: functionality>cost>performance>weight and in this case, functionality = obscene blast of light function first ![]()
Mine showed up yesterday. I haven’t had much time to do testing, but they seem nice so far.
The beam intensity is significantly lower than my XinTD C8, but that’s to be expected. I’ll fix that, at least on one of my lights, with a de-domed XP-G2 and BLFDD driver.
On at least one light, I noticed a dark ring in the hotspot. Very unusual. It seems to be about a third of the way from the center of the hotspot to the outside edge, a thin circle which is visibly darker than the rest of the hotspot. It might just be a slightly off-center emitter, but I haven’t seen this effect before on other lights.
The boxes have a bunch of icky tape on them, which I figure I’ll remove later with a hair dryer.
As for the clips, they’re easy to remove by using the provided lanyard. Just slip a segment of lanyard under the clip, move it back to the tallest point of the curve, and pull. Comes off easily without scratching the light or hurting my hands.
The light is significantly smaller than a C8, very similar to a SF L2m or a Convoy M2… but with a thinner battery tube and a wider head.
The low mode is nice, but the other three modes seem too close together.
Mostly, I’m happy to finally have a genuine BLF light, and after I mod one I should have a nice pocket thrower.
ORSM! :-)
I received mine today. Is it normal to hear a whistling sound specially on turbo mode, i think it’s from the driver?
Are you sure about that? According to specs it should have lvp…
The sample I tested had Low Voltage Protection. I haven’t tested my production versions but should be getting 2 in today.
Ofc it does! That fl is always in my pocket at this moment, i already draw 4 batteries with it, when battery goes low, the torch auto switch on moonlight - blinking mode
I dont know if it cut off power totaly, have to test it, but isnt that enough for you to be warned?
Mine don't whistle at all.
It could be an earthing issue. Simplest thing to try would be to make sure that the retaining rings in both the tailcap and the head are tightened. both of my tailcaps needed nipping up.
A warning isn’t enough if the light has been left unattended, the user falls asleep, or if it accidentally turns on in a bag.
I think low voltage warning followed by cut-off is the best for my needs. But low voltage warning is better than nothing.
Well, I guess people just have to take some responsibility and not leave a light unattended. In a travel bag lockout should be applied or the cell removed.
Sometimes brains are just flat out better than technology. ![]()
Let’s not forget that Li-ion cells are potentially dangerous. Care needs to be taken. Don’t get complacent and leave a light on, unattended. It is OUR responsibility to take these seriously. They are not toys.
or use protected batteries ![]()