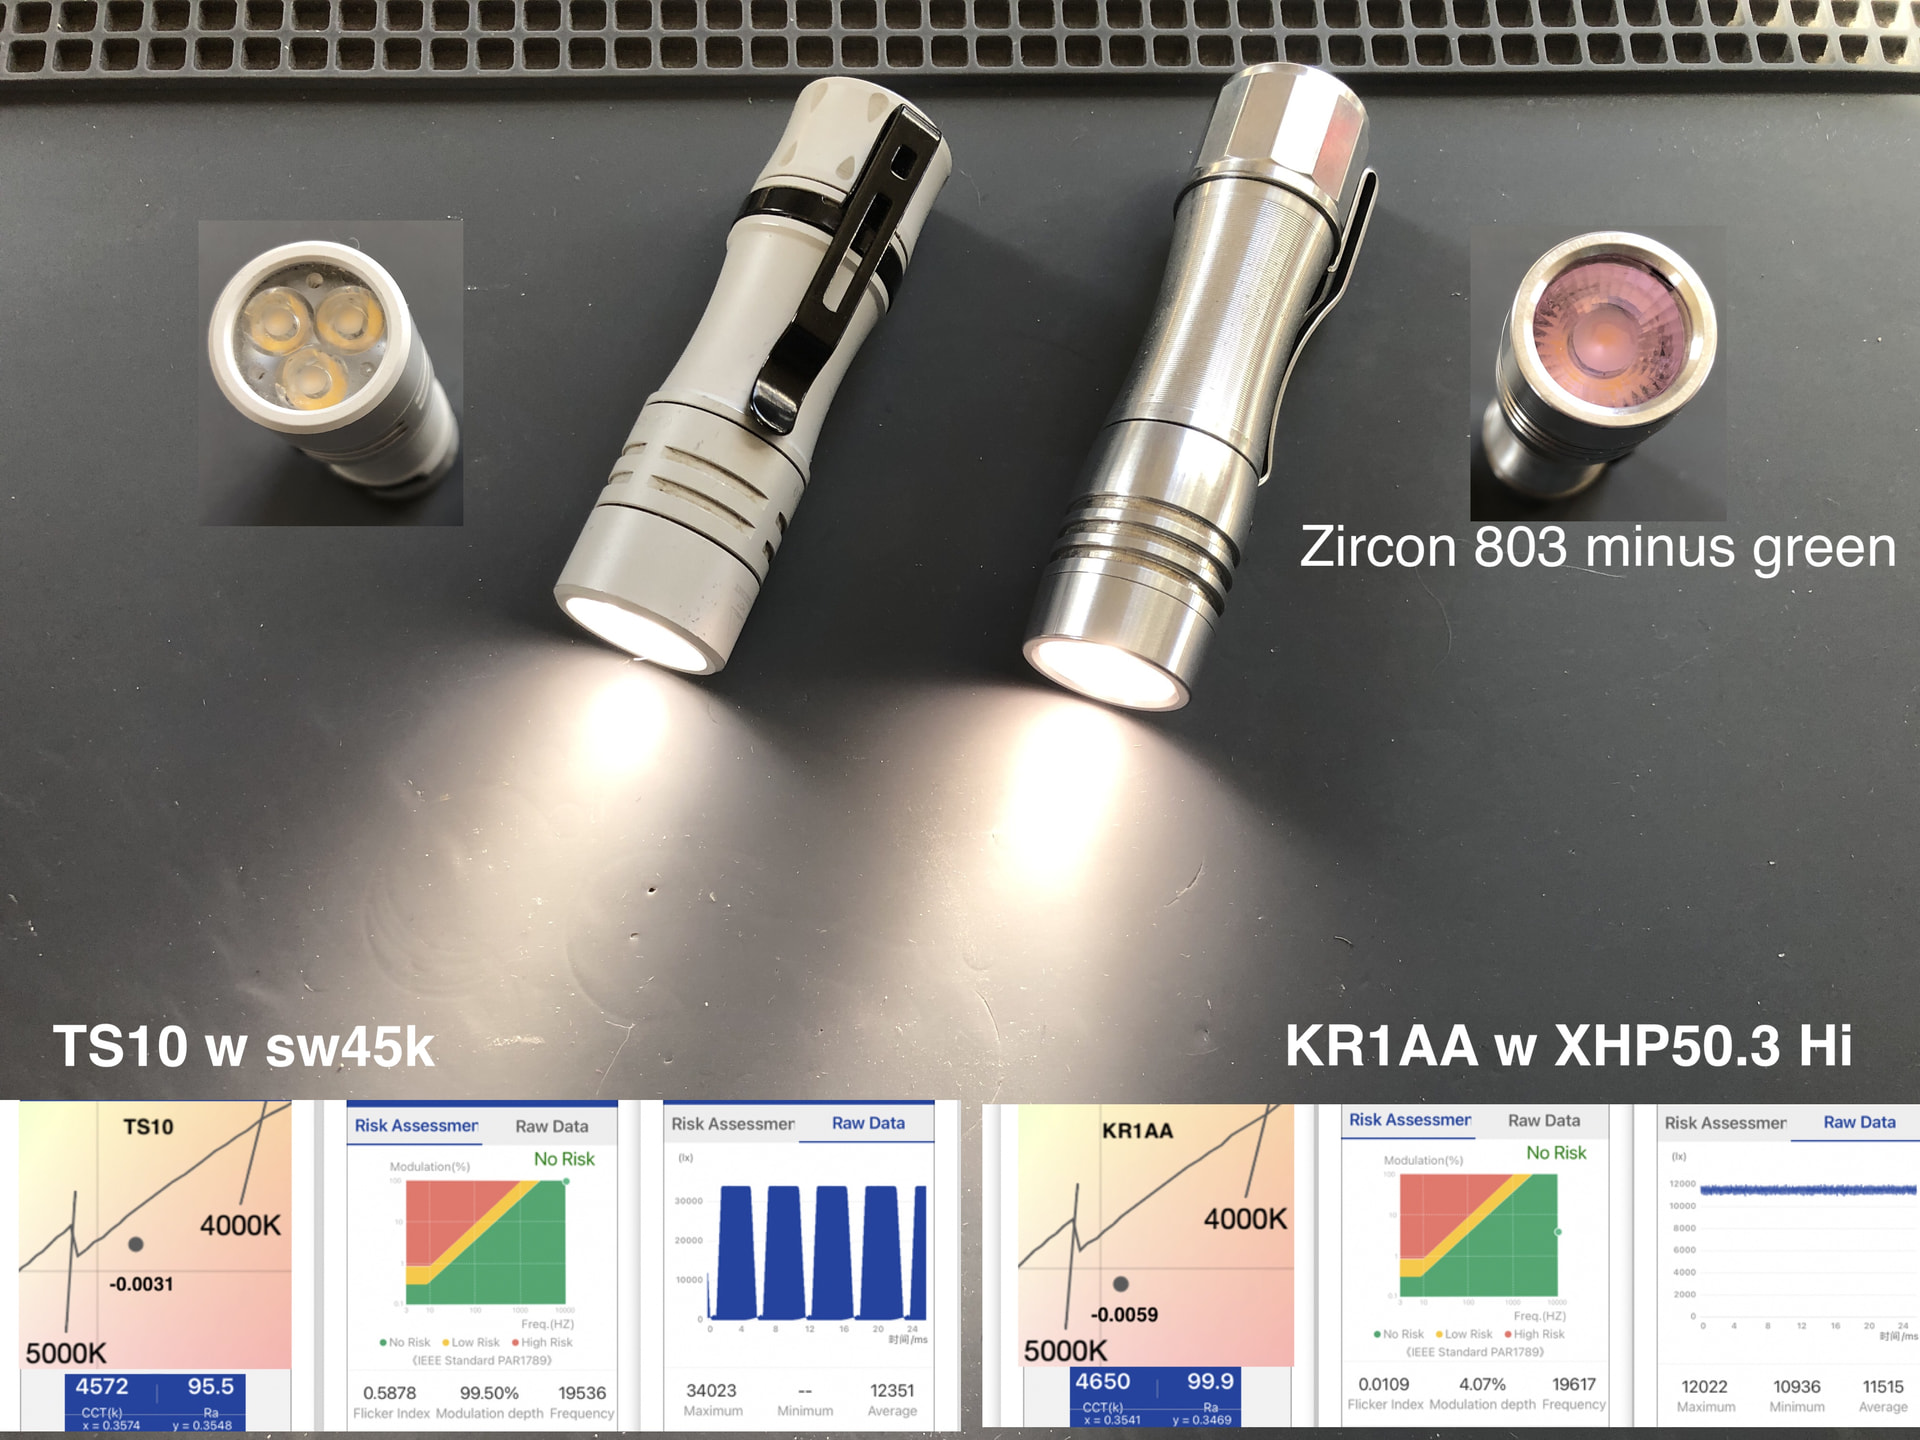
That’s a pretty big penalty, wow. Maybe to be expected with most lumens coming from green but still
the 803 I used reduces output 20.1%. On a KR1AA the filter can be placed between the glass and the optic. Do not try to clean the filter with alcohol, that removes the pigment and ruins the filter. The glass lens can be used as a template to cut around the filter.
On a Zebra or other lights that cant be opened, and dont have an optic under glass, the filter can be placed on top of the glass. Here is a video about that.
@Boaz sells Lee Zircon filters in large sheets, or you can buy the sample book if you only need a small amount
I dont recommend the Lee non Zircon Filter, it is less heat resistant.
here are the light transmissions for each filter..
Zircon 802: 75% transmission
Lee 248 Half minus green: 71.5%
Zircon 803: 79.9% transmission
Lee 249 -Quarter minus green : 81.5%
Zircon 804: 83.6% transmission
Zircon 805: 86.6% transmission
Lee 279 -Eighth minus green : 87.2%
the filter also lowers the CCT and slightly raises CRI Ra and R9. The filter wont turn a low cri LED into a High CRI LED.
It makes more sense to have an NTG50 4200K with no filter, than to have an SFT70 5000K or XHP50.3 Hi 5000K with filter..
A filter on a Low CRI LED such as the SFT, or on a green tinted 9050 LED such as the XHP, is better than nothing, but a poor substitute for a High CRI LED without green tint.
otoh, if SFT or XHP are the LEDs your light has.. a filter will knock down the green tint.. because the filter is a Pink tinted photo gel.
here is the result of Zircon 803 on the Low CRI SFT-70 5000K:
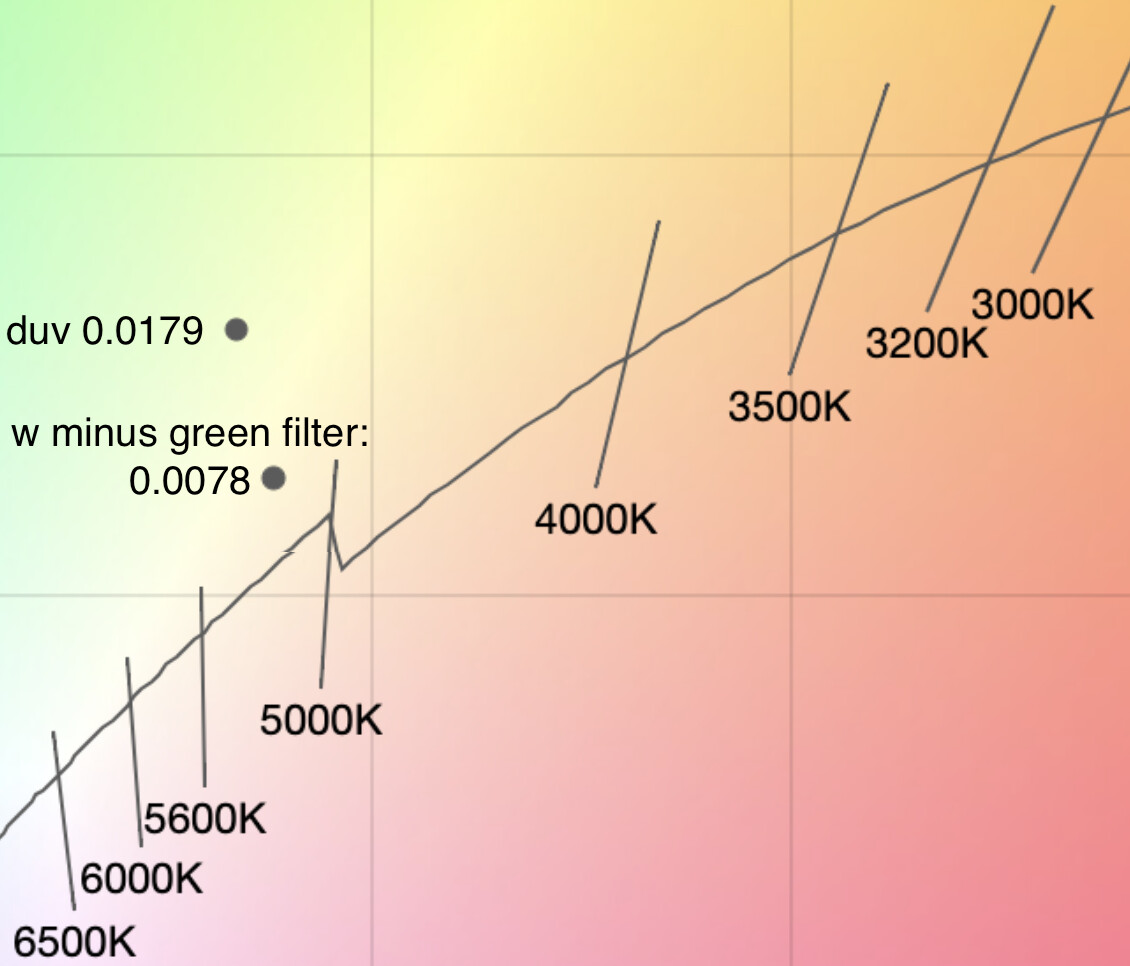
(duv data is from my Opple 3 at ceiling output (the actual values are not from a calibrated spectrometer, but show relative change)
2 Thanks
If you buy the small zircon sample from Lee the shipping on it is another $9.95 so the total shipped is $20.00
The samples are much smaller too …less than 1/4 of the sheets I sell and they include dumb filters that no one would ever want or use .
Otoh if someone is hell bent on buying the sample packs I have a number of those too .
Thanks Jon for reminding people not to clean filters with harsh cleaning products.
3 Thanks
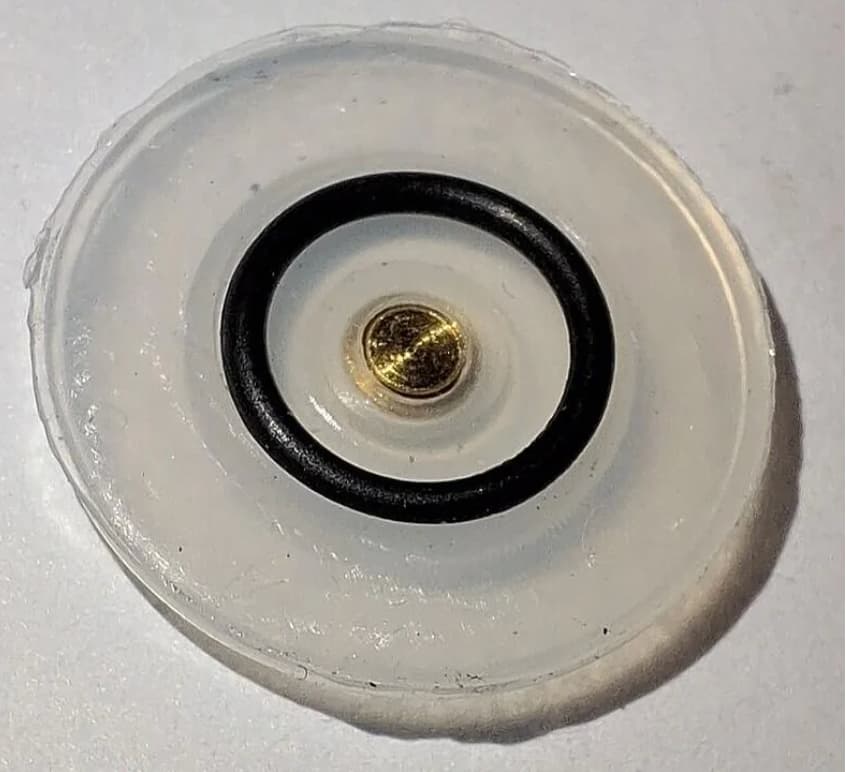
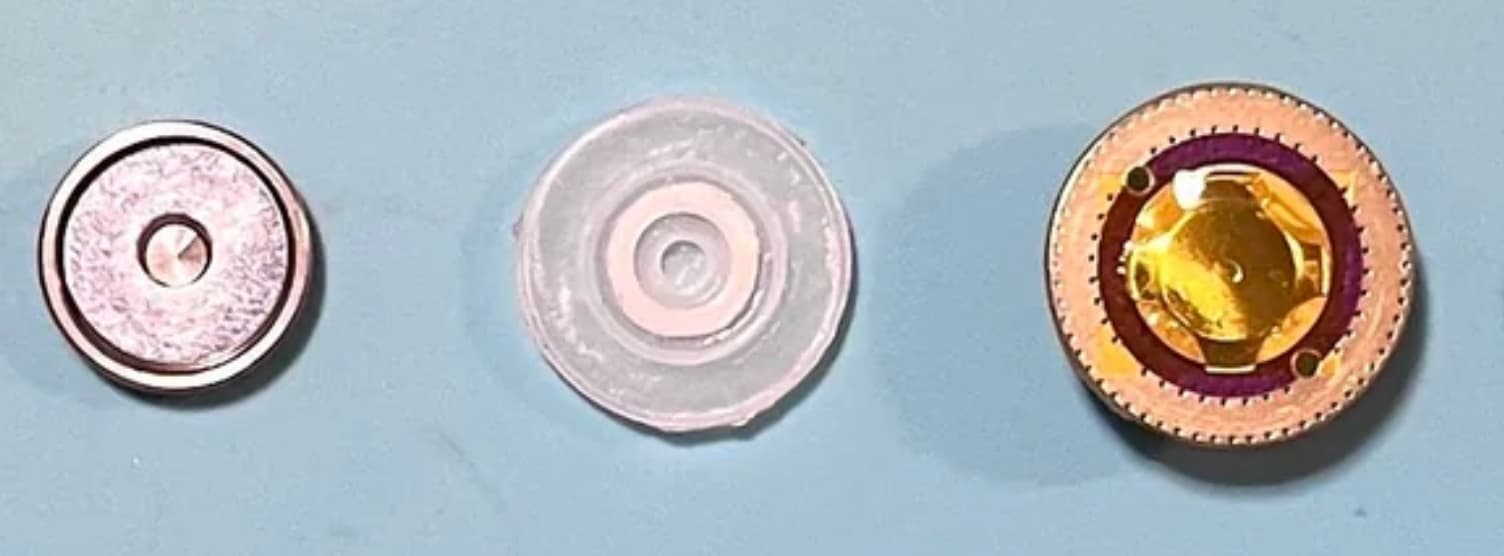
A switch mod has been reported that works on the V2.5 KR1AA. It increases activation pressure and makes the edges of the button more responsive. It is similar the FWAA O ring mod and involves removing the brass nubbin from the center of the rubber switch cover:
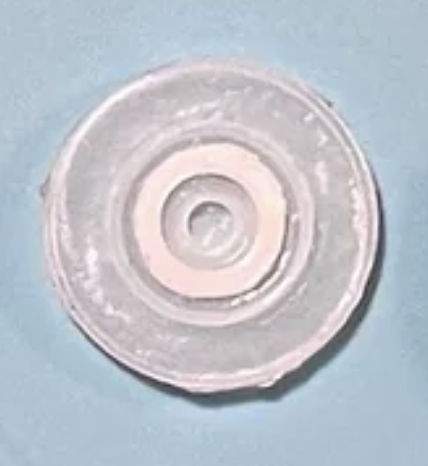
(photo thanks to @Bean_Master7)
(I think the switch works without the nubbin for him because his switch has a magnet nested under the button)
details in his post, he modified a centering ring, but my guess is the 9x1mm O ring that @Firelight2 and @Tankolai used on their V1 KR1AA’s would produce the same result…
the main difference is Firelight2 and Tankolai did not delete the brass nubbin (maybe because their buttons dont have a magnet, not sure):
(photo thanks to Tankolai)
1 Thank
I just spent an hour trying to increase the resistance in my V2.0 switch as shown in jon_slider’s last post.
Unfortunately, I had no luck. If I remove the nubbin, my switch does not work at all even with nothing inside the boot. The tip of the metal switch button is too short to actually depress the popper without some kind of nubbin or extension.
I tried alternate nubbins made out of plastic or grip tape that were shorter than the stock metal nubbin. And I tried sticking grip tape on the tip of the post on the bottom of the metal button. Those allowed the button to work, but the results were unsatisfactory. The resulting button press felt slightly mushy.
I was also unsuccessful actually increasing the resistance. In every case, resistance wasn’t noticeably better than stock. Definitely not safe to pocket-carry without lockout.
I wonder if the problem is my button. None of my KR1AAs have a magnet, however my V2.0 has the stock metal bronze button, while my V1s have buttons with Trit slots.
1 Thank
I’m glad you managed to get it apart, I reckon I spent an hour melting glue and warming it.
I see in Tankolai pic that Jon has added above that there’s a black O-ring in there. I tried a fairly hard nitrile on in my light, the type that sit in a recess in thin water pipes, and couldn’t work the switch. I’m wondering if something more mushy like the soft red rings supplied with Firefly and Hanklights might work better because they’re squidgy?
At the moment my completely non-working switch is working like a dream after the rebuild and I’m in a “if it ain’t broke don’t fix it” situation where locking out with 4 clicks is second nature.
4 Thanks
I also use those plumber orings! Have you tried a thin flat plumber’s washer instead? (I have not because I don’t have any), the type that seal ball valves?
what does the underside of the metal switch button look like on those two versions?
fwiw, here is a pic that includes the magnet in Bean_Master7 button:
it looks to me like the magnet is the part that presses on his rubber switch cover, and is probably why he does not need to use the brass nubbin
1 Thank
TBH, I’m loathe to take it apart again as it’s working so well. Functionality over trying to improve the feel.
5 Thanks
The metal button on the magnet-less KR1AA v2 looks like one in the picture above except no magnet. It’s a hollow metal button with a fairly narrow vertical post pointing down. The tip of the post is the only thing that depresses the button.
I could see how a donut-shapped magnet that extends possibly even below the post could change the switch feel. It might be that filling in the space with a donut shaped object might help.
1 Thank
I tried filling in the inside of the metal button around the post with flat rubber. For the filler I used a section of 3.5mm thick o-ring. It filled the gap but stuck out too far so I shaved it short with an x-acto knife.
I then reassembled the light with nothing inside the button boot. No nubbin.
The result is very encouraging:
- Firm click on cycling the switch.
- No missed clicks (where you hear a click, but the switch fails to cycle)
- Pressure required to activate the switch increased from stock 350g to 2900g. This amount of resistance is almost twice as much as I’d like, so I’ll play around with adding filler inside the boot to try to get it just right
It looks like the reason why my v1s’ switches were so much easier to mod than my v2, was that my v1s’ metal button boots came with filler preinstalled due to including a trit slot. It might be that there is no real change between the v1 and v2 switches at all.
Update: In addition to the above, I inserted a ring cut from sheet polystyrene plastic inside the button boot. The ring is like the white plastic ring cut from an insulating disk, but thinner. This reduced activation pressure to about 1800g. This is still slightly firmer than I’d like it, but is a vast improvement over stock.
I’m quite happy with the KR1AA now that I know how to mod the switch so no lockout is needed. About the only thing this light needs is a thicker clip and to come in Ti-Cu.
1 Thank
yay!
very happy to hear that a filled in metal button (as with a magnet, or the trit button) is working ![]()
1 Thank
So, runtimewise, run twice. Freshly charged 2500mAh NiMH. Starting voltages per 3c vcheck: cell A 1.38v
cell B 1.40v
Parameters:
Ceiling to 56c, or -56, A.k.a. 95/150.
First test cell A: 14:30-15:42 for huge stepdown to about 15 lumens. Concluded the test, but the 15 lumen mode would have run for a while more.
Stepped down voltage: 1.20v
Sustained ceiling=1h12m
2nd test cell B: 16:25-17:38 for huge stepdown. Allowing the cell to run “low” after a short rest, part b started at 17:55. Will add the termination time later.
Stepped down voltage: 1.2V
Sustained ceiling=1h13m.
Stepped down mode=decided to terminate at 1.1v, 18:40. Still maintaining the 15ish lumens with no issue nor stepdowns.
Over the rather small sample of 2 runtime tests using 2500mAh NiMH cells, it would appear that my particular Kr1AA, sporting an NTG50 4200K can sustain level 95/150 for 1 hour and 12 minutes (72 minutes) before stepping down to a lower mode. Will follow up with the extended runtime of the lower mode when it drops lower.
3 Thanks
Interesting. I have the trit slot in mine, and my button feels good and I’ve never missed a click. I wonder if the filler differences between switch type is what is making the difference for people.
“making the difference” in whether a button has missed clicks, or has unintended double clics, is not a function of the button having or not having a trit slot
this person has a trit button and their switch has been giving unintended double clics, when trying to do a single clic:
“The button does things randomly often. It will double press on a single. I will go to turn the light off and get blasted with turbo. Sometimes the light flickers up and down like it thinks I’m toggling rapidly between ramp up and down.”
and to make matters worse, their button has now stopped working altogether, after soaking the tailcap in alcohol overnight.
the metal dome that is the switch, is held by adhesive tape. Soaking in a solvent ruins the adhesive, and then the switch stops working.
more details here:
“The reason mine wasn’t working at all after I used the debonder is because the cross shaped flexible switch had slid off to the side.”
he fixed it.. described here:
moral of the story.. retaining rings that are glued should not be freed with a solvent that will also release the adhesive tape over the switch dome.
imho the root cause of switch problems is that the metal dome is held by tape
when I first received one of my KR1AA, a V1 with no trit nor magnet, I also experienced unintended High outputs, as if I had double clicked, when I was just trying to turn the light off..
that has stopped happening. Im guessing the tape over the metal dome has released just enough around the edges, so the domed metal switch can be pressed and then springs back freely.
2 Thanks
In fairness, I only took it apart because it was malfunctioning badly from new, to the point it was useless. It wasn’t coming on, not switching off, leaping to turbo on one click etc. Hank offered a refund or replace and having read of several other cases, I chose the refund and to wait while the problems are ironed out.
Already mentioned everywhere, but clip tougher and non spinning, tailcap lockout got rid and clicky improved, and ideally the TIR lenses formed individually or the break off point of the moldings improved. Some lights don’t show the break, mine shows it as if it’s been chipped.
The debonder is thin and watery so it can get into threads, but mine escaped the bottle and so I just filled the tailcap and let it soak overnight. Once open, it was an easy job to make another disc and put it back together. If I had to do it again I wouldn’t fear getting debonder under the tape because I wouldn’t re-use the disc anyway.
3 Thanks
thank you for all the info about the switch malfunction, disassembly, and repair ![]()
I hope you dont mind I also posted links to your experience in this thread on Reddit
imo, the differences in switch function between units, is mostly related to how the tape was applied to the dome (luck of the draw), and how tight the retaining ring was closed (skill of the assembler).
more details in this post, and in Hanks words:
“We ensure each button to have solid/crisp clicking feeling, thus the user does not need to mess with the button. Actually, there are some skills to assemble the tailcap to have good click feeling, I don’t think it’s good for the regular user to disassemble it.”
1 Thank
looking forward to the next batch of KR1AA, due end of this month.. I would like to get a Polished Silver w NTG 4200K and tailmagnet
meanwhile,
This Raw KR1AA has become a favorite for its dual fuel and NoPWM, displacing my MAO TS10 that uses PWM.
2 Thanks
I’m definitely getting a ‘louder’ emitter. The 2700K is firelight warm, but now I know the beam on these is so smooth it’ll be good to have something more versatile.
Has anyone commented on the tail magnet? It’s such a small area I wondered how sticky it is. Had a Wurkkos HD10 slither down the fridge earlier ![]()
I have a magnet on my KR1AA w 2700K and it holds well to my refrigerator, with no risk of sliding..
The magnet on my HD10 was weaker and not trustworthy.. I added a second magnet, just slipped inside the spring, to make the HD10 hold reliably.
agree, 2700K is a more relaxing LED, for specialized use at close range.
I want to add another KR1AA to my options, with a cooler NTG for more general use.. debating 4200K or 5000K.
here is some data Punga32 shared:
the 5000K has slightly more candela (about 14% more than 4200K)