Is the nubbin magnetic?
- I would have preferred the clip to have the same width and thickness as the D3AA’s clip. The extra metal would have given it a bit more grip.
I do agree with you about the KR1AA clip. Even though I really dislike the stock D3AA clip (mine is 1st gen, apparently there are shorter versions available now), but the pocket material “socket(?)” where it bends is wider than the KR1AA.
The steel thickness on the KR1AA clip is a bit too thin and springy, imo. I feel like I may end up breaking it if I’m not careful. maybe not, because the FWAA clip on my D3AA is about the same. however it is wider against the length of the light, and seems more robust that way. I do really like that it doesn’t protrude from the body of the light very far. it gives me zero hotspots.
Overall the KR1AA clip is good, but not super great. it is completely serviceable, and it’s super nice that we didn’t get a friction fit clip. All it is is a shrunk-down KR4 clip, similar to the entire light.
I will read your switch fix comments once I tear mine apart. I would love to fix my accidental activation/ghost clicks (not sure what else to call it?) problem. As mentioned there have been a lot of times the switch felt like it activated while it did not, leading to accidentally locking out the light or blinding myself.
1 Thank
Tick…tock…tick…tock…
Or…tikkitikkitikkitikkitikkitikkitikkitikkitikkitikkitikkitikkitikkitikki if you have a standard mechanical.
Great To know!
Really appreciate your detailed info.
1 Thank
I may try to mess with my KR1AA button tonight. I got a few extra Reylight fwd clicky fix conversion kit that come with nubbins, but I’d almost guarantee they won’t work at all in the KR.
I haven’t needed these kits before for my pineapple mini MK1/2s, but bought them just because.
1 Thank
I did an oring mod just like with the FW switches. I searched every oring I could find. Ended up using one from the box of vape atomizer parts that I kept for some reason.
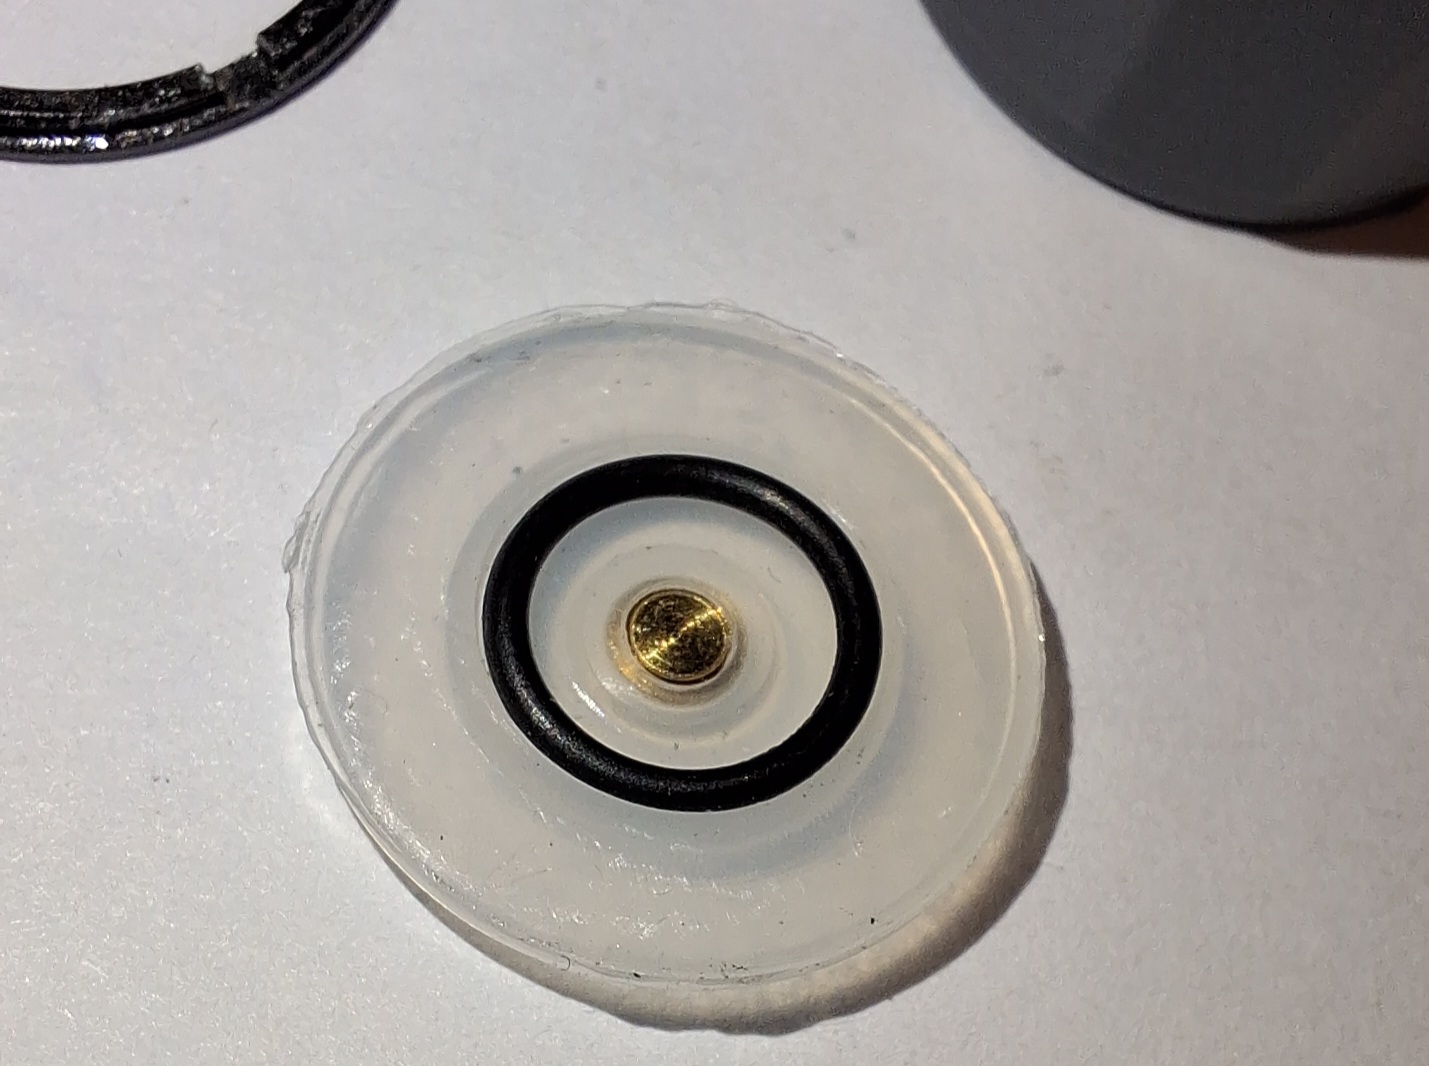
The o-ring I used is 9mm×7mm×0.9mm.
it’s not perfect, and I think it’d be better with a slightly thicker one, but the switch has improved. the feel isn’t much different, but it brought down the number of nonresponsize “clicks” down from about 50% to maybe 10%, by my estimate. when I pulled mine apart there was some dust and tiny shiny specs of what looked like the same color as the bronze PVD on the button.
didn’t really mess with the nubbin, and these Reylight things for his switches look just like a tiny copper sticker. it wouldn’t stay on the brass nubbin and I would’ve had to somehow trim it down I think.
1 Thank
I’m quite pleased with my nubbin and o-ring switch mod. Pressure to activate the switch is fairly high… more than a stock TS10, but probably less than my first run FW3A with o-ring mod (the first run FW3A’s switch used a higher resistance popper than subsequent FW3As).
My KR1AA has had zero nonresponsive clicks. Every click successfully triggers the switch. Both before and after modding. The switch works 100% of the time.
However, I have had a couple minor issues with my KR1AA:
- The edge of the lens is chipped in one spot. The chip is very small and doesn’t affect the beam, but the o-ring goes above that spot so it might affect the waterproofing. I haven’t tested it. Perhaps future versions should use a thicker lens. Or slightly modify the design of the head, bezel and optic so no lens is required.
- A couple times the light would only turn on in low mode. The problem was the driver retaining ring had become loose. Tightening it fixed the issue, at least temporarily. If the problem recurs I might add a spot of low-strength threadlocker. Doing so should allow the retaining ring to still be easily removed, while also preventing the ring from gradually unscrewing itself.
I just emitter swapped the FFL5009R 5000K in my KR1AA to NTG50 5000K. The result is improved. The FFL emitter isn’t bad, but I prefer the rosy tint of the NTG.
1 Thank
Sounds like their are issues and I will wait until they have all been resolved before i make my purchase…
Thankfully, in my case, lol. I’ve got the funds set aside, and I enjoy homebrewing solutions. I have another idea that involves a second switch, placed to mirror the first one such that the apex, or top of both switches are touching, then I shave off the nubbin portion so the 2nd switch can fit.
2 Thanks
first run FW3A switches
All of mine are later models. I just bought a hnbr green oring kit at my last job that had the perfect size. they’re not silicone and they’re pretty stiff. none of them fit inside the KR1AA.
I would say with the o-ring I put into my KR1AA, its click is not as stiff as all my FWs, but that might be because of the type of oring.
zero unresponsive clicks
I’m not sure why mine is doing it. it’s much better now, but I still might take the kapton tape off of the switch popper. did your KR1AA have a contact washer between the tailcap and the switch board, like the FW series? mine did not, I don’t think it’s supposed to have one?
chip in the lens
that is unfortunate. mine wasn’t, but there was a tiny piece of plastic from the TIR molding point (or where they break it off the sprue?) that was trapped between the glass and the TIR. I cleaned all the threads up afterwards. I don’t think that would cause any problems, though. I haven’t had my retaining rings come loose, but I have found that a button top H10 is a tight fit whereas it’s fine in my D3AAs.
emitter swapped
I already posted this in this thread I think, but I ordered mine with the 3500K FL5009R and it was extremely rosy, too rosy for me for anything other than a candle mode nightstand light. I swapped mine to 4000K FL5009R (which is pretty rosy), but almost went 4200K NTG50. I find that the 5000K FL5009R is very neutral, not rosy at all, but I only have samples in 3V although I don’t think that would make a difference. I do really like its current emitter. I believe the NTG50 version would be a bit rosier. to me the 4000K 5009R looks very similar to the first batch FL351A 4000K (rosy) emitters I have.
1 Thank
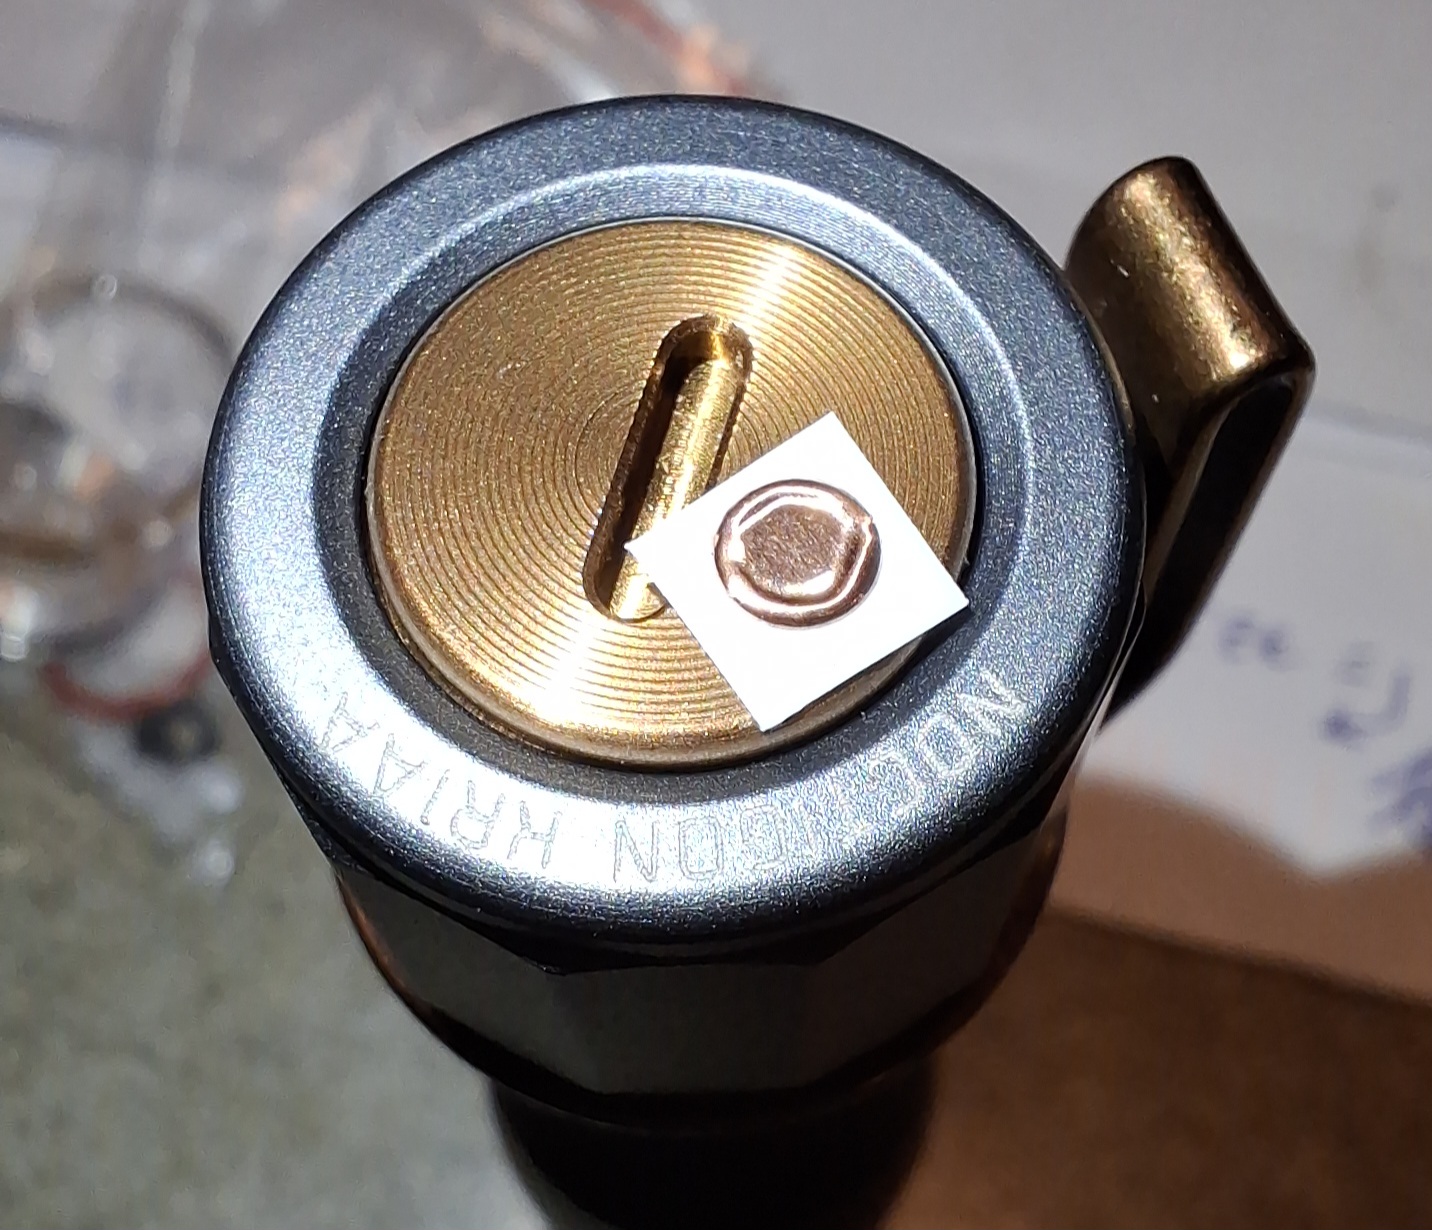
Im guessing the 9 mm Black Oring does not rest on the popper, therefore a nubbin is required to press the popper and the O ring only provides extra resistance to compressing the button.
I note you made a custom shorter nubbin, to more closely match the thickness of your 9 x 1.5mm O ring.. you might be able to use the brass nubbin if your O ring was slightly thicker, such as 9 x 2mm, if available..
or alternate strategy, based on the FWAA,
If a smaller than 9mm O ring was used (pictured in green), without the black 9mm O ring, the brass nubbin could probably be deleted,
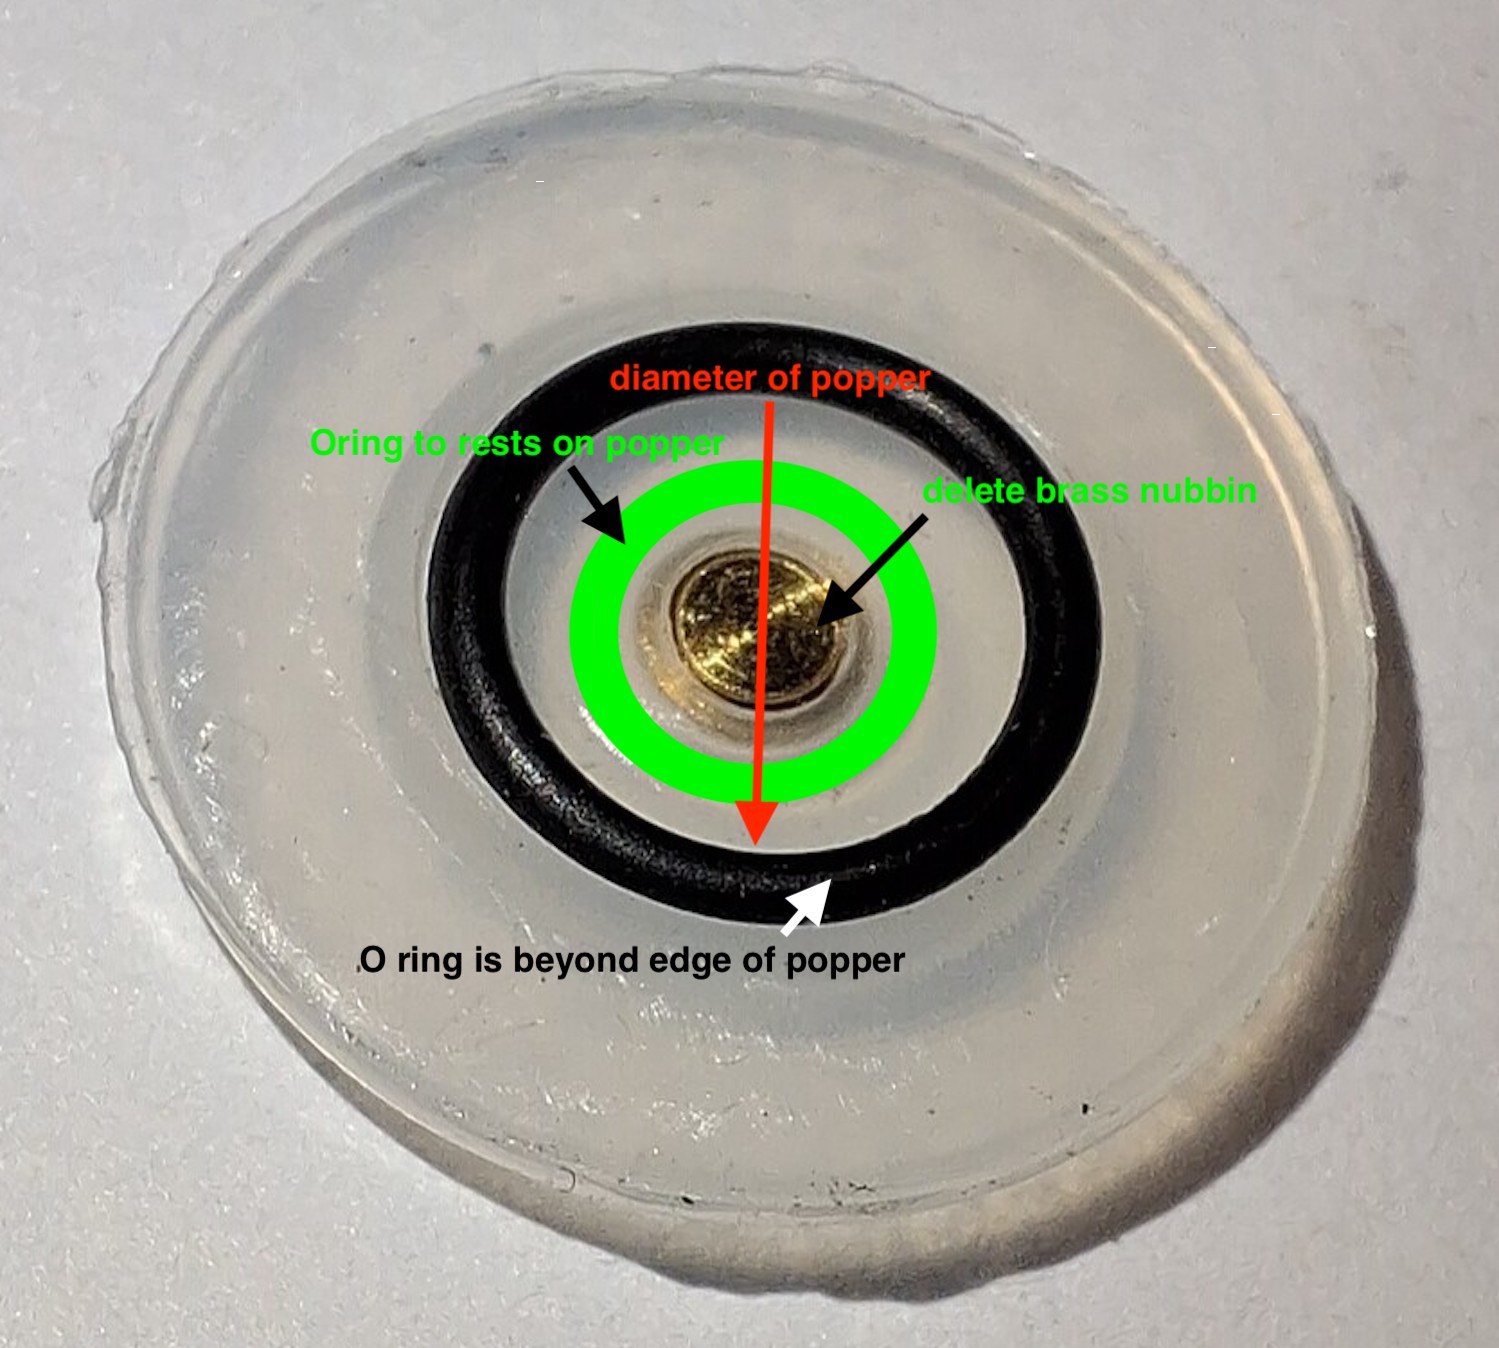
(photo by Tankolai from this post)
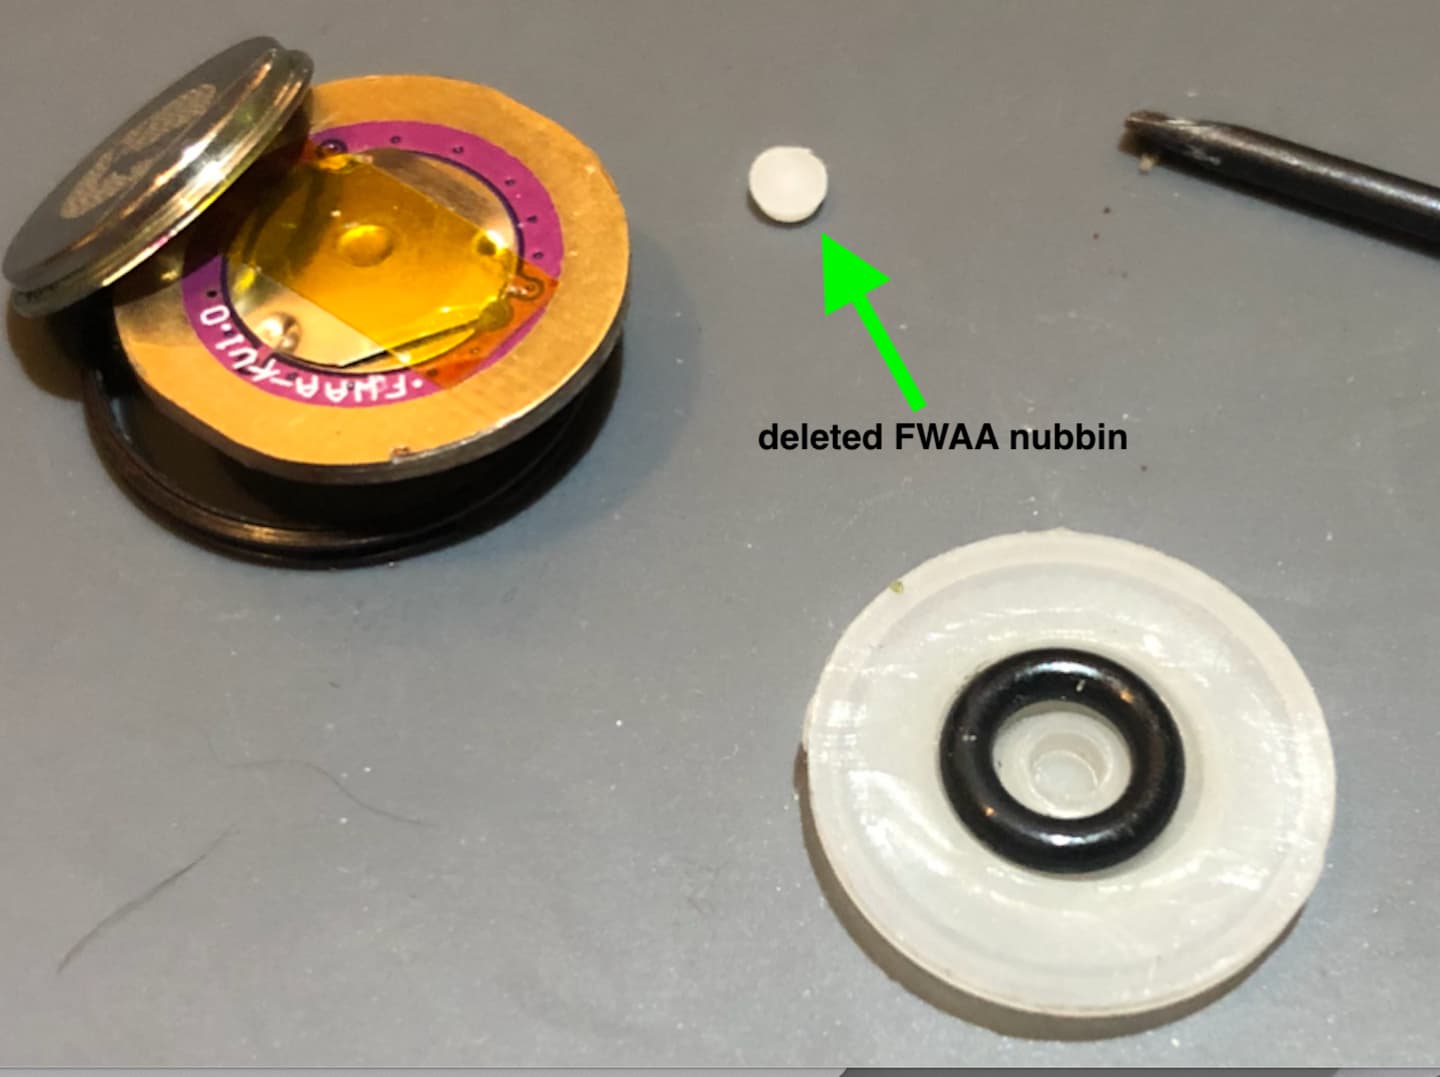
The FWAA mod used a smaller O ring (iirc 8 x 2mm?) that rests on the popper, and requires deleting the nubbin (otherwise the O ring does not make the switch less sensitive):
might be a bad idea, since the kapton tape keeps the popper legs from coming out of their slots..
imo a better option would be to use a thicker O ring.. such as 9 x 2mm (and keep the brass nubbin installed)
or use the FWAA strategy, with a smaller O ring (maybe 8 x 2mm or slightly smaller if available?) and delete the brass nubbin. Then rely on just the O ring to push the popper.
just speculating, I dont have a KR1AA to test these ideas..
2 Thanks
That does make sense. I have a bunch of FW3A nubbins left over from doing that mod to all my FWs. I never had an FWAA unfortunately.
I tried to find an oring to go around the nubbin-holder portion, but I didn’t have any the correct size, they were either to small diameter for that, or too large to go where the 9mm one is.
I’ll still keep looking around for other o-rings for the KR, it’s not exactly where I want it yet
2 Thanks
It took less than 2 minutes to fabricate a shorter popper out of junk that was already on my desk. Since it works so well with the 1.5mm thick o-rings I have on hand, I don’t think I’ll try anything else.
I would be interested in the result if some one else tries a 2mm thick o-ring.
Note: I haven’t double-checked, but I think the edges of the 9mm of o-ring might sit on the outer edges of the popper.
2 Thanks
With the FW3A I do the same thing but with a washer. It Is more thin and more hard and the feel is good. I have to use a scale to check the pressure in grams
1 Thank
Very happy you have achieved Switch Nirvana ![]()
I hope others will learn from your detailed experience, and may follow the Oring Path to Enlightenment.
Im under the impression that switches have some variation, and some pilgrims are satisfied without need for modification.
Its good to know there are Oring options if desired.
For some disciples, the simplest solution may be to keep the brass nubbin and use a 9 x 2mm Oring.
On another note, the bezel diameter and threads are the same as the Sofirn SP10. Since the SP10’s bezel will screw onto the KR1AA, it should be possible to replace the stock optic with the SP10’s bezel, lens and reflector. This might result in a throwier beam. However, if attempting this mod be aware:
- The reflector hole might not be wide enough for the entire emitter. Fixing this might require filing the bottom of the reflector off.
- The reflector might short the wires for the aux leds. If attempting this mod, I recommend desoldering and removing the aux led board and then folding its wires out of the way and covering them with Kapton tape.
I haven’t attempted this mod and probably won’t. But I did test to see that the SP10 bezel would screw in all the way without any issues.
1 Thank
good to know
I agree the Aux board would do well to be removed
the main problem w the SP10 reflector is that it is short and wide, with a large base opening, so it produces a wide unfocused hotspot
PNWest already proved that the stock 5050 LED wont make a focused hotspot in a reflector (they used the stock bezel and a cut down reylight reflector), but it might work to create more throw if someone was to also replace the KR1AA 5050 mcpcb with a 3535 mcpcb and install the 6V Nichia 719a.. This would allow keeping the stock driver.
So far nobody has used a KR1AA host to build a thrower. One solution involves a new 3V driver, compatible with small 3V 3535 LEDs, in addition to a reflector and possibly a longer bezel.. that would make it essentially an entirely different light than the existing KR1AA.
Bean_Master7 has mentioned wanting to use a thefreeman FWAA Driver, which requires assembly.. it is not available in completed form. He has talked about using an SFT25, similar to the Wurkkos TS10SG.
I would have little interest in a Low CRI LED.. the one thing that is unique about the TS10SG is that it uses a Tir, not a reflector. But I dont know if that Tir fits a KR1AA..
I had also hoped the KR1AA would be more throwy than the D3AA.. but I have come to accept that is not possible with a 5050 LED.
I say that based on my experience with Zebralight H600D and Skilhunt H300R, both with XHP50 LEDs and reflectors. Those lights have big wide floody beams.. no focused hotspot at all (except at very close range).. the limitation comes from the width of the 5050 LED. A reflector does not change that.
4 Thanks
I agree that replacing the TIR with a deeper reflector won’t make much of a difference in throw. The relatively large emitters in this light won’t through much.
The beam pattern in my KR1AA with NTG50 5000K looks very similar to that of my D3AA with NTG35, except that the D3AA is brighter. A KR1AA with a throwier LED like SFT70 isn’t going to outhrow a D3AA with SFT25r. Basically the KR1AA is a small EDC flooder.
For those who prefer throw, maybe Noctigon should produce an alternate version of the KR1AA with a 3v driver, 3535 footprint star, and possibly an optic optimized for throw.
2 Thanks
Caution for modders:
Recently I wasexperiencing an occasional problem with my KR1AA where the light would react to the switch, but only turn on in low mode. This only occurred during battery changes. Wiggling around the tailcap retaining ring sometimes fixed it, but it was getting worse.
I finally removed the tailcap retaining ring and the problem went away. I suspect that the problem was caused by scratches on the retaining ring from the tool I was using to remove it shorting to the inner contact ring on the switch board.
My conclusion is this probably isn’t a problem with stock unmodded KR1AAs, but could be an issue for modders. Be warned that if you mod your light you might need to remove one or both of the retaining rings to maintain full function.
Note that the retaining rings aren’t actually needed. The one in the tailcap keeps the switch together when removing the clip, but this happens rarely. Battery changes are done at the head. The one in the head for the driver also isn’t needed since the pressure from the battery should keep it in place.
I experienced a similar problem with an FW3A a few years ago that I had tinkered with too much.
2 Thanks
I have a feeling that maybe temperature changes are messing with the nubbin/switch cover, as an oring would essentially form an air bubble in the tailcap. So when clicking, maybe it forms a vacuum pressure that physically induces a hold, almost like a suction cup?
As an experiment, could you try to reassemble the switch in the warmest, and coldest possible environments to see if the issue still occurs?
**typically, most switches would only need the tailcap removed past the oring to equalize, but putting a secondary oring sandwiched under a rubber boot and the switch might cause that air bubble, so you might have to disassemble and reassemble the switch.