Allright these are the final correct versions with the comments and crap figured out, thanks guys. (For some reason when I try to enter the comments in the single line text field at upload it didnt ever work but when I go in and edit its fine).
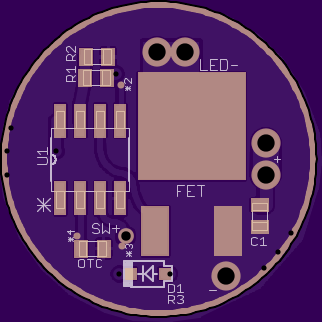
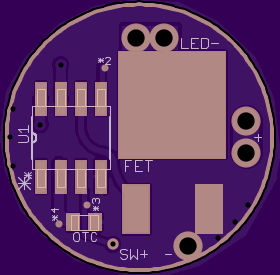
20dd_v3.1 Single sided except for zener. 8mm spring pad exposed
17dd_v3.1 8mm spring pad but only 5mm exposed (scrape as needed)
15dd_v3.1 8mm spring pad but only 5mm exposed (scrape as needed)
15.17dd_V3.0 Single sided 8mm spring pad but only 5mm exposed (scrape as needed)
10/23 All boards updated to 3.1, only change was moving R1's input (the voltage divider) from downstream of D1 directly to VCC.
All of the “star’s” are single points, “negative” layers holes in the mask (tstop and bstop layers) which expose small portions of the GND plane and a trace to the corresponding leg of the MCU for that star, all you need to do to “connect” your desired star(s) is to add a solder blob in that circle, the mask will keep it together and make it easier to bridge the .015mm gap so its really easy to do!
Use the + symbol to create bullet points. Also always make sure the end of each list item has a space before the new line break. So if you want this in markdown:
Item 1
Item 2
Item 3
etc
You would enter in OSHPark:
+ Item 1
+ Item 2
+ Item 3
+ etc
After the last character in each line above you must hit the space bar ONCE before pressing ENTER to start a new line. I have not put an extra line break between each list item above, BLF forum has done that and I'm not sure how to remove it.
well that didnt work :(.- When I hit enter after the space nothing happens on screen, the cursor doesnt move at all, is that correct?- wight’s edit page fixed this part but still not working for me.
Also WTF, I can use eagle somewhat proficiently but cant make freaking bullet points lol!
Edit: sorry man, autocorrect always forces your name to wright and I don’t always catch it, I swear I know your name by now.
Ok tried that too, I wonder if it could by my old ass computer…
Can you post a copy / paste of how you do it switching to the simple post editor (not the advanced WYSIWYG editor), if you do that even if it doesnt display right I should still be able to quote your post and see it there.
One thing I’m really happy with, notice I have thermal’s turned off on the sections of GND plane that needs to deliver high current (the FET’s source leg and the large batt- in via) but turned on for everything else for easier soldering, that was not easy to do.
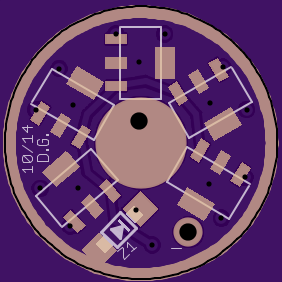
Want to share this here while I’m at it- I’ve received my first boards and got it built and runimning in a P60 host so I’ve updated it to the initial “V1.0”. This is another one of the ones that can use either be AVR or PIC (ATTiny10/10F322) as a direct swap, not one single other change needed!
I'd just like to thank everyone for the positive input here. I'm a fool when it comes to electronics but that has not stopped me using this thread to order other parts. I've been using driver adaptors, aa battery ends, etc and I know I can come here and look in the OP to find what I'm looking for without searching for hours. I love using what I can here in my builds as it just to me adds a little something special to mods or builds knowing that someone here has added to whats being done.
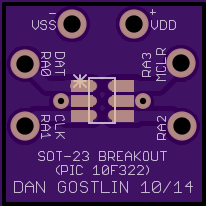
Here's another board I just made up, for anyone looking to program 10F322's or ATTiny10's (if you ignore the markings, tho + and - are correct from one to the other) I had to throw this together after having a hell of a time programming my first 10F322 today having to air wire to 5 of the 6 leg's.
SOT-23 breakout board (again labeled specific for the 10F322 but will work for any SOT-23 package)
.5x.5", total is $1.30, note GND planes are NOT connected to VSS.
I had ordered the 3.0’s so now I need to know what the actual difference is. No Voltage monitoring on a Zener set-up with the 3.0? But it will work when used as a normal driver? Is that right?
While I’m here…I just built a Ver 1.0 driver and everything went smoothly. But I’m only getting 5A from it where I usually get 6A or a little more. Wonder what gives? I’ve got solid ground, all the solder joints worked out beautifully (or so I thought) I’m running the new U3 emitter and figured I’d see higher numbers, but am seeing lower. Aaaggghhh!