This is my Water cooled XHP70.2 Playskool Flashlight Project!
The video gives a short summary of the features and some beamshots.
This is a long post made in several sections which you can peruse through at your leisure.
1. The backstory
2. The parts I used
3. How I put everything together
4. Beamshots
1. The backstory
I got the inspiration to get the Playskool flashlight and modify it into something brighter when I saw a reddit post where people were discussing their first childhood light.
I purchased this light last summer from a nice grandmother who was selling it on Craigslist for $5. She was surprised I wanted it for myself. ![]()
Taking it apart was a monumental effort. This light was built to take all the abuse young kids could throw at it and continue functioning. I had to cut off the frontal blue bezel with a hacksaw to have any chance of removing it from the rest of the host. Even with the bezel sawed in half, I still have trouble taking it off which shows the robustness of this light.
Originally I had been planning ton putting my D18 into this host with a fan for cooling but I wasn’t satisfied with the outcome. It was very front heavy, the fan wasn’t effective enough, and worst of all there wasn’t a way to press the D18’s button without drilling another ugly hole into the host. 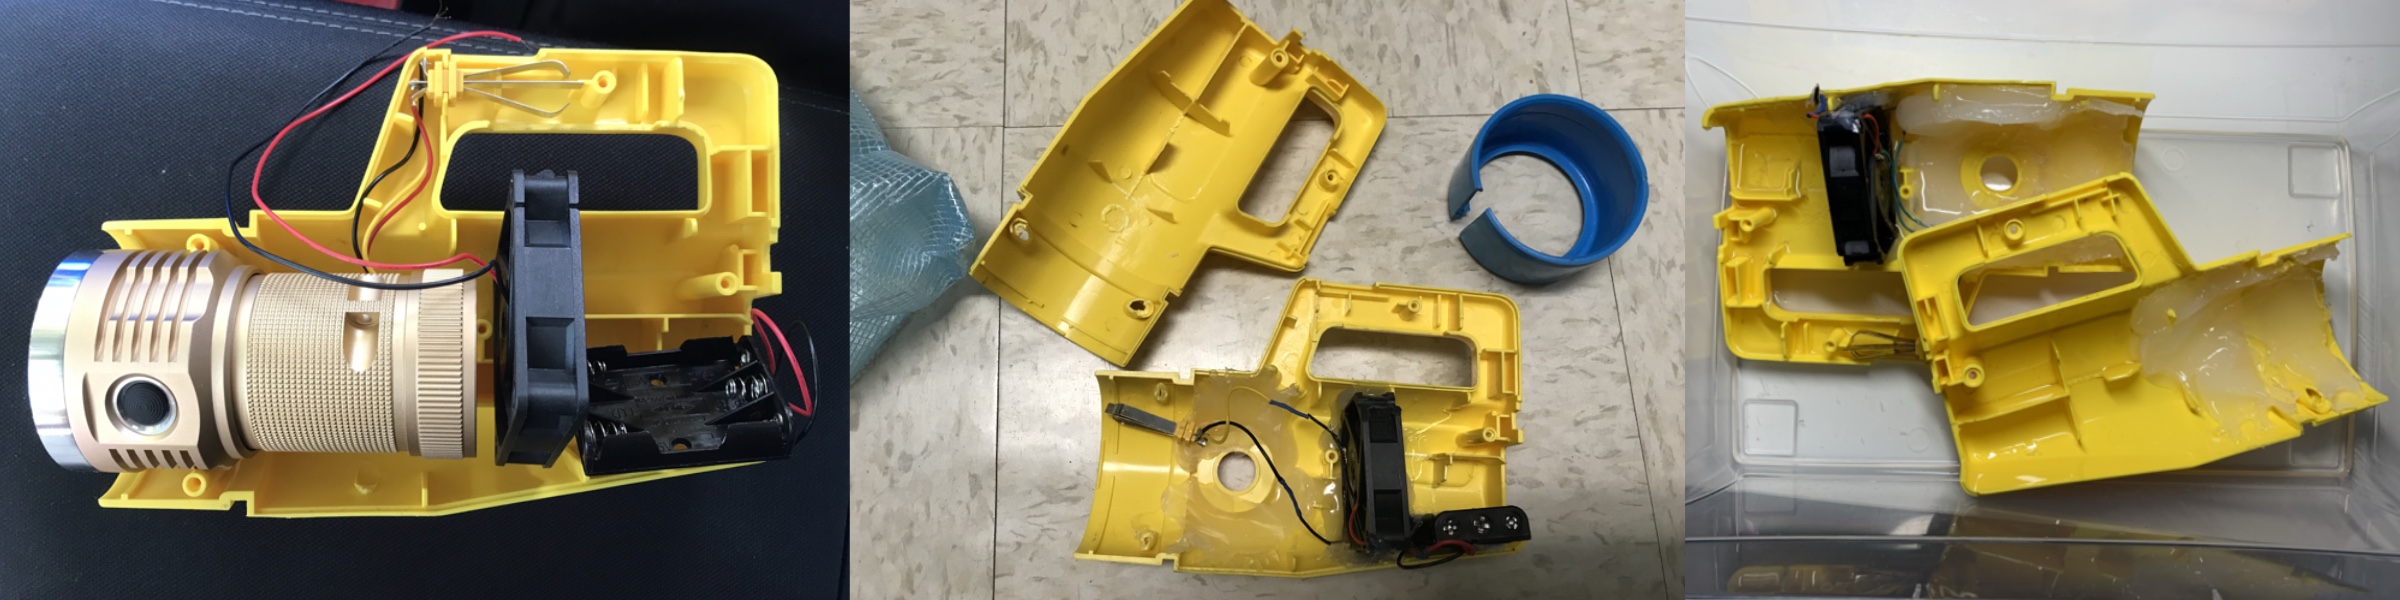
I abandoned the host I had in search of another Playskool flashlight because the hot glue I used was so firmly stuck to the yellow plastic. This year when the Old Lumens build contest popped up again, I decided I’d get to work on this light. I planned out the light and purchased the parts I needed from a mix of FastTech and Aliexpress, and went on the lookout for another Playskool Flashlight I could use.
This search was rather futile since no one nearby Toronto was selling one, and the ones available a good distance away were in the $40 range and being sold as “vintage.” I was unwilling to pay so much and with time running out, and my other parts having arrived, I decided in early December to try to remove the hot glue using a heat gun.
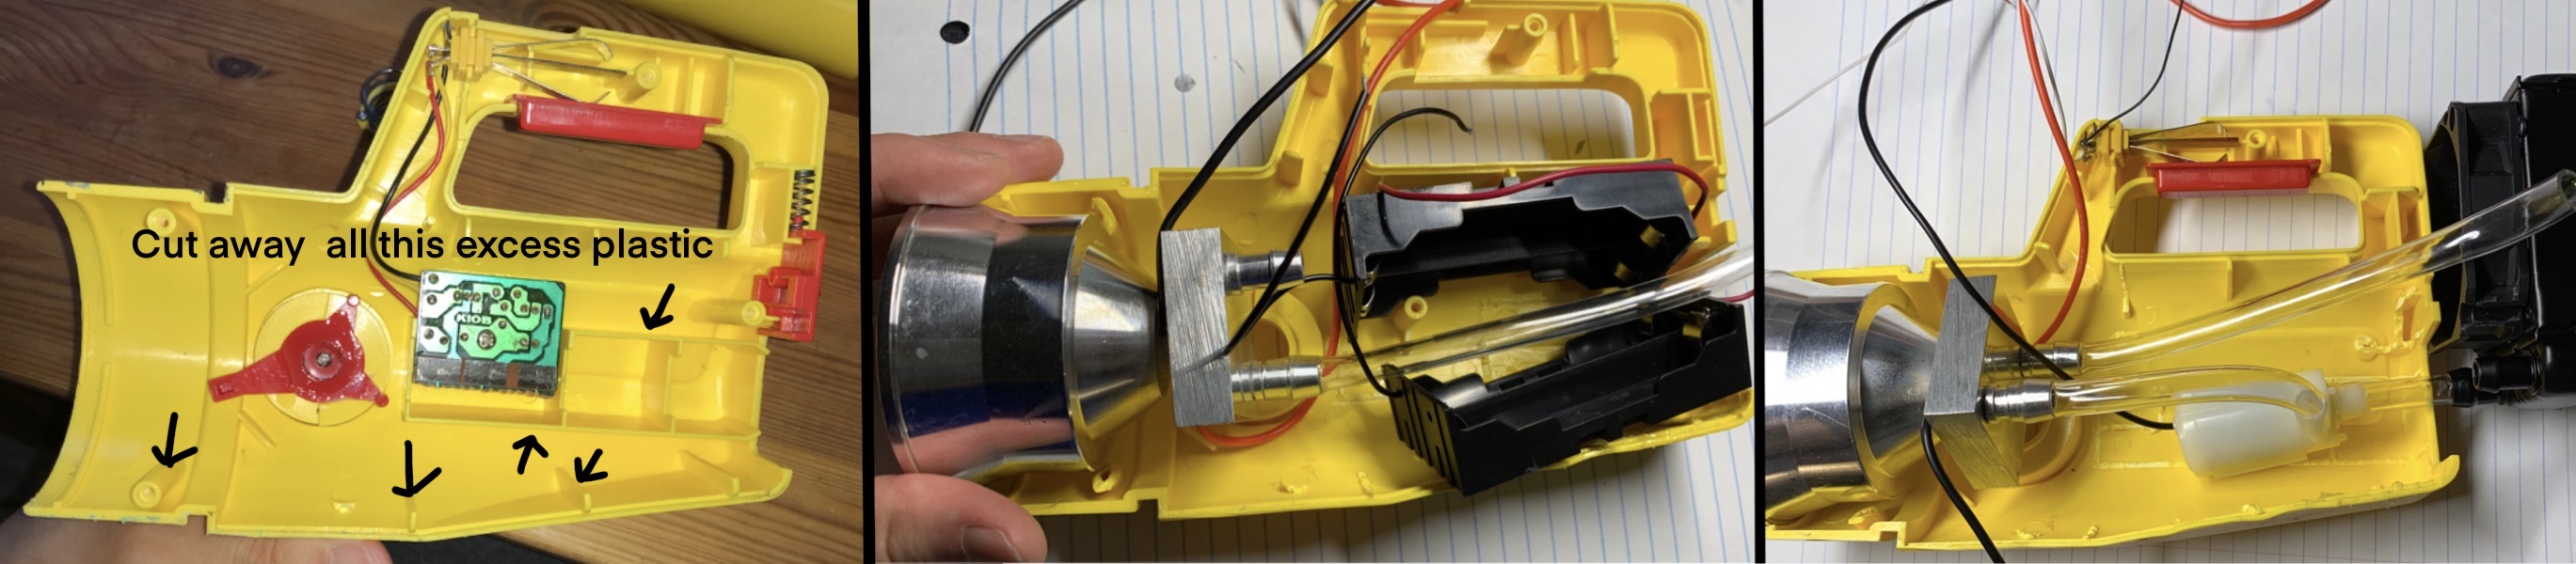
Luckily before trying that, I did some searching online and discovered that isopropyl alcohol helps to loosen the bond of hot glue. I dumped a 500ml bottle of IPA into a container and soaked the shell of my Playskool flashlight in it (shown in the photo above on the right).
After a lot of yanking, I finally managed to get all the hot glue out, but broke my fan in the process. Luckily I had ordered a spare once since I hadn’t expected to be able to remove it from the mess of hot glue.
Finally I could start this build!
2. The Parts I used
Reflector: I chose a Convoy L6 Reflector which I had originally purchased for a different project which never quite took off. It fit pretty well in this host but still required some hot glue for support. I was considering using my FT03’s reflector but this one worked out alright.
Emitter: I picked a 3000K XHP 70.2 on a 20mm DTP MCPCB from FastTech. I wanted to replicate the incandescent look but unfortunately I later realized that 3000K just isn’t quite yellow enough and the brightness on turbo certainly won’t be fooling anybody :smiling_imp: . I won’t be buying from FastTech again since the MCPCB my emitter was mounted on wasn’t flat and I had to sand it extensively using sand paper to make it flat.
An special thank you to klrman who sent me one of his spare centering rings for my L6 reflector this summer for free! The L6 reflector I had previously purchased from FastTech didn’t come with a centering ring so I recommend buying from Simon instead. The intended light for that centering ring never materialized but I’m glad to say it has been repurposed for something even crazier! :sunglasses:
Side note: look at how much light is lost in the Convoy L6’s reflector’s centering ring in the photo on the right! My Playskool flashlight is lit up from the inside even though I pushed the centering ring all the way flush and it’s a perfect fit from original Convoy parts. I wonder how much light you Convoy L6 owners are unknowingly losing!
Driver: I put my old MF04S driver to good use! I had contemplated throwing it away after swapping my original MF04S driver for one with Anduril made by Lexel but I’m glad I kept it and was able to repurpose it for this project. In the photo below, I am testing it for the first time to see if my driver still worked after being haphazardly stored in my parts bag for so long.

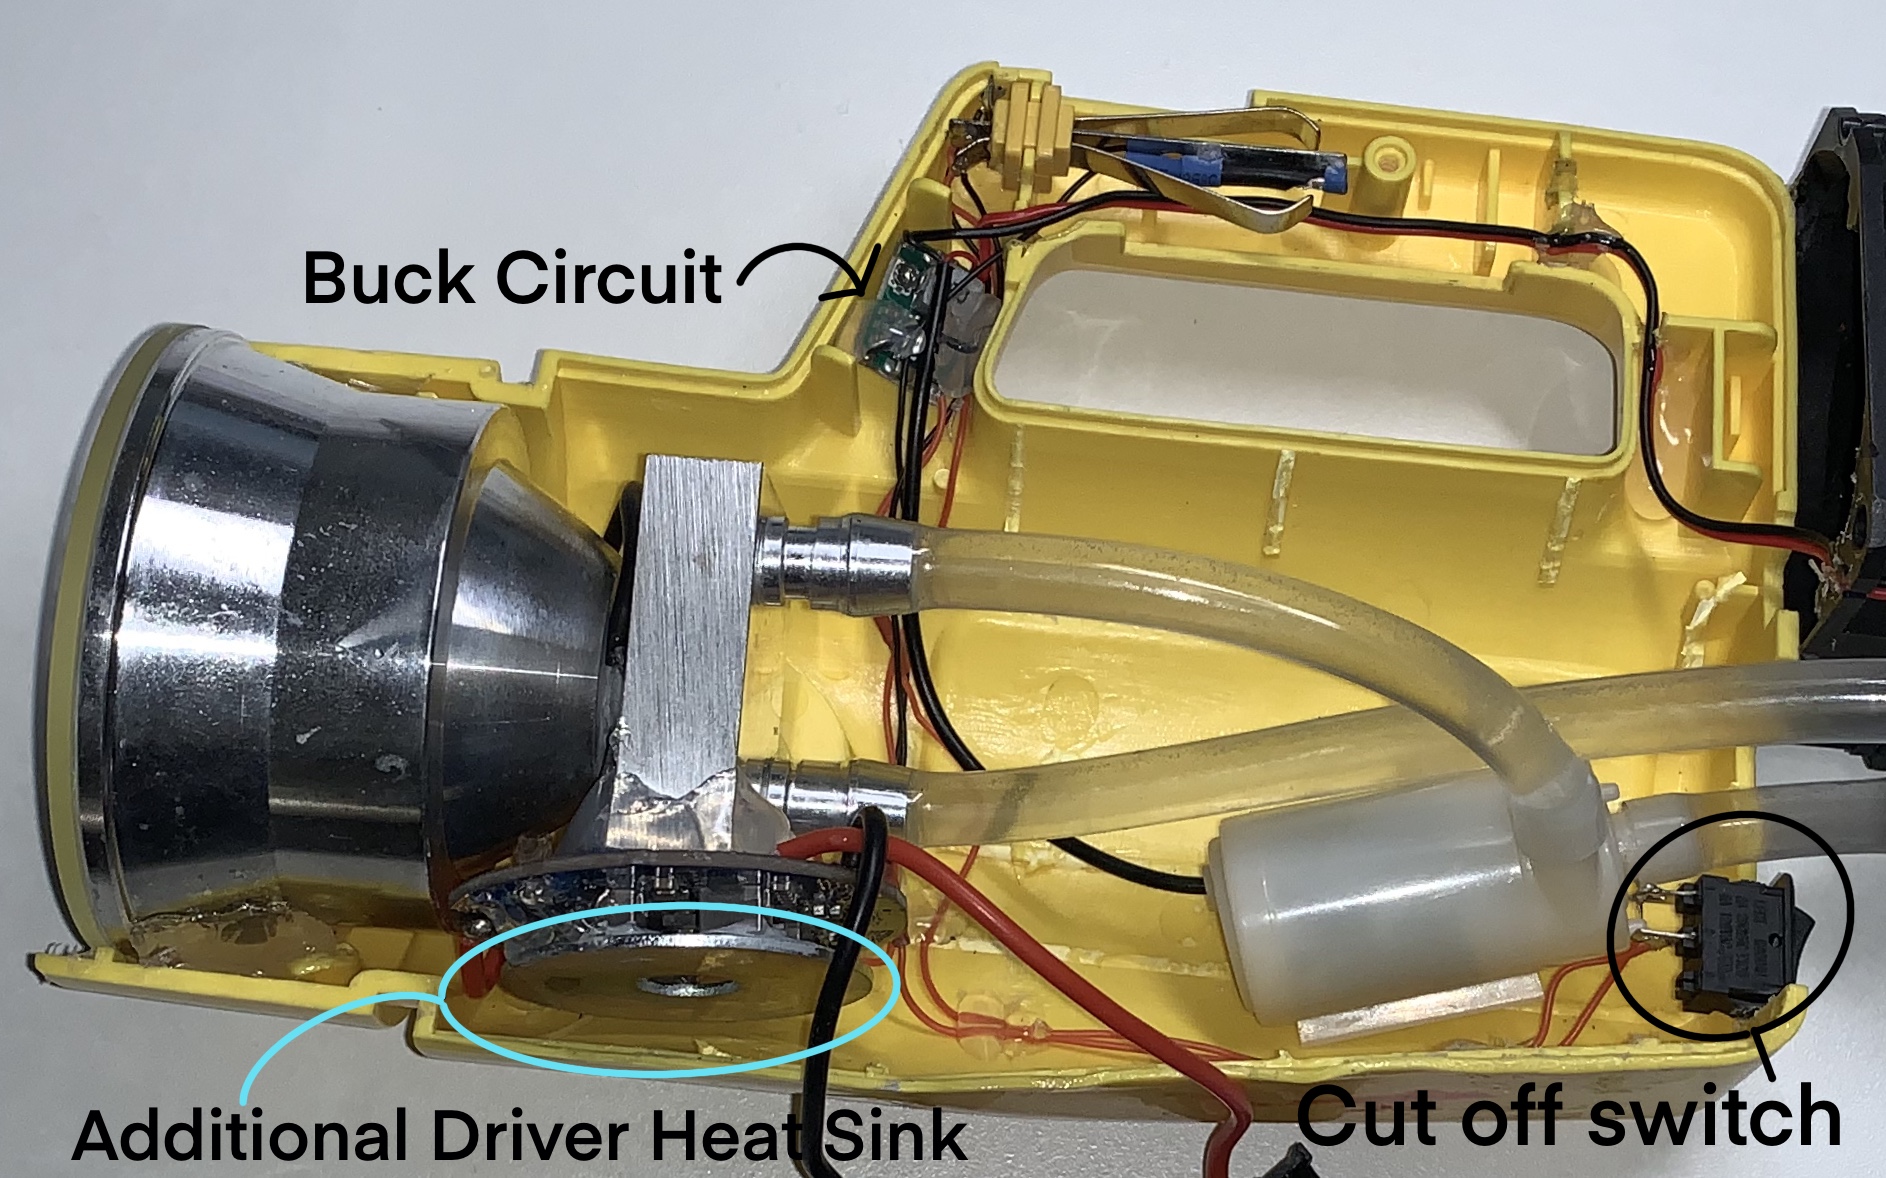
I wanted to be able to run the XHP70.2 on a high brightness setting for an extended period of time so a good cooling solution was a must. I decided to try my hand at water cooling which worked excellently. I am able to run this light at the 2nd brightest setting for ages and never noticed dimming.
Here are the other parts I used for my light to implement USB charging and my Water cooling system.