When i'm happy with the switch and the lead designs, i will get quotes from the local water-jet cutters for cutting out a sheets worth of copper leads. The leads will be one of the higher cost components in each switch and so the cost of water-jetting will very much dictate the final price.
To be fair i haven't yet made even one of these switches so i can't say it's for real until i do. For all i know i might have overlooked something major and the switch won't ever work properly.
It really should work well with direct drive lights though, especially with a brass post instead of a spring but that won't work in every case.
Thanks Jeansy, i should have something to report on, hopefully within a week.
I received the first set of prototypes a few days ago and set about assembling one straight away. After having done so a number of things became apparent:
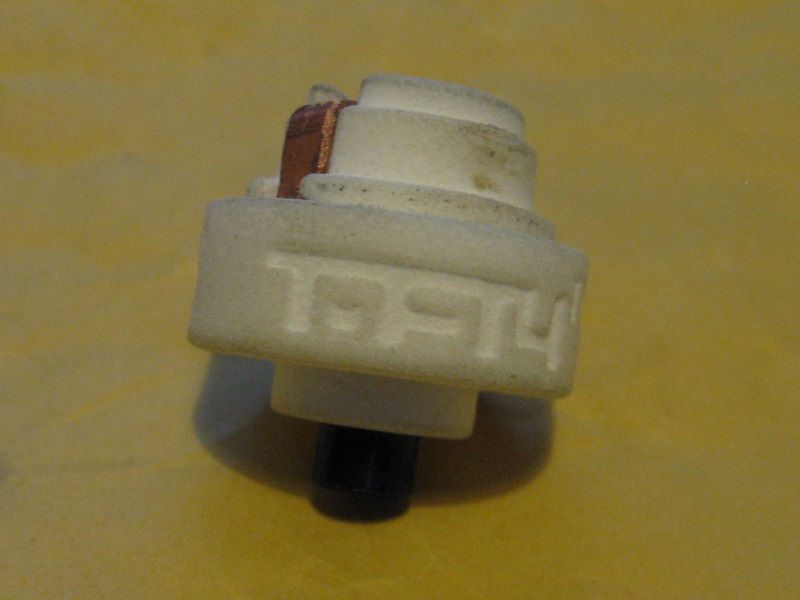
First the bad news: It turns out that as i sort of suspected my routing of the positive contact lead was overly complicated and almost impossible to do correctly but worse was the way the leads came into contact with the central contact post. The contact post is cone shaped and ended up spreading the contact leads out and loosing electrical contact. The original switch held the leads in a different arrangement which i have now emulated to solve the problem as well as simplifying the basic lead design.
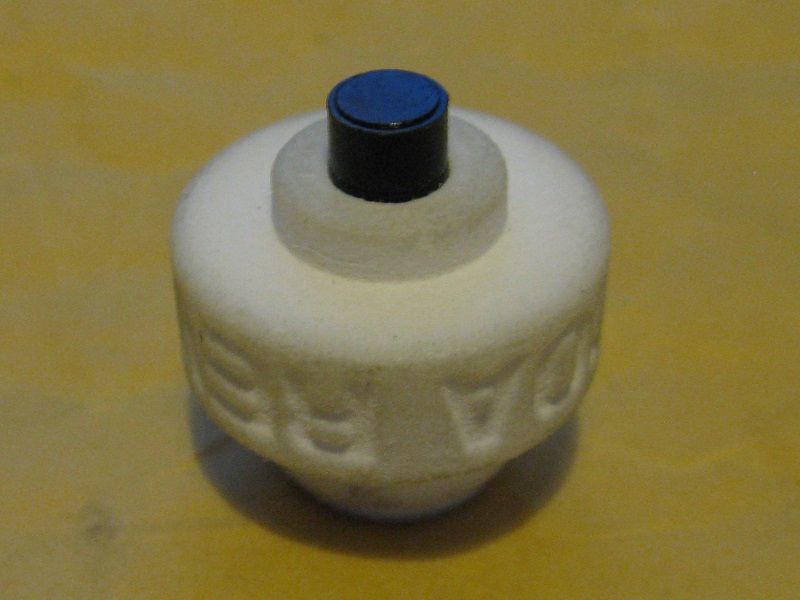
The good news: The clicky components work perfectly, i must have clicked the test switch quite a few thousand times by now and it still works perfectly. Tolerance wise the printed parts are perfect and look like they will hold up well to the rigours of flashlight duty.
I've already drawn up and modeled all the necessary changes and will order the new switch bodies and send out for water-jet quotes for the leads first thing monday.
The test switch, well handled but still clicking properly.
Thanks dct73, i use Solidworks for my 3D modelling and rendering but i prefer AutoCAD for 2D drawing, i find it more forgiving to use during the actual design stages.
Thanks, hopefully the next batch will be fully successful.
To be fair all i'm doing is re-shaping someone else's switch to suit our requirements better, rather than designing something new.
The only switch i have that could be considered quite is in a Vital Gear FB1 body but that's just because it's quite small. I don't think any latch type clicky switch could ever be silent by their very nature. The solution in my opinion would have to be an electronic switch like the one Mattaus is developing (here's the thread over on ColourfulPlasticFrogs).
Thanks scaru, it really was an excellent and inspiring project.
If my switch is no good then at least Matt's Smart Switch (mentioned above) should be able to handle the current with no problems.
In most situations the switch should be contained within an isolated environment and not have too much opportunity to corrode. However the switch is now designed to be dismantled easily if the need arises, with easy access to the copper lead's contact faces for cleaning if corrosion does occur. The first few switches which will be pretty much a beta won't be coated in anything but if they are considered successful then a silver or nickel coating will be considered.
I'll look into nickel plating as an option but silver plating would be my first choice.
Solidworks will allow the conversion off my 3D models into STEP but to be honest i'd really rather not share these switch models at the moment as i plan to sell the switches if they prove to be any good. In time after demand dries up a bit, i would consider releasing the CAD files to the community.
Update.....
I just got two quotes back for the water-jet cutting of the copper leads; one was over £900, the other under £300. It was hard to decide but i think i now know which one i should go with. They ought be done in a week, the order for the new switch bodies has been sent to Shapeways and should be back by the 21st and the only other thing to do is make a suitable bending jig for the leads and the first five or six switches should be ready to be sent to testers by the end of this month. Fingers crossed.
I don't see why not, my leads have a cross-section of 3mm by 0.5mm at the narrowest point while the originals are only 1.95mm by 0.42mm, with a bottle neck point going down to 1mm.
If the original Judco can handle 10A then 12A should be fine for this one. Even if the high current causes sparking and blackens the contact faces they can be easily accessed and cleaned, although to be fair so can the McClicky's contacts. Unless it's actually melted they should be able to be brought back to life.
Laser cutting is also an option for copper parts. Typically an etch process is preferred but it has a higher setup cost. I have had parts laser cut for under $100/USD for processing a single sheet.
I understand about the CAD files. No worries. I was just wondering how you are making the contact area. I’ve worked a lot with power relays and other high current contacts and it is amazing how much can go wrong. It is the main reason so many switches are rated so low. Fortunately, from what I understand, LEDs are a rather “soft-start” where you don’t have to consider inrush current exceeding the normal operating current (like motors). I could be wrong on this but I don’t think so. At least not with 7135 regulation.
The worlds “worst” switch is the mini tailcap switches that draw current through the actuation spring. What “were” they thinking I converted one of these to handle 1.5A perfectly without any new parts.
And yet another Solarforce tailcap has rainbow springs that let the batteries rattle. McClicky to the rescue, but I’m all out of McClicky’s……heeeelllllp!
I was a little worried that laser cutting might harden the parts and require annealing before bending, but the major reason i went for water-cutting is that i'd already done some previous research into it and the drawing had been made to the relevant required specifications. In the future both the printed bodies and copper leads could do with some serious cost analysis but for now i just need to prove that it works at all.
Which mini switch did you mean? the after market mini-maglite ones; Nite-ize, Terralux or even the Kroll?
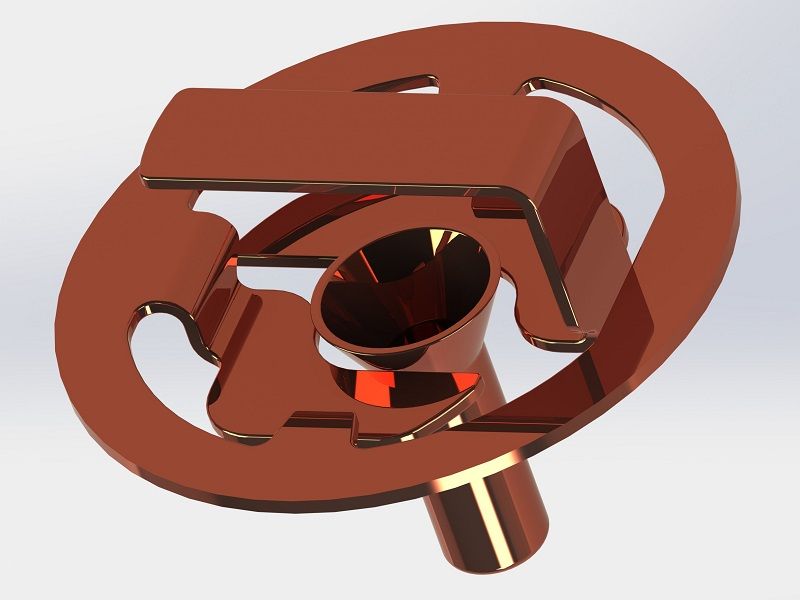
Here's a render of the leads and central plunger, this is exactly the same type of contact made inside the original Judco but with the advantage that the thicker leads can allow chamfering of the contact edge to increase the contact area. A flat plate plunger, rather than the cone shaped Judco one would also be a possible upgrade.
How many amps do you think you were putting through the Solarforce switch? I haven't tried anything too high in my Solarforce hosts yet.
I read that you've been hedging your bets in terns of high current switches, but to be fair so have i, the Mattaus Smart Switch ought to be something quite impressive.
I was pulling 4.73A and had been for some time when I changed my lights layout from 2 18650’s with an extension tube back to the original L2P host with 2 18350’s. The smaller cells would rattle so I knew something was amiss. The spring was partially collapsed and discolored from heat. When I was running the 2 18650’s I was using Panasonic PD’s, they were a bit short so I was using a spacer that compressed the spring…burned or not it was still making contact. The driver end spring is bypassed.
I have 6 lights with McClicky’s, as well as a favorite that I haven’t run with a switch at all as it pulls 11.88A in my preferred configuration. Hedging bets? Neither of you actually has a switch to offer at this time. I’m just wanting my M8 to run at 4000+ Lumens reliably so I can play with it! Matt’s switch should easily handle what I have set up, and then some. Yours is still a question. No reason I can’t set up lights with both is there? I have a light to build for a friend that would employ a triple xp-g2 direct drive on an aw imr18350 for some 7.50A, a little much for the McClicky, a bit too little for the heavy duty smart switch. Yours is perfect for this, and I actually need to build that light twice as my Aunt want’s one as well.
We have Ford, Dodge, Buick and Chevrolet at this house, no loyalty oaths have been taken.
Not an either/or proposition, more of an “and”. BeUTful ain’t it! lol
They have a shunt disk but they wired the spring to the shunt with a connection through the spring.
By maintaining the shunt but routing the contacts on the two fixed tabs, you bypass the center a pole.
It will be interesting to see how your contact scheme will work through extended cycling with a high load.
I like the straight forward approach of the automotive solenoids…
As for patterns files for machining… whatever kind, The manufacturer normally adjusts for kerf allowance if needed.
The only thing you want to watch out for with laser is slag. This can be easily knocked down of a flat sheet. In that sense, water-jet is a superior process at the cost of a rougher edge. Chem etching rules them all except cost.
For forming, a hint that might help; put a hole where you want the bends. Old sheet-metal trick when you don’t have a break handy.
The planned price will be $25 i'm afraid but that will include world wide shipping and each additional switch in the same order will be $20 due to combined shipping. Also the first 5 to 7 switches available will be sold to testers for $20 in exchange for constructive feedback. This will be decided by the first posters in this thread getting first refusal.
It's not a particularly good price but for the first 70 switches, this is as cheap as i can make them.
That's quite a bit over the 3A rating, impressive that the switch was still working.
I was just messing around about hedging bets. I'm certainly not partisan as i'm actually working with Matt on the Smart Switch, and of course both switches are designed to fulfill different requirements. I have to say that i think everybody is going to be really impressed with the Smart Switch.
I haven't worked with those switches, i'll certainly try to avoid such things. I very briefly thought about using the internal spring as one of the connections as i was considering ways of keeping the switches height and complexity down, but quickly discounted it as an option for the obvious reasons.
I'll have to have a look at automotive solenoids, i must have some lying around somewhere. It makes good sense to study something that is used in the same environment of high current and lowish DC voltages.
The water-jet place i'm using have an OMAX system which as far as i researched is about as good as water-jet cutters get so i'm hoping for some good results.
Thanks for the bending hint, if my bending jigs don't give the desired effect i'll give it a go.