Hi Foy, get that 2010 working yet? Might be time for some mods! I’ve got some copper SinkPAD stars for XM-L and am thinking that a XM-L2 on copper would be a nice upgrade, and a good time for a different driver as well. Got any recommendations for a driver for the XM-L2? 17mm for this light if I can remember correctly from the first page.
Not complaining about the emitter it’s got, but already have a XM-L T6. I’ve also got a P-60 drop-in with an XM-L U2 at 5000K running 3A already on a copper star, wonder if I could get that one in there?
Wonder too if bigger wires and a copper braid in the tail spring might help boost it up a little. Hmmmmm……
When the drivers get here, I’ll be ready to make the mods. I have the emitters, I have copper stars and teflon coated 20ga wire. I have the willingness to mess up a good light if I fail.
So, while I’m waiting….I got to looking at how everything fits together and how my beam pattern looks and decided to tinker a bit. When I first ran through it and put everything back together I screwed the battery tube in tight then seated the pill down tight as well, thinking it would touch the top of the battery tube and make for some additional heat sinking. Turns out I was wrong, the pill didn’t touch the battery tube. So, I cut a piece of solid copper wire (think, ground wire from romex) and bent it around the area that holds the driver in a double circle. So now when the pill is in place in the head the battery tube doesn’t seat all the way as it’s up against this copper. Fitting the pill by trial and error till the beam has a nice even hot spot (pill is loose, not seated) I then tightened the battery tube up against the copper, with the effect of tightening up the pill and making a good solid contact to add that heat sinking that I thought was there from the get go. Now my beam is gorgeous, everything is solid, and we’re good to go!
When the drivers get here I’ll start over! lol The driver I ordered is a 5A driver, probably too much for the XM-L2 T6 I got, but it’s a ramping programmable driver so I can set Hi wherever I want it, might set it all out for a Turbo mode or hold it back some so as to take it a bit easier on the emitter. We’ll see.
Wow Dale, that sounds like an interesting way to improve the beam, but not sure I follow it all - I thought the beam pattern changes with the position of the emitter in the reflector - further in or out, but if you are constrained by the plastic LED alignment piece, or the contact with the star board, how can the pill positioning effect that, accept maybe if you are pulling it further out of the reflector?
I'm asking because I'm struggling with beam patterns too.
But, alas, there is that which we did not consider! lol
The depth of the reflector is fixed, is it not? From the lip on top of the head to the bottom where the emitter emerges is a fixed factor. The pill screws in too far when seated. Backed out maybe half a turn brings it up to meet the reflector and thereby returns it to the glory for which it was originally designed!
I found the beam to be best when the pill, or more properly the centering ring around the emitter, pushes the reflector up maybe 1/4mm. This is then seated firmly when the bezel with lens is screwed down snug. To be honest, only one side of the reflector was slightly raised so it’s probably not even a 1/4mm.
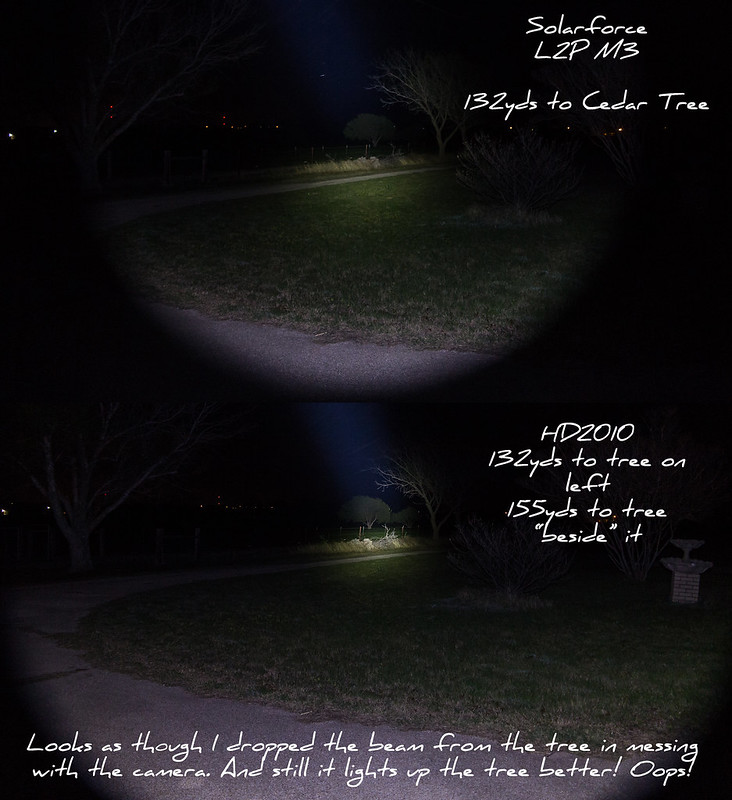
Something worked right, cause it’s definitely hitting hard downrange! Took it and my L2P with M3 head outside and did a quick comparison. The L2P will put light on a cedar tree 180 yds away, the HD2010 will light it UP! From just showing the tree is there to being able to easily see the branches and if anything is in/under it. No contest.
Been mod'ing a UF T20 zoomie, yuck, sanding down a 20mm SinkPAD til my fingers went numb...
Oh, interesting!! Already got 91 kcd out of this beast HD 2010, so maybe I'll spend some time on it, maybe closer to 100 kcd . The #'s are awesome, in the 1300's for lumens.
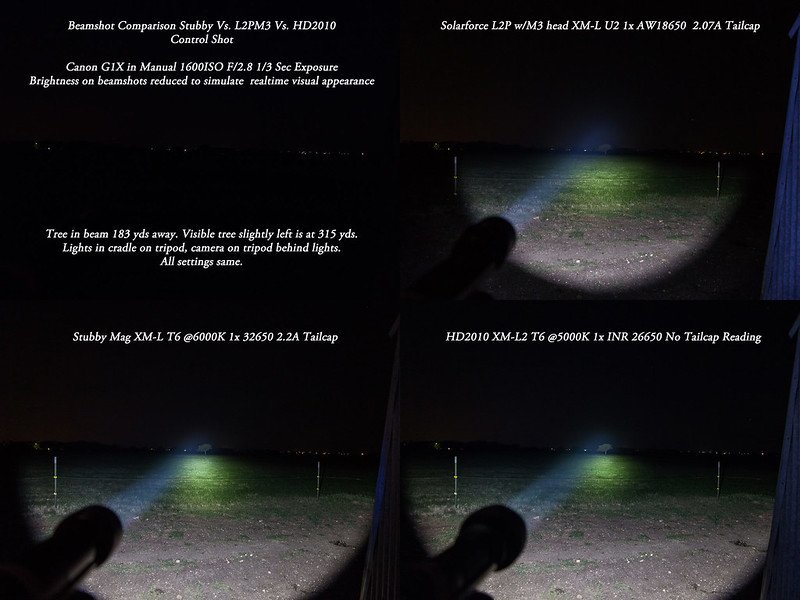
Here’s a beamshot comparison from last night, the main tree (cedar tree) is 132 yds while the Cedar to the right of that one is 155 yds away. The one on the right, further back, is not really visible with the L2P M3 light while it’s plainly visible with the HD2010. And a caveat there is that I let the beam slip down while taking the shot of the HD2010!! Next time I do this I’ll get my carrier and tripod out so the lights will be in exactly the same position, this was kinda spur-of-the-moment freehand with a Canon G1X.
Both lights are stock aside from some assembly tweaking on the HD2010. Also interesting to note that the AW18650 in the L2P M3 was at 4.12V while the LiNiMnCo 26650 in the HD2010 was at 3.75V. Reckon I need to get em both up to 4.2V and redo it tonight.
Well, it looks like there will be no more testing today! I soldered a 20ga copper wire into the tail spring to bypass the springs resistance. Put a rested LiNiMnCo 26650 at 4.15V in and it lit up for about 3 seconds, poof! There went the XM-L T6 emitter! Nice little shock wave showing in the silicone dome where the feed wires blew. My very first blown emitter! or is that
I have the new XM-L2 T6s here, need to get one of those on a copper star and hope the driver comes in soon.
But that’s progress, is it not? lol
I was only getting like 1.24A at the tail while everyone was talking about 4+A, guess I found all those A from the High Discharge 26650!
Dale, Congratulations on/Sorry for your first emitter destruction. At least it gives a good excuse to upgrade the emitter.
Thanks for figuring out and reporting on the pill to tube heat sinking/reflector focusing mod. I was going to try to find a bigger O-ring to fix my rattly lens. This will fix that and improve the light (actually, maybe several of my lights). You Rock Brother!
Is this what I can expect from modding? Get it very satisfactorily right and find you’ve gone too far? Last night, I was very very pleased with this light. Now I’ve killed it! lol Oh, the sacrifices I must endure….
Was already planning on modding the emitter/star/driver so no tears this time. Now if I get the mods done and fry it again……
Perhaps I should set up the new driver running on an 18650. Perhaps these LiNiMnCo 26650’s with 18A capability should be kept out of this light?
Now I’m a bit worried about my choice in (JohnnyMac recommended) drivers, that 5A job might just be too much again but with it being user selectable ramping outputs I can hold it back some, but WILL I? 8)
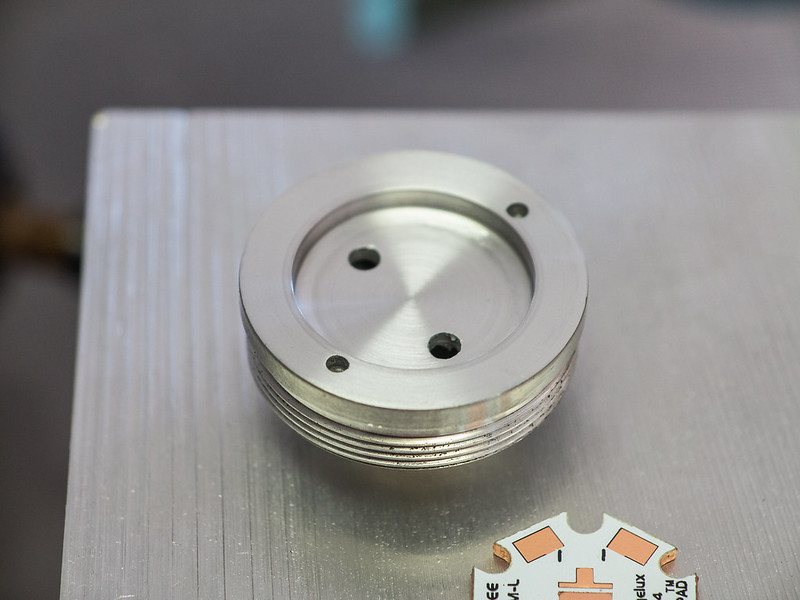
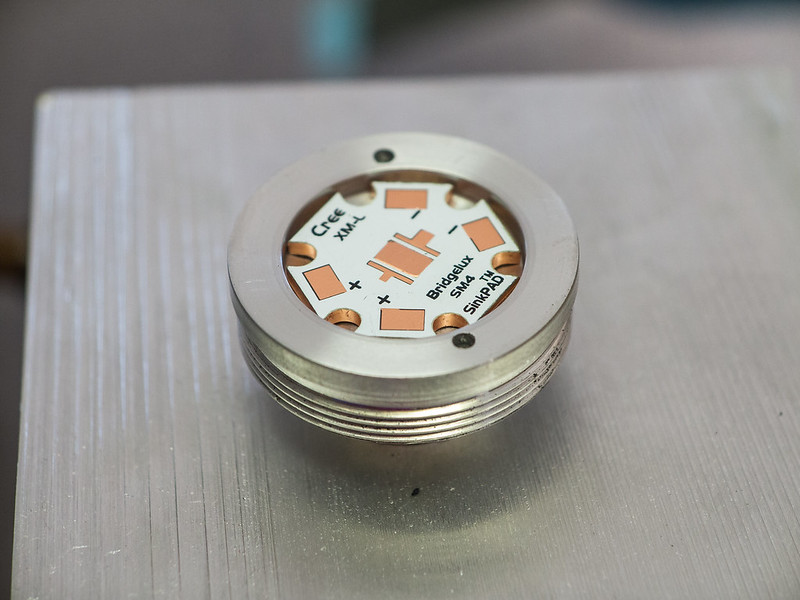
Details on the HD 2010 (and others) here: https://budgetlightforum.com/t/-/15778, basically it's got a KD V2 driver @4.09A, XM-L2 U2 1C on a 20mm SinkPAD - SinkPAD trimmed to fit, UCL/p lens. For mounting the driver, I put in a P60 pill grinded down, some grinding in the aluminum pill as well, and added a few copper discs, so it's got some real nice heat sinking.
I want to redo this to a Nanjg at 4.2A because I can custom program them, and am having better luck/reliability with the Nanjg's - had too many KD V2's fail on me...
For fitting up the LED into the reflector, what I did lately on a couple of lights is solder/reflow a copper disc to the backside of the SinkPAD, giving it better heat xfer and raising the height. Might give this a try on the HD 2010.
Well, not that they throw better, but the way this light is designed, if you improve light output, you improve throw - it may not always produce such good results. If you noticed, I had a XML U3 1C on an aluminum star and got 63 kcd, so combining the XM-L2 and SinkPAD running at high amps (4.1A), you will get a really good increase. Also with the SinkPADs now, I'm carefully sanding down and polishing the mating surfaces (bottom of SinkPAD, top of pill) before applying a good thermal grease - the sanding/polishing I didn't do before. Ohh - also forgot I beefed up the springs by soldering in solder wick (copper mesh wire) down the middle of the positive and tailcap springs.
Collectively, there's a lot of mod'n in this light...
Thought I’d keep everybody up to date, since the emitter got fried this morning after doing the copper wire in the spring thing. I had planned on using a 20mm SinkPAD star under an XM-L2 emitter, but instead of trimming the star (in case I want to make changes later) I opened up the pill so the 20mm star would fit….with my cordless drill and dremel tool.
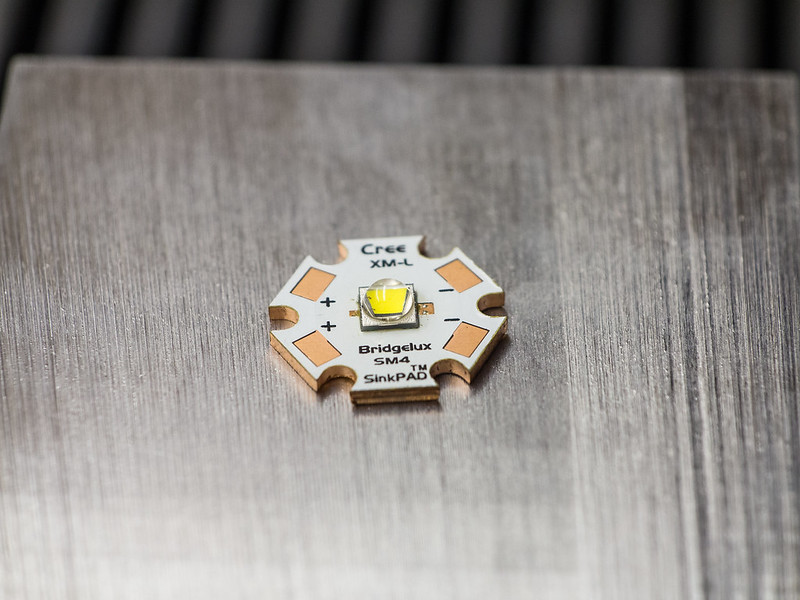
And then I reflowed one of the 2 XM-L2 emitters to a copper star, and it actually works!
These pics were taken with my G1X and the 250D close-up filter…the filter came while I was working on this.
But I ran into issues with the solder points contacting the bottom of the reflector. Seems that larger 20ga wire might not have been the best way to go about this, as I also tore the contacts off the driver trying to put it back together…wires are too stiff! But that reflector, what to do? Well, I cheated. I filed the bottom off at as much of an angle as I dared, then got even bolder…I used to use a couple of SS 3/4” ball bearings doing leather holsters, so I dug one out and put it down in the reflector and gave it a few good knocks while on top of a support that was open in the middle, pushing that flat at the bottom of the reflector away and towards the emitter. Just enough so that it’s taller and doesn’t touch. I also redid the solder points to compress the wire onto the star as much as possible and keep it as far out towards the edge as possible. Works, but I still have no driver. I wired it up direct to an AW 17650 and it’s fine, but I still need to put an insulator in there just in case.
Wow, that is real nice dremel work on that pill, and the reflector work, original! I sanded down the SinkPAD to fit, and I used 22 gauge wire and it still also doesn't work out well with the reflector.
I got the drivers in today from Intl.-Outdoors so I started immediately (wife made me stop and eat, can you imagine?!) and got the HD2010 put back together. But it wouldn’t be right without problems, so problems there were. It stopped working almost immediately. So I redid the contacts to the star, still issues. Seems that when I put the retaining/ground ring back on the driver it wouldn’t work. So I hooked up a 14500 using the connectors off 2 Cottonpickers chargers so that the magnets were on the battery and the alligator clips could be hooked up the the spring and ground. Everything worked fine like that. Put the retaining ring on, nothing. So I put a very small amount of solder on the outer negative ring and tried again. Finally! Ground is made, everything is good and the light works fine. Now I just have to figure out how to work those crazy 4 groups 9 modes Group Bwithrampingtosetyourdesiredlevelsbuthowinthehelldoyougetthemtostaythere Chinese toy-with-the-American stuff! (I don’t know how you do it Foy!) Whew!
But it lights up, in what mode only God knows, I’ll play with it tonight and see if it’s any brighter than it was before, doesn’t seem to be to me. I’m running the LiNiMnCo 26650 cell in it now, after starting out with an AW 18650 2600mAh cell for safety.
But at least my reflow of the XM-L2 T6 on copper is working. As are my soldering points (which I’ve never been good at but these look pretty good!)
I’ve got a piece of shrink wrap from a “D” cell size tube in between the star and reflector, just in case. And another slim piece of same coiled inside the pill to ensure the sides of the driver don’t touch anywhere.
Is it perfect? Well, I’m the one that put it together so that should be the answer to that!
I got some tailcap readings with my DMM that finally make sense, but not on the HD2010. It reads nada. My other lights show about what they should by using 12ga Romex solid copper (not stranded) wire in the DMM for leads…2.5” long. So here’s a collage showing 3 of my main throwers in a shootout at 183 yds, with a tree to the left at 315 yds that’s not directly in the beam but visible in the larger size in flickr.
Why won’t the HD2010 show anything on the meter at the tail? This is using the new driver at a supposed 5A but it’s very difficult for me to find a Hi mode in all that 4 Group 9 Mode gobbledygook.
 . The #'s are awesome, in the 1300's for lumens.