——-8-5-14 Upgrade to the Texas Poker…check it out! I put an XP-L in this lil guy and gained over 300 lumens! It was drawing 3.11A making 552 OTF with the de-domed XP-G2 I put in it with the BLFTiny10 FET driver. Now, same driver, it’s pulling 3.20A and making 873 lumens OTF! WooHoo!!!——-
Hey everybody, thought I’d share some pics of my new light that Photon Fanatic is completing. This is a pet project, done with a 1” bar of Grade 23 Surgical Grade Titanium that I’ve had for over 13 years. Finally figured out what I wanted to do with this bar, thanks in part to the Forum. So I tried to apply some of what I’ve been learning here in the last couple of months (stuff missed out on at CPF by the way) and designed my own little rocket. Based on either a Cree XP-G S2 in 5700K or a Nichia 219 in 5000K, with a driver custom designed by Matt Wright out of Australia and being programmed in Germany, the hold-up to this light’s completion, the driver will push 1.2A for something in the neighborhood of ~300+ lumens on hi, with regulation and overheat protection as well as over-discharge protection. That’s the plan, anyway.
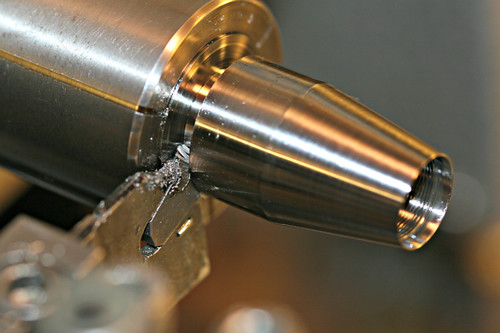
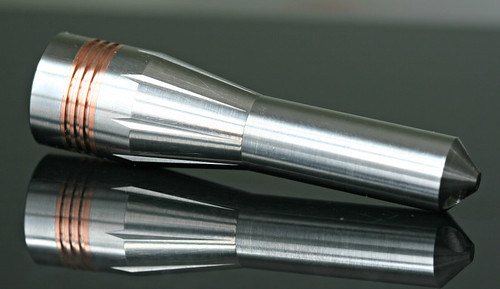
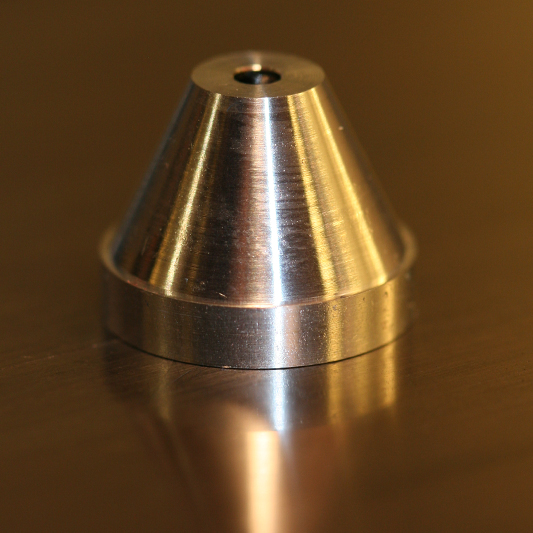
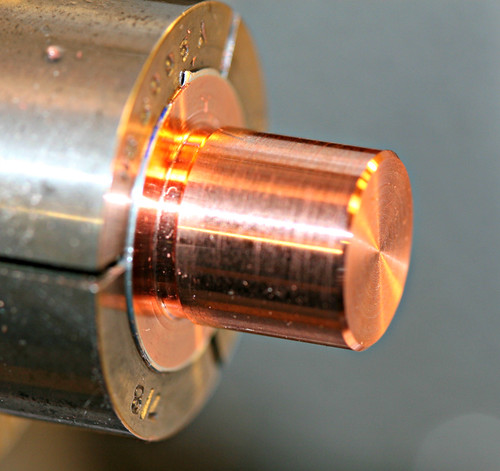
I have always like the look of Leupold rifle scopes, so based on the bore end of a scope, I submitted my idea to Fred Pilon for this build. Fred uses an old Swiss manual lathe and uses it well. He also designs in Solid Works and has stuck by the design perfectly. The design calls for a large heatsink in copper, as the Ti doesn’t remove heat well…with this in mind external ribs from the heat sink were designed as a solid piece that pretty much fills the Ti head. The bezel screws onto the sink, the copper pill screws into it from below, and the battery tube screws into the base of the head. Making this a twisty for simplicity, the 3 modes should be easily accessible.
Bear with me, this is a first for me in more ways than one….
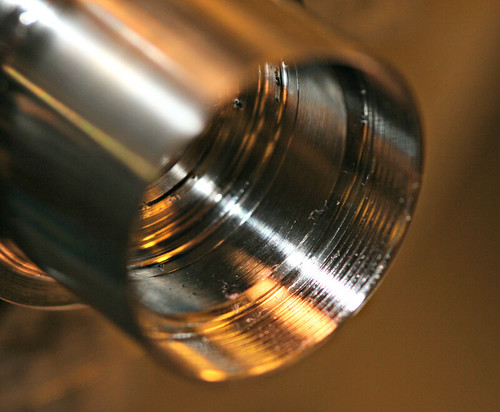
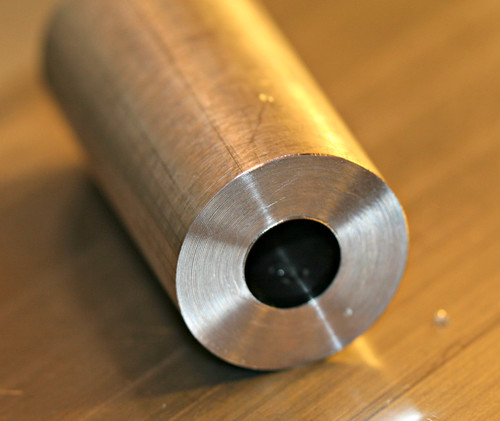
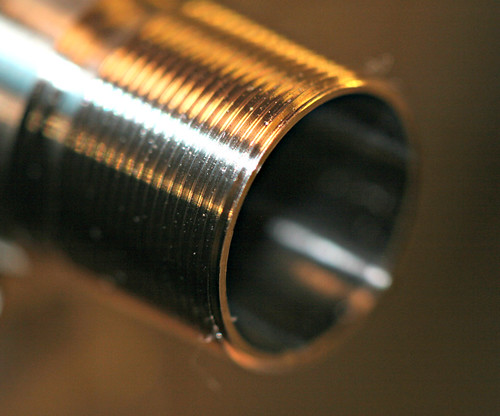
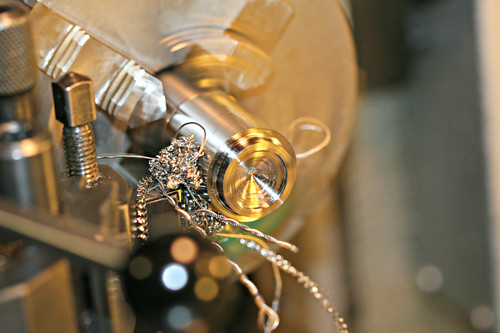
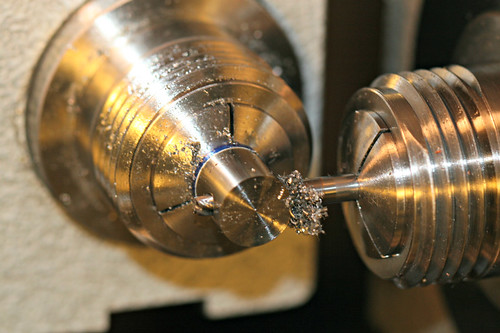
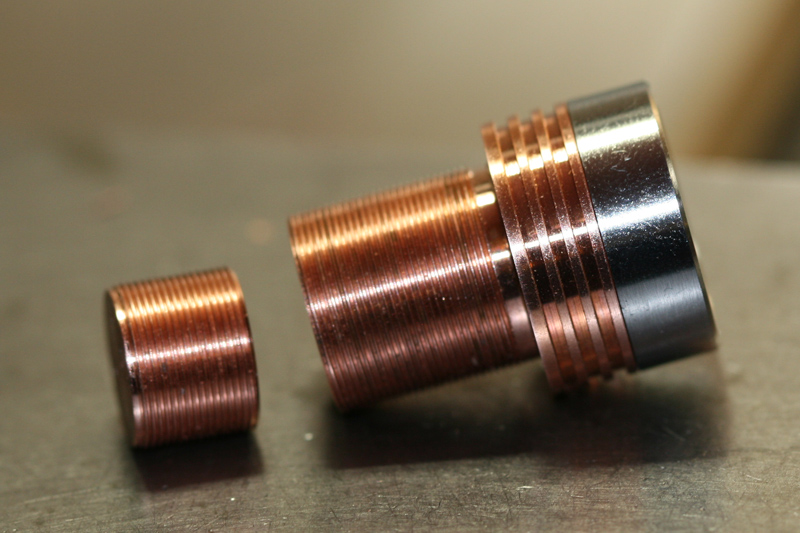
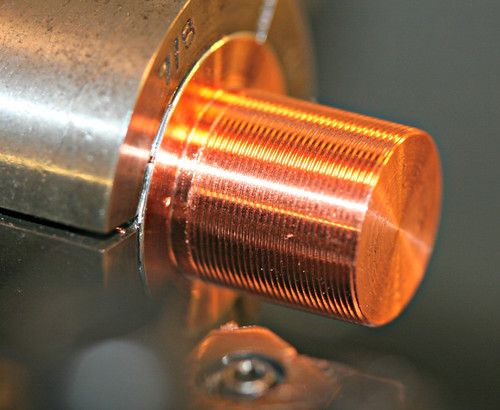
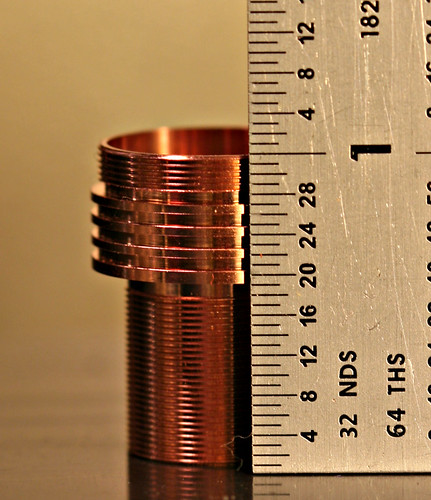
.5mm threads anyone? This pitch is used throughout. I have a sample of these in a Ti pill bottle made from the remains of this 1” bar and they’re smooth as butter.
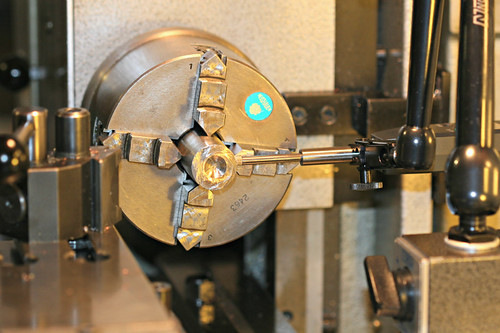
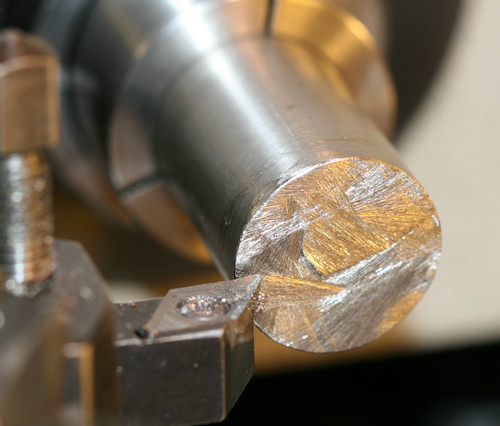
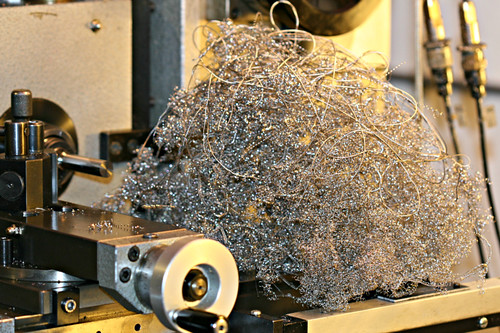
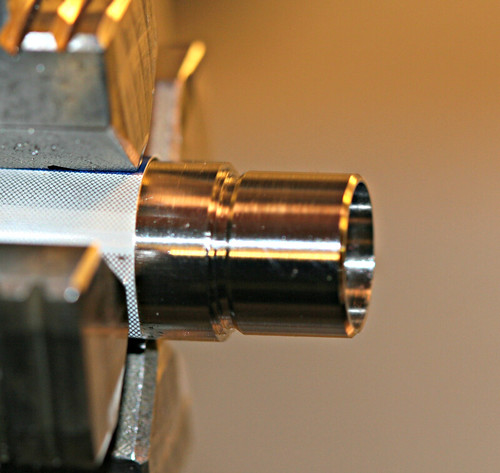
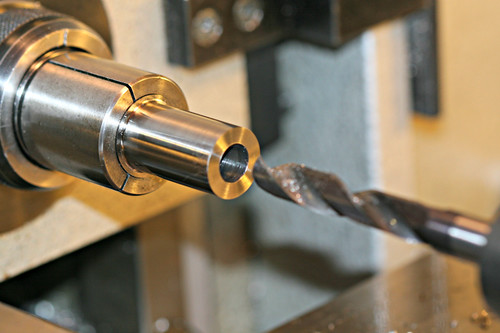
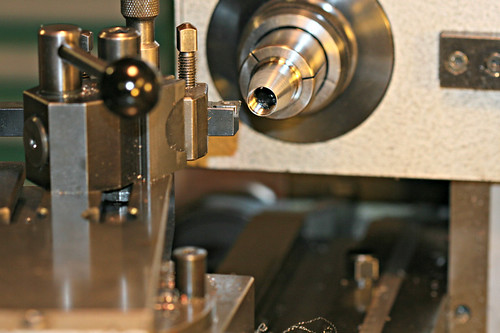
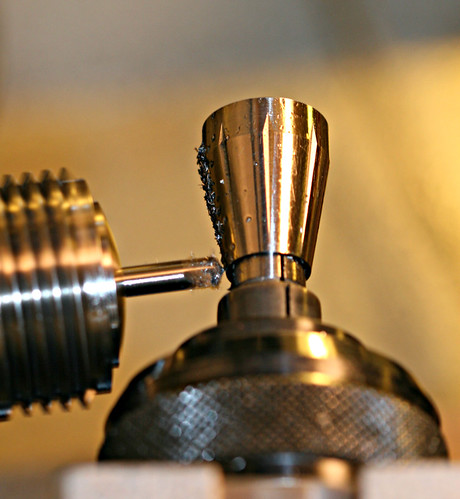
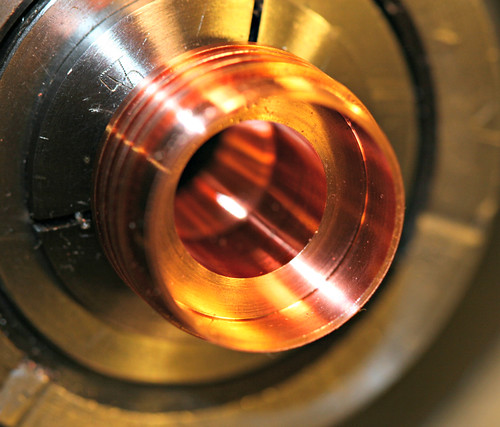
Boring out the pill area after the outer threads for the ramp portion of the lower head,
Did I mention Fred like’s a challenge?
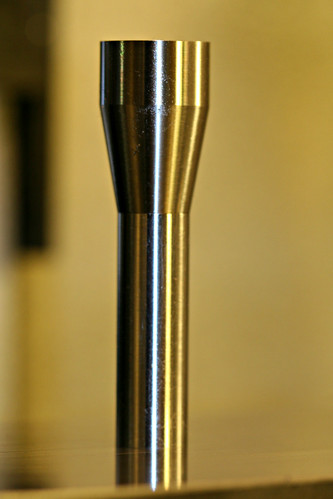
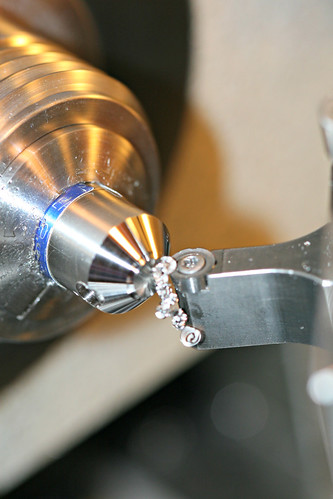
Creating the exposed ribs for heat dispersal. Whether or not this works, it’s sure got a nice aesthetic!
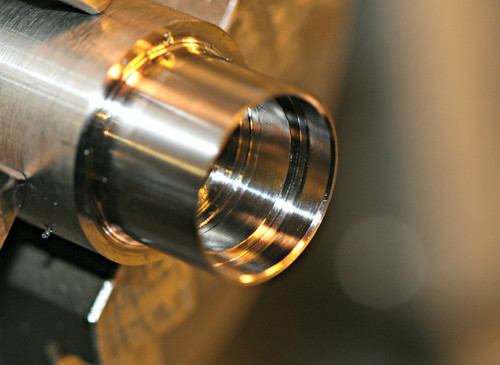
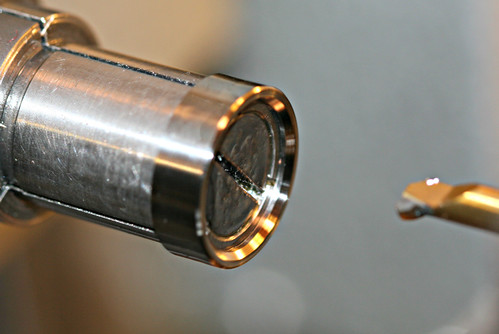
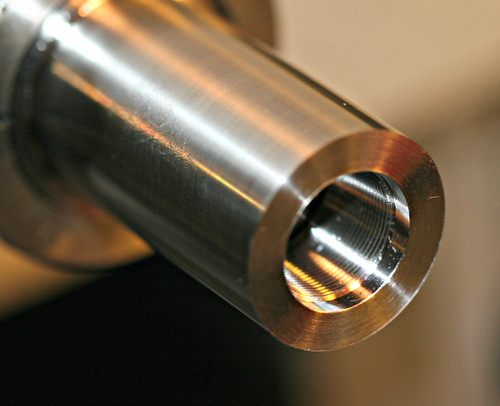
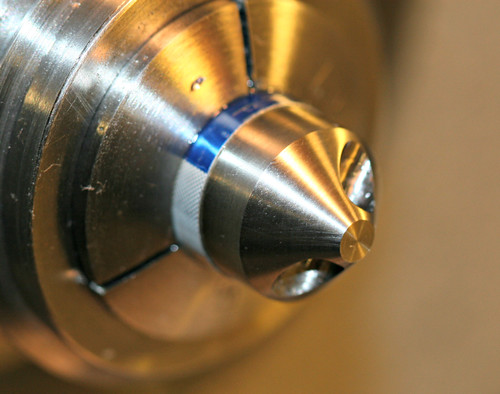
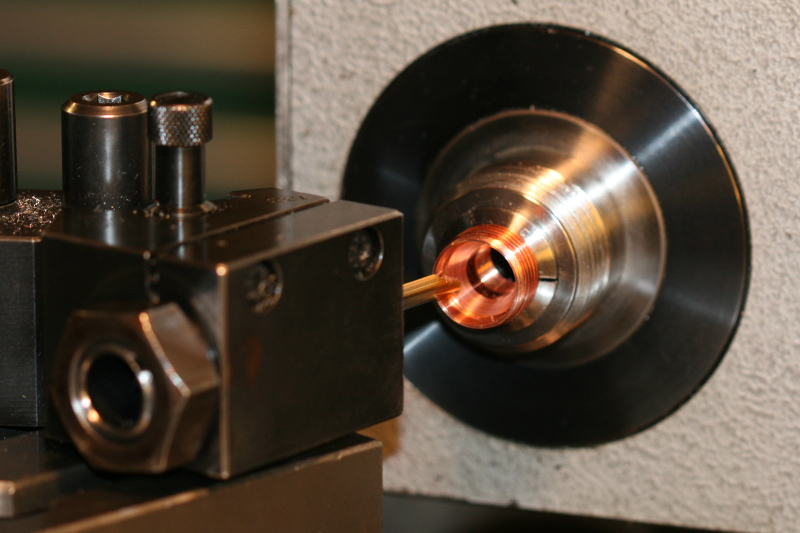
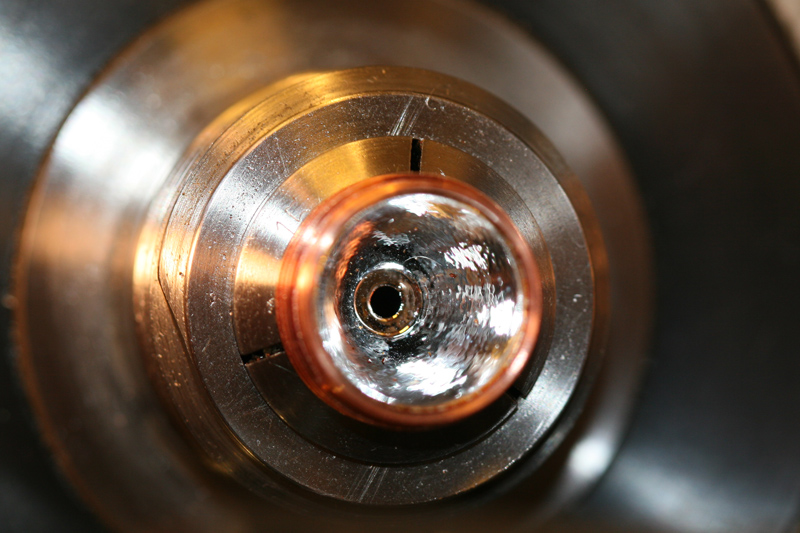
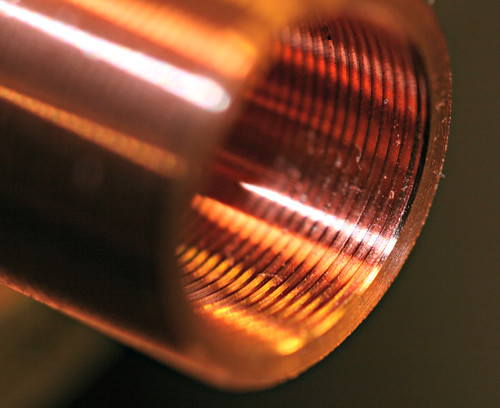
The reflector area, bored, countered, ready for the reflector and lens.
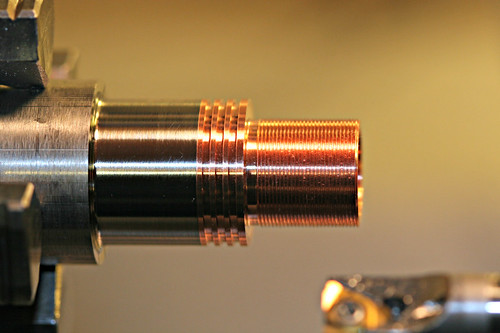
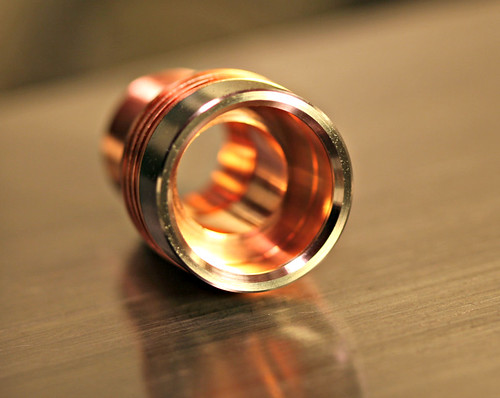
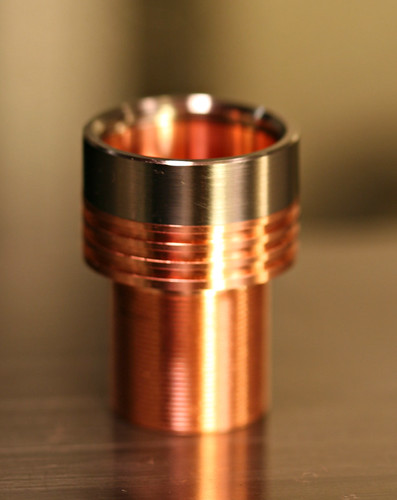
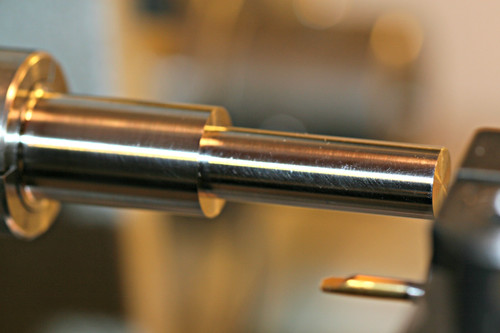
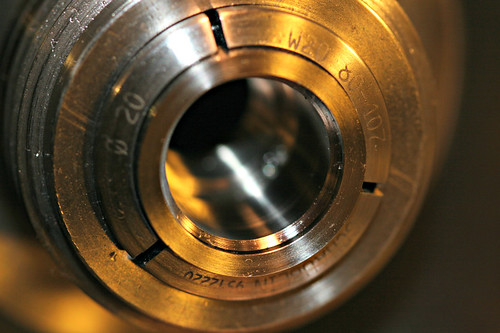
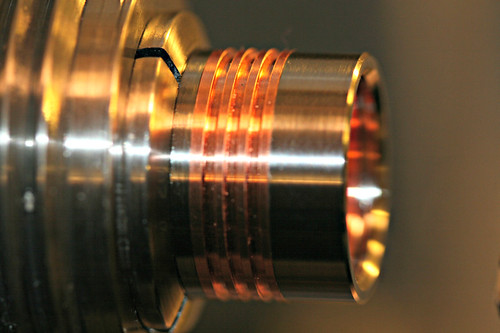
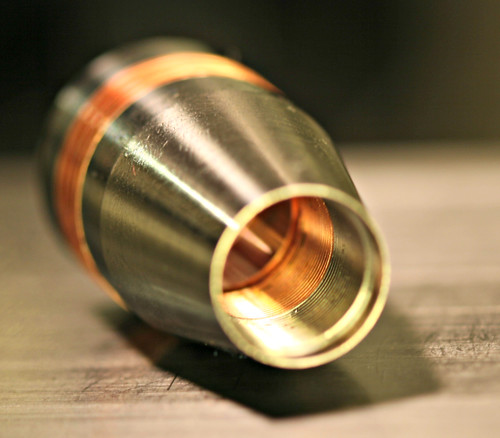
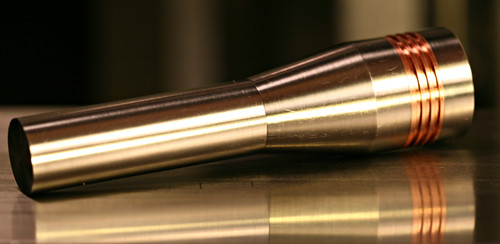
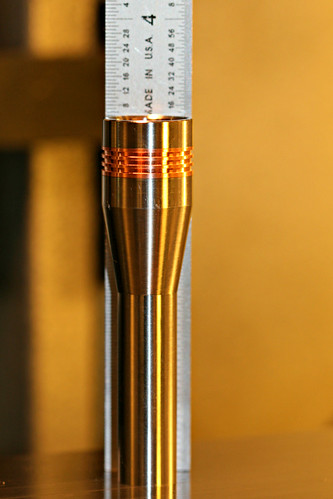
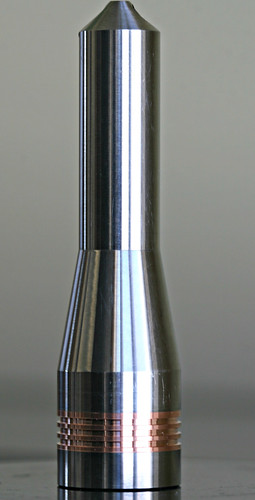
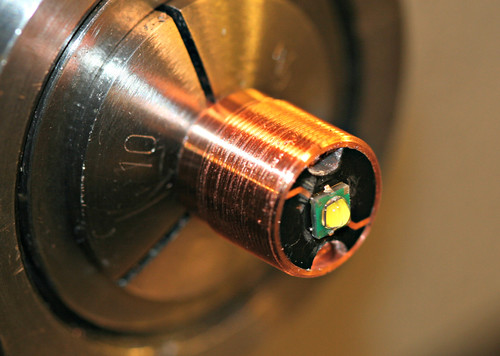
The copper heatsink, with quite a bit of work in this one tiny piece. Art! Gotta love it! I figure those threads are just a little thicker than my thumbnail.
So we’re all good? Nobody wants to see anymore?
I have no idea how all this works, so I’m going to break it up in sections. Consider this phase 1.
Phase 2
Many years ago I made 3 rings from this bar, you see how rough the ends were when I sent it to Fred. I had almost zilch for tools, cut it with a hacksaw. That took some doing!

Fred sqaured it off, turned it down for the bezel, and started the tedious process of boring out and countersetting all the tiny details. Have I mentioned the outer diameter is 20mm on the head? The overall light will be about 3” long, with a 13.25mm battery tube. Getting some idea of scale?

Threads on the bezel, for attaching to the heat sink.

The heatsink, threaded into the bezel. Perfect fit. Fred’s lines are genious!

Opening up the lens area of the bezel. Very small work here as well.

Flip the bar, on to the battery tube. More hacksaw results here, from Y2K.

Squared up and bored for the 10440 cell, now the boring work of stock removal.

Making Ti twistys, the time consuming way.

Step back to the bezel for a look at it’s fit on the heatsink.

Nice!

So this will wind up phase 2
Phase 3
Now some seemingly simple stuff, right?

Now that the end of the tube is prepared, it’s time for more threads!

So now let’s make the back end of the head, in preparation for the battery tube.

Turned down and bored, ready for yet more threading! There’s 5 pieces of machining on this light, with 8 areas of threading!!

Ready to see if the battery tube fits?

Starting to look like a glorified tire thumper, but look at the fit….nice work Fred!

The 1” bar held in the lathe, with the cutting tool set on an angle to cut the taper for the head to join up with the battery tube. Tedious stuff again.

Another nerve wracking moment, parting off a piece you’ve got a lot of time on. Once again, perfection!

The shape of the Texas Poker. The tapered portion will be reduced further to meet the copper heatsink and the battery tube will get some more work as well.

So it’s time to get the pill area cut out of the lower head. For me, every step get’s more nerve wracking with all the time involved. Don’t know how you guys do this!

Piece o cake! Love how that fresh copper looks against this dark Titanium. Wow oh wow!

So here’s the head, bezel mounted, heatsink inside and man what a work of art! On a tiny little flashlight dreamed of for a decade.

As Fred said when he got to this part , “What’s to say?”

And moving out of this headed for the last phase…
Phase 4
Boring the tail for my 3.8mm Ti curb chain. This is a neck light after all.

A live shot of the tail being tapered, Ti flying, how in the world does he do this and get pictures too?

Perhaps I failed to mention that Fred went down inside the battery tube and cut a raised bump at the bottom, to ensure contact with cells that had wrap around the edges, and now on the outer end, cutting this little mole nose ….I’d be scared all over again to get inside the already tedious little tube.

Essentially, the work is done. A few cosmetic touches and some work on the pill and star board. But here stands the Texas Poker.

Star cut down from 20mm on the bottom to 10mm on top. This is a XP-G S2 5700-6100K found at LED-tech in Germany. Got 4 of em just in case

Trace removed, ready to go into the pill.

Fit’s the pill like a glove. I swear I can’t figure how he gets those lines so dang tight!

Cosmetics on the head, the last of the machinework save for boring the pill for the driver. Which will be done when the driver arrives.

So, here she is, a final polish to make her gleam when all is done and she’ll be coming from Mass to Texas! YiHaa!


Thanks for watching! Hope you enjoyed the amazing show that Fred Pilon, known as Photon Fanatic, put on for me with his camera while working magic on an old Swiss manual lathe. Sheer genius and worth every dime! Thanks Fred!
EDIT-New Photos: These are the last of the pics from Fred, he dropped the light in the mail this afternoon!
Boring the heat sink for the reflector, a Dereelight orange peel aluminum unit

And here’s the reflector, nice and beefy with a reinforcing ring around the top…good for heat sinking too

Perfect fit! But of course it is, Freds the conductor on this trip!

Ah, a thing of beauty! As near perfectly matched as any I’ve seen, this should really make a nice beam!

And here’s the pill to go into the heatsink, keep in mind that little bad boy is only about a half inch in diameter!

And in the next few days, I’ll be taking my own pictures! This has really been an incredible experience, Thank You Fred for an amazing ride!
That is absolutely the beginnings of a work of art. You must have friends in high places with parts built here and there and modded over yonder. Half a mm thread pitch is so small. For those not into metric the distance from the top of one thread to the top of the next is twenty thousandths of an inch. This is very detailed work. Keep those pictures coming. Thanks for sharing.
djozz quotes, "it came with chinese lettering that is chinese to me".
"My man mousehole needs one too"
old4570 said "I'm not an expert , so don't suffer from any such technical restrictions".
Old-Lumens. Highly admired and cherished member of Budget Light Forum. 11.5.2011 - 20.12.16. RIP.
yes. i cant wait to see more. i love titanium
-the- Throw calculator - Pulsars list
Those two pieces look like one with different colors, amazing.
P60dropins.com (just a redirect for now)
Where you meet a few people and things start falling in place. Nice people. Helpful people. And they’re movers and shakers and I got lucky. That doesn’t happen to me real often, and I really really appreciate it when it does!
Who said it? “I Love it when a plan comes together!”
So do I.
congrats, puts my custom light to shame! haha…
that thing is a piece of jewelry
-the- Throw calculator - Pulsars list
I’m tellin ya, Fred’s a genious on that lathe of his! He’s got some works that are just drop dead gorgeous and look impossible to do. And manually. Don’t know how he does it. Wish I could!
Hey, y’all see my post count climbing over there? Don’t even think about seeing this light when it hit’s 1000!! ROFLMAO
i said it before and I'll say it again, simply amazing!!
The Flashlight Forum (TFF)
The Vaping Forum (TVF)
https://docs.google.com/spreadsheet/ccc?key=0As
Who said anything about giving it away for 1000 post's posted. 500 post giveaway would be a lot better. I'm the first entry. Hope I win this thing. Simply orsm and thanks for such an amazing giveaway.
djozz quotes, "it came with chinese lettering that is chinese to me".
"My man mousehole needs one too"
old4570 said "I'm not an expert , so don't suffer from any such technical restrictions".
Old-Lumens. Highly admired and cherished member of Budget Light Forum. 11.5.2011 - 20.12.16. RIP.
i like the way you think
-the- Throw calculator - Pulsars list
Looking to change the rules eh? You really do have a horrible memory! Don’t even think about it, means it just ain’t gonna happen!

But swim over here through Midland and don’t get blown up at Ft.Hood and we’ll talk
Very exciting time for me, the closest I’ve ever come to “commissioning” a successful build on something was a few holes poked in the top of a gun barrel with a window in the slide over it for competition shooting with a Glock .40 cal. That was before Glock started doing it, and it worked very well. 4 holes and a slot. Nothing like this at all!
Some of y’all will like the idea of this. Know how I happened upon Fred? I was talking with Matt, the designer of the driver, about a build he’s doing for a kick-a** P60 drop-in that’s not quite done. He had mentioned making a new light with a bigger head to have cooling fins and I’m sitting here looking at this big 2 1/2” diameter chunk of Titanium, sitting on my shelf like a big heat sink that there’s never gonna be any way I can do anything with it, too big! So I ask him what I could do with it, kind of offhand like, make a flashlight head? He say’s, “Give it to Fred, see what he can do with it” I contacted Photon Fanatic in a PM and gave him the chunk of Ti. Payed it forward if you will. And that’s how I found out what Fred does and ended up commissioning him to do this light with another piece of the same grade of Ti that I also had.
Ironic, isn’t it? When you’re finally willing to give something away look what can come back at ya?
Edit for clarification purposes: Fred works for money.
That is the most exquisite tiny light I have ever seen .
UN . BE . LIEVABLE .
BRAVO !
What I do
Howly cow
Thanks God you have used Canon EOS for this work, those shots are simply gorgeous!!! 
Thanks for the compliments, really means a lot to me. I can’t, however, take credit for the pictures as they are Fred’s from his 30D and 100mm macro. Nice photo’s though, to be sure.
I’ll take some stacked macro’s when I get the light, with my 5DMkII or 1DsMkII, see if we can show a bit more of his fine detail work!
In doing all this posting and writing the description something occurred to me. Now I don’t know if Fred planned it this way or not, but…the V-Grooves in the head, the wider portion of groove that breaks over the ridge, that is almost exactly the position of the emitter in the center of this lil jewel! Almost like the tines on a physical torch that surround the flame, I really like that visual and once again I have to be amazed at the creative artistry that is Photon Fanatic!
Having made rings from this Ti in the past, I know that the tiny bezel detached from the light is near weightless…one of the things that’s always drawn me to Titanium, the piece is just difficult to believe even when holding it in your own hand, mind boggling compared to like items. I just can’t wait to have this light in my hands!
That is just quite frankly jaw droppingly gorgeous. Congratulations.
And severe thumbs up to fred. He is without a doubt a master of the old school.
Cannot wait to see this finished, please keep us updated.
http://theflashlightforum.com/index.php
http://www.thevapingforum.com/index.php
Everything was looking pretty amazing through the build, until the end.
Then you turned the awesome-meter past 11 with those grooves on the head.
ruffles. You are certainly a hard task master. It started of at 12 for me and went to a 15 (out of 10).
djozz quotes, "it came with chinese lettering that is chinese to me".
"My man mousehole needs one too"
old4570 said "I'm not an expert , so don't suffer from any such technical restrictions".
Old-Lumens. Highly admired and cherished member of Budget Light Forum. 11.5.2011 - 20.12.16. RIP.
Nothing to say, nothing to add. Just posting out of wonder.
Three Tanna leaves to give him life, nine to give him movement. But what if he eats the whole bag?
Scott
Here’s a bonus, the last of the Ti bar. Fred made a pill fob for my wife by my request in order to use the rest of the 1” bar. This series of pictures you can thank MRsDNF for, enjoy!
[Thud!]
That was the sound of my jaw hitting the floor.
http://wardogsmakingithome.org/index.html
War Dogs, Making it Home - Rescue Dogs for Returning Vets
It took 100+ pictures to make those 7! That collage is actually 16×24 at 300dpi, click it and go to Flicker to see it full size.
Laugh out loud Wayne! Thanks! Now my kid will never get to sleep! “What’s so funny Dad? So what’s so funny?”
No I did not make this or take the pictures. I just inquired about it.
Thanks for nothing DBCstm. I will no longer post any pictures of any machining I do. I'm just not worthy.
djozz quotes, "it came with chinese lettering that is chinese to me".
"My man mousehole needs one too"
old4570 said "I'm not an expert , so don't suffer from any such technical restrictions".
Old-Lumens. Highly admired and cherished member of Budget Light Forum. 11.5.2011 - 20.12.16. RIP.
I’ve seen your work man, post em up! That little scope looking mini is awesome, send it to me and I’ll take some pics for you.
I tried to show the little pill fob against common objects so’s you could get a sense of it’s size. My mojo was off but I’m happy with a couple of these, especially the ones in front of the P-60 and in my wife’s hand.
Glad you like em.
Bottom’s up!
Wow!!
Incredible work. Thanks for sharing!
It looks fantastic. Thank you for the many pictures. I haven’t the equipment or the ability to do such a great work. For me it’s really nice to see, how such a great product was produced.
Light up the darkness.
I’m a photographer. Can’t help myself. So, with that being said, here’s a new shot I just took for a size comparison evaluation. This picture is a stacked macro comprised of 62 individual shots merged together to get this one highly detailed picture. Nothing spectacular about the Solarforce L2P used here other than the Gold color. But, the AAA MiniMag recently acquired from O-L is a very cool little light! I hope to chop it to a single AAA and with that in mind started taking some measurements. That’s when I realized that in chopped form it will be almost exactly the size of the Texas Poker shown above! The chopped AAA MiniMag in this photo is not actually chopped….I took the liberty to Photoshop it to show the result if I’m able to pull it off. Go ahead, look at it full size in Flickr and see if you can find the “seam” lol
Pages