Anduril 2 UI diagrams (generic, Lumintop, Sofirn)

congratulations, and thanks for explaining your setup :wink:

my guess is the reason you can use 3C from On in simple mode to switch ramp styles is because you are not using the stock firmware… in any case, glad your light is working well for you :wink:

fwiw, the stock D2 firmware does not allow me to access 9H from On… so, no extended UI in simple mode for me, unless I want to reflash to newer firmware (I have no motivation to do so)

1 Thank

Hi folks, @ToyKeeper suggested it some time ago in this thread, and here it comes, an Andúril 2 diagram created with TikZ for LaTeX:

So, be invited to have a look over at GitHub, more details are in the README, use the diagram, modify it, and let me know any errors you find or suggestions you have.

It is a one-page diagram, so obviously there is a lot of information on there, but still, having heard that diagrams can be intimidating, maybe the layout is not too scary and can cope with differences in interest and knowledge. :grin:

Anyway, I am hopeful that this is useful to the community.

8 Thanks

Thumbs up :+1:, this must have been quite a lot of work. Definitely a step forward to have a text-based format for better collaboration.

Visually, the diagram seems much clearer than the usual one, probably due to the thinner lines and fonts.

One thing I would criticise is the use of two different “OFF” states in the diagram. I suppose you’ve done this to fit the ramp in the centre and make the OFF state look less busy, but it suggests there is a “different kind of OFF” depending on the state you’ve come from. That’s inelegant and might be confusing.

Also, any reason not to create the simple UI diagram too? I find that’s very useful to give to beginners.

1 Thank

Thank you very much, and good call! Actually, at first, this was exactly my thinking when I added another “OFF” on the right. Then, with some use of the diagram (I like to print it and add some notes, if need be), it simply became one “OFF” to me, just like technically there are also two “ONs”, the “ON” and the Ramp image. And yes, positioning the ramp in the center was the initial reason behind this.

Now coming back to this, to clarify that this is the same “OFF”, how about adding another small “ON”, as is already the case with “Toggle Ramp Style”, like in this draft:

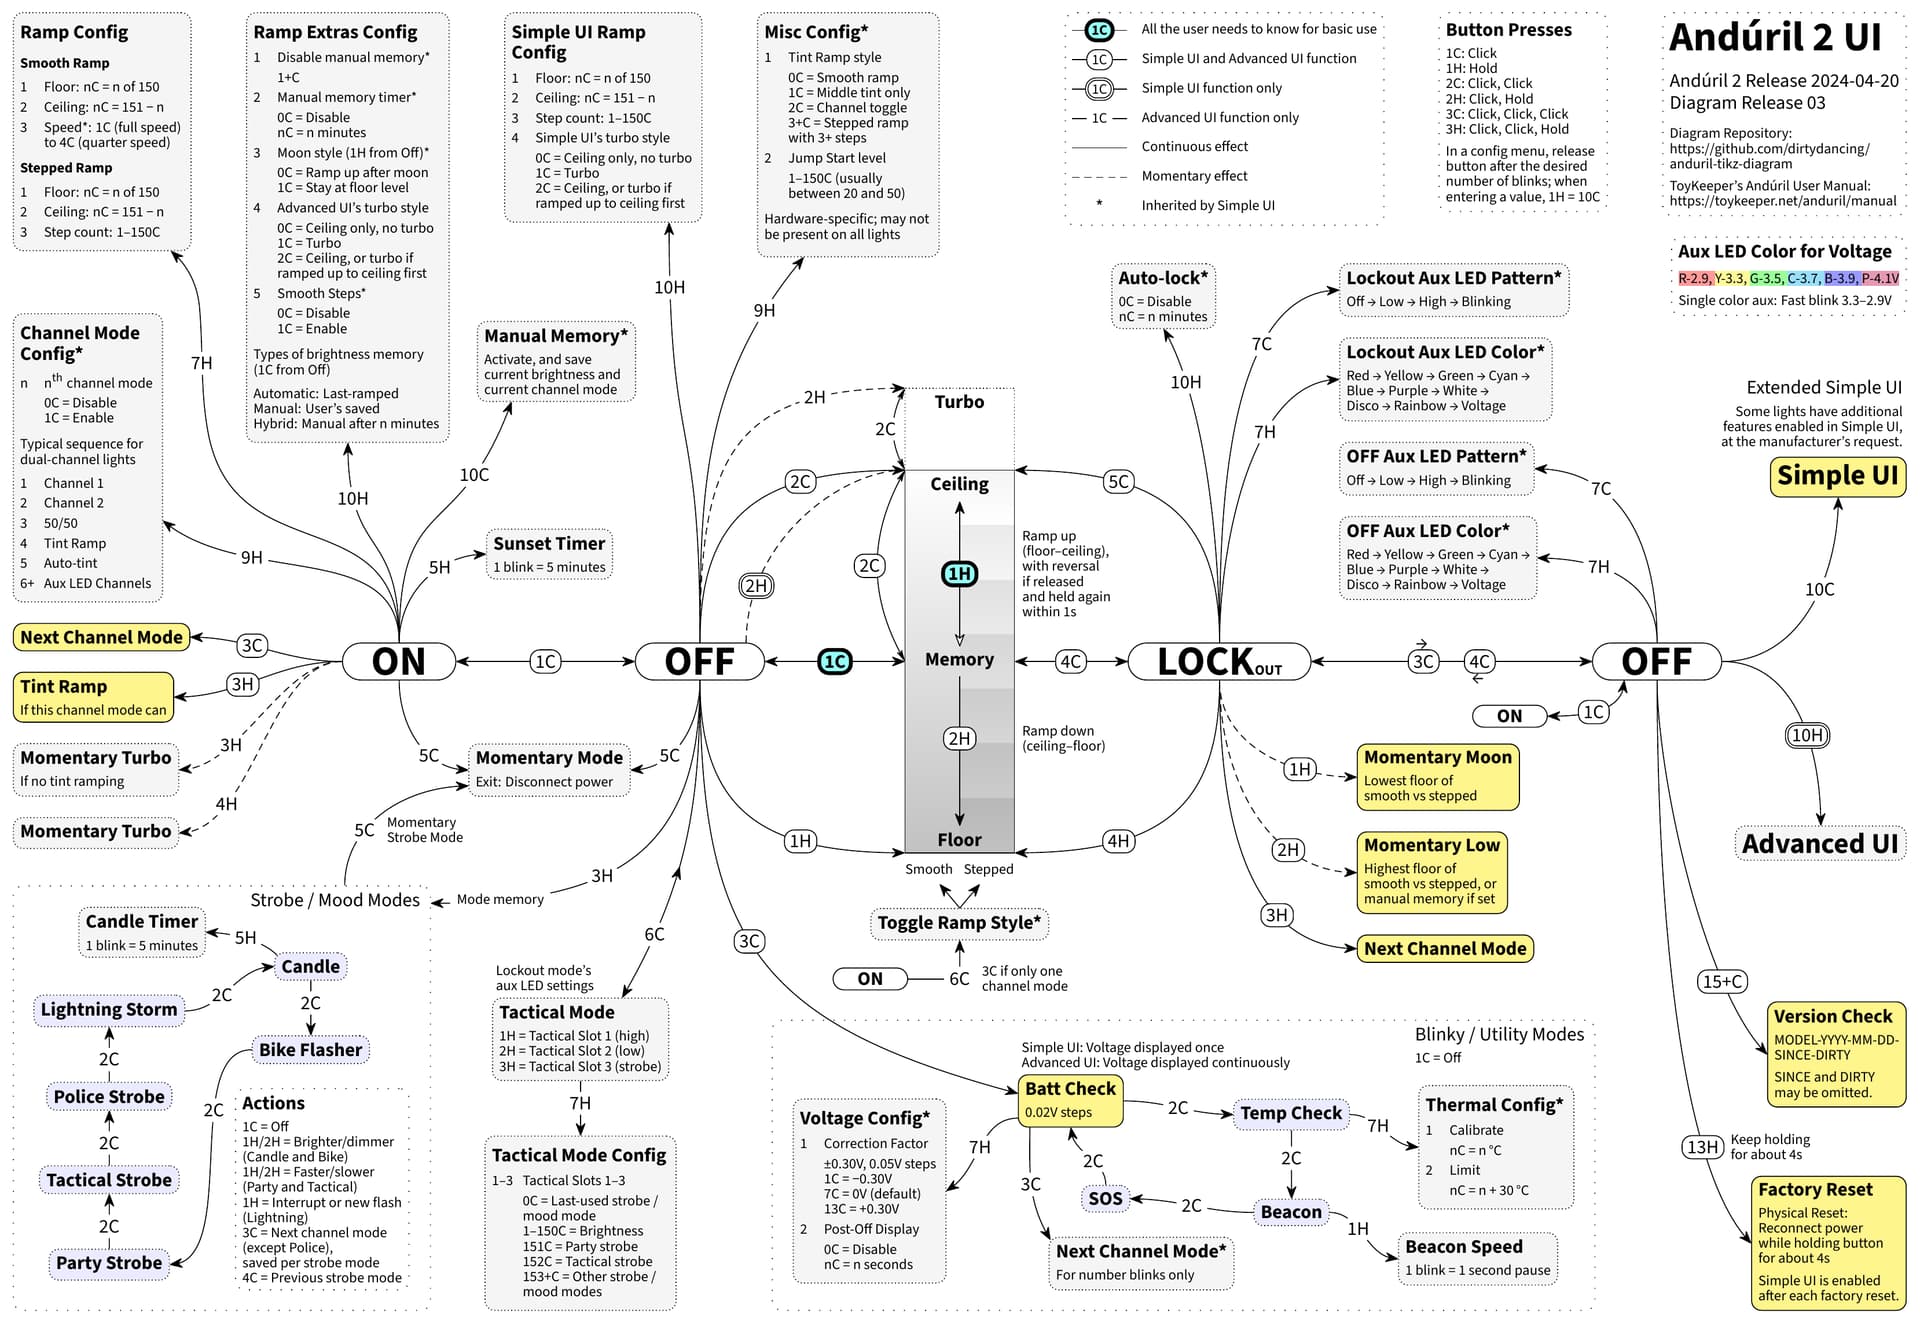
As to a separate Simple UI diagram: Presently, I do not intend to make one, and the reason is that this diagram is supposed to cover Simple UI as well; furthermore, with Extended Simple UI, the Simple UI looks quite different, and arguably you would need an Advanced UI diagram in any event to cover all the possibly enabled features with Extended Simple UI.

The idea here is that an absolute beginner can start with 1C and 1H, “All the user needs to know for basic use” and even less than the complete Simple UI (visually supported by the turquoise coloring), then go ahead with Simple UI (visually supported by the yellow coloring), and finally go full Advanced UI (unflashy gray coloring):

So, a beginner could focus on the framed button mappings of Simple UI, and could then move on to the non-framed button mappings of Advanced UI.

Maybe not all of this becomes clear immediately? I am always happy to improve the visual language of the diagram, and also to learn a thing or two about the TikZ code itself; so if you have further feedback regarding any of this, just let me know. And please feel free to completely take apart the diagram, given that there are so many details to pay attention to. :slight_smile:

Anyway, the diagrams by @containerfan are great, and there is a separate Simple UI diagram available. I figure it is good to have some choice, and somewhat different approaches to the diagrams. This can suit even more people’s preferences, and it helps with making sure that for those interested, there is always at least one current diagram around.

You are absolutely right! I’d never noticed… :smiley:

A wormhole to ON. I think this is a clever solution.

I hadn’t noticed that at first - I think this is a great idea. I would, however, consider adding a few additional (more than 1 click) operations to turquoise as these are also the basics:

  • 2H for ramp down
  • 2C for Ceiling when the light is on,
  • 4C for lock / unlock

Great! I created a new diagram release on GitHub including this extra ON.

Well, the 1C and 1H come straight from ToyKeeper’s text manual, cf. also ToyKeeper’s README. And because the diagram follows this manual (a link to the manual is included in the upper right), I do not intend to broaden the scope of the “basic use”. Actually, I really like this kind of minimal “basic use”; it is correct, and as simple as it gets. And it can put an immediate end to the seemingly everlasting contention that Andúril is “too complicated”.

This means that if you prefer the “basic use” to be wider, you will have to convince ToyKeeper to change that in the Andúril User Manual. :grin:

2 Thanks

thanks for this new flowchart:
1newdiagram

it has a description of channel 3,4, and 5, that I find very helpful:

one question
what do the aux color abbreviations mean:
1

1 Thank

Disco, rainbow, voltage.

4 Thanks

True. And thanks for bringing this up. The idea behind these abbreviations is to write everything out once, in Lockout Aux LED Color, and underline the letters of the abbreviations:

The reason for this is to use up as little space as possible, while still having the Aux LED Pattern and Color both for Lockout and OFF (as opposed to just pointing at one box for both from two sides), because then it is possible to mark different settings for Lockout and OFF in/on the diagram. It seems that this it not as clear as I had hoped it to be, so I will look into this.

3 Thanks

Thanks again! I have added the full, unabbreviated description and created a new diagram release over at GitHub. Just a heads-up: Andúril is a moving target, so also this might have to be adjusted in the future.

And one more outlook: with the TikZ code, it is possible to change the entire appearance of the diagram by just changing a couple of lines in the code, so this might come in handy for individually tailored diagrams in the future.

3 Thanks

Excellent!
Your flowchart is very useful :beer:

2 Thanks

In this case, you might be interested in this newly released diagram specifically for model number 0135, hank-emisar-2ch (for example for the Emisar D2), based on the previously released generic diagram.

As you can see, in this diagram for model number 0135, the Extended Simple UI is included, and displayed slightly differently (orange) from the “vanilla” Simple UI (yellow). Furthermore, some details are adapted, such as the Anduril 1 turbo style, which is the default for model number 0135 (and for all Hanklights):

Again, if you find a mistake or something to improve, just let me know; I have checked with a D2. The idea here is to give everyone the opportunity to modify the diagram according to their invididual settings and preferences.

At present, I do not intend to create further model-specific diagrams, and my focus is on the generic “vanilla” diagram. Still, with both the generic diagram and this diagram-0135, a broad range of lights should be covered. And it is quite straightforward to change the appearance of the entire diagram and also individual properties of the button mappings, such as Advanced UI only or Extended Simple UI.

1 Thank

thank you! saved a copy :wink:

1 Thank

Thank you for inspiring me to add the default settings to the model-specific diagram-0135 (but not to the generic diagram, as the default settings are model-specific). As the diagram contains a host of details by now, I may have overlooked something, so if you spot anything, just let me know:

4 Thanks

Coming back to this: On the occasion of adding “2C from On/Ramp” to the two turbo style configs in order to clarify what exactly turbo style is about, I have now also added an ON at the ramp memory right at the center of the page. Maybe, besides clarifying what the “On” in “2C from On/Ramp” is, this will also visually clear up that there have been two ONs (for the one and only ON) all along. :grin:

1 Thank

I have a Sofirn SF16 (UV) and I’m curious if any of these diagrams are suited for it?

No. The SF16 has three modes (low, med and high) that can be changed by tapping the switch while the light is on.

2 Thanks

no

The SF16 has a simple 3 mode interface, it does not use Anduril UI.

If you want to experience Anduril, I recommend you try a Wurkkos TS10

2 Thanks

Thanks fellas, I’ve been interested in trying out one of their lights and that looks like the perfect recommendation!

1 Thank

IMO an interesting concept but I am not sure that I see the need for this complex and flexible a user interface for a supposedly simple item like a flashlight. I just downloaded the manual and any flashlight user interface that takes 22 pages to print out seems to me to be needlessly complex for 99.5% of users. I belong more to the KISS school of users. Also I see why it was made public domain as I cannot imagine a light manufacturer taking the time, effort and expense to develop user interface software this complex.

The only other flashlight user interface that I am aware of that even comes close to this complexity is the 22 mode choices plus turbo timing incorporated in the two high power upgrade LED modules from Lumencraft for the Maglite incandescent flashlights. Per their description these were developed by DrJones as the Guppy2drv and I believe that he is described as a BLF member.