From ivan thinking net (a great resource!)
Hi SammysHP,
Speaking of this, was a "standard" ever finalized for a POGO pin configuration key adapter to flash file updates/new configuration files into driver vias or onto SMD pads using a USBasp programmer?
Sorry, I wanted to write “compile time”. No, there is no fixed standard. Hank uses a consistent layout on most of his Emisar/Noctigon lights, but other manufacturers use different layouts (if they have pads at all).
OK, thanks! Without a readily available adapter for USBASP programmers, and my desire to flash updates to my Andúril lights, it's the excuse I need to start learning an electronics hobbyist platform. But which one... Arduino? And where to start.
For a novice with solid soldering skills, what I need is a good online source to learn how to build SMD circuits, as well as basic programming, without getting overwhelmed by the sheer number of YT tutorial videos and other online sources to choose from.
Can a fellow Wurkkos TS21 owner with Anduril 2 do the version check? I am reading it as 2021-06-xxxxxx or 2021-07-xxxxx
Looks like I don’t have the “1H = added 10C” on my light even though it was released in 2022-01
Incidentally, I like version check which needs 15C or more but somehow still ended screwing up the aux led mode in standby setting aka 7C. Took me at least 5 more 7C tries before I was able to restore the previous behavior of the aux led aka low
Is this just the flaky switch or am I that bad at pressing it?
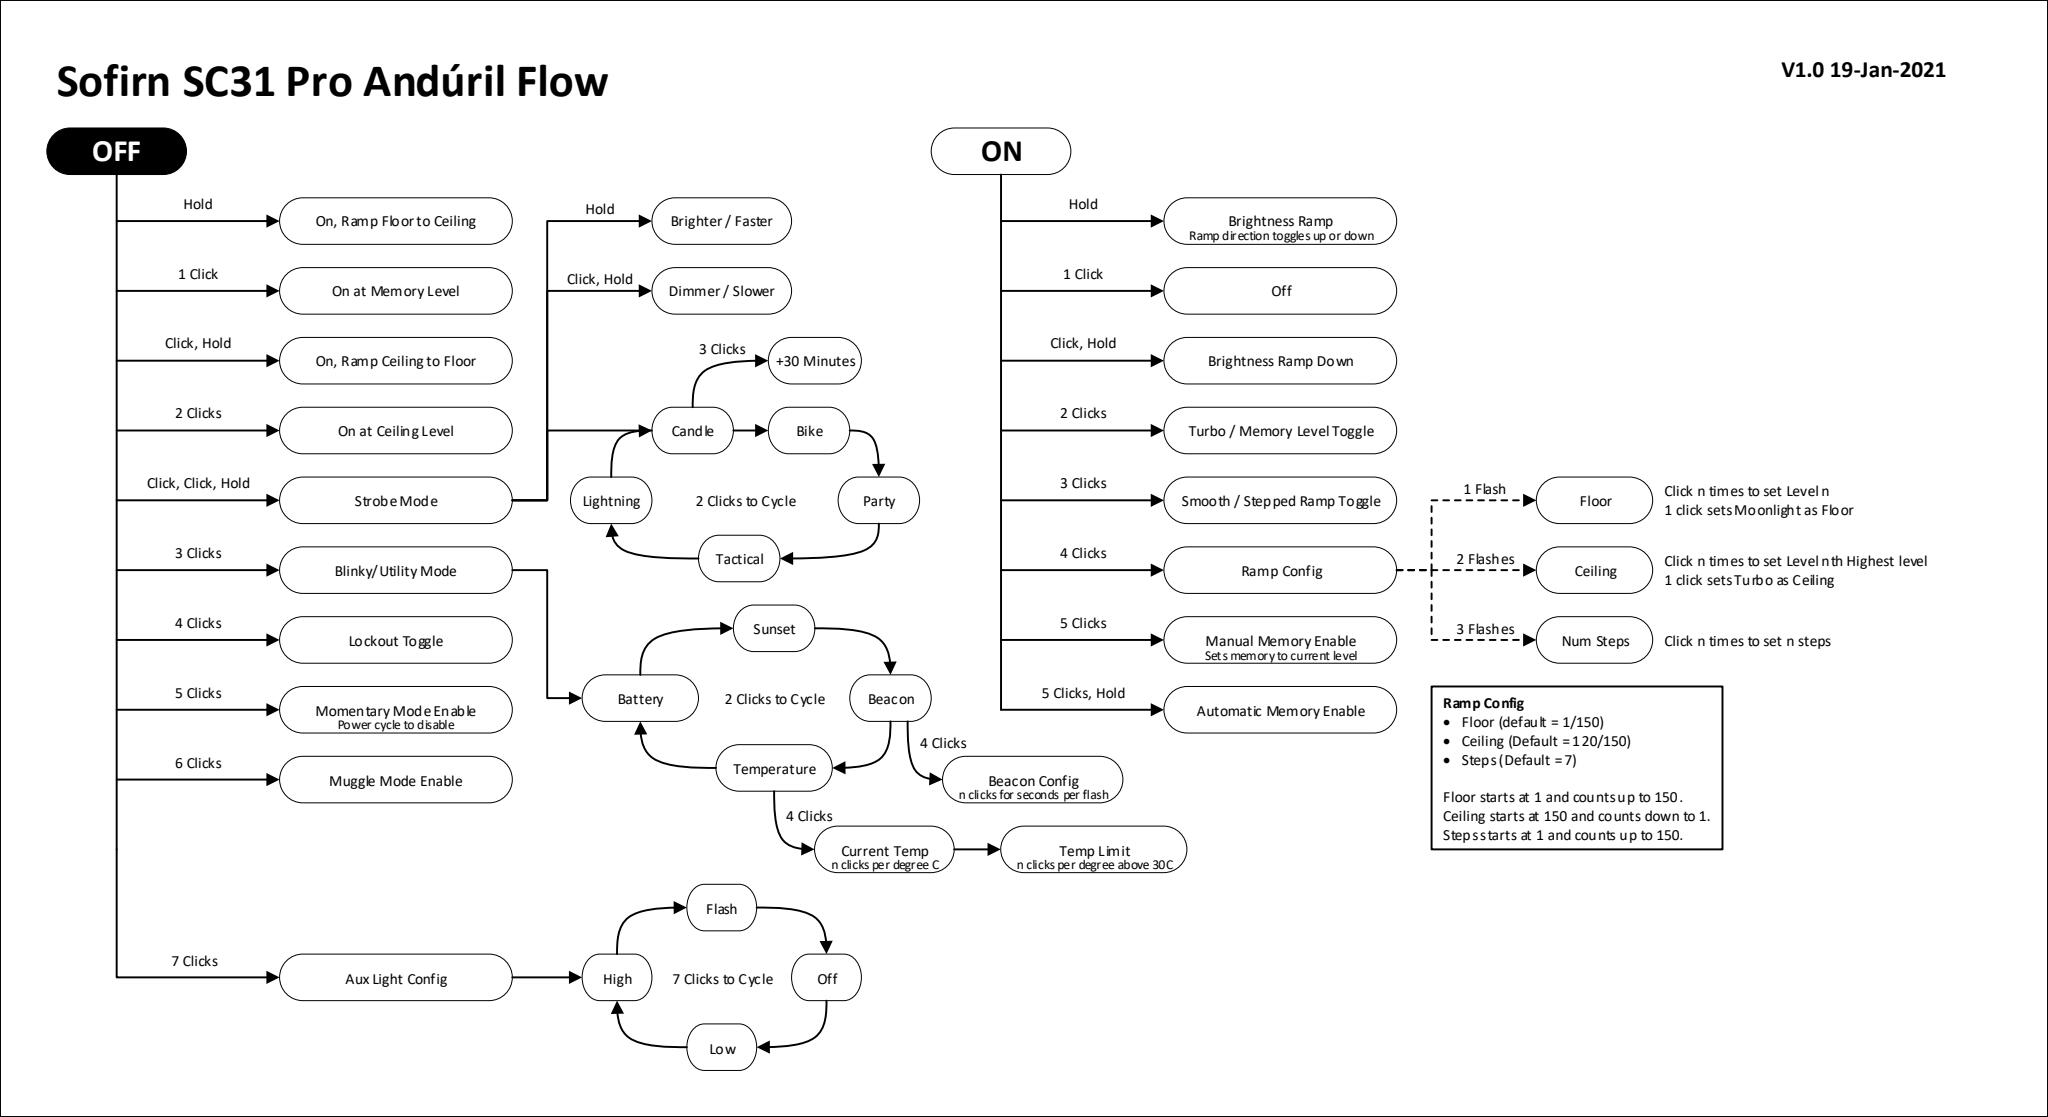
I am trying thermal configuration. I reached the temperate check and the light is blinking the room temperature pattern. One of the flow chart has typo. It says 2H for thermal configuration but I think it is 7H
When I do 7H and hold, some buzzing happen and when I release the button, it goes back blinking the room temperature pattern again.
- What exactly should happen if I do 7H and just hold; does something loop until I let the button go?
- When the button is release, what pattern should I be seeing?
- I want to set temperature to 60, so I should be clicking 30 times; do I just ignore the blinking light and keep on clicking?
- Is there some type of feedback when these type of configuration is done?
If you do 7H from temp check and immediately release, the light will buzz indicating it is waiting for your input. Here you would enter the current room temp (assuming the light is at room temp) to calibrate the sensor.
If you want to set the upper temperature limit, you need to do 7H and continue to hold until the light flashes once, then release. The light will buzz, and you would enter the desired limit as n+30C. So if you want the limit to be 60C, you would click 30 times, then wait for the buzzing to stop.
Unfortunately, there isn’t any feedback or indication that the limit has been changed. A UI involving one momentary switch and a single set of flashing LEDs has its limitations.
That was helpful. I do not think I managed to get it to buzz continuously. While I was clicking 30 times, the light seemed to in the “show current temperature” holding pattern aka “2blinks+1blink” indicating 21 degrees. That means I was NOT in the input configuration mode at all. The temperature calibration is close enough, so I only want to change the temperature limit from the default of 45 to 60.
Can you also confirm:-
Battery Voltage - continuously shows battery voltage in a loop
Current Temperature - continuously shows current temperature in a loop
Temperature Limit - NOT AVAILABLE aka never shown; only saved internally
That’s correct. In advanced mode both battery voltage and current temperature display will loop. In simple mode, battery voltage will display once before turning off and temperature info is unavailable. There is no way to display temp limit in either mode.
“Ramp Extras Config” gave me only two options. After the second flash, the light turned off while I was waiting for the 3rd flash to configure “Stay at floor level” option to click.
This is from ON -> 10H
Am I doing something wrong or this firmware does not have all the options? This is Wurkkos TS21 Anduril 2 light.
Before that I did manage to setup the temperature limit and the floor setting; so I think I am getting hang of doing the configuration
P.S. I wonder if I am landing on “Misc Config” (9H) instead! But this light has no tint ramp.
Replying to myself; looks like my light has what they call “Manual Memory configuration Menu” via 10H from ON and that config only has 2 options. Other two options are not there on this light as this light took the firmware from 2021-06
Oh well, that is life! But at least now I don’t feel so dumb.
The charts on this thread have been a lifesaver, and saved me hours of frustration after getting my first Hanklight. I read on a recent post, though, that folks were looking for versions revised to incorporate Toykeeper's tint ramping/channel switching functionality, so I came up with these. I'm sure they could use corrections/improvements. If so, let me know and I'd be happy to update them.
Version 1: [PDF]

Version 2: [PDF]

Those are very nice charts/diagrams. Will have to download and study on them some! Thanks for the effort.
I just discovered this on Sofirnlight.com
This is the easiest to follow Anduril diagram ive seen yet.
Id like to see more Anduril/Aduril2 diagrams done like this.
Try Dynalist (or Workflowy)
I use Dynalist and have exactly what you describe for all my flashlights, and everything else in my life too.
I developed that diagram, and Sofirn asked if they could use it. There’s a newer version that is more complete and accurate. Take a look at my post on Reddit.
I tried to develop an Anduril 2 UI diagram in the same format, but it just got way too complicated and I adopted Lux-Perpetua’s format.
Thanks, will check it out
Maybe someone here can help me with this…
No matter how many times or different diagrams I look at I can`t find how you set the second level of the light in lockout mode.
In other words, My D4V2, when locked out has 2 different brightness levels. The first is very low and the second is much brighter.
I had set my light up like this previously and now I have a D4SV2 and want to do the same but can`t figure it out no matter how many times I look at the diagram.
The settings for the two momentary brightness levels while locked-out are based on the settings of the two floor brightness levels (for "smooth ramp" and "stepped ramp") and the manual memory brightness level if that has been set.
The user manual from the creator of Anduril (forum member ToyKeeper) is available here:
http://toykeeper.net/torches/fsm/anduril2/anduril-manual.txt
I get what your saying and I`ve done it before on my D4V2 but I can`t for the life of me remember how to do it.
I`ve looked at the diagrams till my eyes fell out and cannot figure it out.
The first click is moonlight and I`d like to set the second click as something higher.
Is it done from lockout? From the light off but not in lockout mode? Is it done with the light on?
Can it be done with Anduril 1 and Anduril 2?
I can`t tell ![]()
Okay, I found it. I must have saved it previously as a text file so here it is (the instructions that is)
The two lockout brightness levels are tied to your two ramp floor levels (smooth and stepped). The
lower of the two always comes first. To change one of the levels follow these steps:
• unlock the advanced UI if you haven’t already (10H from off)
• turn the light on
• select the ramp you want active (3C from on toggles between stepped and smooth)
• 7H from on, then release after the first blink
• click N times to set the ramp floor to level N (1 is the lowest)
• wait for the light to come back on normally
• enter lockout (4C) and test it out
If you use hybrid or manual mode memory, the memorized brightness level over-rides your second
lockout level so it is no longer tied to the brighter of the two ramp floors. To enable manual mode
memory, follow these steps:
unlock the advanced UI if you haven’t already (10H from off)
• turn the light on
• adjust the brightness until you get to the level you want
• 10C from on
• enter lockout (40) and test it out
Unfortunately I cannot get it to work on my D4SV2 ![]()