Bear,
Check out JohnnyMac’s review to get an idea about the features.
Bear,
Check out JohnnyMac’s review to get an idea about the features.
I’m not sure what you’re looking at Sharpie.
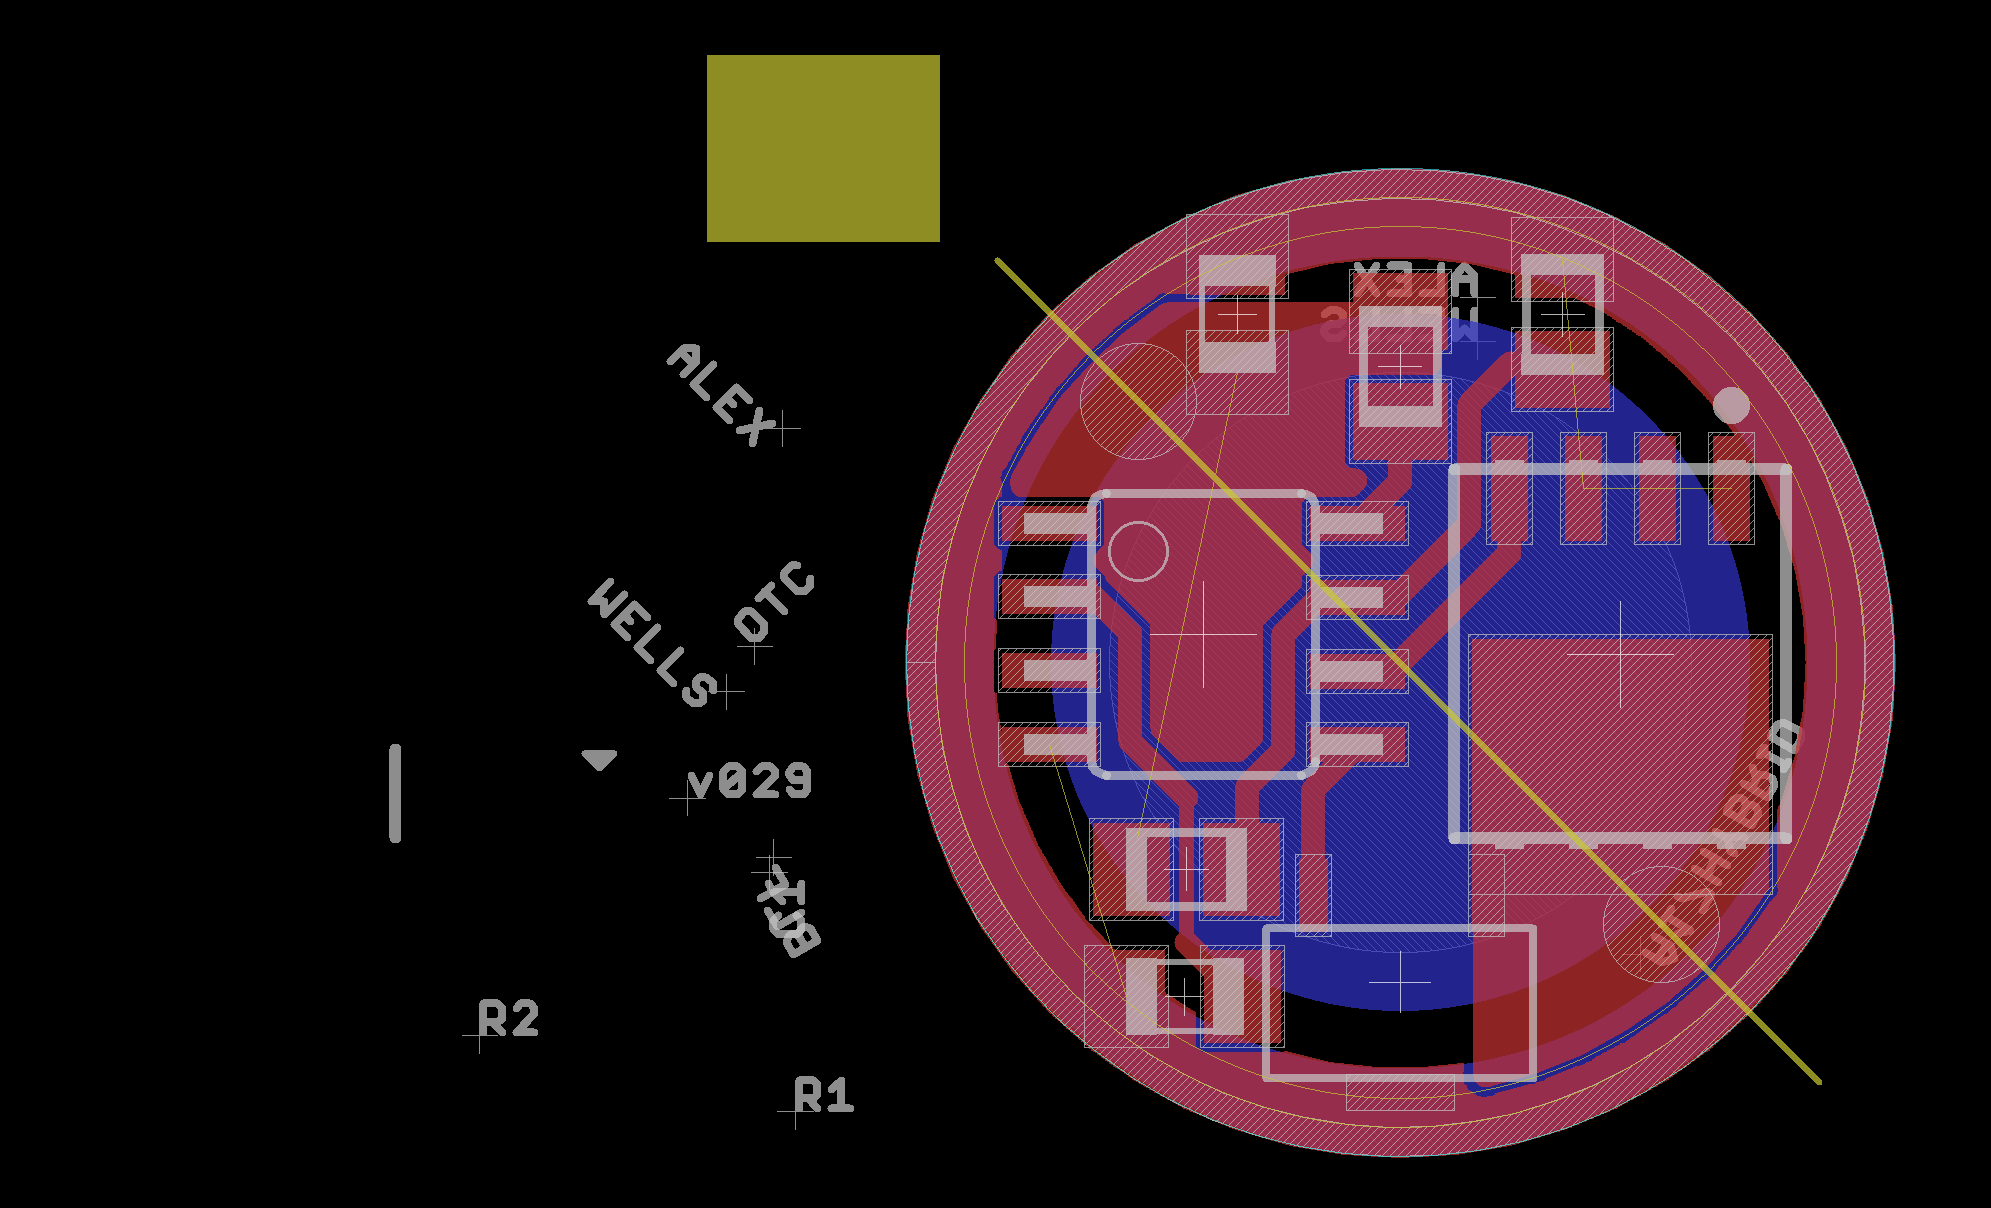
R1 is connected to V+ and Pin 7
R2 is connected to GND and Pin 7
OTC is Connected to Pin 2 and GND
OTC does not connect to R1
They re-did the board for the groupbuy to add the bleeder resistor found by the LED+ pad. The rest of the circuit would be the same just in slightly different locations on the board.
Both my SS/Cu and Al sets showed up, everything matches, no problems here. Absolutely beautiful lights. I knew the SS/Cu would be outstanding, but pleasantly surprised how well these aluminum sets are machined. They are outstanding as well.
Big “Thank You” to all involved making this happen.

I just rcv'd one set of SS/Cu (131 of 400) and an aluminum set. I got a few nicks around the X5's bezel, top outer ring, maybe a little too deep to simply sand out, but the light is gorgeous none-the-less, and you kind of have to look for it or feel for it to find the nicks.
I can see though the box was not a good idea for shipping the lights in. Much prefer the cardboard boxes the alum set came in, for shipping that is. The bigger SS X6 actually wore right thru the felt from the head of the light - two big holes there, so the light was sitting direct on the wood. The felt though is way too thin - it's for presentation but certainly not for shipping. The copper X5 was out of it's cut-out, but there's nothing really holding it down - some foam should have been added inside the box, both below and above the lights.
This is minor stuff in my view, but of course you'd like to be one of the lucky ones, but it's always a crap shoot.
Thanks Again team for getting this done!! Awesome lights!! They are clearly treated with a coating, but I know this was mentioned - good thing to keep them shiny for a while. I think it was mentioned it would last only so long, like 6 months? Guess it depends if you use them or not  .
.
Amazing! Isn’t this the person with all the issues? And taken off the list? And put on the backup list? I ordered quickly, of course I did not pay for DHL or whatever it is. But he got his light already I’m cracking up, really, out loud as I write this. I’m really happy for Myhken here, but a rather bizarre scenario in my opinion.
Origin post still preparing shipment for me, 3 days now.
gorgeous lights!
ha, he even got all matching serial numbers on lights and box. Serendipity.
Would it be too much to ask that TK's post regaurding the UI instructions be posted in the OP for reference? Possibly even the how-to links Dale posted?
I know because I’m not just going off of some second-hand gerbers. I’ve built many of these myself and laid out my own boards with a few things added. I also know how the Firmware interacts with the board (to an extent). LVP would not function at all without R1 being connected to V+. I also know for certain that OTC is connected only to GND and Pin 2. The Pin 2 charges the cap while running, then checks voltage on Pin 2 at start-up.
The fact that these drivers have been largely working at all essentially confirms what I’ve told you.
I think there may be a problem with the rendering of the gerbers you have. What you show as the bottom copper layer looks more like the b-stop layer (unless Banggood drastically changed everything)
I’m glad that i got the lights and my complains are just for perfecting the Handling-Processes.
So I understood Kens statements. Am i wrong with it?
dude5, with a forward clicky you half press to select a mode then click it fully to lock it in. If you want to change modes you have to turn it off, cycle through with half presses, then click it fully again to lock it on.
With a reverse clicky you click it fully to turn it on, then half press through the modes at will. With a more complicated UI like this one, the reverse clicky is easy… especially with the configuration menu. Configuration with a forward clicky is a PITA.
Bear, the driver board is designed by Wight, a member here that really helped get the FET drivers up and running. The UI (user interface) is by ToyKeeper, she’s a code wiz and managed to cram an unbelievable amount of options into the initial ATTiny13A MCU then perfected the use of the larger memory in the ATTiny25 this driver uses. Pilotdog68 has been incremental in configuring the lighted tail cap… and speaking of that switch, ToyKeeper wrote the code to allow a mechanical switch (clicky) to reverse directions, previous not heard of. To then get the Chinese manufacturer to work with us and make these drivers available, with ToyKeeper tweaking along the way on the samples to ensure the overseas company got it right, we ended up with some never before done copper lights. The stainless light utilizes a massive copper pill to handle heat for these hot rods, all in all the entire light/lights is a new venture in joint cooperation between members of a flashlight forum and the manufacturer’s overseas. Progress, my good man! Progress! ![]()

ger-slash, no, you’re not wrong… I too understand where Ken’s coming from and realize much of the issue is with wording and phrase style of someone that doesn’t speak English natively. S*it happens.
Everyone who bought the matching box gets a full matching set. The serial number issues are only with the no-box sets.
I'm a dummy, I can't get it out of muggle mode. It flashes once, stutters and goes to medium or high mode. I tried short pressing during the stutter and turning it off during stutter. :/
Here ya go Sharpie, ver 013 of Wights FET+1


SOOC
Sharpie - I can positively confirm what PD68 says is correct, as many others can. There's been 100's, probably 1000's of these drivers built, and the 2 resistor voltage divider is always the same way, and works. It originated from the Nanjg 105C driver that we easily reversed engineered (very simple design) wayyy back.
Without the thru hole definitions you could be missing the V+ connection, as shown in this design here in the OP: https://budgetlightforum.com/t/-/31102, here on OSHPark: https://oshpark.com/shared_projects/7sNNyipn
Dale - where is ver 013 of Wights FET+1 from??? Latest was always v009?
Someone asked much earlier in the thread:
That’s how mine showed up:

The clip looks squashed — too tight to get a folded cloth seam up into the bend, and too loose at the open end to stay on

Just asking if this looks typical to others who’ve gotten aluminum X5s, before I consider trying to fix that with vise and pliers, since I went through this with the original A6 and the clips just snapped. (The KronoX5 clip came installed, and is so tight I haven’t gotten it off the flashlight yet, broke a few thumbnails trying; the KronoX6 clip is not installed, not looked carefully at that yet)
(I tried getting replacements for those original A6 clips and was defeated by customer service)
When I build a Zener modded version of this to run a 6V emitter, I change the ADC settings in the firmware to accommodate the higher voltage from 2 cells. Works fine. Pretty sure everyone else does it this way as well, or turns off LVP by commenting it out in the firmware.
I just built 2 very different lights with MT-G2 emitters a couple of days ago, the larger one runs a pair of 26650’s for 10.45A, the smaller runs 2 18350’s for 6.31A (an extension tube allows use of 2 18650’s for 11.34A)
Like Tom, I’ve built dozens and dozens of these. Maybe 100 or more myself, not keeping track. I even build a 10mm variant. (Fun, that!)
Zoom Zoom, may I ask… when you clicked off during the stutter how long did you wait before turning it back on?
I know some people are still in the waiting list and haven’t received their codes, I have a SS/Cu X6 available which I reserved from nitro, if you are in the waiting list and missed this GB and still want the light please reply here.
I paid $45 shipped but I think it is worth more than that. Again this light is in nitro’s hands, I just reserved it for the right buyer (one of the members in the waiting list)… It’s not for me as I have my own set on the way.
3-5 seconds, since you asked I went ahead and tried it again a couple times and waited 10-15 seconds. I've tried removing the cell after shutting it off too.

