Received my 1A and 3D here on the southern tip of Africa!
All works as advertised, even the one with the shorter tube (2.726). Only imperfection I can see is minor scratch/dirt inside one lens and on reflector, but nothing to get hysterical about. Will strip them and check everything (and hopefully not break anything in the process).
Thanks again to all involved.
Very glad to hear that you are happy ;)
I had three delivered with:
. Slight eccentricity of the battery tubes on all
. Slight tail cap anodized color mismatch on one
. Knurling machined incorrectly on one
. Three or four anodized finish pin point specs
. Reflectors and lenses all clean
. LED’s all appear okay
. All function 100%
. Very bright on Sanyo laptop pulls
The clip is tight but works. I need to spend two minutes on my bench grinder to take care of those tabs.
I kept two and gave one away. They are all 1A tints with a slight rosey glow that works really well to illuminate the inside of tool boxes, closets and cabinets. Places that are kind of dark when I’m coming in from bright daylight around the house. I expect these to be fabulous work lights for just about any home project. These lights throw out a wall of light which is great for my general up close day and night lighting needs. The UI is great… I just leave it in no memory 7 mode so that I can easily use it in total darkness and kick it into brighter as needed.
All in all its not going to replace any late night outdoor throwers or walking the dog lights but for just about anything else it is near perfect.
Thanks everyone for this group buy.
i ordered three so far, and all three works flawlessly. I ordered all three at seperate times.
sorry if this question has been asked already, but i couldnt find the answer.
but is there anyway possible to start the light on high? or change the ui to memory?
i know we can change the ui to a 4 mode, and i can go from moon to high, but i would like one of my a6’s to be able to start on high with the first click.
Yes, check the UI diagram again. When you go to config mode, you can change either the mode group 4/7 or the mode memory on/off, depending on when you hit the button.
U.I. diagram and lots of other stuff here.
Could anyone who has proof positive that the Olight or other clip actually fits these flashlights, post that proof?
EDIT — reply, thank you for the picture of the Olight clip — I have forwarded the picture to the Professional Guy
I emailed the Professional Guy about clips
— asking if they could get us a good price on the Olight clips
(not demanding a free improved clip, just “can you do this?”
— saying I did not want stock replacement clips because I know they break.
I got a staffer’s reply asking if I was sure the Olight clip would fit, and
saying they have extras of the original clip on hand, and
offering me replacement stock clips.
I said no thank you, I’ll wait and hope.

Hope it’s good enough, too tired to make a better one today.
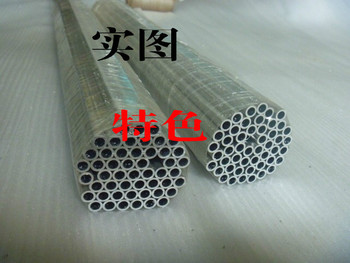
Other than posting “add me to the list” this is my first post, but I did read this entire thread. I have a question regarding the off-center battery tubes. There are a lot of complaints about them showing shoddy workmanship, mostly stating that they were ‘bored off center’. I recall ONE post that stated that the bodies were probably machined from extruded tubing. This seems much more likely than taking a solid rod of Aluminum and turning 95% of it into chips on a lathe. If this is indeed the case, isn’t the problem more that Manker is buying cheaper extruded tubing with walls that are not of constant thickness rather than doing a poor job of machining them? This could also affect the threading operation as well. Granted that there are methods (that would take extra machining steps) to mitigate this, and Manker has plenty of other things that they certainly did wrong.
How ARE budget flashlight bodies like this produced?
Lazy-R-us
Thank you xelario
I emailed a link to that picture and this thread to the Professional Guy.
Tubing is usually purchased from an extrusion manufacturer.
. The spec is on the outside and inside diameter with tolerances.
. The tubing is cut to length, trimmed and then threaded.
You don’t bore out tubing if it can ever be avoided. The process is slow, expensive and seldom yields results as good as extrusion.
My guess is not that cheap tubing was purchased but that the tubing was out of spec and no one noticed.
......WE all noticed :O
Thankfully though, my one sample works as should.
Can you please explain, you moved o-ring that was between glass and reflector, and put it between head and glass?
So there was no o-ring there in the first place?
Thanks!
(note to self: slow down when taking things apart)
Hi guys. I ordered one in 1A tint with the intent of de-doming it as I don't like cool white's. I ordered it when there were only 1A's left. I feel bad for all that received bad ones. Mine was pretty much perfect as I received it. But,,,,I de-domed it, added so more thermal paste under the mcpcb (the solder job was even done pretty good) then I cut a little bit of rubber off from the back side of the switch boot as it was to touchy the way it was. Soldered a jumper wire on the switch spring to help with some of the current loss. Boy she gets hot fast. I might take the driver out and put it in one of my Convoy lights, C8 maybe? Then I might as will check the solder job on driver since it will be out. A BIG thank you for ALL who was involved with this light.
Are you serious. This made the ui and light more special than it already was! Thanks for such a fantastic light!
Thanks for the link! I didn’t even know this thread existed haha
Yes. At least mine only have three o rings. The one above the reflector didn’t seem to be doing much so I put it against the glass hoping to keep any water out at the outer most part I could. Ymmv! ![]()
OK, mine do get weird — the UI sequence does get weird when they’ve heated up, on all three lights I bought.
(acts like the length of the short and medium clicks gets shorter and shorter once it’s hot)
Do we assume that means bad soldering inside and ask for replacement based on suspicion that’s the problem?
Or is it appropriate to open it up and take pictures if that’s a visible problem inside, try to resolder it, and then ask for a replacement if needed?
I don’ t want to leap into complaining if it’s still being figured out.
And if we specified hardware that fails when (over)heated — well, that’s a case of “…. hurts when I do this” … “Well, don’t do that!” as far as I’m concerned.
I seriously doubt that you would have believed that it made enough of a difference to scrap all the pieces.