First Impressions Wurkkos Orange TS10 V2, w RGB Aux and 4000K LEDs

I received this light free of charge as a review sample. The review is written as an Intro to Anduril, for new users. Im heavily biased. Anduril is my favorite UI, and the TS10 is one of my favorite little lights.

my first steps in setting up the light:

  1. I remove the head and remove the orange disc that blocks battery contact during shipping. Then screw the light back together, with the battery inside. The light blinks once to confirm battery contact. I then remove the plastic film that protects the lens.

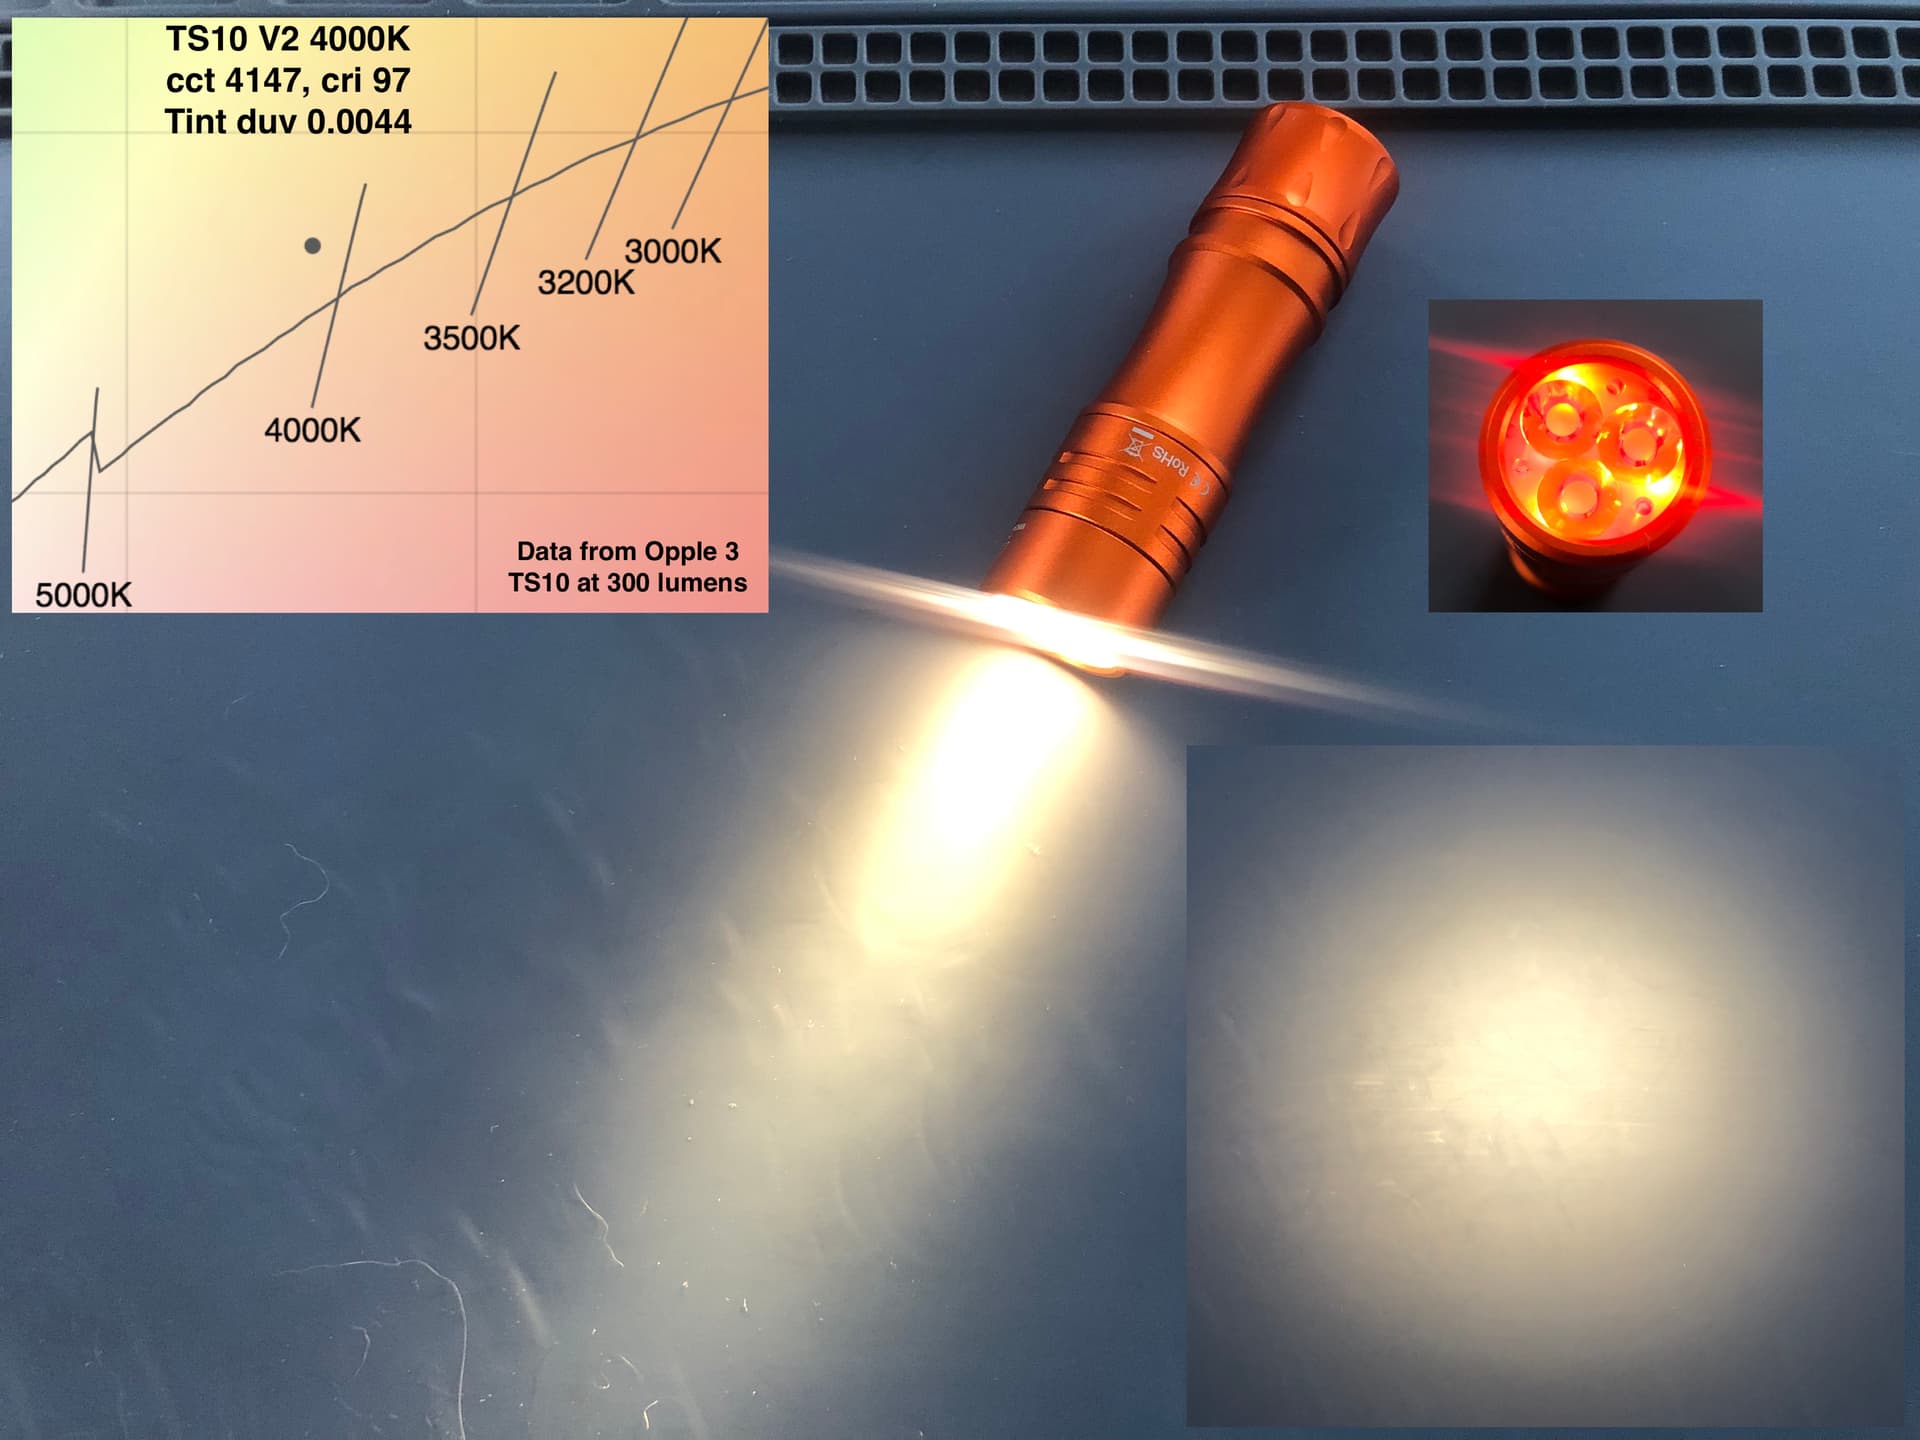
  2. I do 3C from off for battery check, and count the blinks. There were 3 followed by 9 more, that tells me the battery is at 3.9V. I did not recharge, I usually wait to get below 3.6V before recharging.

After it blinked out the voltage one time, the blinks stopped by themselves. This tells me the light arrived in Simple UI, by default.

RGB Aux come w a new Anduril feature that displays the battery voltage as an Aux color for 4 seconds after turning off the light. The Aux then switch to a default of Red at High Brightness.

I like Red aux, but want them to be dim, so I made my first Recommended settings change:

  1. I did 7C from off, three separate times, so the Red Aux are now on Low Brightness,

I set the Aux to Low brightness, to preserve battery life. Be aware that if you choose to use High brightness Aux 24/7 (not recommended), the battery can be drained in less than a week.

  1. A note of Caution!

I noticed the bezel gap seemed a bit larger than expected.
When I tried to unscrew it, I found I could loosen it easily by hand.

So I made a point of tightening the bezel down firmly.
I took the head off the body and used rubber strap wrenches, if you dont have that tool, I suggest just making it as tight as you can with bare hands, or with rubber gloves on.

That completes the initial setup. The light is now ready to use.

I proceeded to check the min and max outputs in Simple Mode, which arrives in Smooth Ramping by default. My homebrew lumen meter (which reads low on max output), said 0.6 lumens low, and 700 lumens high.

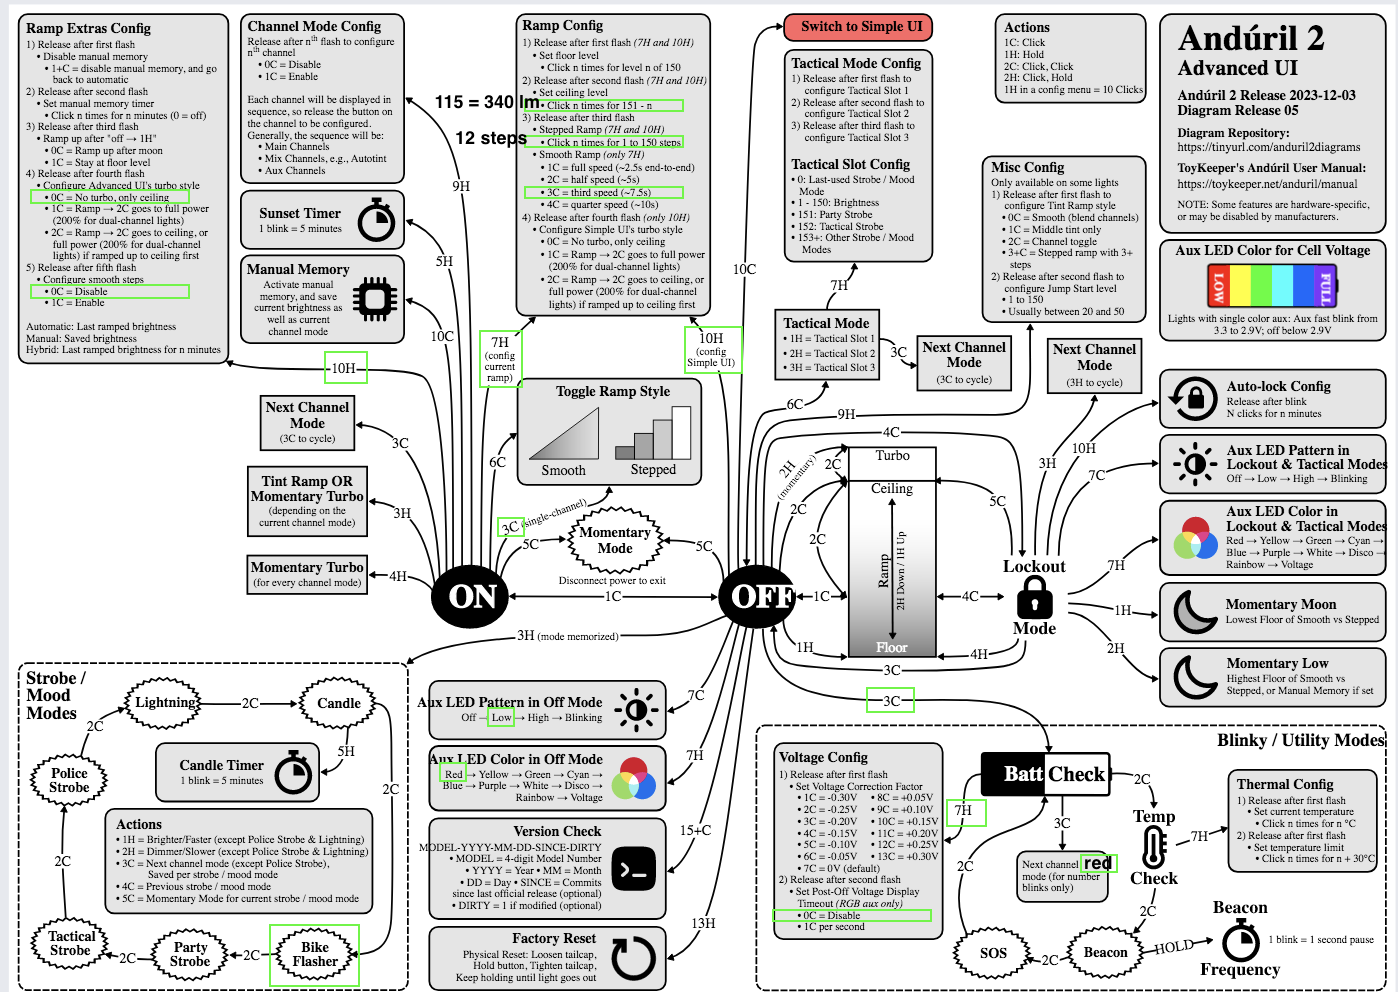
I then switched to Advanced UI by doing 10H from off.
I confirm the light is in Advanced by doing battery check (3C from off), which now repeats in a loop until I clic off.

Low mode in Advanced Smooth Ramping is about 0.01 lumens and maximum is about 920 lumens, which begins to drop quickly.

Next I changed several Advanced mode settings to my Personal preferences. I use this flowchart to keep track of the changes:

  1. I disable Turbo.

  2. I change the Advanced ceilings to level 100/150, which gives about 340 lumens. Because I like to limit my Anduril lights to an output that is close to Sustainable…

  3. I also lower the Simple mode ceiling to 100/150, = about 340 lumens.

note, for Simple mode, setting the ceiling affects both Smooth and Stepped ramping, unlike Advanced mode, which allows separate ceilings, (and floors) for the two ramping styles.

  1. From On in Advanced, I change from Smooth Ramping to Stepped Ramping by doing 3C.

  2. I change the number of Stepped modes in Advanced, to 12 steps (personal preference). The default is 7 steps in Advanced and 5 steps in Simple mode.

  3. I change the Advanced ceiling in Stepped ramping to match the ceiling I use in Smooth ramping.

  4. I change the default blinky, which is a flickering “Candle Mode”, to the Bike Flasher option, as I find that useful to alert cars when Im a pedestrian in a crosswalk.

  5. I change smooth ramping speed to be slower, I like option 3, shown on the above flowchart.

  6. I turn off Post Off Voltage display, see the flowchart box titled Voltage Config if you want to do that.

If you want to learn more about the many Optional features available in Anduril, I suggest you read a Manual. Here is an Online version: Anduril 2 Manual · Ivan: Thinking

Note Anduril is ever evolving, there are a lot of different versions. Not all manuals list the same features, and not all Anduril lights use the same firmware version. There may be things listed, or missing, in a manual that do not match a given light. Same is true for flowcharts.

If you are new to Anduril and have questions I will be happy to help…

Cautions and Safety Warnings:

  1. Anduril has no automatic Thermal Step down when using blinkies.

Do not use too high an output with blinkies, when you are not holding the light, or you may burn yourself when you touch it.

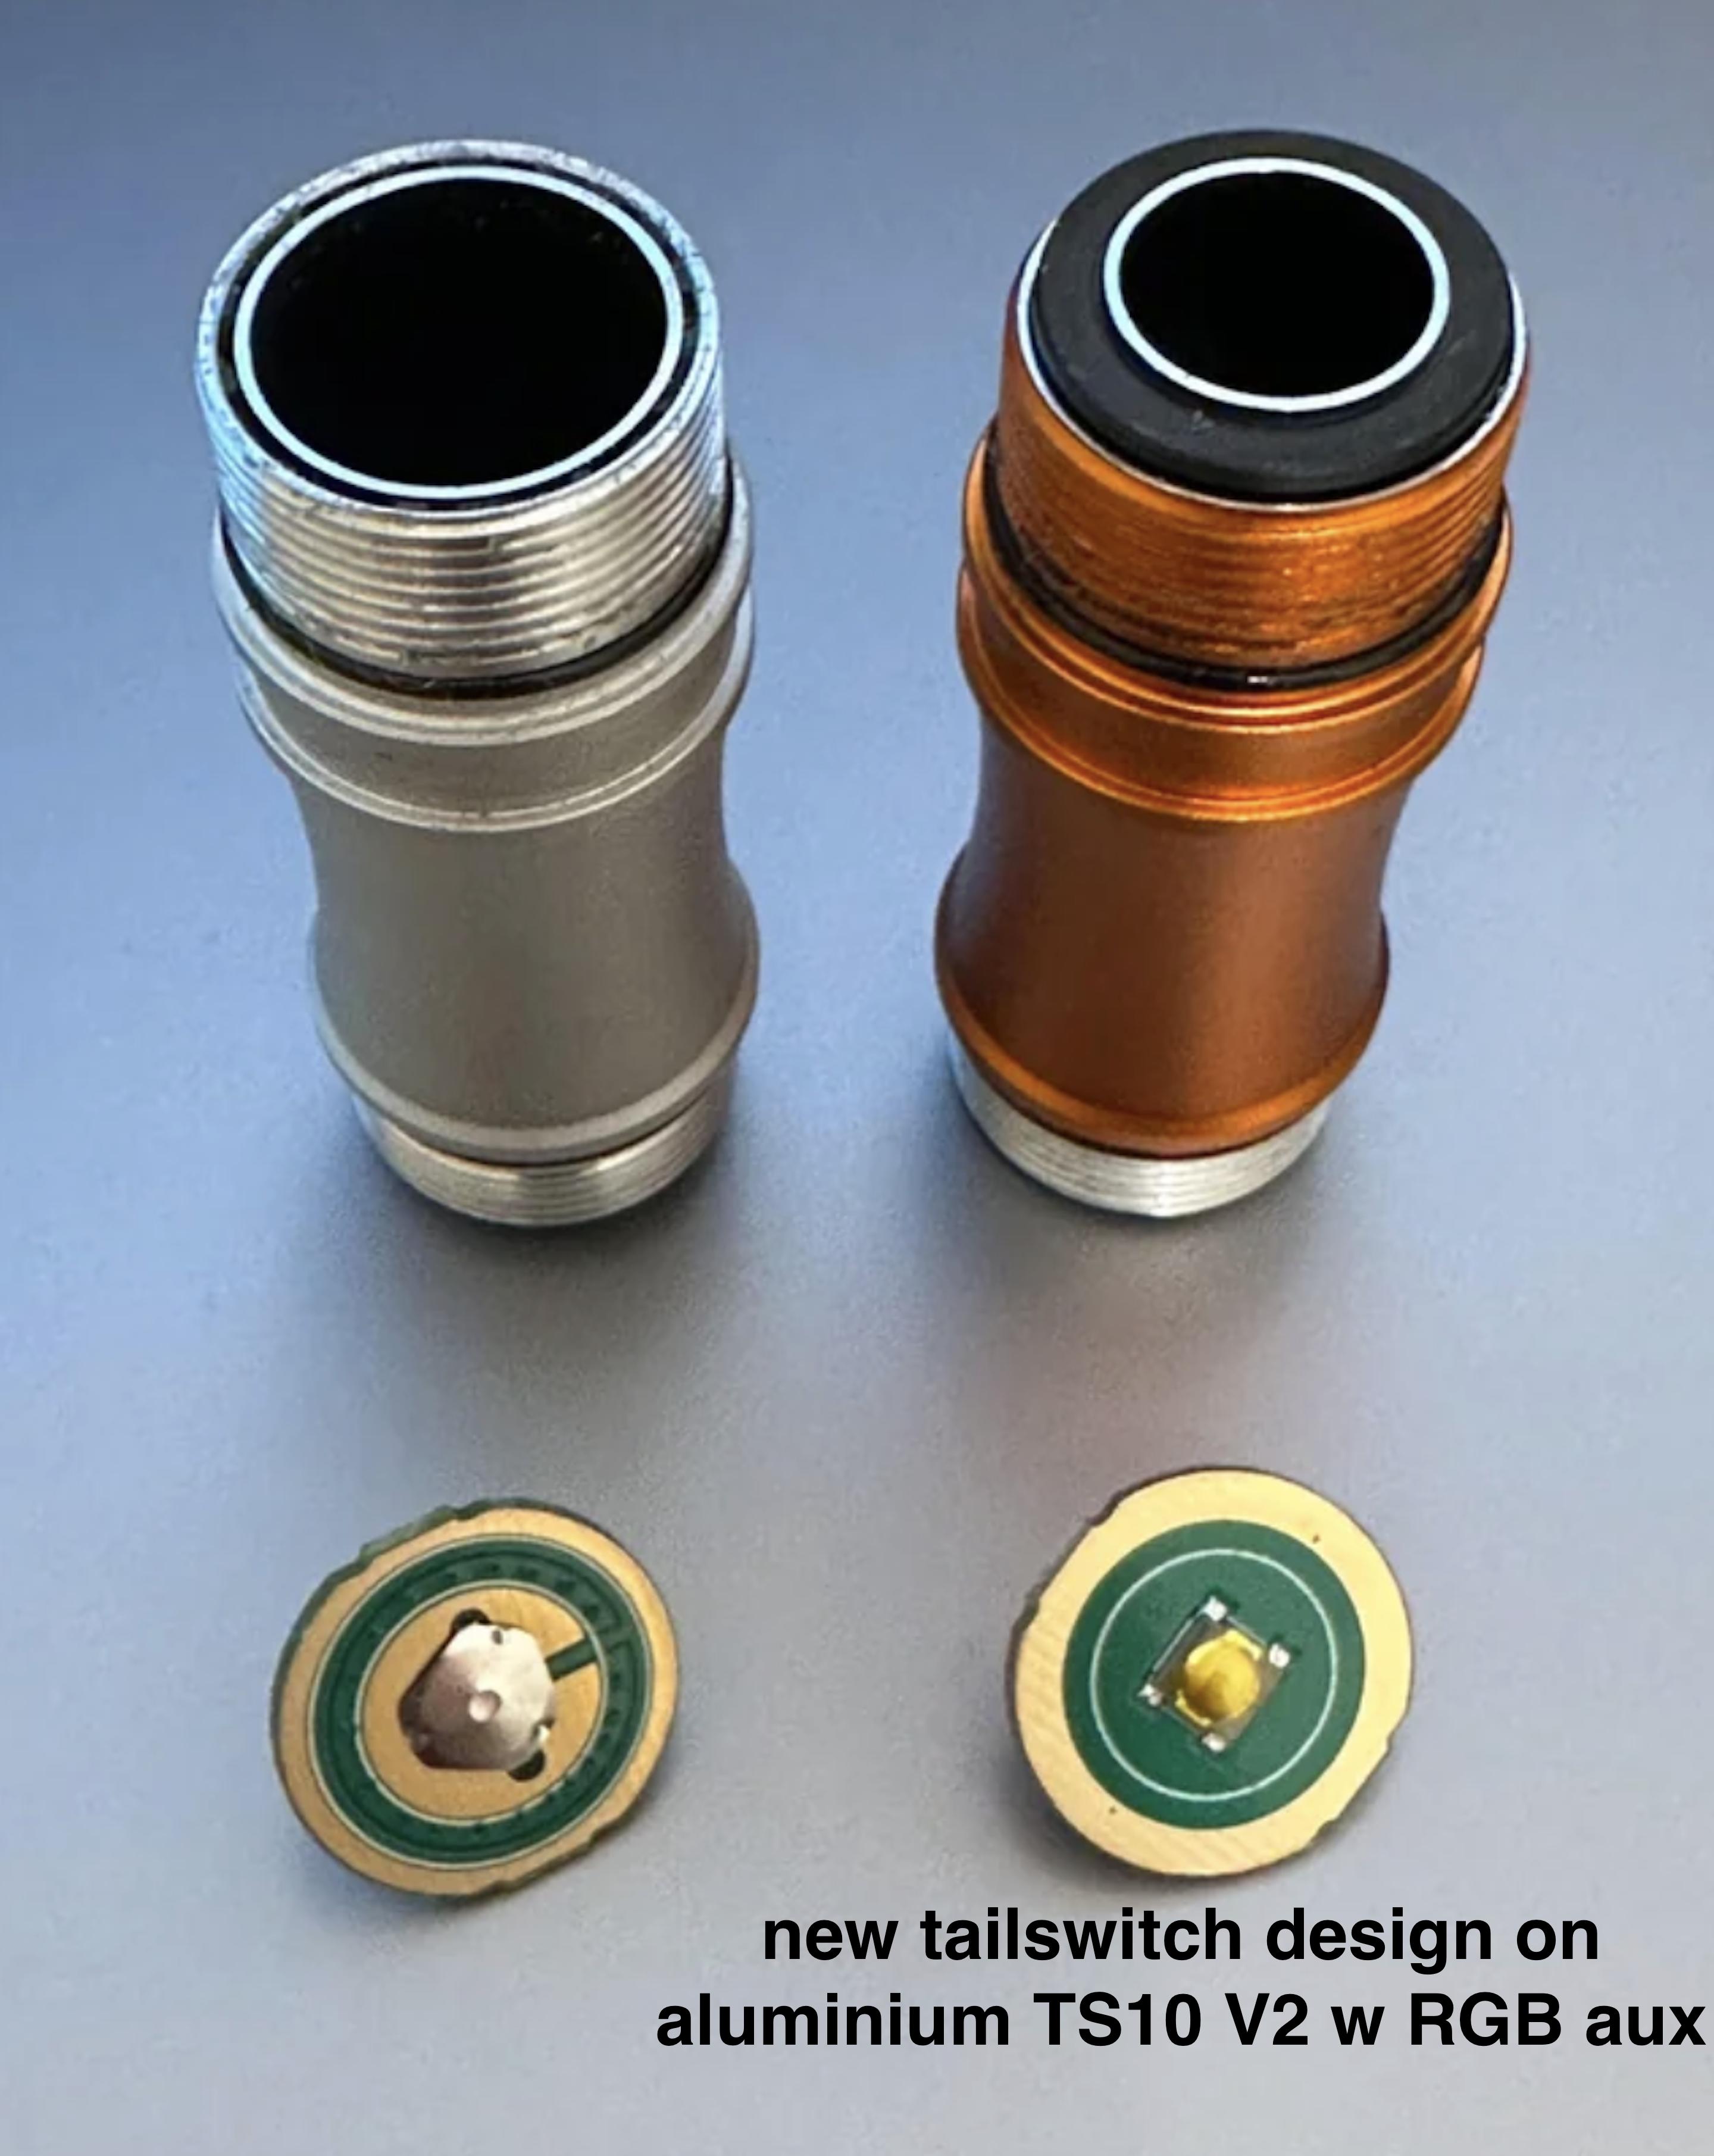
  1. Do not use Physical Lockout with.a TS10, because if the tailswitch gets pressed it starts a Factory Reset and erases any optional settings you have changed.

  2. Do not use Turbo over and over again, as this can cause excess heat that can burn you.

  3. Do not use batteries that are 52mm or longer. H10 button top, and some Protected cells are too long and will not allow the light to close all the way, and then the tailswitch wont work properly.

I verified Voltage and Thermal calibration w a DMM and IR Thermometer and confirmed both arrive accurate. No need to change calibration of the Voltmeter and Thermal sensor in the light.

I recommend buying the light with the stock battery.

If you want to buy other batteries, I recommend the extra high capacity Vapcell F12 (both flat top and button top work in the TS10). I also recommend the USB rechargeable 14500 cells from Lumintop, Acebeam, or Skilhunt.

One of the things I especially appreciate about the TS10 are the Ultra Low Firefly outputs… this is a light that is really well suited for nightstand use. The Aux make it easy to find in the dark, and the low modes are low enough not to ruin our sleep hormones when lighting a path to the bathroom in the middle of the night.

The one physical thing I change on all my TS10’s is the pocket clip. My personal favorite is the clip from a Lumintop EDC05. I like that it is very short, so it does not ride on the head when unscrewing to change the battery.

otoh, When you order a TS10, I highly recommend also ordering the alternative long black TS10 clip that Wurkkos sells (similar to an Olight Baton clip)… The long clips work really well on a Hat, and the TS10 has a nice floody beam for close range handsfree tasks…

imo the TS10 is a great little close range Urban EDC light,

Recommended.

9 Thanks

So what’s new with V2 besides orange ano and RGB aux? How does the tint look compared to the old batches? (There was some issue with greener than normal tint with some ti versions recently).

The tint is above BBL, but does not look too bad in actual use:

someone posted a photo showing a new tailcap design. I dont feel any difference in pressure needed (I like that the switch is less sensitive than a stock FWAA).

I think the switch change is intended to reduce some warranty issues w non working switches. It works great for me: (not my pic)


I have not disassembled the tailcap, no reason to. If I had not seen that photo, I would not have guessed it was changed.

Bottom line is that V2 adds RGB Aux and implements the automatic Post Off Voltage Display. It relieves Wurkkos from having to stock separate Aux LED colors, and allows people who like Disco to use the Auto changing Aux colors at a Rave :wink:

The light arrived with firmware version 0713 2023 07 29 (if I counted right).

This particular firmware version produces a blink at top of ramp (annoying to me), allows changing Aux brightness while in Simple mode (useful), and uses 3C (not 6C), to switch from smooth to stepped ramp. (Im glad not to need to use 6C to change ramp)

5 Thanks

Nice walk through on setting up the TS10!
I’m also a TS10 fan.

I just got an Orange V2. I thought I would throw out another data point.
I think the switch is a little stiffer. Not bad, but I noticed it.

My Opple 3 with ~300 lumens output.
CCT: 4325, cri 94.5
duv: 0.0006

Set at 130/150, ~800 lumens
CCT: 4400, cri 97
duv: -0.0032

At higher drive (above ~130) I see the CCT starts climbing quickly and duv goes more positive (signs of overdrive). This is a new trend with V2 emitters… I didn’t see these signs of overdrive with V1 builds.

FB

7 Thanks

Which is a development build for testing purposes unfortunately. :frowning: It comes with some rough edges. You should update it to the latest release to get the best experience.

6 Thanks

FWIW, I also find it worthwhile to pull off the bezel and optics, to check for any extra flux on the LEDs… and then gently clean that off if necessary, with isopropyl alcohol and a cotton swab. I got into the habit back when the FW3A came out, since so many of those shipped with a glob of flux right on the LED’s emitting surface, and it has saved me from burnt LEDs a few times.

Also, one of the first steps I do is a factory reset. Sometimes manufacturers ship with weird settings, and I like to clear that out before I do anything else.

Of course, I also tend to reflash the firmware on any new lights, after I’ve checked the version and verified the hardware works.

… which brings me to that version you reported. 2023-07-29 was a test build, only intended for hardware enablement purposes (like, check if the hardware functions and has correct pinouts). It wasn’t supposed to be used in production. So I’d recommend updating it, and I also sent a note to Terry asking him to keep things more up to date.

That function had a bug in the 07-29 build. It used high brightness when it wasn’t supposed to. After I got dev hardware, I noticed the issue and fixed it. The first published release was 2023-08-29, which included several improvements. And at the moment, the latest release is 2023-12-03. But I’m hoping to do a new release in a week or so.

If it helps, each release .zip file includes the manual matching that version of the code. Releases are kept here:

… and the latest version of the manual is here:

People can also subscribe to the project repository on github, to get email notifications about new releases. It’s not for everyone, but if someone wants to stay up to date without using git or compiling the code, the site has some functions to help with that. Releases happen roughly every month or two.

6 Thanks

can you please mention what specific features the stock firmware is lacking? It seems to work fine for me. I like that it uses 3C to change ramp styles. My only complaint is that it has a blink at top of ramp (very minor pet peeve)

This is a review sample. My mission is to help new Anduril users get up to speed so they can use the light as is. Most new adopters will not be able to update firmware. I have not found any reason to suggest that the stock firmware is in need of updating.

Is there any specific feature that this build contains that should not be there and is a potential source of functionality problems?

Though I can update my own firmware, I do not want to adopt the new versions that require me to use 6C instead of 3C from On, to switch ramp styles.

But if you feel Im missing out on a valuable feature in the newer firmware, Im interested in learning what that is.

Thanks for the helpful links to manuals correlated with firmware versions. And for all you have done to bring Anduril to the masses :wink:

2 Thanks

After signing up to receive updates a few minutes ago, I then went to the Repositories option on my profile settings page, but when entering “ToyKeeper” into the search box, I received the message, "0 results for repositories matching ToyKeeper sorted by last updated.

Where do I find your repository please?

Thank you very much for the Tint duv data at 300 lumens… that is extremely helpful.

Im interested in your thoughts about switch pressure, if you have a scale, maybe you could produce some data for us.

I put each of these 3 TS10 headstanding on a scale, and slowly pressed the button until the light clicked on. My Orange actually has the lightest trigger.

None of the versions require 6C to change ramp styles. That’s only a fallback mapping for lights with more than one channel mode enabled. If you have more than one channel mode, 3C changes the channel and 6C changes the ramp style… but with only one channel mode, you can use 3C or 6C to change the ramp style.

The change log has details about what changed since then. Here’s a partial list:

  • Calibrated things to work better on TS10 v2, like the ramp shape, better low modes, better aux behavior, and saner defaults.
  • Added “smooth steps” / soft start / soft off.
  • Fixed a few bugs in the post-off voltage function, including one specific to the TS10.
  • Fixed some bugs in tactical mode.
  • Made it possible to set different channels for different blinky modes.
  • More accurate timing, like in beacon mode.
  • Made battery check mode more consistent and more precise.

The ones people will probably notice first are smooth steps and post-off voltage fixes. Those are visible immediately when turning the light on or off, and can make a big difference in how the light feels overall during use.

1 Thank

toykeeper.net/anduril

On that page, click on “Watch”, then “Custom”, then “Releases”, then “Apply”. Or whatever other settings you like.

2 Thanks

I just tested 6 aluminum V1 TS10s… all are in the 1lb 4oz to 1lb 8oz range on multiple presses.
I’m surprised they are this consistent!

The orange V2 measured 1lb 12oz to 1lb 14oz on multiple presses. It does feel a little different with shorter travel. Not bad. Just a little different.

I also tested 2 brass, 1 copper and a Ti. All tested about the same as the aluminum V1. One Brass was a little lower… ~1lb 2oz.

FB

1 Thank

thank you!

where do I find a link to download the hex file I need for my RGB TS10?

Each release is a .zip file containing all the .hex files, manual, etc.

2 Thanks

Thanks… did not realize there was this anduril.2023-12-03 Hex file link
on the changelog page… got it downloaded now… along w the manual…

and reflashed to my Orange TS10
the light works but not as expected

  1. 3C from off gives No Battery Check
  2. 7C from off does not change Aux brightness
  3. the Aux are On when main LEDs are on

those issues affect both Simple and Advanced

Any chance you flashed the v1 (ts10) hex rather than v2 (ts10-rgbaux)? Based on the symptoms it seems like maybe the firmware and hardware are mismatched.

Thank you! That is indeed my issue… will start over with the reflash.

Reflash worked. I then disabled Turbo, post-off voltage, and Smooth Steps.

and changed the ceilings to 115 which gives about 340 lumens. the version it shipped with gave 340 lumens at level 100… a change in ramp spacing of 15 points… As we can see, the ramp spacing depends on the firmware version…

Very glad for the change in tail switches myself, the SMD switch is far better in longevity than the spot-welded plate, opens up more options for customizing the switch feel, and should be more repairable in the future.

Also, interesting to note how they went back to the original head styling, the Ti V2 had the grooves go around the entire head.

1 Thank

It is very annoying to feel the slow flashlight as the Convoy S21E firmware.

I upgraded all my lights to 03/12/2023 and I got one with firmware 2022 and I love it.

I click and have all the light on immediately and click and get the off immediately.

It is the right thing to do, I like immediate on when I need it, I usually carry two lights one on and one to immediately see something if any noise is heard and the soft on I don’t get it, it is 1 or almost 2s slower than the same flashlight with stock Anduril from the new flashlight a 2022 version.

When I turned on the 2022 version it gave me a joy! the on/off in an instant.

With the 2023 lights it is very, very slow!

Could this be removed?

Or change it with an option?

The problem with anduril that people who don’t know it misconfigure my lights and I reset them.

I would like to have instant On/Off by default!

Thanks.
PS: Hasn’t anyone noticed this?
It’s frustrating to turn on and not get the light instantly.

1 Thank

Definitely unfortunate to have this mismatch if expectations. This version is the one that shipped with every TS10 v2 so far. That’s at least 2000 lights (going by wurkkos.com + aliexpress sales counters). So most consumers presumably won’t ever upgrade from this version.