I did one of these last month for a forum member, security guard, and got it running 4.9A at 1462 lumens, left it domed with 117Kcd. That was with a stock light, so I had to do most of the tweaks that MaxToch did for us here, with maybe a bit more tweaking on the output level.
I left it domed so he could it use more generally, not so tight it doesn’t work fairly close but at the same time powerful enough to reach out a good ways. I lit up a neighbors house at 432 yds well enough to easily see someone prowling around, I think he’s quite happy with it and his co-workers want the same! lol
For me, it was always the unknown. Do these parts screw together, press fit, will it break if I do this? Once you know, it’s a piece of cake. (or pumpkin pie with Miracle Whip on top! :bigsmile: )
I prefer domed throwers mostly, for general use - lot of light down field, and decent flood zone. Of course the XP-L HI in this one is an excellent compromise.
There's actually a little dab of glue between that ring and the driver. The glue, being a tight fit, and having nothing to grab on to is why I got stuck with it. Once the tube is screwed in though, it gives you a lot of leverage, and then it came out easy.
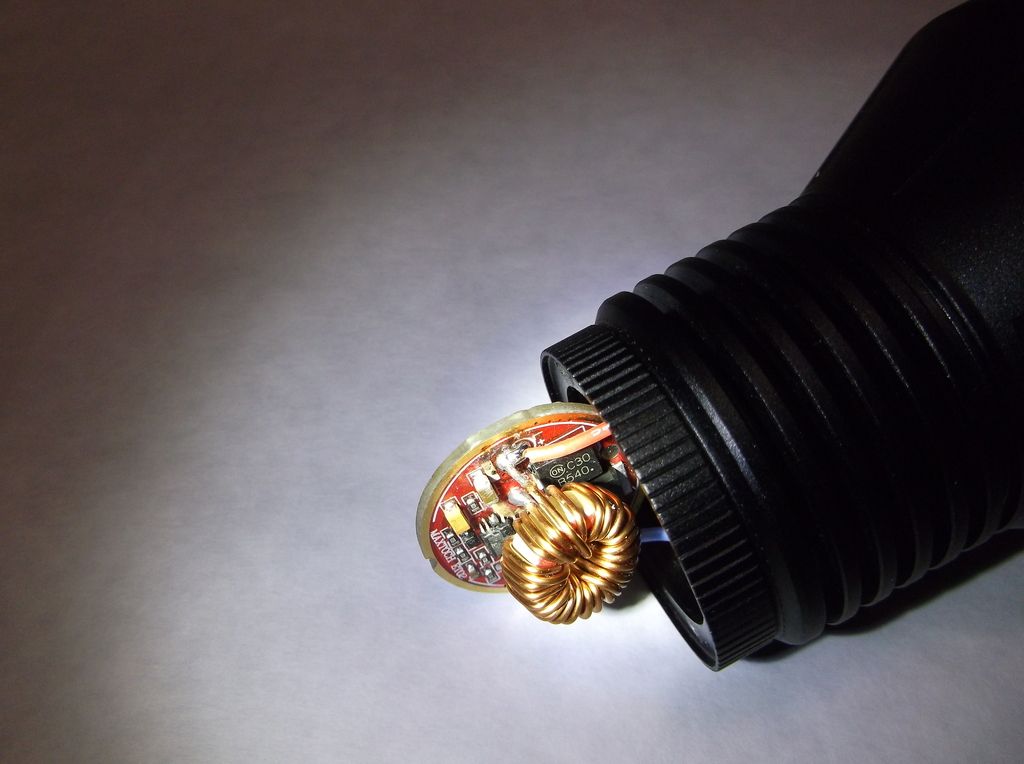
Looks like the resistors (for modding) are under the thermal epoxy. I'm guessing it's the two large resistors stacked. Seems like the epoxy can be scraped/cut away. There also appears to be some thermal padding there - the brown stuff - it's soft.
It's pretty well done overall. Potting those components is a good idea for the high amps. I'm guessing the wire is 22AWG, based on the thickness and the solder points on the MCPCB.
There are two sense resistors, side by side, so they have at least one additional one stacked there. In the case of the stock one I did last month the 2 were R050. I took it pretty low to get to 4.9A, was beginning to scare me on the possibility of frying the driver. I kept the thermal epoxy in place and used the thermal pad as well.
Toroid, what IS it’s actual purpose? Is it to smooth spikes? I always seem to see these on Buck drivers, where two cells (or more) are powering a single emitter, or when multiple types of cells can be used, like 2-CR123 or 1 18650. I still don’t really understand what exactly they do.
The sense resistors set the current, that much I DO know! So the toroid isn’t controlling the amount of current, but rather, the quality of same?
Thanks for the assurances and advice. I forgot the A6 is protected. Cell was down for about 40 hours, been pretty sick a couple days so I had forgot (doing much better now). Still irked at myself as I know better than to let this happen. The light was on a low mode so I felt no pocket heat nor saw anything from the outside till I pulled the light out. Hopefully the lesson is learned for good now. Ordered 2 more Efests and a 14500 from Richard today, will reserve those 2 for this light.
Very good driver pics! I’d planned to protect the cells from movement under recoil (mount will be a short 308 scout carbine that kills on both ends) but it seems I might need to epoxy-pot at least that heavy toroid, maybe the whole driver? Any thoughts or experiences from anyone with lights on a hard kicker please let me know. I’d hate to kill this light from stupidity!
Man, it couldn’t hurt… do you ever use JB Weld Stick? They have one called Water Weld, it’s like a jelly roll with one part in the middle and the other on the outside, you simply cut off an appropriate sized piece, knead it together till it’s uniform color, and place it. Stuff sets in about 3-5 minutes and is a rock within the hour. Since it’s not liquidy wet on application, I prefer it to the normal epoxy mix. That’s what I’d do with the entire toroid and driver bay, put a big ball of the stuff on there, press it into and under the toroid, and put the light together. Go hunting and enjoy!
The NewZeland hunters use the stock drivers as is far as I know and with no ill effects that I have heard of.
These guys shoot thousands of round a year hunting rabbits mostly with different calibers including shotguns, so I would think the driver is fine as it sits.
Dale and TomE both can probably verify that driver sits in there pretty darn solid on the shelf with the other piece holding it down very solidly in place. I really don’t think you will have any problems with it to be honest.
Edit: and again quick draw McGraw (Dale) beat me to the punch with an answer……hahaha
Bout the ruggedness to take jolts from a recoil, from what I see the big coil is secured down by epoxy pretty good on 2 sides, and the driver is locked in there by the ring that is secured down with those 4 SS screws. It's quite secured - one of the best I've seen locked down, but accessible easily. Of course a complete or heavy amt of potting would be the best, as Dale suggested. Again, Iv'e seen drivers more in need of that than this one though.
The other issue for jolts is the batteries and springs. 2 cells is twice the weight, so you need some beef in the springs, and these springs are pretty good, good stiffness. You could run 22 or 20 AWG wires down the middle of the springs (bypass) and that would help the spring stiffness and potentially reduce the chance of a brief disconnect or flicker, but a pair of protected cells seem to fit pretty tight in there anyway.
Haven’t got mine yet, but I was contemplating either a tubular non-conductive spacer or perhaps an o-ring or three placed to transfer the load to the body or head instead of only the spring would solve any potential problem. I don’t think any spring alone could withstand this much force without excessive movement, and I’d rather not have that load placed on a phenolic or ‘glass board (especially if it ’slammed’ the force onto it) if I can have something more substantial handle it. I’m not shy of recoil but this thing is a real sharp kicker and the recoil pad won’t help the light even if it helps me.
With SingPost, it got delivered late afternoon when tracking is showing “Notification of shipment confirmation”.
Open up one of the three unit to check, everything is in order except for a black metallic particle on the led and some condensation on the reflector after some use of the light (after it is cooled). No big deal, will open it up to dehumidify and blow the particle away.
Wow the hot spot is so intense it hurts my eyes, do not stare at it at close proximity!
The simulators really do the bulk of proving out a design in today's world. Less dependence on the bench tests when you can see signals in real-time, simulated. Guys at work here use them all the time - every design is proven in simulation first.
I'm not sure if the big bulky toroid inductors are the way to go in today's designs though - seems dated. Take Richards' design for example - probably other options available, at least more compact enclosed packaging. His L1 inductor used here: https://budgetlightforum.com/t/-/32835 is the equivalent I'm guessing.
Either way, the need for an inductor increases the need for a larger size driver to put it on. The donut shaped toroid is listed all over the place as the most efficient, but where size is an issue there have to be some compromises I’m sure.
I have the small square inductors for the Seis-um driver, but now I don’t have a light that driver will go in so I have one built and another waiting on standby… I also have similar inductors that were part of the Knucklehead design some time back that didn’t pan out.
Edit: My Sniper is at the local Post Office, carrier might feel stalked by the time he get’s here with it later. (Might have to call him and intercept him somewhere, lol) [yes, I have my carrier’s phone number. Whaaaaat?]
David,
Got the light today complete with all the extra’s I ordered. Looks good and throws Great!
I will never open up the head as the reflector has no dust, none inside, nor any marks.
Really think this is one factory hot rod that nails it and does not need to be messed with.
The logo is printed level as is the BLF-TE.
YOU DID GOOD AND THANK YOU!
Big thanks also to Amanda for handling her end, everything was as ordered and packed very well.
This was my first Maxtoch purchase but will not be the last. Incredible build quality and fit and finish.
I ordered extra holsters and they will work for many other big head lights and protect them well.
What a deal.
Later,
Keith


 Waiting sucks