Hello!
Welcome to my short Review of the Wurkkos HD10 - a 90° 14500 headlamp with Anduril 2.
Introduction
First of all - this review is based on a pre-production unit. I can not guarantee that the final product will look, feel or perform the same way. This review unit was sent to me free of charge by Wurkkos (thank you very much, @Wurkkos_Terry!). I was not paid for writing this review outside of free access to a sample light.
This is actually a very interesting light for me. I had been waiting for this light for a long time ever since I first saw it teased (almost a year ago!), because I had been looking for a successor for my Sofirn HS10 with better battery life and UI. Therefore I was very stoked when Terry drew me as one of the testers for this light as it was pretty perfect for my needs - or so I thought. But more about that later. Let’s start with some basic specs.
Specifications
| Manufacturer: | Wurkkos |
|---|---|
| Model: | HD10 |
| Battery: | 14500 (900 mAh included). No dual-fuel, LiIon only |
| Length: | 83 mm |
| Diameter (body): | 17-22 mm |
| Diameter (head): | 23 mm |
| Weight: | 65 g (incl. battery), 45 g (excl. battery) |
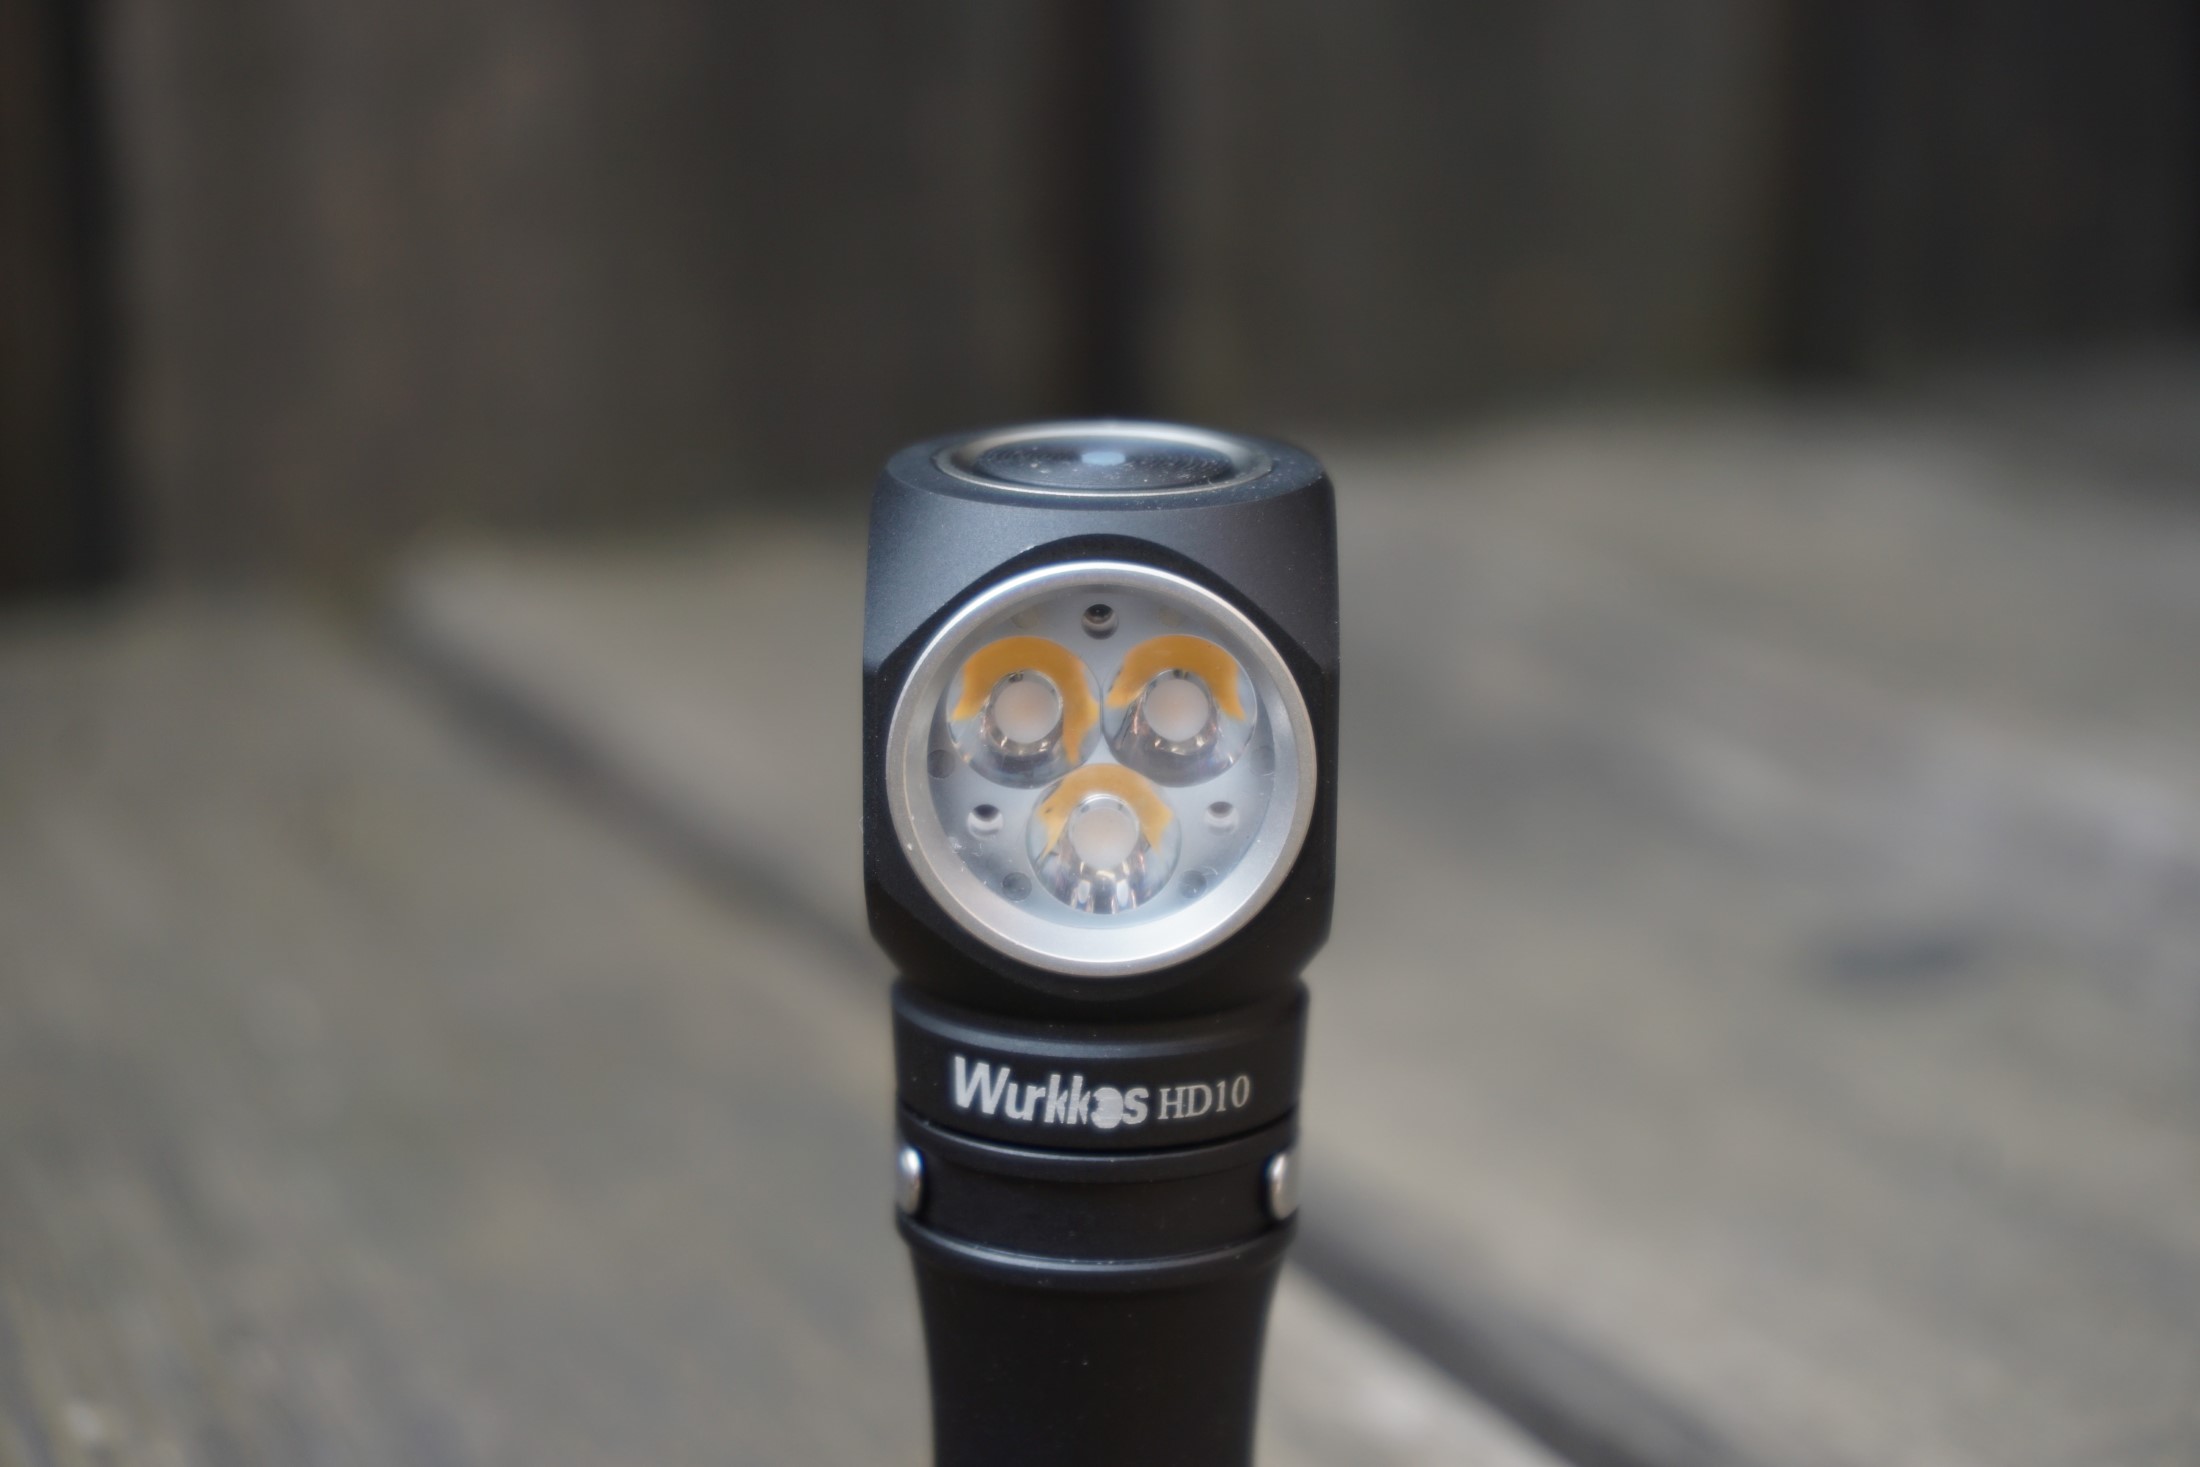
| LED: | 3x CSP2323 4000K (95CRI), RGB AUX (6 LEDs for each color) |
| Optic: | Triple TIR, unknown specs |
| Button: | E-switch |
| UI | Anduril 2, version check output: 2022-07-25-0715 |
| Other: | IP68, USB charging, magnet in tailcap, charging indicator in power button |
Packaging and contents
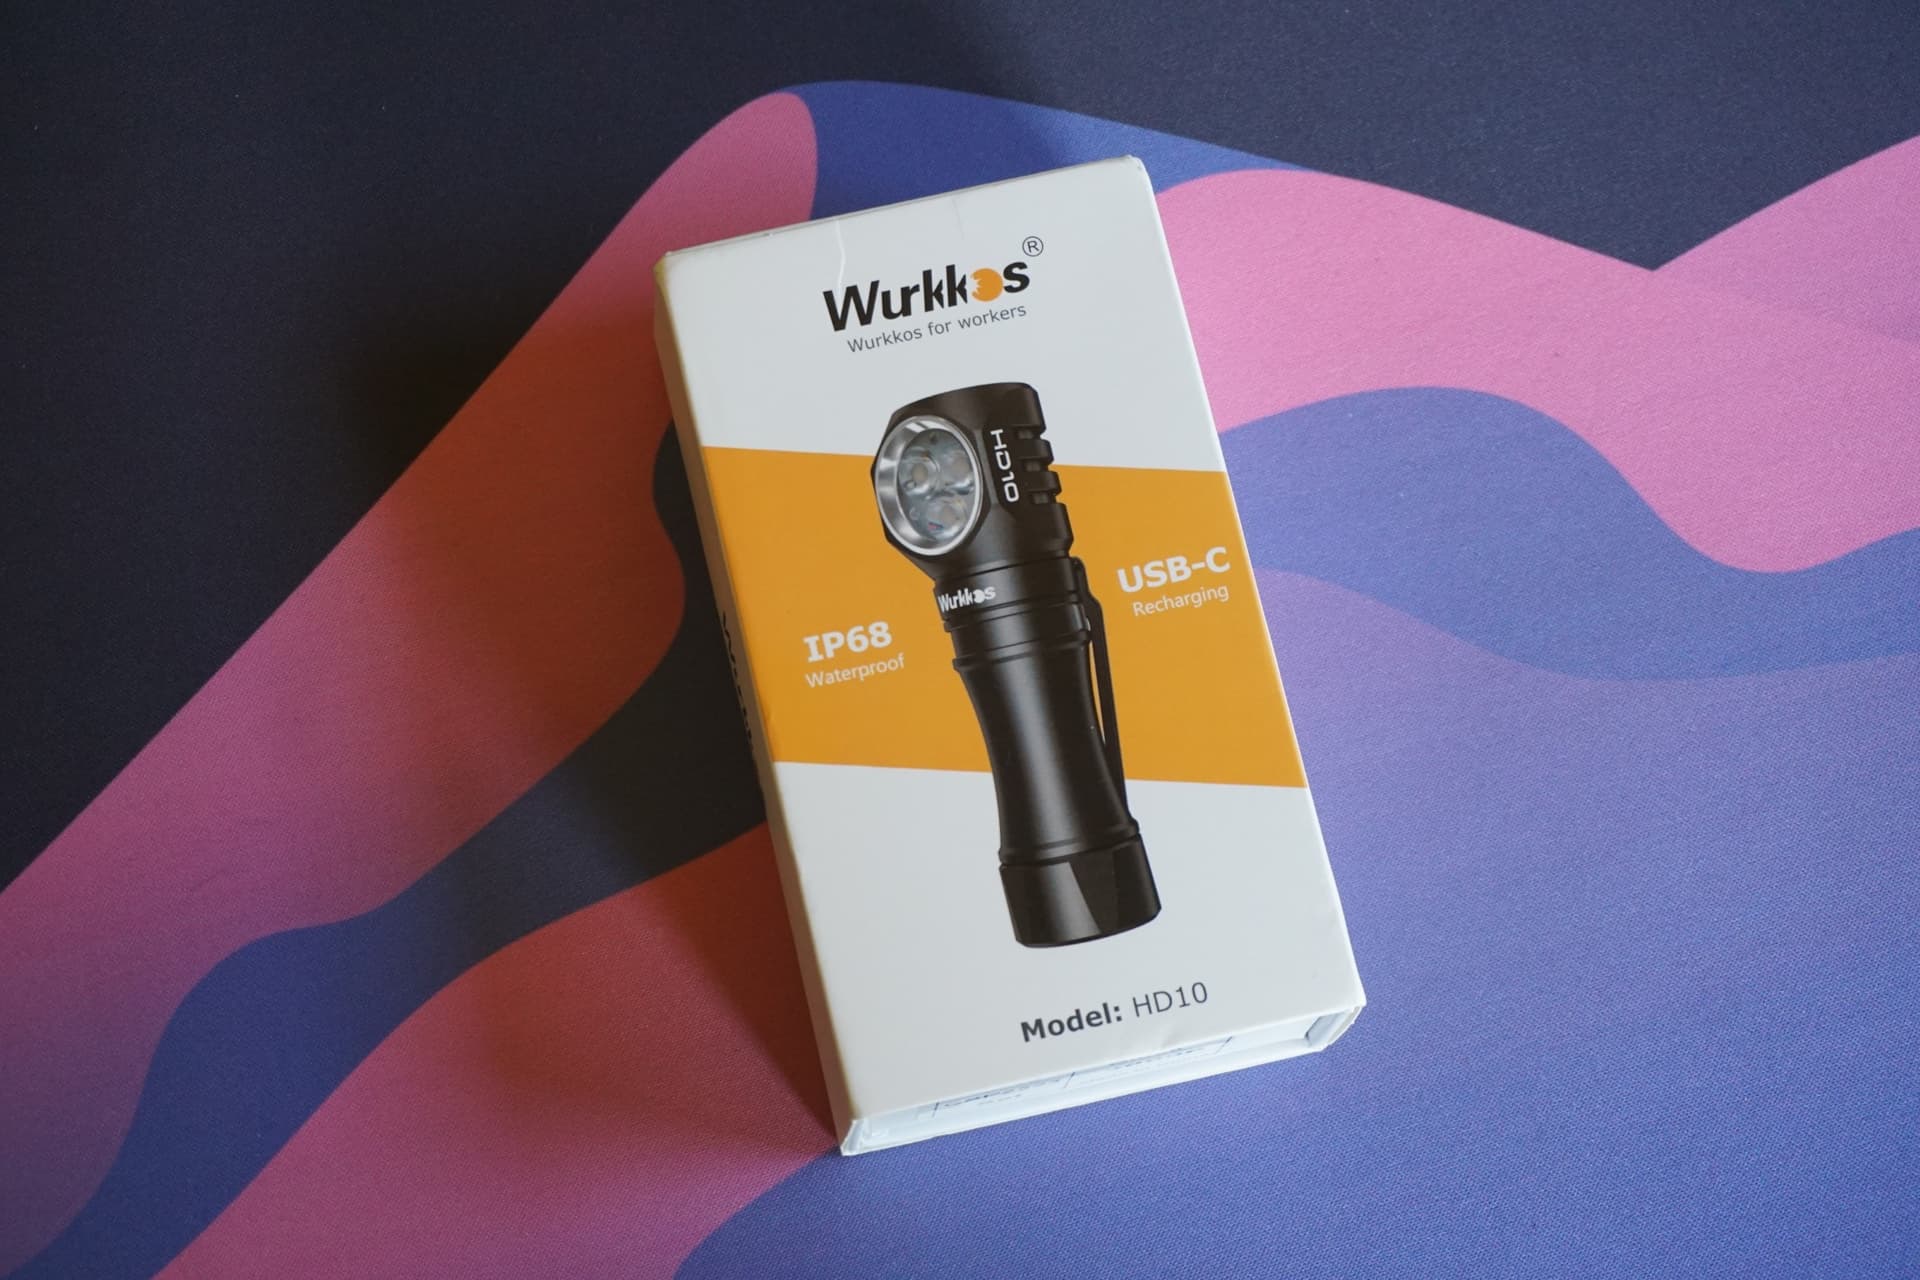
The packaging is simple and reduced to the necessary information.
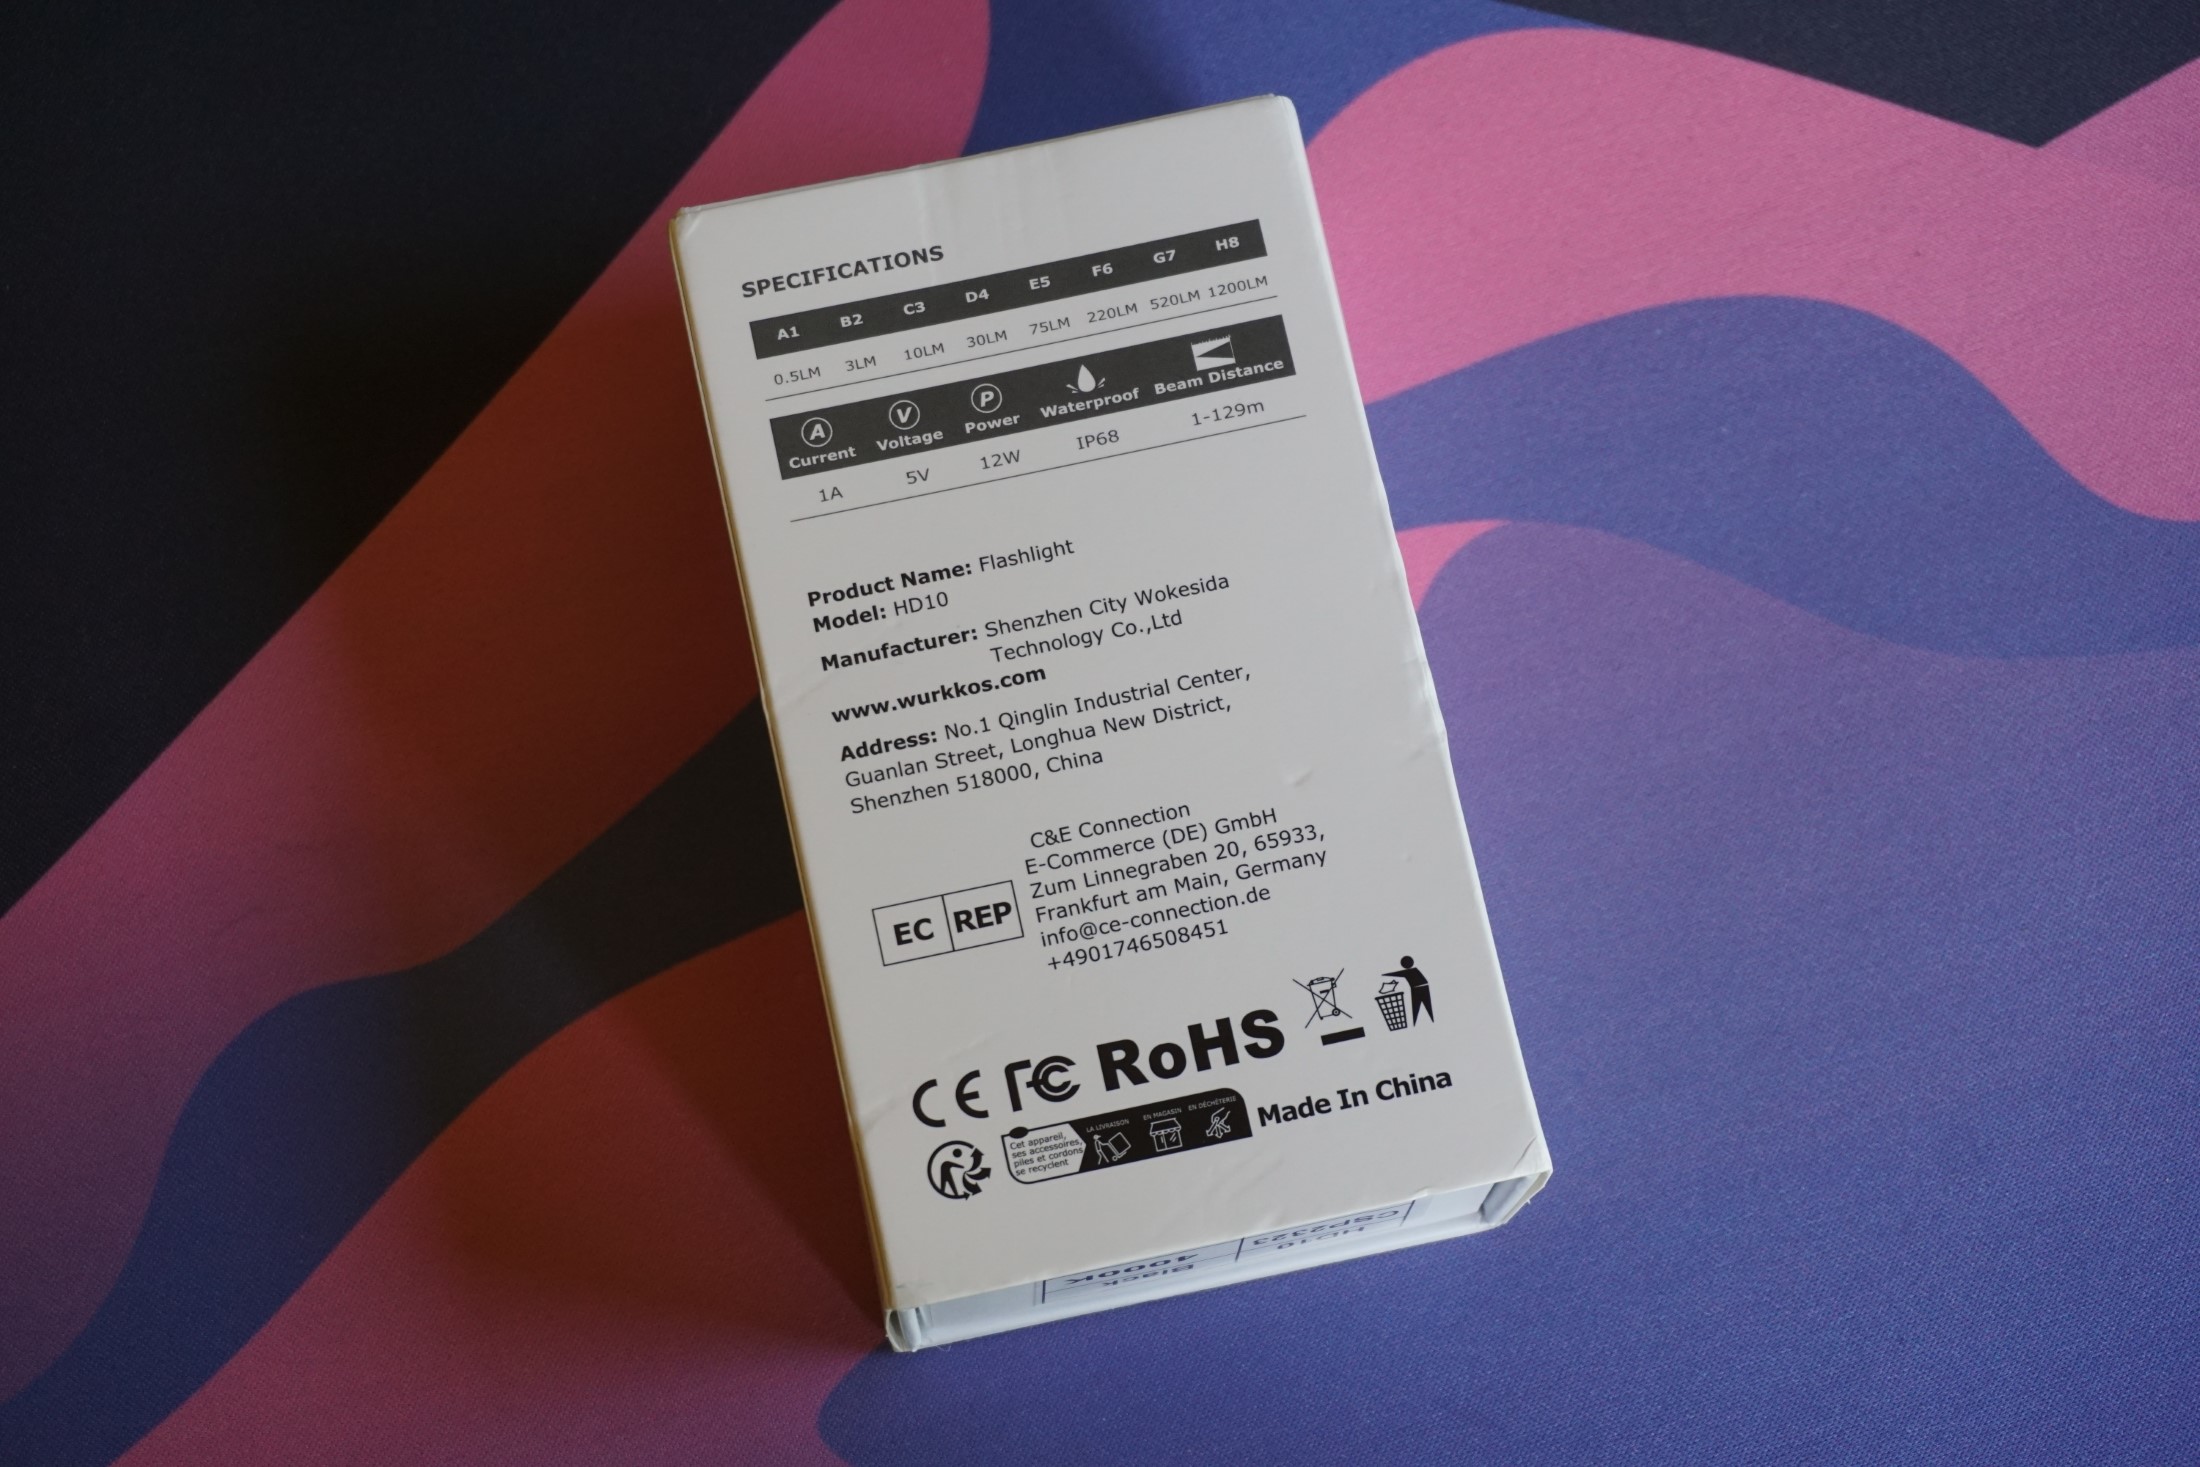
Front side shows a rendering of the light, next to the brand and model name, the IP68 rating as the fact that it has USB-C charging. The rear gives some legal information (website, address, address of the EU distribution partner, various certification logos), as well as the brightness (up to 1200lm) in different modes. I assume these are the default brightness steps in simple UI, stepped mode - the light ships, however, in ramping mode as we will see later. The beam distance is specified with up to 129 m.
Curious is the combination of 1 A, 5 V (USB charging specs, presumably) and 12 W (which are probably the highest power in non-turbo? Not sure. Weird).
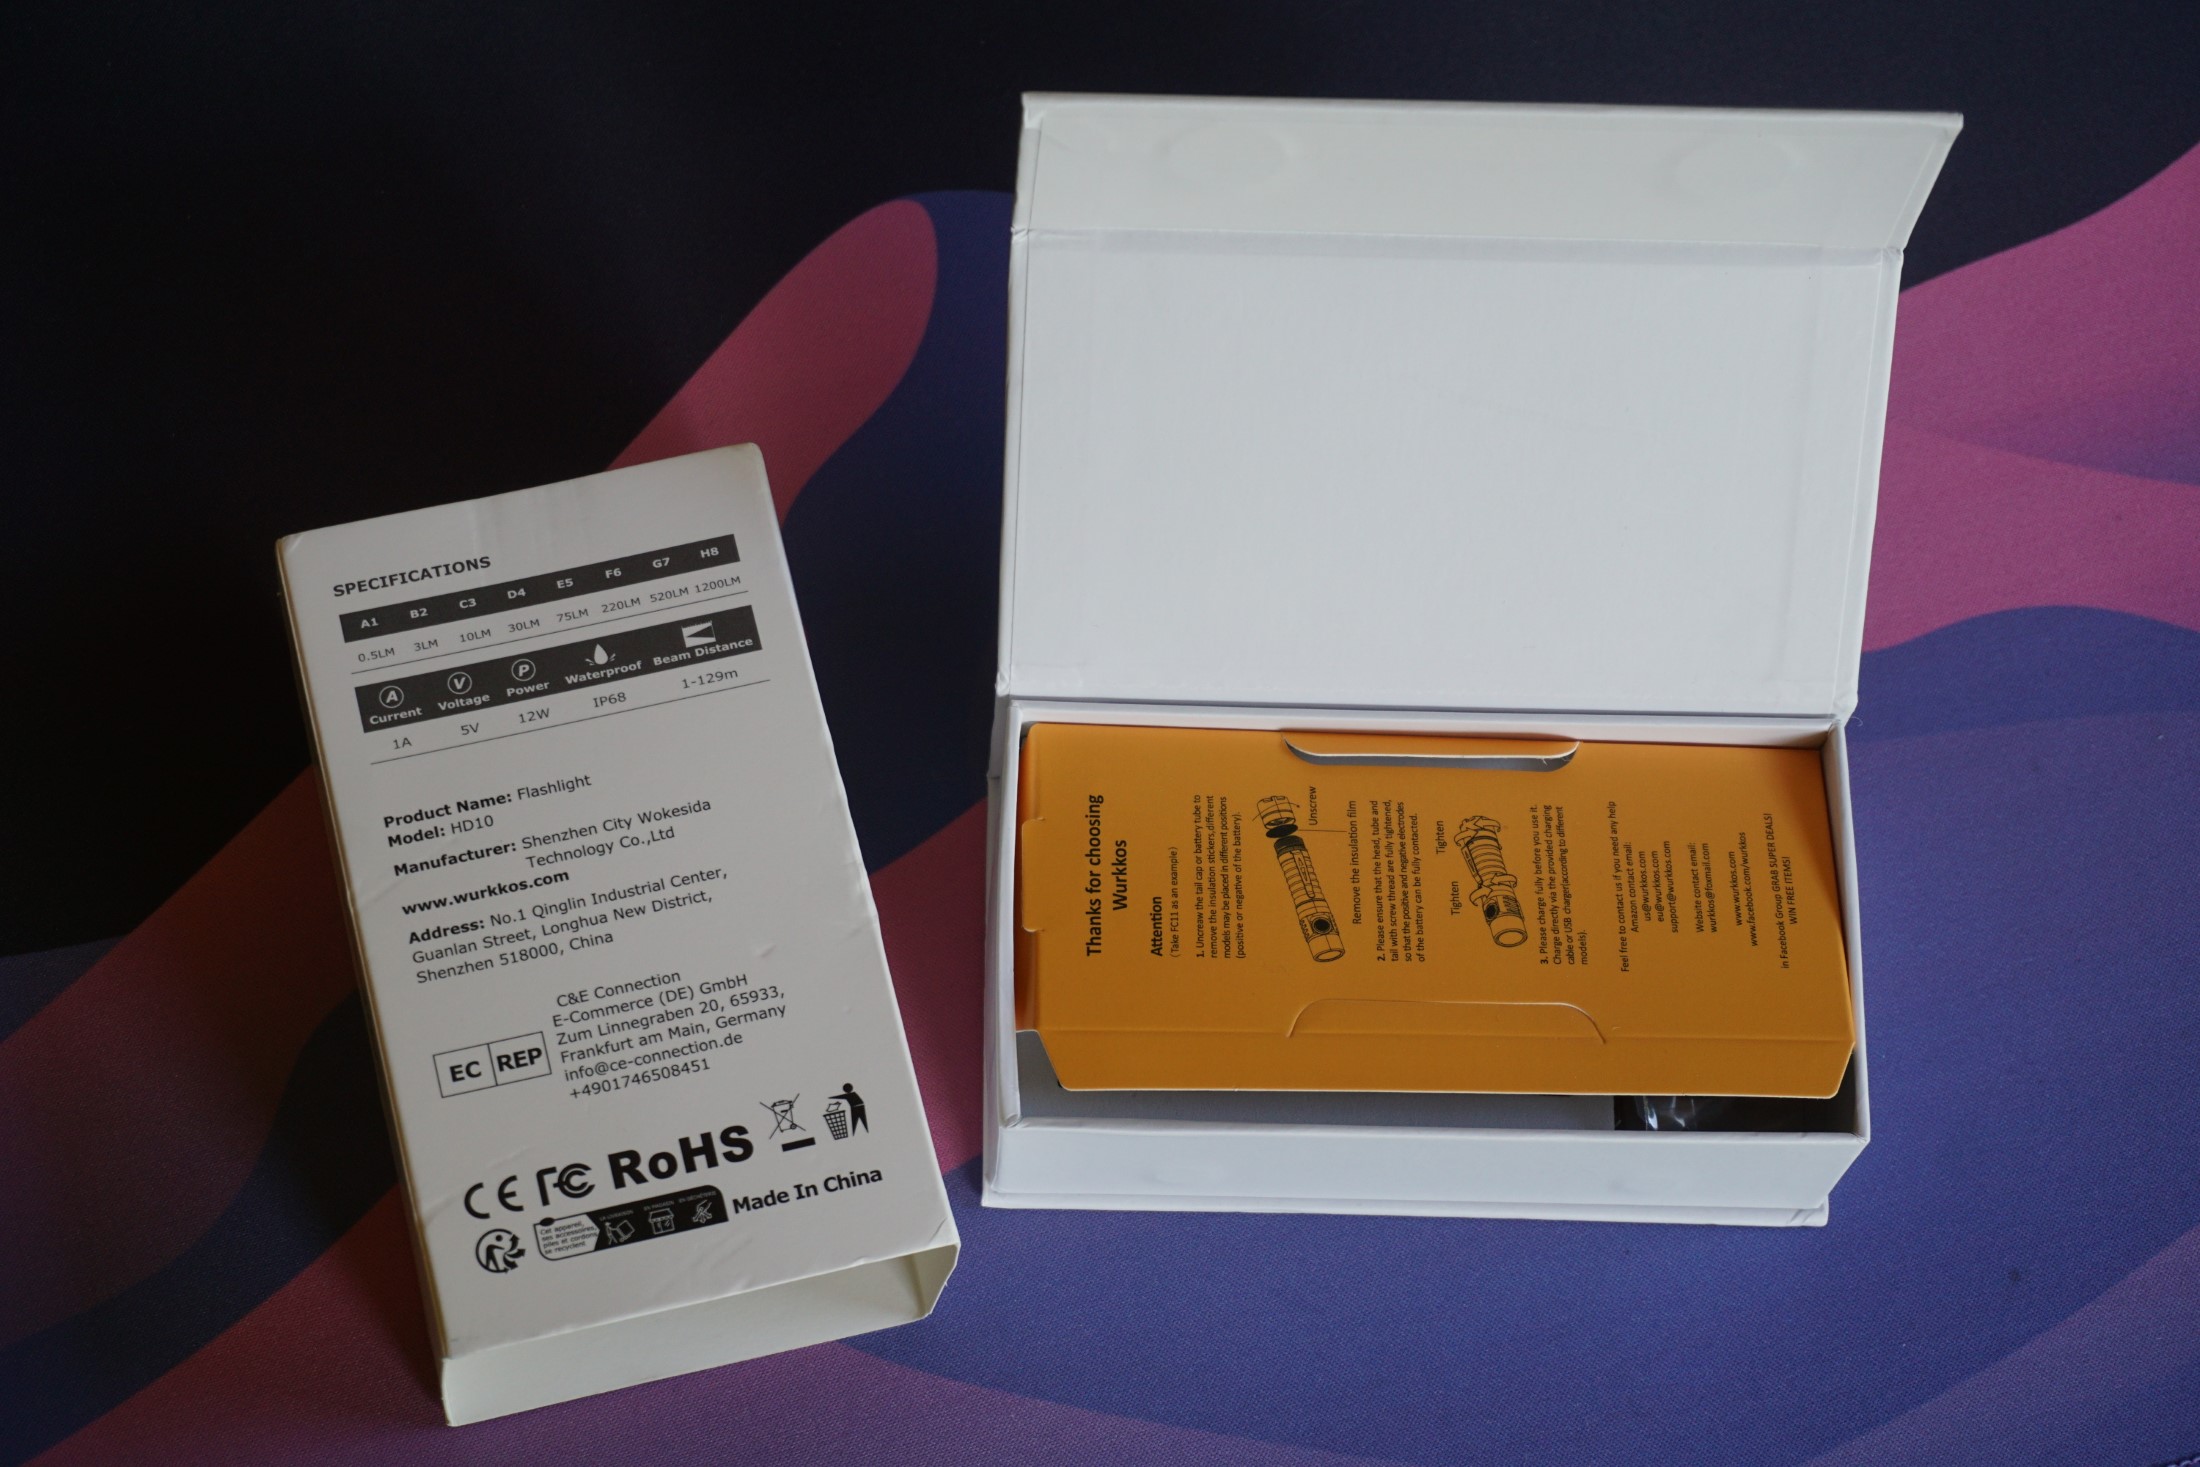
One of the sides of the slide-out-part of the packaging lists the LED type, CCT and flashlight color (I hope we will see colorful HD10 later on, just like the TS10!).
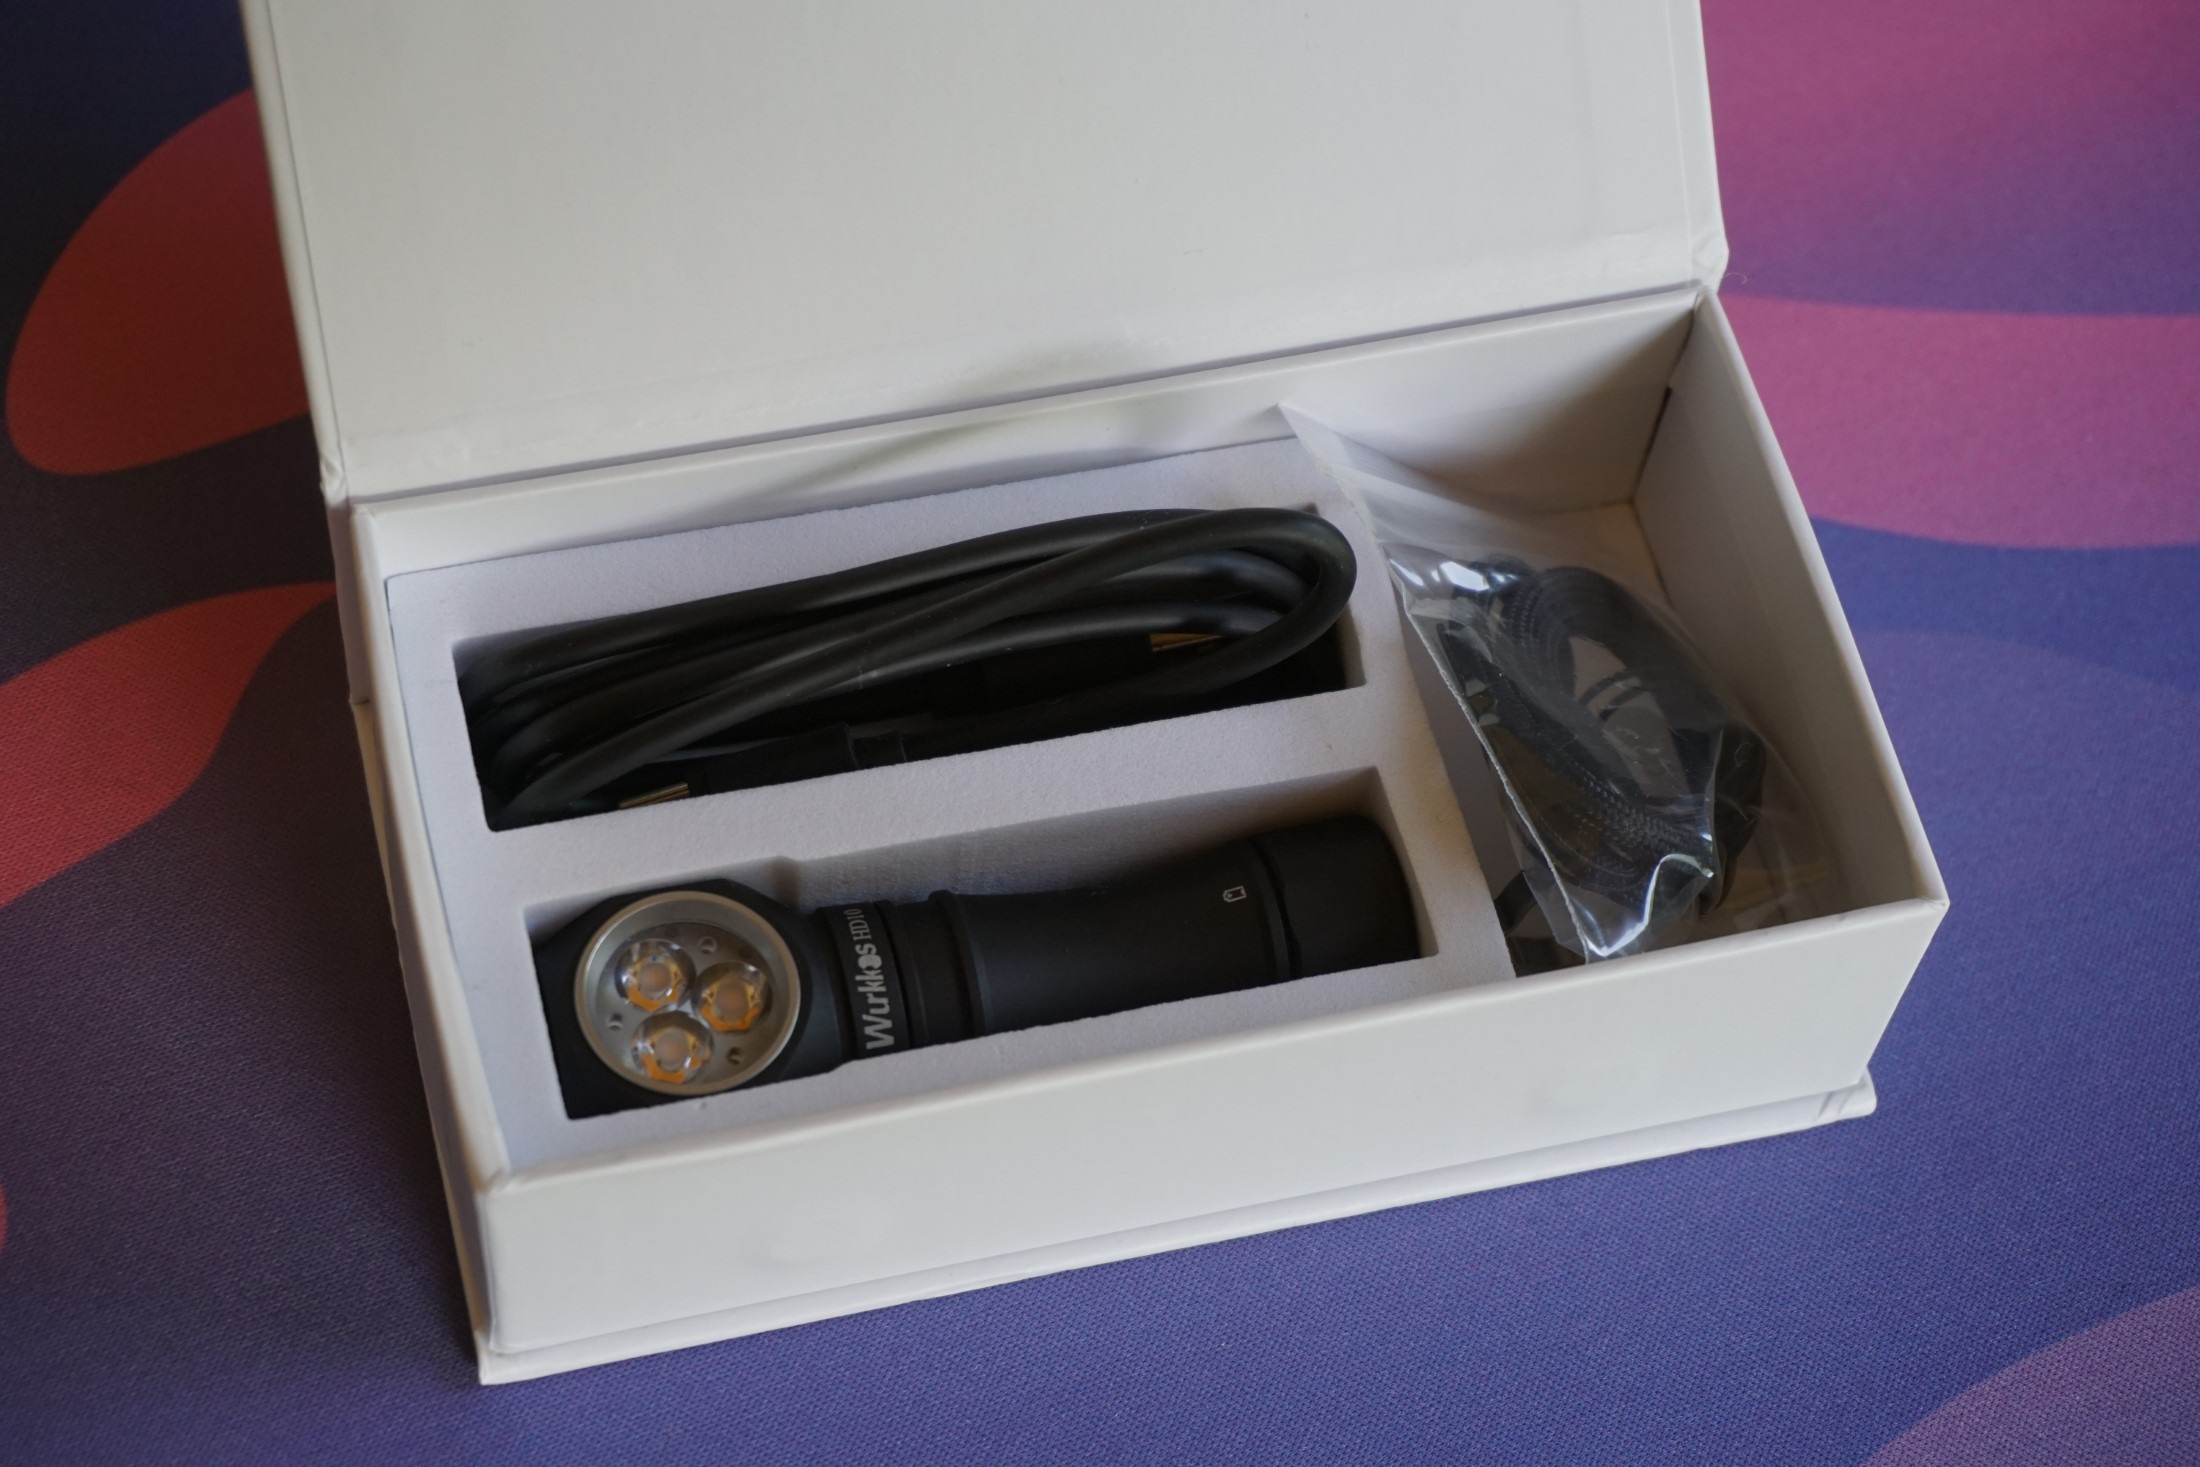
The inside has a piece of cardboard that reminds us to remove the insulation piece and then carefully re-tighten the battery tube. Underneath it we have the light, a USB-A to USB-C cable, the clip and a lanyard. The battery is shipped inside the light, most likely for legal reasons (standalone batteries not part of a device are not allowed on regular airfreight).
The foam packaging protects the light well. The box is neither oversized, nor too small to promise safe delivery. I would have preferred to see a packaging that involves less plastic and foam, and more recycled/recyclable materials instead (corn starch foam and bags, more use of cardboard/paper), but hey. It is very well packaged. That’s what counts.

Looks and feel
Exterior
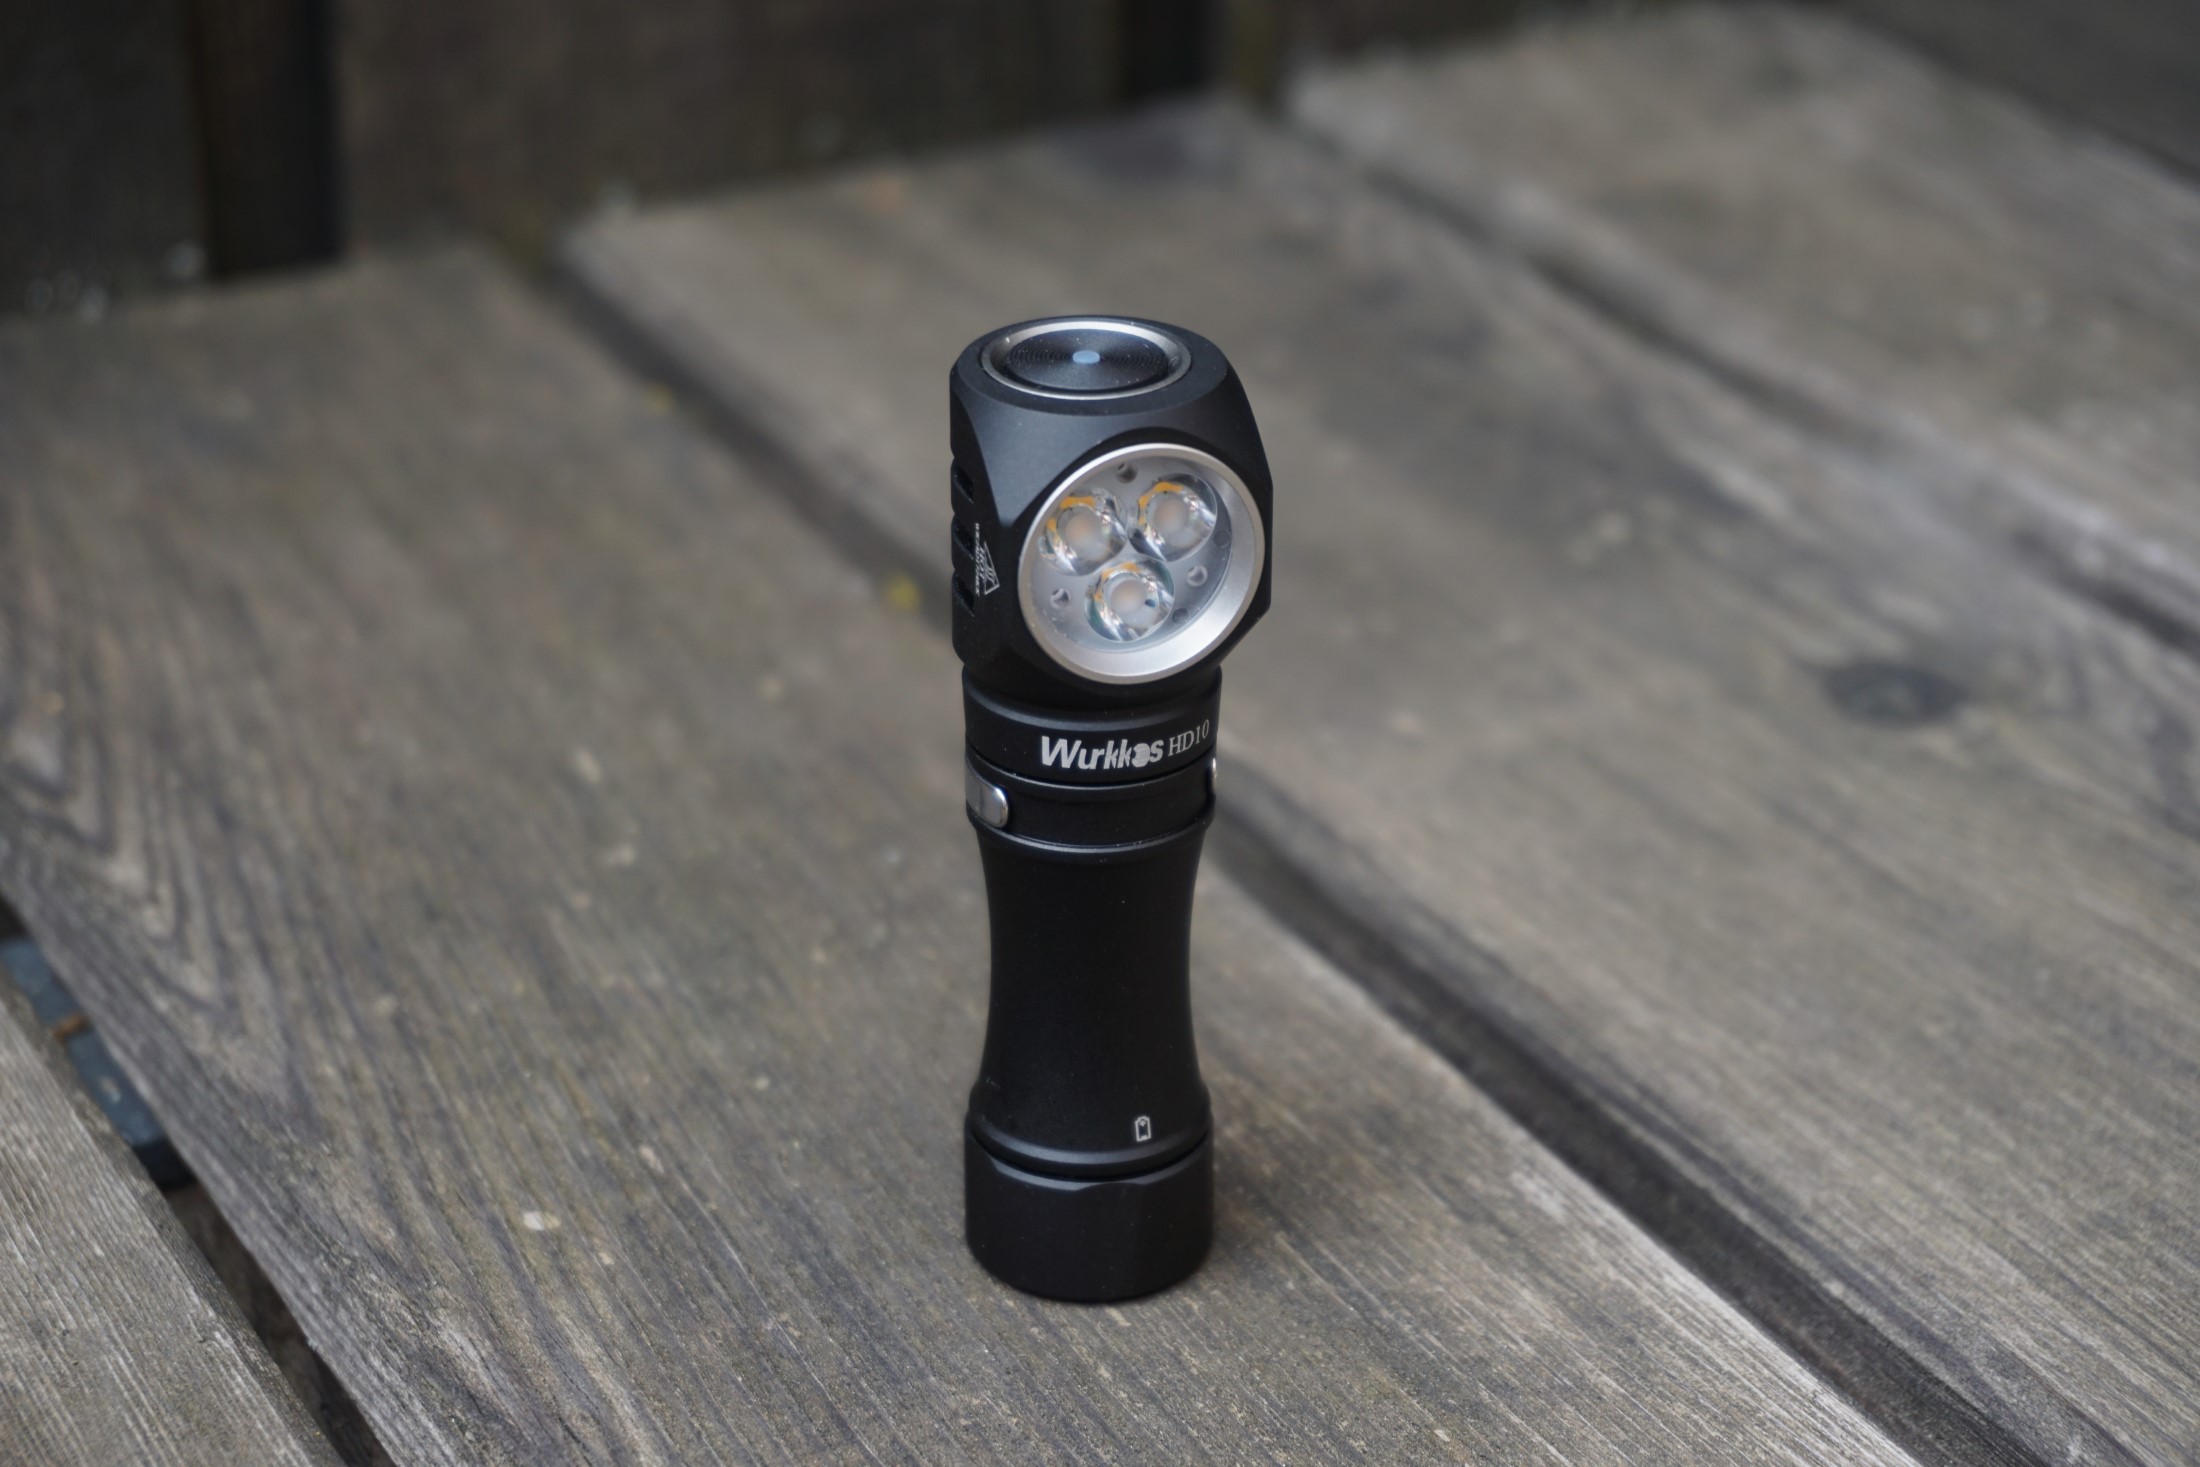
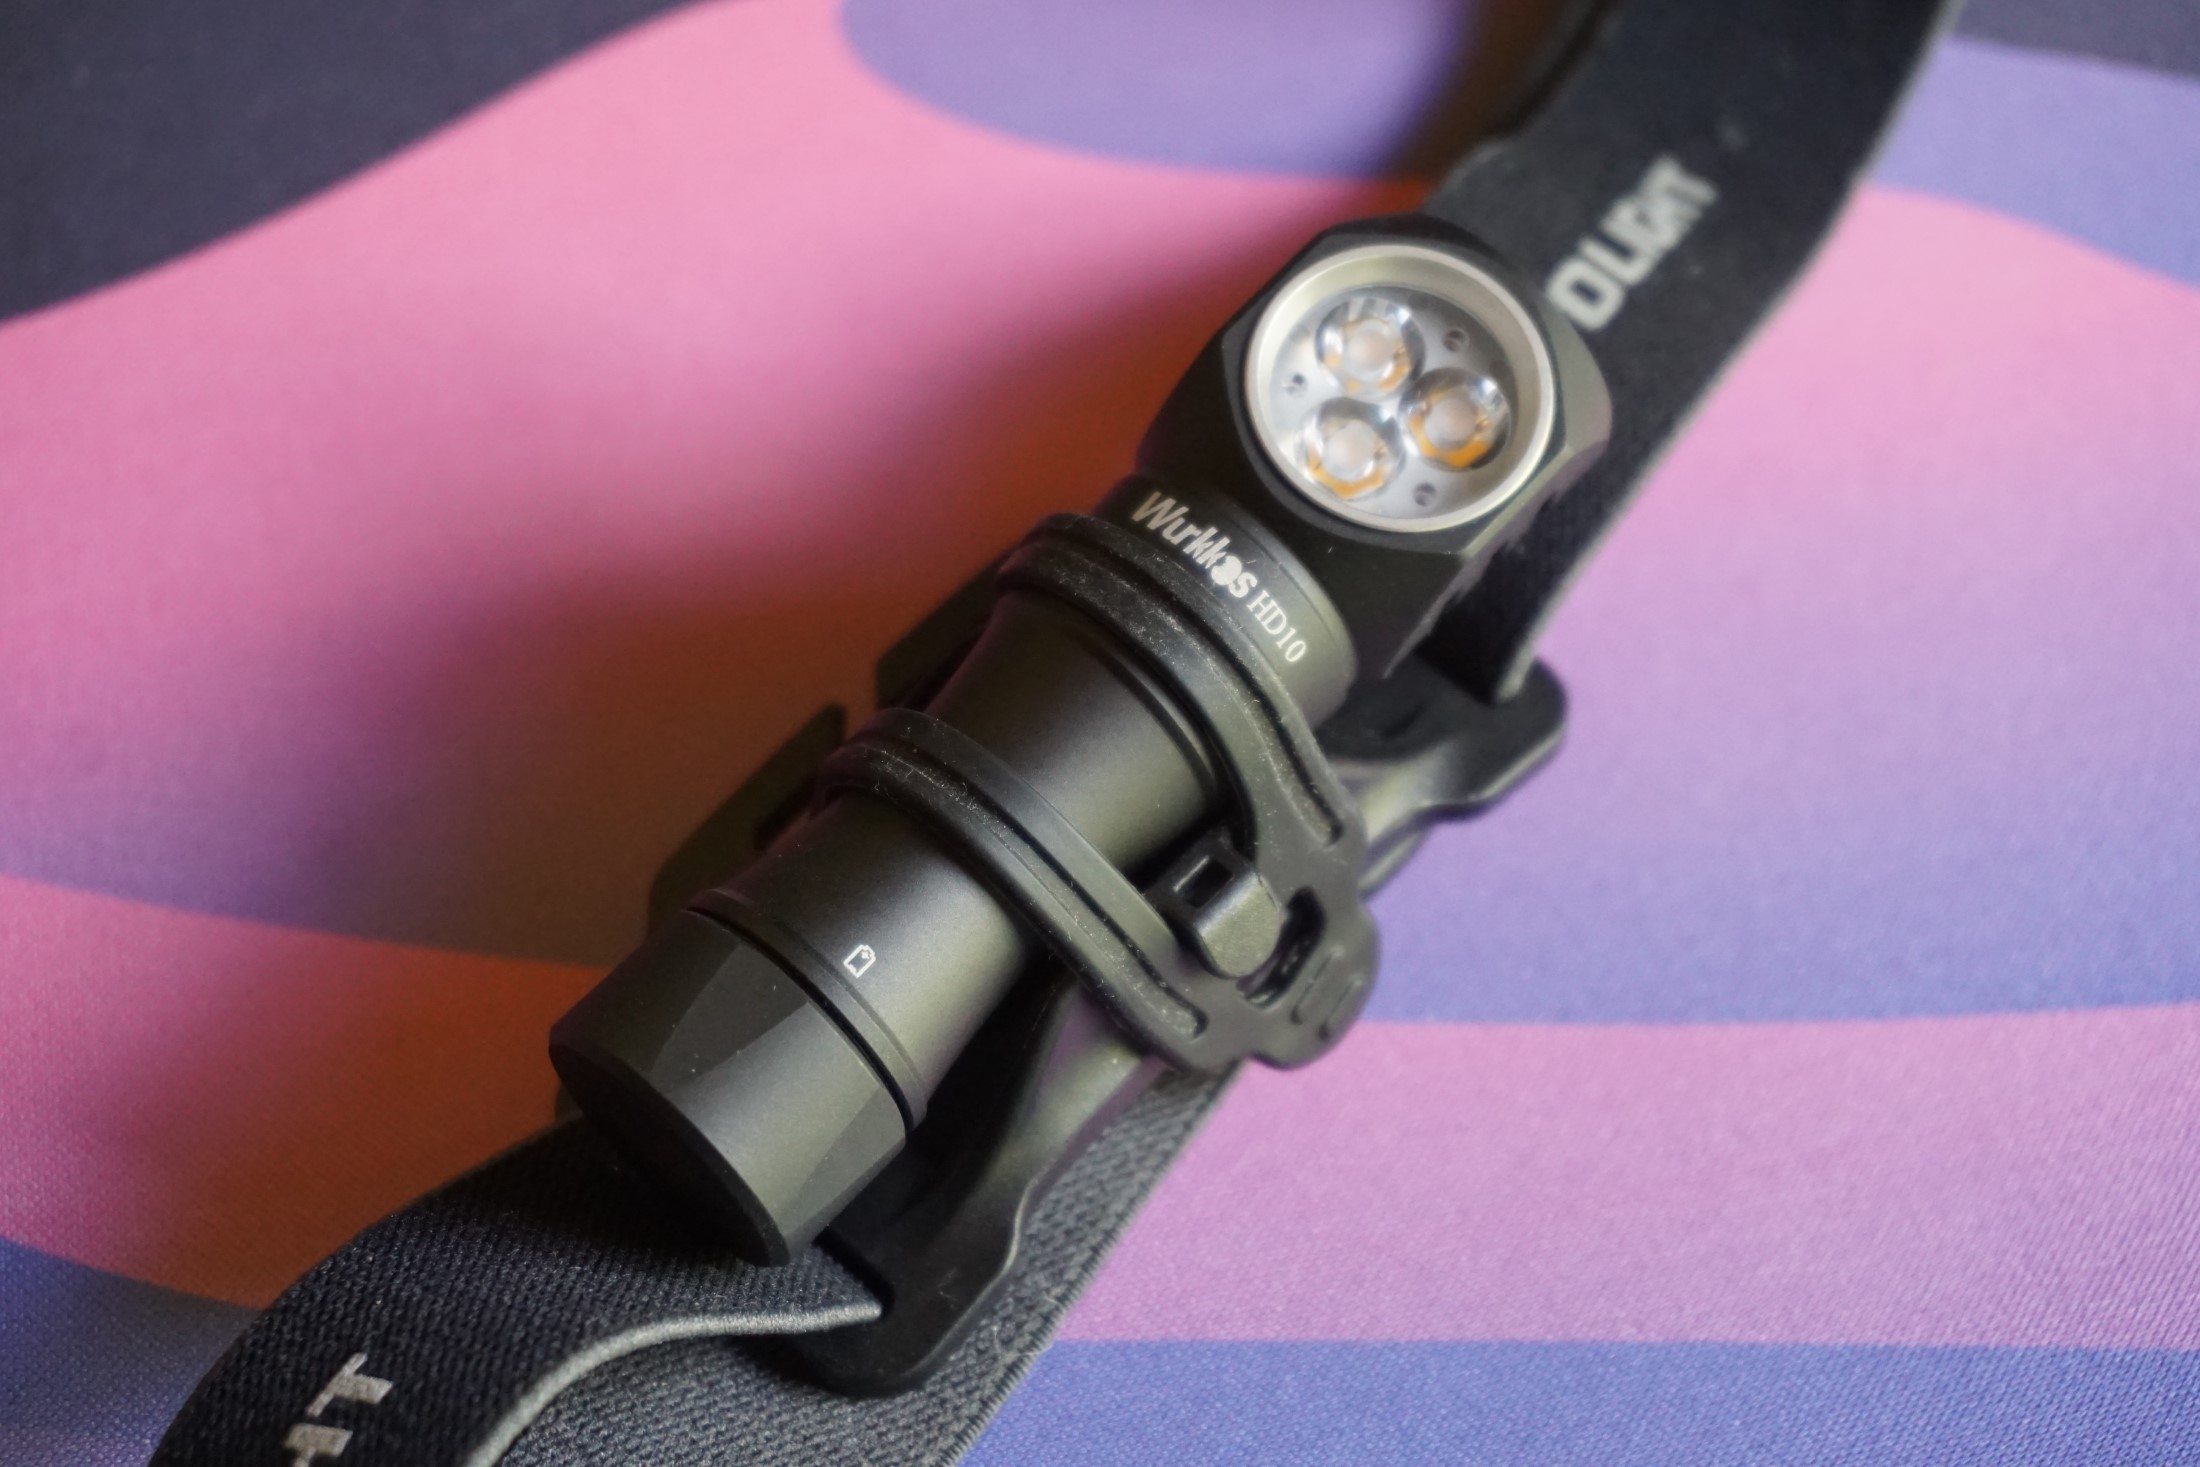
The light has a nice slim design, and reminds me a lot of the Wurkkos TS10 in its design with the slim waist battery tube. The anodisation is slightly matte and very uniform - great quality that looks and feels good. The light never feels “slippery” despite not having any knurling or grooves on most of the body, only some approx. 2 mm deep heatsinking grooves on the head.
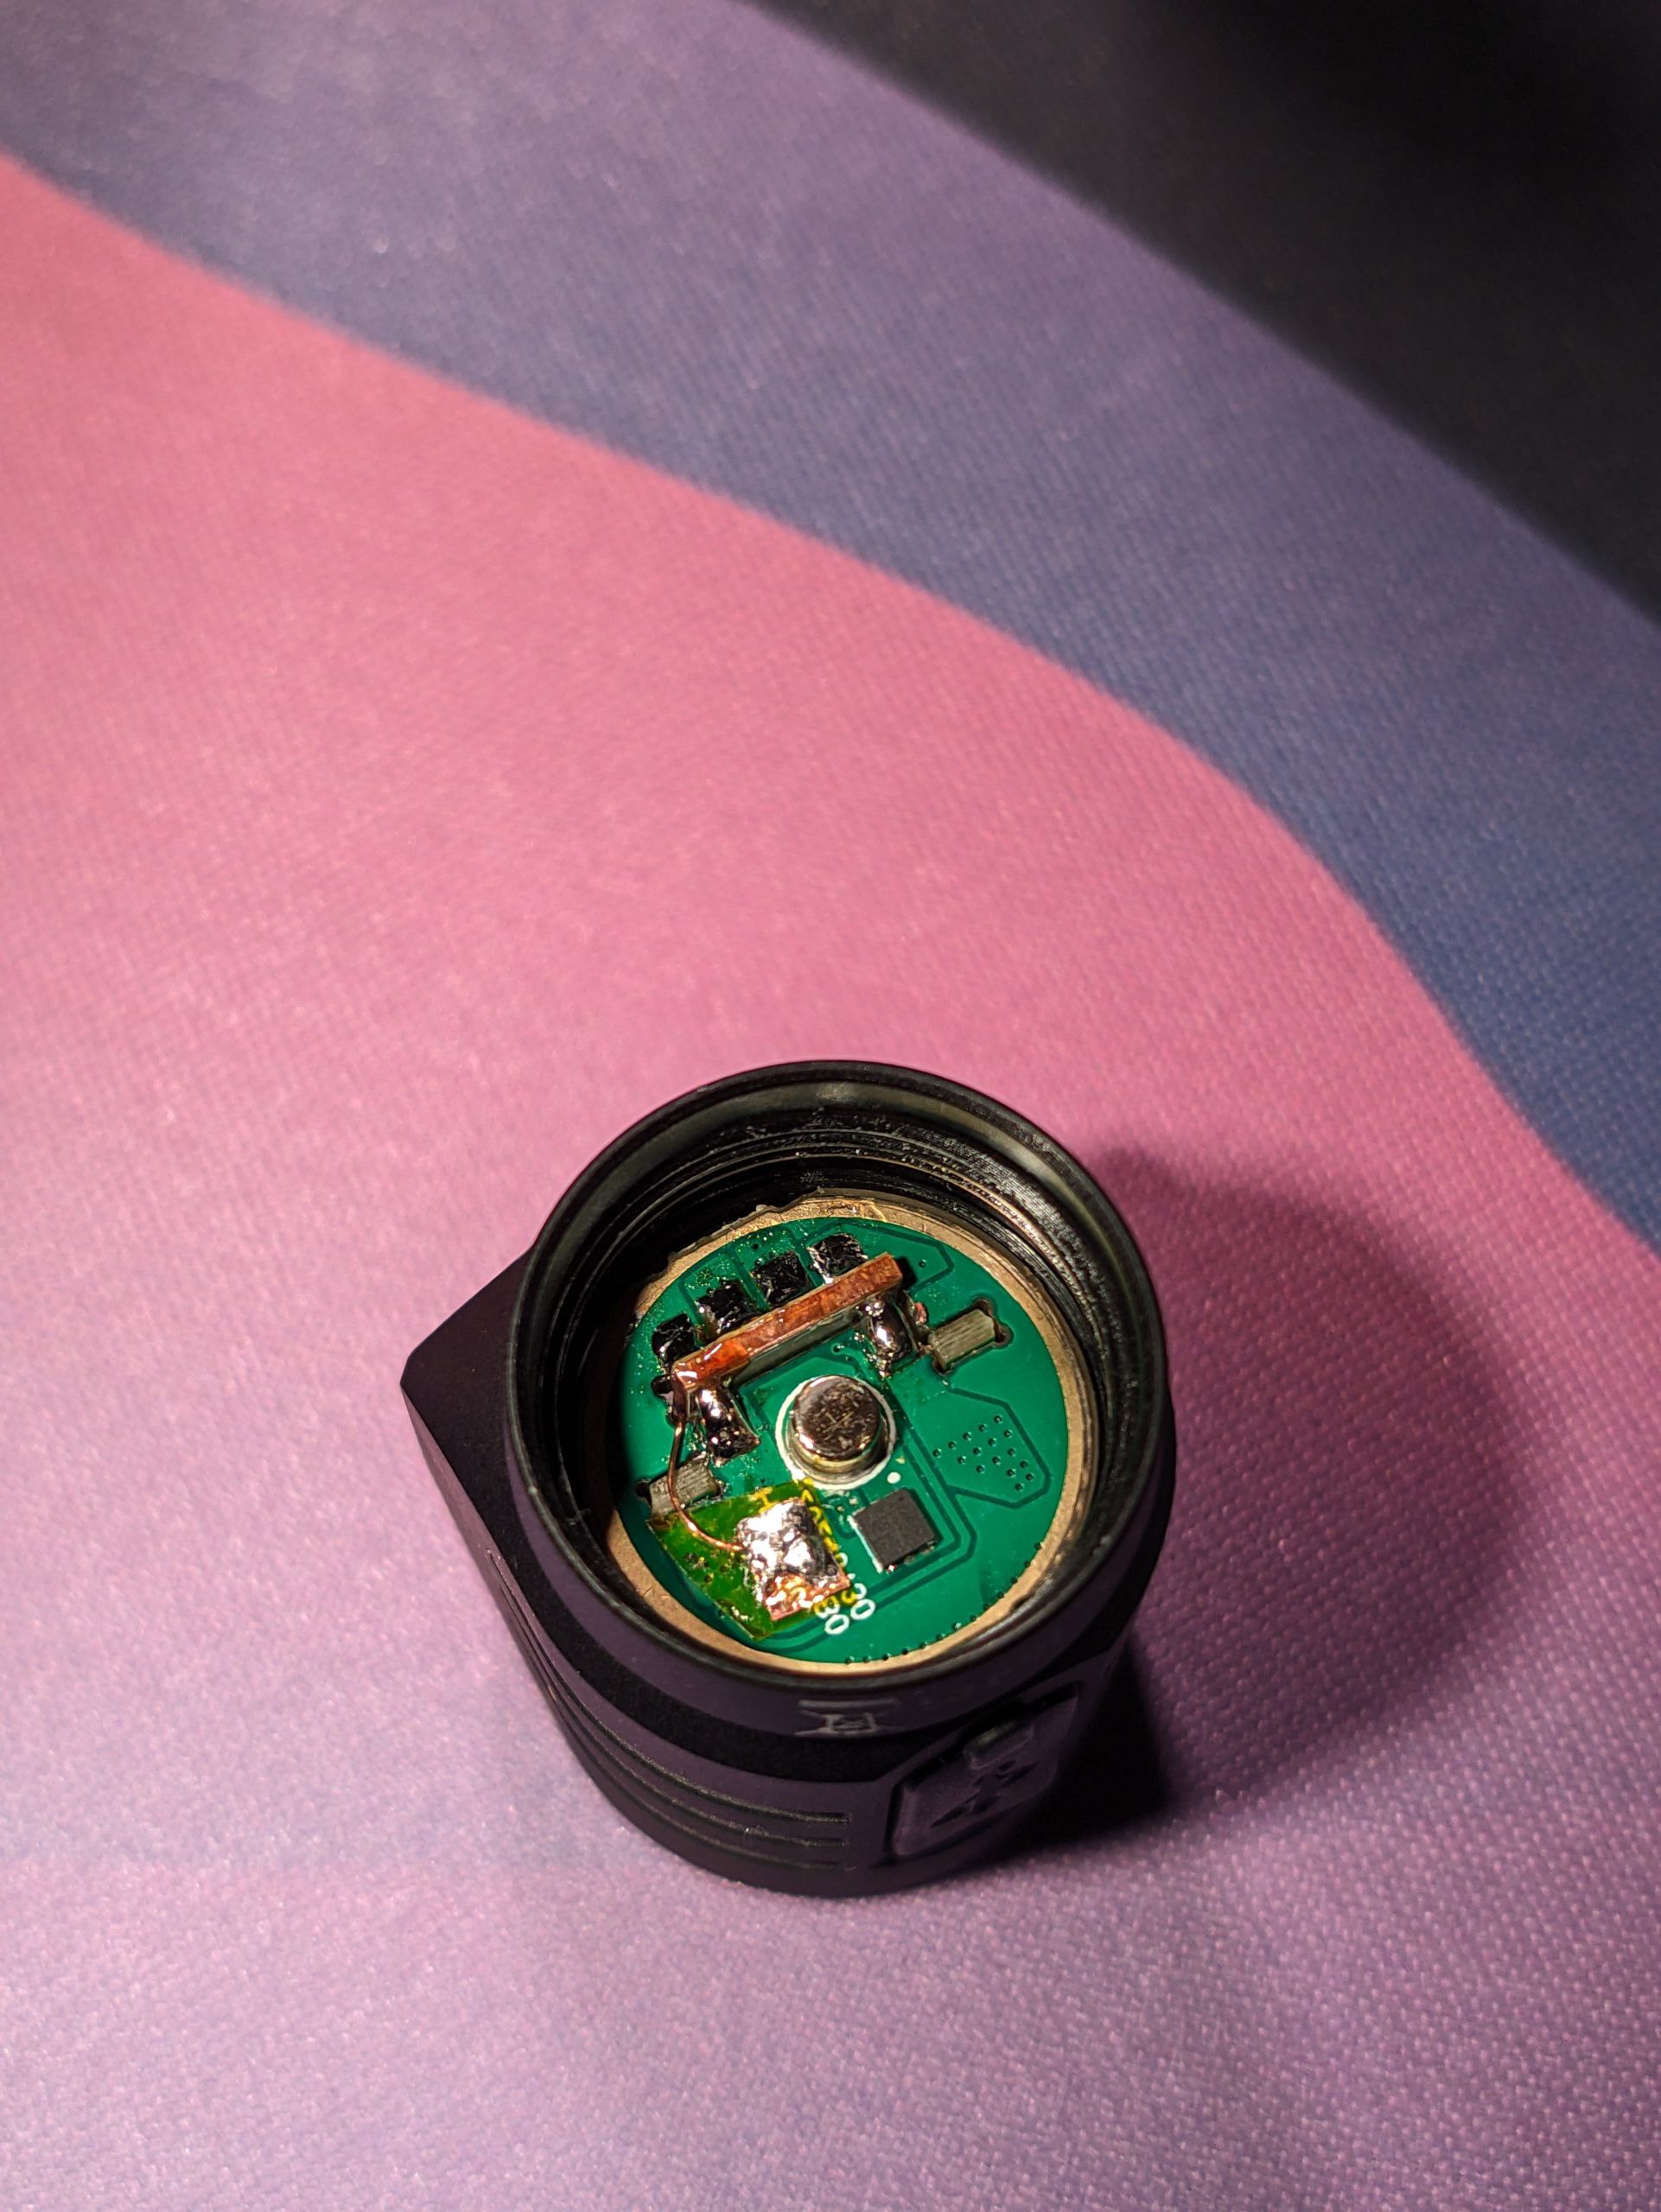
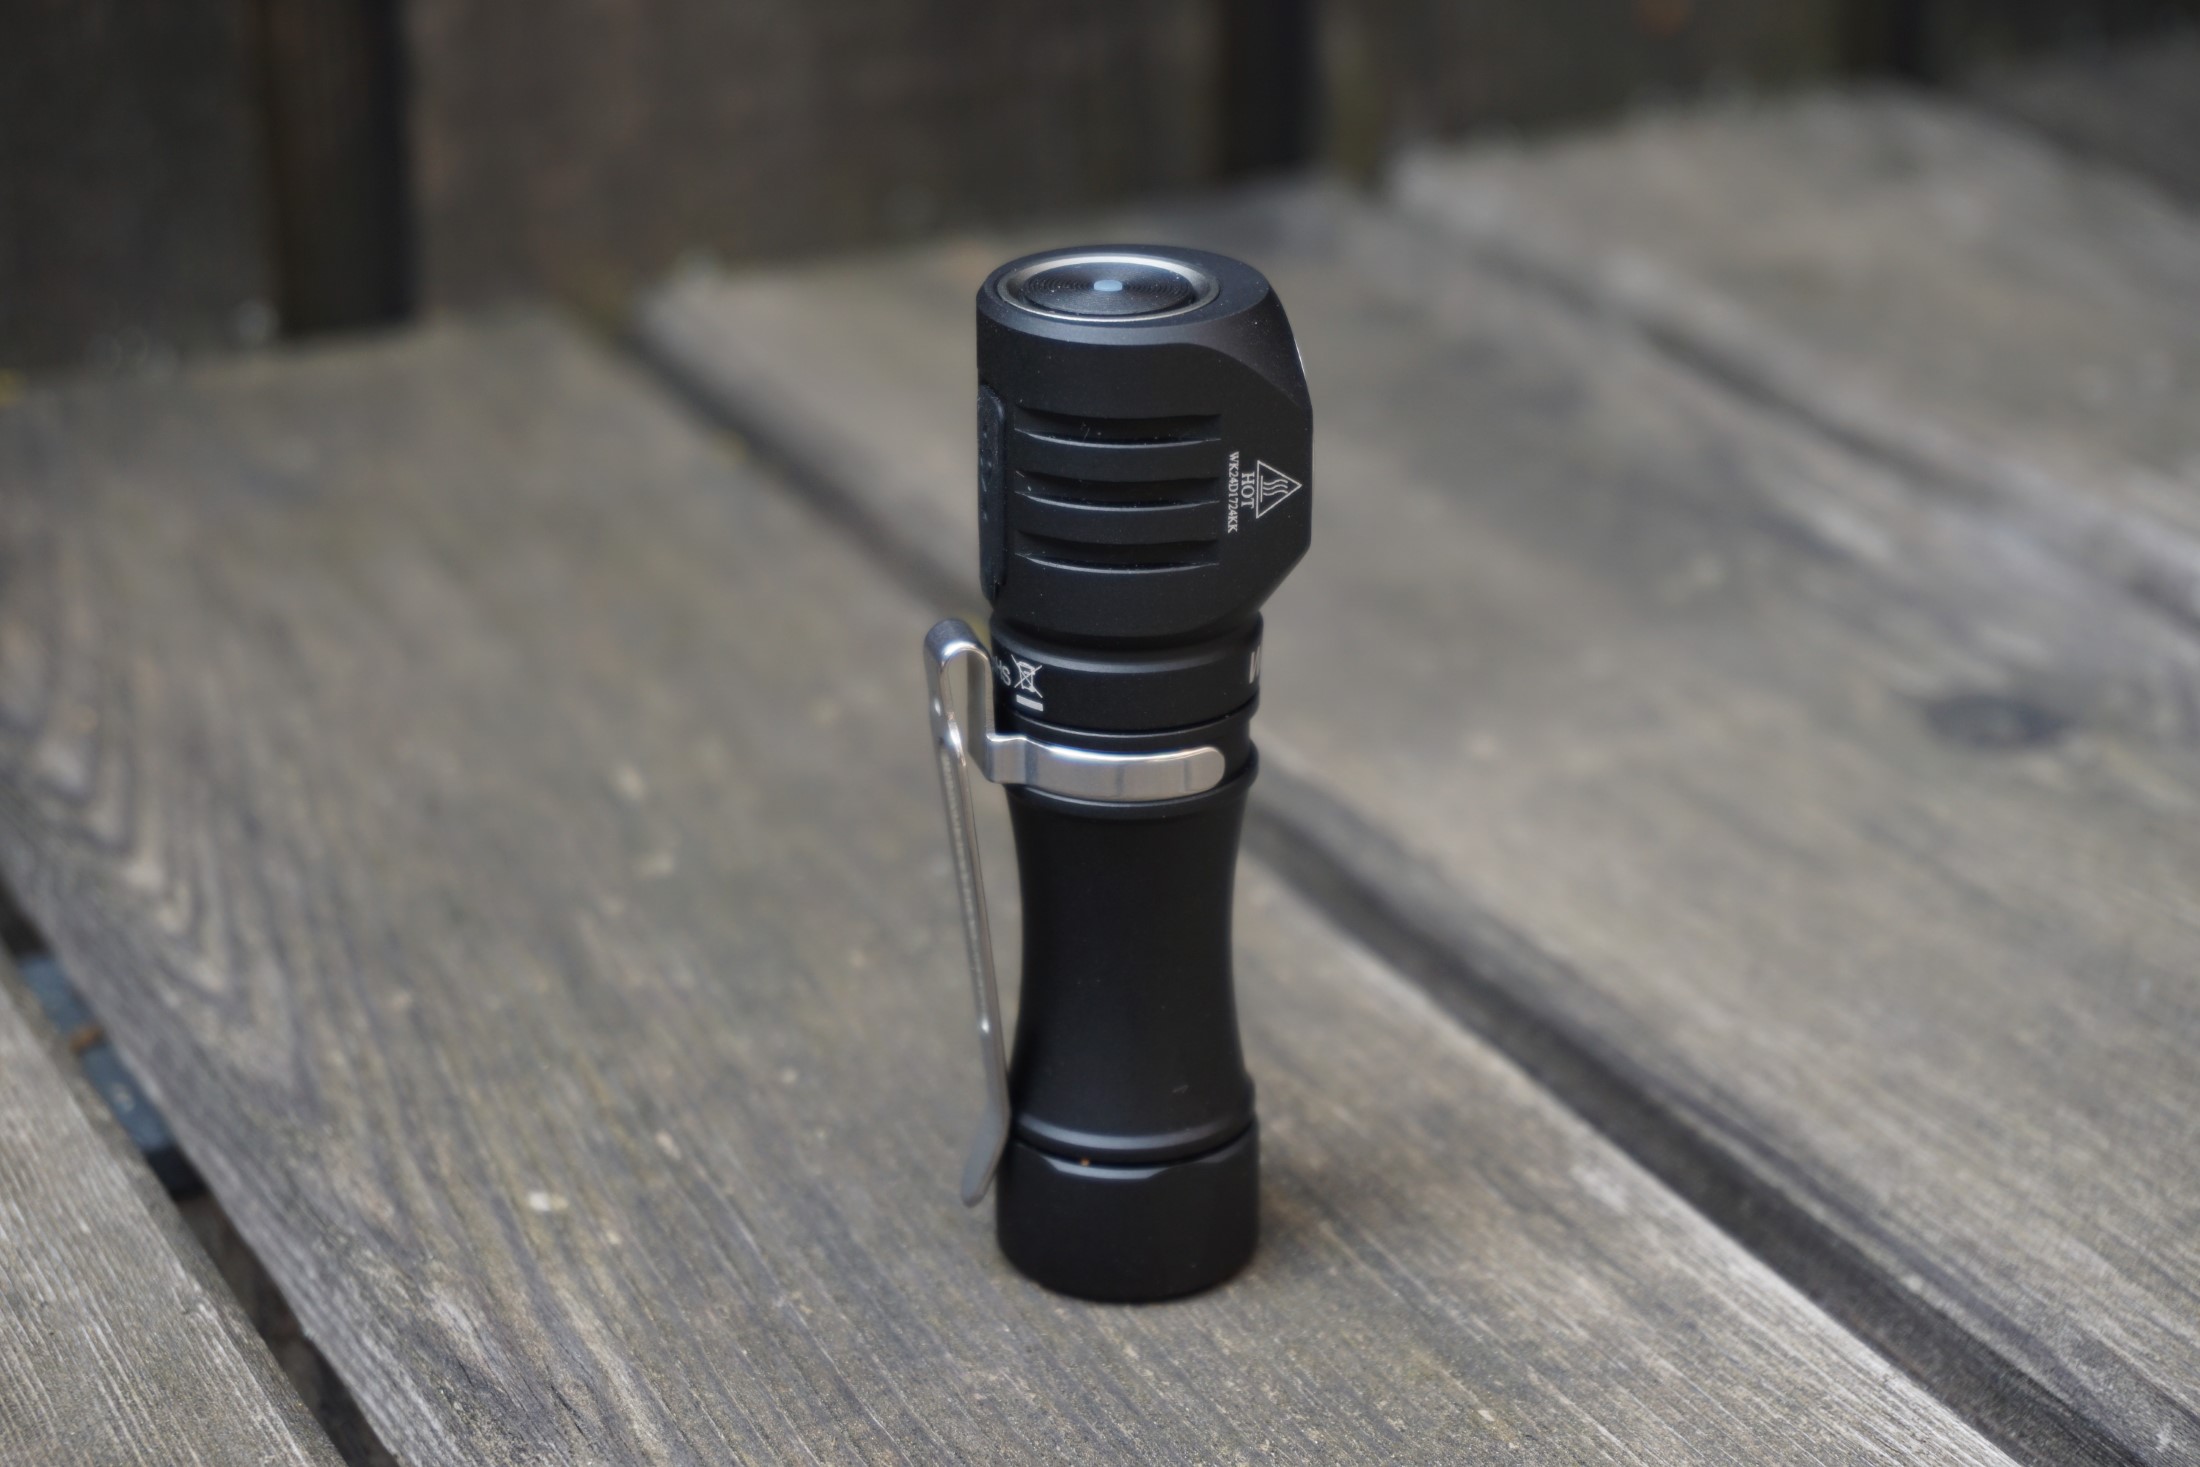
The clip sits in a dedicated groove on the battery tube. Sadly the tube is not reversible due to only one side having a larger drilled diameter in the first few millimeter for additional clearance with the driver PCB, making the clip non-reversible. I would have preferred a reversible tube to allow for the clip to be mounted in either direction. That would have made the light more universally useful. I have not used/tested the clip much, as the light would always protrude out of a pocket if clipped in place. The only real usecase for it I found is to clip it to a shirt or pant front pocket, and have it light your path. Not sure how useful that is due to bobbing.
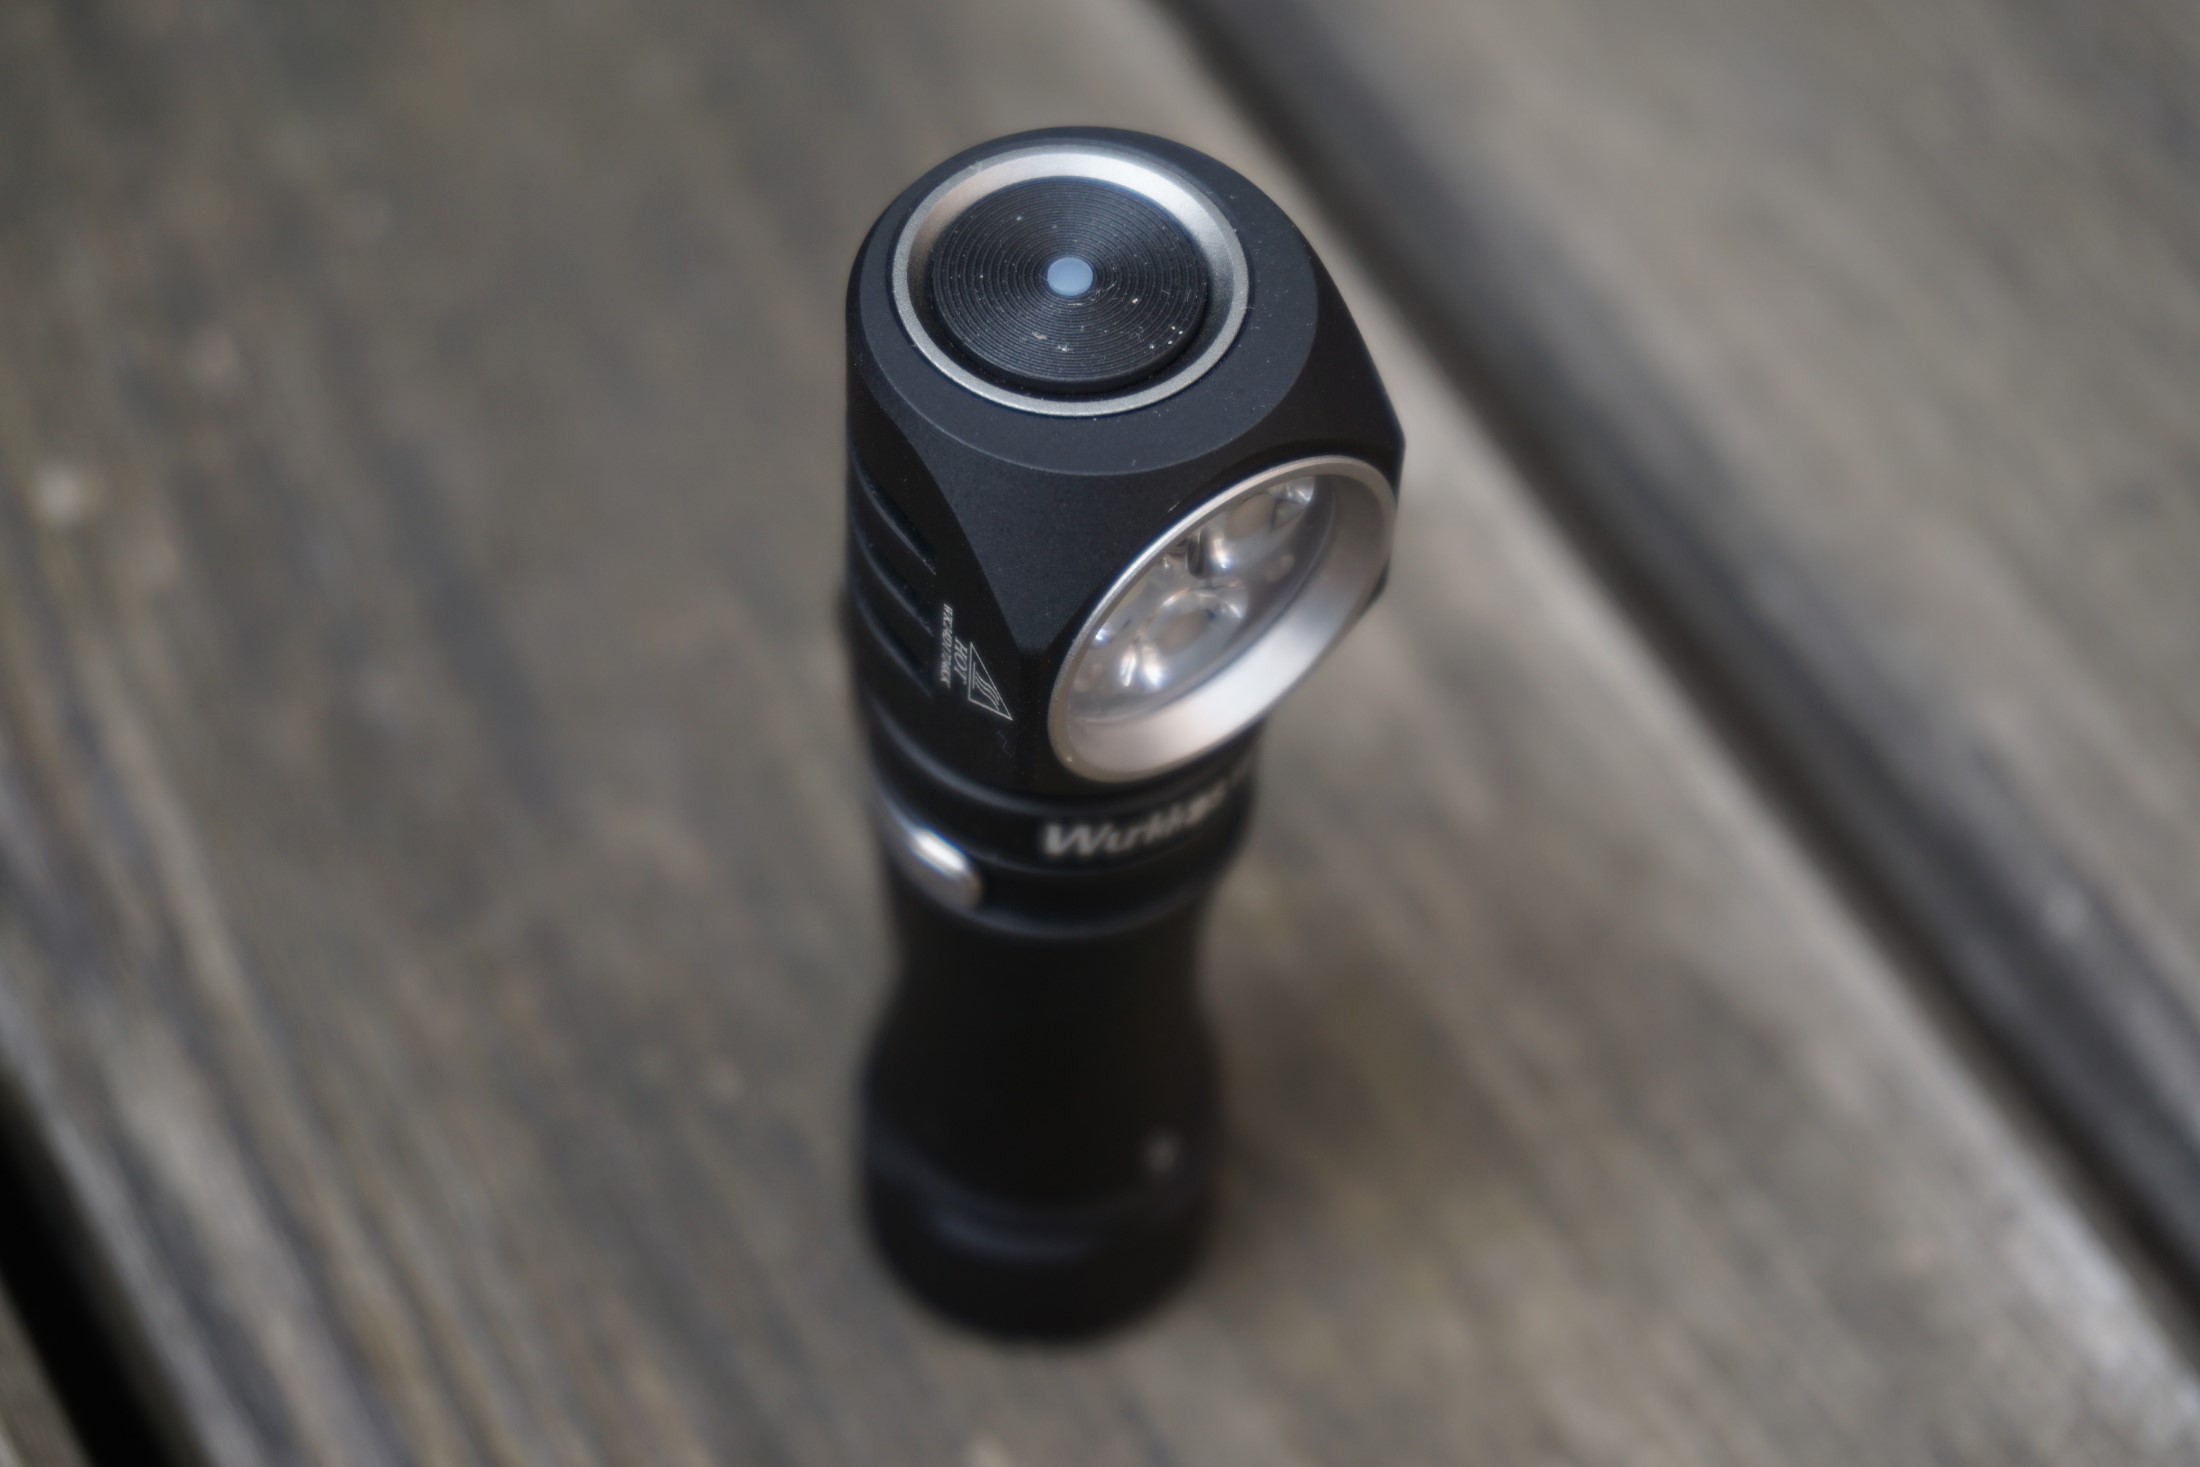
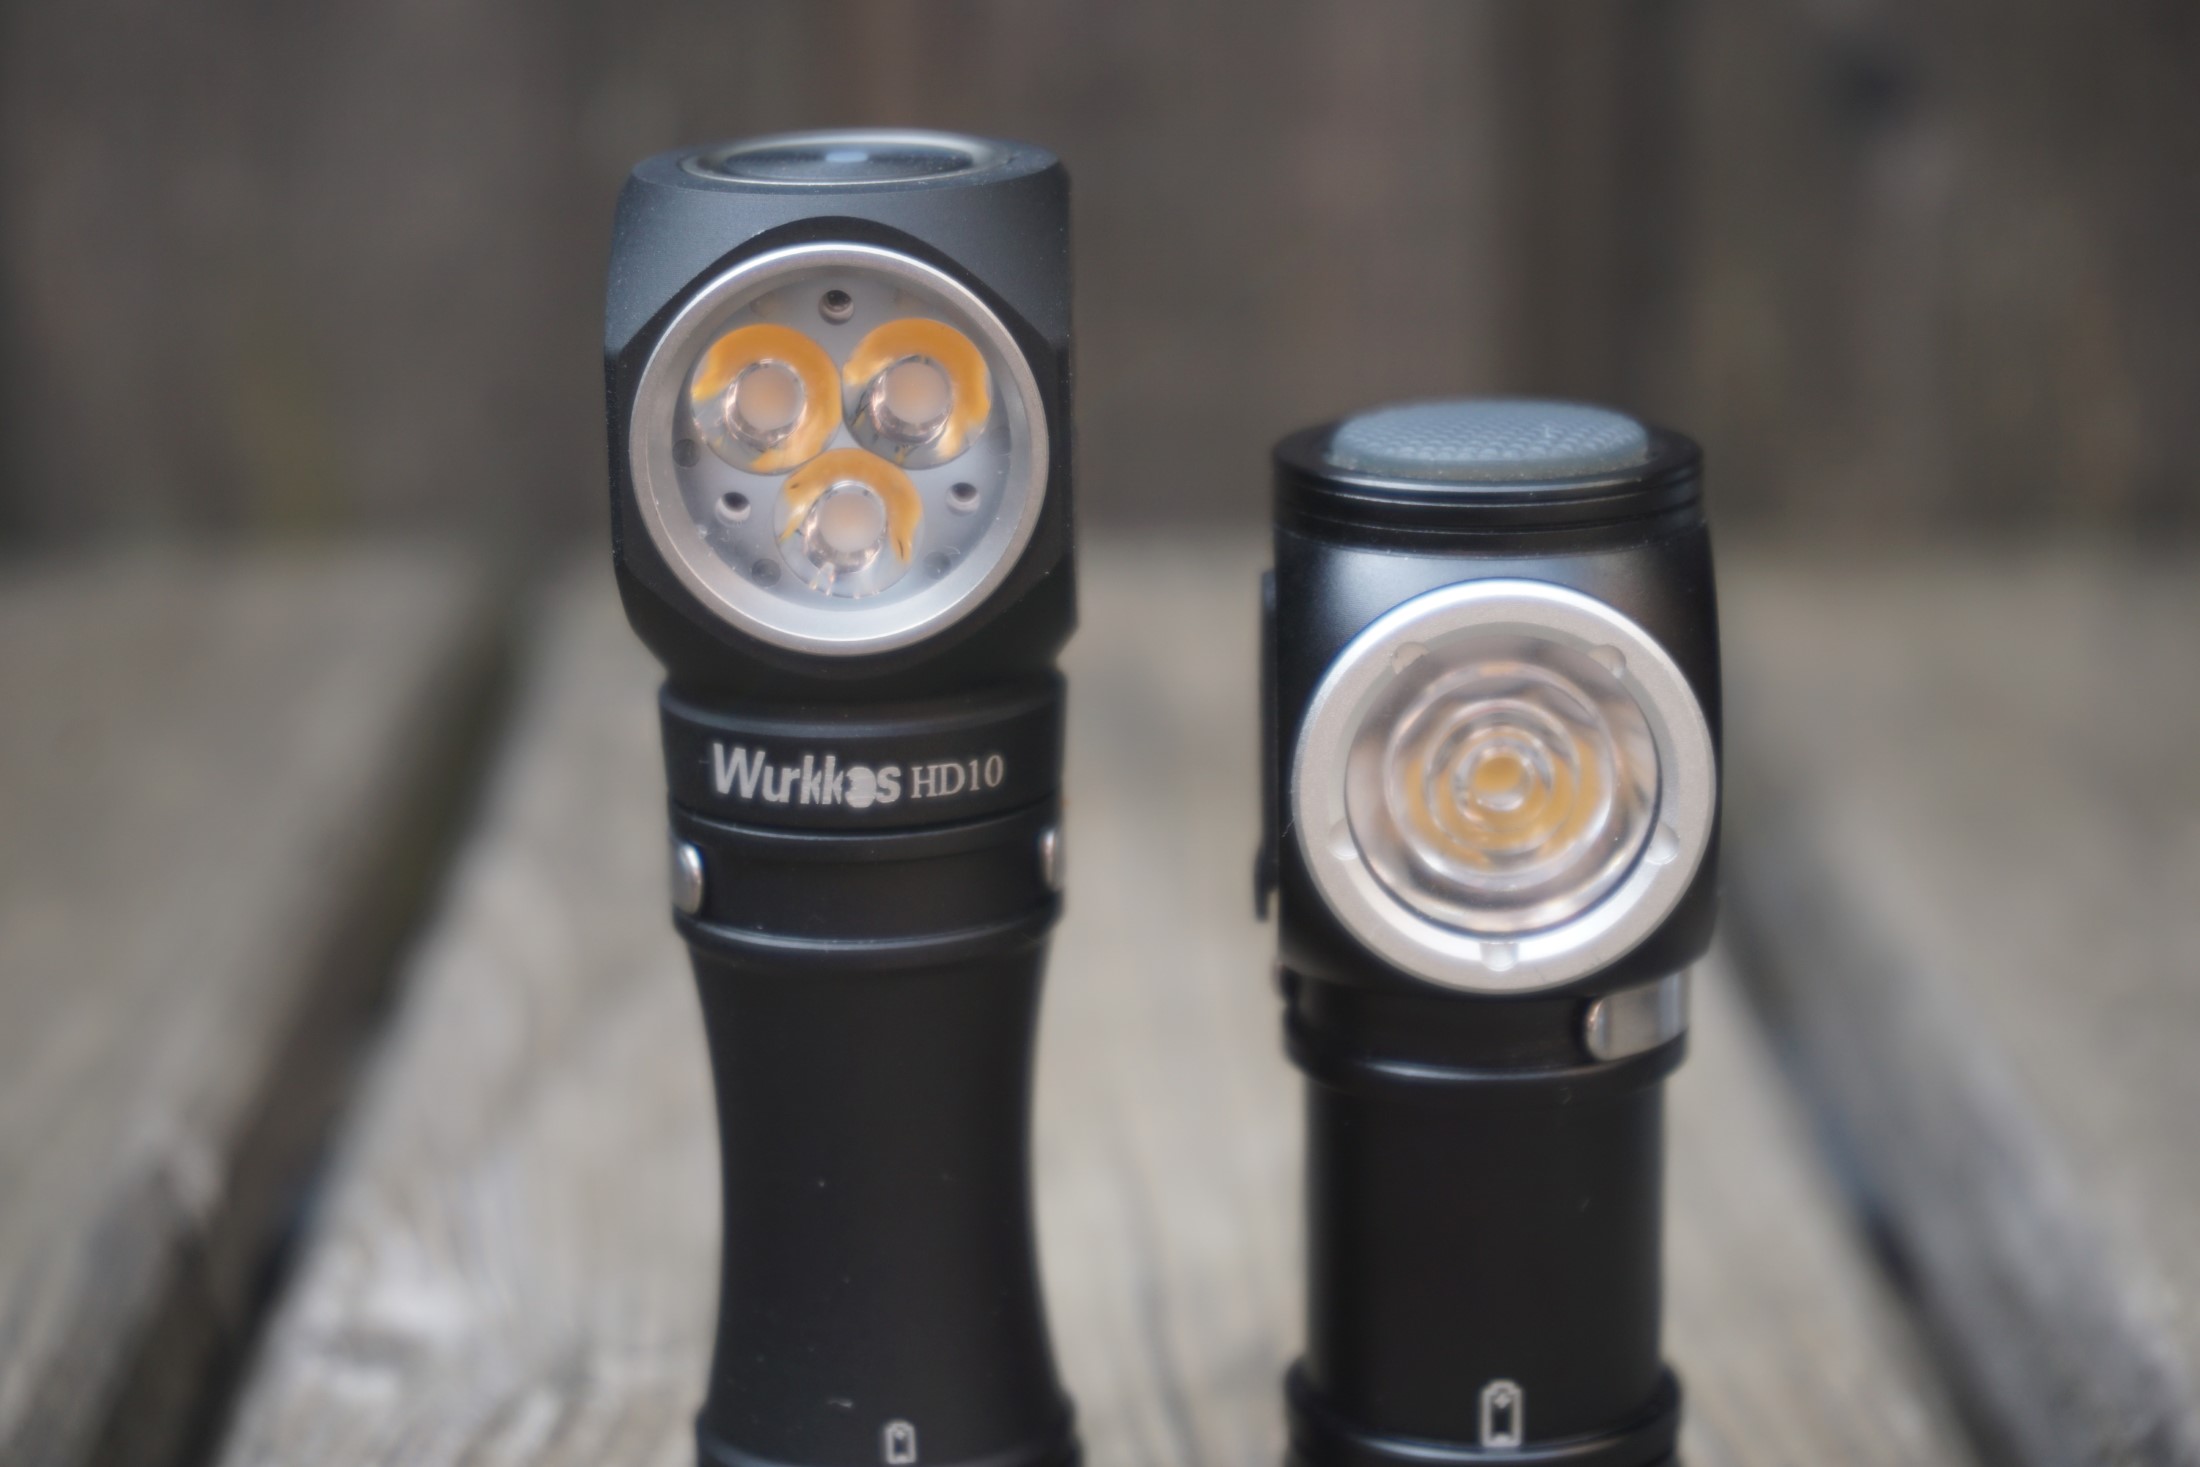
The triple TIR is framed by a slim silver bezel that appears to be pressed in - I tried and could not get it loose by pressing the light against a rubber mat and rotating. If it is screwed, it must be secured with Locktite or similar. It is covered by a glass lens. Due to it being non-removable, I have no way of checking AR-coating or if O-rings are placed around it. The IP rating of the light, however, suggests it is properly waterproofed.
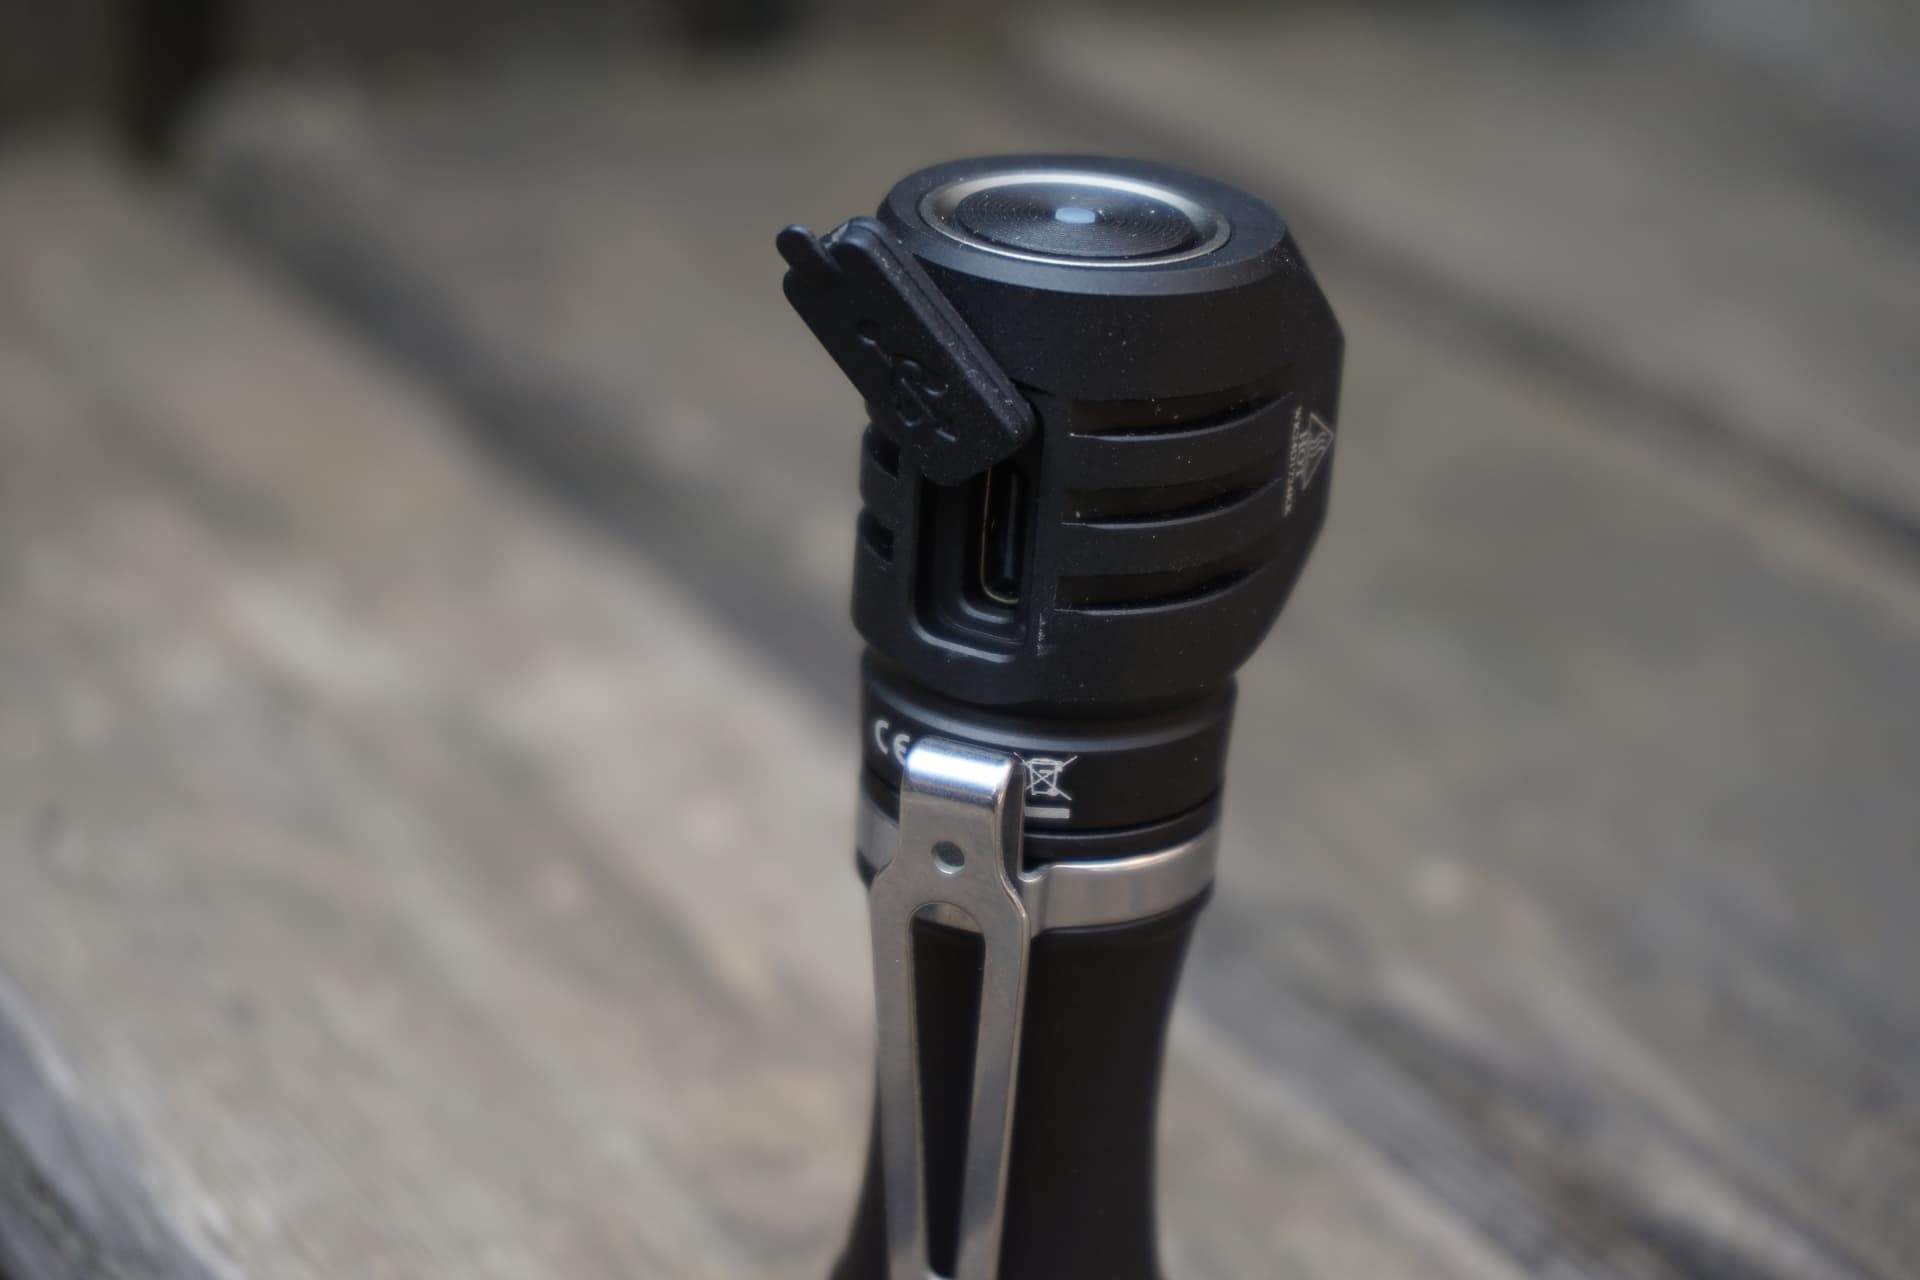
The USB port flap is on the rear side of the head and well designed. It is almost impossible to open it accidentally, but easy to open on purpose and it feels snug and water-tight when closed. The slot around the USB-C port is large enough that even larger USB cables fit without issues. Out of my cables, only Anker Powerline+ with connectors close to the limit allowed by the USB IF need a bit of force to push inside the groove and then sit wedged in place.
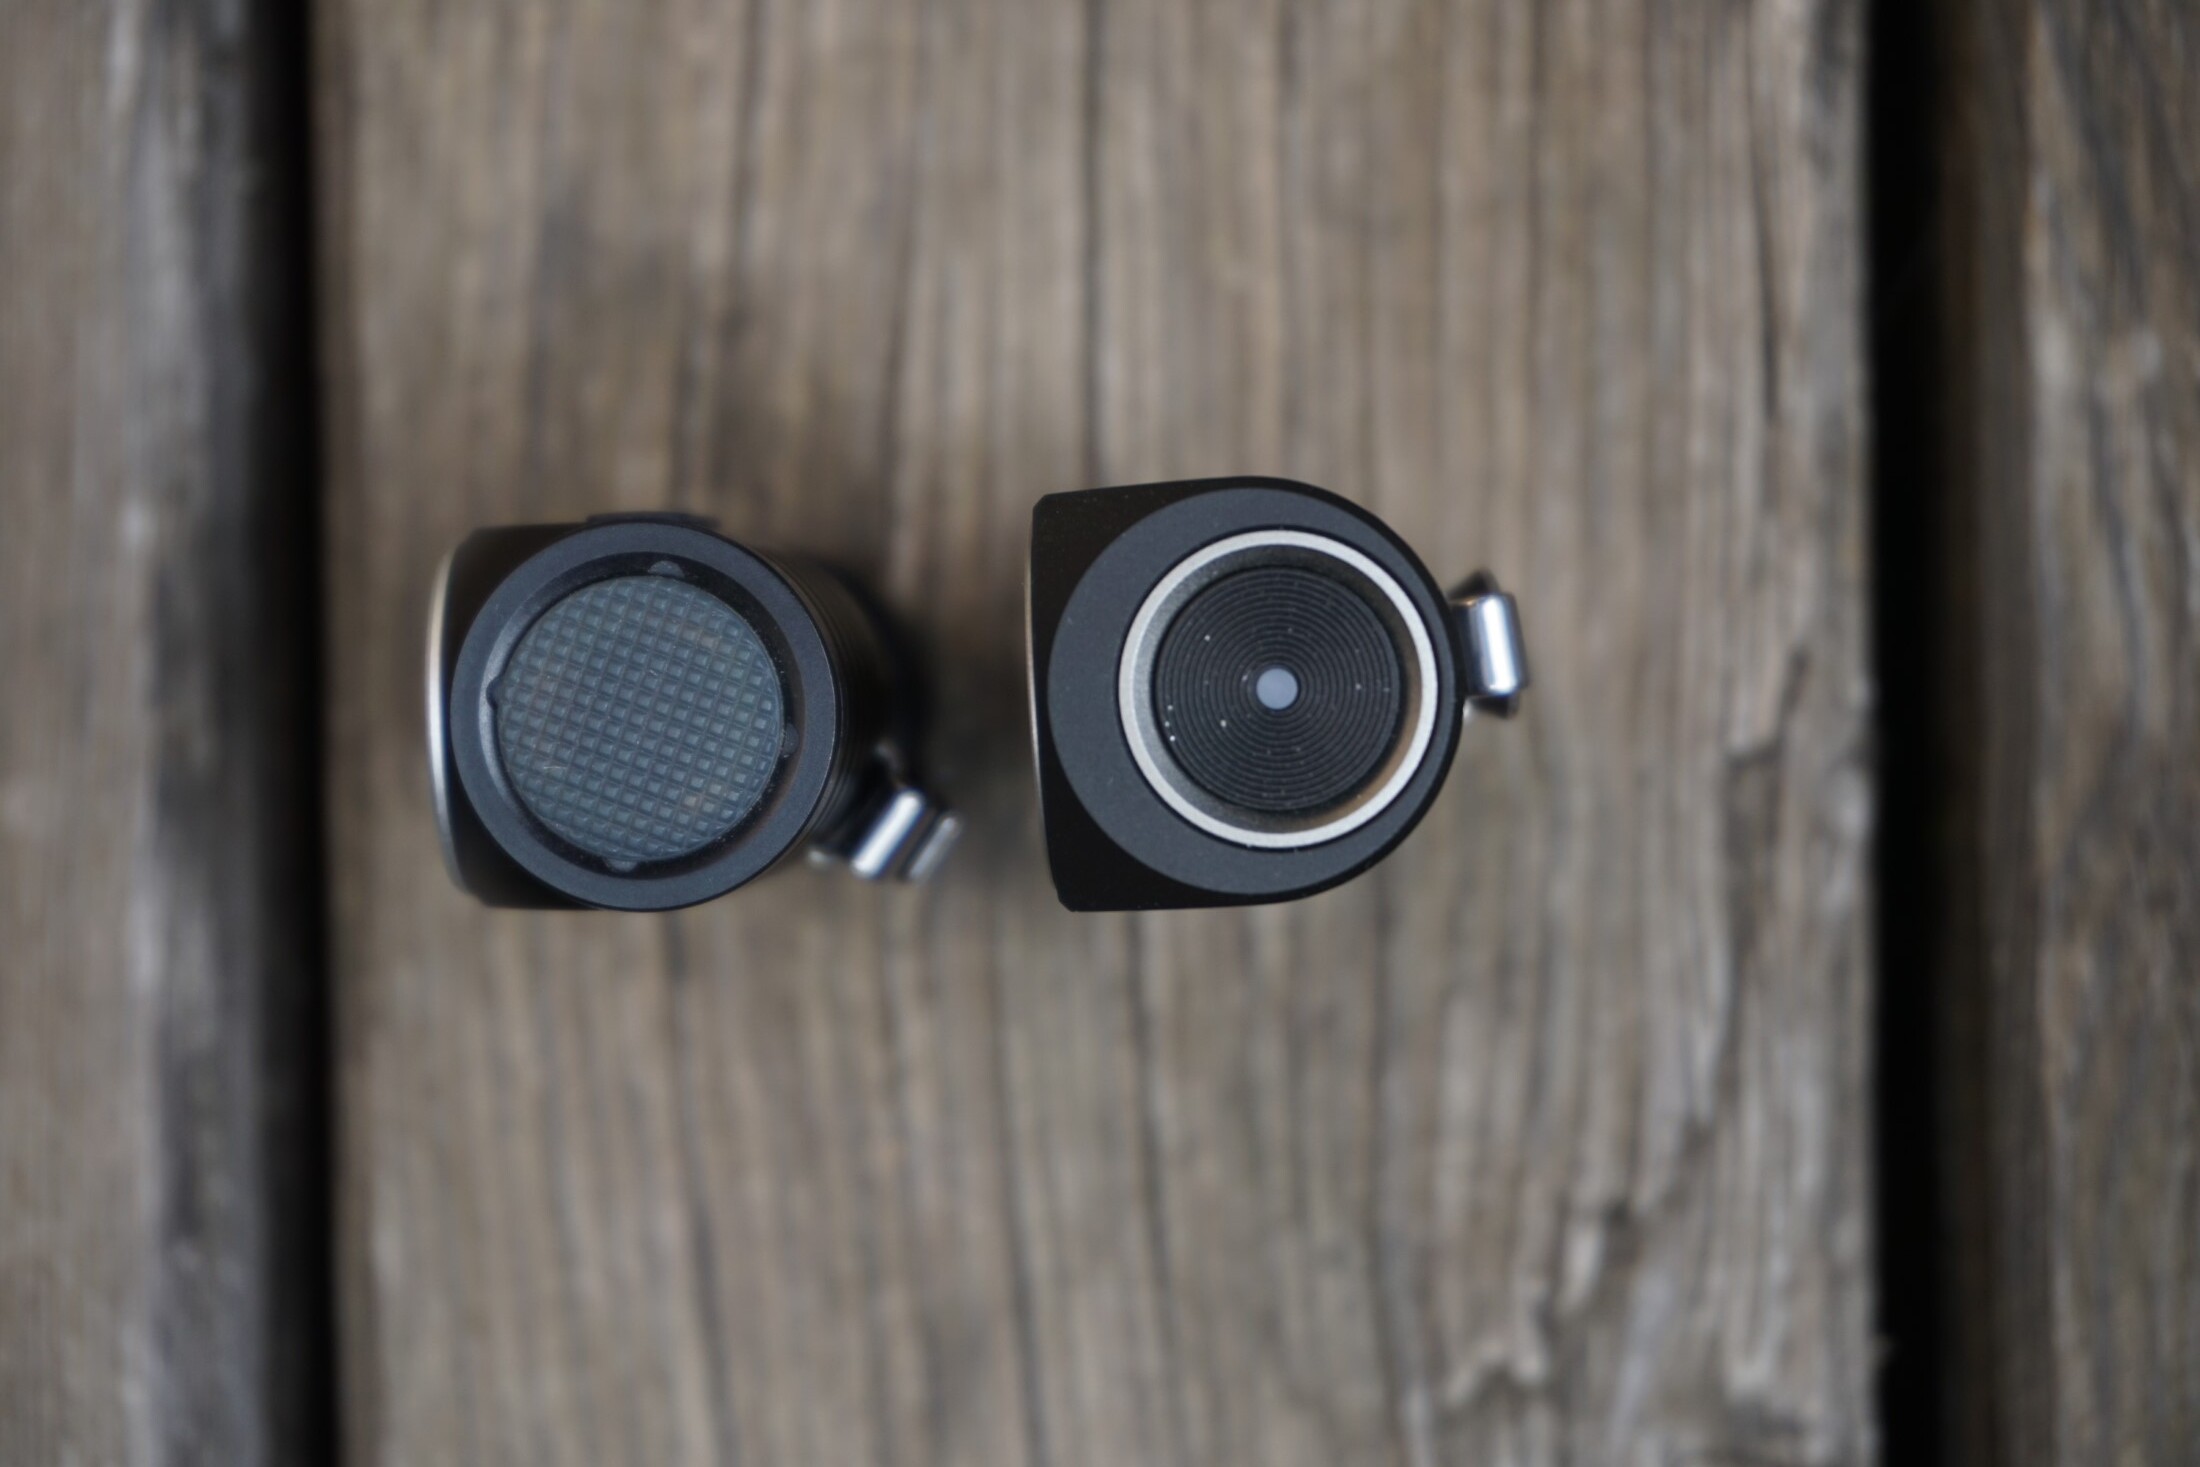
The E-switch sits on the top end of the light. It measures 12 mm in diameter and is made out of machined and anodized aluminum with a small silicone insert in the middle for the charge status LED. Button presses give a clear haptic and acoustic clicky feedback. The button is nice to use.
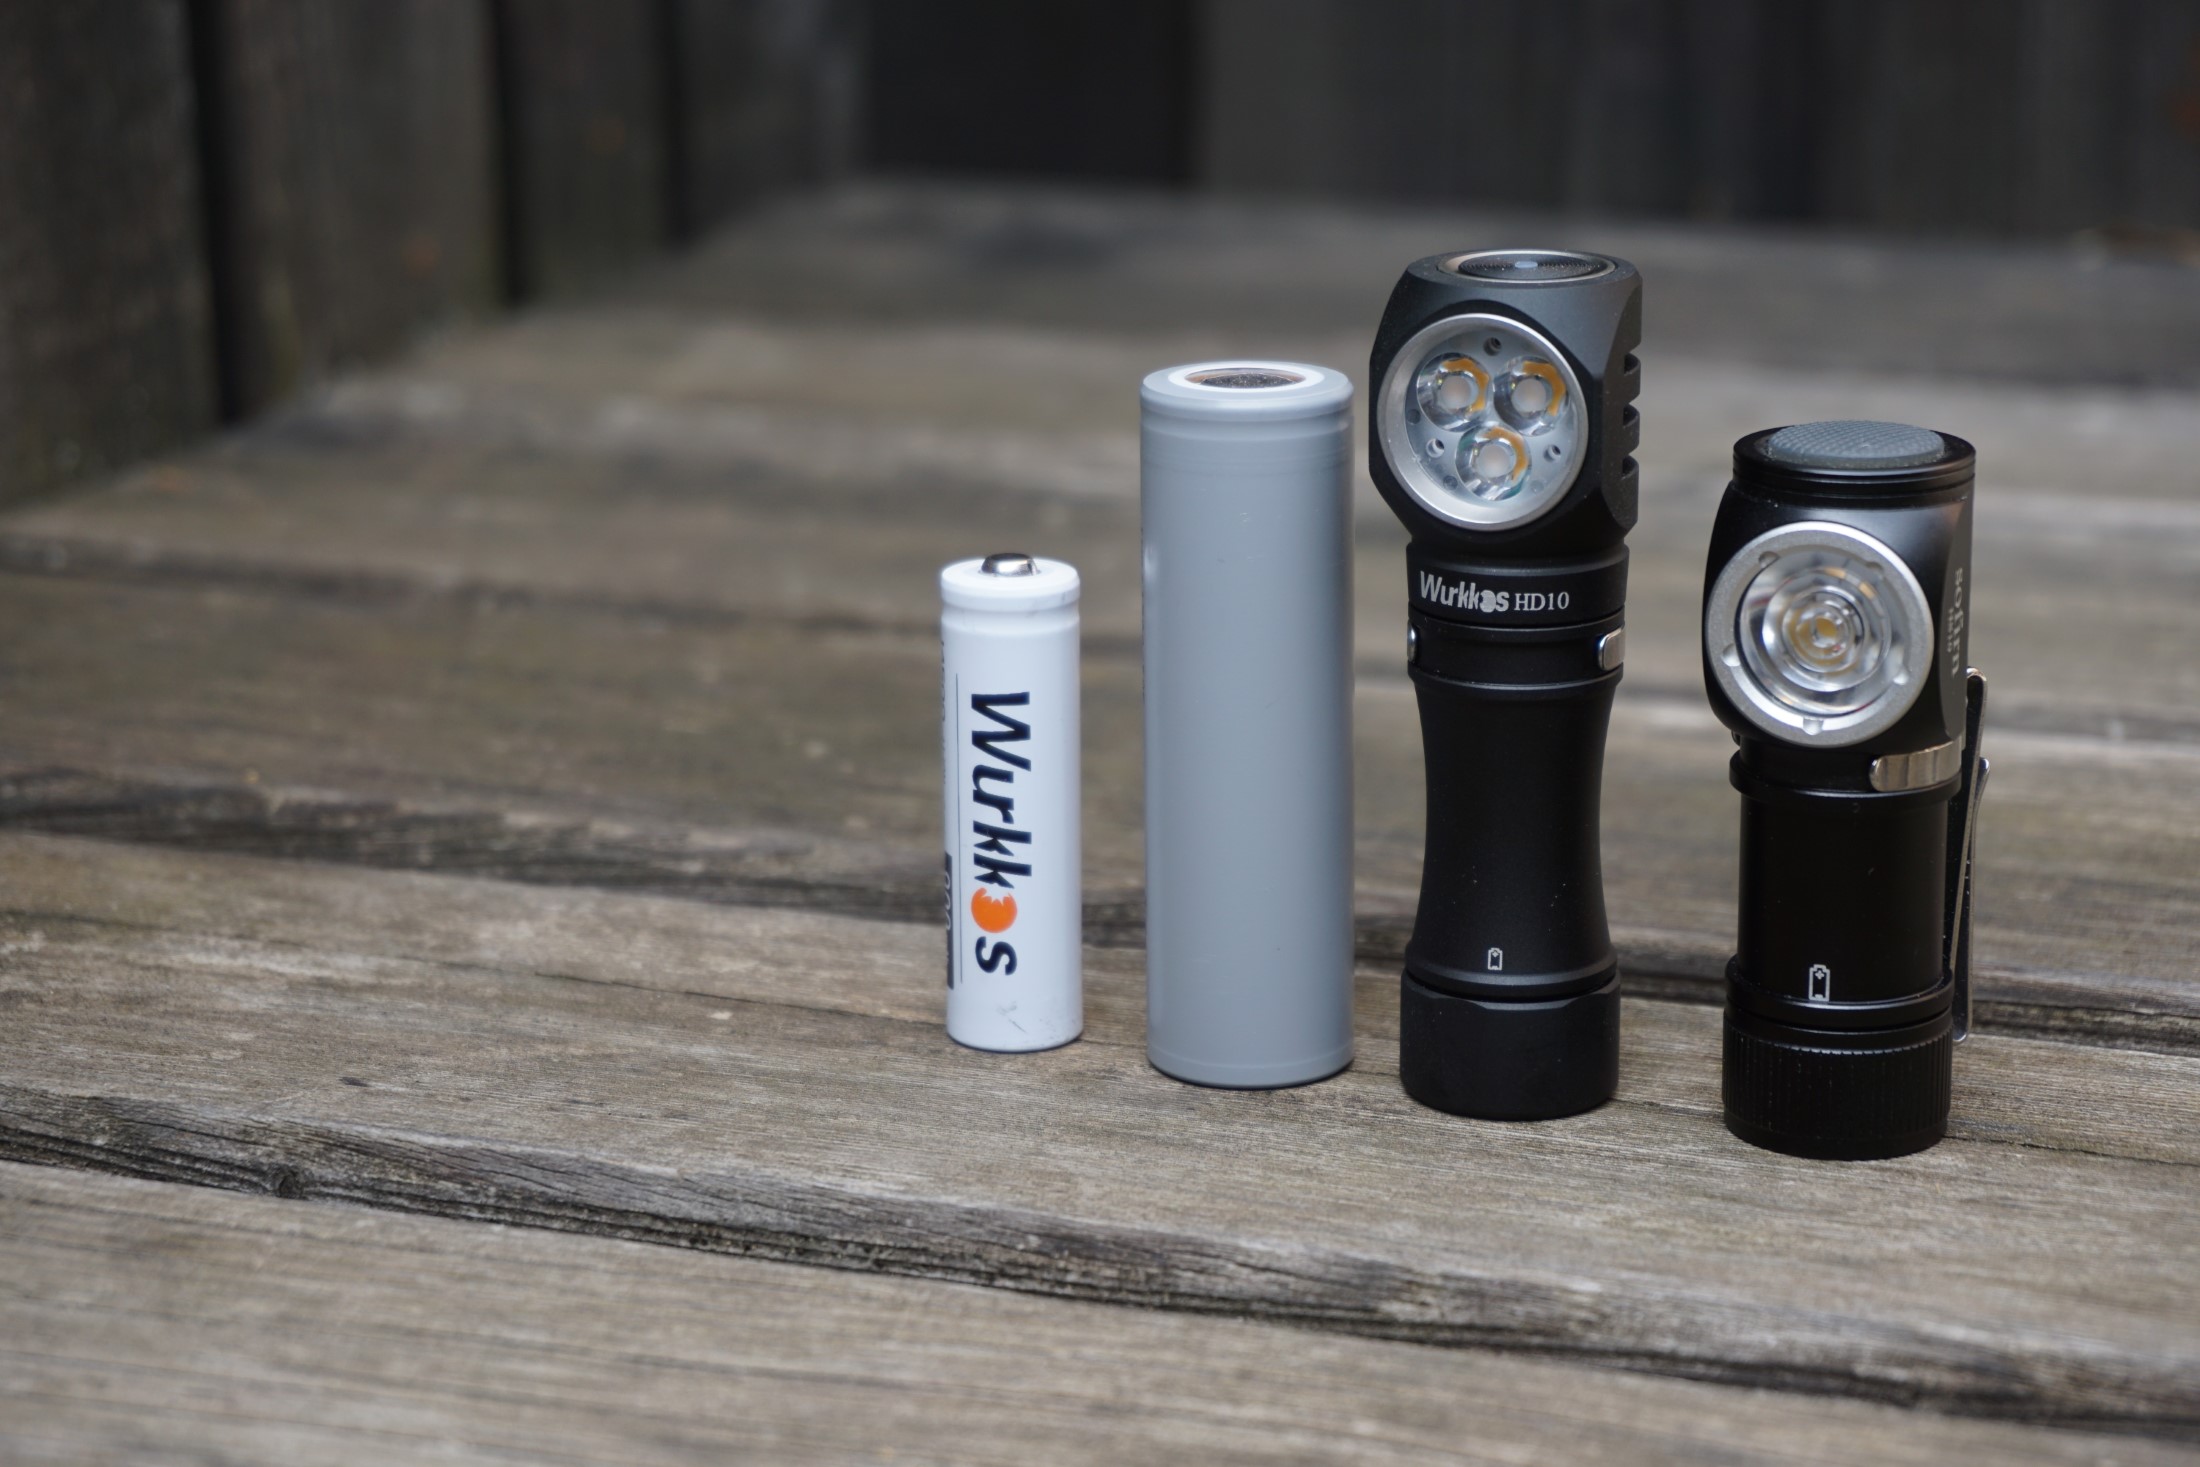
Size comparison
In order to maybe help judging the size of the light, I took some pictures next to the included 14500 cell, a 21700 cell, as well as a Sofirn HS10 (16340 90° headlamp). While the body of the HD10 is noticeably slimmer, the heads are about the same size. The metal button is a lot nicer to use in my opinion, but this may be preference.
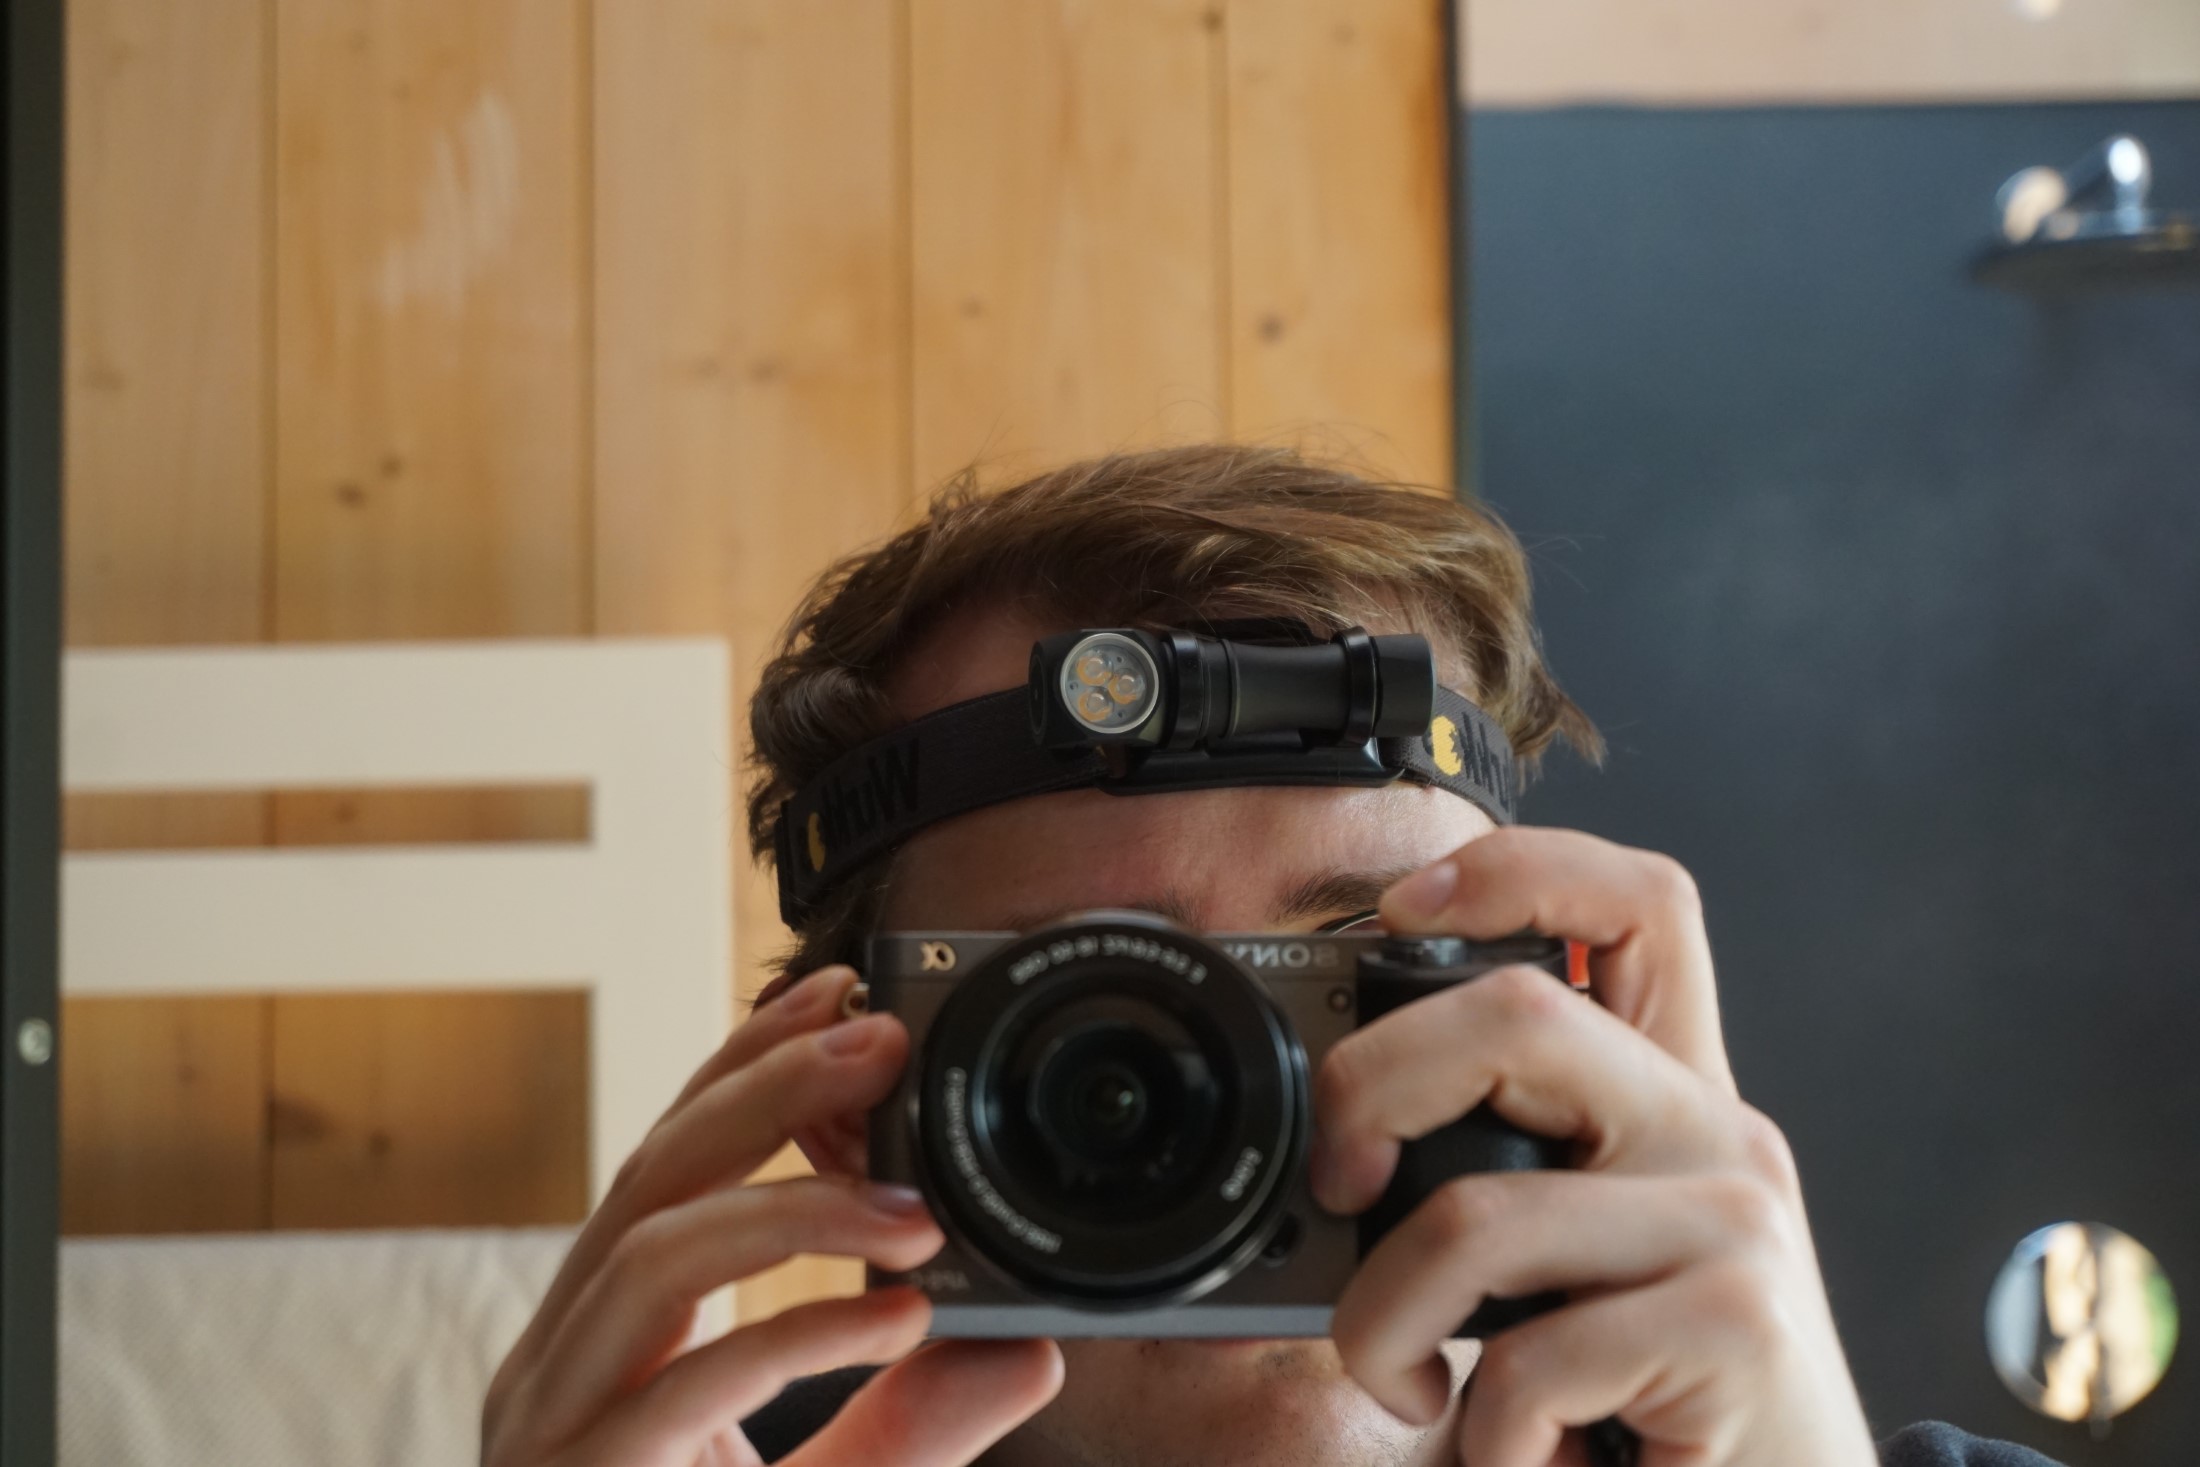
The headband
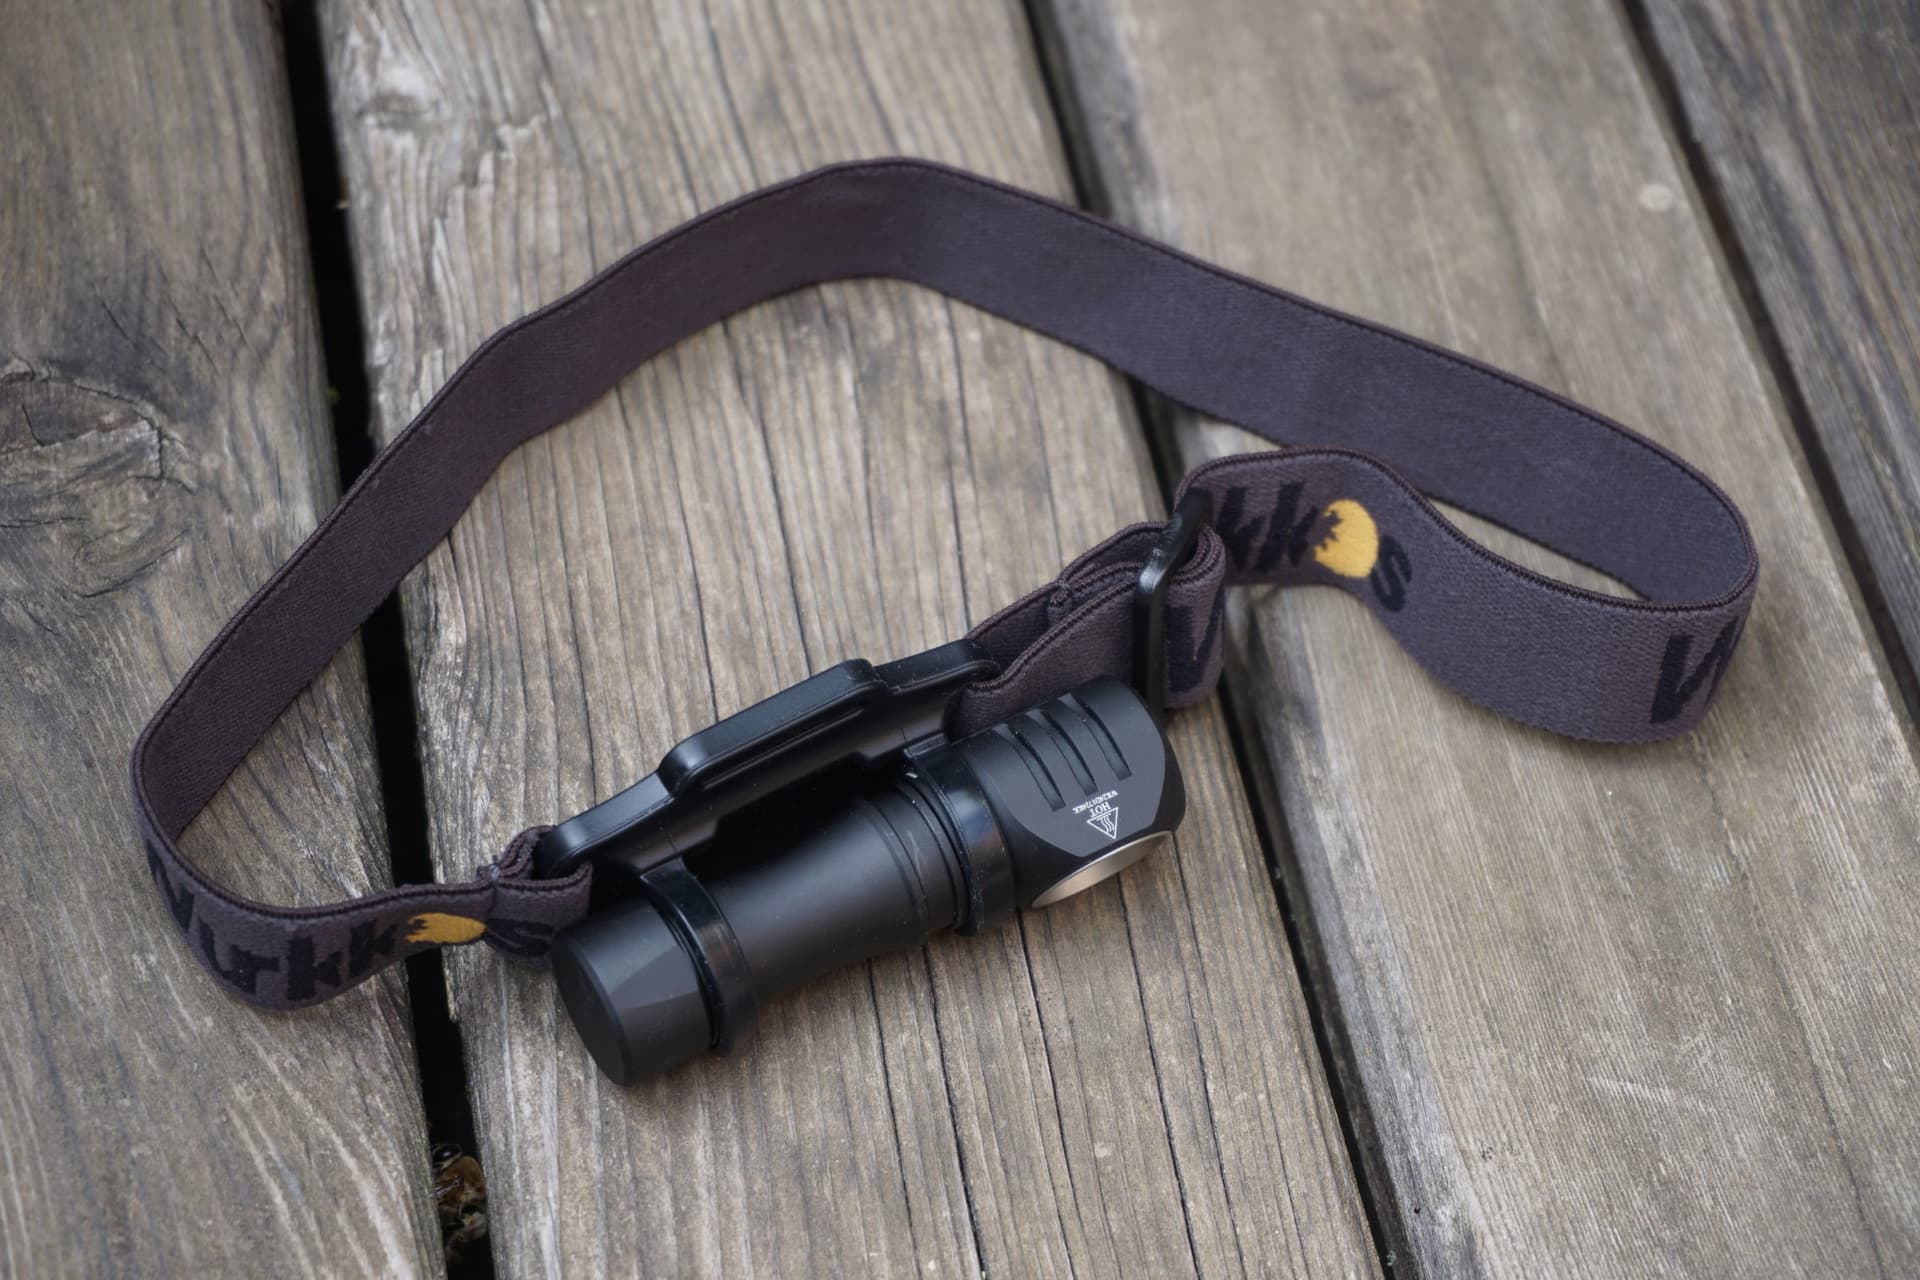
The headband is a pretty classic design, similar to the ones included by other brands. It is easy to adjust in its length, and should fit about every head size out there just fine. The fabric feels like good quality. What I do not like about it is the fact that the rubber part is not covered by the band (like most other brands do), and instead the rubber touches your skin all the time - this is okay for short wearing, but can get annoying quickly.
In addition, the light uses the “2 silicone loops” design, where it can be quite finnicky to get the light into the loops. I do not think it is possible to get the light into the headband without removing the clip, unless you stretch the loops further and keep the clip forward-facing.
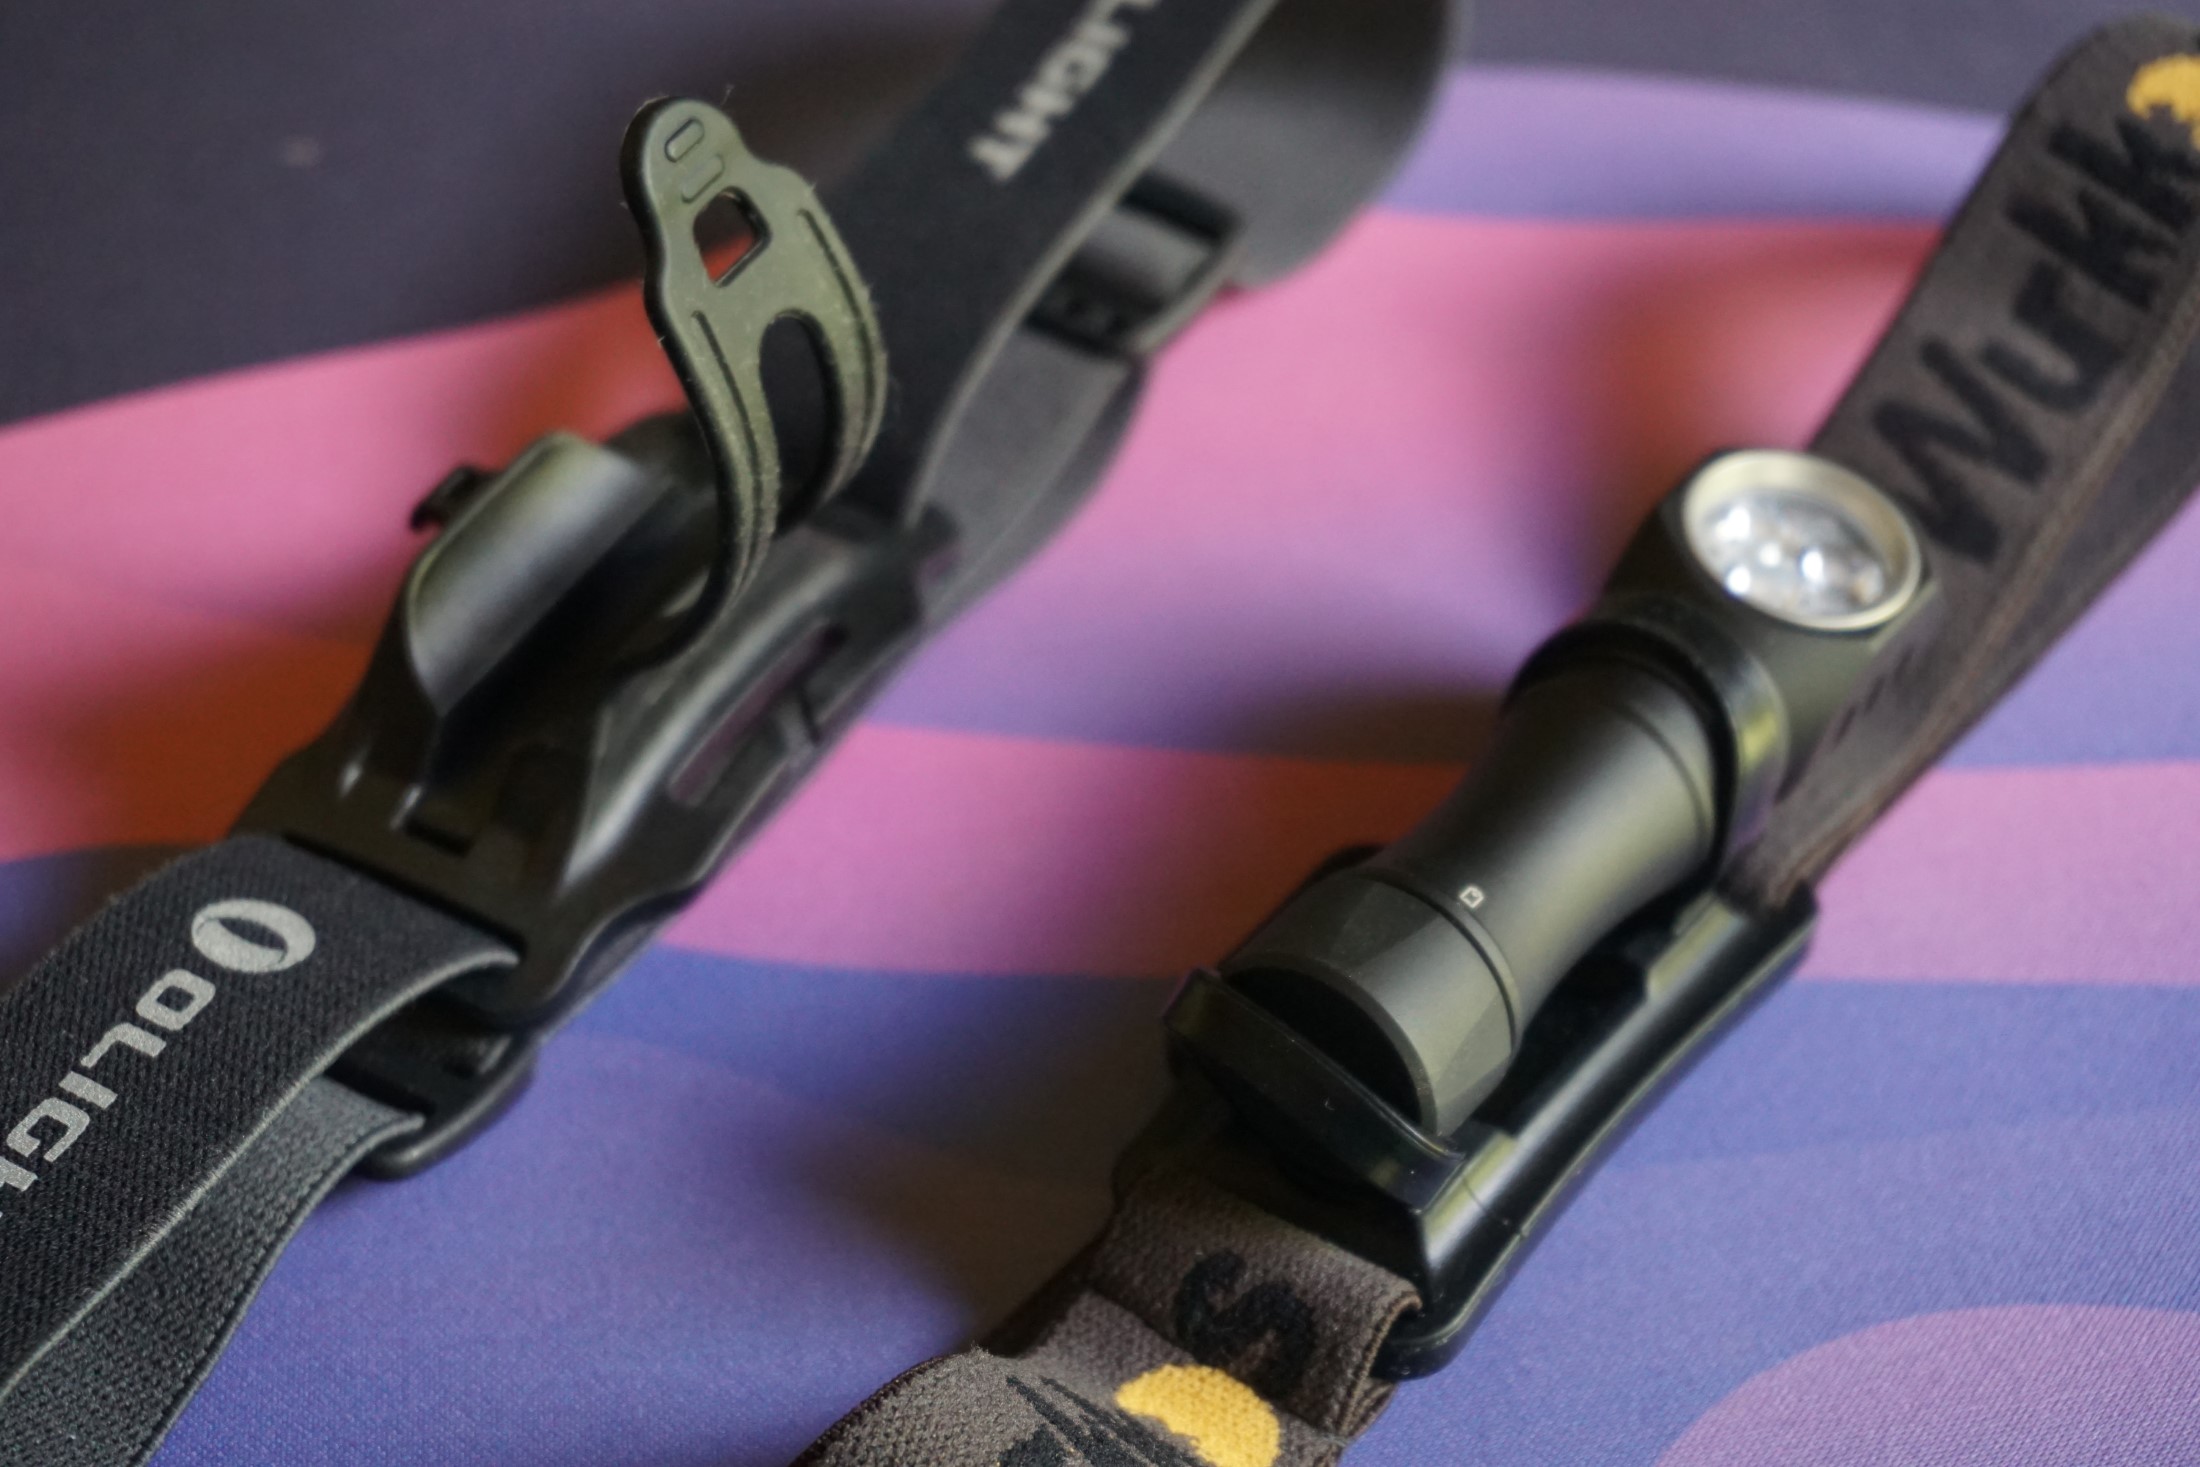
I prefer the approach of Olight for the Perun Mini 2 headband, where you have a rubber flap that gets closed over the light. Luckily the HD10 fits the Perun Mini 2 headband just fine (although you have to either remove the clip, or turn it forward facing).
UI
Honestly, not much to say here. This light uses a standard Anduril 2.0 (version check: 2022-07-25-0715) and I see no point in repeating how to use Anduril, when others did a great job already at creating visual diagrams and Toykeeper made a nice official guide. Most of you will be acquainted with Anduril anyway and know what to expect.
Firmware/hardware bugs
This is a point I did not expect to bring up for an Anduril light. In my testing, more than once the light ended up in a weird state where the aux lights were on, but no button presses allowed me to turn on the main emitters, and no amount of presses got me into any kind of setup or changed anything. With lots of button presses I got an occasional short light-up out of the main emitters, or shortly turned off the AUX LEDs. This mainly seems to happen when the power is cut for a short moment while the light is on, but sometimes also happened randomly when removing/replacing the battery. Sometimes it recovered after a while, sometimes I had to factory reset the light and set it up again to get it back to working.
I do not know what exactly is going on, but this seems to affect multiple/all testers. Apparently this issue is not limited to this light, one user reported Lumintop FWAA being affected by very similar behavior in the past: 【Wurkkos HD10 update】HD10 update flashing pad and orange is on the way - #754 by andrx
My guess is, it is some combination of certain hardware design, that can lead to undefined behavior in Anduril. My feeling is, it has something to do with battery undervoltage protection, since it always happens when removing and adding battery/power supply.
At least one light also broke entirely and refuses to turn on even after an attempted reset: 【Wurkkos HD10 update】HD10 update flashing pad and orange is on the way - #758 by wolfgirl42
@Wurkkos_Terry this calls for some investigating the issues, and maybe make a new hardware revision before the final launch. If so many of only 10 review units already display erratic behavior, the amount of trouble a larger production batch would cause is probably very high.
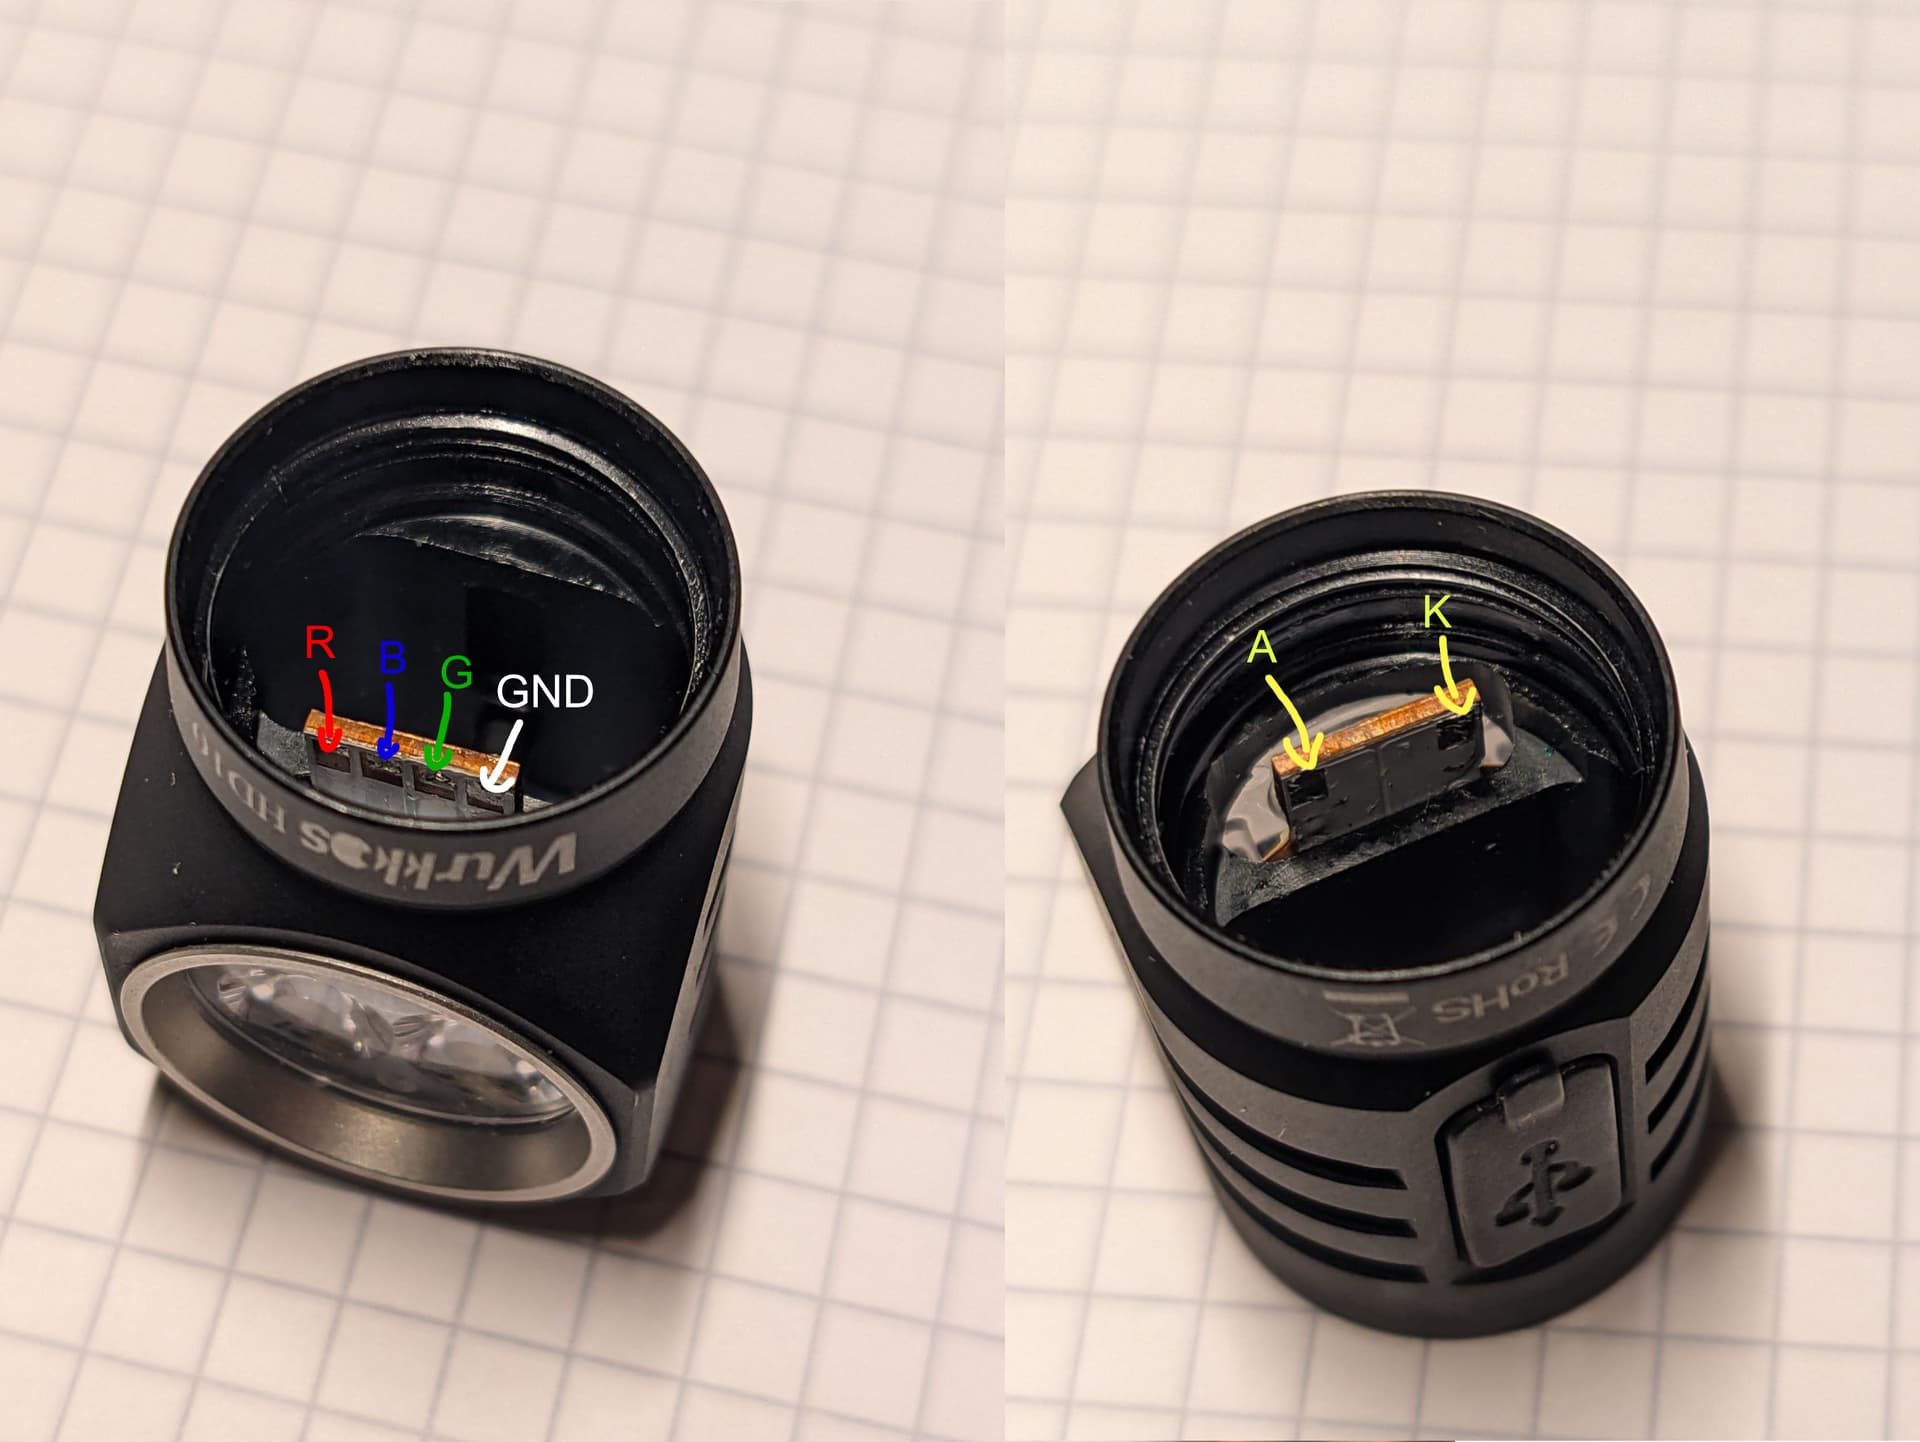
AUX LEDs
As I already mentioned, the light has 6 RGB AUX LEDs. They are equidistantly spaced around the outline of the TIR. Due to suboptimal choice of current limiting resistors they can be quite different in brightness (especially in the lower brightness mode), and mixed colors rarely are the color they should be - red is very dim, what leads to “orange/yellow” being more of a slightly lighter green, and “white” being more like a second teal. In the brighter mode, green and blue can be used as a moonlight replacement for night vision, while red is too dim, and not really suitable.
My current colors are battery voltage dependant (low mode) when unlocked, and red (low mode) in lockout. The low mode red is barely visible during day, but great to find the light next to your bed in the dark, while being dim enough not to be a nuisance while sleeping. In the low mode gif I forgot adding purple - sorry for that. Since both were taken with the same exposure settings, they should convey the brightness difference a little. It looks similar to how it looked to the bare eye.
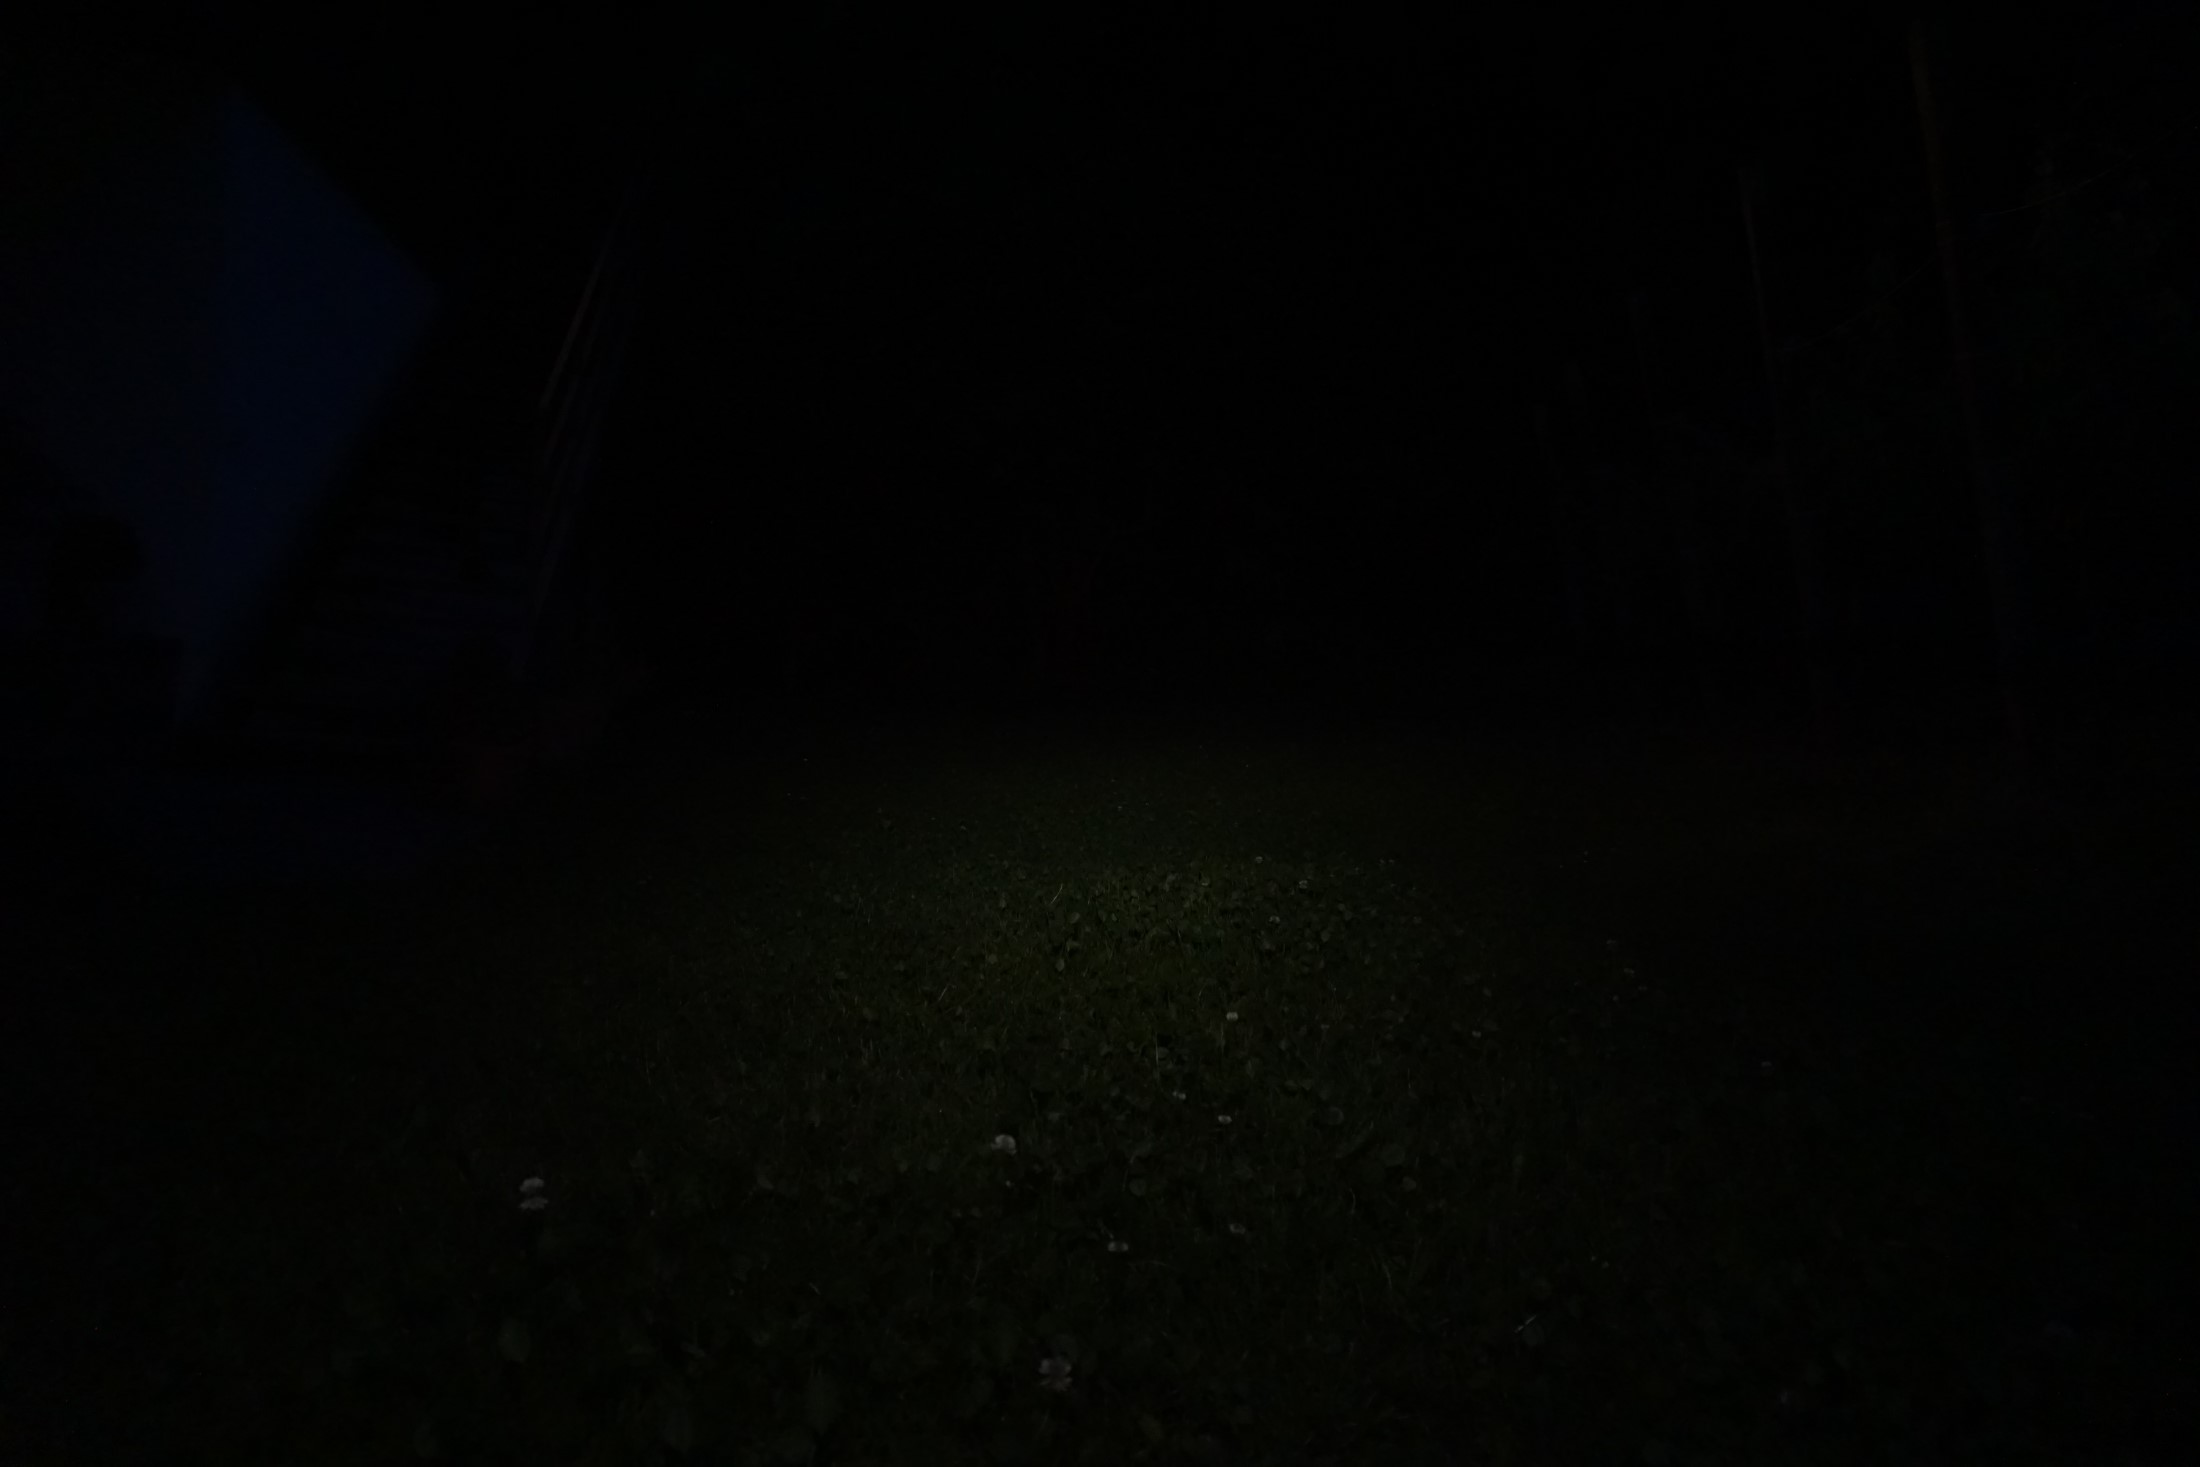
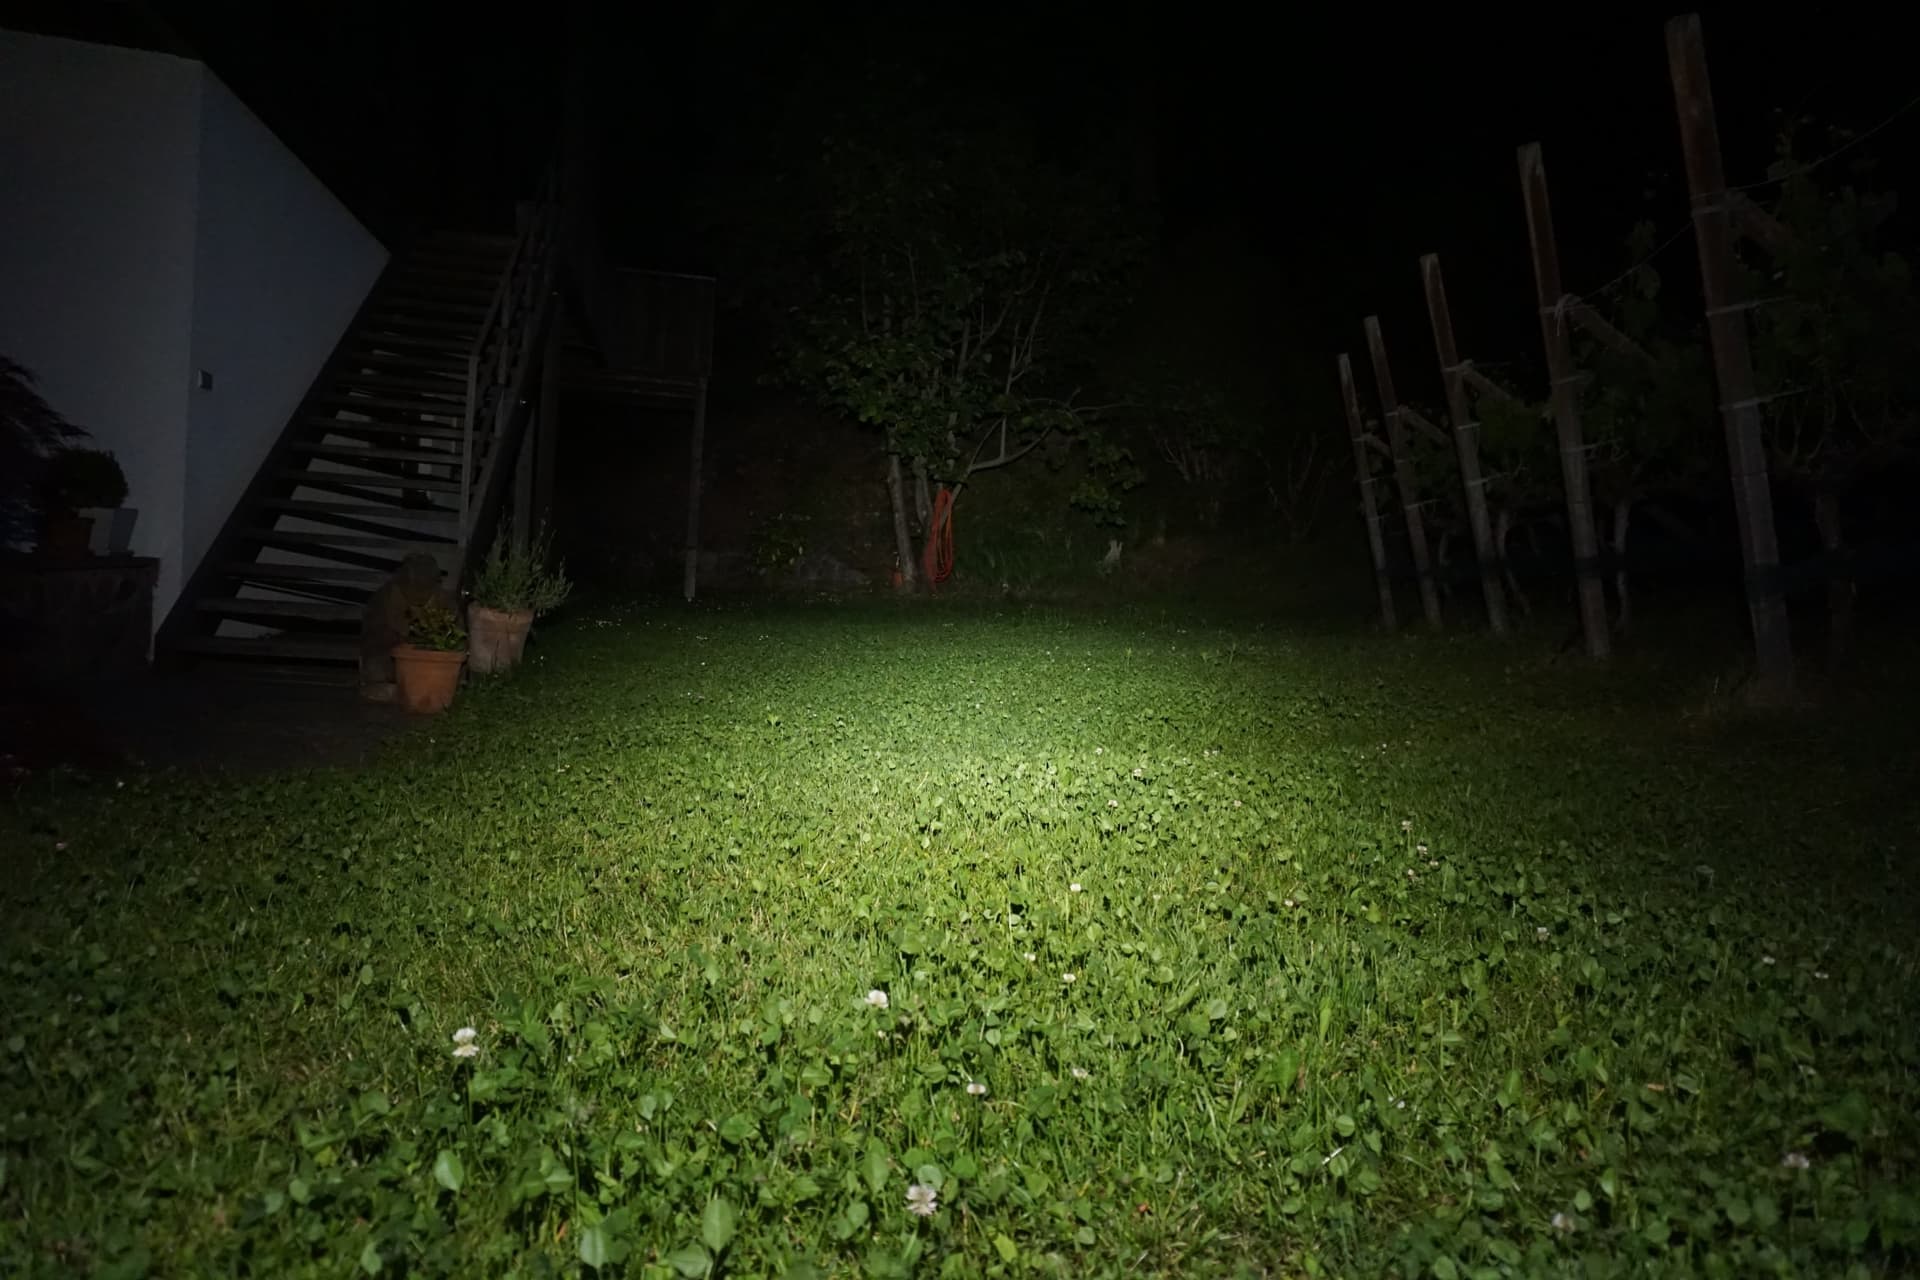
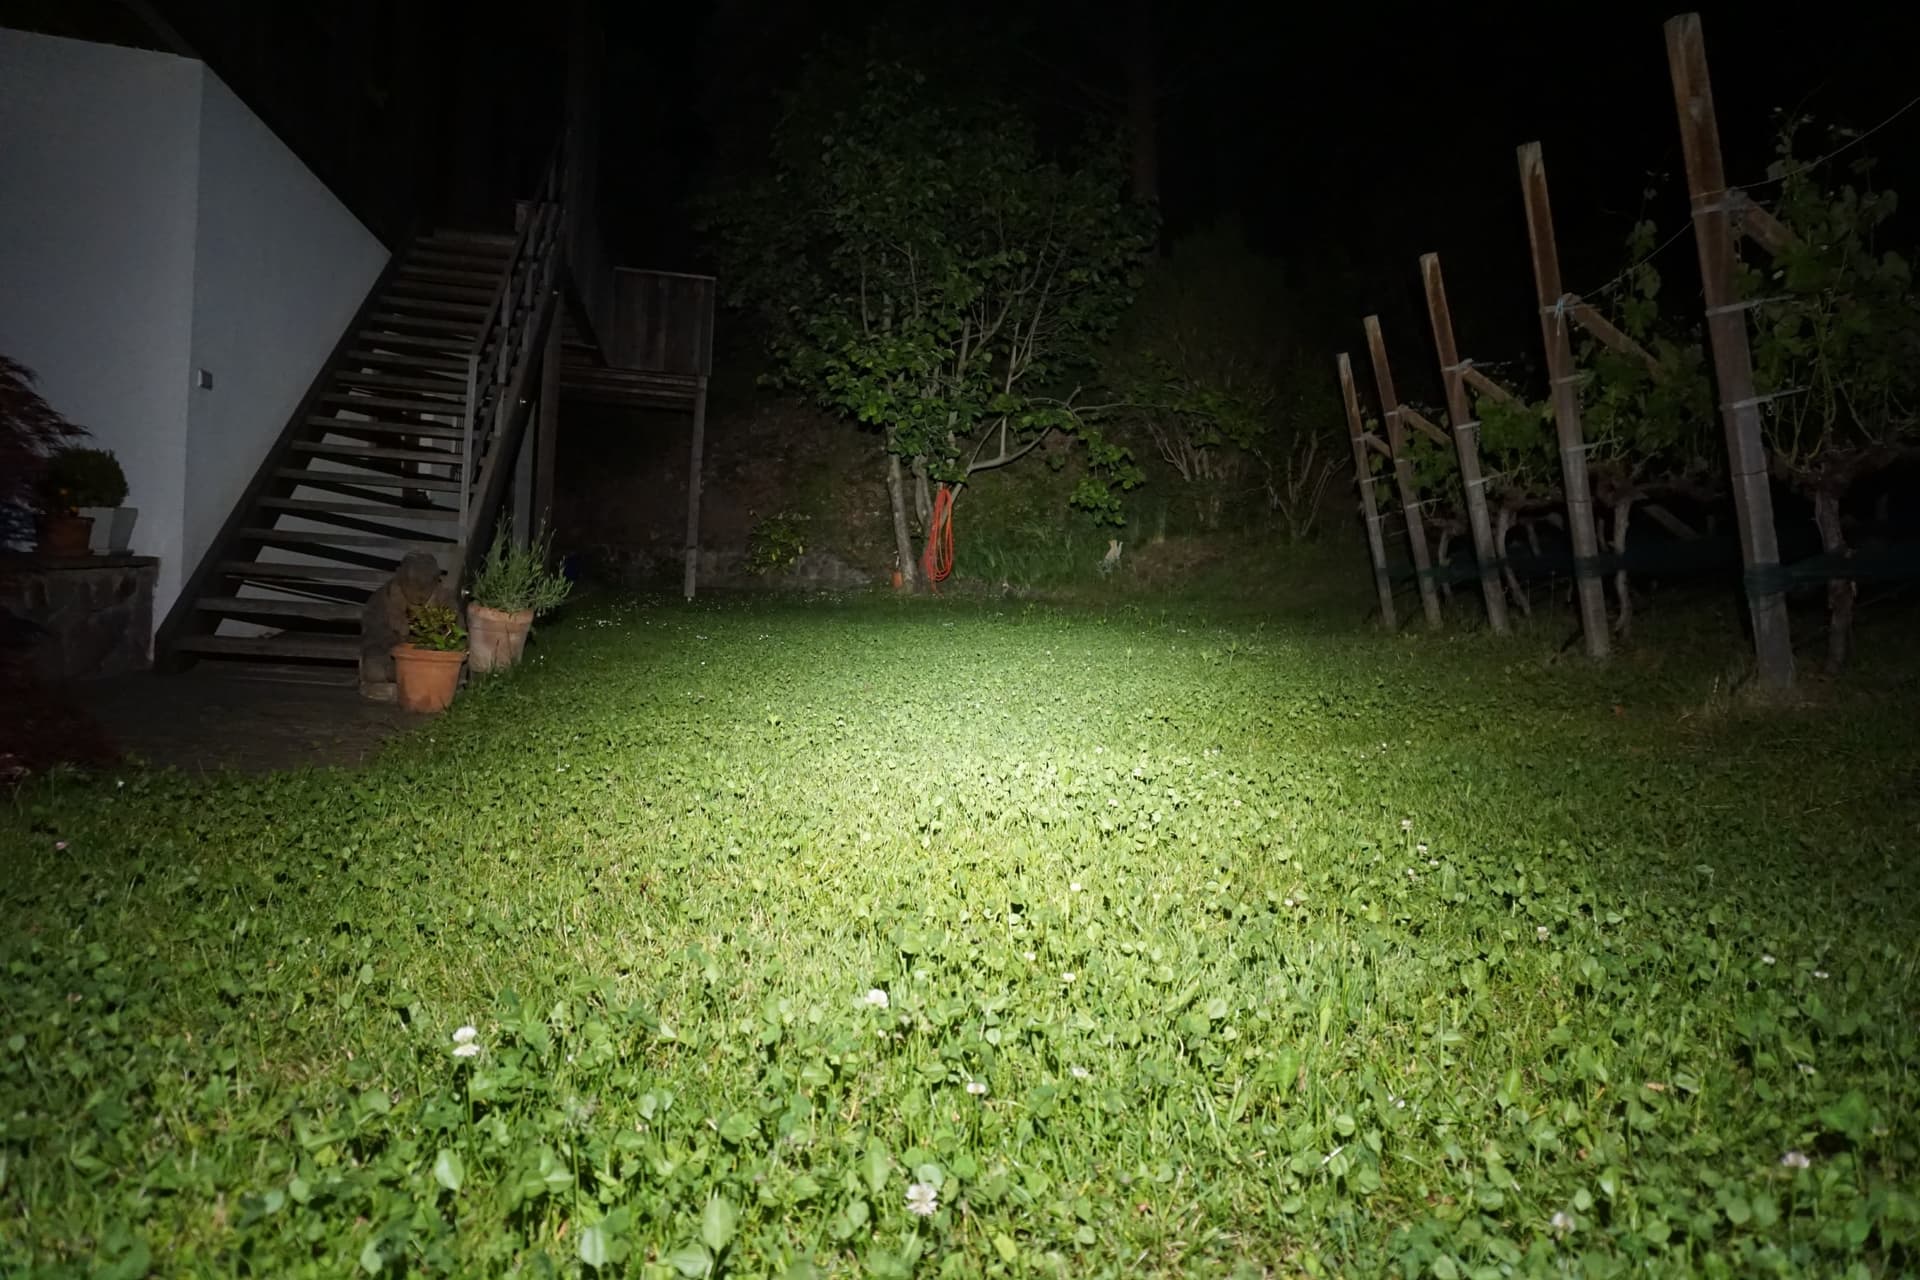
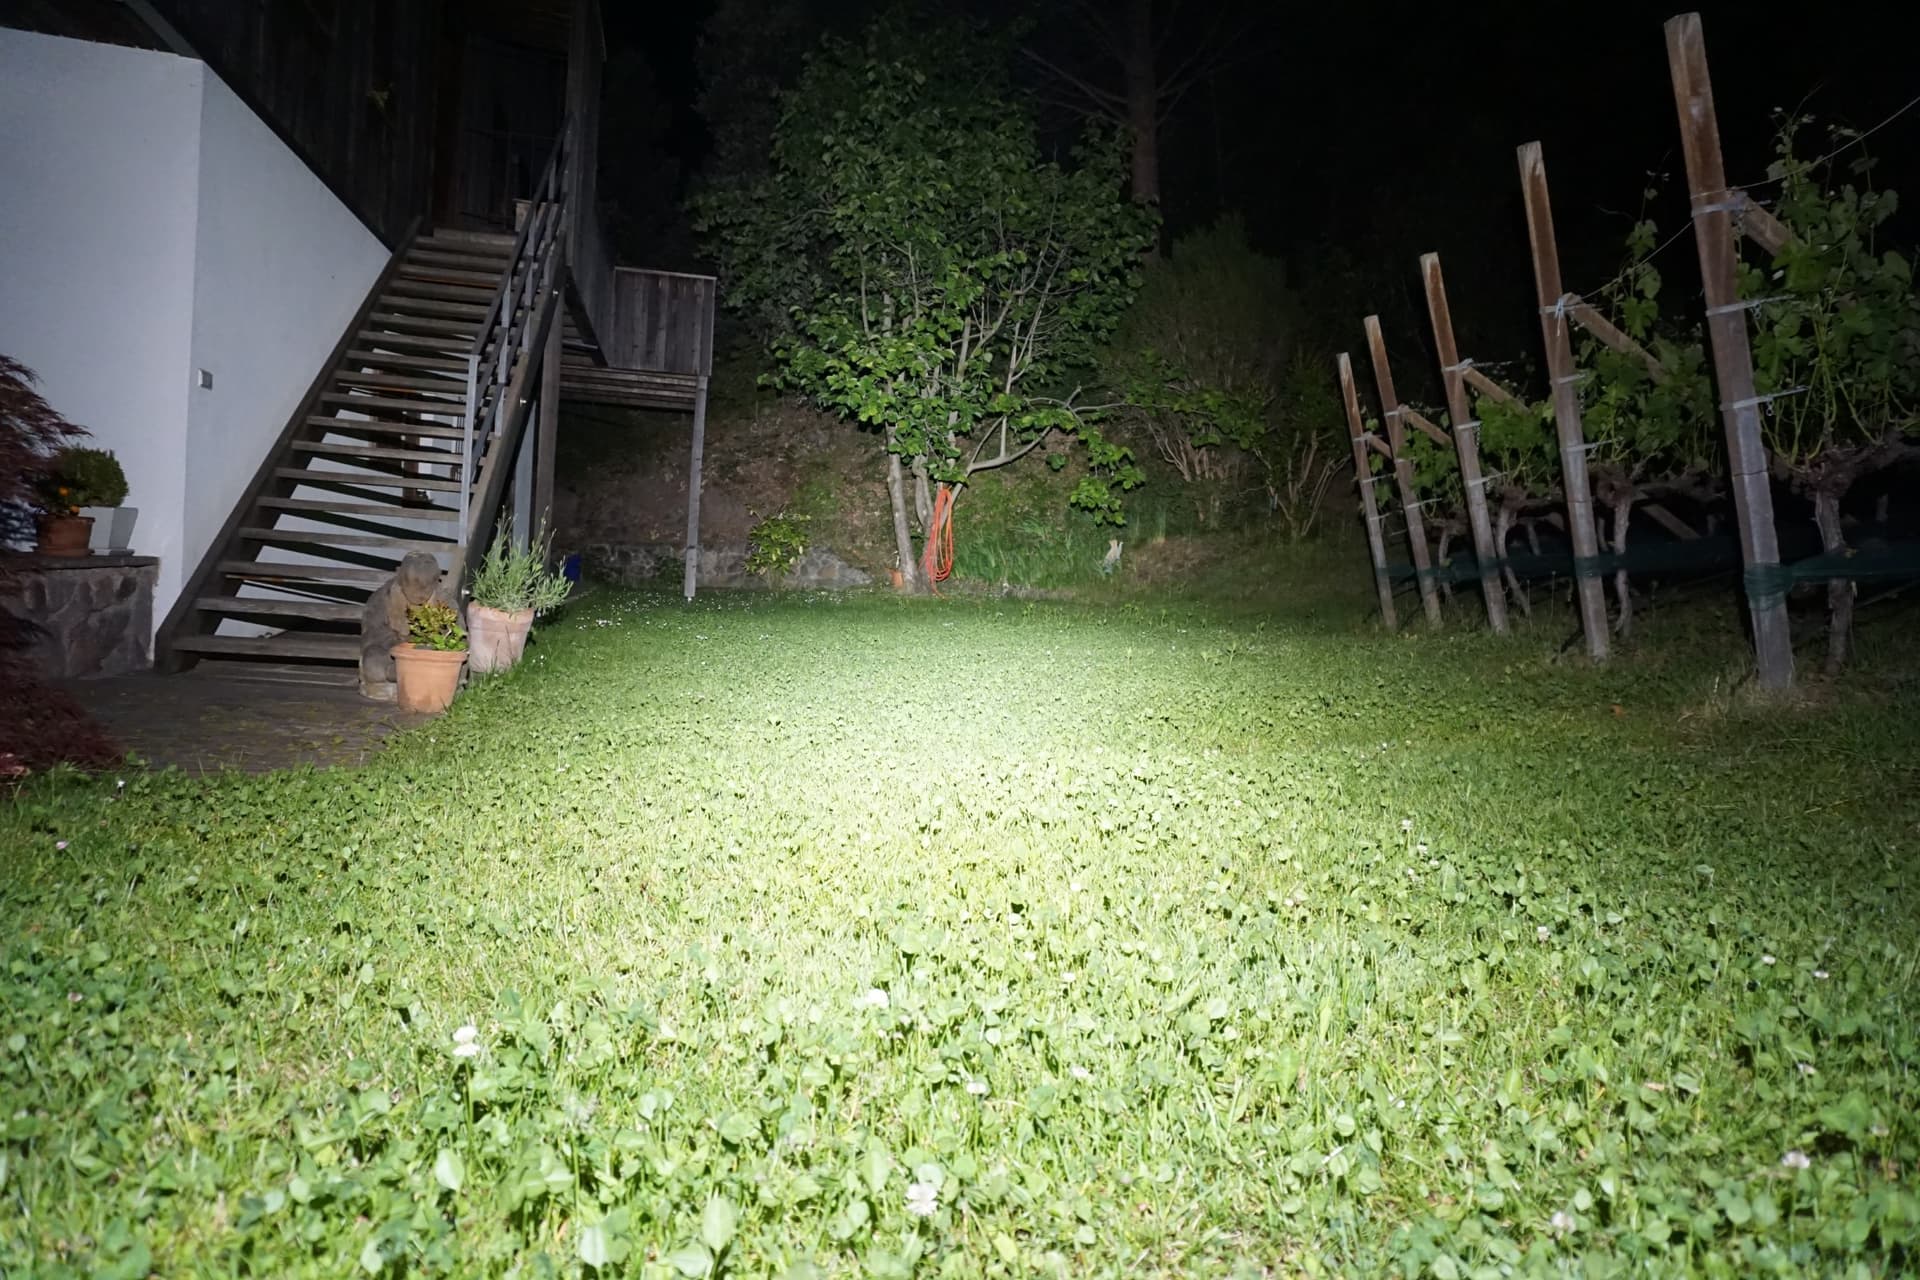
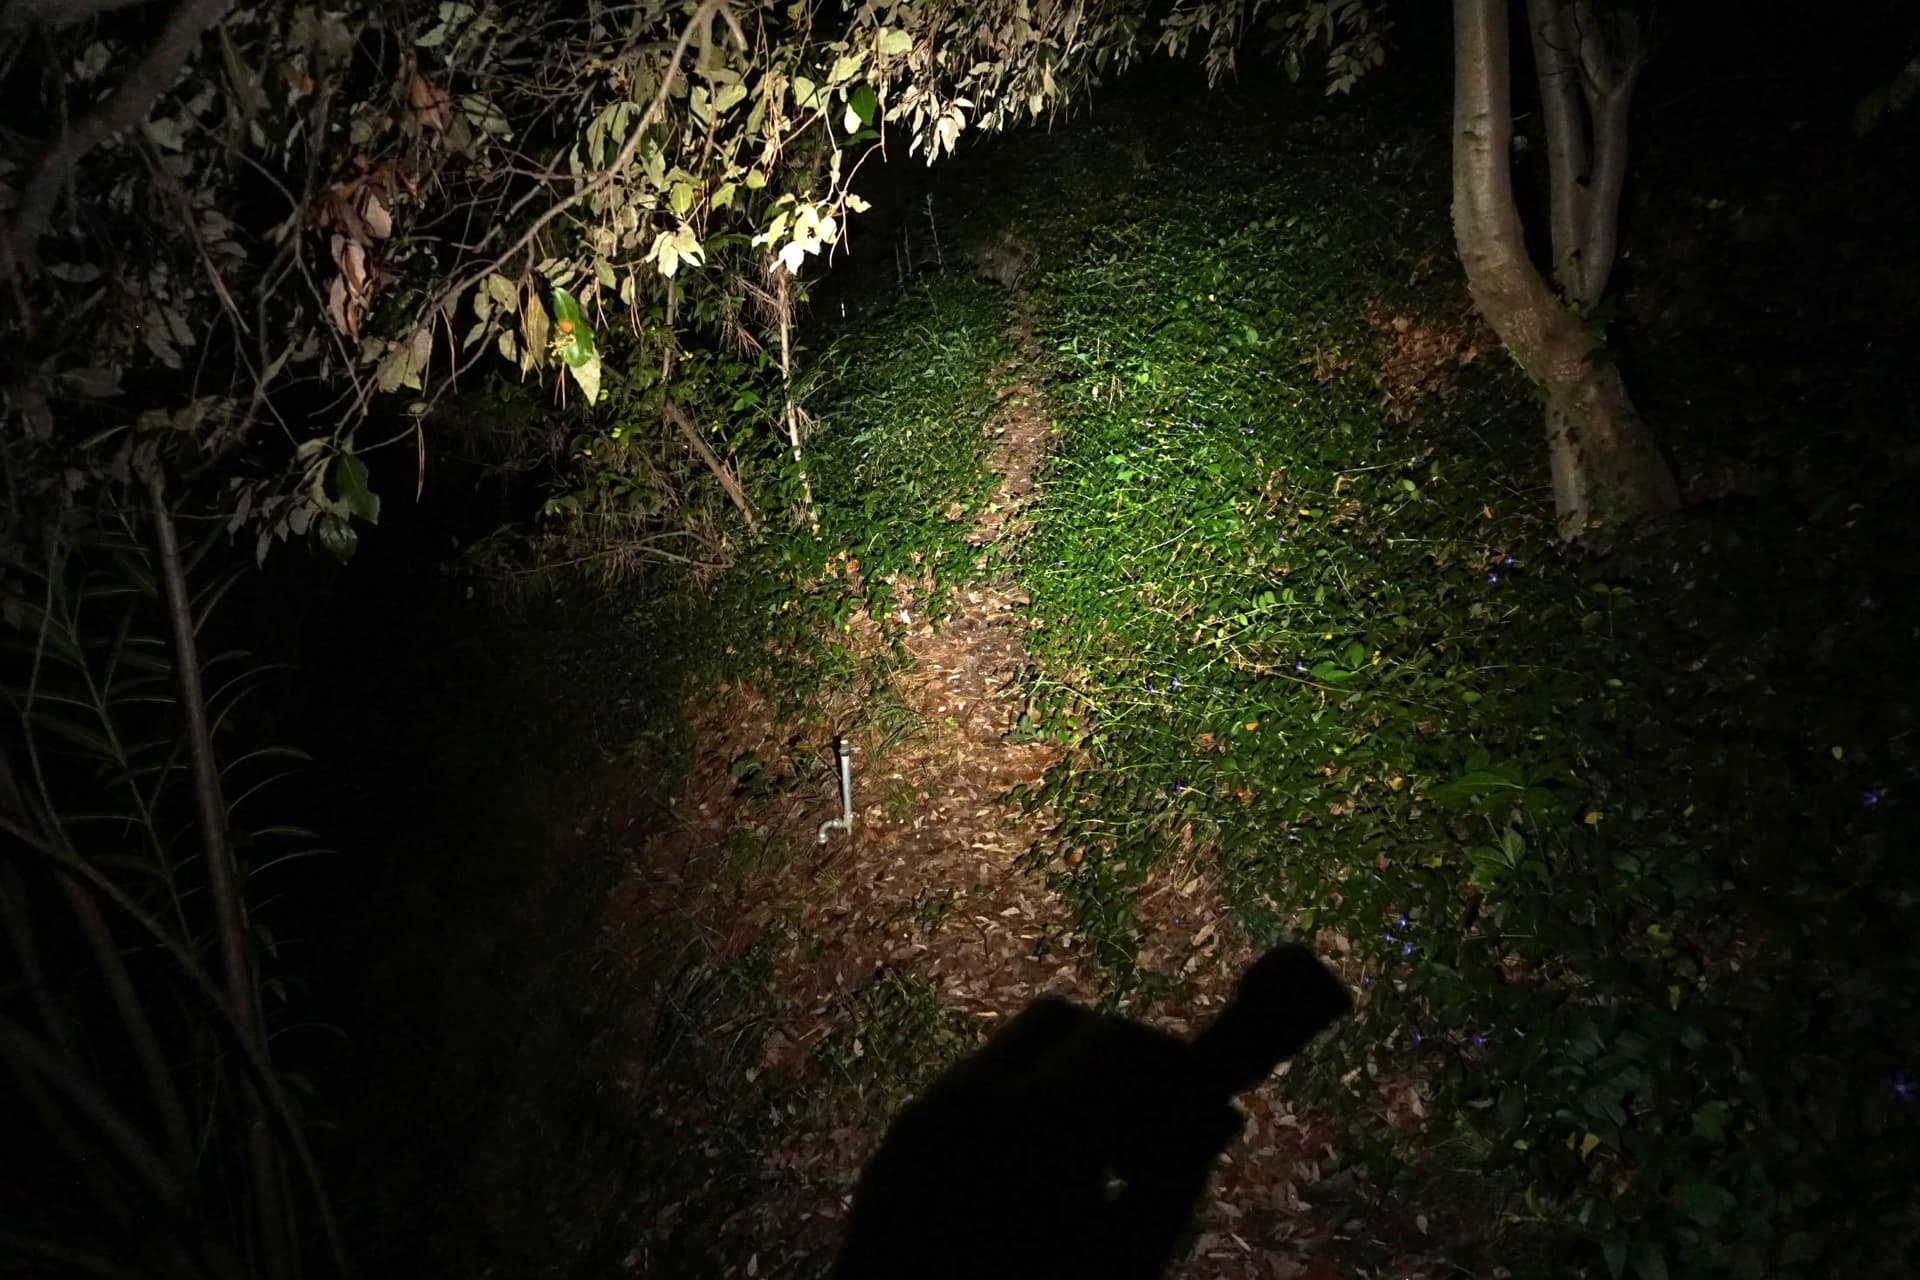
Beamshots
Beamshots are something I am simply terrible at. Sorry. Hope they will still be of some help.
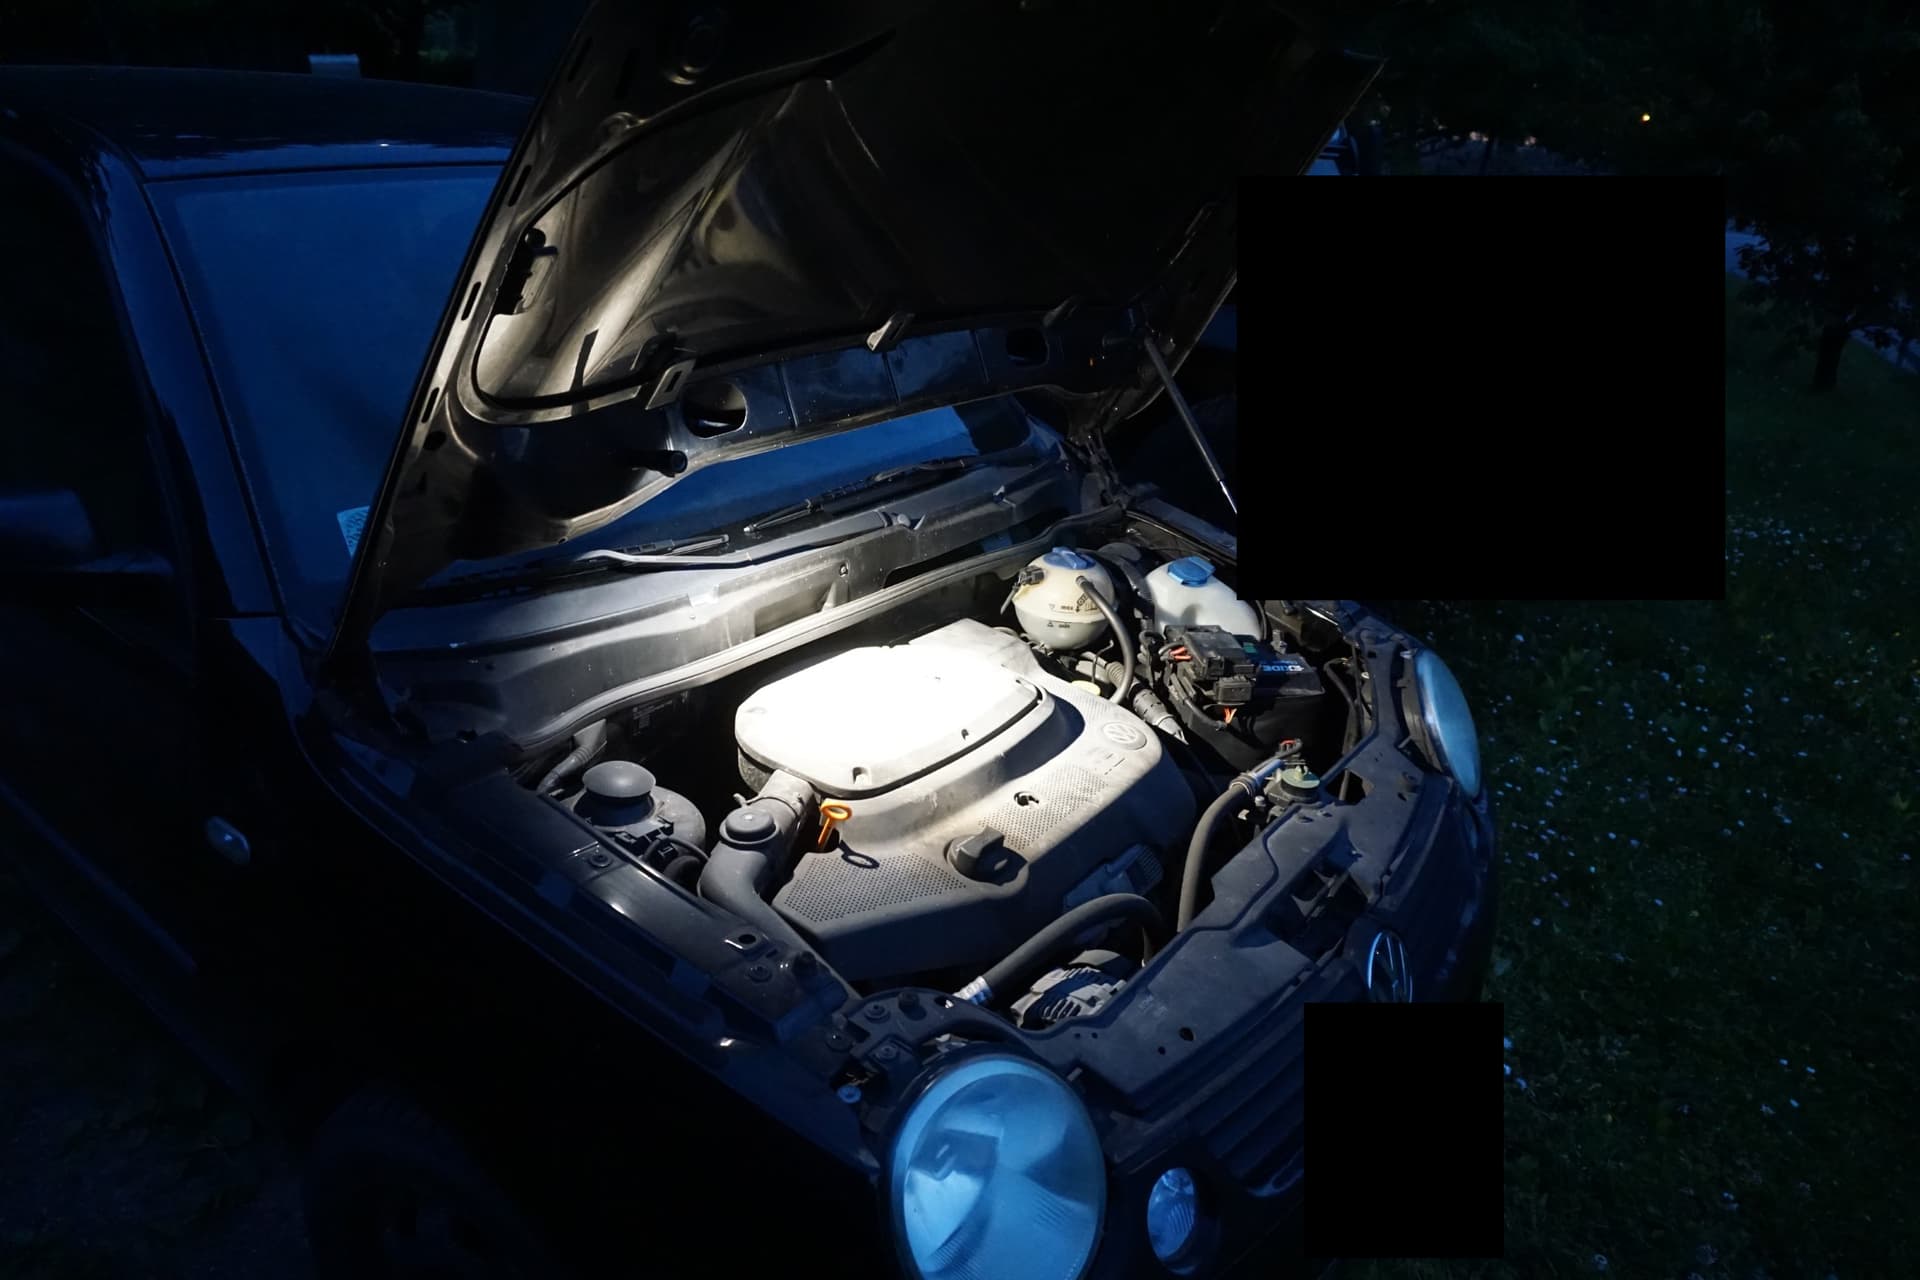
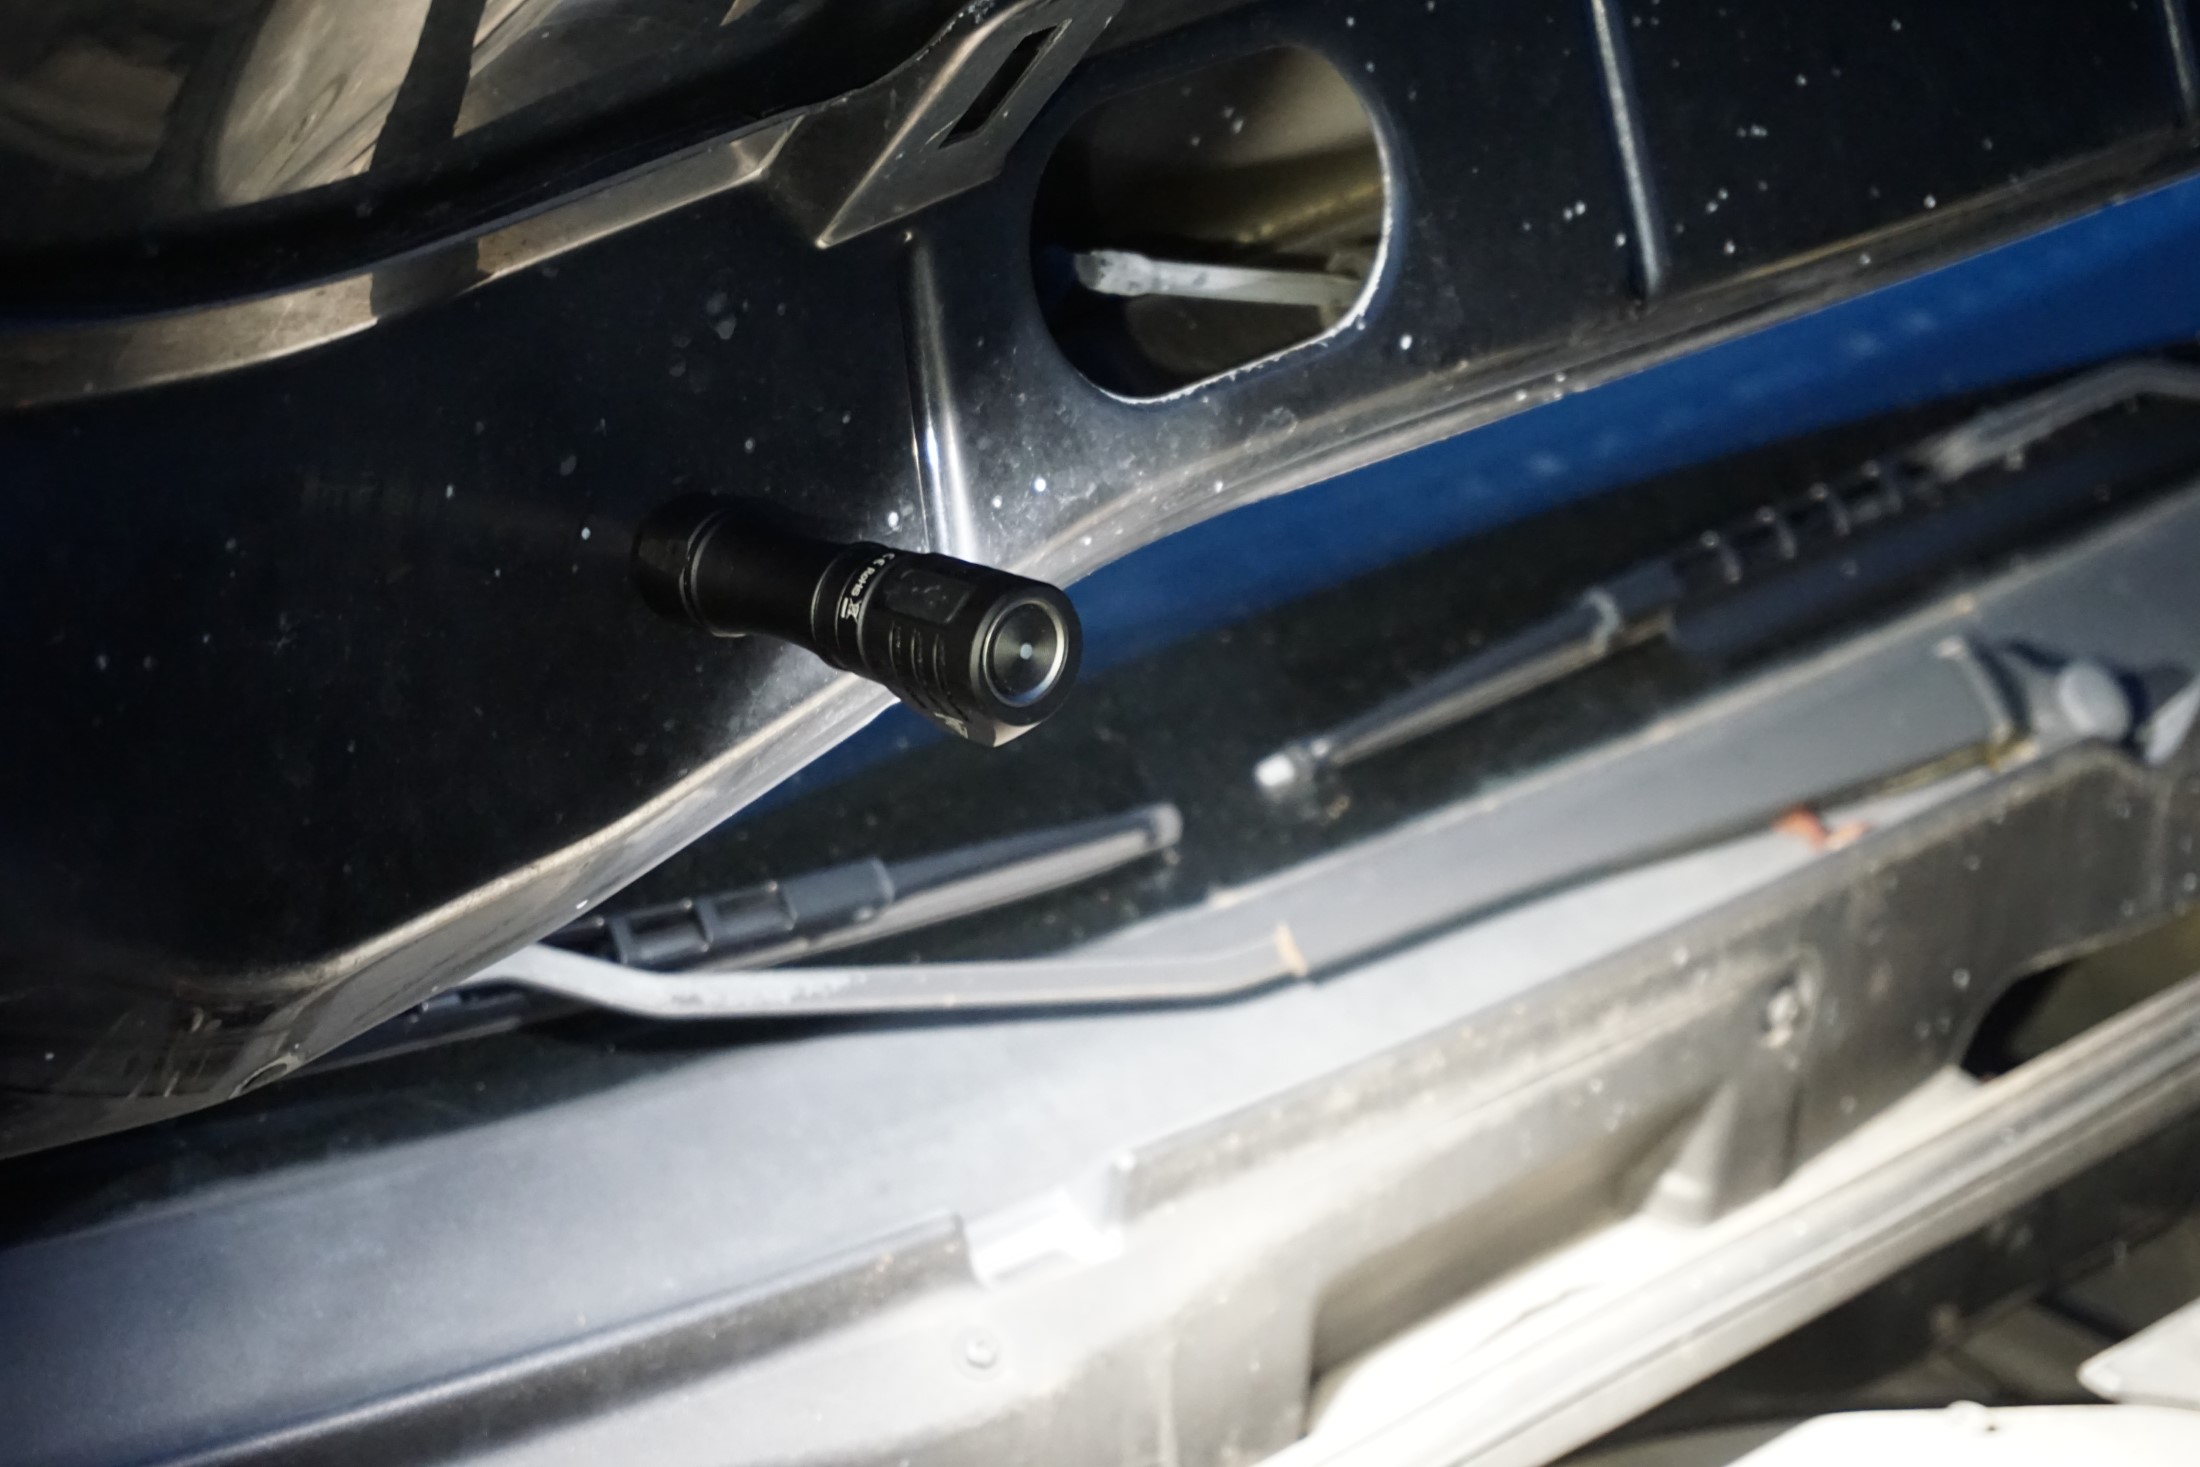
The magnetic tailcap kinda predestines this to be used as a work-light. The magnet could be a tad stronger, but it gets the job done, and sticks to any ferrous surface quite well. Useful!
For these pictures I put the light in stepped mode, and only posted the ones where you actually can see something. The last is turbo.
Sofirn HS10 turbo as a comparison:
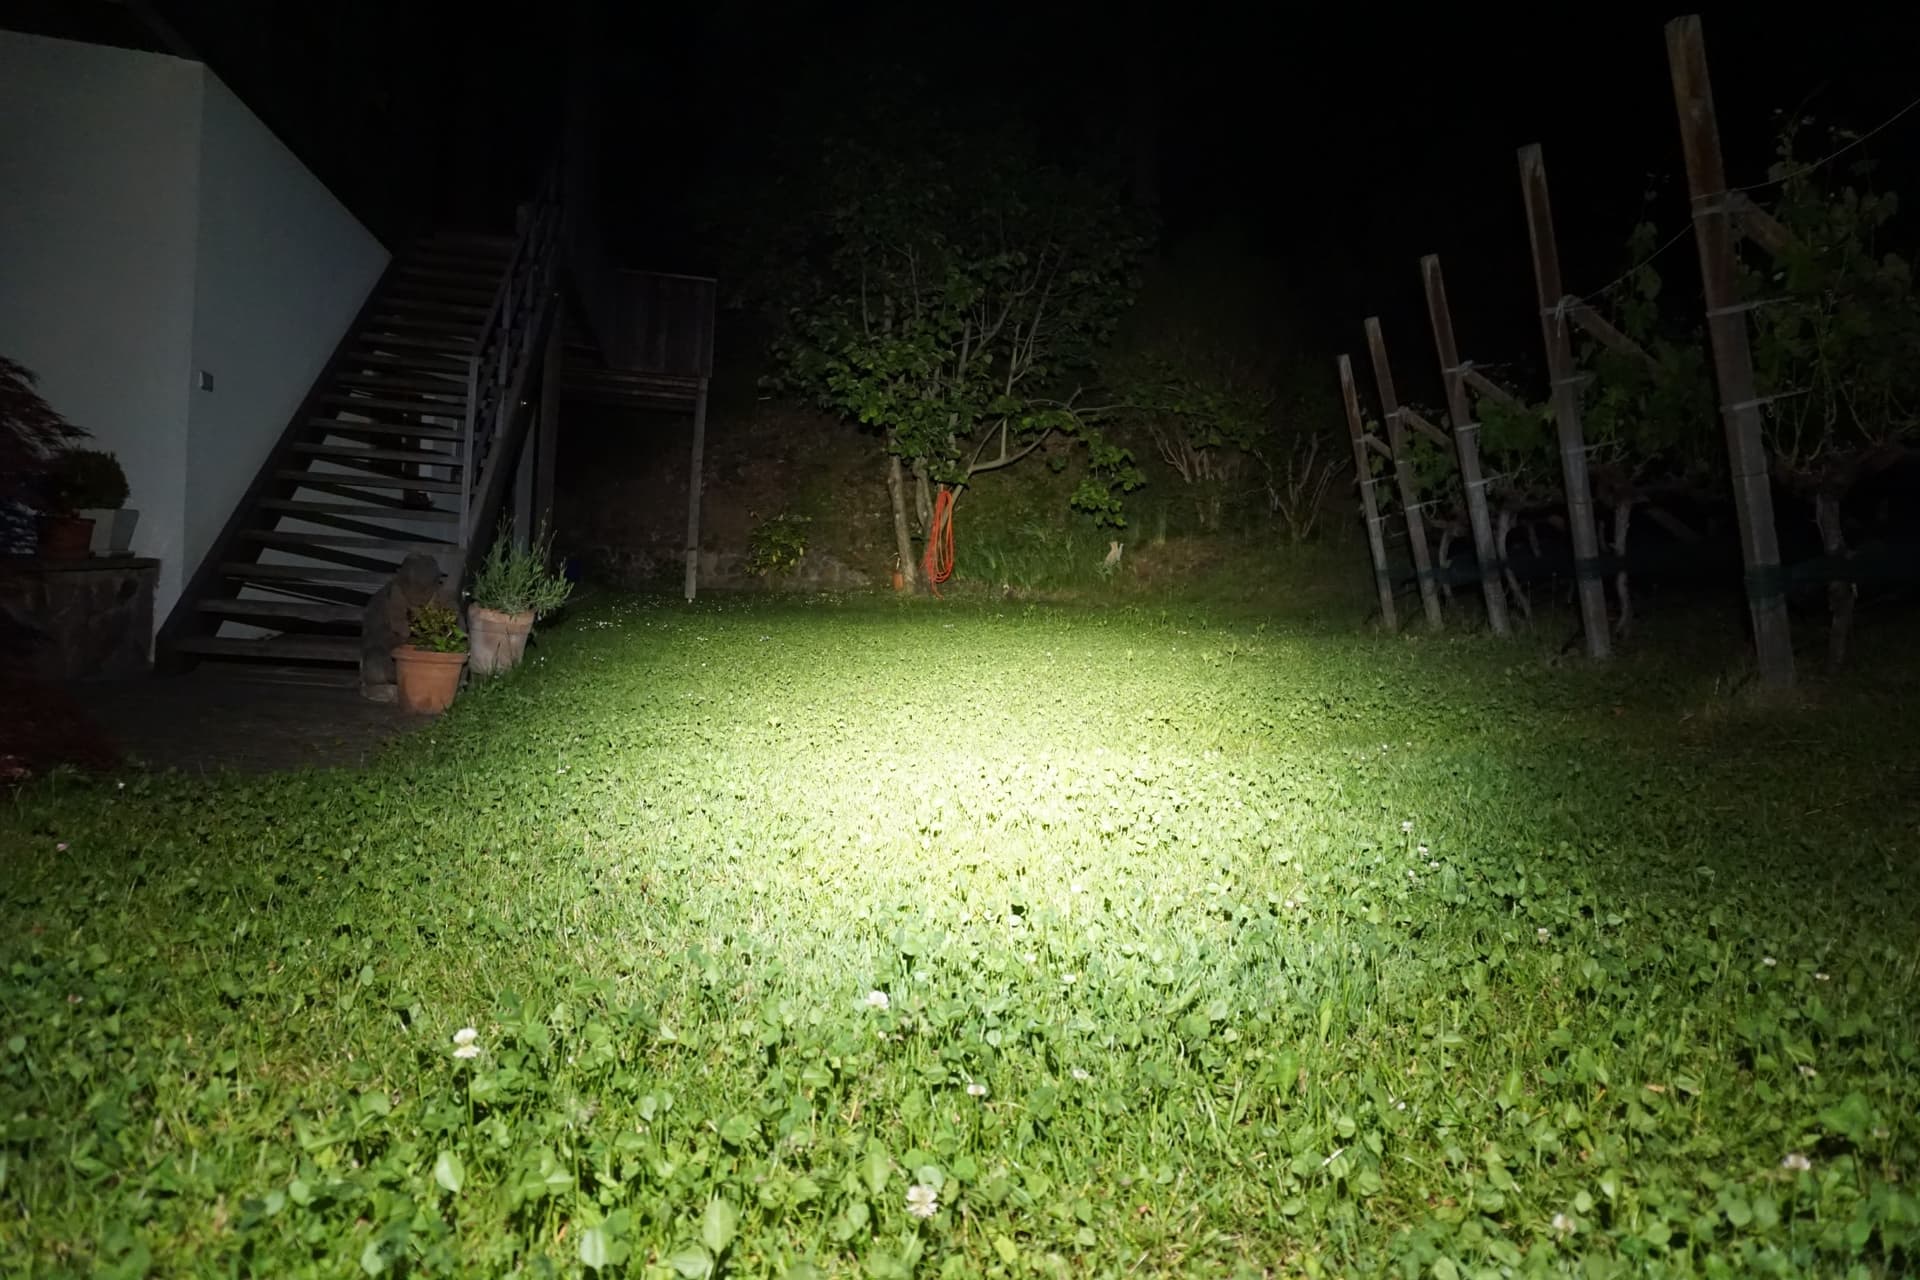
The beam profile is nice and balanced, a good choice for a medium-powered headlamp. If it were more narrow it would be annoying indoors or as a work-light, much more floody and it would be too dim for outdoor use. Wurkkos nailed the sweet spot.
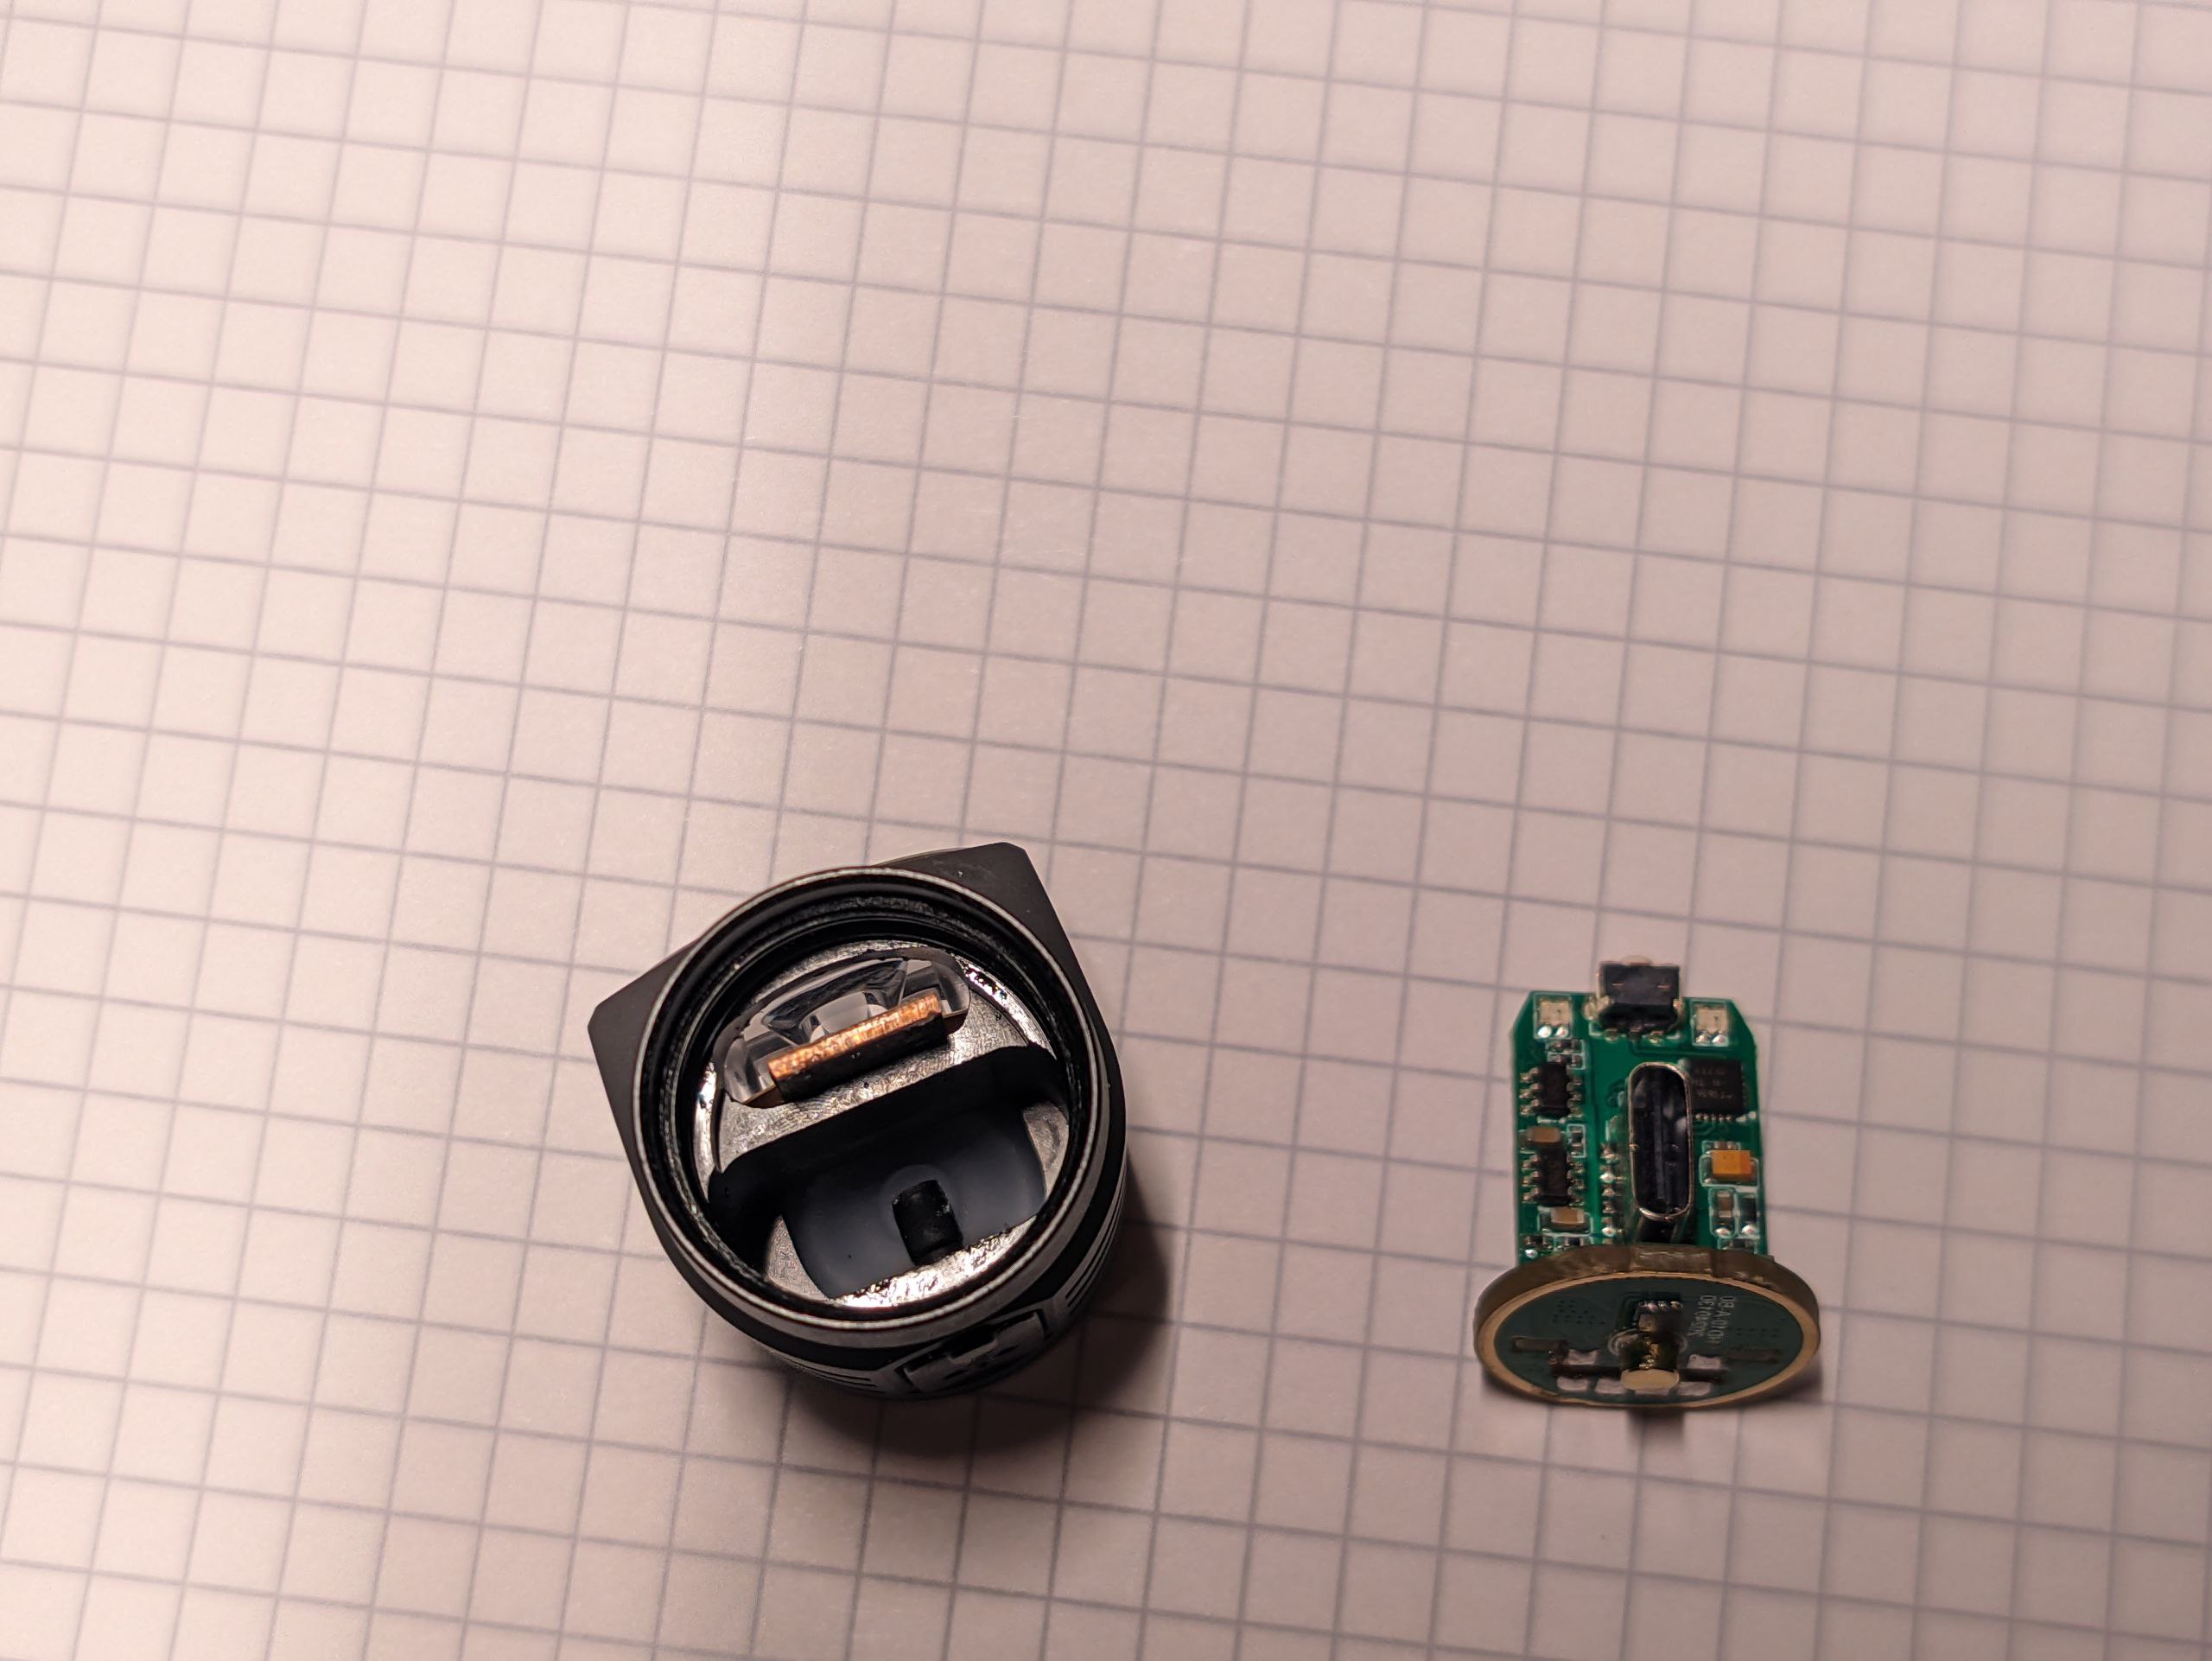
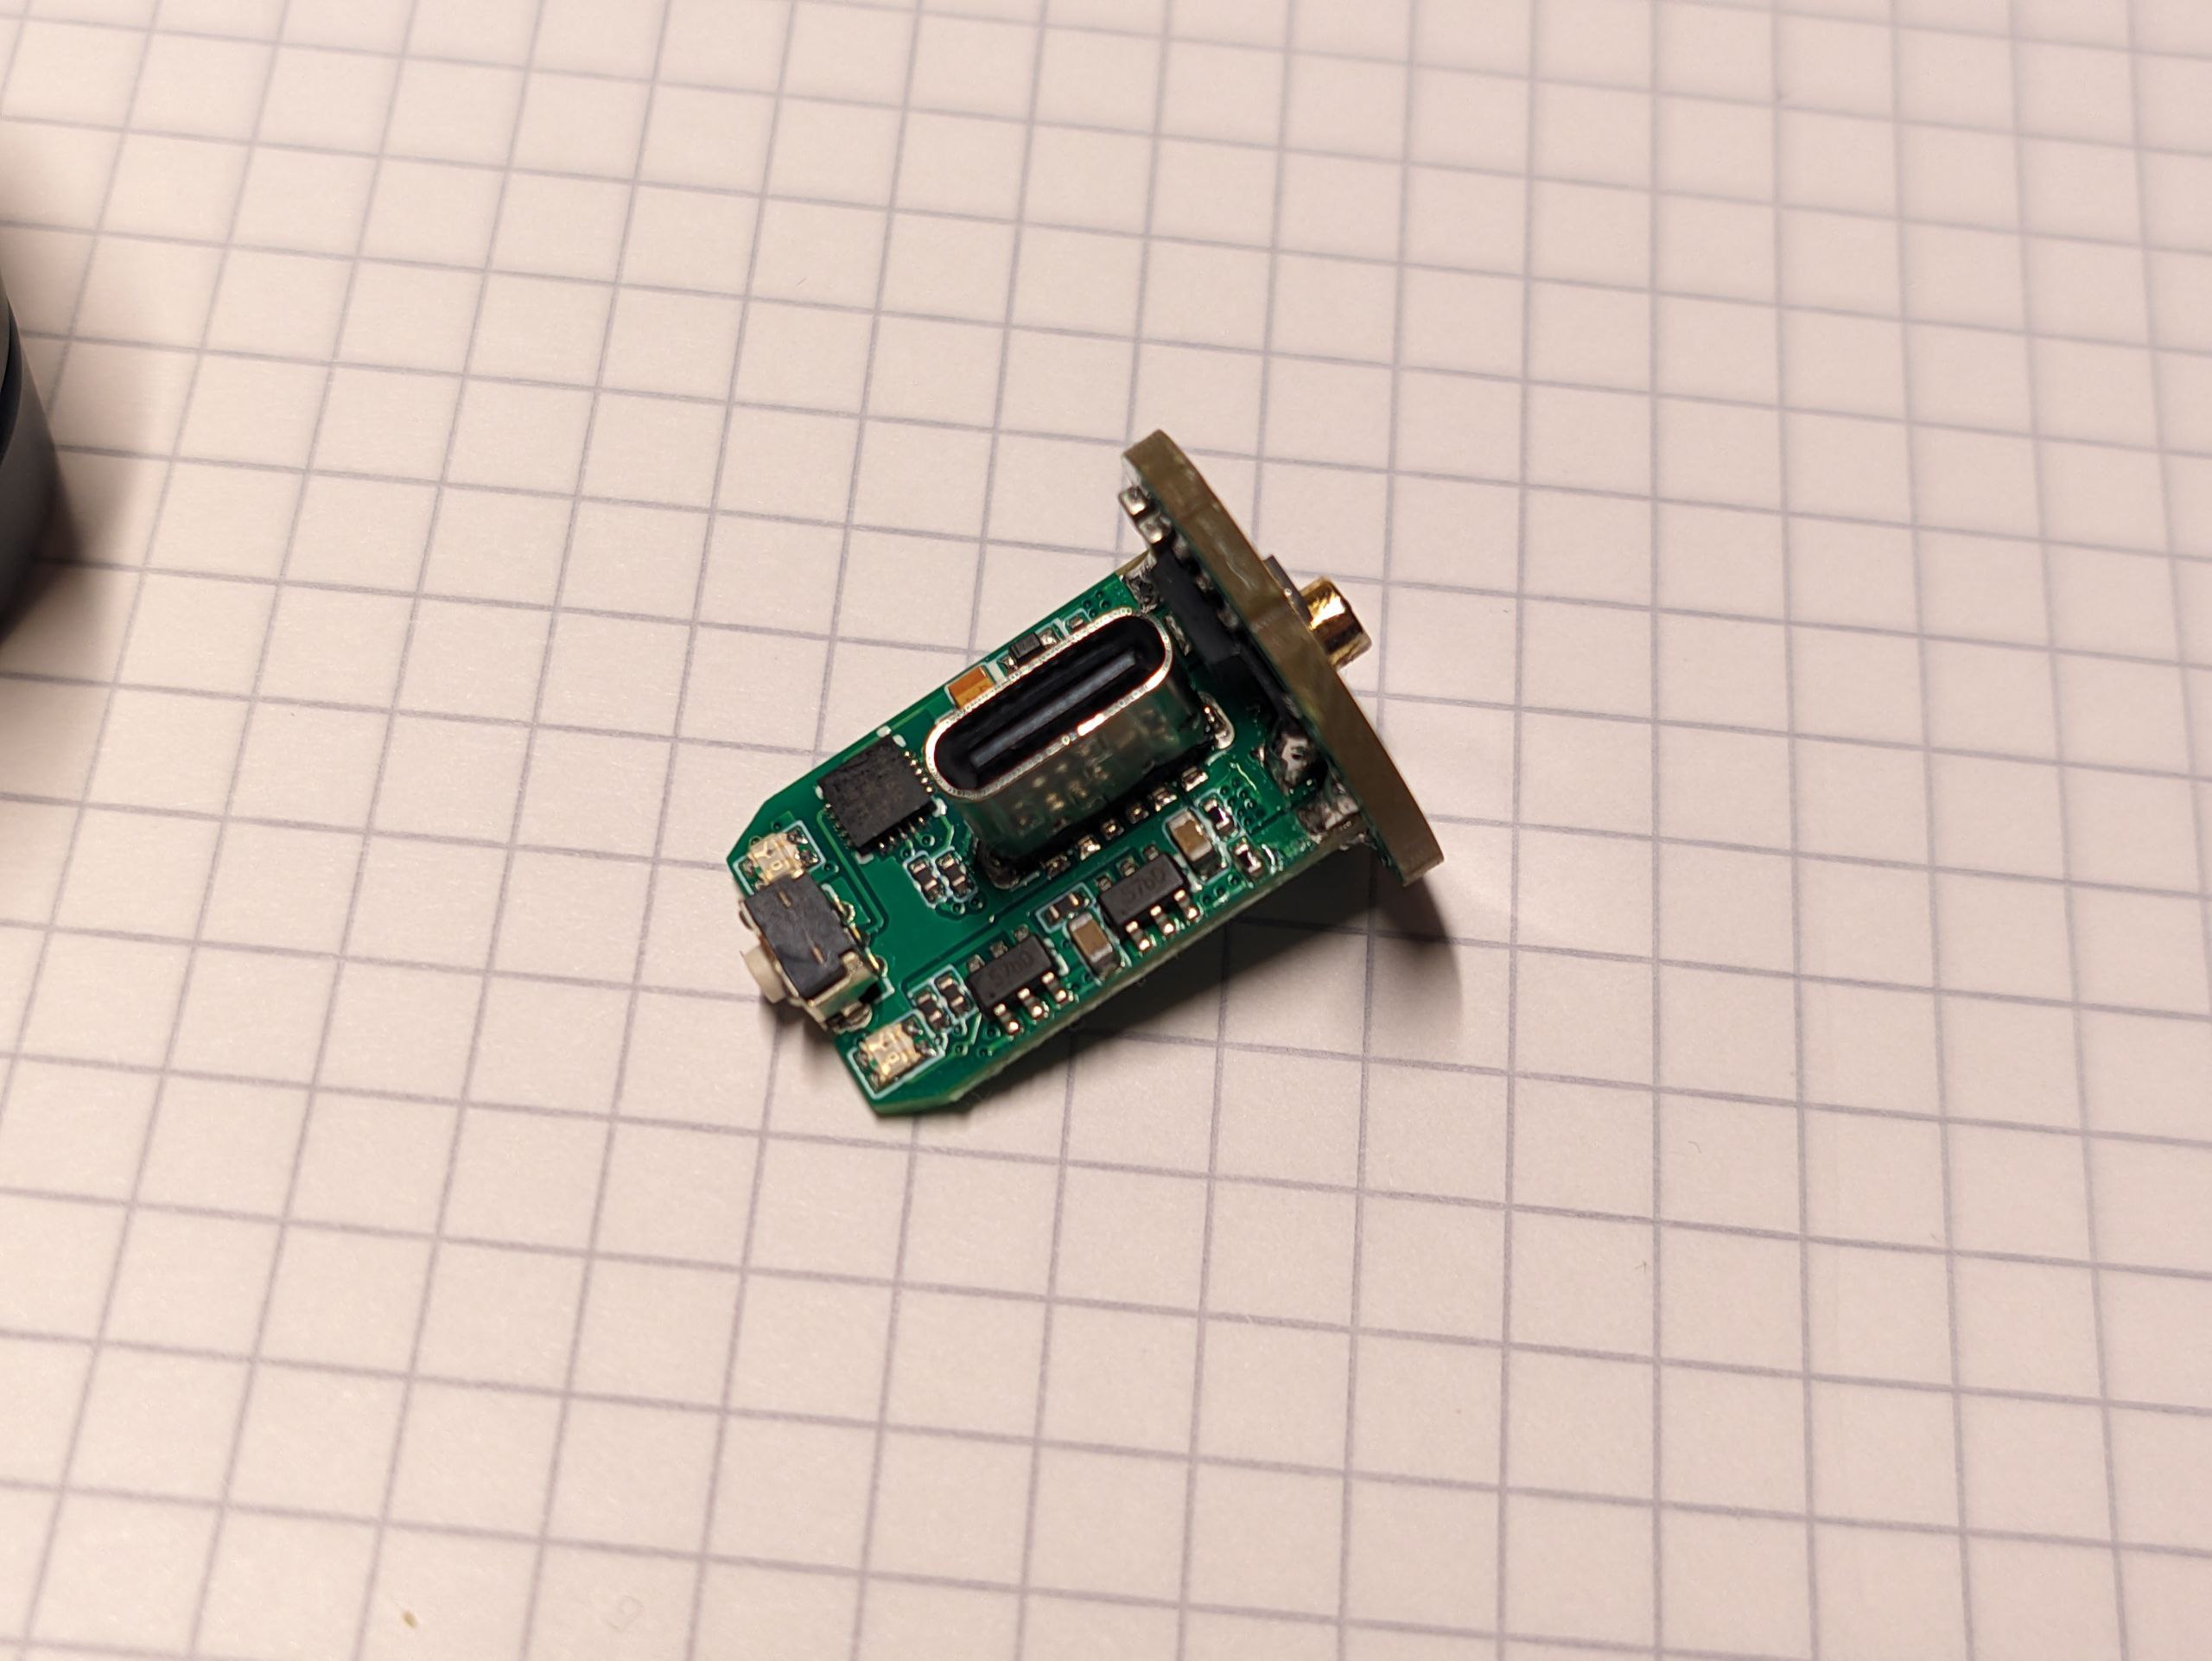
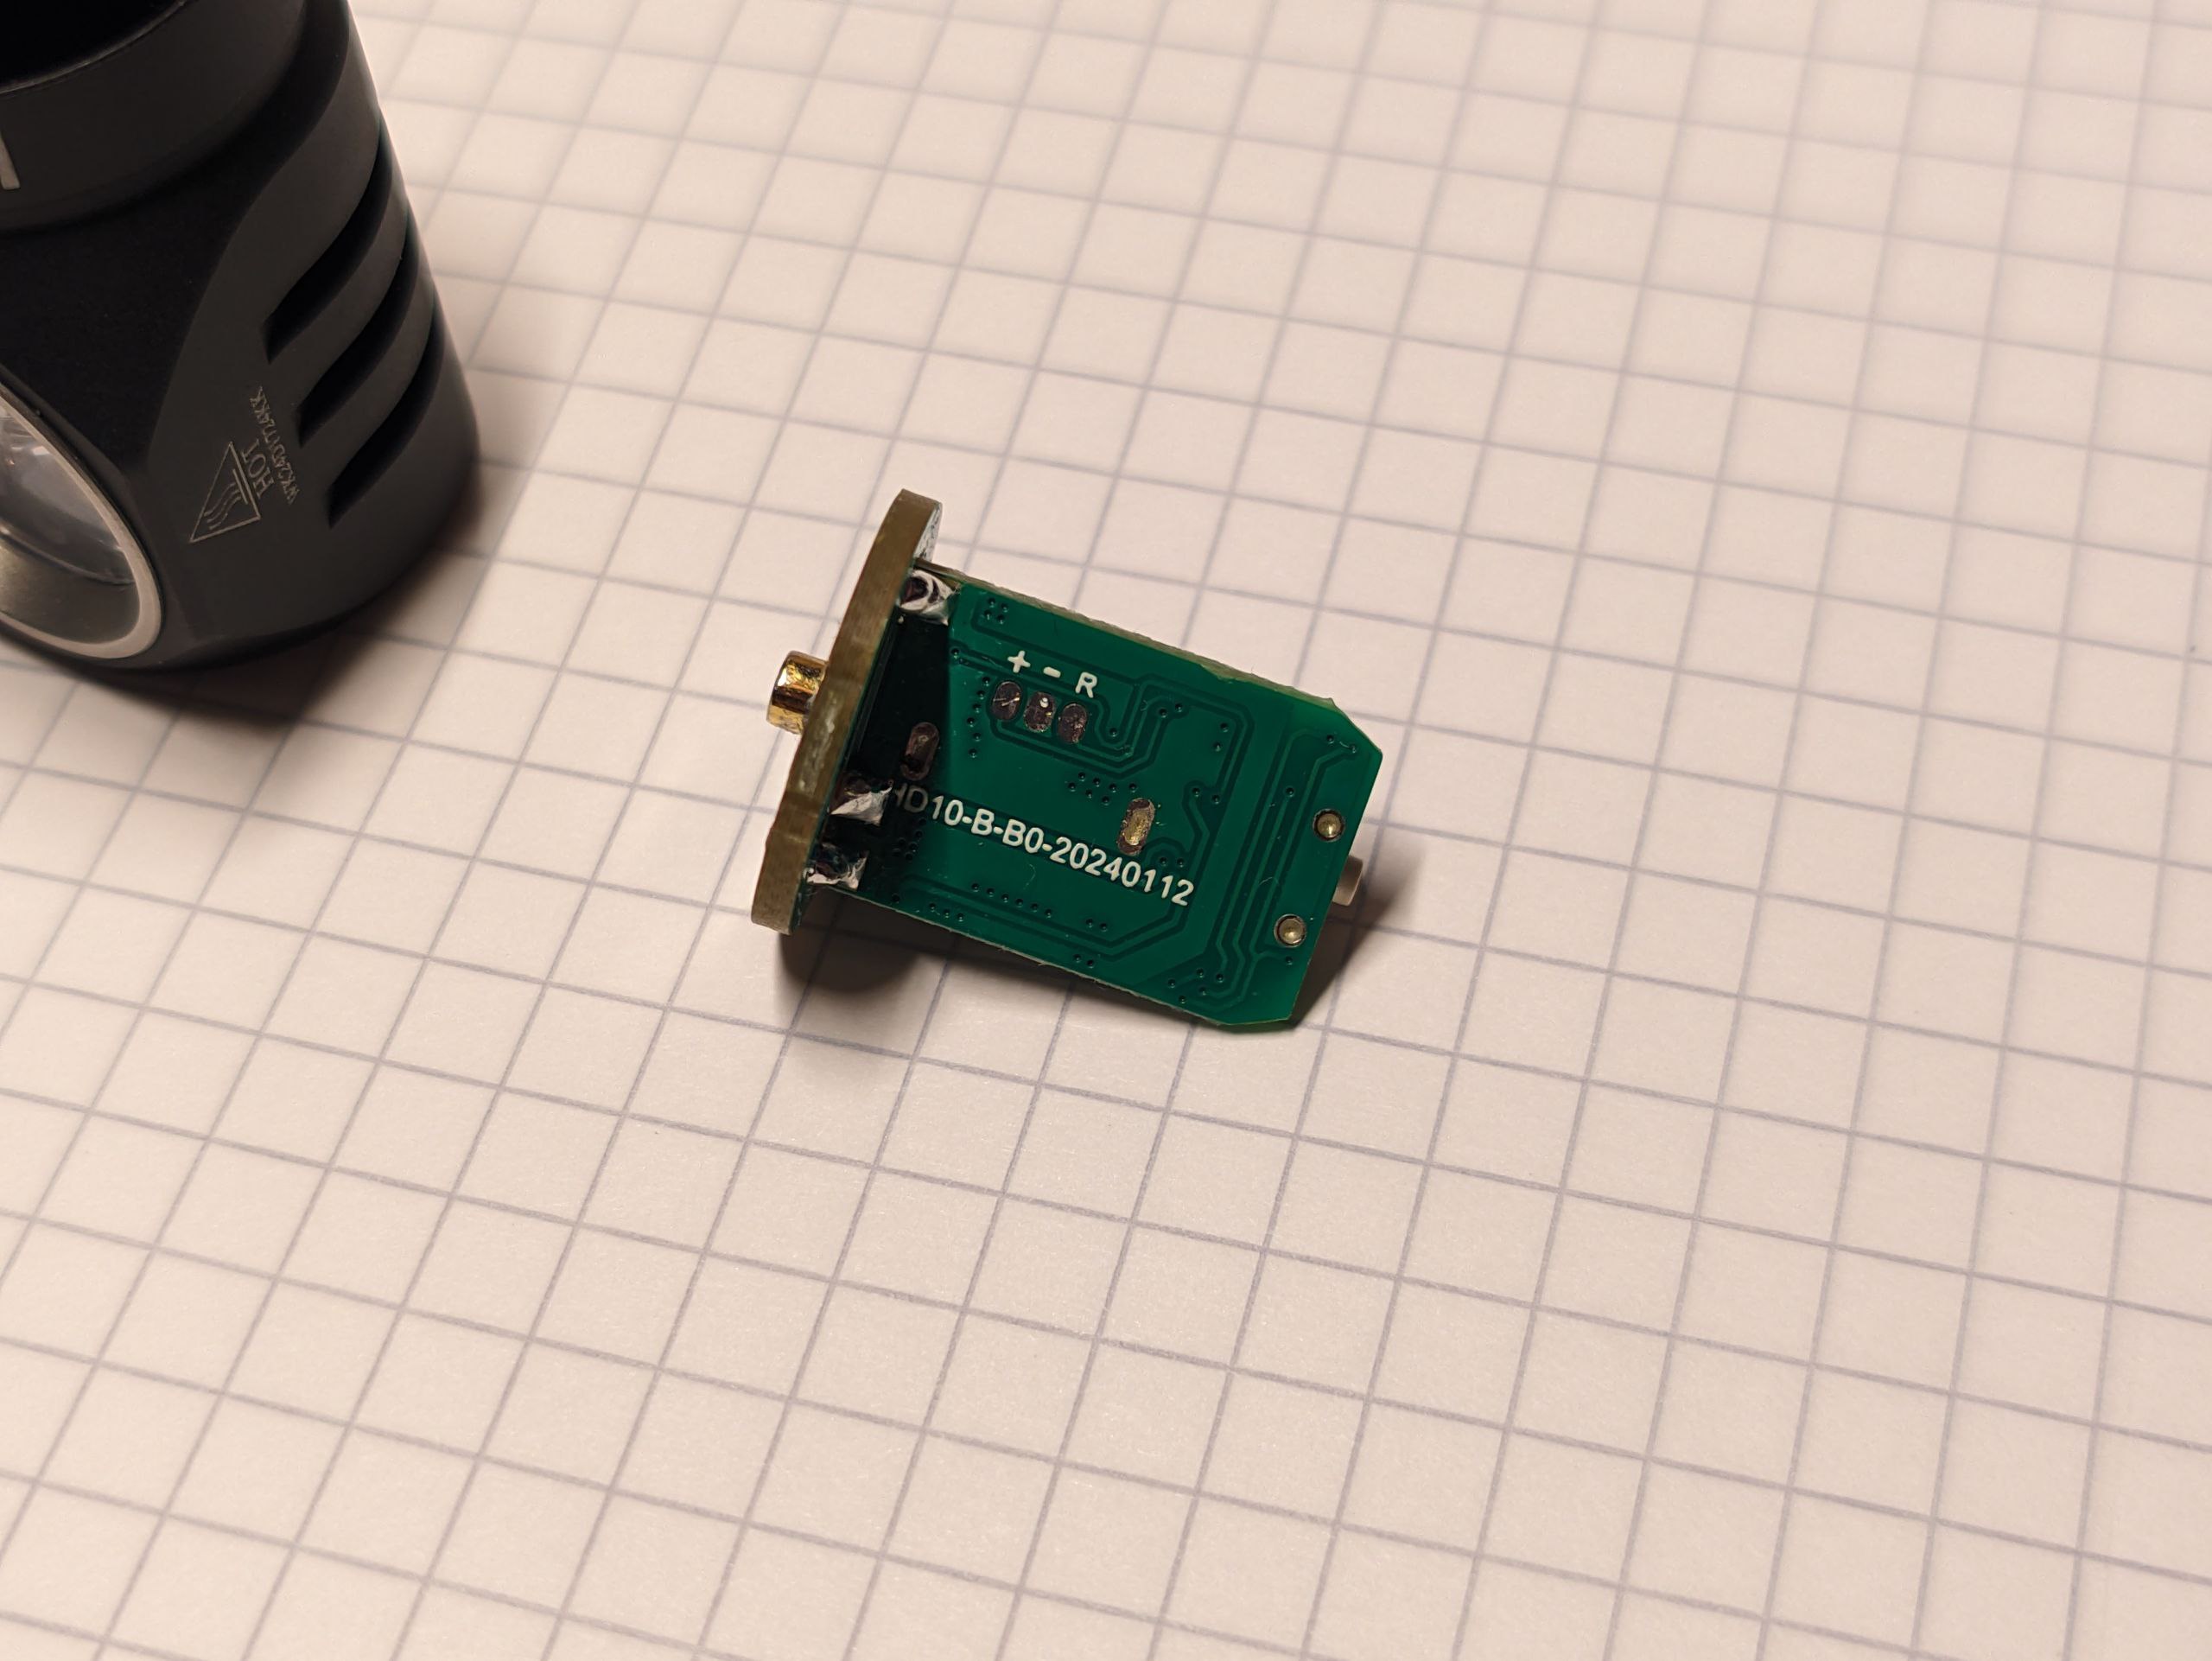
Technical analysis
I was curious how the driver would perform (or work) from a technical point of view, so I hooked it up to a lab PSU and measured current in all modes. I do not have the equipment to properly measure lumen, or do runtime graphs and measure thermal step-down, so you will have to wait for other reviewers. All measurements in this chapter are performed with a Riden RD6006P, limited at 5A to protect the LEDs (since the internal resistance of a constant-voltage PSU is much lower than that of a 14500 cell).
AUX current consumption
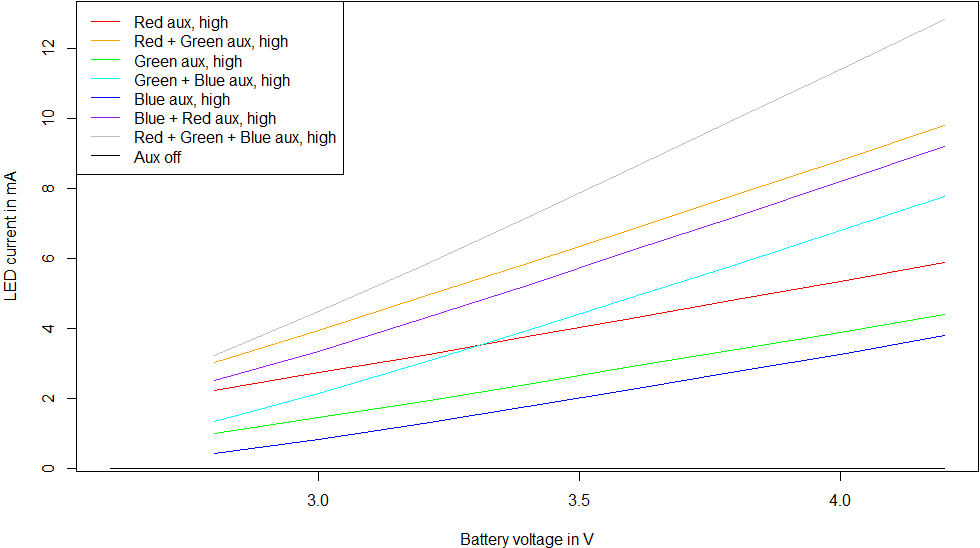
Current consumption for the AUX LEDs mapped from 2.8 to 4.2 V battery voltage in 0.2 V steps. Note the difference in the measurement unit between the two graphs. All uA range measurements were taken with a Brymen BM235 in uA range - it has a shunt resistance of ~100 Ohm in that range, which may slightly skew the results. All mA range measurements were taken with a Brymen BM235 in mA range. It has ~1 Ohm shunt in that range, which may again slightly skew the results. Both times the effect should be minimal, and the mA range showed no significant deviation from the measurements of the lab PSU itself (which lacks accuracy for smaller differences, however).
At 2.8 V the AUX operation was already unreliable, and the light often shut them off already. At 2.6 V it was always off. So the LVP threshold seems to default to around 2.8 V which is a reasonable value.
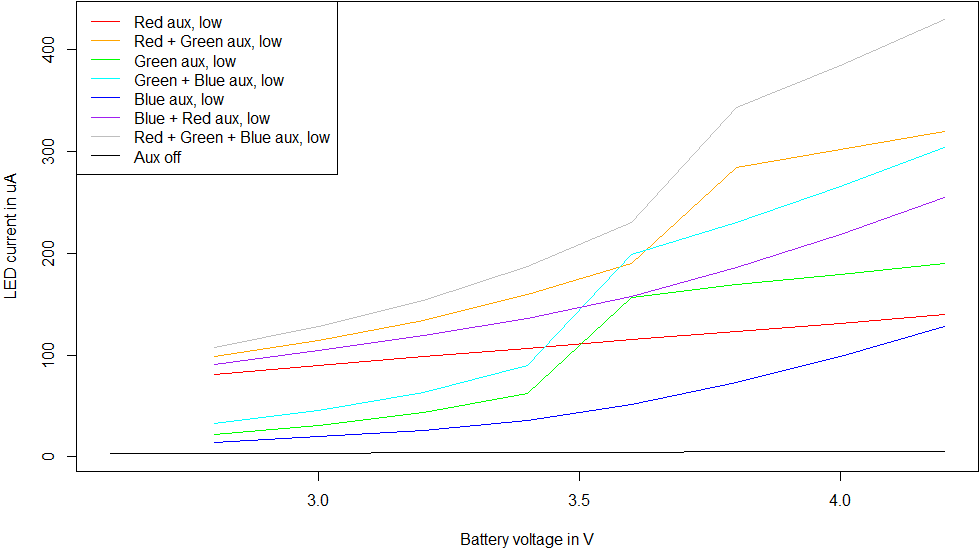
For those interested, I will list the min and max values here.
| Color | Low setting at 4.2 V | Low setting at 3.0 V | High setting at 4.2 V | High setting at 3.0 V |
|---|---|---|---|---|
| Off | 5.7 uA | 3.8 uA | ||
| Red | 140 uA | 90 uA | 5.9 mA | 2.73 mA |
| Red + Green | 320 uA | 115 uA | 9.8 mA | 3.95 mA |
| Green | 190 uA | 31 uA | 4.4 mA | 1.46 mA |
| Green + Blue | 304 uA | 46 uA | 7.78 mA | 2.13 mA |
| Blue | 128 uA | 20 uA | 3.79 mA | 0.83 mA |
| Blue + Red | 255 uA | 105 uA | 9.21 mA | 3.34 mA |
| Red + Blue + Green | 430 uA | 128 uA | 12.83 mA | 4.49 mA |
The idle draw is low enough that battery self discharge will empty it faster than the 5 uA current. Even the 320 uA (low “orange” aux) would result in over 100 days battery life. The high aux settings however chug a lot of battery, I would recommend not to use those as “always on” settings. But that’s not what they were made for in the first place, so it’s fine.
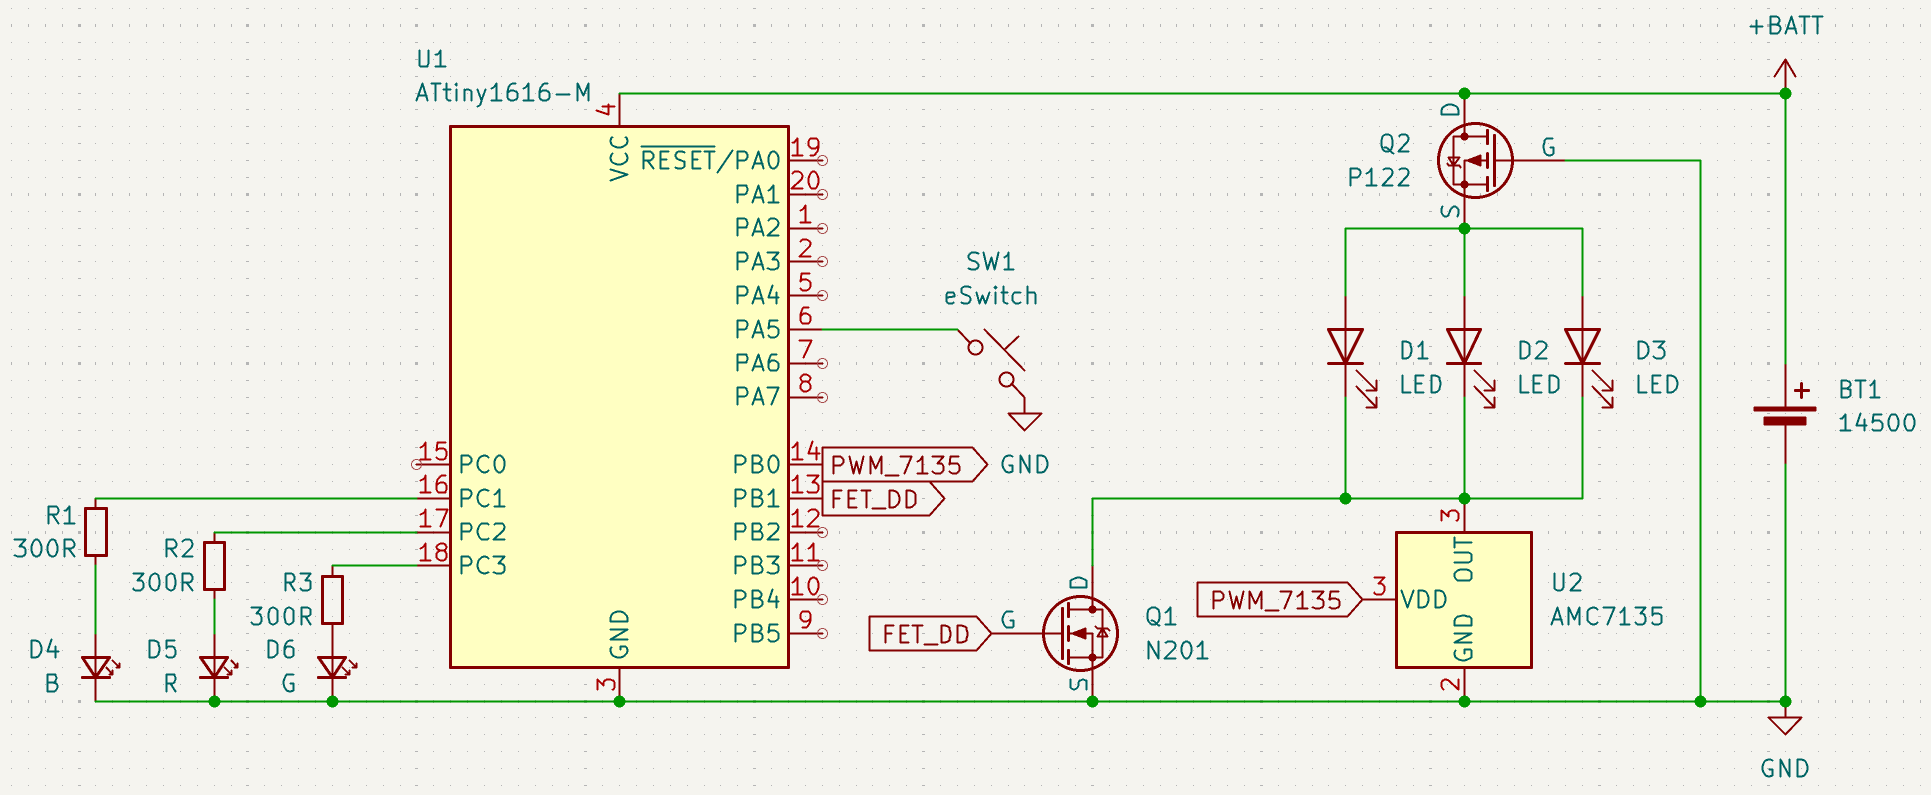
Main emitter measurements
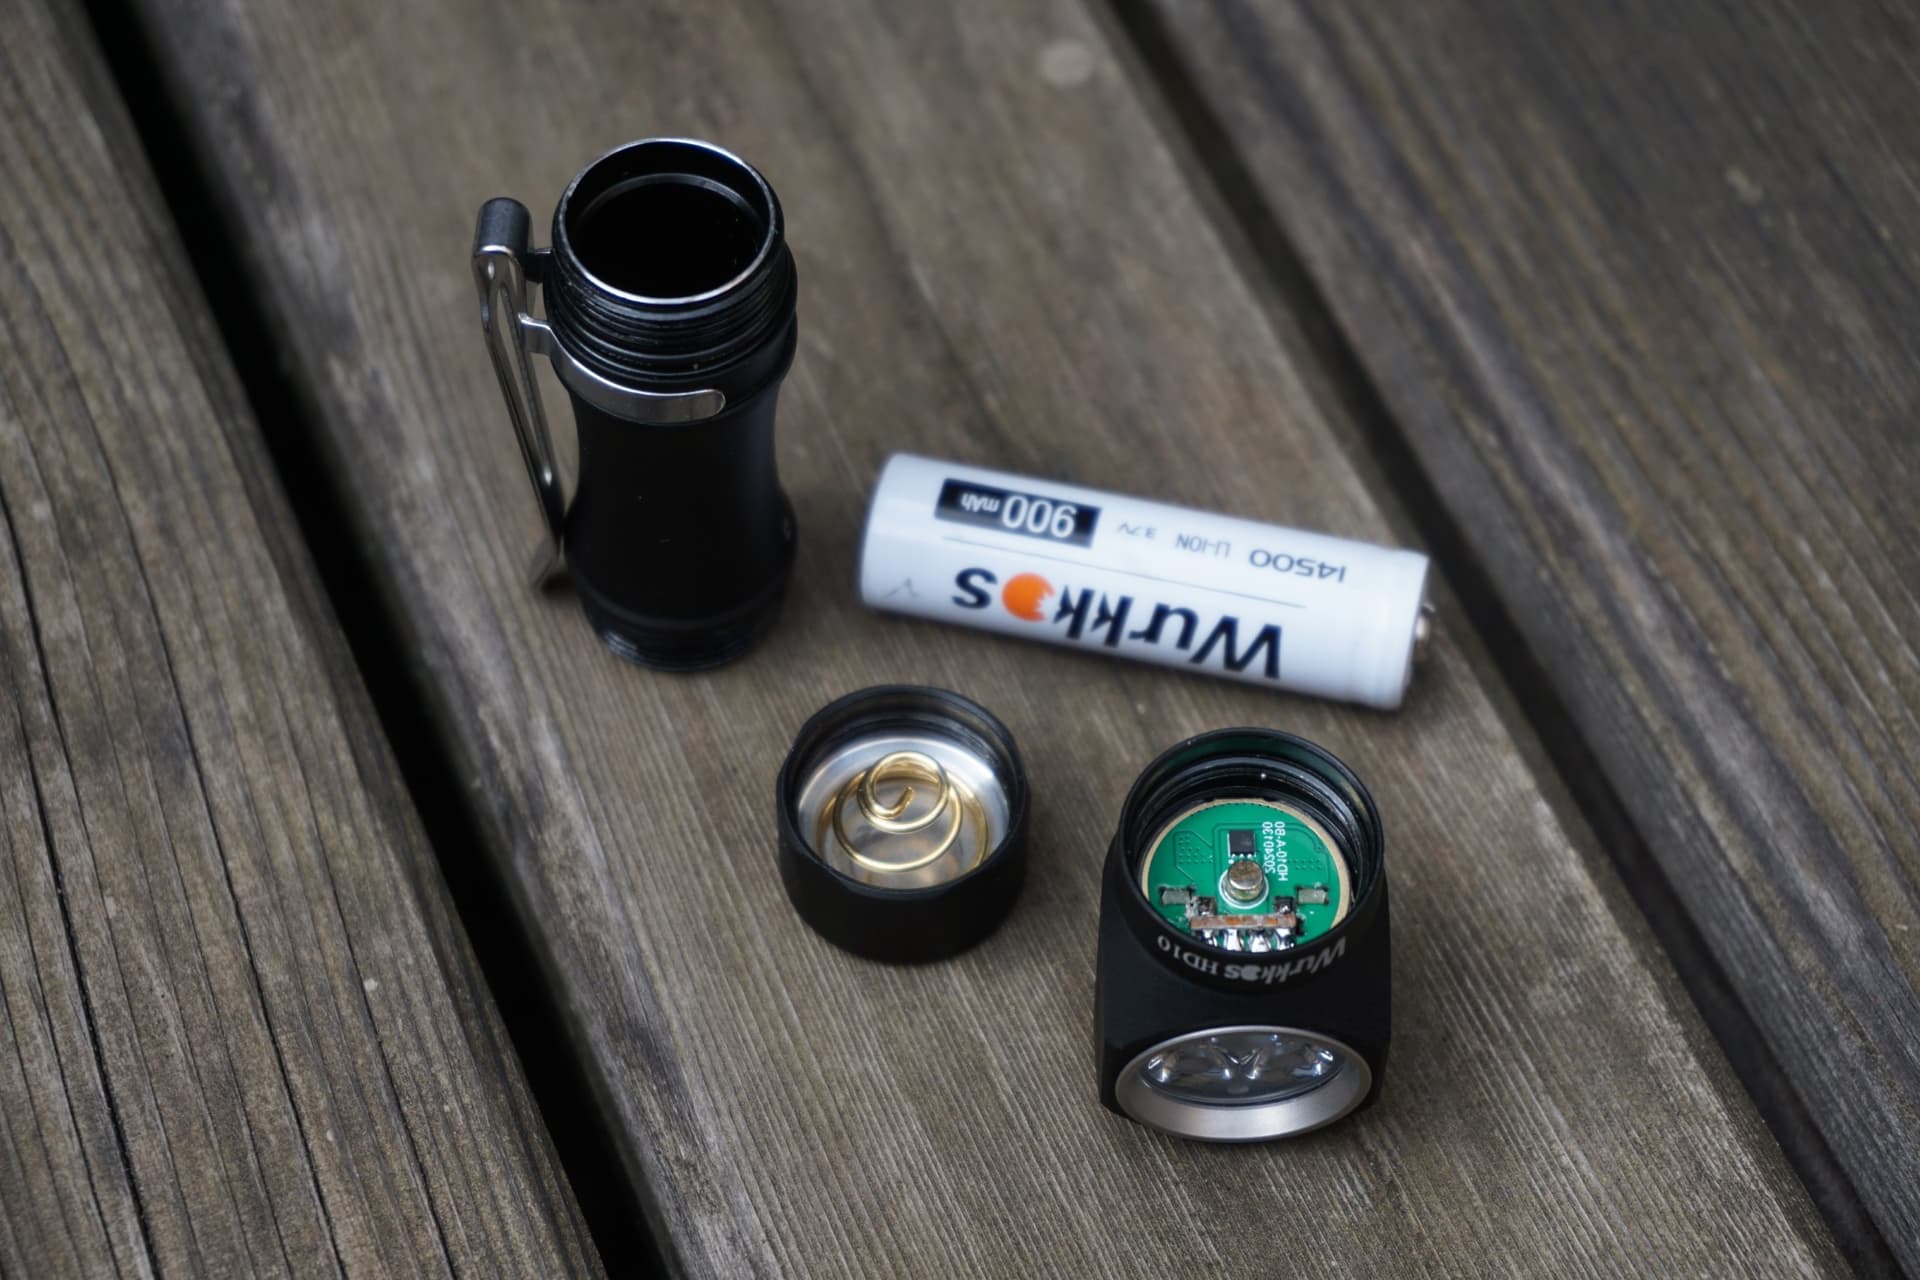
This was a pretty interesting thing, since Wurkkos had not stated the type of the driver - the measurements made it clear that, despite my hopes for a buck or boost, we got a FET+1. The lower modes are regulated perfectly down to 3.0 V. At 2.8 V a clear step-down happens, where the light lowers the output brightness due to hitting LVP. At 2.6 it is already turned off.
At Step 6 and higher the light switches from linear regulator + PWM to PWM of the battery directly, since we get a strongly battery voltage dependant brightness again. This is typical FET+1 behavior. Not great, these are the simplest and cheapest drivers out there, and I had hoped for more. In a 21700 light with 5000 mAh battery efficiency does not matter that much for me, but in a small light, efficiency is very important.
| Mode | 4.2 V | 4.0 V | 3.8 V | 3.6 V | 3.4 V | 3.2 V | 3.0 V | 2.8 V |
|---|---|---|---|---|---|---|---|---|
| firefly | 1.55 mA | 1.49 mA | 1.42 mA | 1.34 mA | 1.27 mA | 1.19 mA | 1.11 mA | 1.04 mA |
| Step 1 | 4.4 mA | 4.2 mA | 3.9 mA | 3.8 mA | 3.5 mA | 3.3 mA | 3.1 mA | 2.6 mA |
| Step 2 | 13.0 mA | 12.6 mA | 12.4 mA | 12.2 mA | 12.0 mA | 11.7 mA | 11.1 mA | 5.5 mA |
| Step 3 | 40.8 mA | 40.5 mA | 40.2 mA | 40.0 mA | 39.6 mA | 39.3 mA | 38.3 mA | 12.7 mA |
| Step 4 | 112 mA | 112 mA | 111 mA | 111 mA | 111 mA | 110 mA | 108 mA | 12.7 mA |
| Step 5 | 275 mA | 275 mA | 275 mA | 275 mA | 275 mA | 275 mA | 275 mA | 12.7 mA |
| Step 6 | 887 mA | 819 mA | 751 mA | 681 mA | 612 mA | 543 mA | 475 mA | 12.7 mA |
| Step 7 | 1870 mA | 1650 mA | 1431 mA | 1218 mA | 1015 mA | 821 mA | 636 mA | 12.7 mA |
| Turbo | 5000 mA | 5000 mA | 5000 mA | 5000 mA | 5000 mA | 3770 mA | 2260 mA | 12.7 mA |
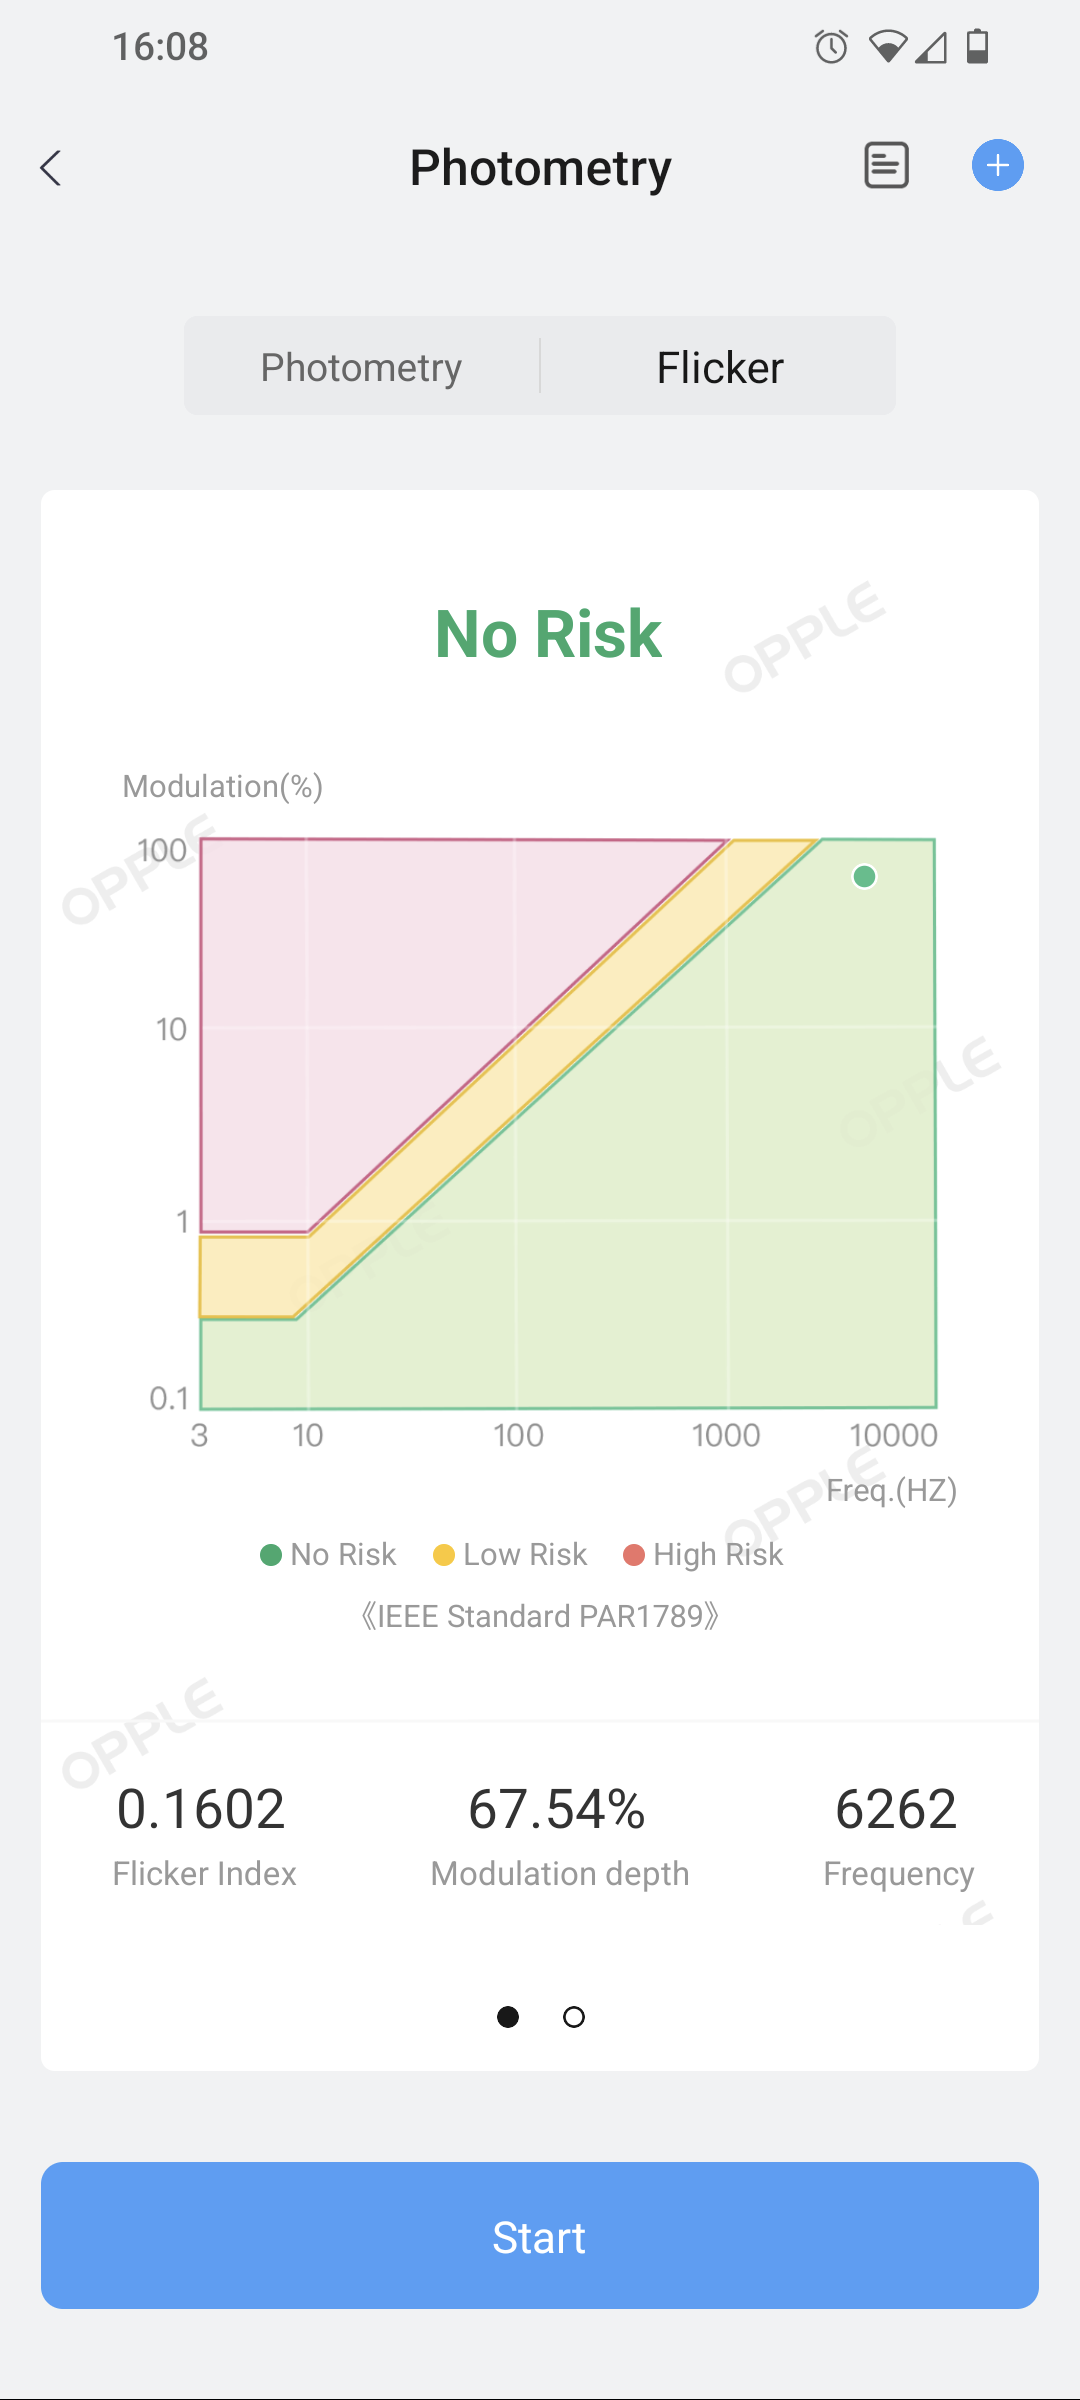
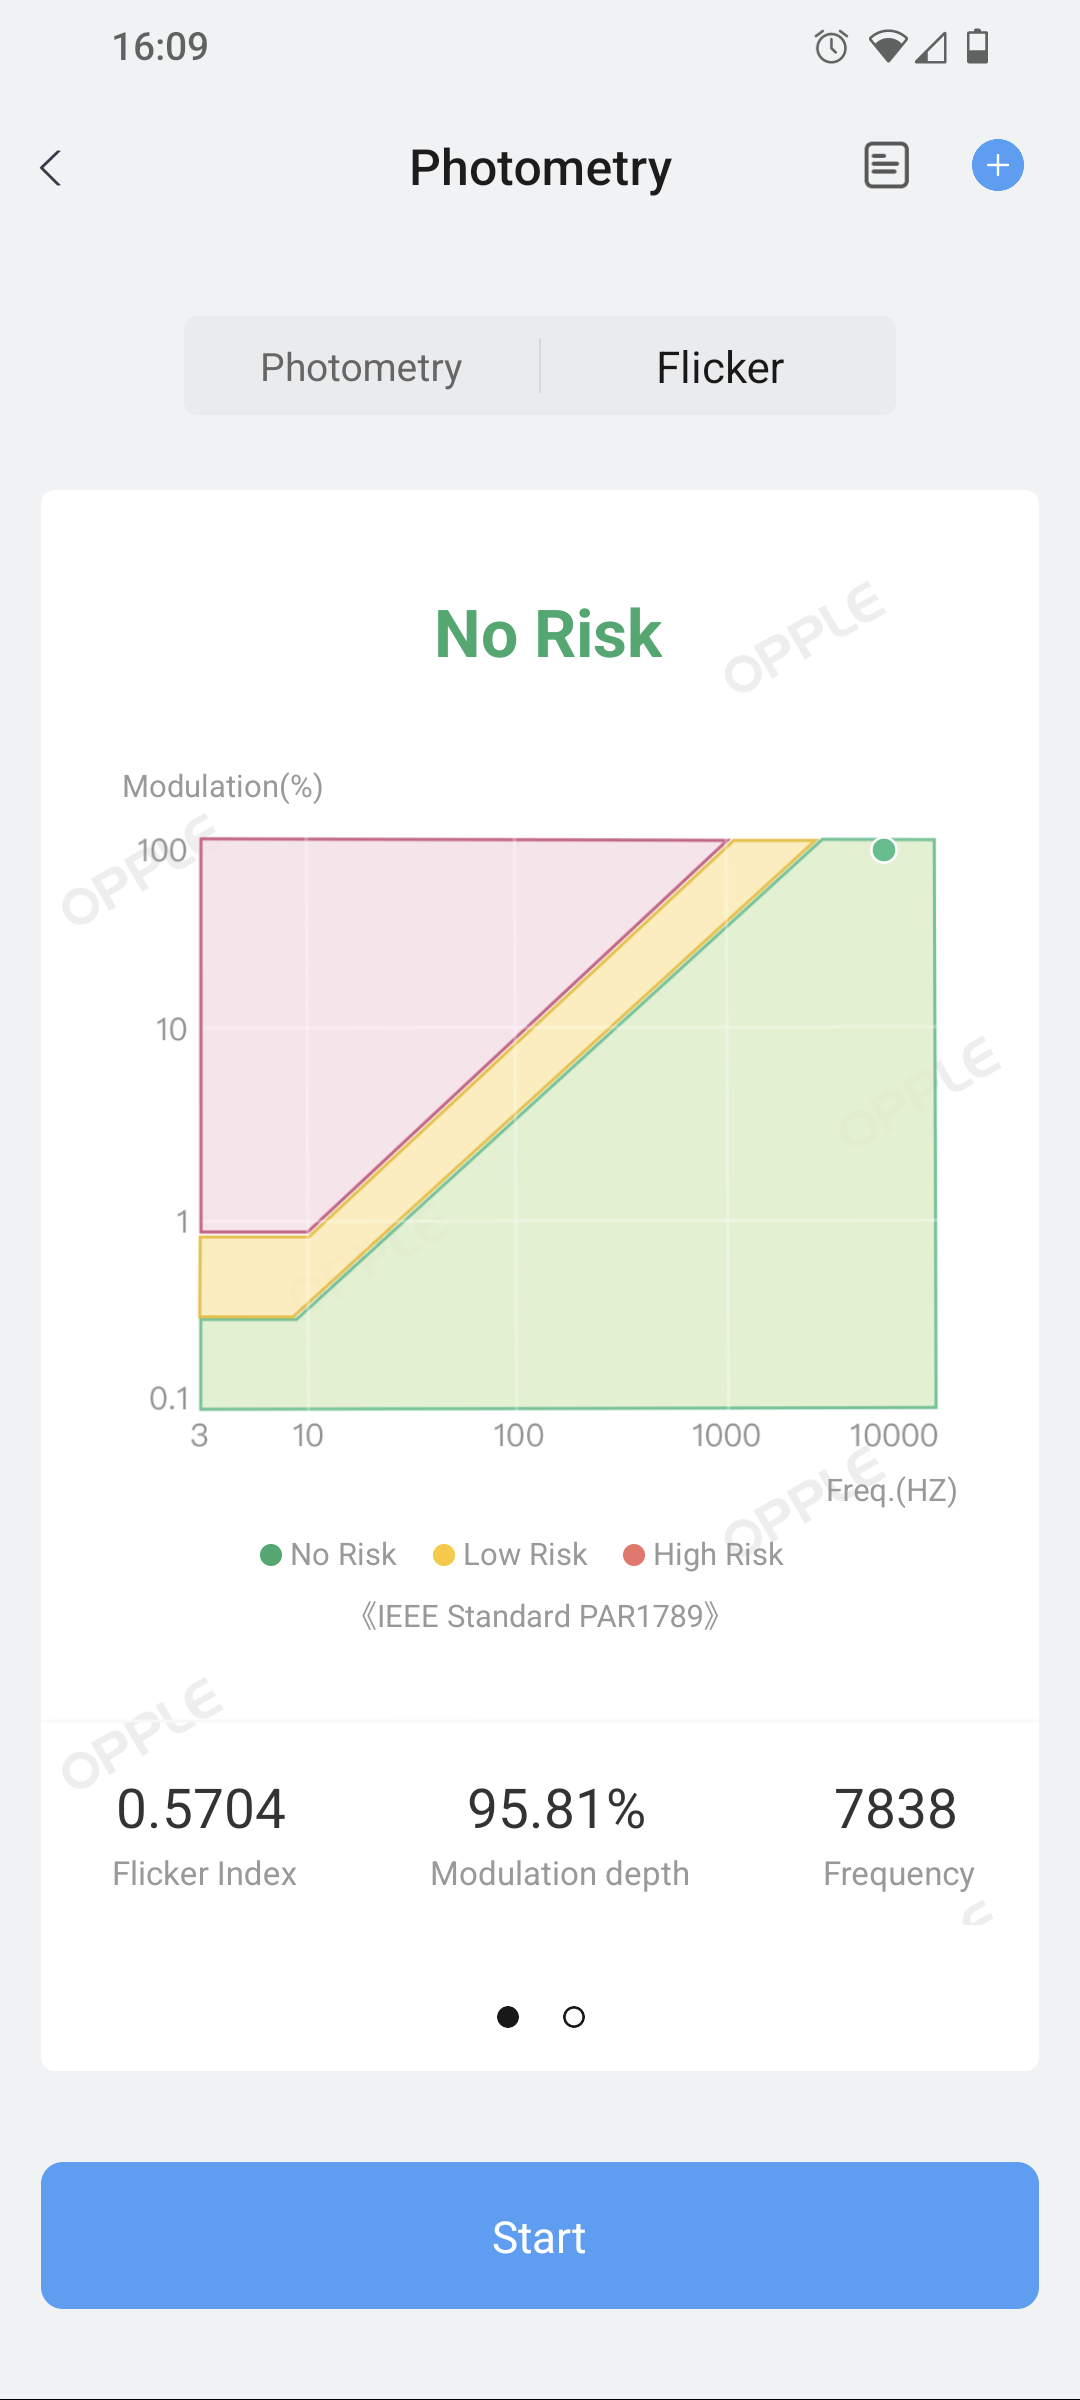
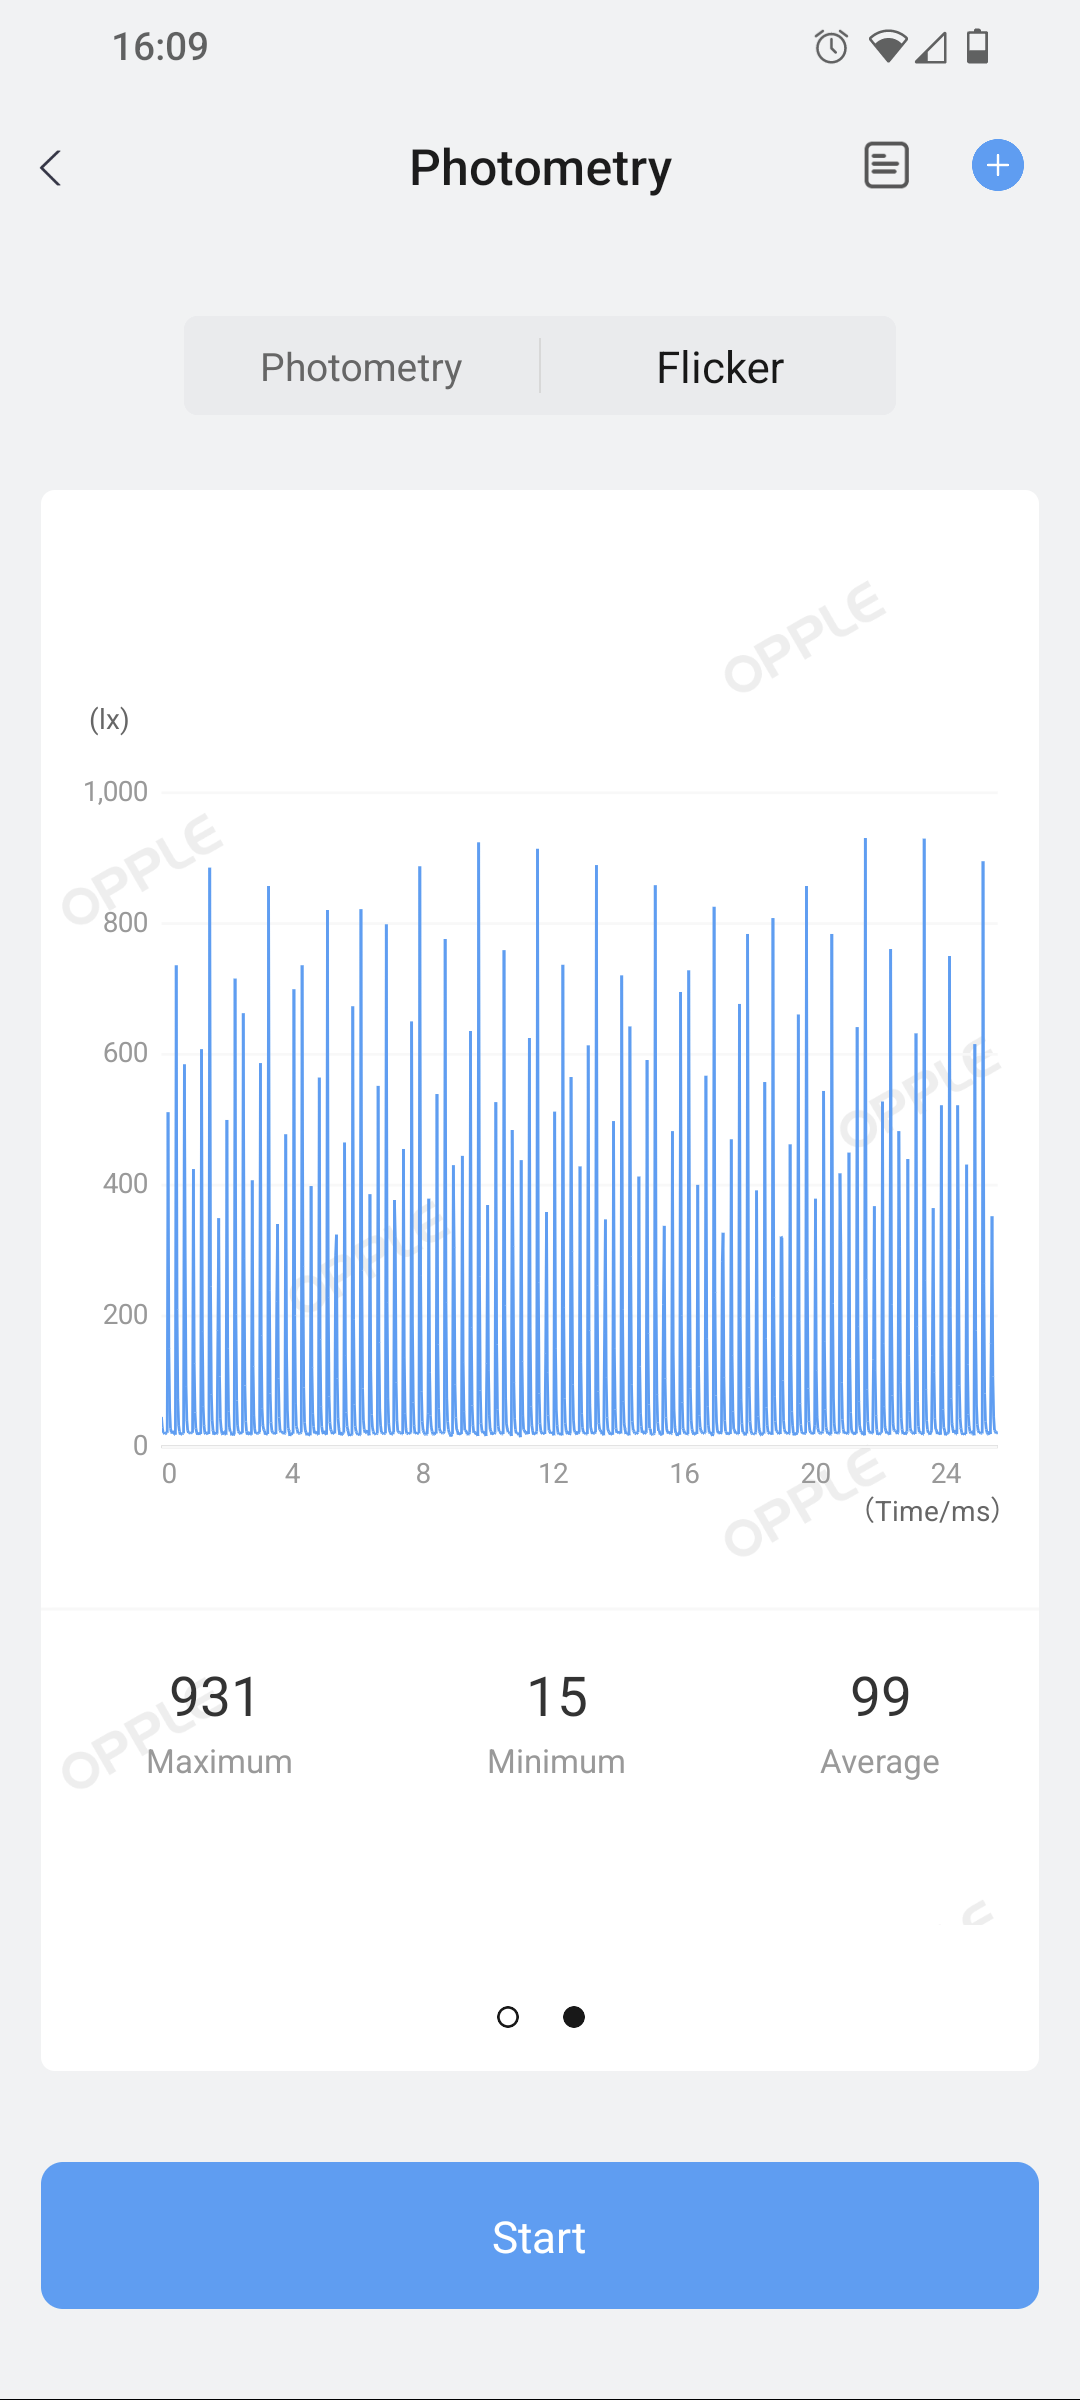
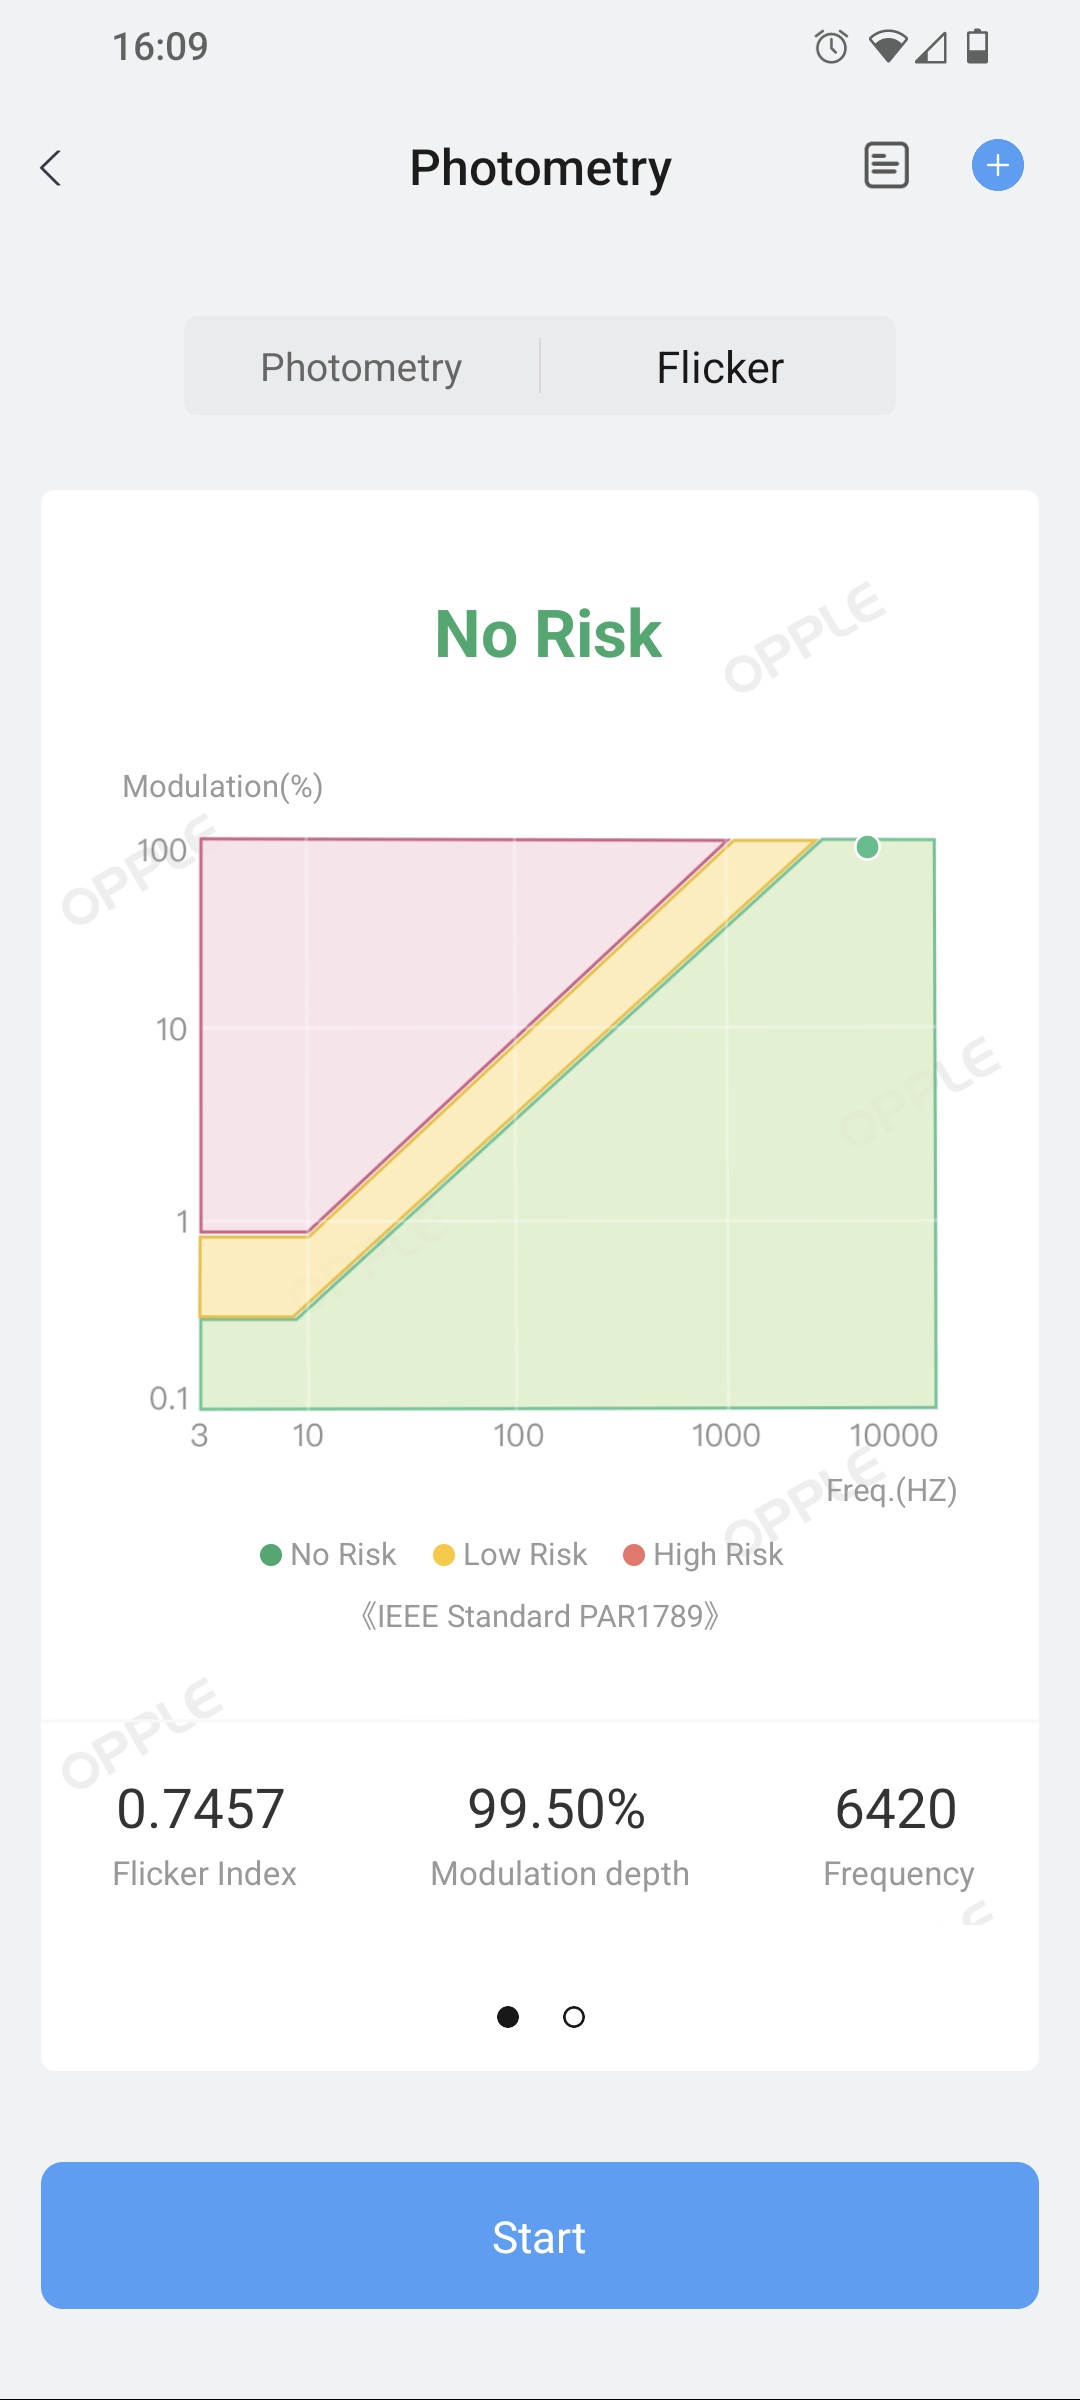
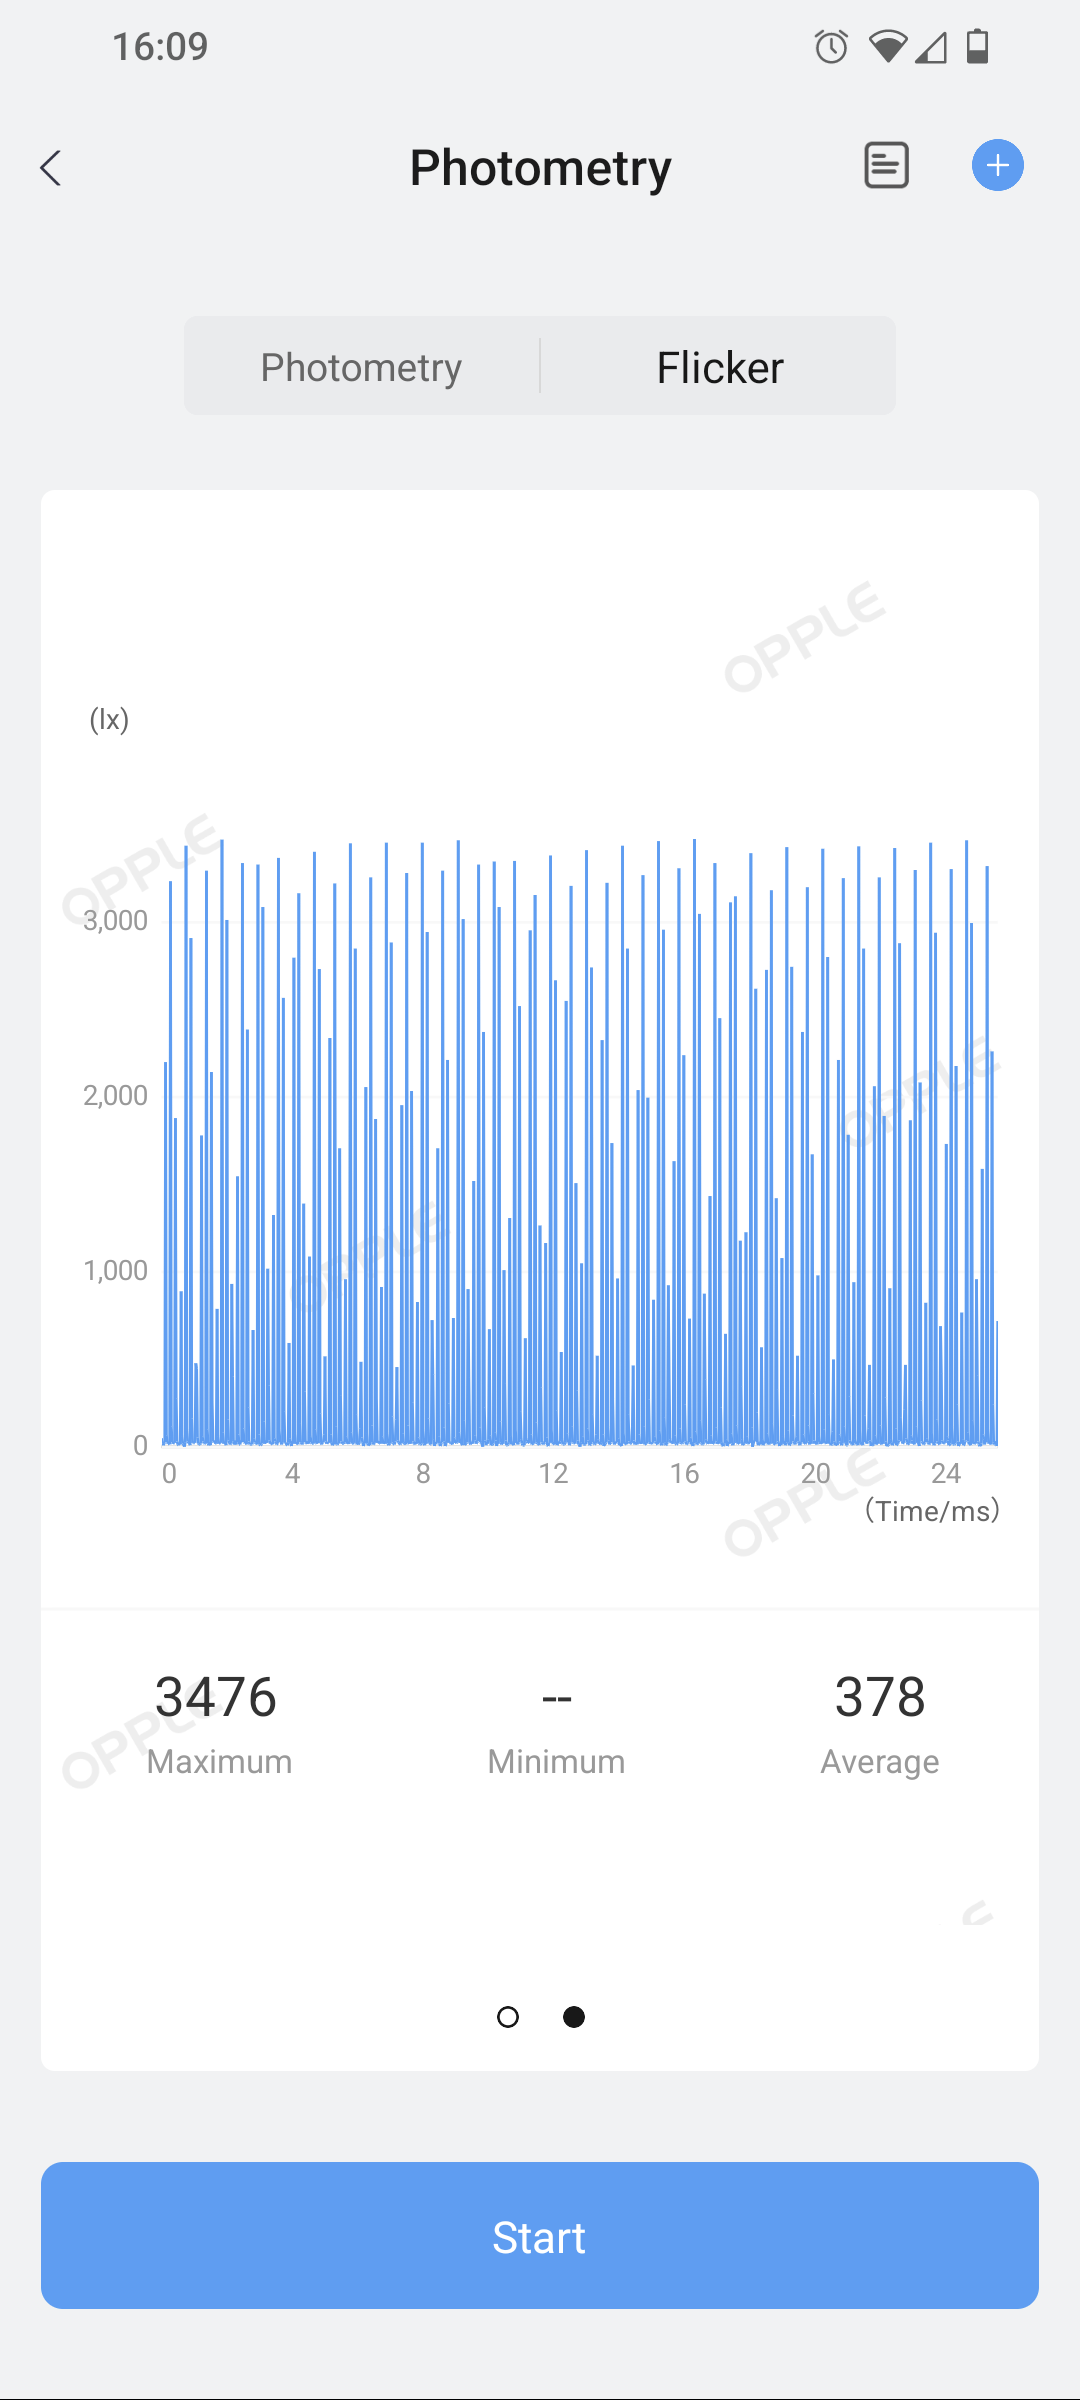
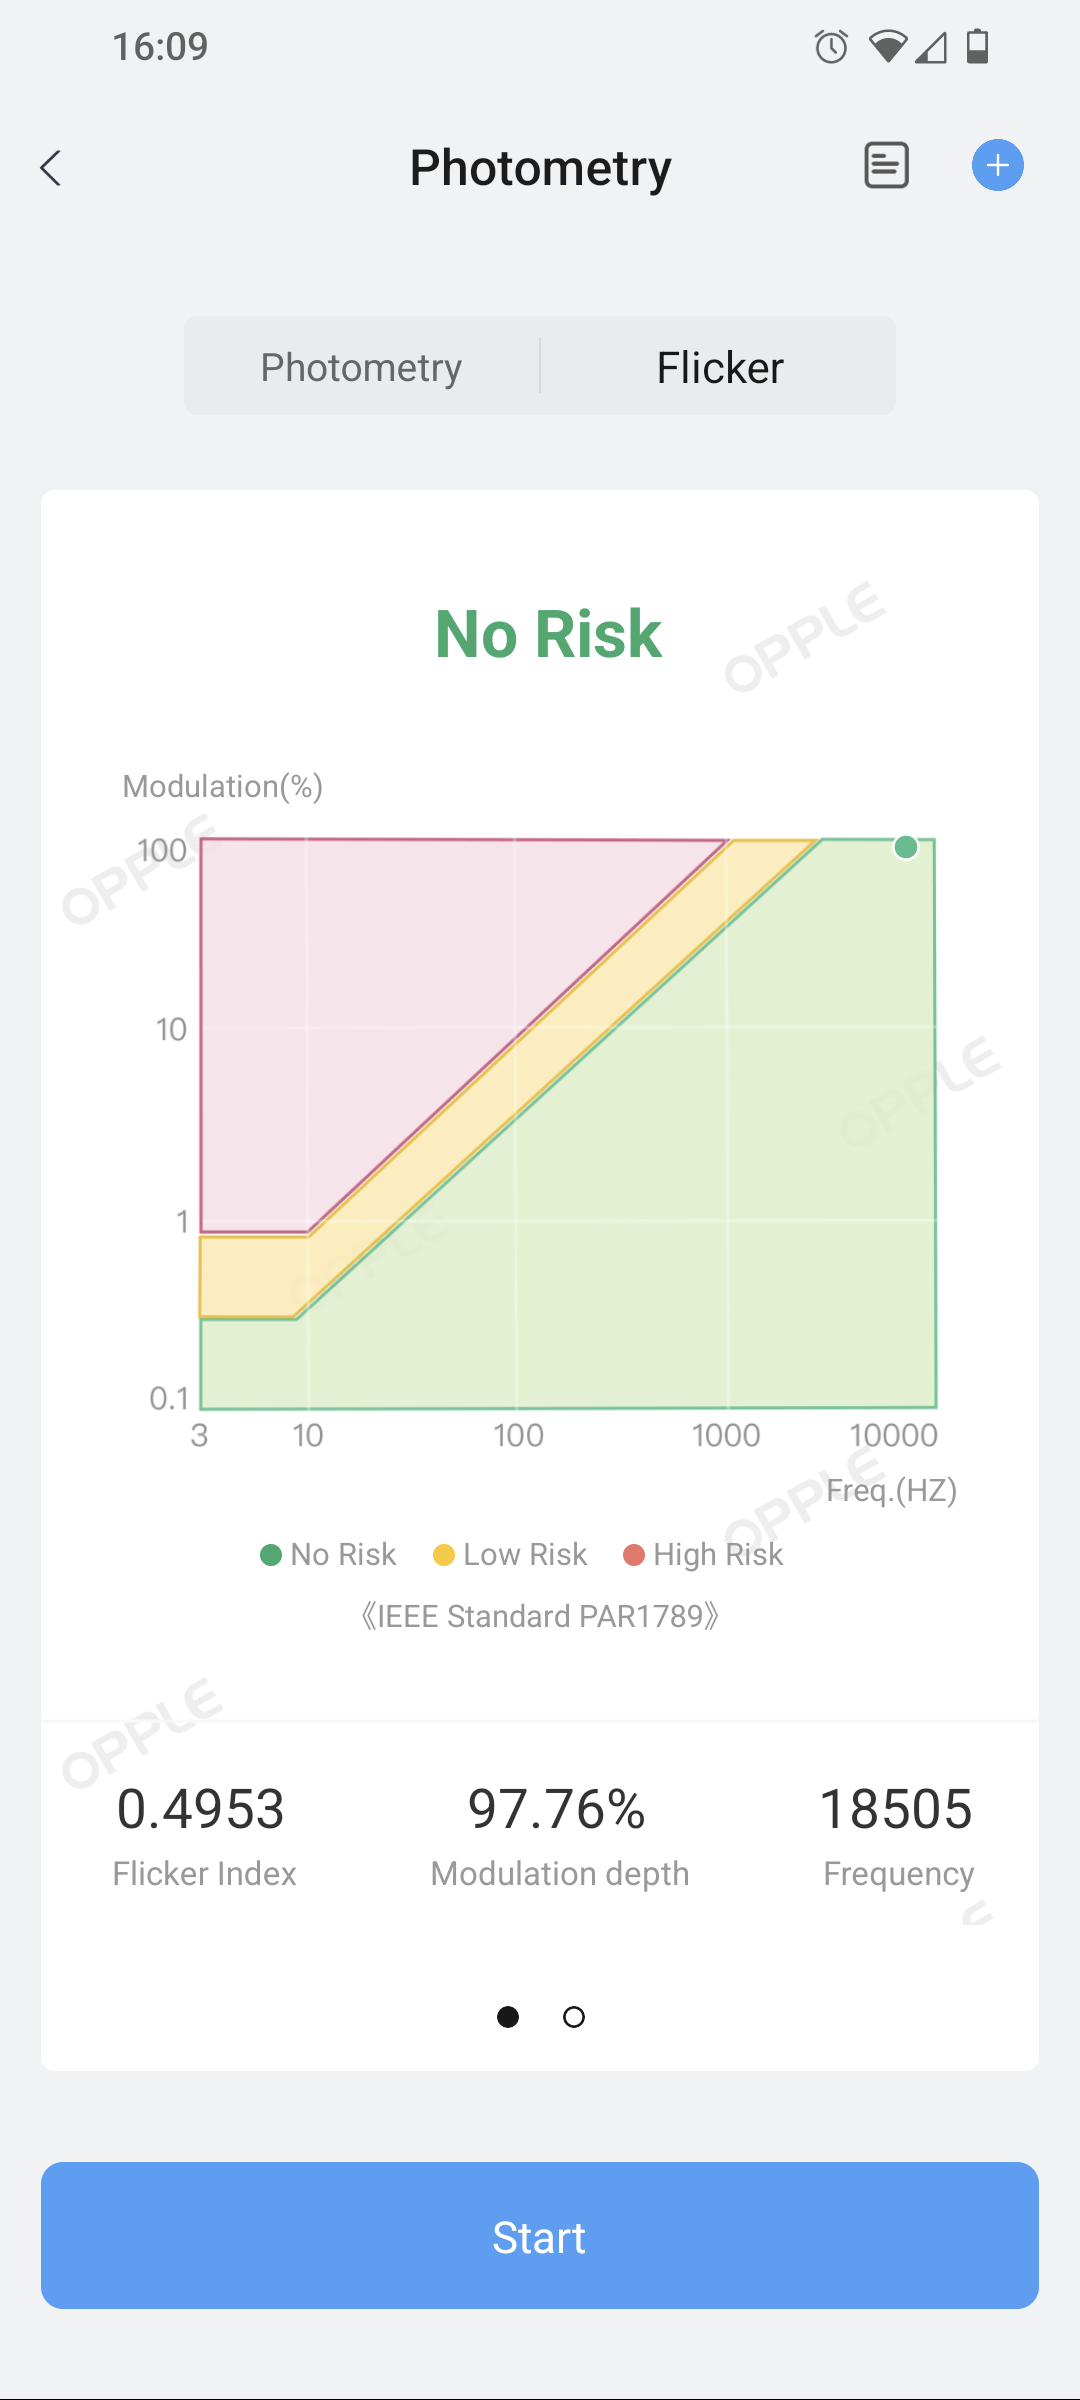
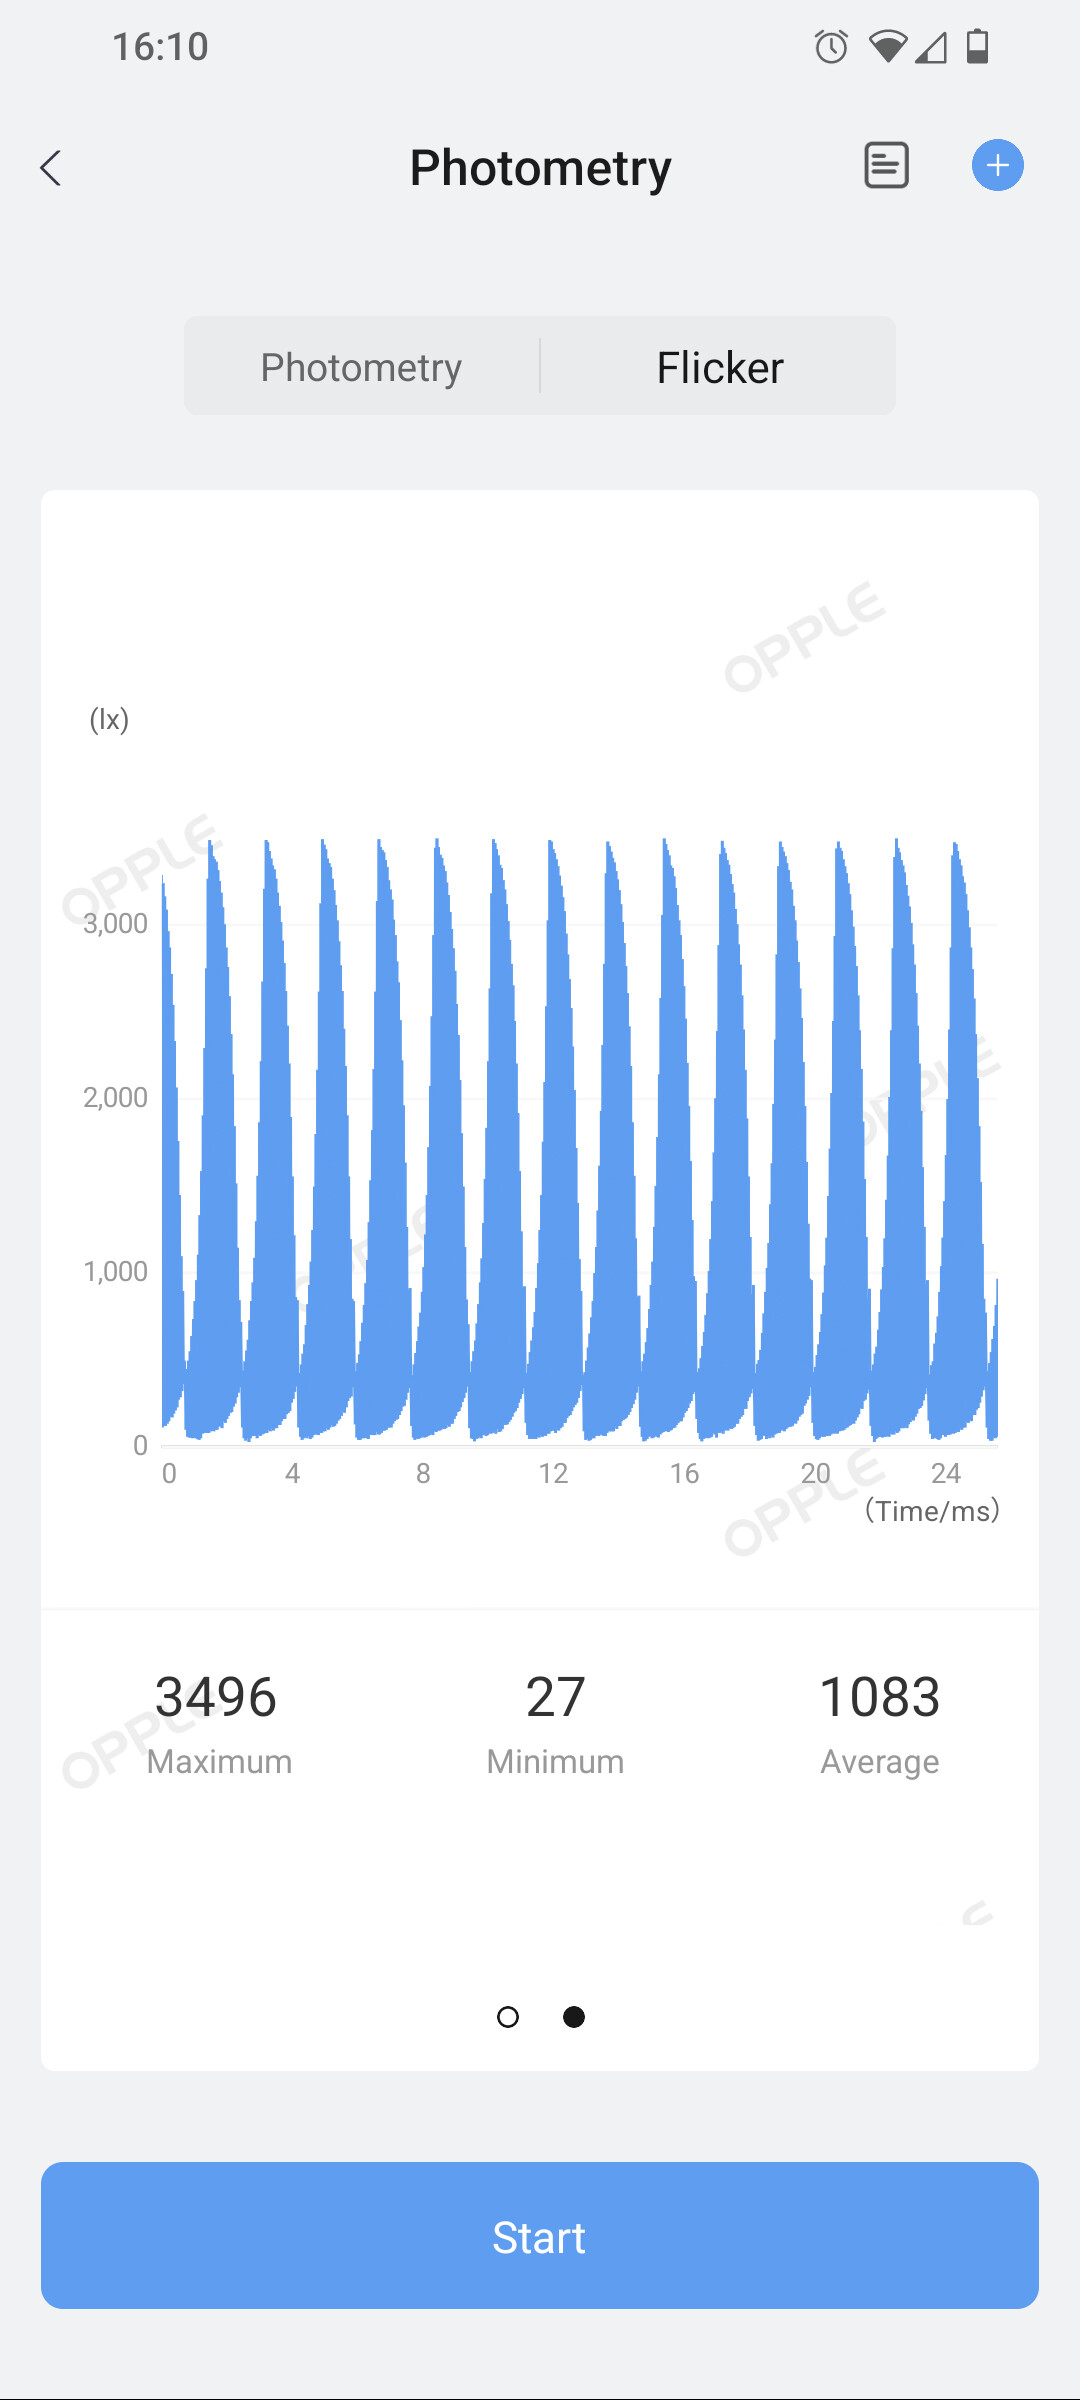
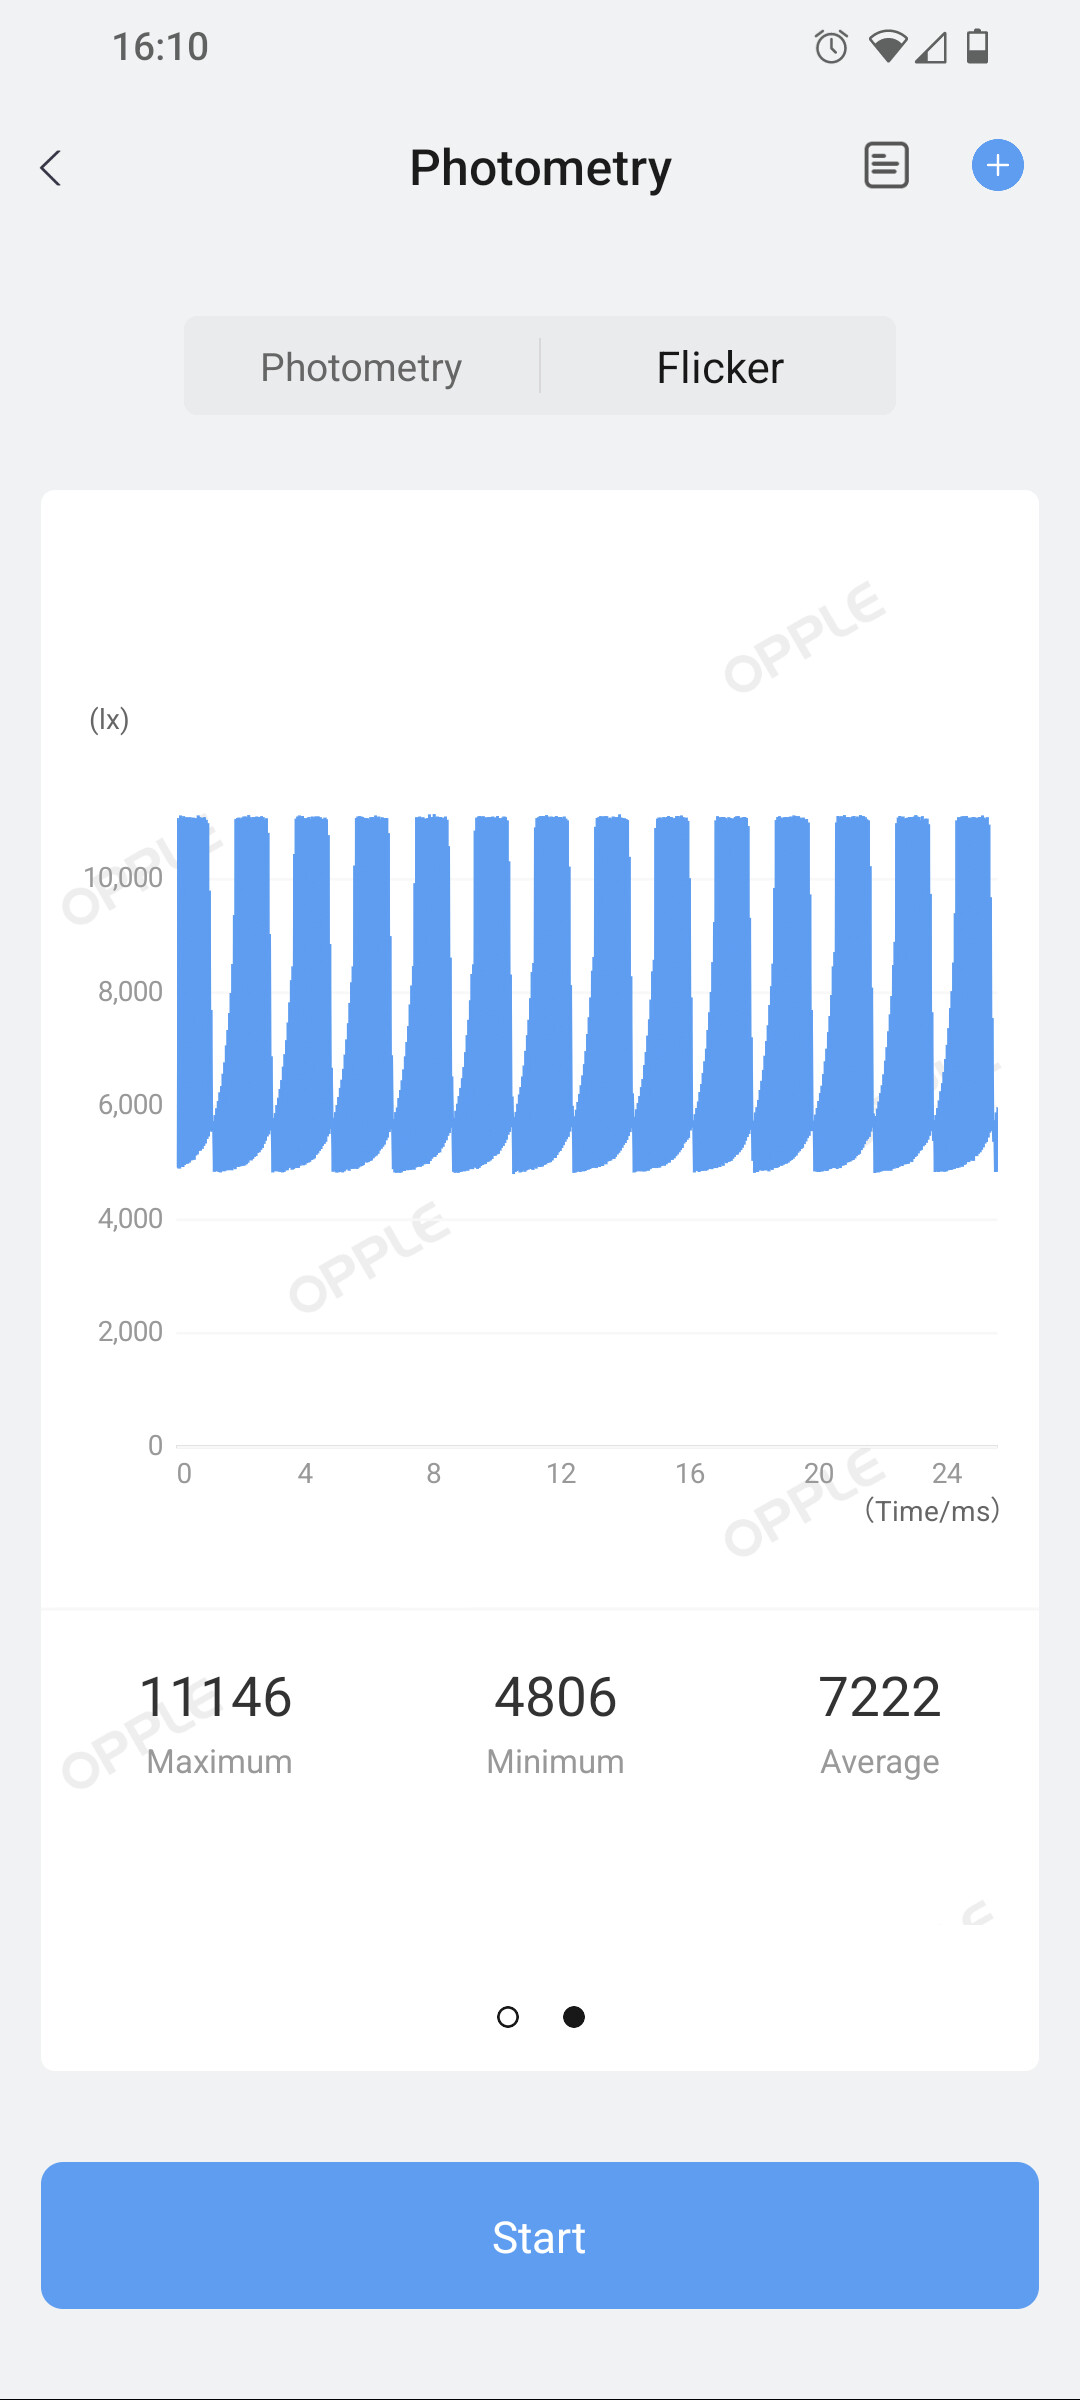
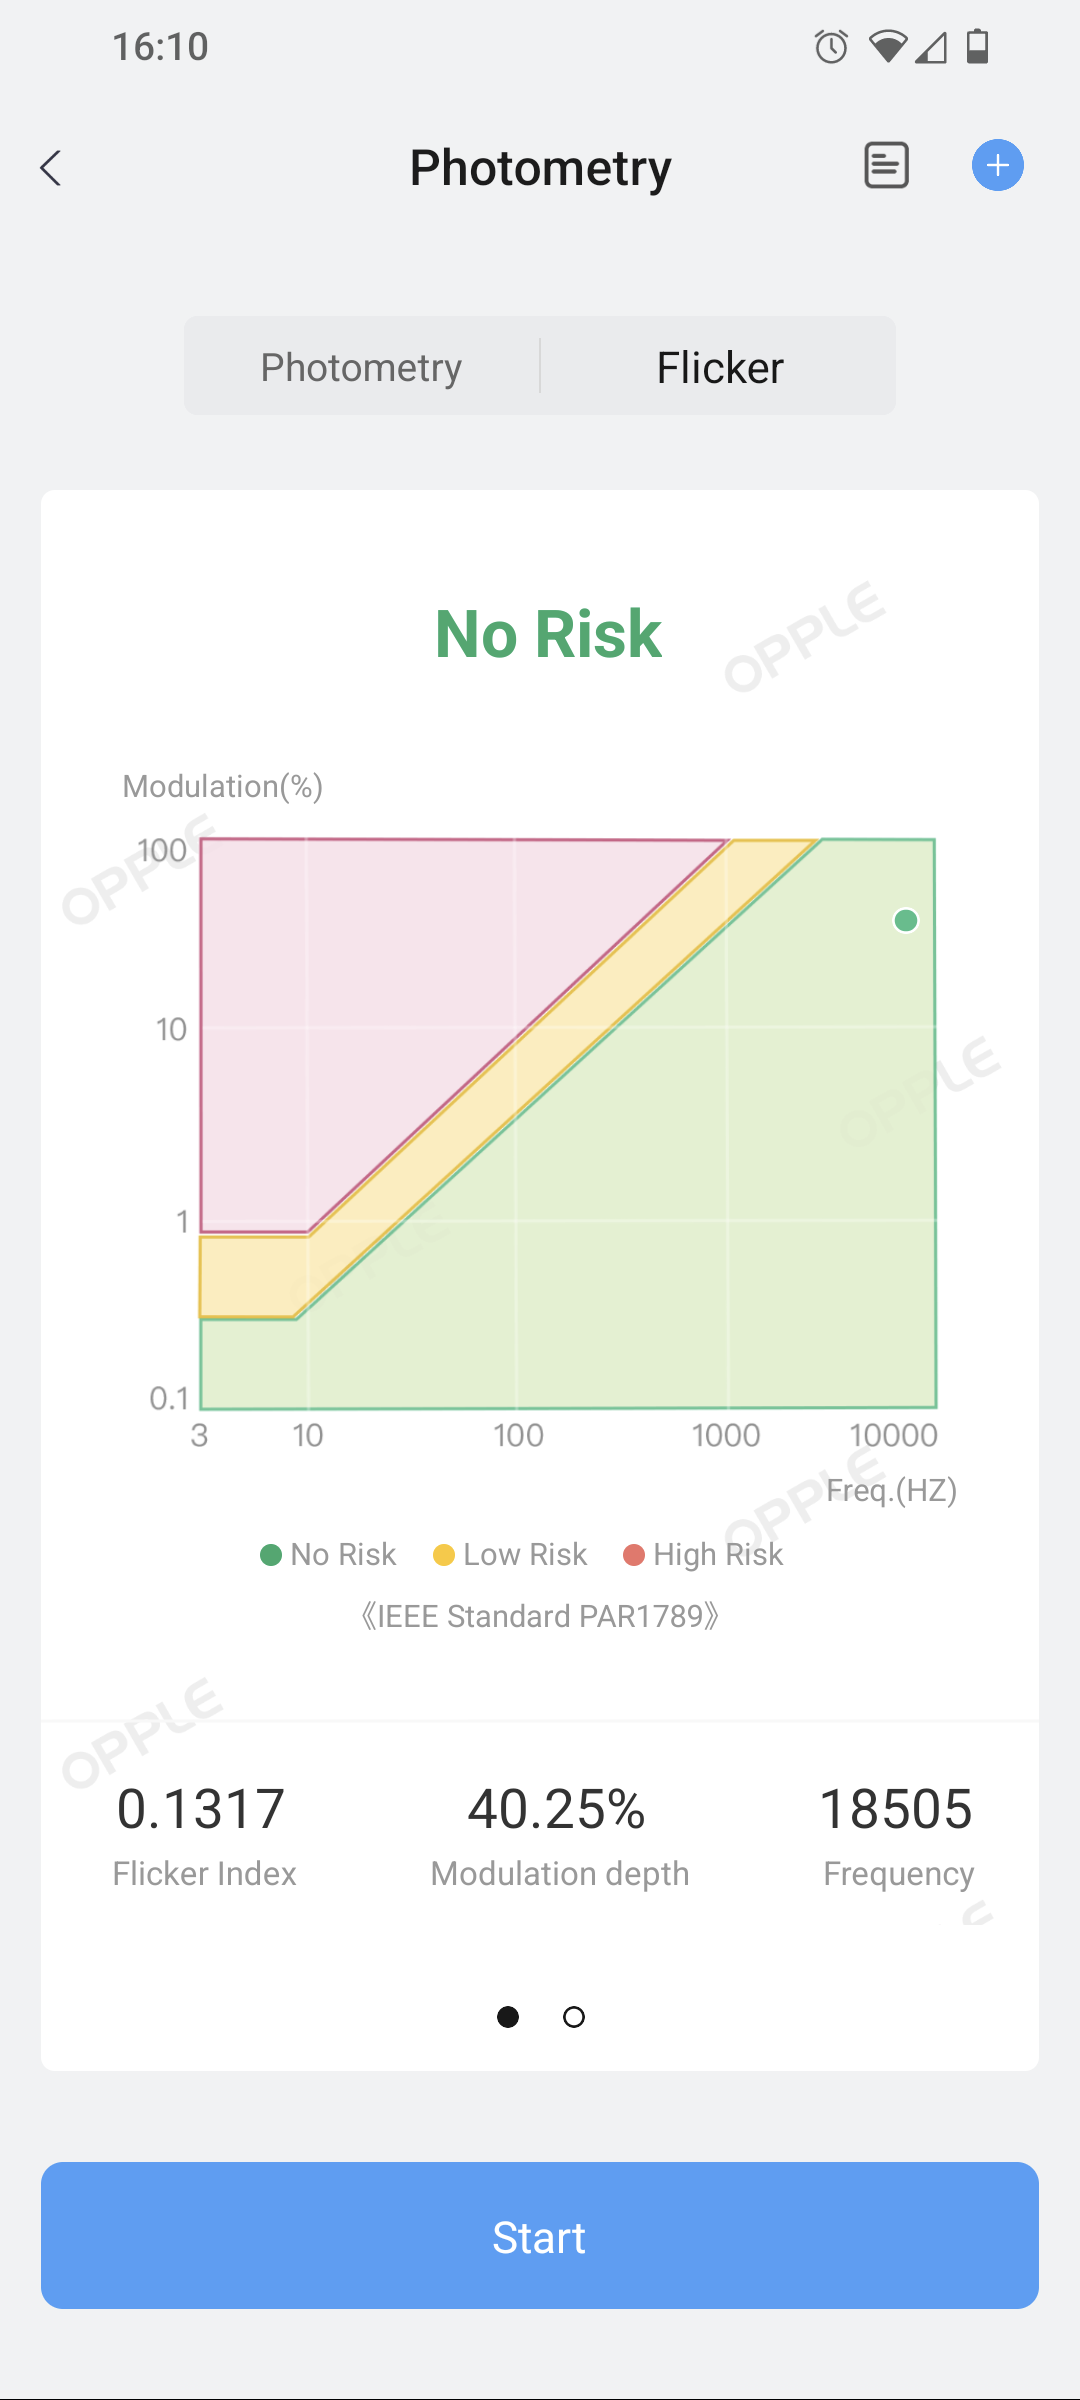
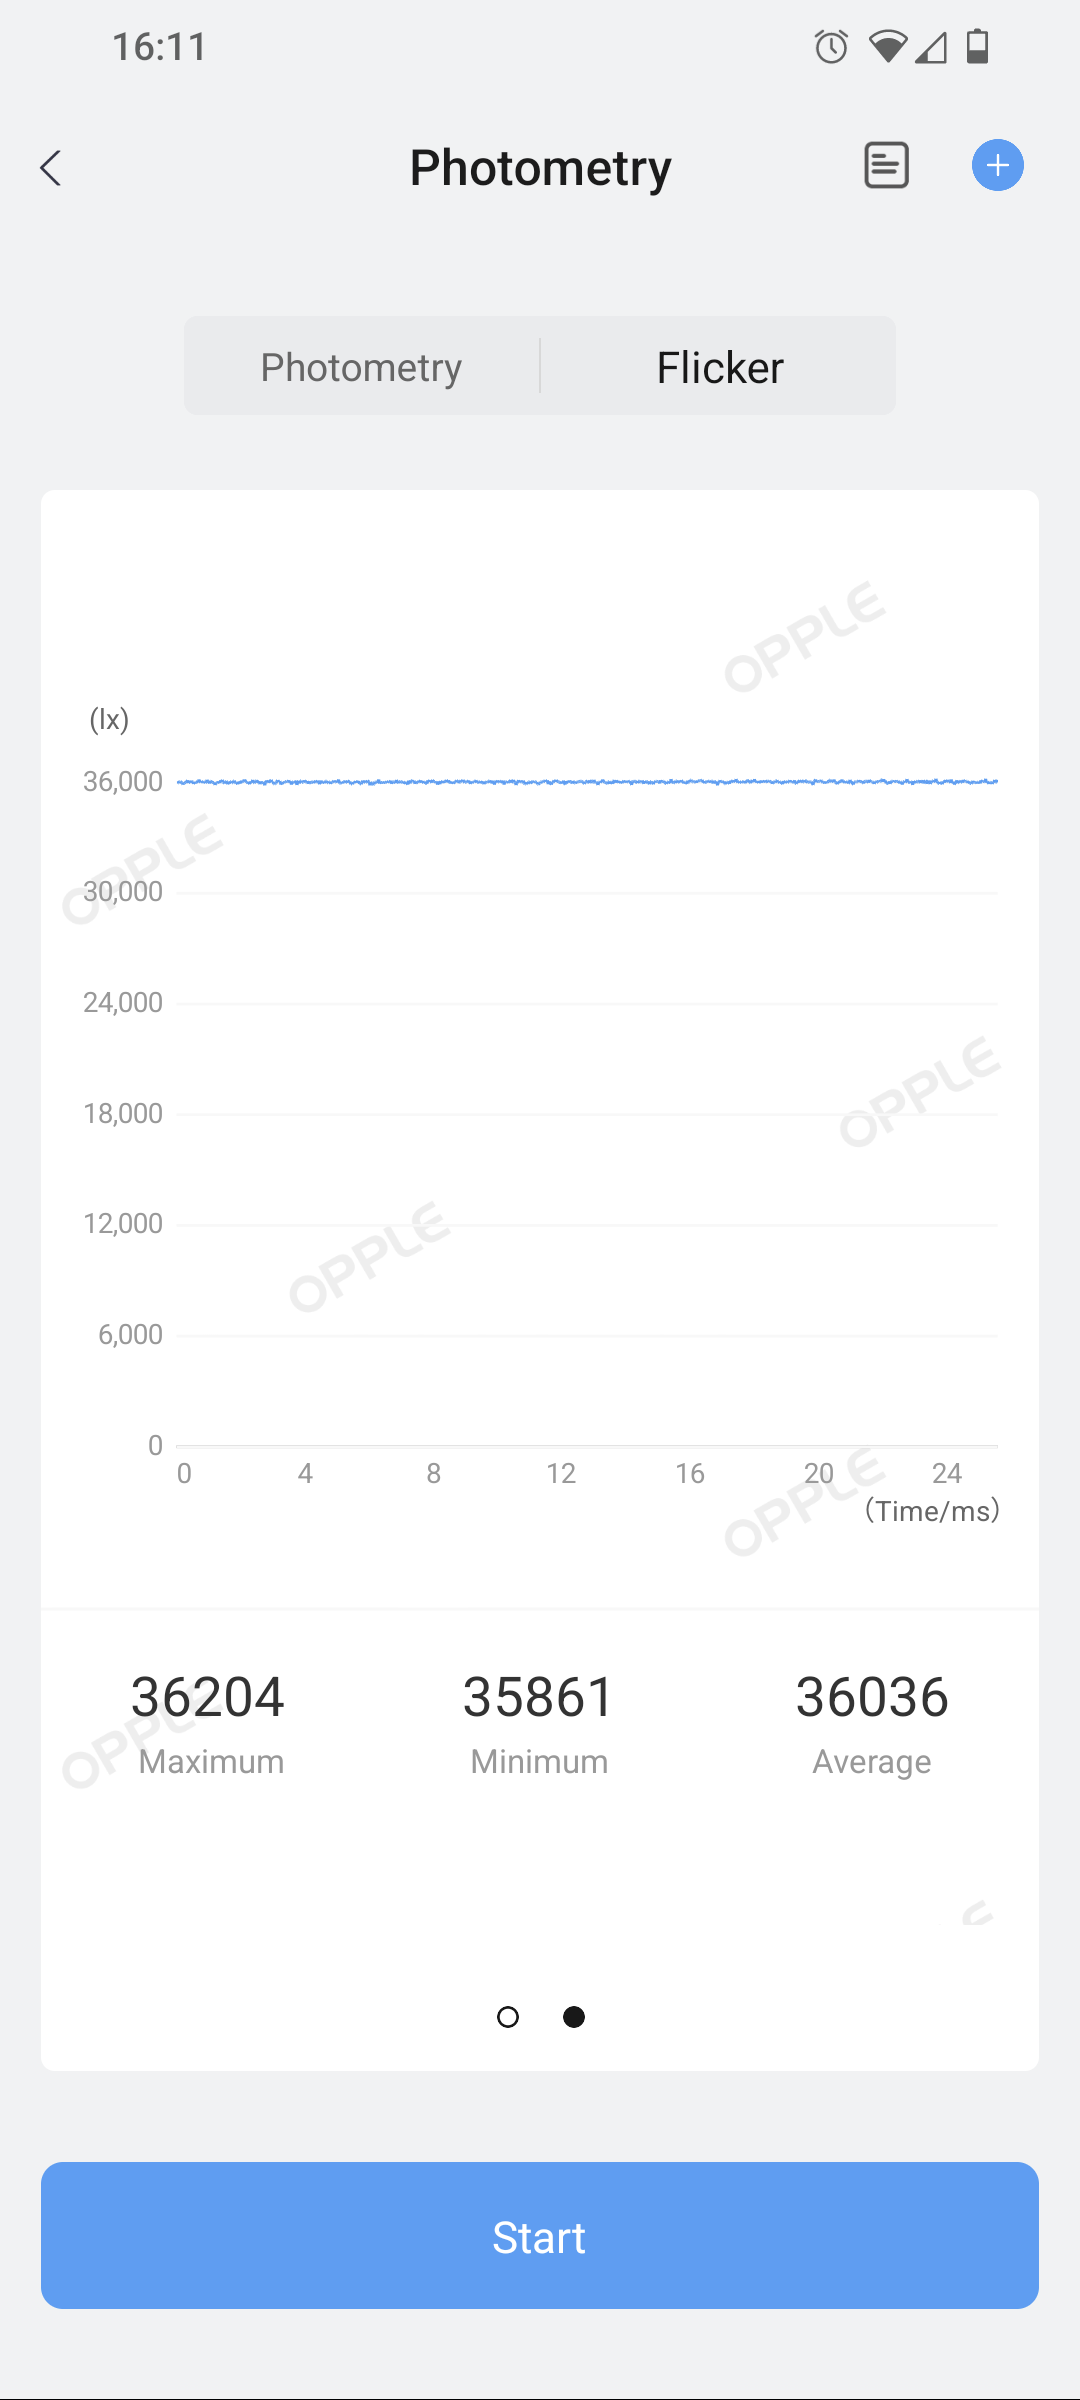
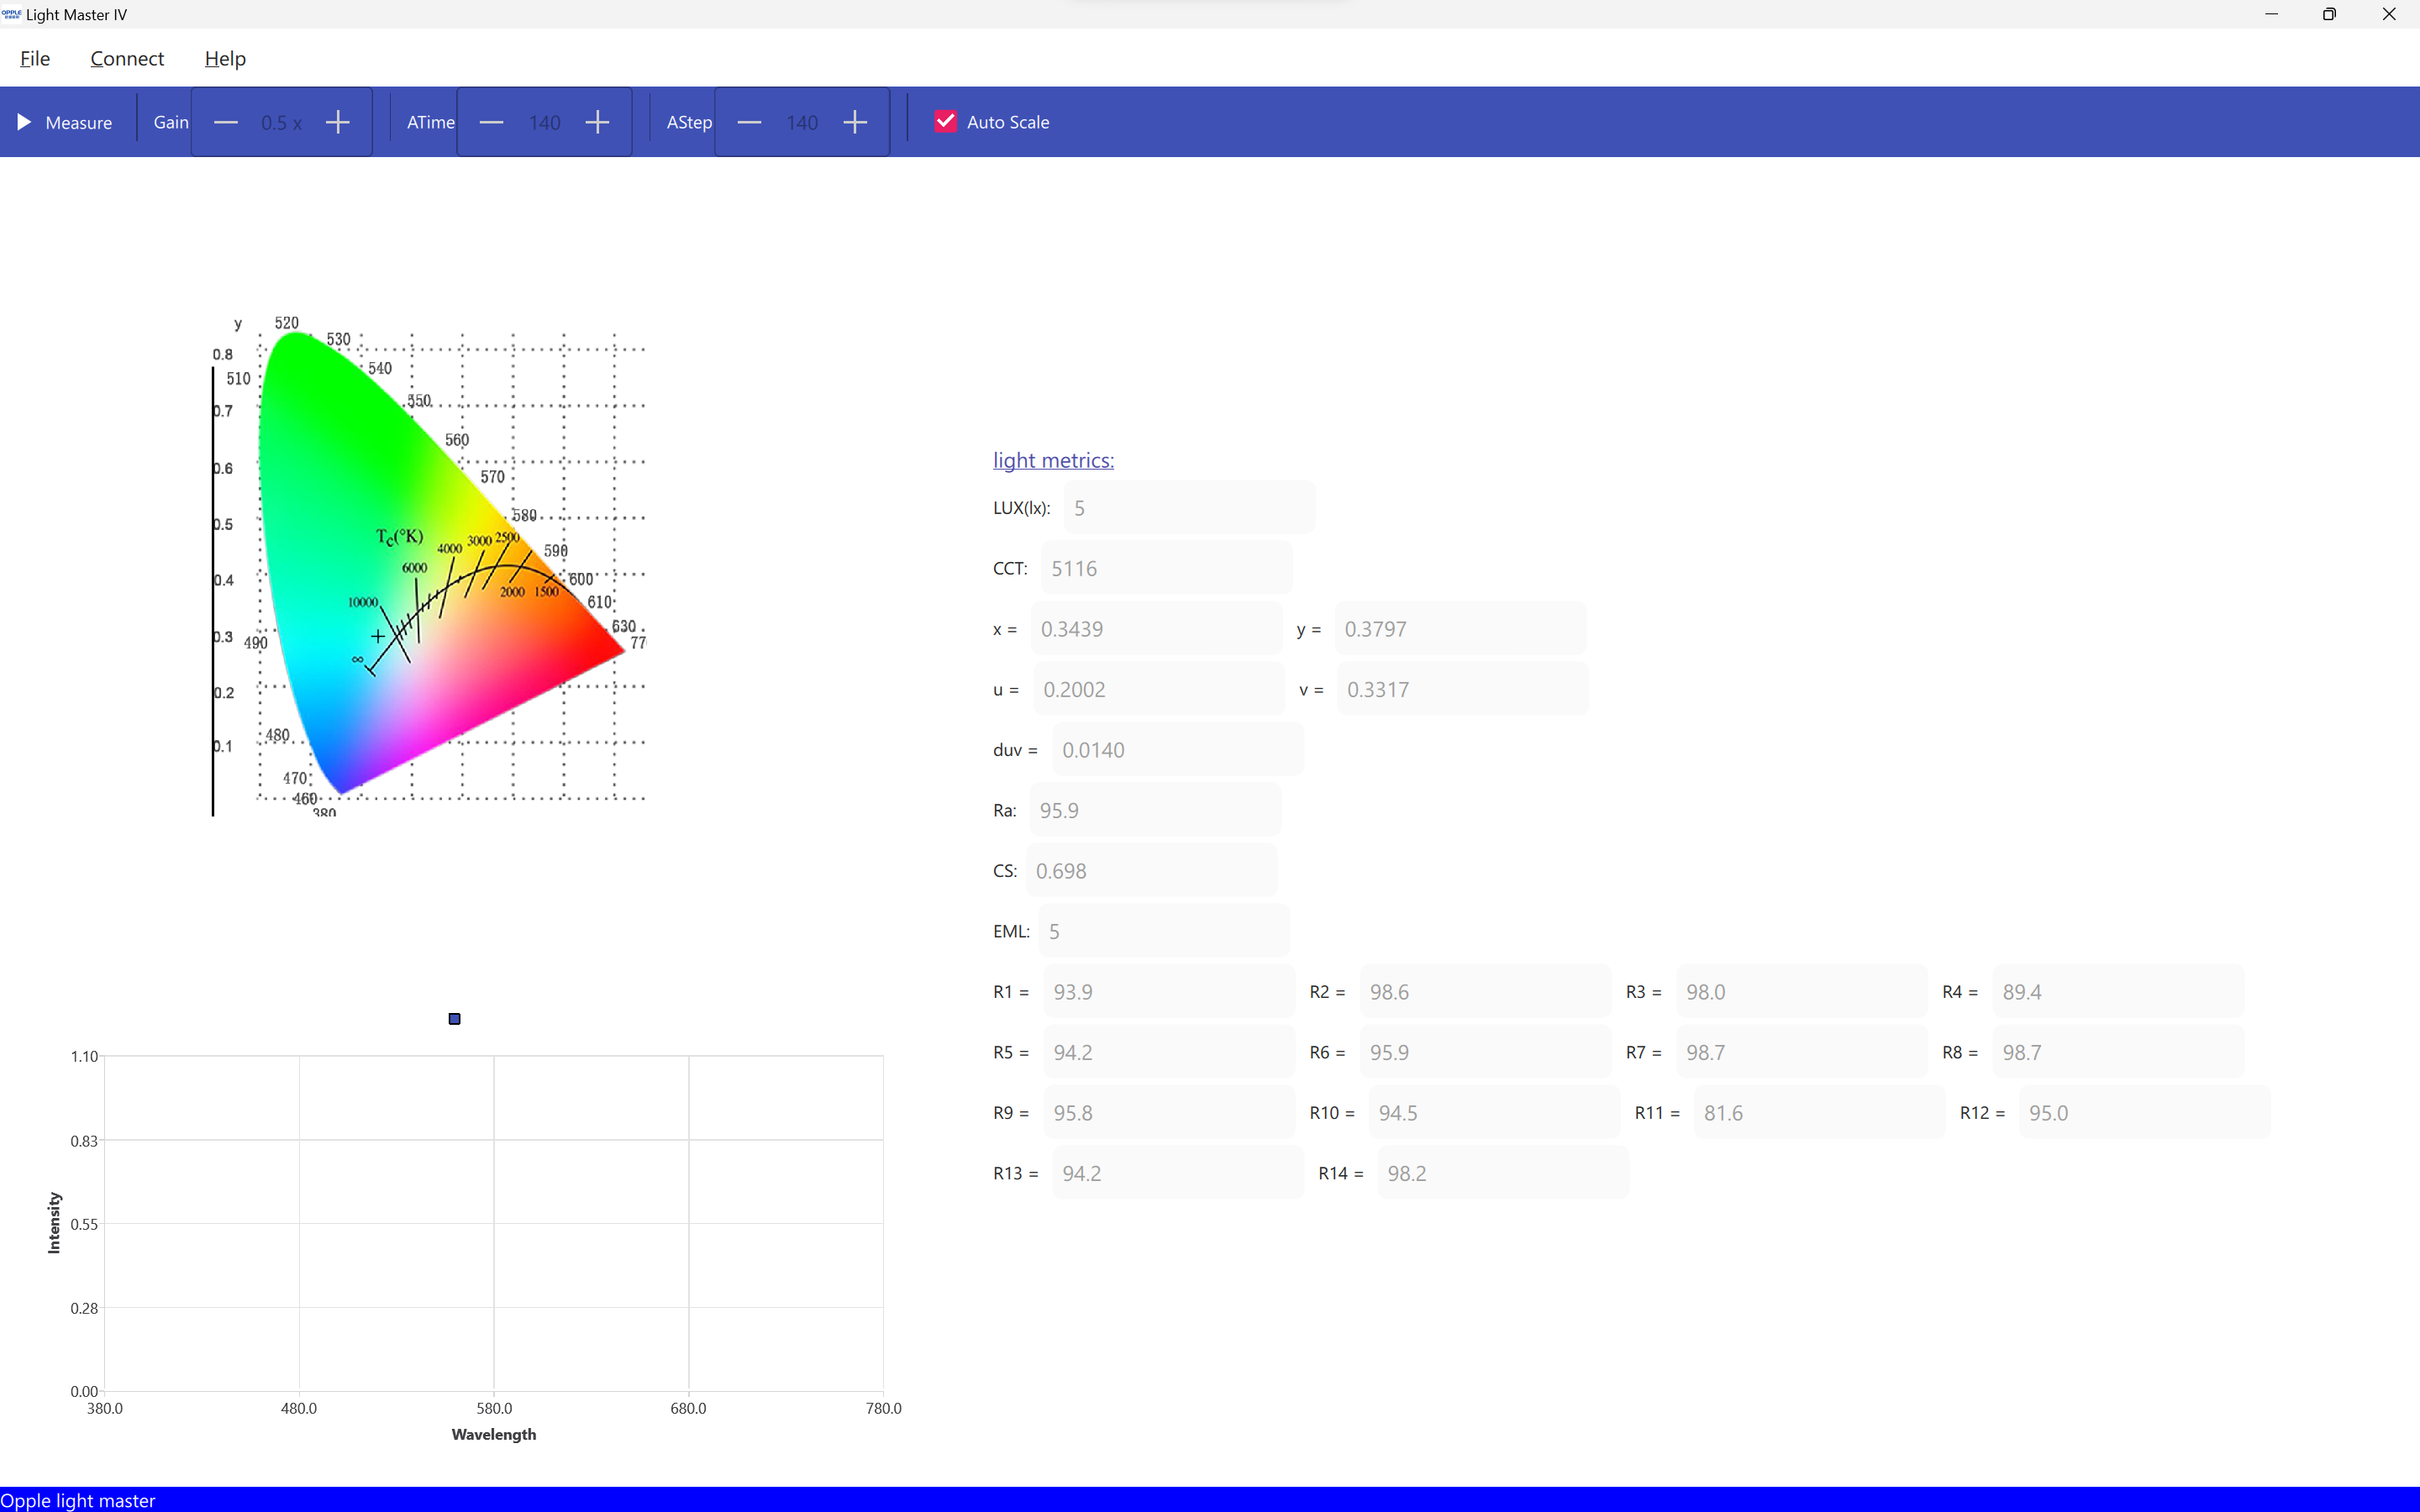
Judging from this, I expected a clearly measurable PWM flicker - measurements with a Opple LM4 confirmed this. All measurements apart from flicker were taken with Steves new Windows application that is yielding decent results for almost all LEDs, while the Flicker readings were taken with the “Opple Smart Lighting” Android app. All in approx. 40 cm distance from the light. The CRI and R9 is excellent, I did not expect Wurkkos to solder such high quality LEDs in this light - especially considering there is zero marketing for “high CRI” or anything involved. This makes the non-removable bezel a bit more bearable ![]()
| LED current at 4.2V | Lux | CCT | DUV | RA | R9 | Flicker Index | Flicker depth | Flicker frequency |
|---|---|---|---|---|---|---|---|---|
| 4.4 mA | 11 | 4176 K | 0.0038 | 96.4 | 92 | 0.1602 | 67.54 % | 6262 Hz |
| 13 mA | 63 | 3992 K | 0.0018 | 97.5 | 95.9 | 0.5704 | 95.81 % | 7838 Hz |
| 40.8 mA | 340 | 4035 K | 0.001 | 97.3 | 95.4 | 0.7457 | 99.5 % | 6420 Hz |
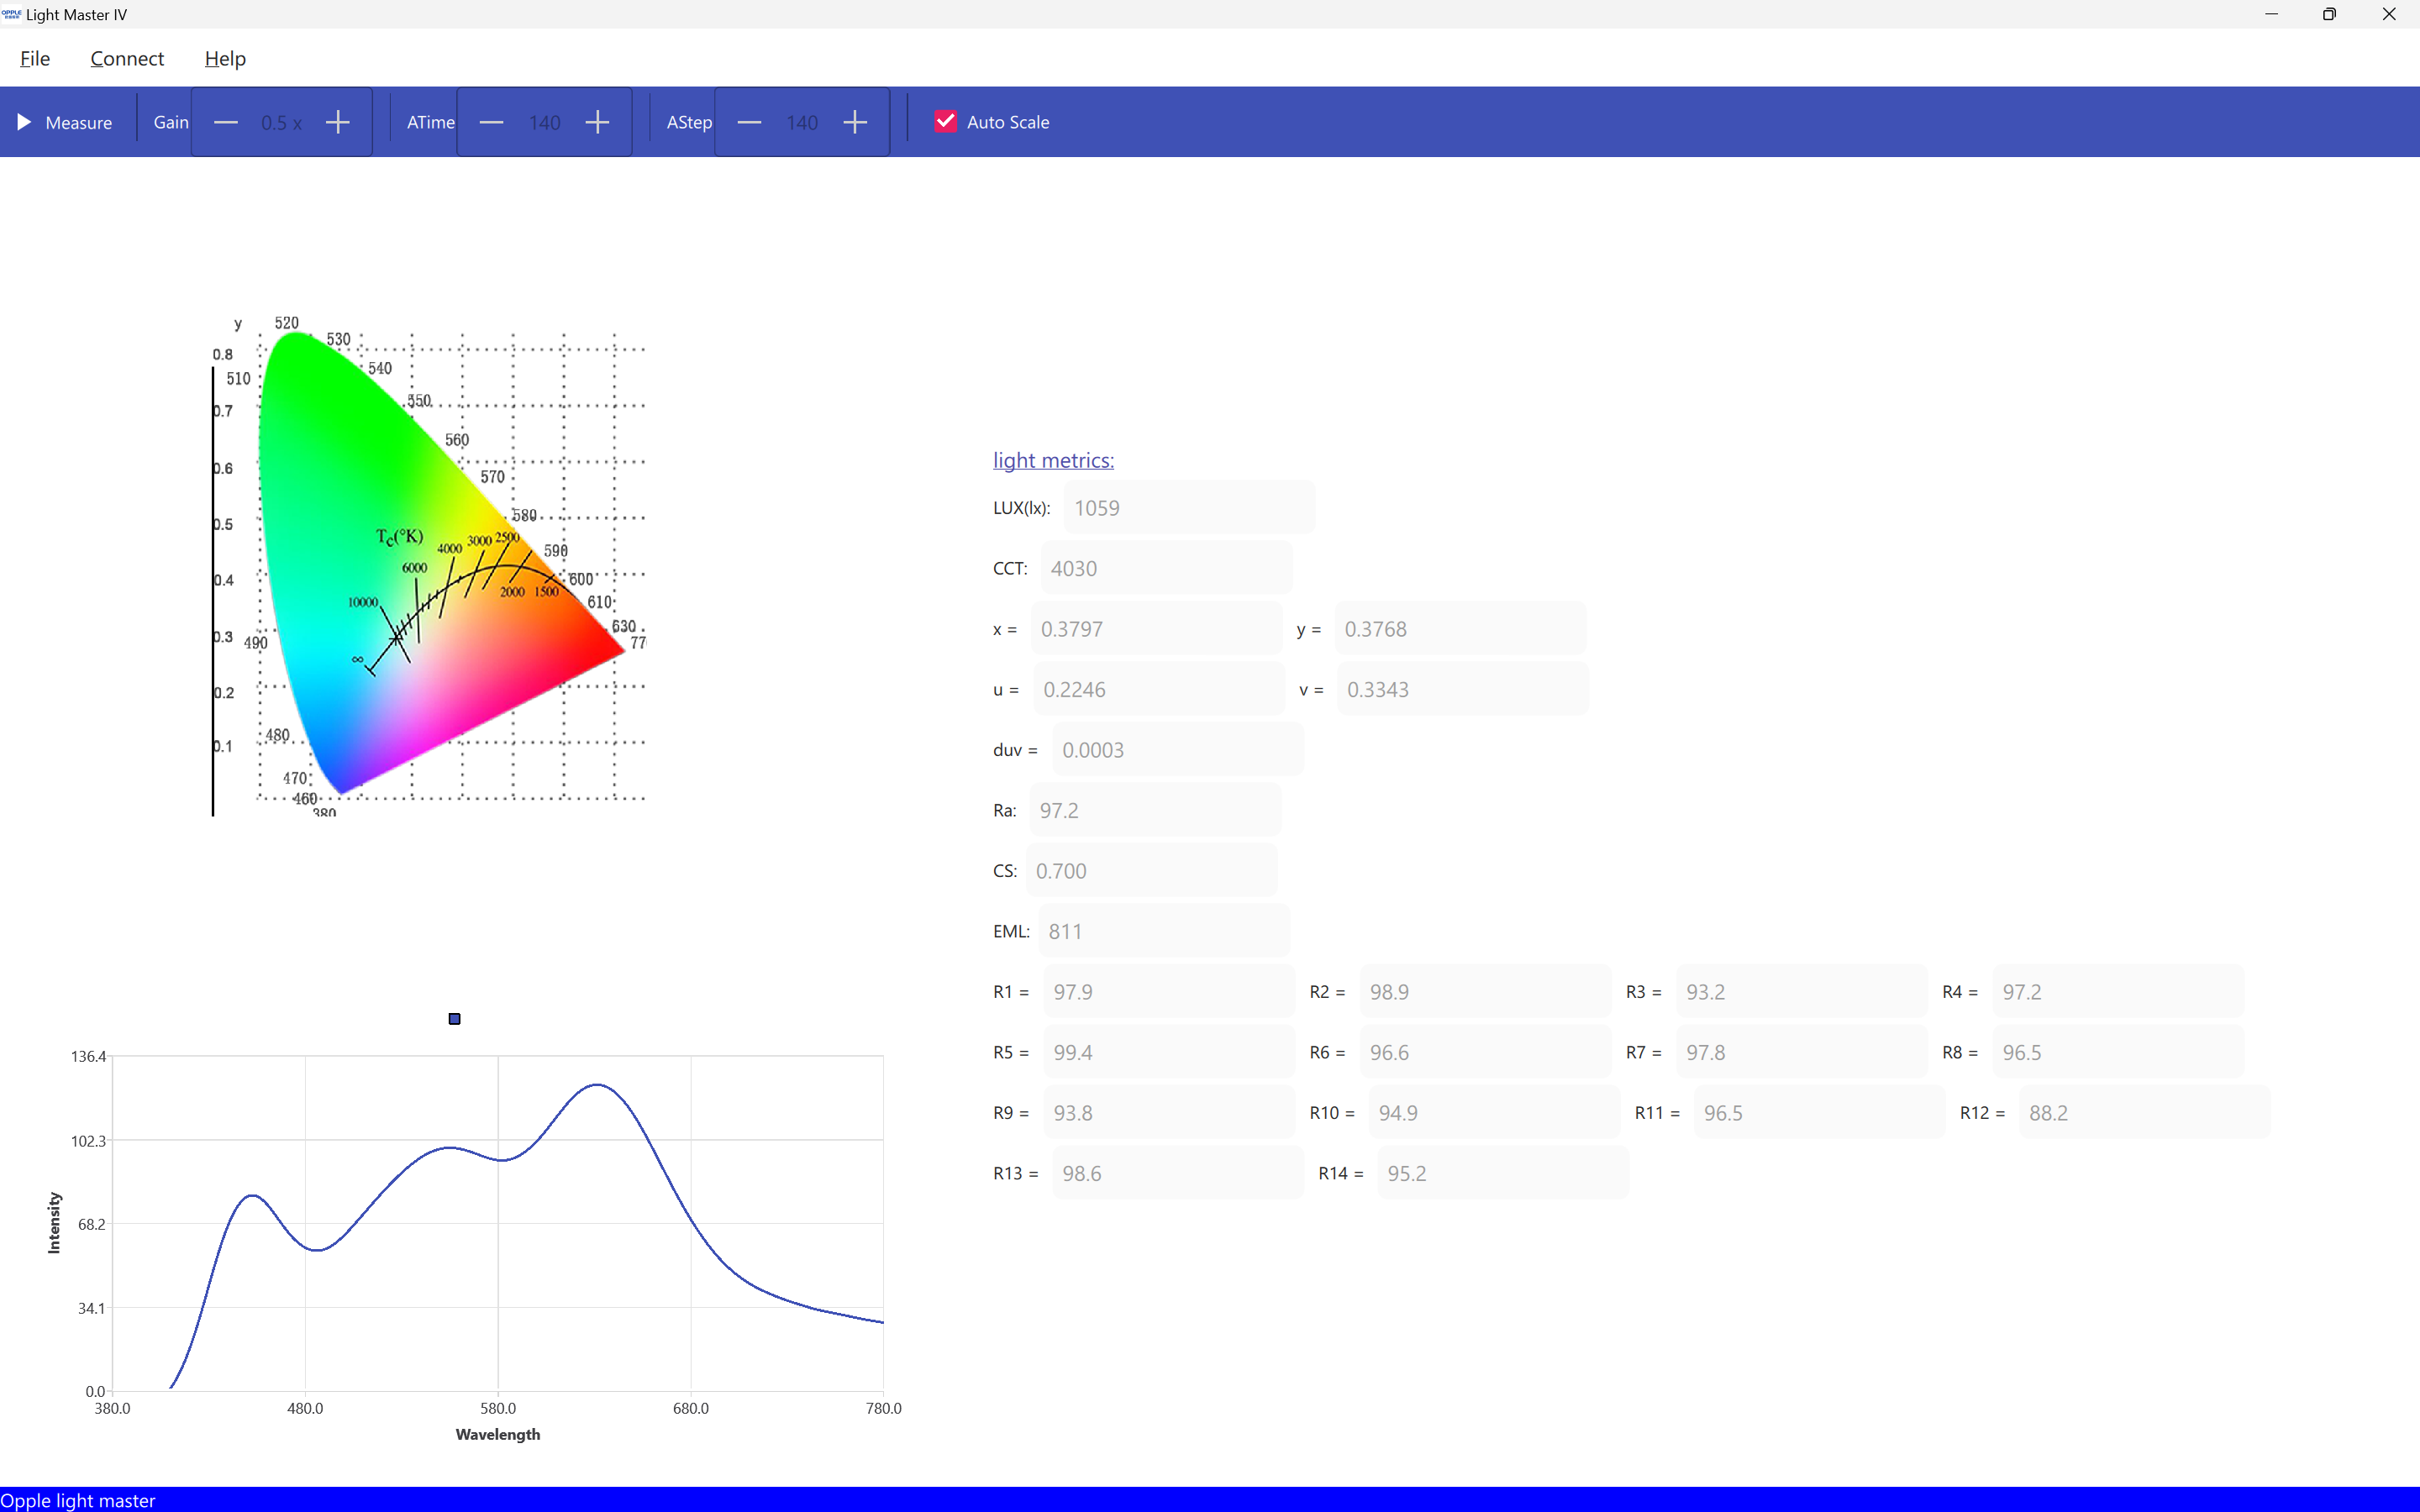
| 111 mA | 1054 | 4030 K | 0.0003 | 97.2 | 93.8 | 0.4953 | 97.76 % | 18505 Hz |
| 273 mA | 2642 | 4029 K | 0.0002 | 97.2 | 94 | 0.1977 | 82.07 % | 18505 Hz |
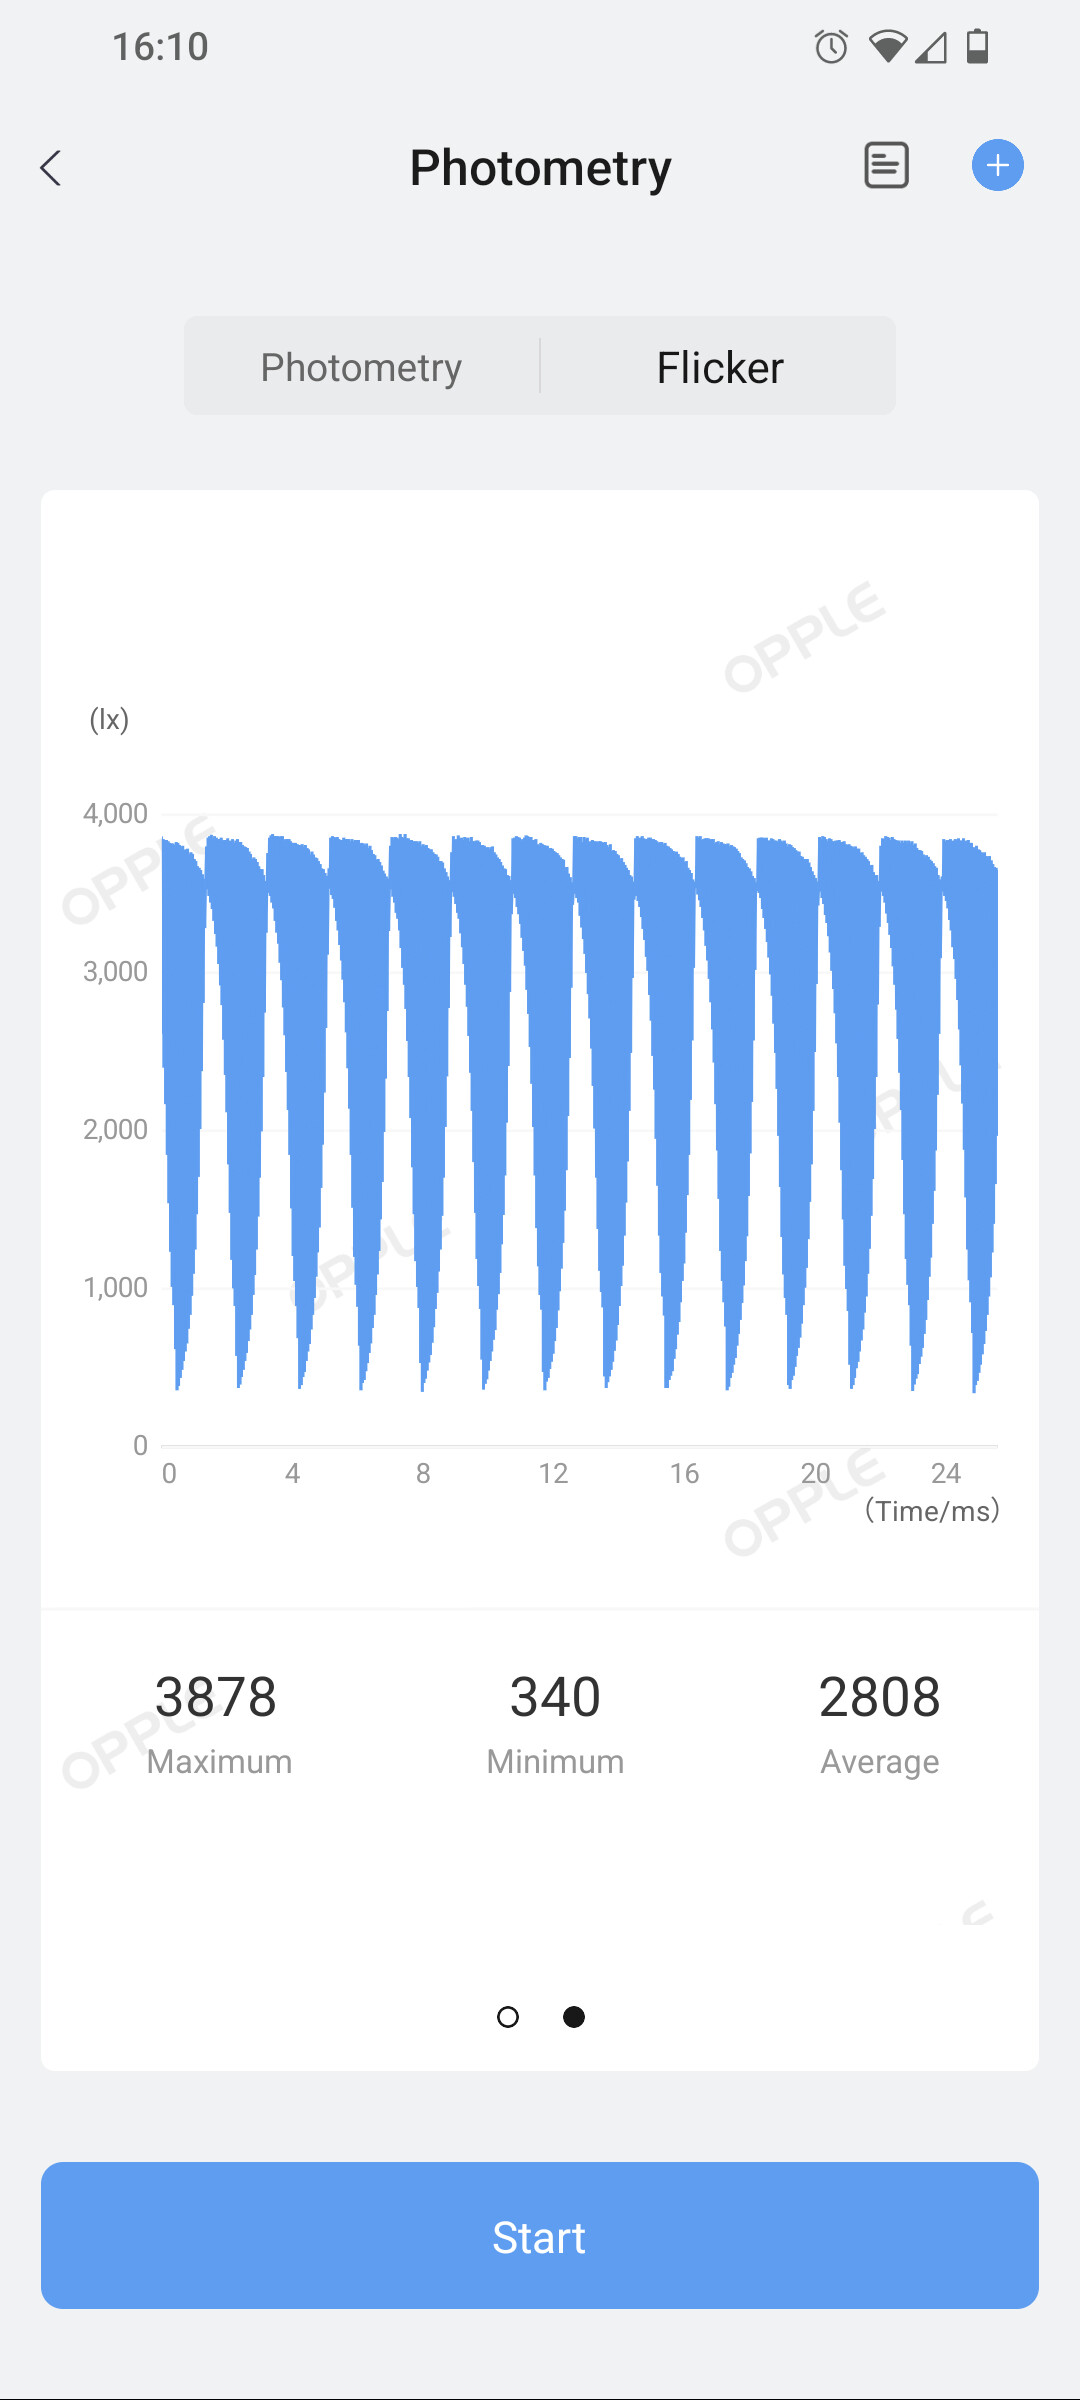
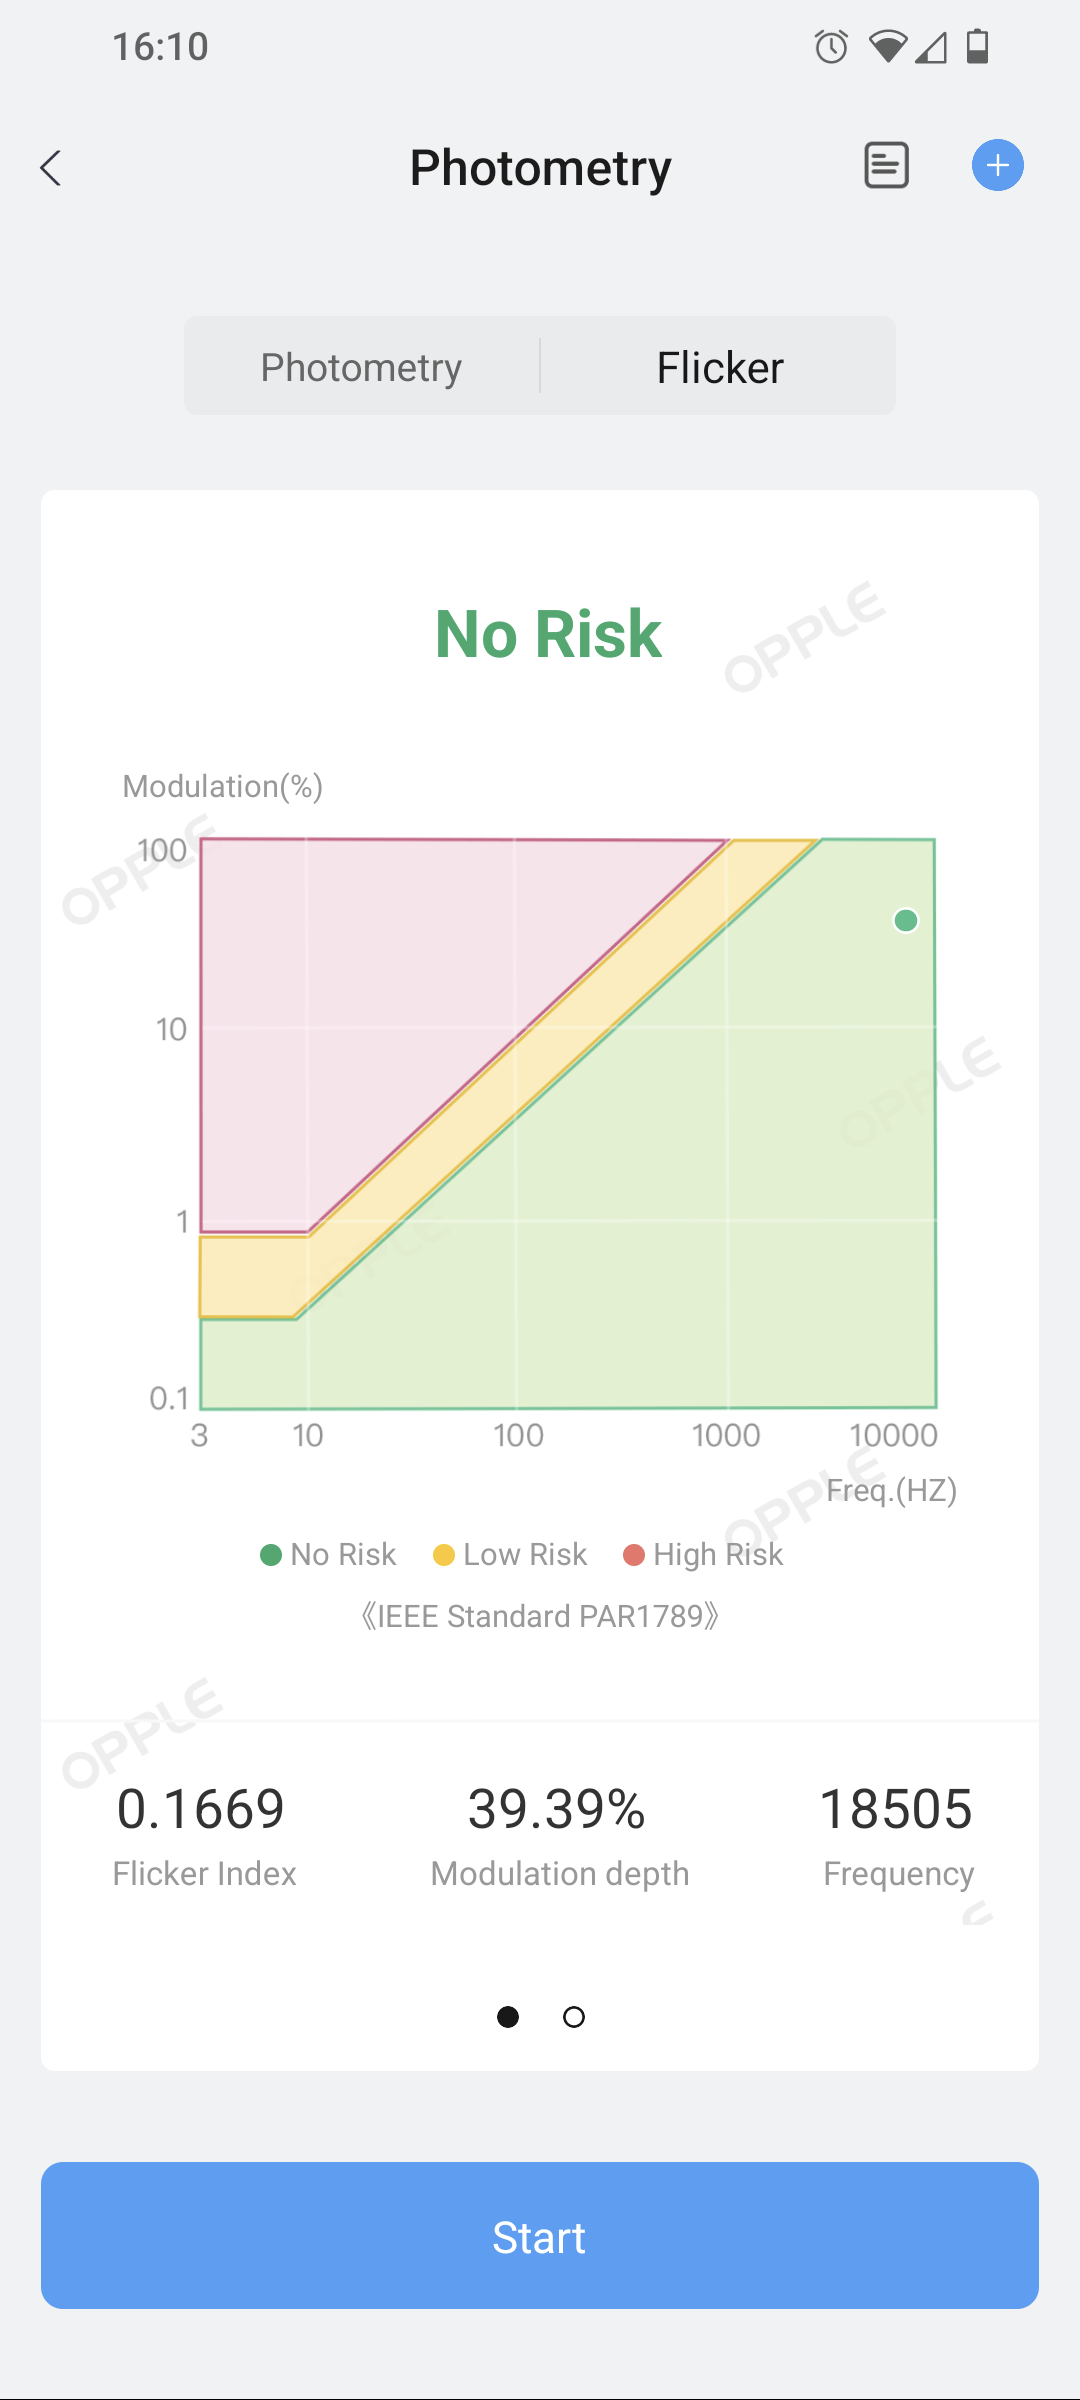
| 887 mA | 7072 | 4121 K | 0.0012 | 95.8 | 97.6 | 0.1669 | 39.39 % | 18505 Hz |
| 1870 mA | 14953 | 4119 K | 0.0003 | 95.1 | 94.6 | 0.1317 | 40.25 % | 18505 Hz |
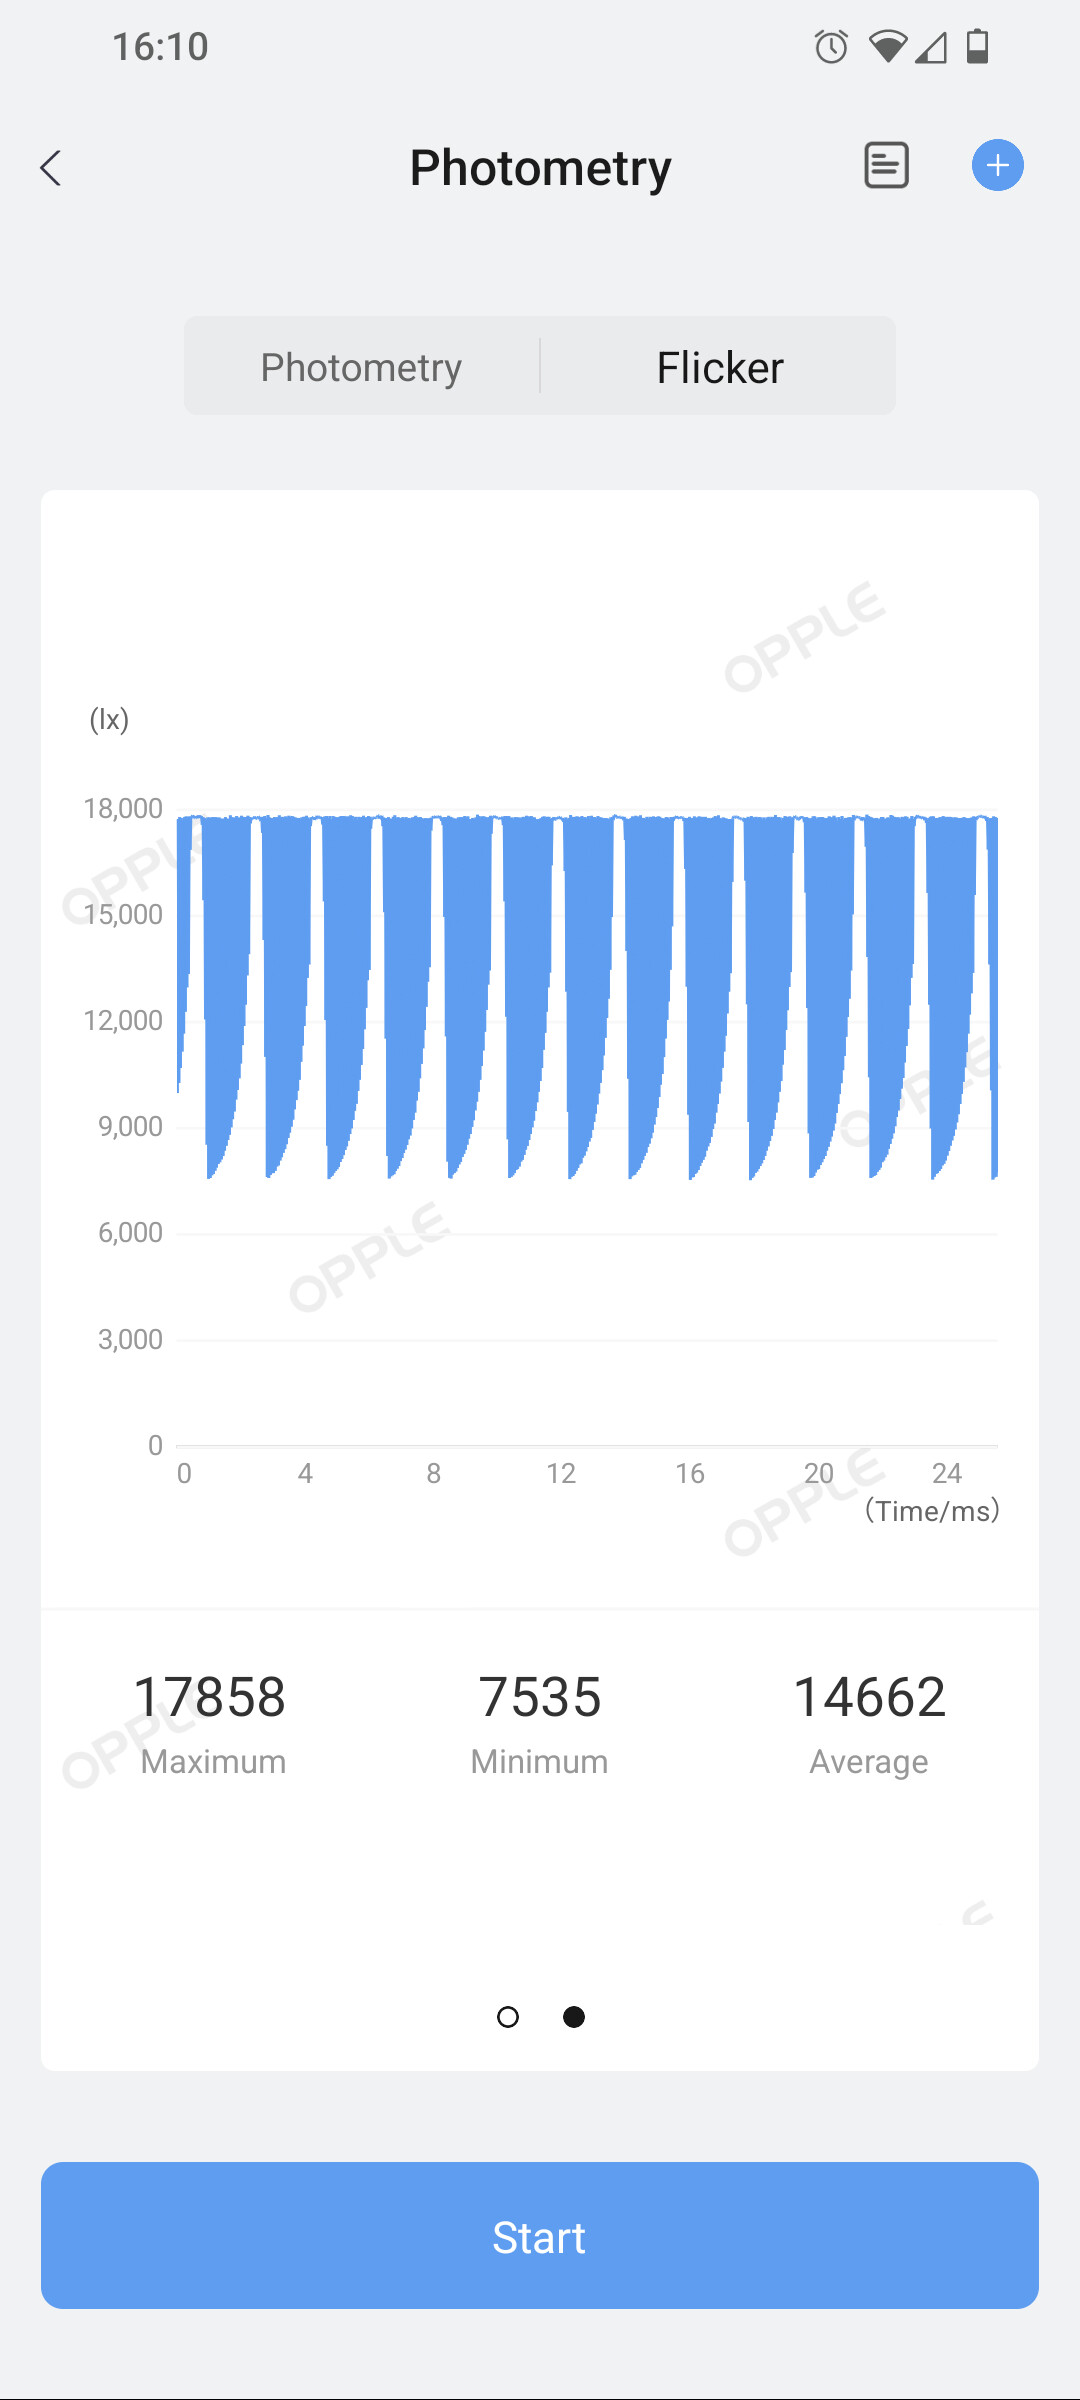
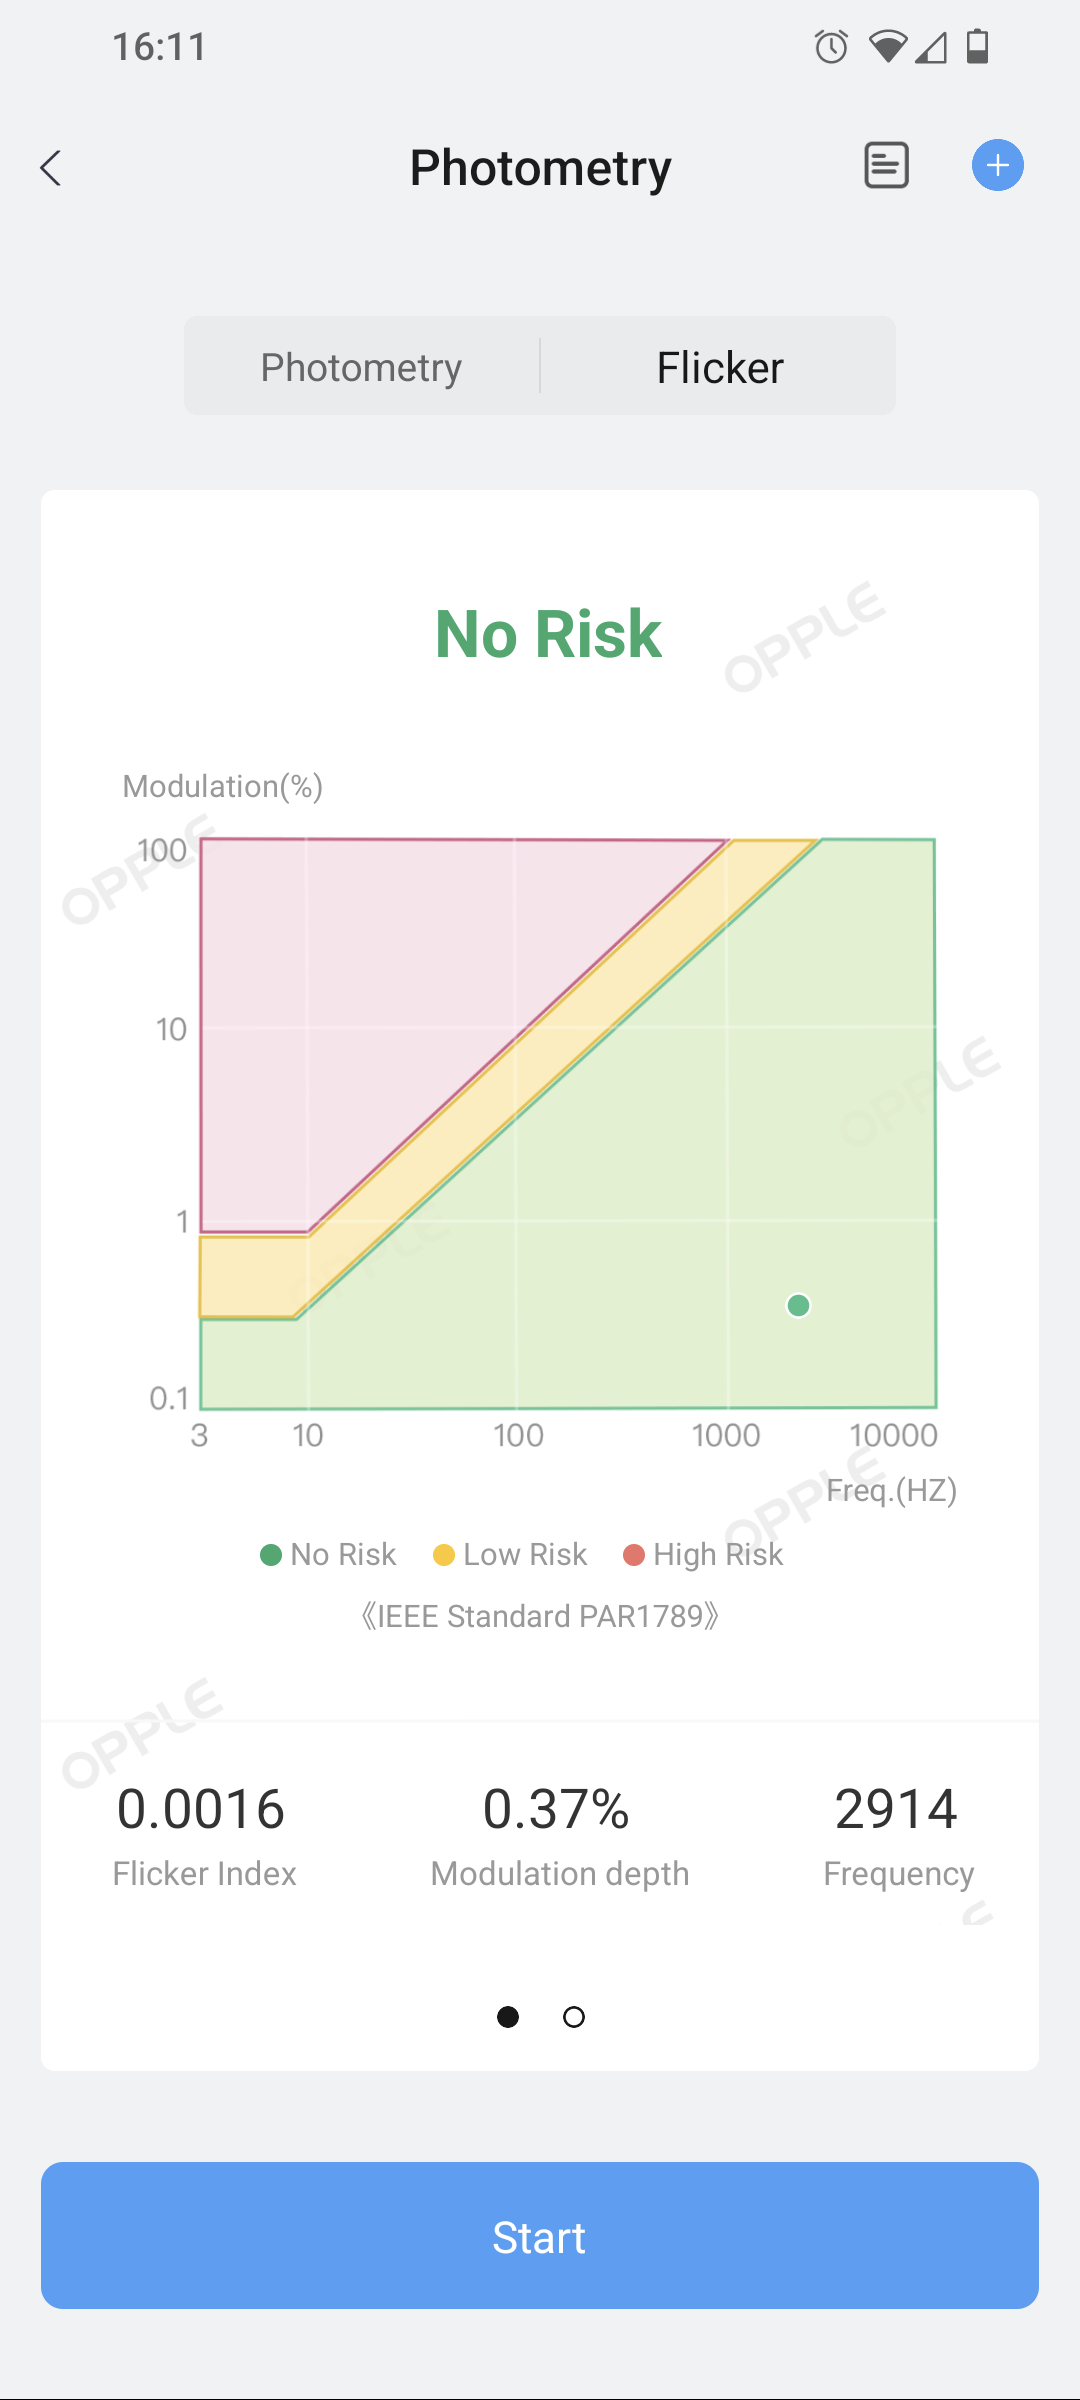
| 5000 mA | 36861 | 4147 K | -0.0019 | 96 | 93.2 | 0.0016 | 0.37 % | NA |
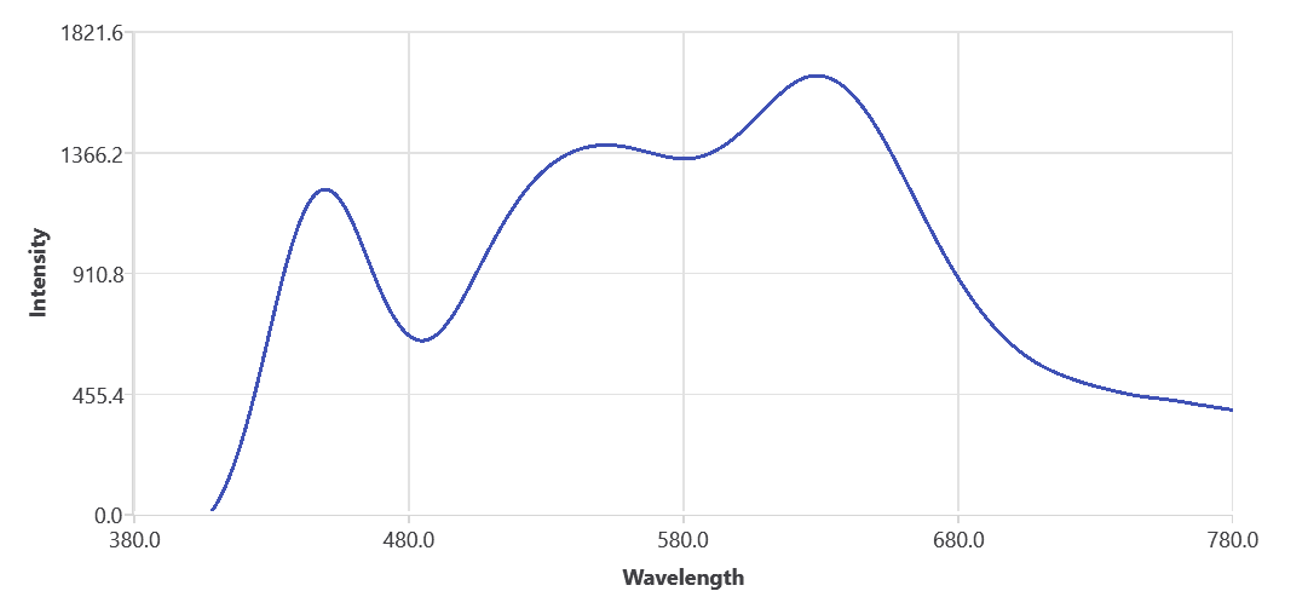
This is a spectrum, recorded at 1870 mA current. The others looked similar, with some slight changes. Keep in mind, the Opple LM4 is not a spectrometer, but a multi-band-sensor - this spectrum is reconstructed using a mathematical model and not directly measured. Usually the reconstructed spectra of the Windows client match actual spectra well (as tested by @koef3).
The full reports are hidden away behind spoiler tags to avoid making you scroll for 5 minutes, and since most won’t care - I only included them for completion.
Opple Flicker screenshots
Step 1

Step 2
Step 3
Step 4
Step 5 (last step done by the AMC7135)

Step 6
Step 7
Turbo
Opple Intensity/DUV/CRI/R9 measurements
Baseline (Light off)
Step 1

Step 2

Step 3

Step 4
Step 5

Step 6

Step 7

Step 8

In my testing, on the highest non-turbo level of the stepped UI with default settings, it could last for over 2 minutes before starting to ramp down and being (very) hot to the touch (indoors, no airflow). The next lower level got hot, but ran for over 10 minutes without any (visually) noticeable step-down. This obviously depends a lot on the battery, as the higher modes are battery voltage (and internal restistance) dependant. I have not actively used the light for extended periods of time in one go yet to say how it behaves during longer nighttime walks or car repair sessions.
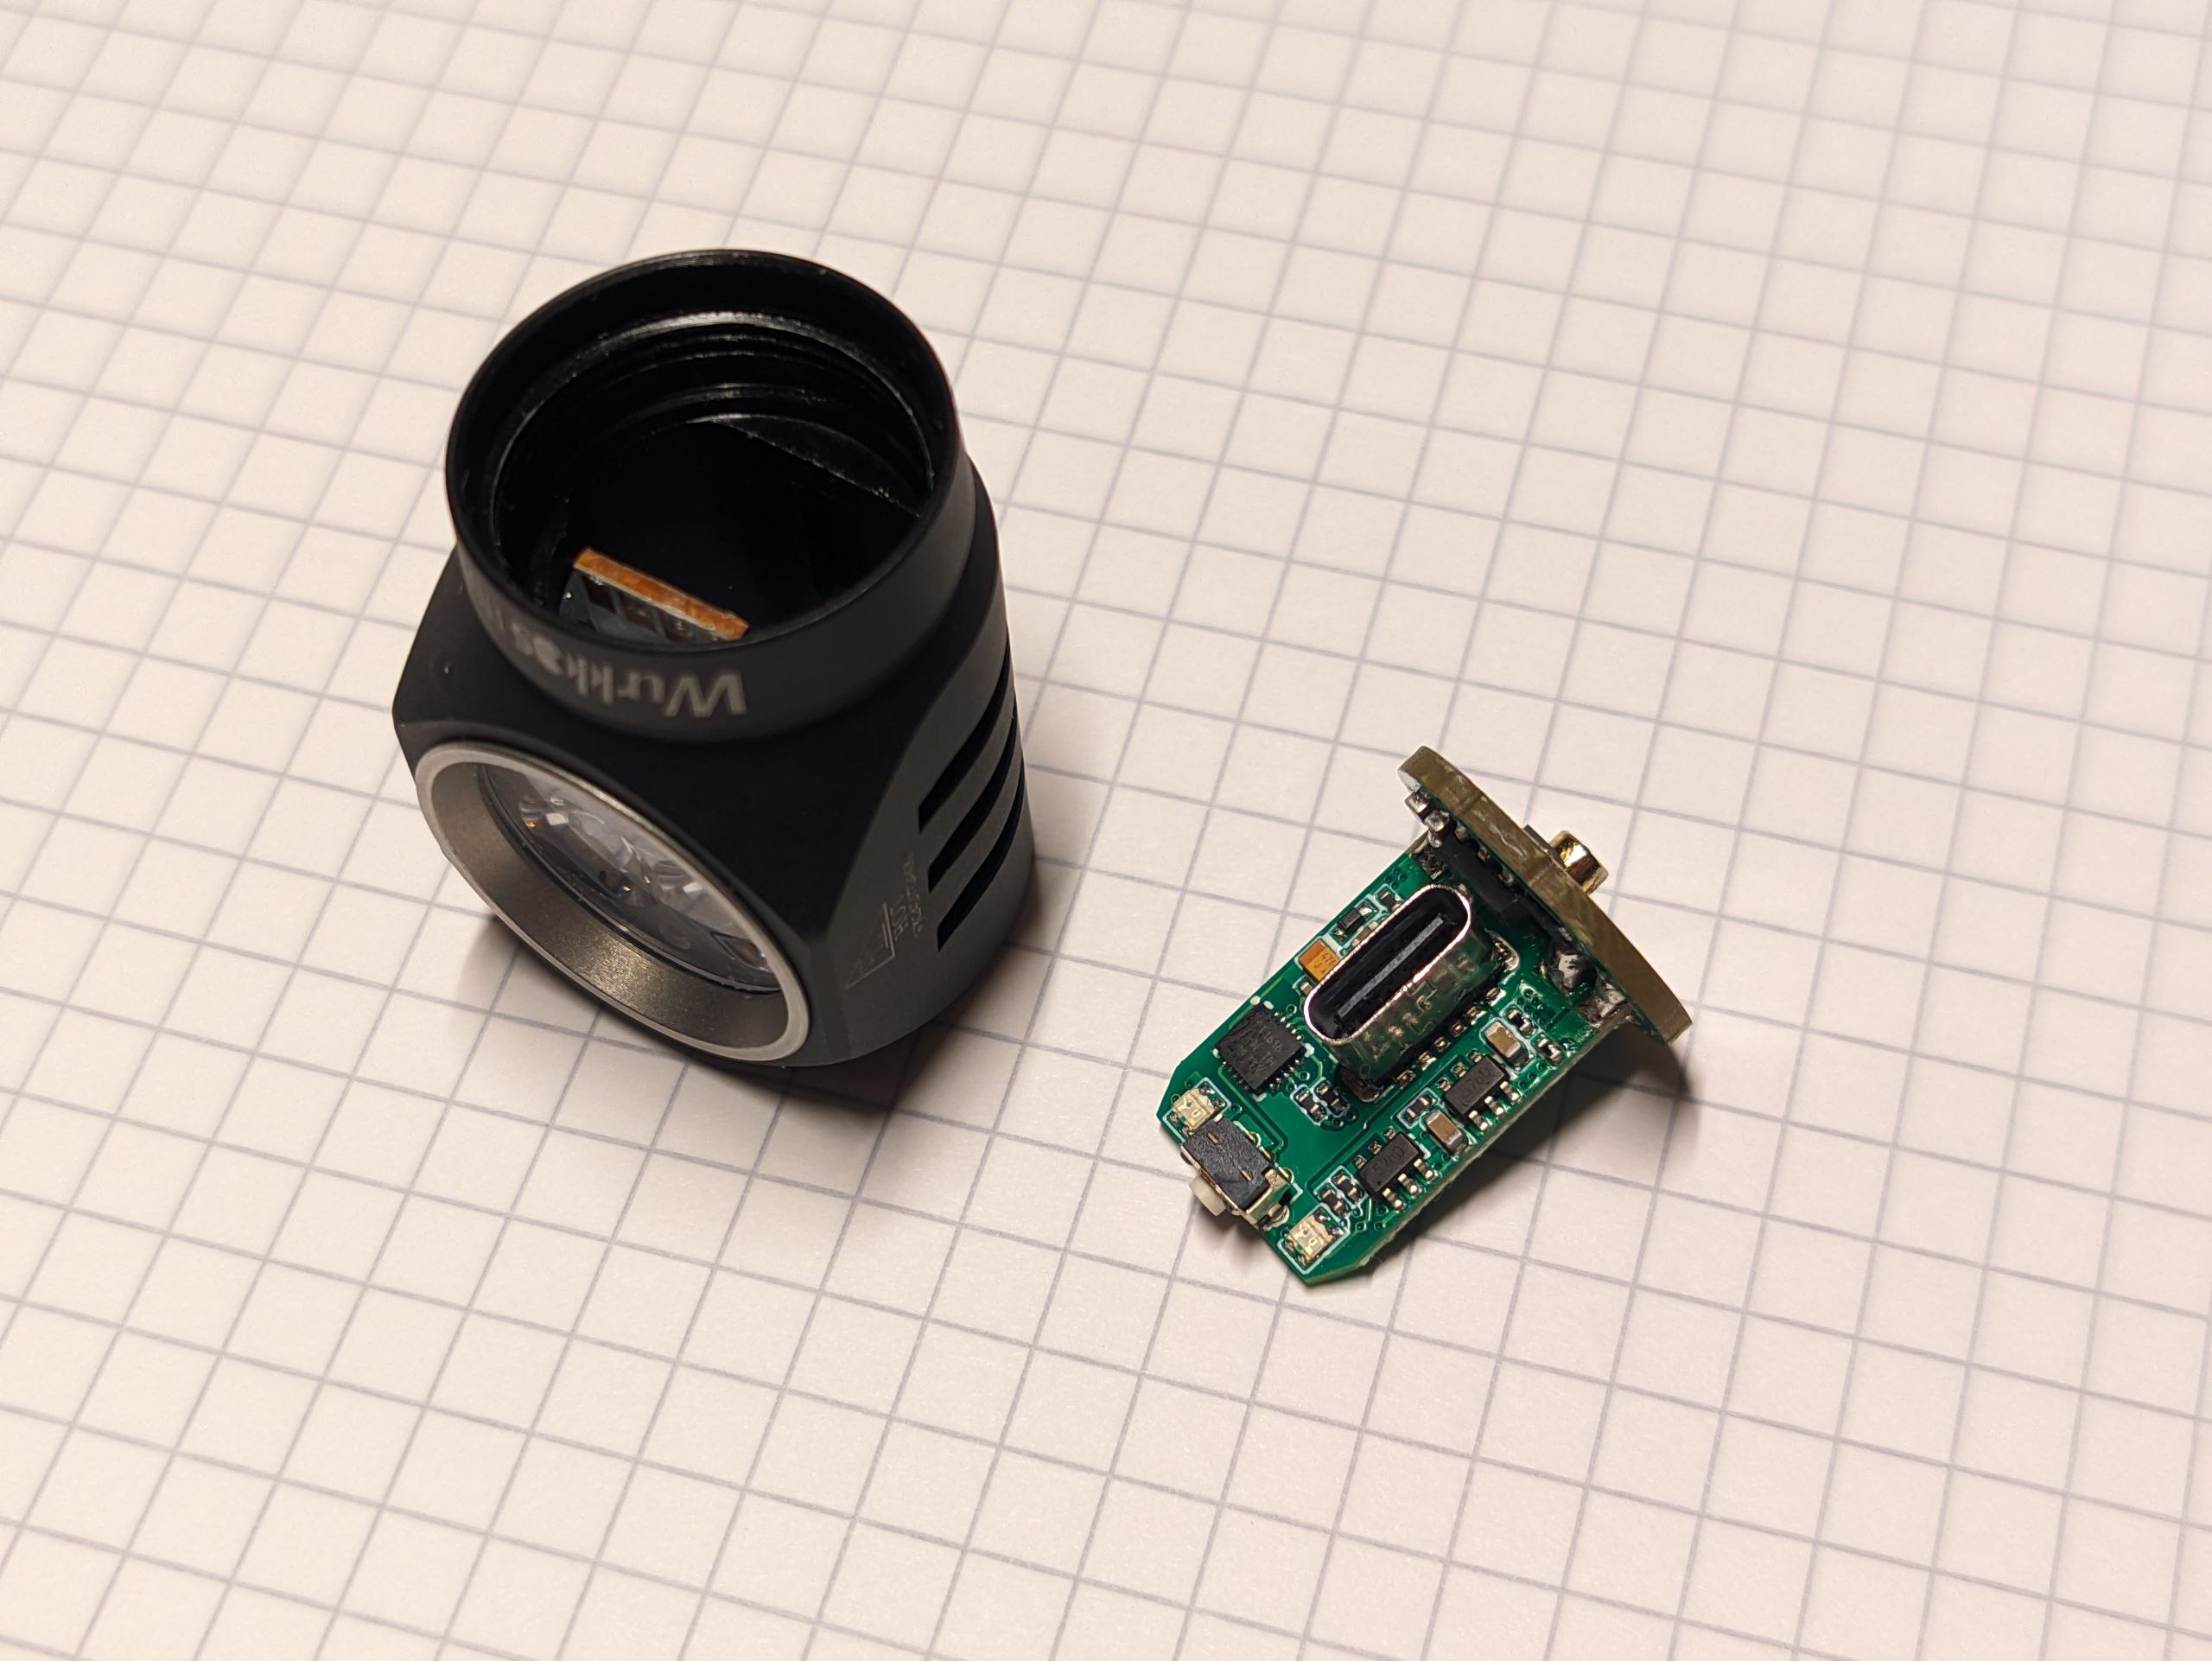
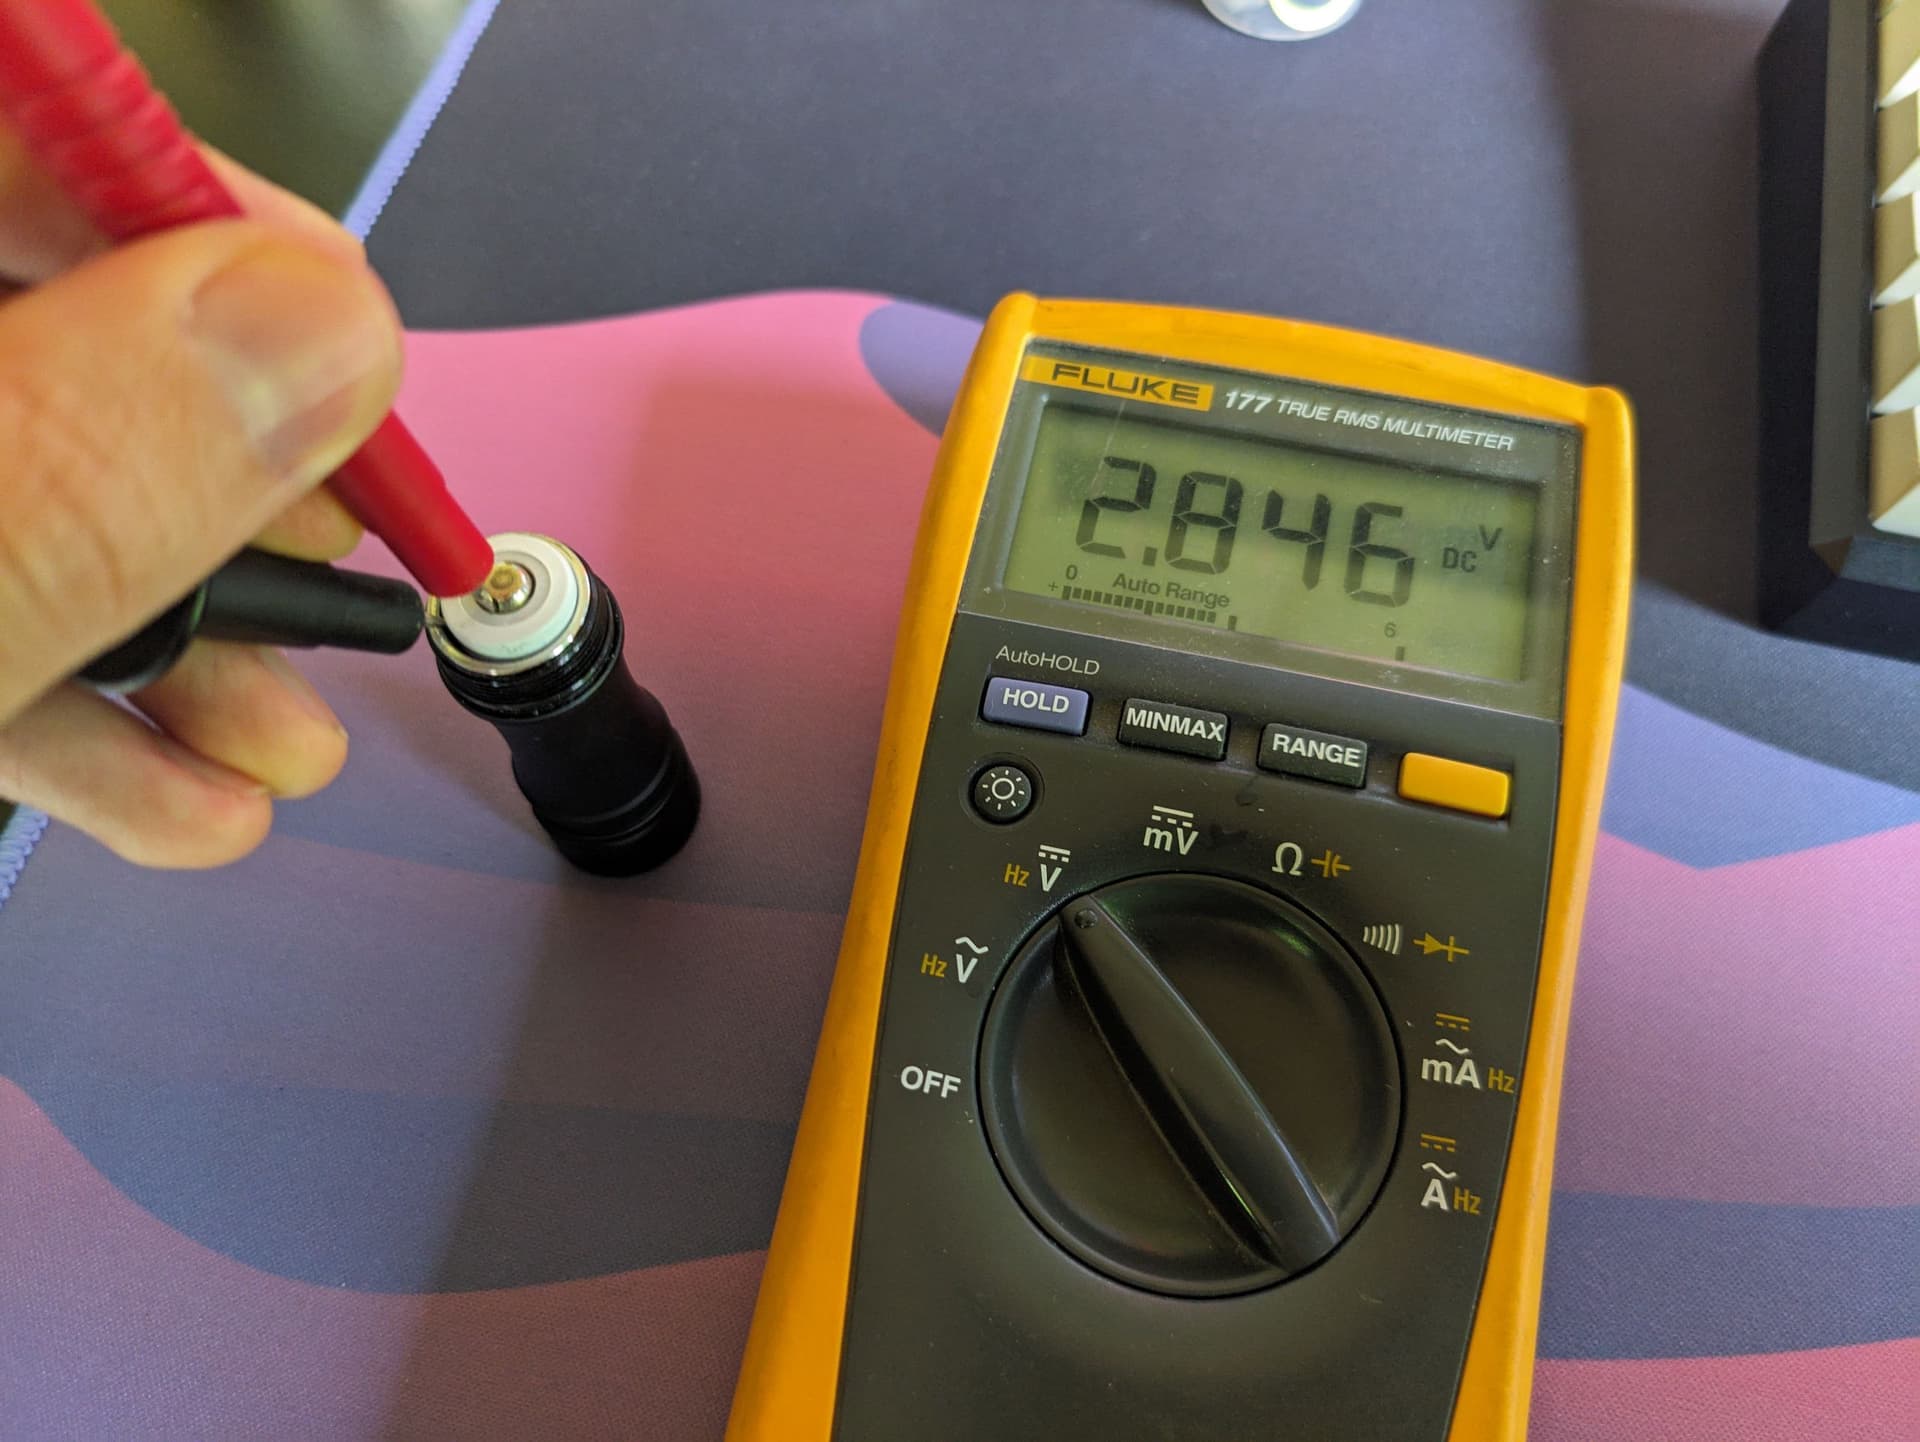
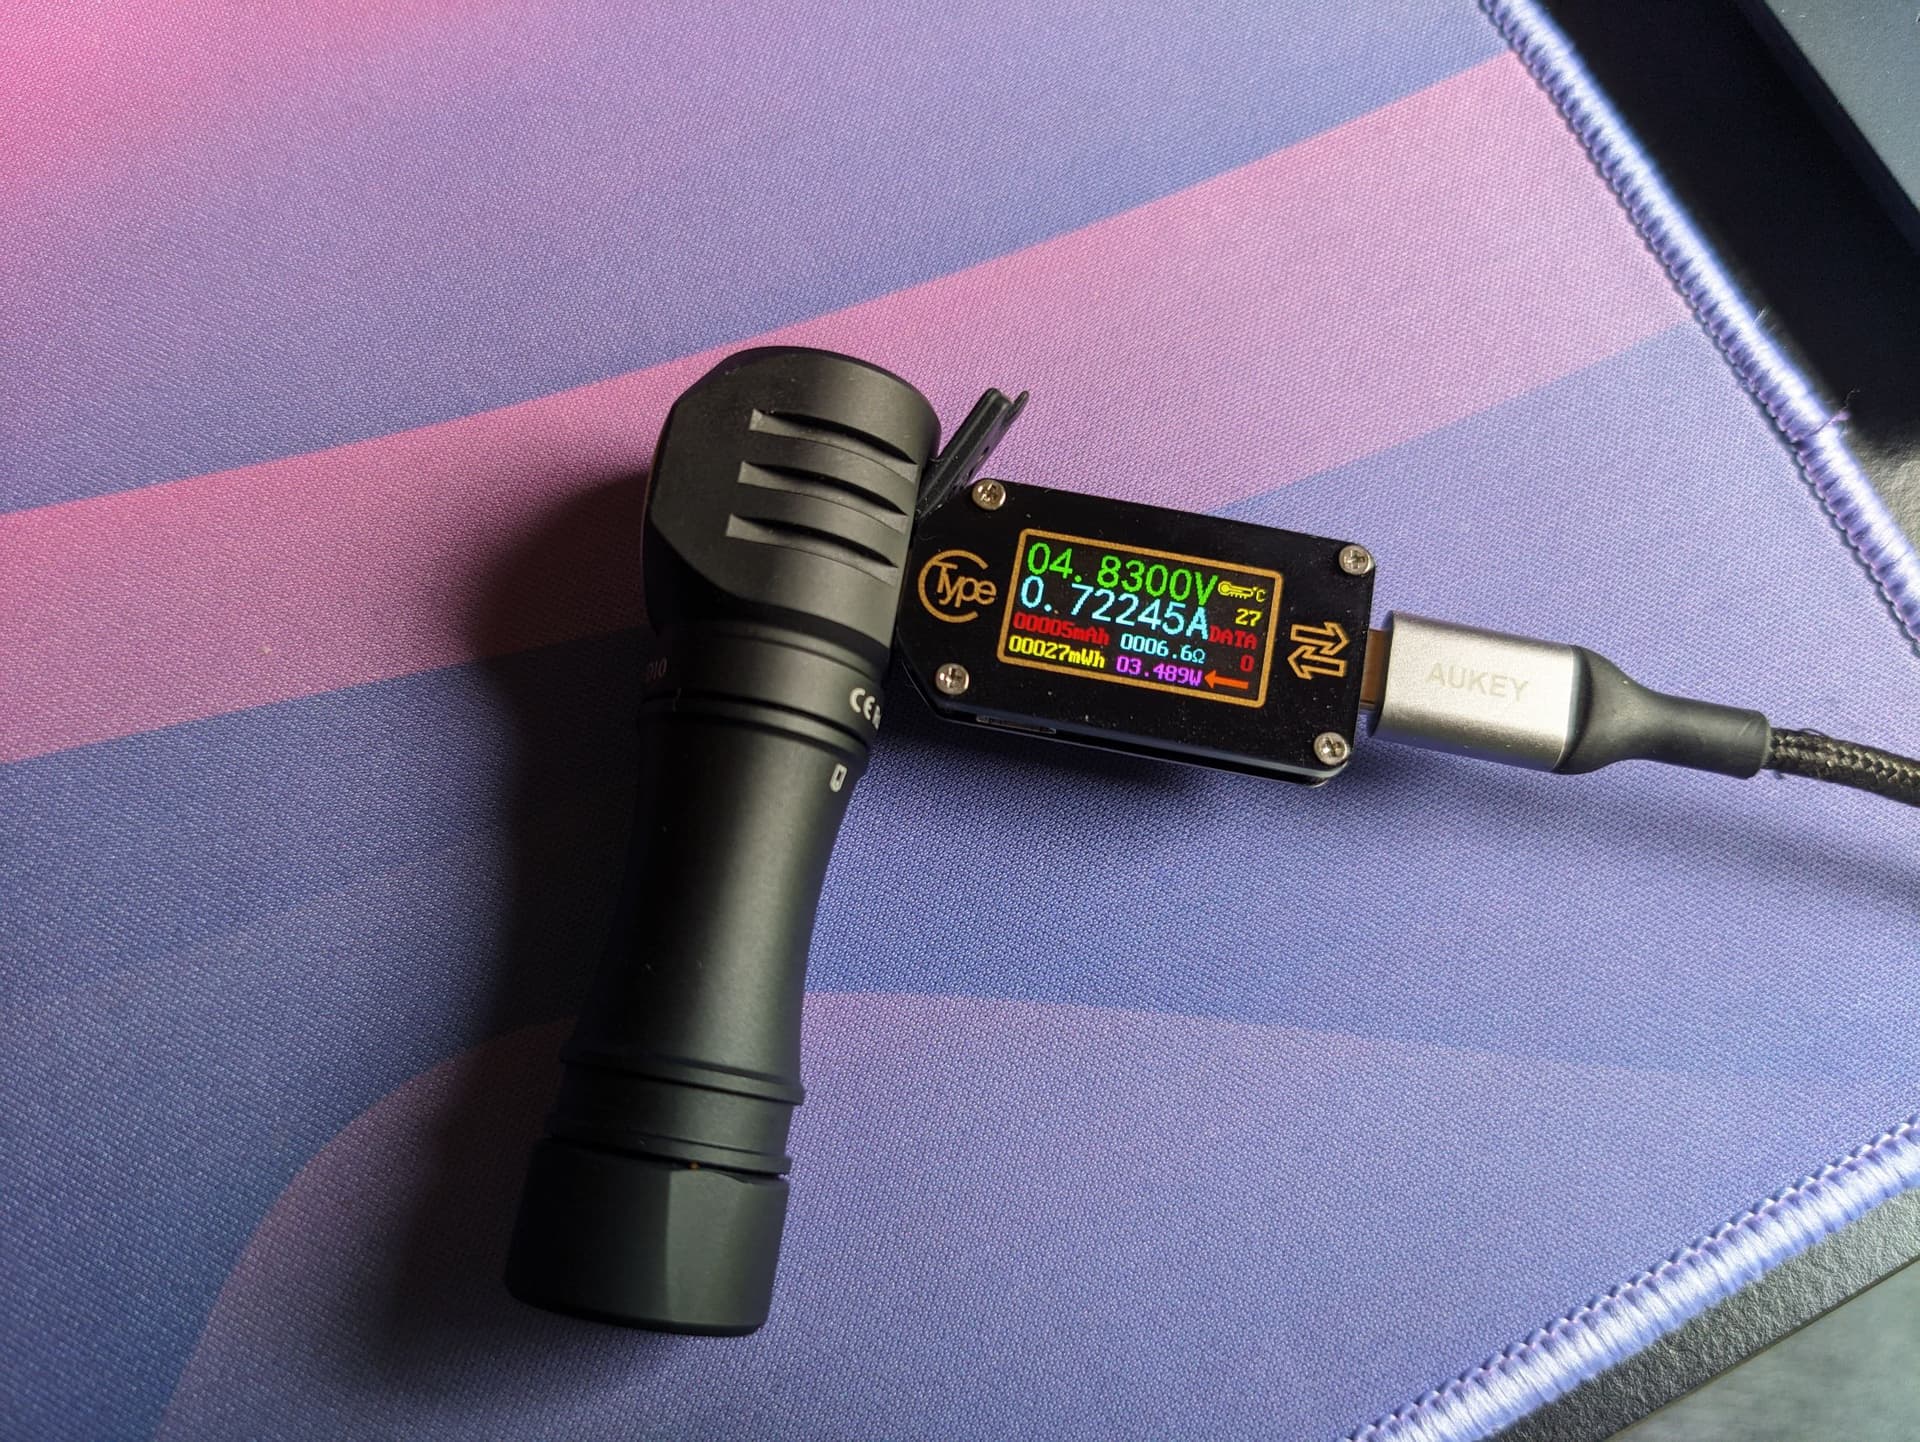
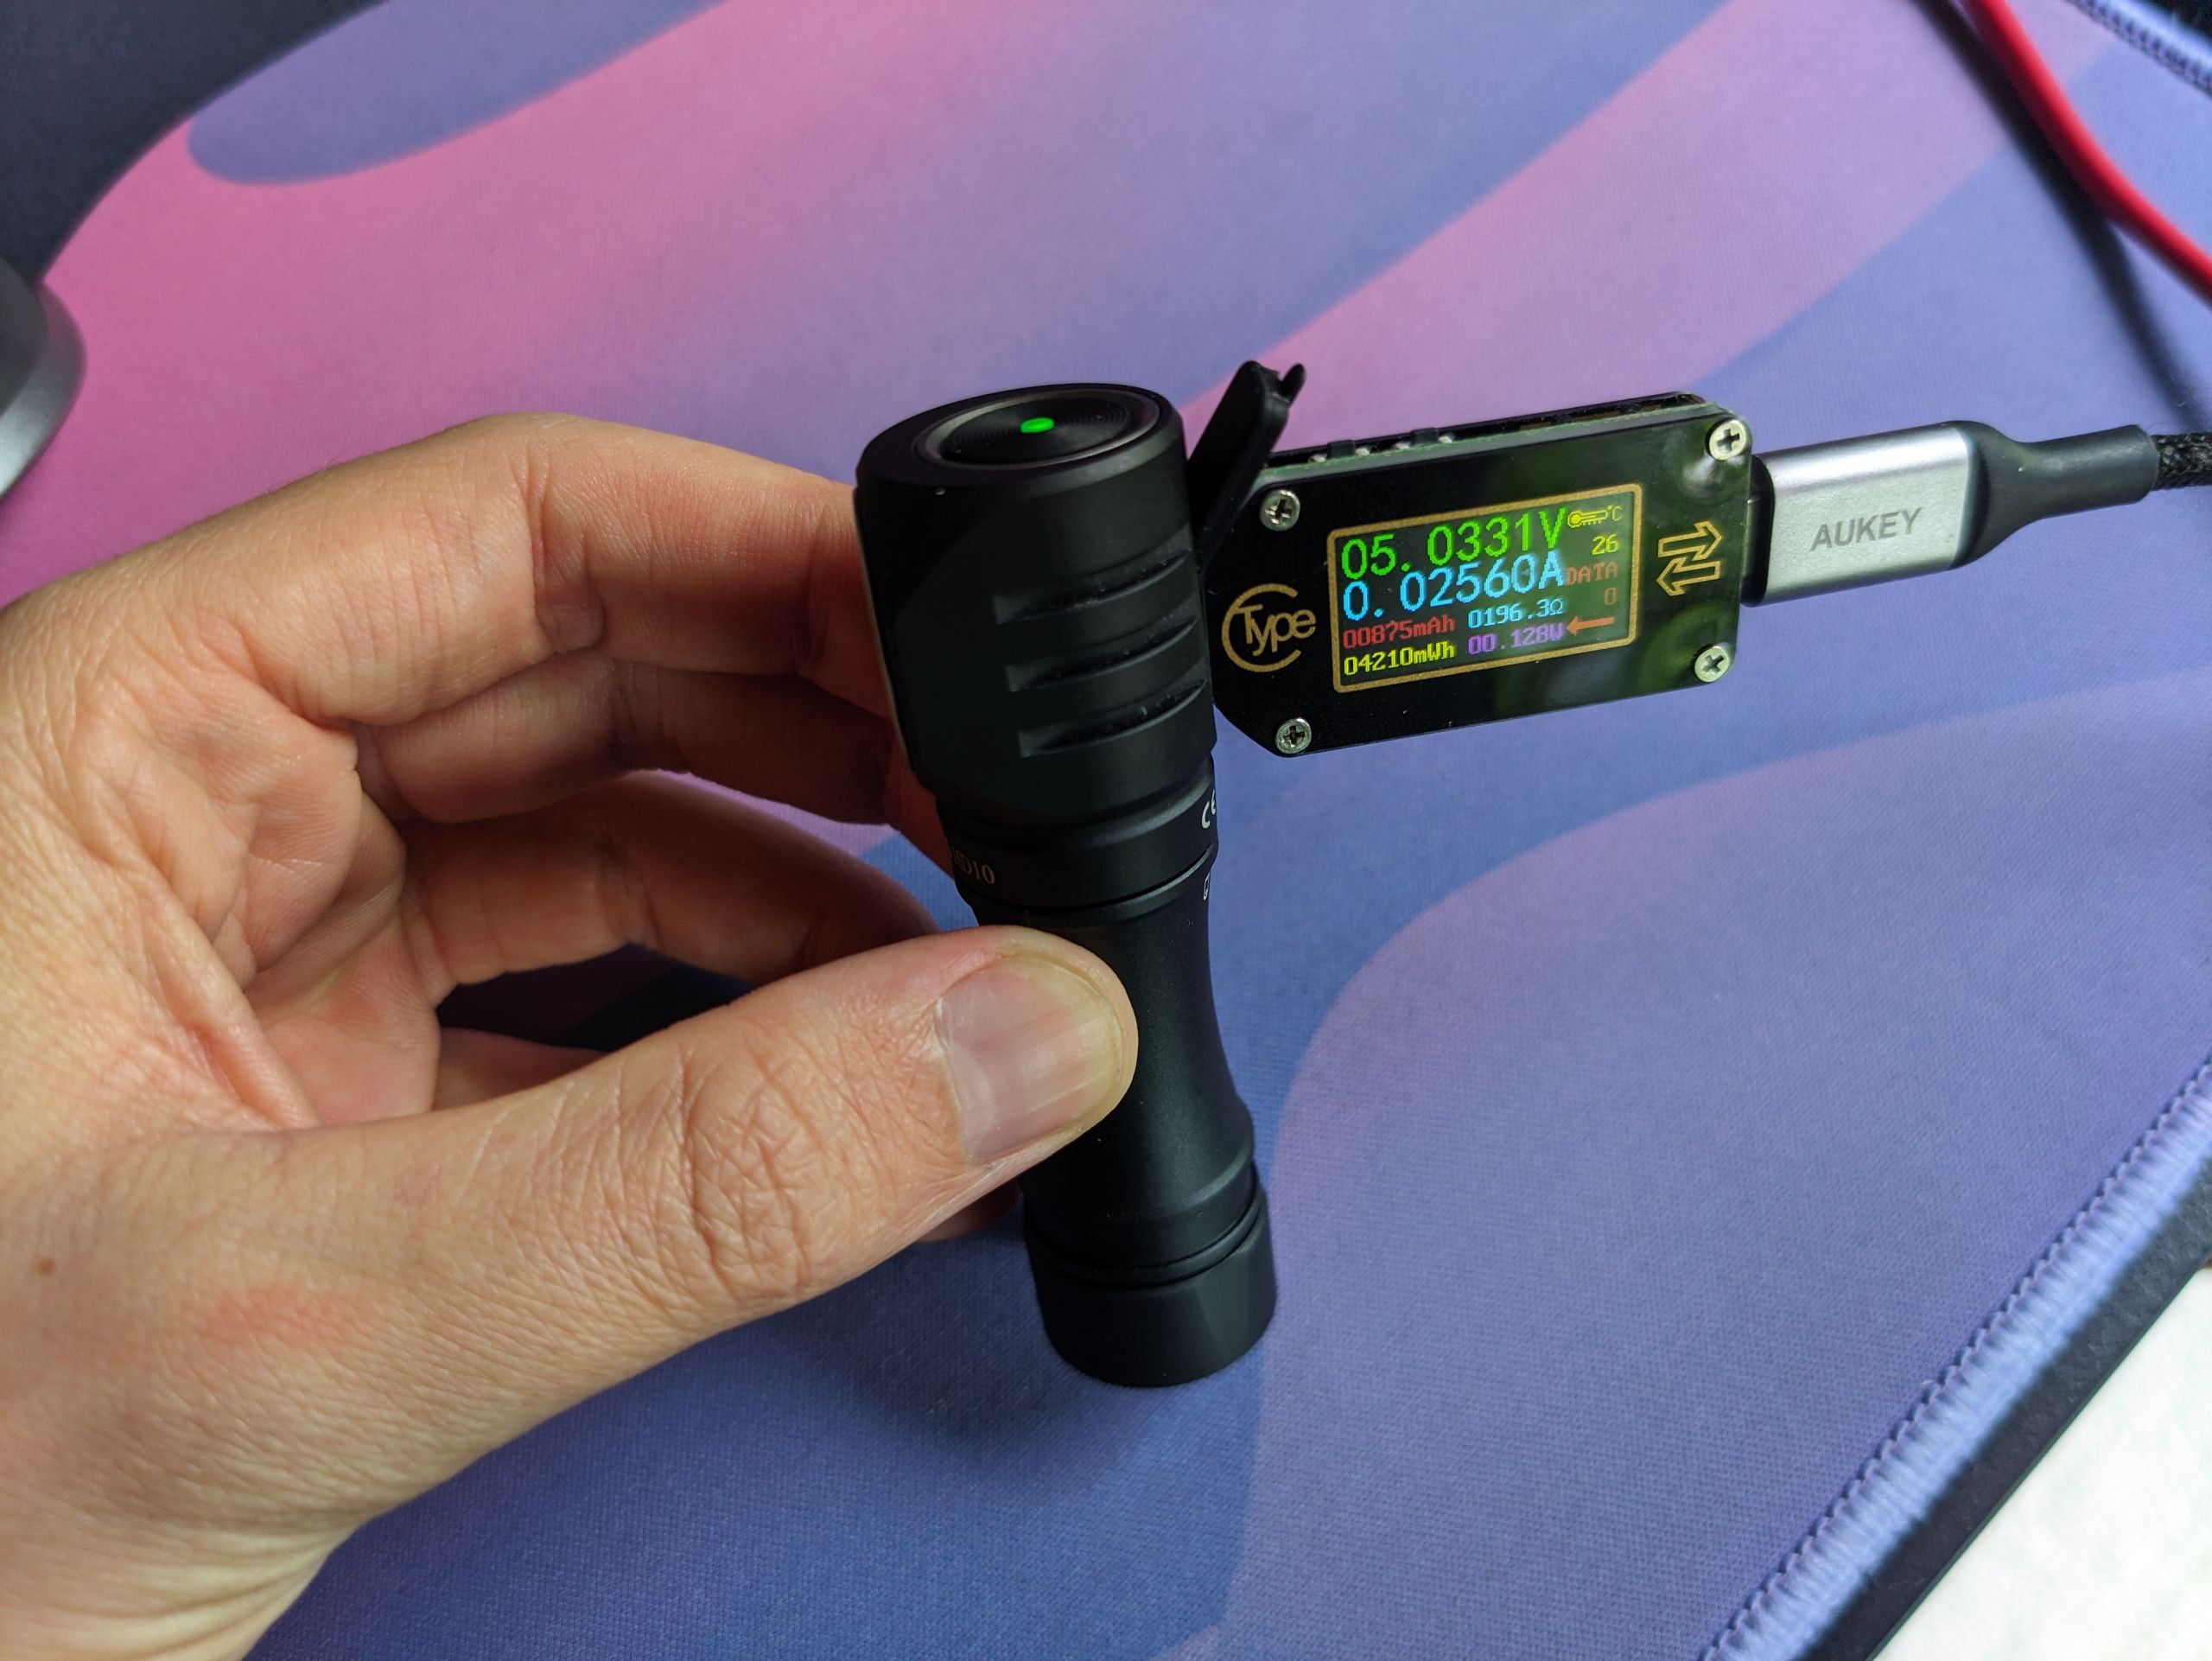
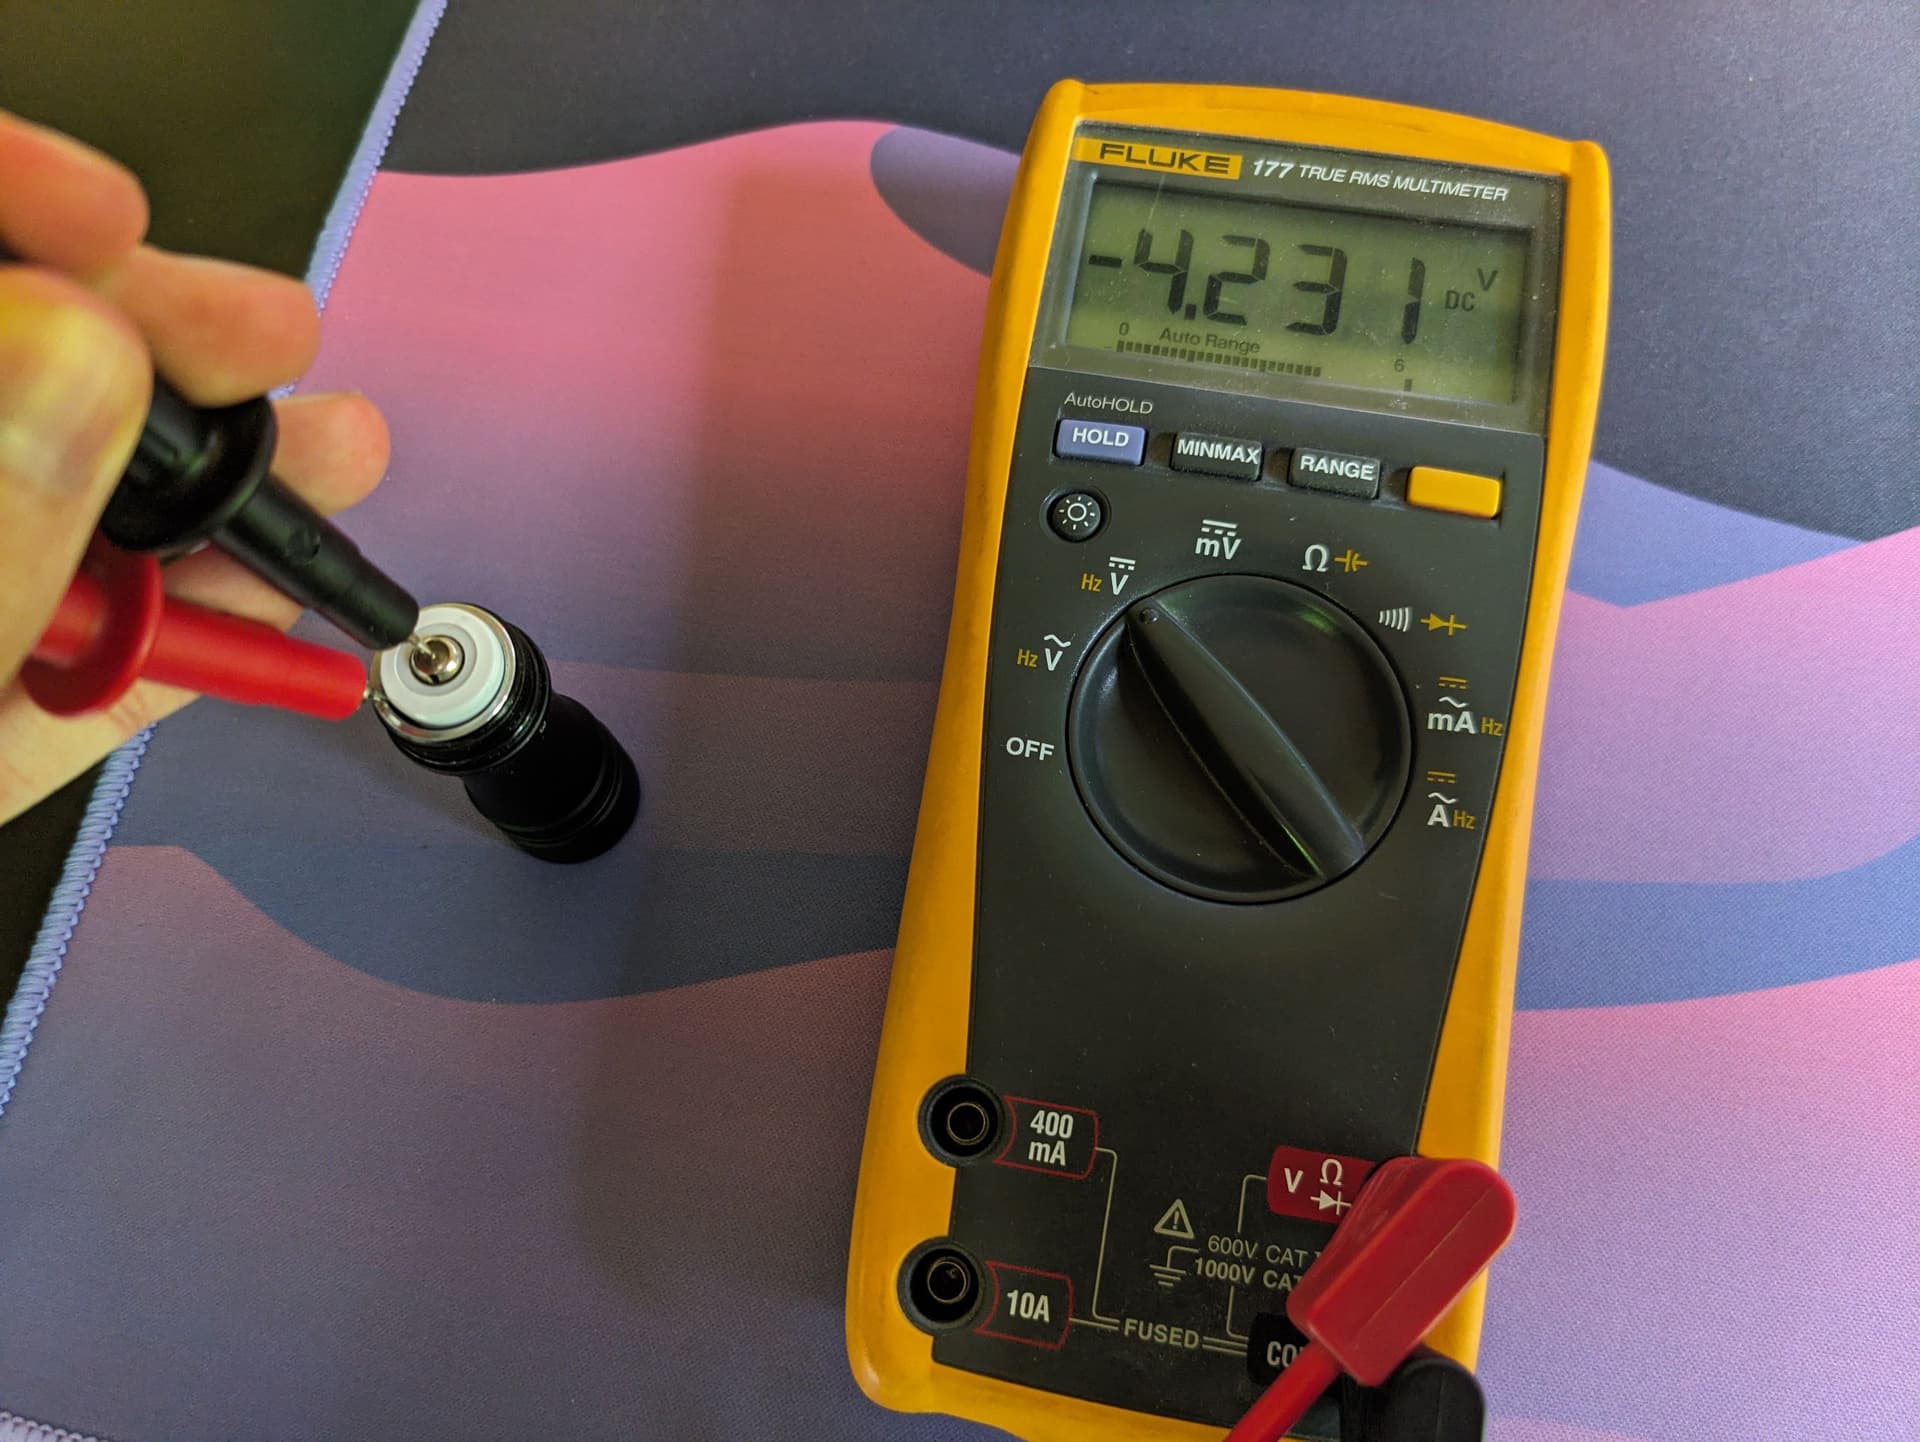
Integrated battery charging
In order to test the integrated charging, I let the light run down until it hit LVP and measured battery voltage (2.85 V). I then connected it to a USB-C charger (USB-C to USB-C works!) and logged the charging with a Riden TC66C. Sadly the app disconnected halfway through and I lost the charging graph. It began around 0.7 A, peaked at around 1.1 A and then gradually lowered once the CV phase of charging began, until the charge terminated at 4.23 V. I would have preferred a value slightly below 4.2 V, but this is fine. No complaints here.
Verdict
There is much to love about this light. The formfactor is great, both as a slim and lightweight pocket-lamp, as well as as a lightweight headlamp. Apart from the soft pressure of the headband it is almost not noticeable. For a work-light, the magnet could be a tad stronger so it holds better on curved surfaces. On flat steel it already sticks perfectly as is. The build quality is great, and the light looks and feels very nice.
The emitters are gorgeous. A bit more choice for different CCTs might be useful, but 4000K is a very good allrounder that is well suited for almost any task. The AUX LEDs could be a bit better set up, so that the mixed colors look closer to how they should look - green + red and pure green are almost indistinguishable, and red + blue + green is deep teal instead of white. The brightness levels in both high and low mode are reasonable, and having 6 nicely spaced LEDs behind the TIR leads to a uniform and good looking AUX light.
However, it is not all perfect, and there is multiple points of criticism - I hope some can still be addressed before the production batch:
- Non-removable bezel. Wurkkos, please, let us swap LEDs if we want. Or just replace the front glass, if we manage to break it somehow.
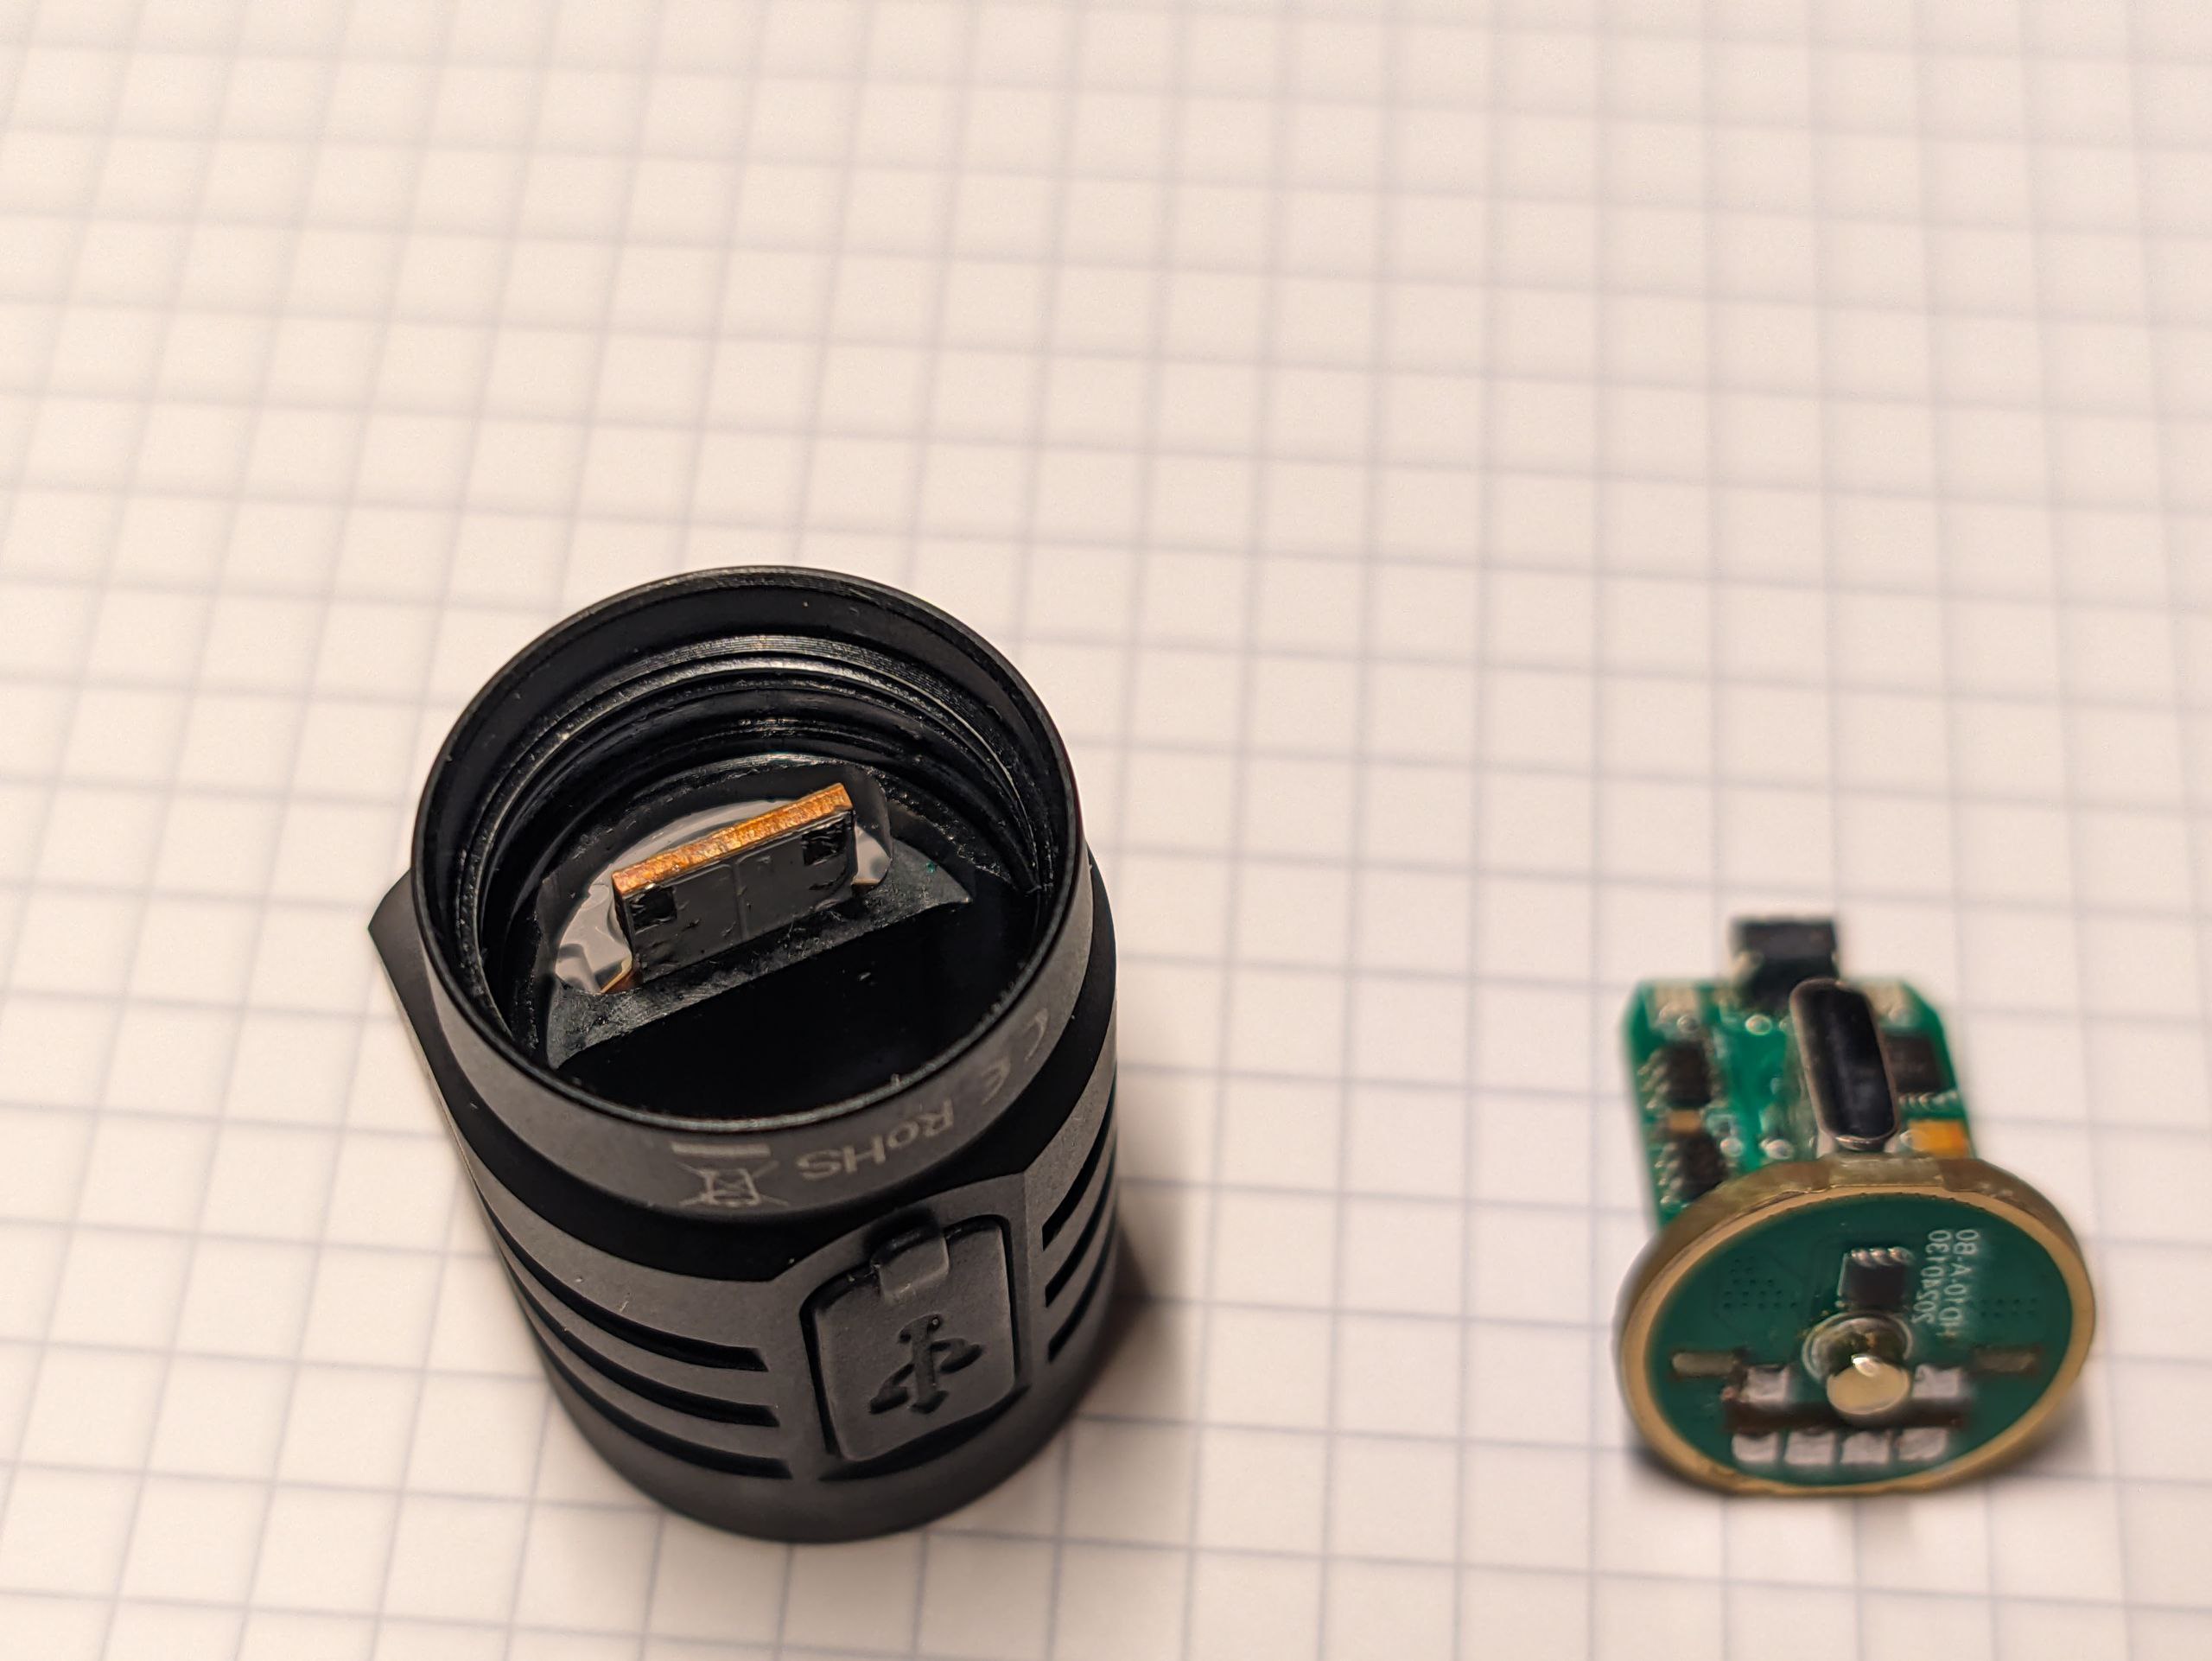
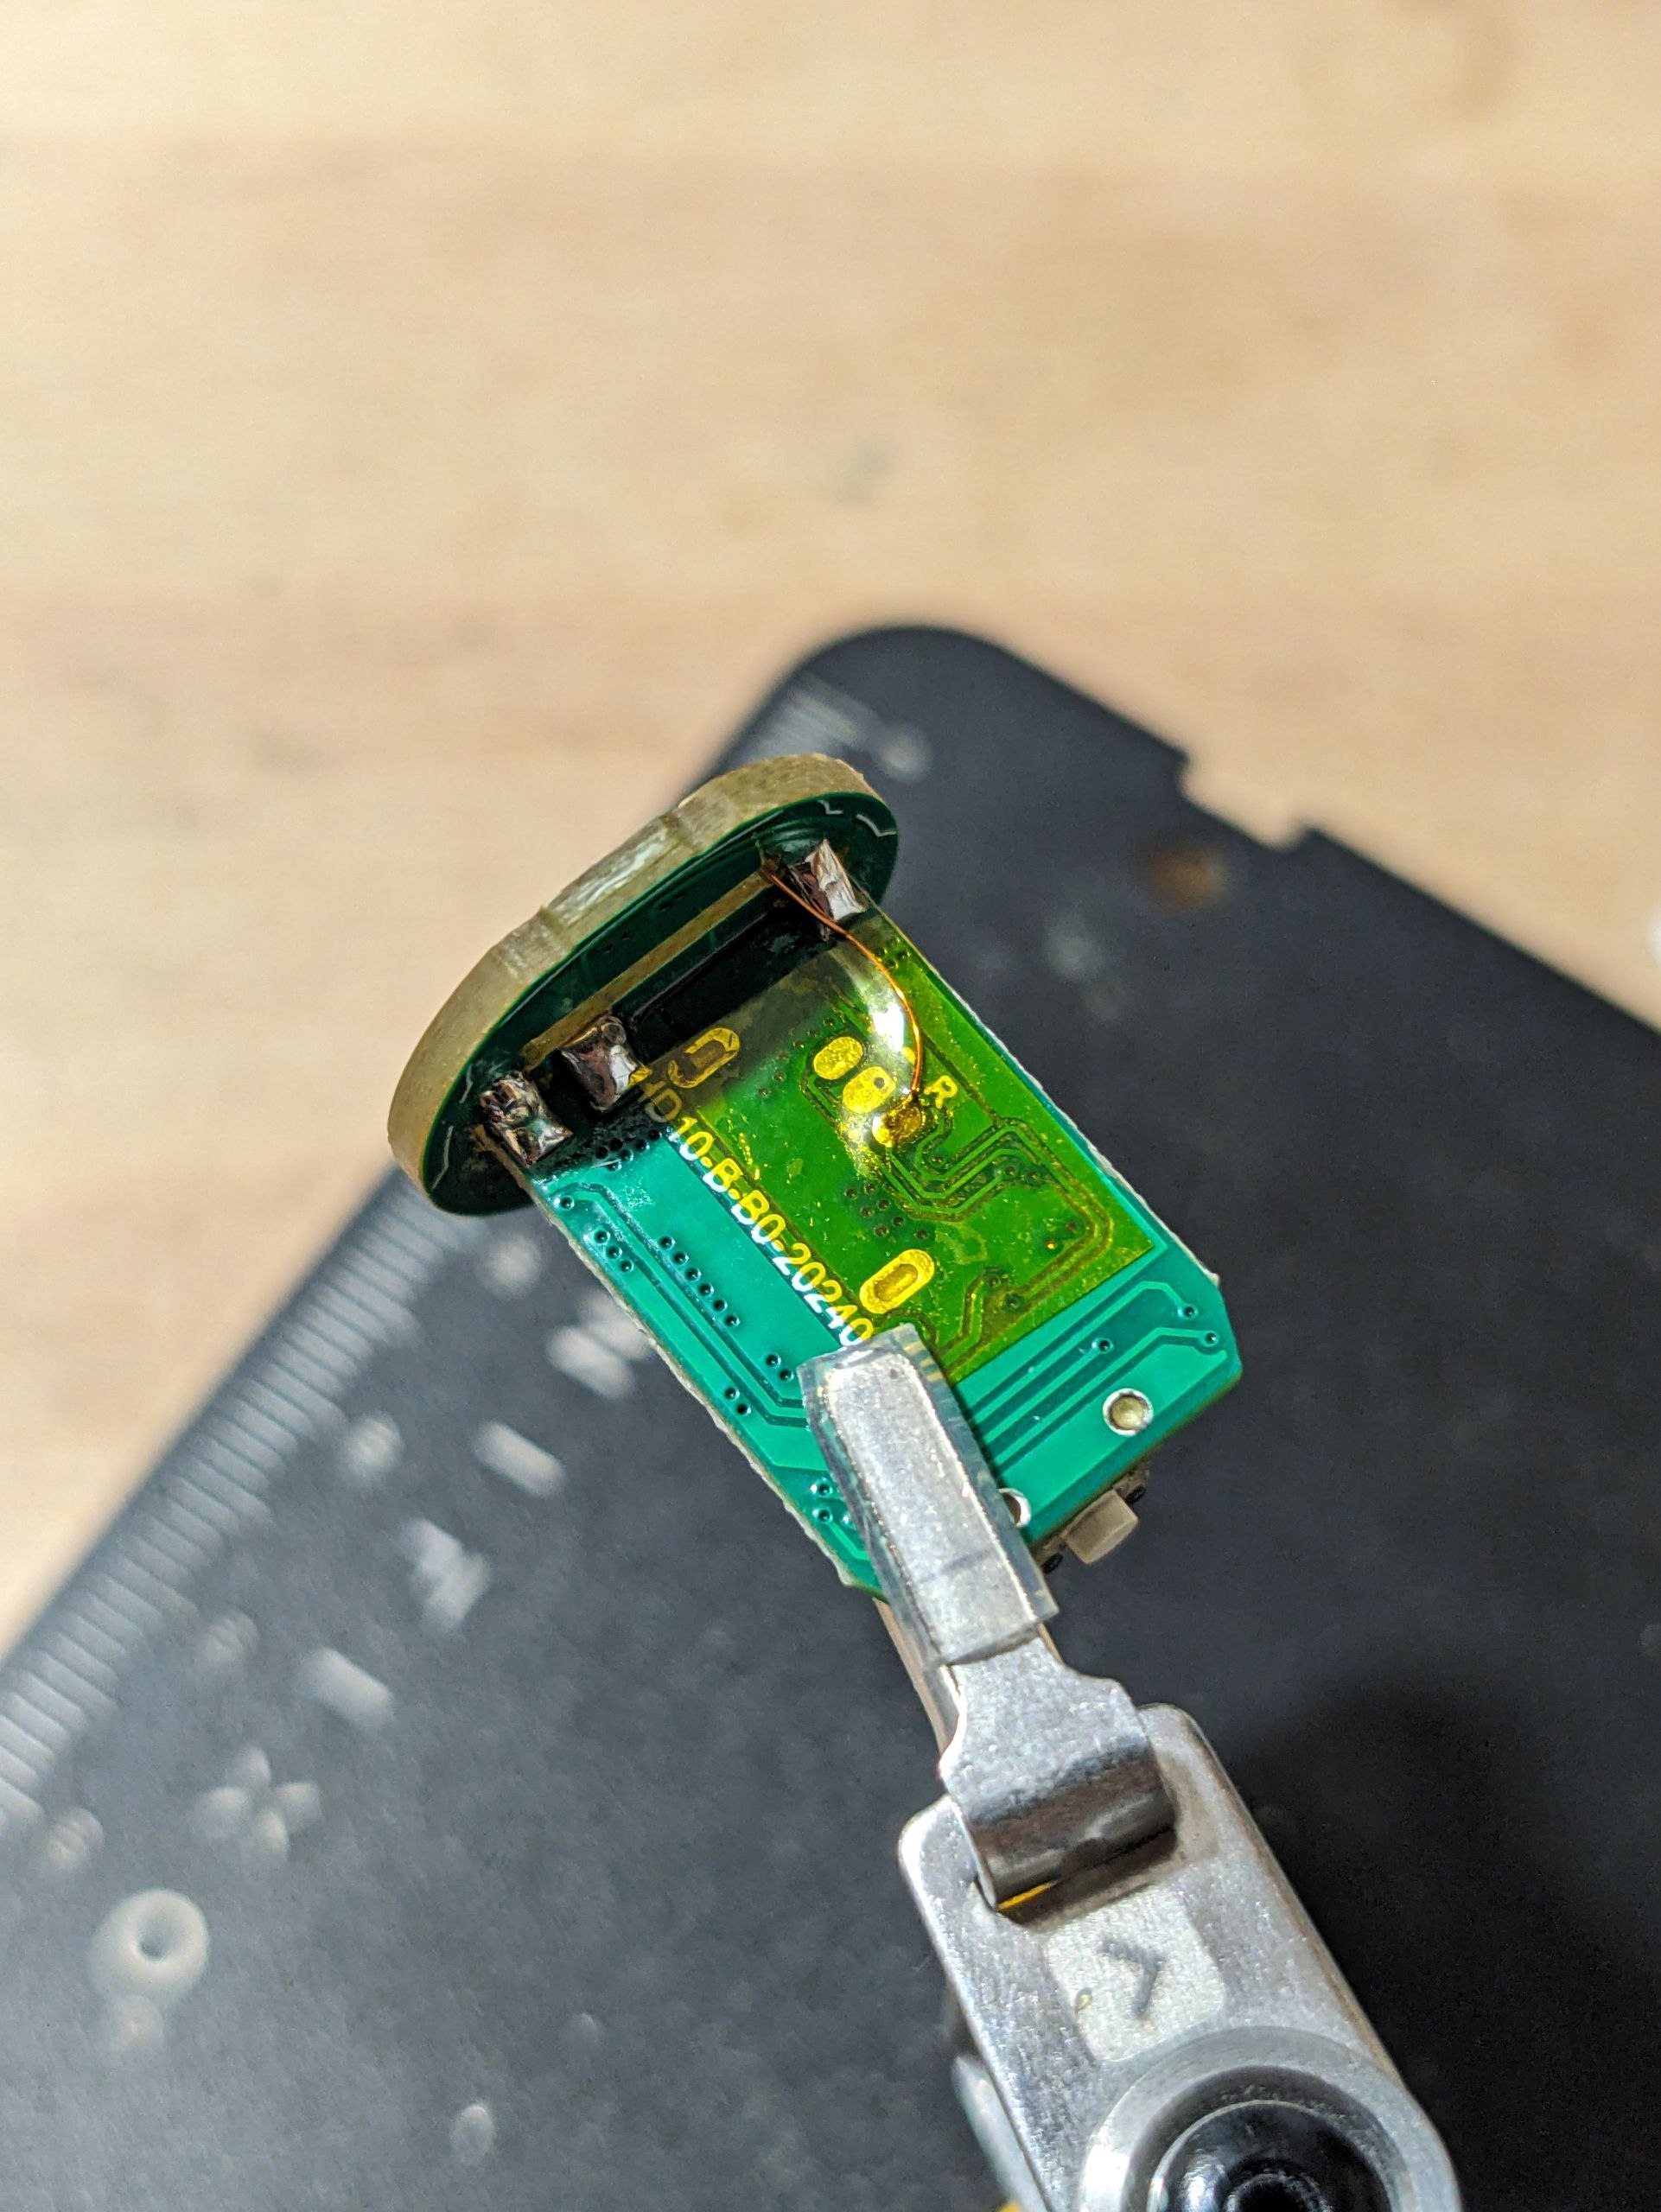
- Non-removable driver. I originally wanted to create a drop-in-replacement driver for this light, consisting of a new MCPCB (3 LEDs in series) and a dual-fuel boost driver similar to the D3AA, but if I can not remove either… Well.
- FET+1 driver. I really hoped for a DC-DC driver for higher efficiency - 900 mAh ain’t a lot, and the heatsinking capacity of such a small light is low. Every % increase of driver efficiency is very welcome and directly improves user experience.
- No flashing pads. This is by far my largest issue with this light. It runs an excellent and frequently updated open source software, but we can physically not access any flashing pads to update it to the latest versions (especially since it launched with a 2 years old FW), or personalize it. This is not good. Wurkkos, please fix this.
- Battery tube is not reversible, so that the clip can only used one way. All this would take is machining a similar 3 mm deep step into the other end of the tube, so we can safely reverse it. Threads are already identical on both ends.
- Firmware bugs
All this being said, I have extensively used this light for about a week now, and it has fully replaced my previous Sofirn HS10. It is a fun light, and I enjoy using it. Honestly, most users will be perfectly fine with what it offers already. But with a few very small changes, it could be better. We are an enthusiast forum, and a light that ships with Anduril gets measured by enthusiast standards by me. I hope Wurkkos still has the time to pick up some of our feedback ![]()
The only thing that is an absolute dealbreaker unless addressed is the amount of bugs people encountered in this short time. I do not know what is happening here, but please - address it. This will make or break the public opinion of this light. And it really deserves its time to shine. It is great - when it works.
Edit history
- 2024-05-20, 16:05 CEST: Added section about packaging, added weight
- 2024-05-20, 16:15 CEST: Added some missing image descriptions
- 2024-05-20, 16:30 CEST: Fixed Introduction heading, added some more information about runtime/step-downs
- 2024-05-20, 17:05 CEST: Fixed Opple screenshots showing in wrong sizes
- 2024-05-22, 19:00 CEST: Add charging chapter
TODO
- Add battery charging time and charge current graph once I managed to run it down to zero for the first time