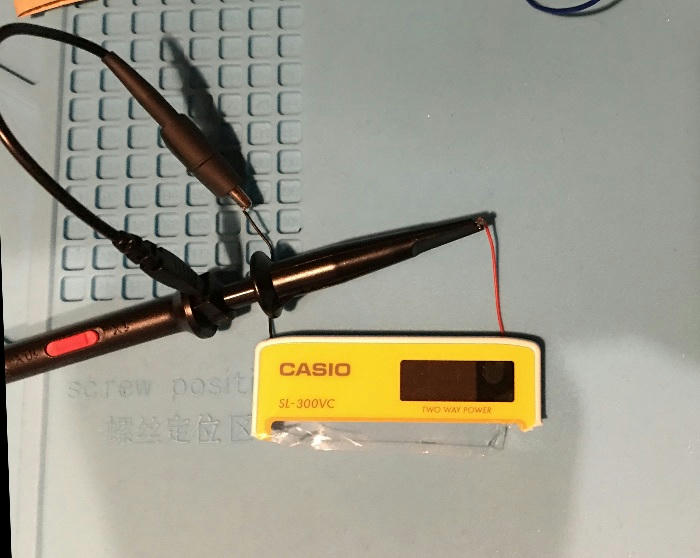
.
For my first BLF review – I decided to try a niche that hasn’t been covered before; optical sensors.
A while back, I was intrigued by posts that showed oscilloscope screen captures of flashlight PWM. However, finding specifics on what sensor was used (and setup) was rather elusive. Therefore, I decided to test a variety of optical sensors to see which ones, if any, would work for measuring flashlight PWM with an oscilloscope (within a reasonable cost). I started out testing only two sensors, but had way too much fun, which then morphed into a two-month project.
The Types Of Optical Sensors Tested
- photodiode
- PIN photodiode
- phototransistor
- Adafruit breakout board
I opted not to test a photoresistor because of their reputation for being slower than a phototransistor or photodiode (as confirmed in this YouTube video).
The Thirteen Sensors Tested
- Adafruit analog light sensor ALS-PT19
- AMS-TAOS TSL257 light-to-voltage-converter
- Everlight PT334-6C phototransistor
- OSRAM BPW34S PIN photodiode
- Shine Gold Electronics SG-PT3NT phototransistor
- Adafruit log-scale light sensor GA1A12S02 (ADA1384)
- Adafruit phototransistor ADA2831
- Shine Gold Electronics SG1133 photodiode
- Shine Gold Electronics SG5051 photodiode
- HAMAMATSU S1223 PIN Diode
- HAMAMATSU S5973 PIN Diode
- Thorlabs FDS100 PIN photodiode
- Everlight PD438C-S46 PIN photodiode
The Cost
Eleven of the sensors can be purchased for under $20, one at $39 (all approximate prices). I’m sure there are hundreds of other good sensors, but there was only enough time/money to test a few, which has revealed a few excellent, inexpensive choices (as well as some failures).
The Four PWM Generators Used For Testing
- Convoy S2+ (Biscotti firmware). The Convoy S2+ uses an increasingly high PWM frequency over several levels, which was extremely useful for testing a sensor’s fall times. When the Convoy’s PWM gets to 18Khz-36Khz, a sensor will need a fast fall time to capture a stable waveform without clipping.
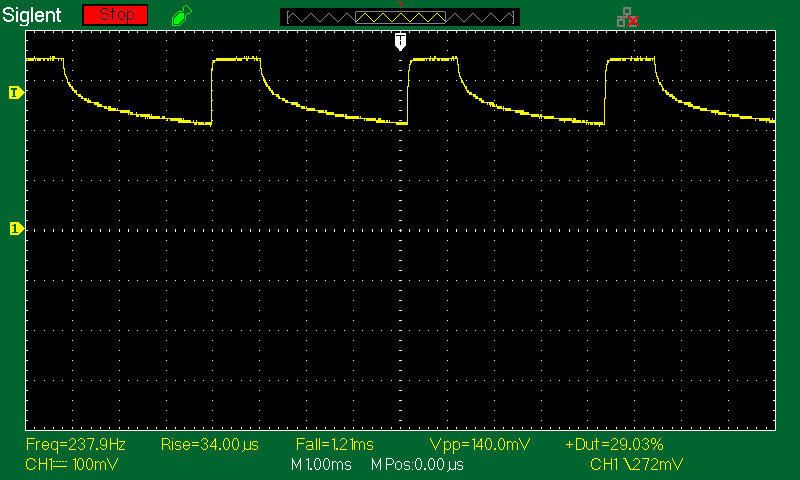
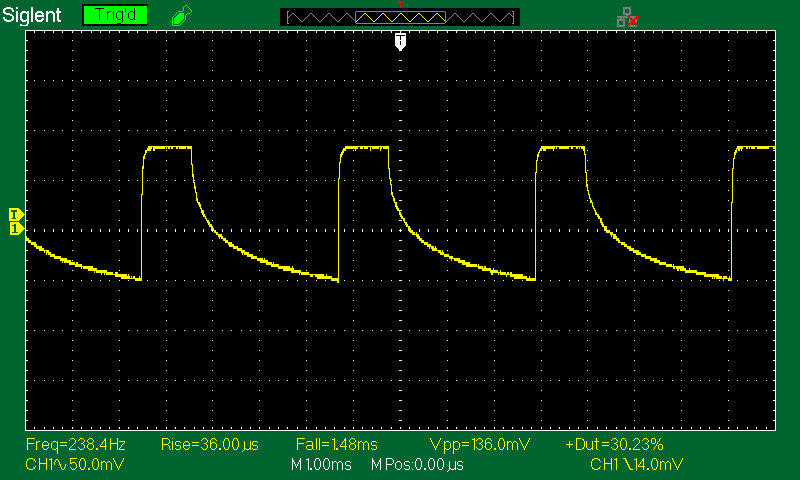
- J5 Tactical V1 Pro (solid PWM on low @ 238hz)
- Nebo Armor 3 (to illustrate ramping PWM at 100Hz)
- Home-built PWM light generator using a Koolertron signal generator (100Khz-400Khz)
This post is not about whether PWM is good or bad, but how to test for it with an oscilloscope and an inexpensive optical sensor.
Why not use a regular LED? Well, maybe, but those aren’t optimized for use as a photodiode. Using a regular LED may produce less than satisfactory results. If you’ve tested one that works as well as the recommended sensors at the end of this post, please provide specifics with testing results.
Testing Notes
- A Siglent SDS1102CML+ oscilloscope was used (link). Just about any low-end scope should work for the frequencies were measuring.
- The photodiodes/transistors will need a biasing resistor to convert current to voltage (for viewing on an oscilloscope). The resistor values on my schematics can be taken with a grain-of-salt. My values are just a starting value. You may find lower/higher values work better in your circuit. Some of the photodiodes/transistors are more sensitive than others to the resistor value range. I would suggest a variable potentiometer (link) or maybe a programmable resister board (link) if you’re going to experiment.
- If you’re going to handle these types of components, you should use a grounding strap (link), or use alternative ways to ground yourself.
- The biasing/load resistor for the photodiodes/transistors should only be attached to the side of the component shown on my schematics. If attached to the opposite side (+ power), unwanted filtering/attenuation across the resistor can occur, caused by a bench supply’s large output filtering caps. This is not a problem when using a battery as a supply, but is a problem with a bench supply (from personal experience).
- Most sensors had good rise times. However, it was the fall time that determined whether a sensor was fast enough for successful PWM measurements.
- PWM frequencies used during testing were:
100Hz (Nebo Armor 3)
236Hz (J5 Tactical V1-PRO)
2Khz (Convoy S2+)
18Khz (Convoy S2+)
36Khz (Convoy S2+)
100Khz (home-built PWM generator)
200Khz (home-built PWM generator)
300Khz (home-built PWM generator)
400Khz (home-built PWM generator)
The four highly recommended sensors are listed at the end of this post if you don’t want to read through all the data.
-- The First Sensor --
Adafruit analog light sensor ALS-PT19 (LINK)
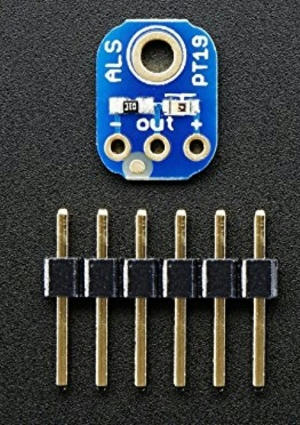
The ALS-PT19 is a surface-mount sensor with a 10KΩ resistor mounted on a small breakout board (what Adafruit calls it). You will want to solder the supplied three-pin connector onto the PCB. FYI, if you’re not familiar with Adafruit, it’s one of, if not the most well-known electronics educational/kit companies. The story behind the woman who started the company in her dorm room is an interesting story YouTube.
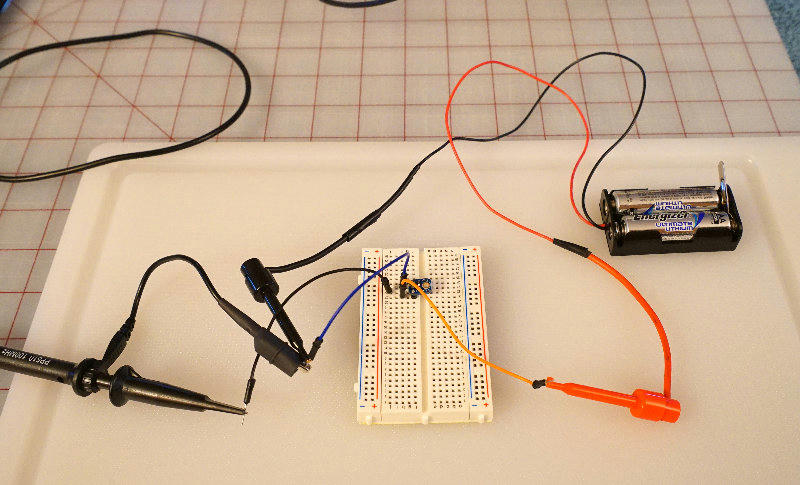
After soldering the connector onto the PCB, the sensor’s 3-pin connector was plugged into an Elegoo solderless breadboard (link), and a 2X AA battery holder was used for a supply (two Energizer Ultimate Lithiums in series at approx 3.4V). No external biasing components are required. Supply voltage can be 2.5V-5.5V
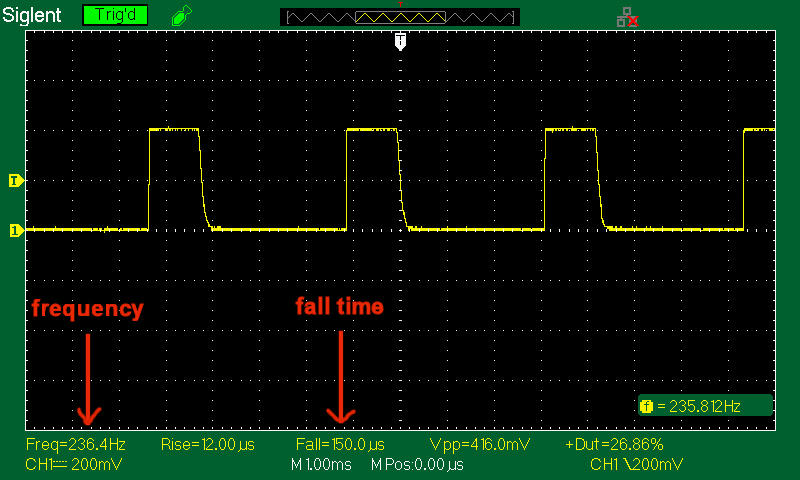
The J5 V1-PRO on low, PWM at 236.4hz. Note the fall time of 150us, which is much slower than other sensors tested. At 236hz, the slower fall time is not a problem - yet.
J5 on low, triggered on the falling edge and zoomed in for an accurate fall time of 133.8us
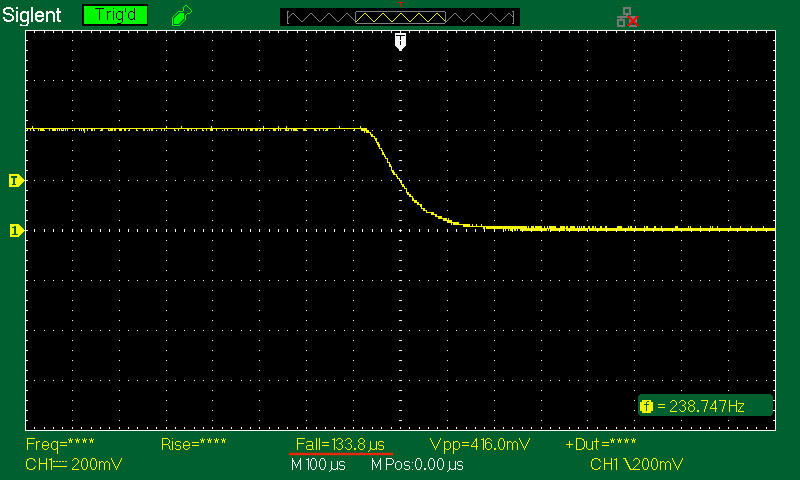
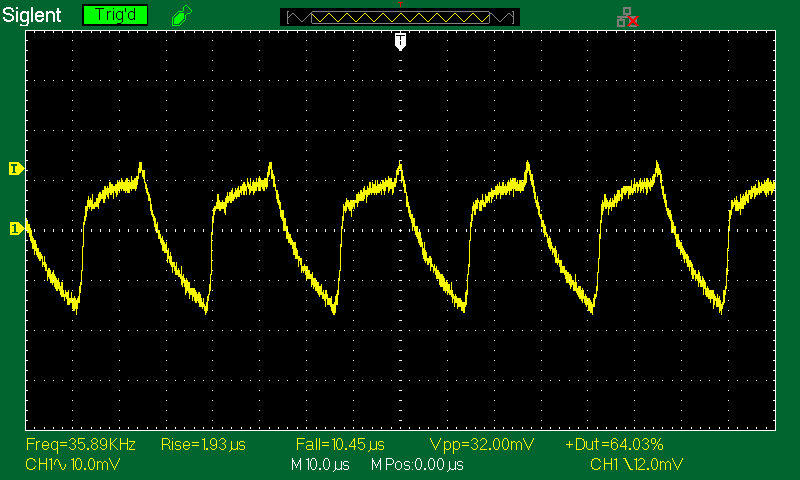
The Convoy S2+ at .1% brightness, PWM increases to 2.27Khz (a much higher frequency than the J5). Here we see an obvious slope on the waveform’s falling edge - which can only get worse at higher frequencies.
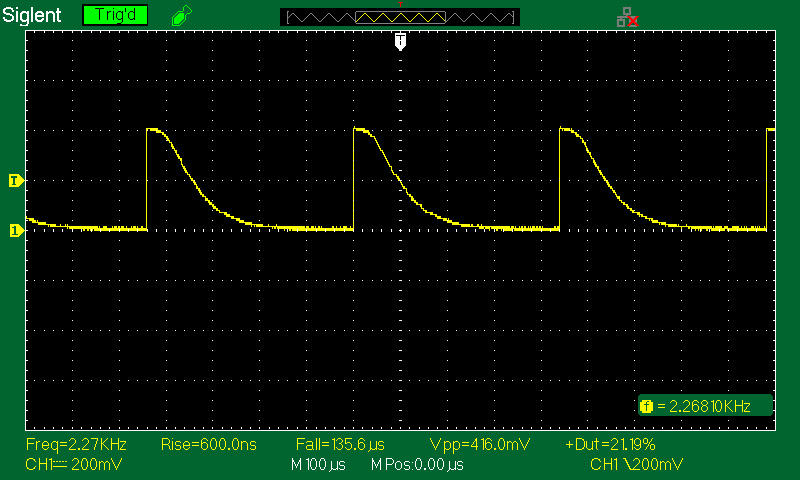
Here’s where things go south. Because the Convoy increases the PWM frequency to 18.1Khz at 1% brightness, the sensor’s slower fall time causes severe clipping.
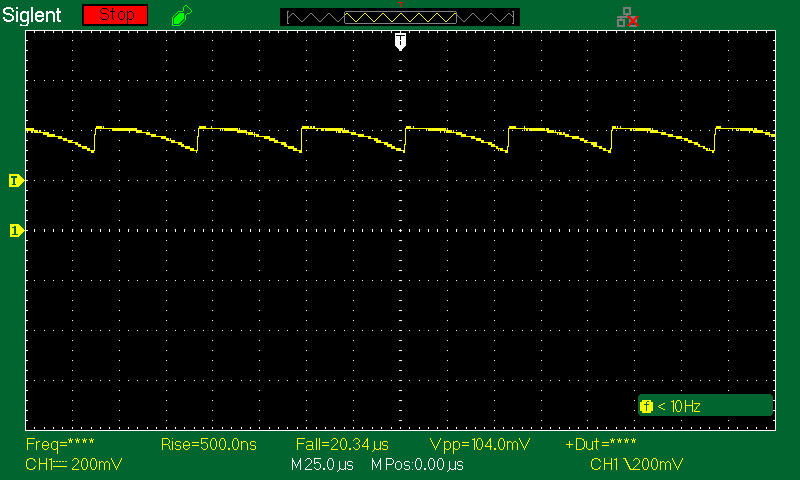
There’s no point in showing the Convoy’s waveform at 10% and 35% brightness levels because the clipping is much worse at 36Khz.
CONCLUSION: this sensor may serve well in other types of circuits, but it’s not fast enough for measuring PWM on flashlights that use a higher PWM frequency (like a Convoy S2+).
AMS-TAOS TSL257 light-to-voltage-converter LINK
The 3-pin TSL257 is a photodiode amplified through an onboard inverting op-amp. The block diagram is from the data sheet. The three pins are; Vdd, GND and Out.
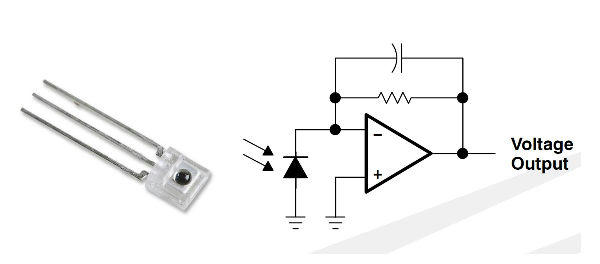
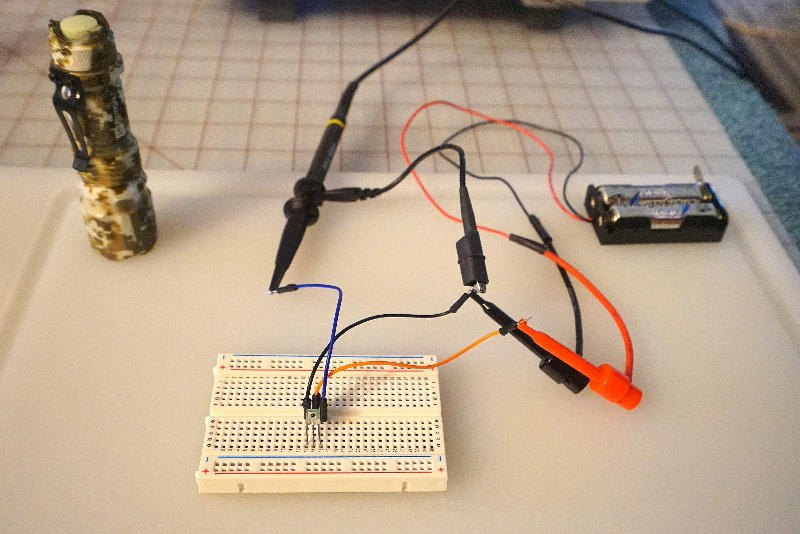
The sensor was configured on a solderless breadboard, and a 2X AA battery holder was used for a supply (two Energizer Ultimate Lithiums in series at approx 3.4V). No external biasing components required. Supply can be 2.7V-5.5V
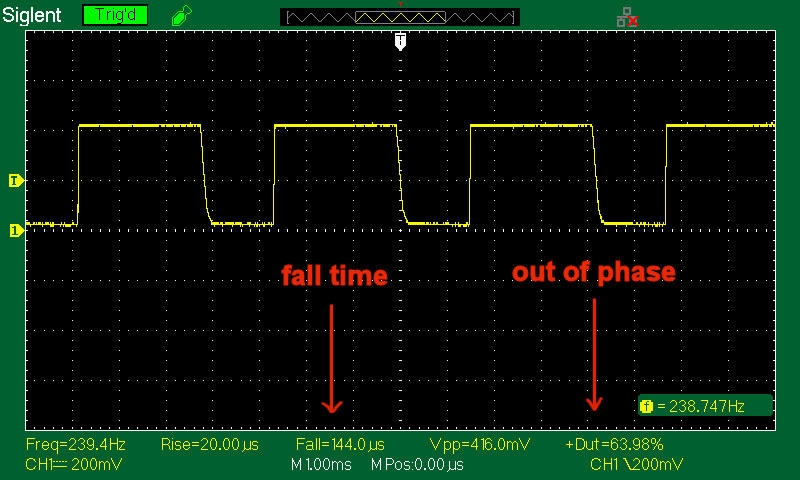
The J5 on low, PWM at 236Hz. Note there‘s an issue I didn’t catch initially. The duty-cycle (+Dut) is 180 degrees out-of-phase at 63.9% This is because the photodiode output goes through an onboard inverting op-amp. The inverting op-amp is doing exactly what it's designed to do - invert the input. Therefore, the real duty cycle for the J5 is closer to 36%. You can also set your scope to -Duty to correct for this. More importantly, note the fall time of 144us. That’s slow compared to the other sensors tested and is about to become a problem with the Convoy S2+.
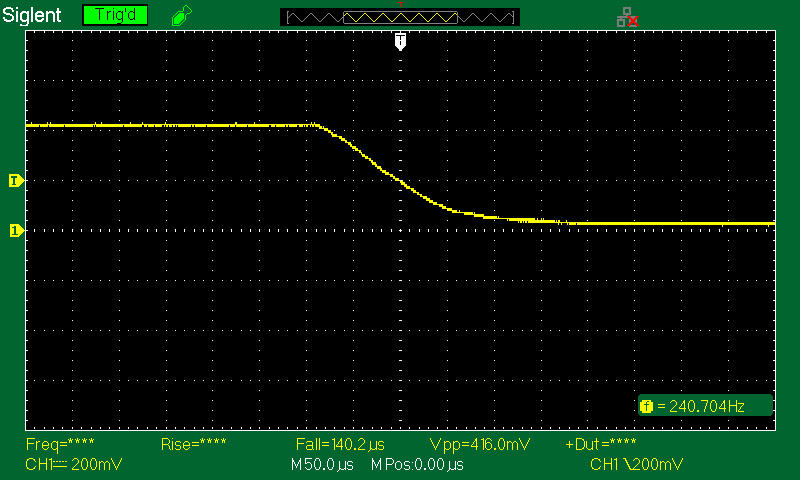
J5 on low, triggered on the falling edge and zoomed in for an accurate fall time.
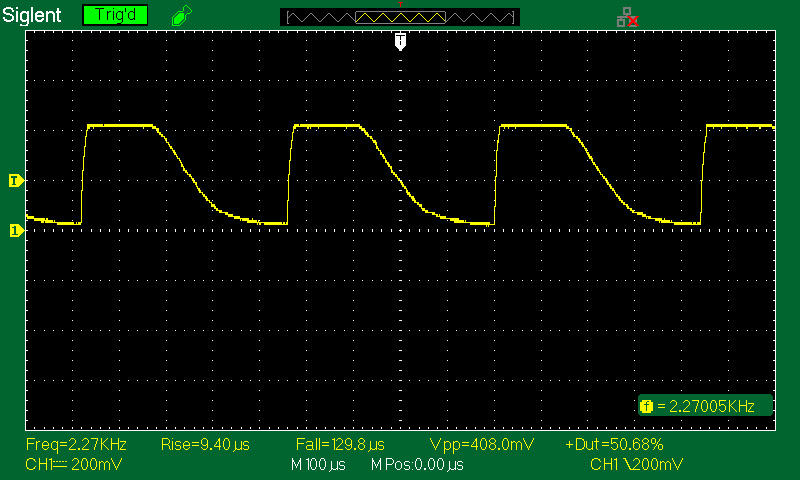
The Convoy S2+ at .1% brightness, PWM at 2.27Khz. The ski slope on the waveform’s falling edge becomes more pronounced.
Here’s where things fall apart. As the Convoy’s brightness increases to 1%, the PWM frequency increases to 18.2Khz. The sensor can’t keep up, and we see severe clipping. If we do some math:
1 divided by the Convoy’s PWM frequency 18.2Khz = 54us
The sensor’s fall time needs to be significantly faster than 54us to avoid clipping on the falling edge. A sensor fall time of 140us is way too long.
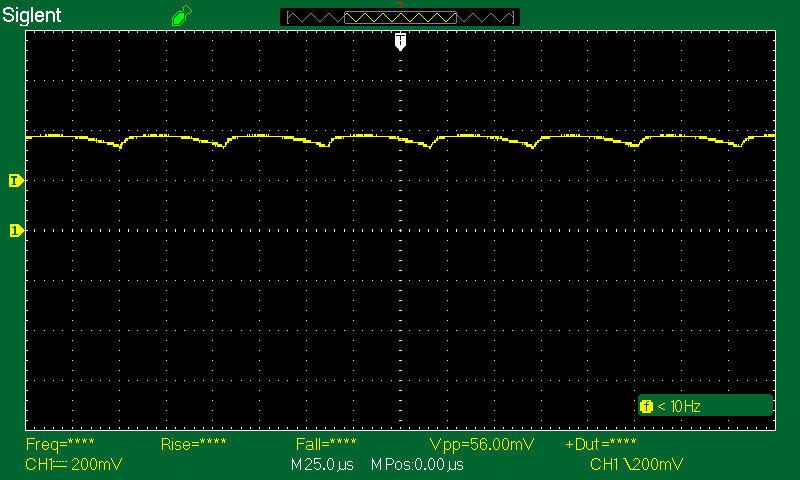
When the Convoy brightness level is at 10%, the PWM frequency increases even more to 36Khz. Another scope capture is pointless, because there’s no discernible waveform to show (the waveform is clipped beyond recognition).
CONCLUSION: this sensor may serve well in other types of circuits, but it’s not fast enough for measuring PWM on flashlights that use a higher PWM frequency (like a Convoy S2+).
Everlight PT334-6C Phototransistor LINK
This phototransistor will need a biasing resistor to convert current into voltage. In this case, approx 500Ω-600Ω.
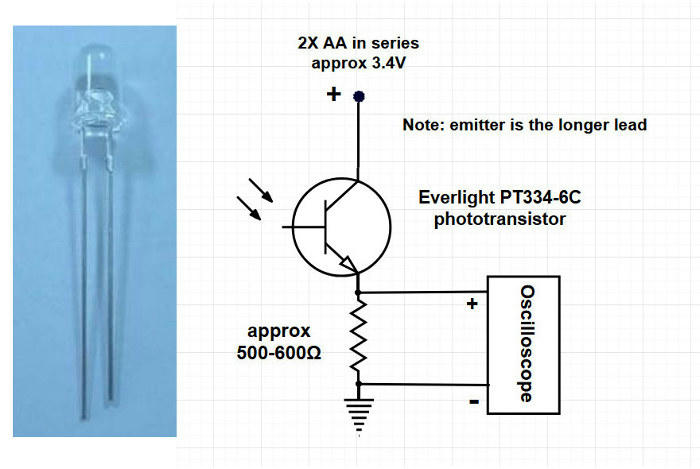
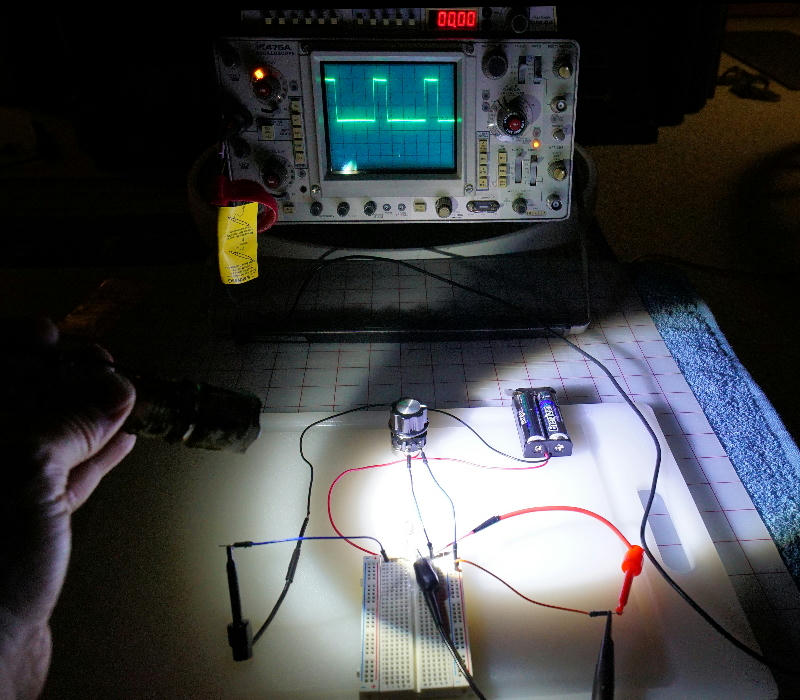
Again, a wireless breadboard was used for configuration. A rotating potentiometer (0-10K) was used to experiment with different resistor values. I temporarily pulled from storage my Tektronix 475A to see if it was still working, it was.
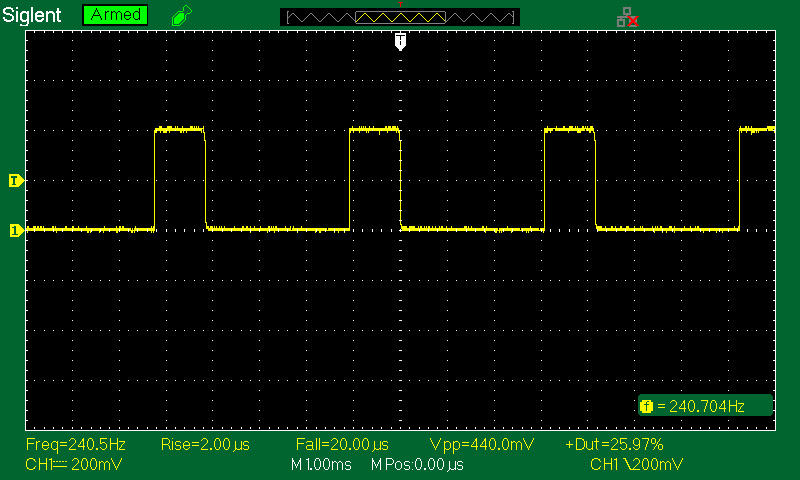
Back to the digital scope. The J5 on low, with PWM at 241hz. Note the sensor’s fall time is 20us, about seven times faster than the previously tested TSL257 (at 140us).
The J5 on low, triggered on the falling edge, zoomed in for an accurate fall time of 14.5us
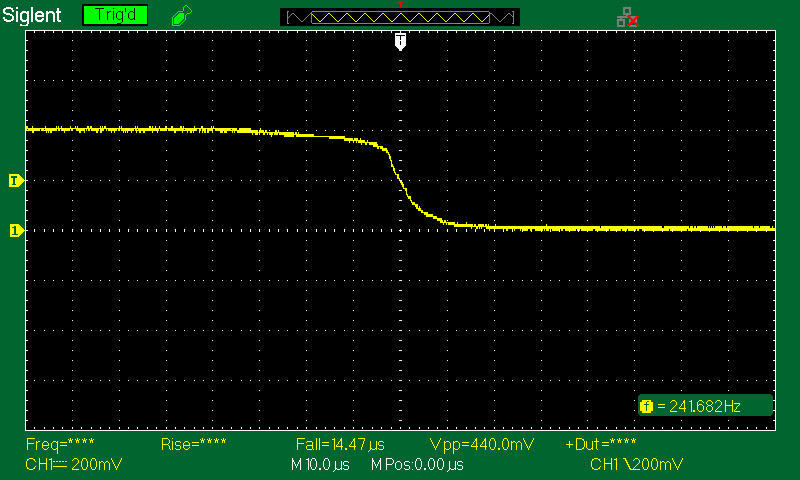
The Convoy S2+ at .1% brightness (PWM at 18.2Khz). Waveform still looks good.
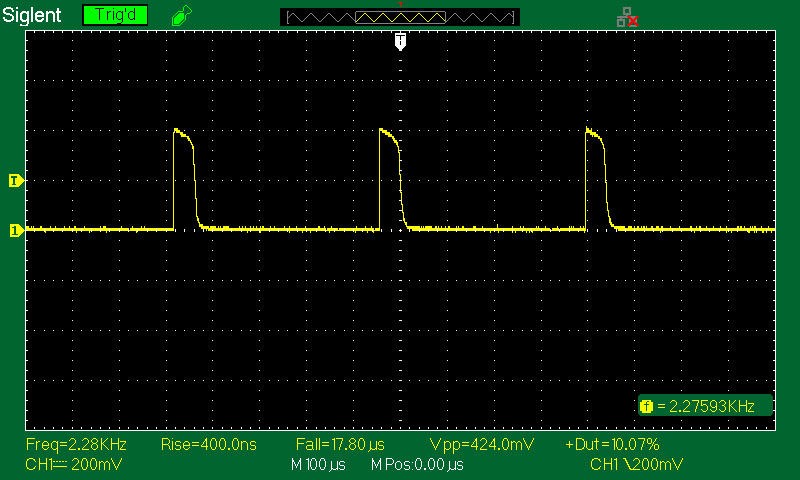
The Convoy S2+ at 1% brightness, PWM at 18.2Khz.
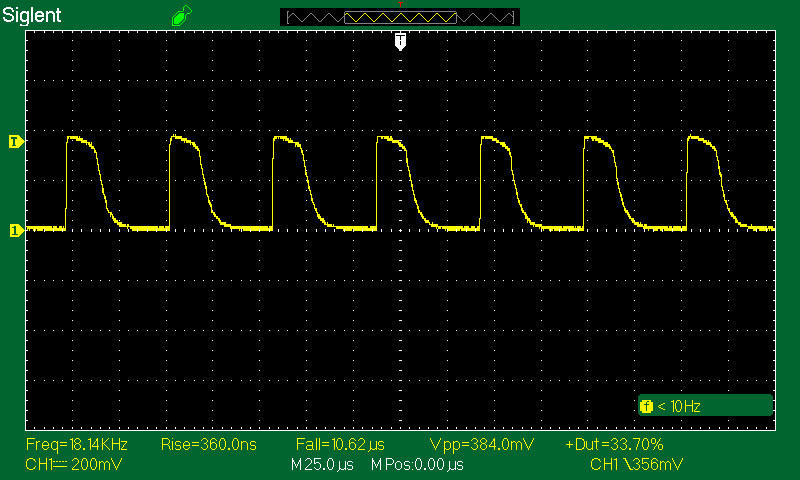
The Convoy S2+ at 10% brightness, PWM at 36.3Khz.
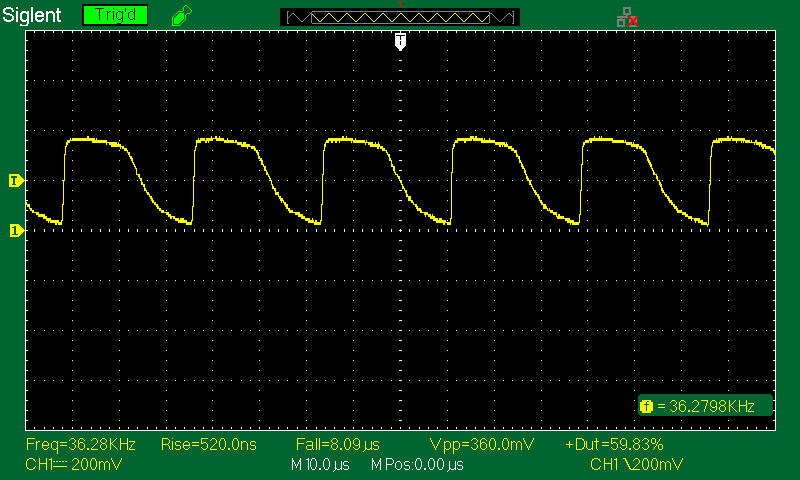
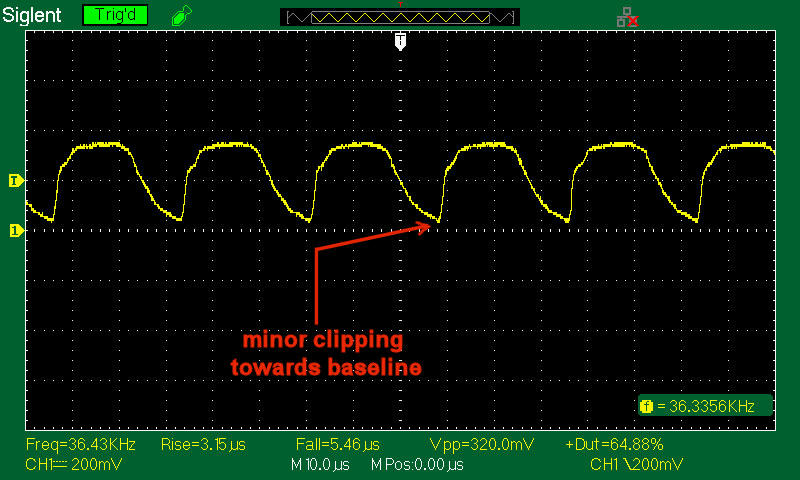
Finally, the Convoy S2+ at 35% brightness, PWM at 36.4Khz. At this brightness level, the sensor saturates easily and the flashlight needed to be gradually pointed away from the sensor to display a stable waveform. Also note some minor clipping towards baseline.
To illustrate how this sensor can easily saturate, I recorded a short video. This phenomenon is not isolated to this sensor only, it was seen on others sensors as well.
www.youtube.com/embed/nRSs_Otieao
CONCLUSION: This sensor is marginally adequate for testing flashlight PWM. However, it’s more sensitive to the angle of light at higher brightness levels, and it’s a bit more difficult getting a well-defined waveform at 36Khz in comparison to the OSRAM photodiode (tested next) or the HAMAMATSU S1223 PIN photodiode (tested later).
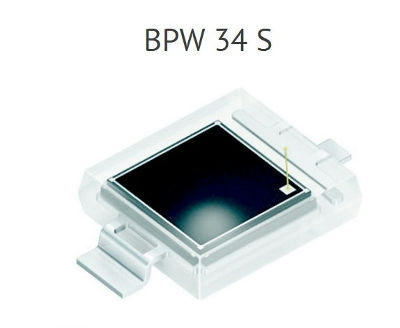
OSRAM BPW34S PIN Photodiode LINK
The OSRAM is a PIN photodiode (I = intrinsic semiconductor region). This was a surface-mount version, but there’s also a through-hole version (link). Note that both OSRAM and Vishay have licensing agreements, and you can find a similar device under the Vishay name (link). A biasing resistor will be needed to convert current into voltage. 8K-10KΩ is a good starting value. I used a rotating potentiometer for a resistor.
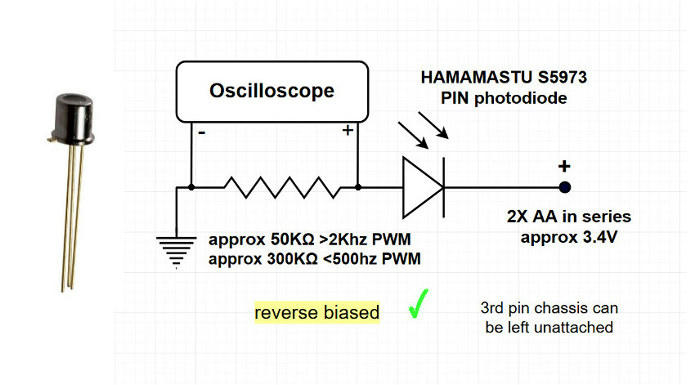
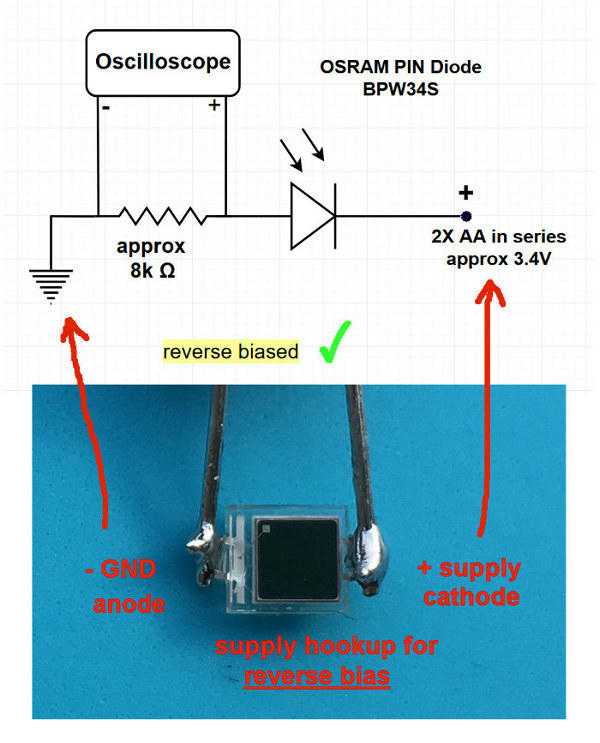
Wires were soldered onto both ends of the photodiode to accommodate testing. The data sheet wasn’t clear to me which end of the physical photodiode was the cathode or anode. Eventually I figured it out, so here’s my schematic (with photo) to clarify which end to hook up to ground and +supply. Remember, photodiodes are reverse biased. If your output seems stuck on high, you probably have it forward biased (incorrect), but it won’t hurt anything (unless you try). The resistor should only go on the anode side of the photodiode (reference “testing notes” on why).
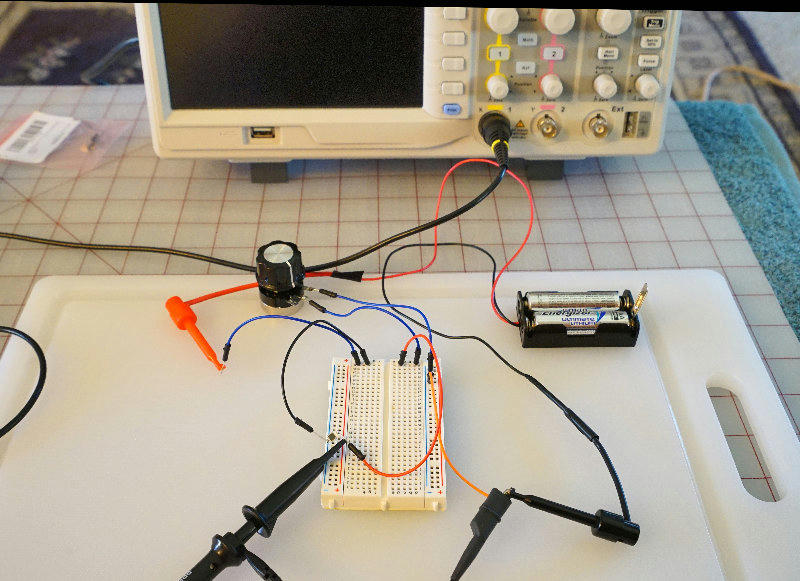
The J5 on low, PWM at 242Hz. Note the excellent fall time of 4us.
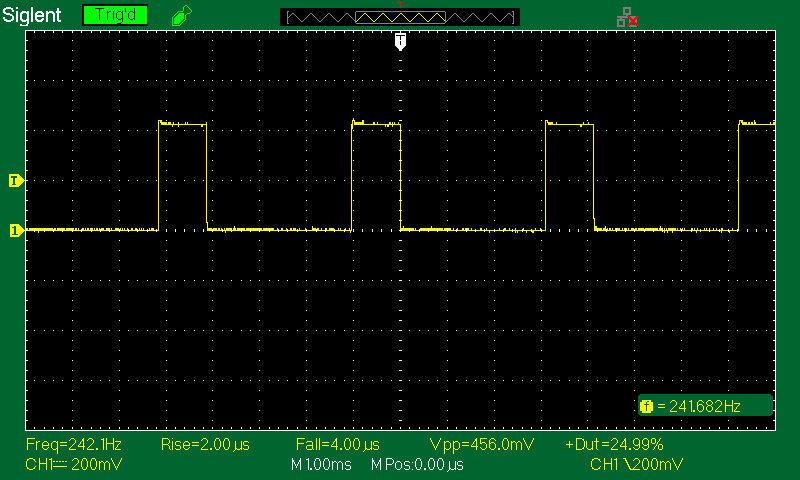
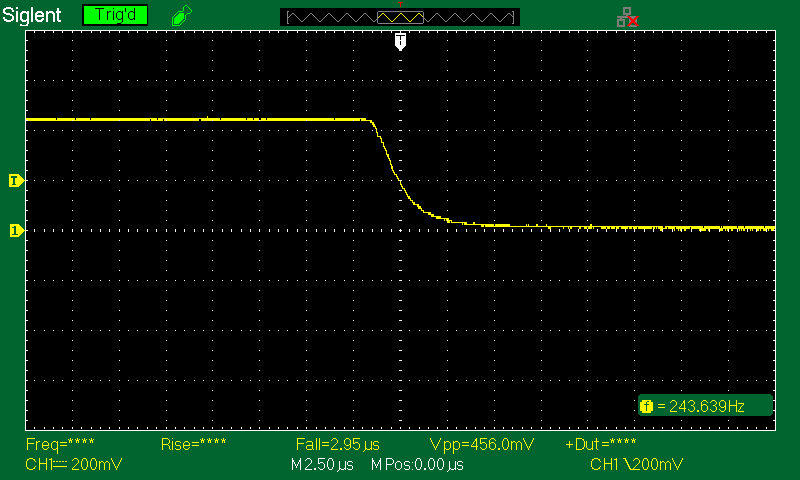
J5 on low, triggered on falling edge and zoomed in for an accurate fall time of 3us (fast compared to some of the other sensors tested).
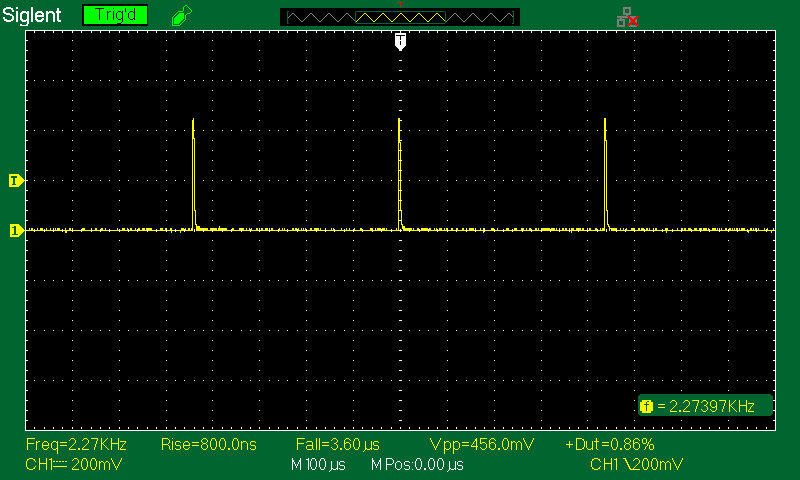
The Convoy S2+ at .1% output with a PWM of 2.27Khz. Fall time is still fast at 3.6us
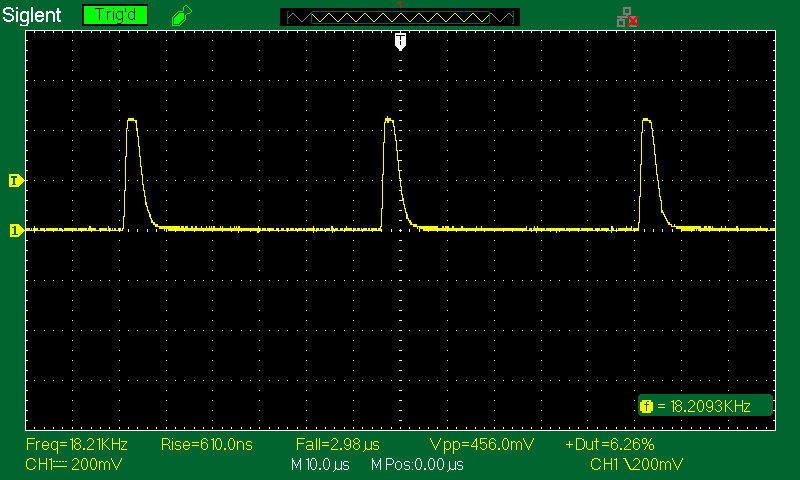
The Convoy S2+ at 1% output with a PWM of 18.2Khz.
The Convoy S2+ at 10% brightness, PWM frequency increases to 36.3Khz. The OSRAM’s short fall time produces a stable waveform. Other sensors will struggle at this frequency. Doing the math;
1 divided by the Convoy’s PWM frequency of 36,250 = 28us.
A sensor’s fall time needs to be significantly faster than 28us to avoid clipping on the falling edge.
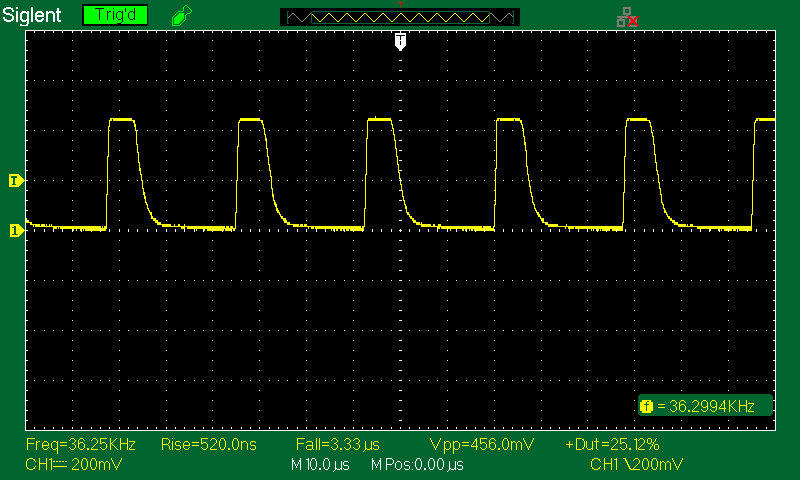
The Convoy at 35% brightness, PWM at 36.4Khz. The OSRAM displays a stable, well-defined waveform with a fast fall time of 4us.
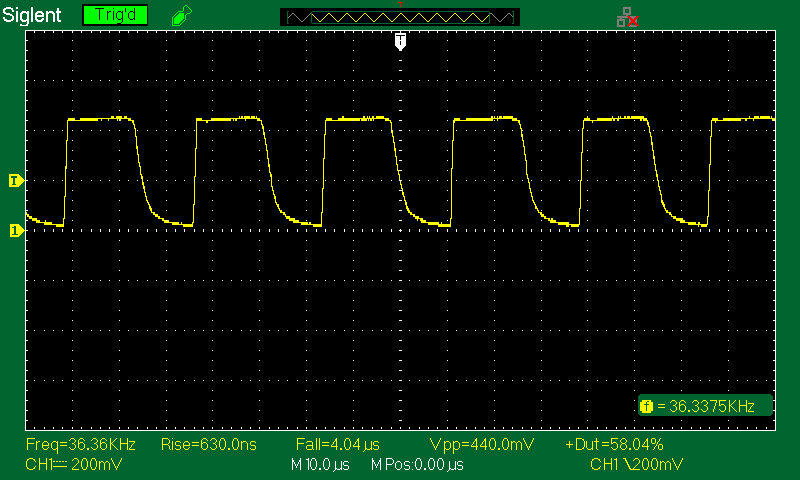
Since the OSRAM is working so well, I will use it as an opportunity to illustrate ramping PWM, using the Nebo Armor 3, a relatively new light by Nebo. Hold down the Nebo’s “on” button, and the output will ramp up, then back down (continuously). In this video, we see a ramping PWM frequency of 100hz across all duty cycles.
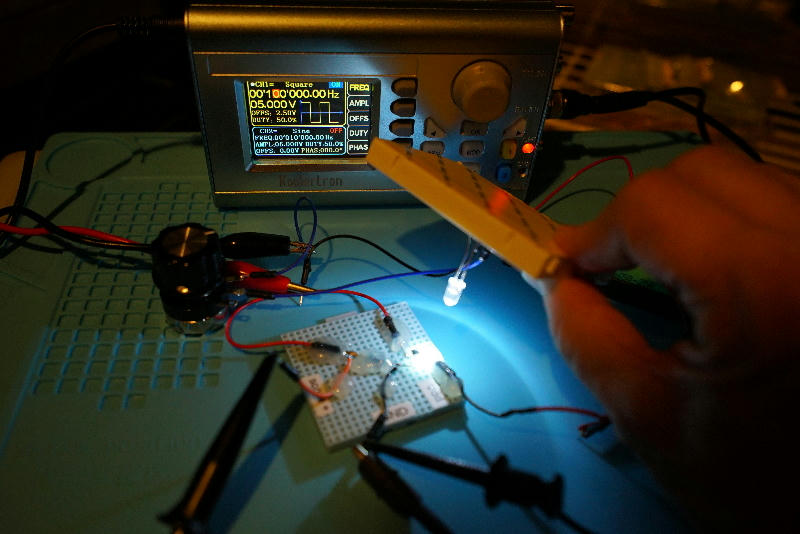
To test the OSRAM further, I will do one more test. I used a Koolertron signal generator (link) to create my own home-built LED PWM generator where I could set the frequency much higher than the Convoy. Using a regular inexpensive off-the-shelf white LED (link), I applied a 0-5V square wave to the LED (with biasing resister), to create my own PWM light generator. In this photo, you see the white LED (driven by the signal generator) shining on the OSRAM photodiode. The following waveform captures from the OSRAM are at an applied PWM frequency of 100Khz, 200Khz, 300Khz, and 400Khz.
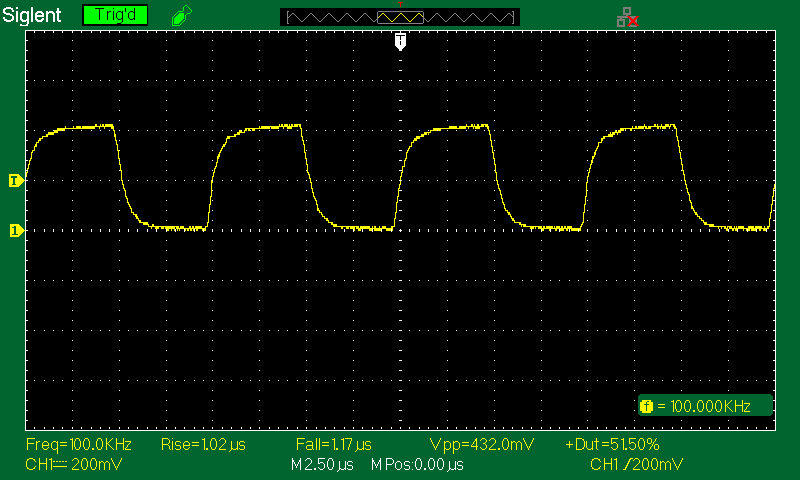
Koolertron signal generator output set to 100Khz, the OSRAM waveform still looks good. Fall time is fast at 1.2us
Koolertron signal generator output set to 200Khz. The OSRAM still keeps up.
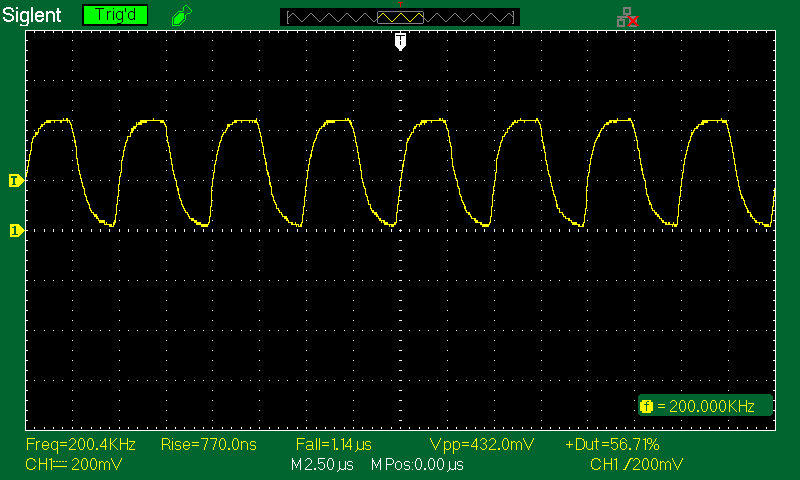
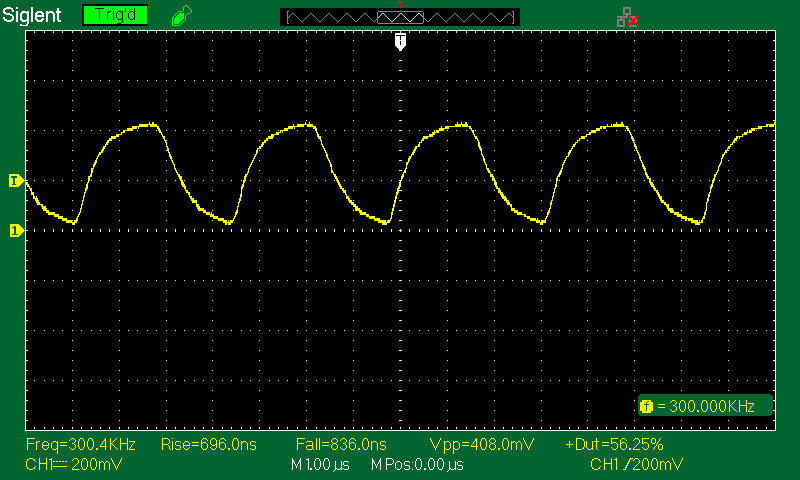
Koolertron signal generator output set to 300Khz. Some very minor clipping towards baseline, and waveform slope becomes more noticeable.
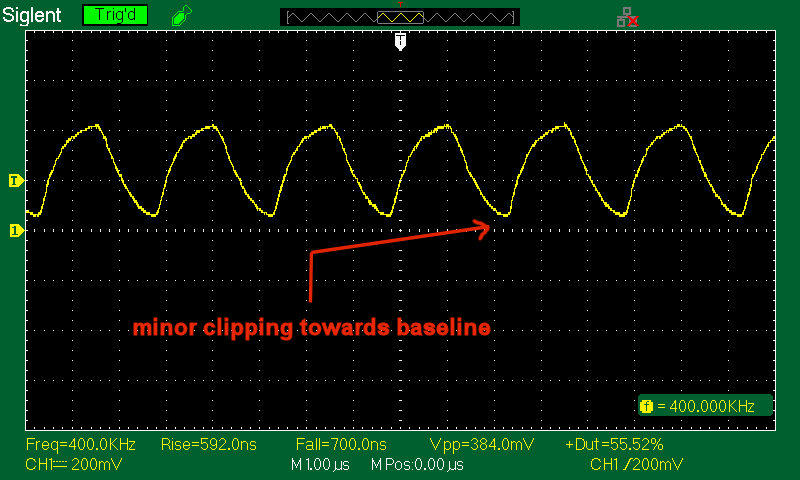
Finally, at 400Khz, the waveform shows a small amount of clipping towards baseline. No need to try higher frequencies (it will only get worse). I don’t really know if we’re reaching the limit of the OSRAM sensor, or the limit of how quickly the test LED (PWM generator) can turn its light output ON/OFF. There may be other factors as well. Either way, the OSRAM can respond to higher frequencies than you’ll see on a consumer flashlight.
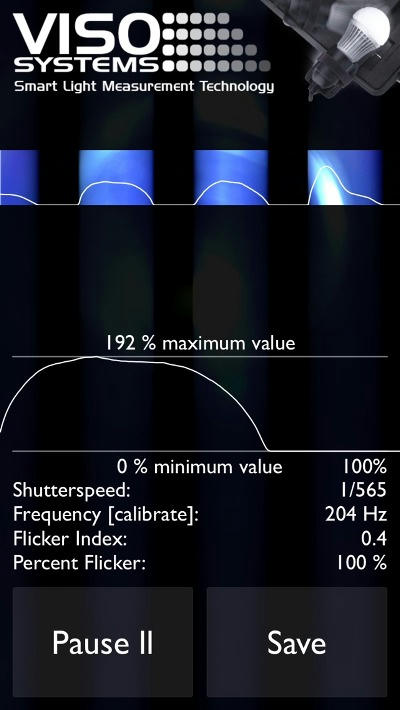
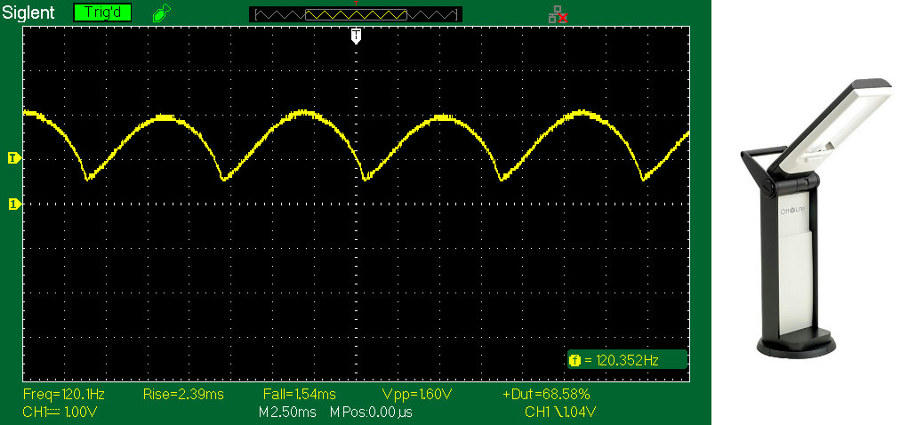
And just for fun, I decided to shine my wife's OttLite task lamp (TrueColor fluorescent bulb) at the sensor. Note the expected frequency.
CONCLUSION: the OSRAM PIN photodiode is an awesome sensor (at less than $10) for testing flashlight PWM. The OSRAM handled all flashlight PWM frequencies with ease, including higher PWM frequencies you won’t see on a consumer flashlight.
Shine Gold Electronics SG-PT3NT Phototransistor (LINK)
As with all other photodiodes/transistors tested, it will need a biasing resistor to turn current into voltage. A value of 300Ω-400Ω is a good starting value.
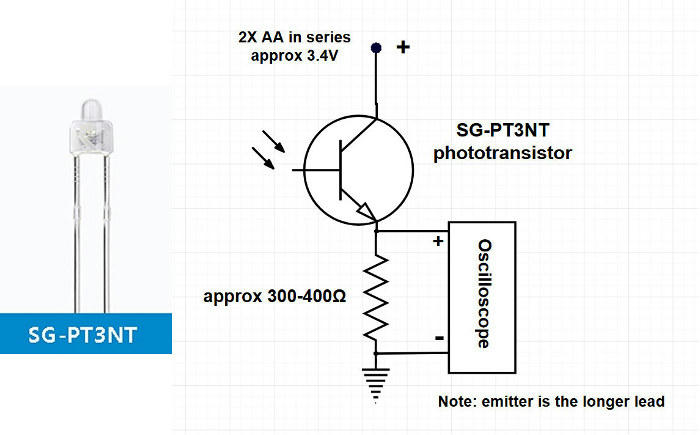
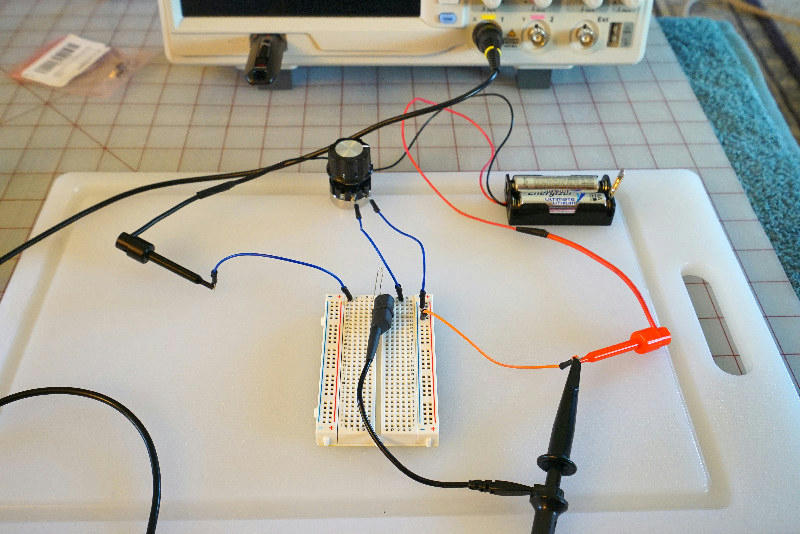
This phototransistor was configured on a wireless breadboard with two AA’s in series for a power supply.
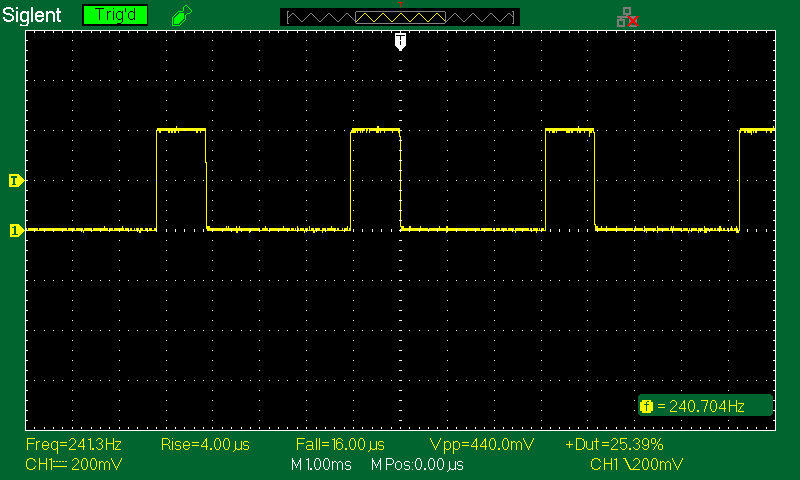
J5 on low with a fall time of 16us (neither the fastest or slowest of all the sensors tested).
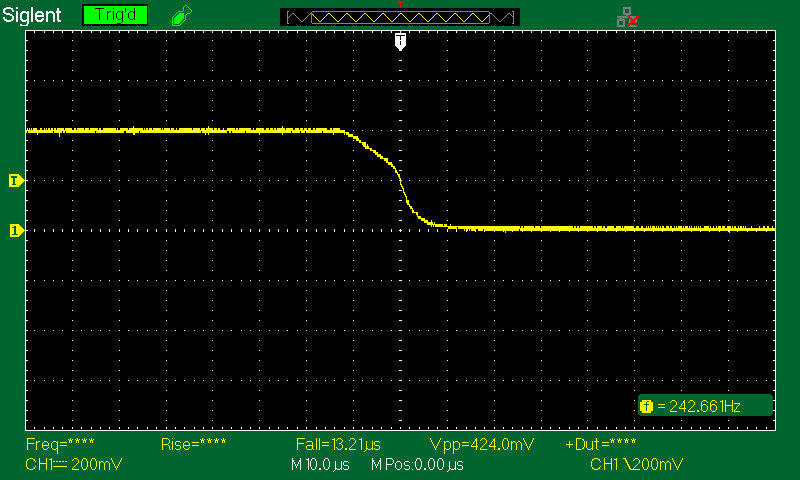
J5 on low, triggered on falling edge, zoomed in for accurate fall time of 13.2us
Convoy S2+ at .1% brightness, PWM at 2.27Khz
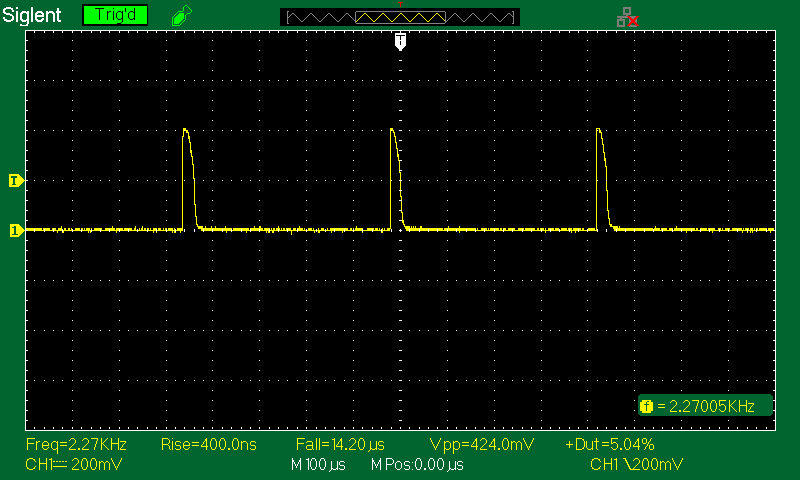
Convoy S2+ at 1% output, PWM at 18.2Khz. We start to see a noticeable slope on the waveform’s falling edge, caused by the sensor’s slightly slower fall time (compared to the fastest sensors tested).
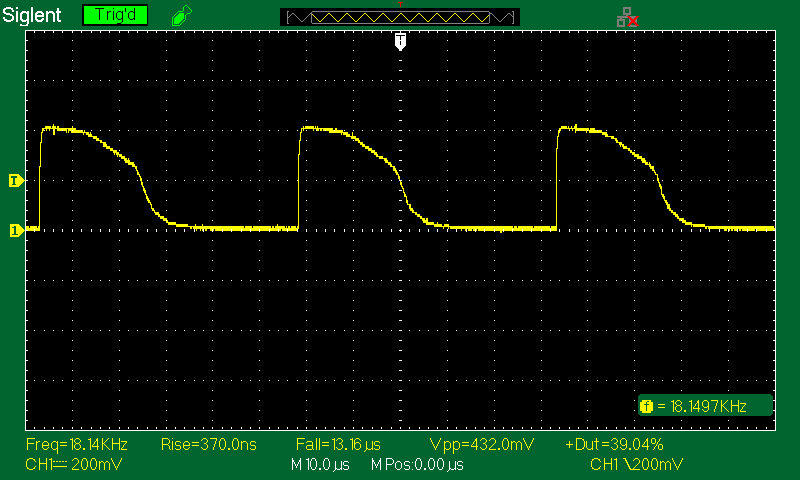
Convoy S2+ at 10%, PWM at 36.25Khz. Waveform not as well-defined as seen on the OSRAM.
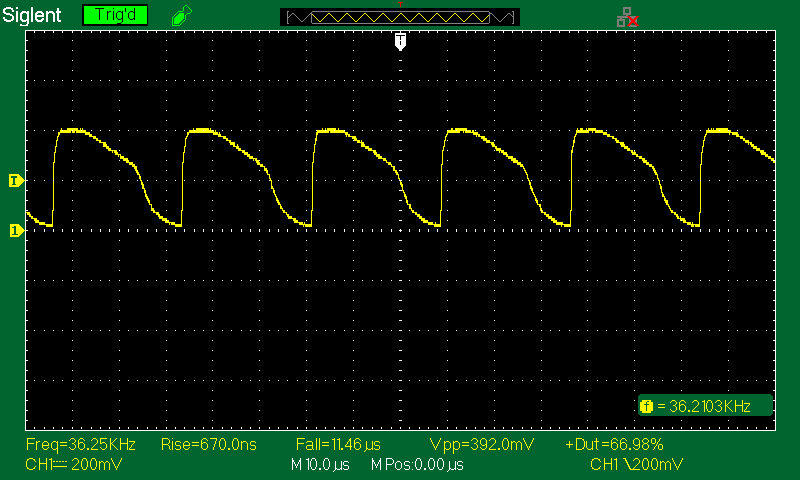
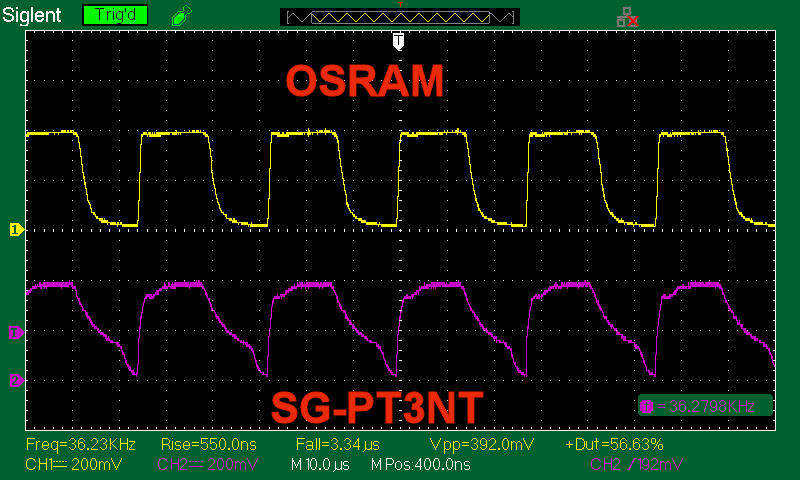
The Convoy S2+ at 35% brightness, PWM at 36.2Khz. This sensor was more sensitive than others to the angle of light. Getting a stable waveform required shining the light at just the right angle away from the sensor, otherwise the sensor would saturate (producing a flat waveform) or disappear towards baseline. The waveform also looked more wonky (less like a square wave) than what I saw with the other recommended sensors, like the OSRAM. To illustrate wonky, here’s a dual channel/dual probe capture with the Convoy shining on both sensors simultaneously (Convoy at 35% brightness). Note the OSRAM’s more defined waveform pulse.
CONCLUSION: This sensor is marginally adequate for measuring flashlight PWM. A well-defined waveform could not be obtained at higher PWM frequencies and the sensor was particularly fussy about the angle of light.
Adafruit log-scale analog light sensor GA1A12S02 (link)
This breakout board (what Adafruit calls it) has three components; sensor, resistor and cap. The block diagram is from the spec sheet. Apparently, the amplifier circuit is built into the sensor.
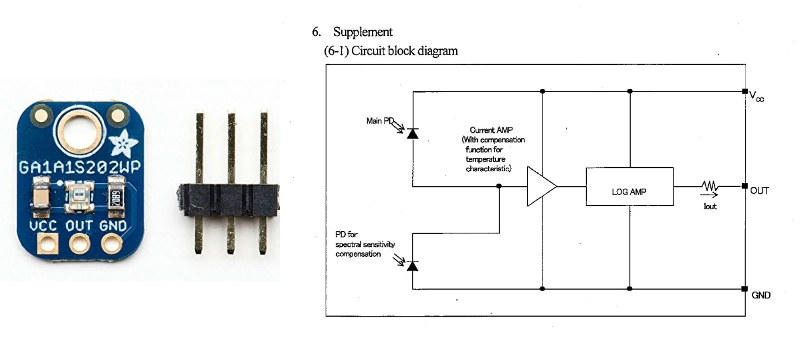
It’s advertised as “a true log-linear relationship with light levels”. You will want to solder the supplied 3-pin connector onto the breakout board, to attach stuff.
This device was very slow with a fall time over 9.6ms (note that’s milliseconds). This is the slowest fall time of all the sensors tested (by far). Because the fall times are so slow, it quickly becomes obvious this sensor is not adequate for measuring flashlight PWM. I chose to turn the J5 on STROBE (7.8hz), to get a stable waveform that doesn’t clip. I did remove the PCB’s surface-mount cap from the PCB (thinking it might help), but it didn’t. Clearly, the amplifier circuit contributes to its slow fall time.
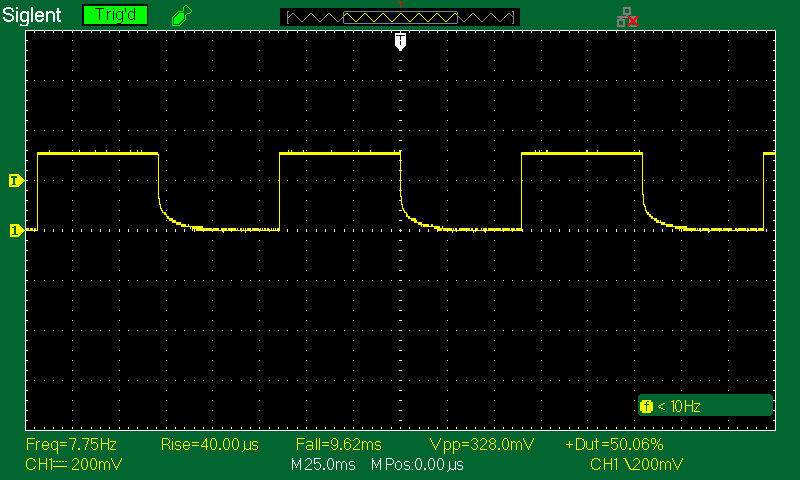
J5 on strobe, triggered on failing edge, zoomed in for accurate fall time. Fall time is 9.2ms. That’s over 1,000 times slower than the OSRAM.
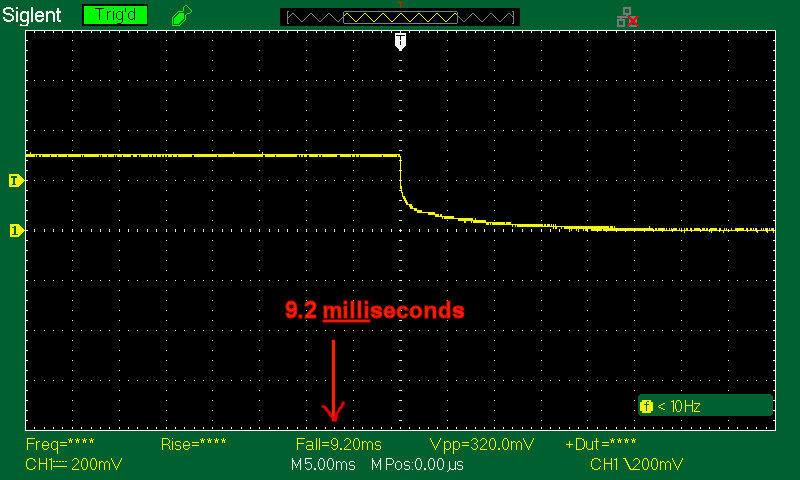
The slow fall times become even more evident on the Convoy S2+ at .1%, where the PWM frequency increases to 2.3Khz. Even at the Convoy’s lower frequencies, there is severe clipping.
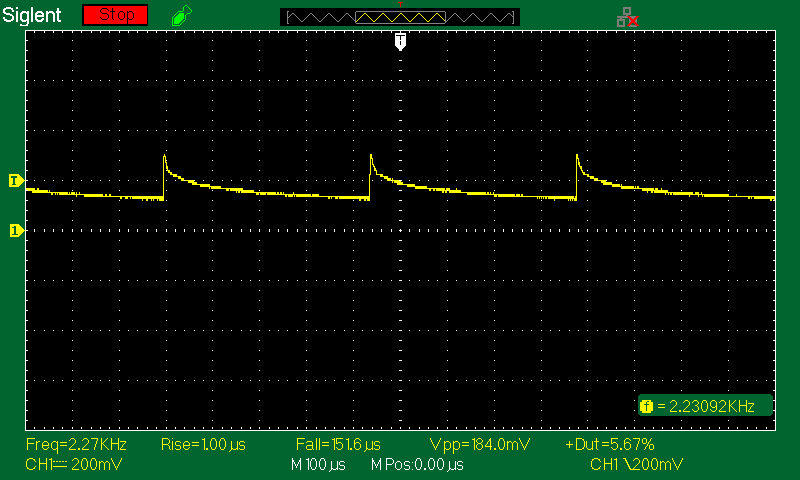
No further testing was necessary.
CONCLUSION: this sensor may serve well in other types of circuits, but it’s not fast enough for measuring PWM on flashlights that use a higher PWM frequency (like a Convoy S2+). It was the slowest of all sensors tested.
Adafruit PhotoTransistor ADA2831 (link)
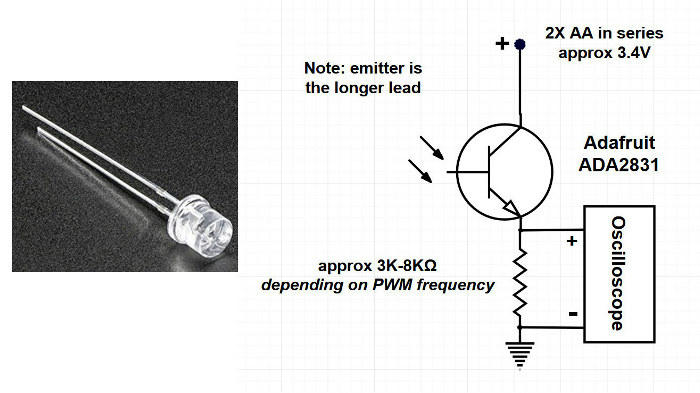
The ADA2831 will need a biasing resistor to convert current into voltage (for measuring with an oscilloscope). An 8KΩ resistor (approx) on the emitter worked well for lower PWM frequencies. HOWEVER, for higher frequencies (like the Convoy at 36Khz), I discovered that 3KΩ worked better. I could not get a stable waveform across all PWM frequencies with just one resister value. We will see this dual resistor phenomenon with another sensor.
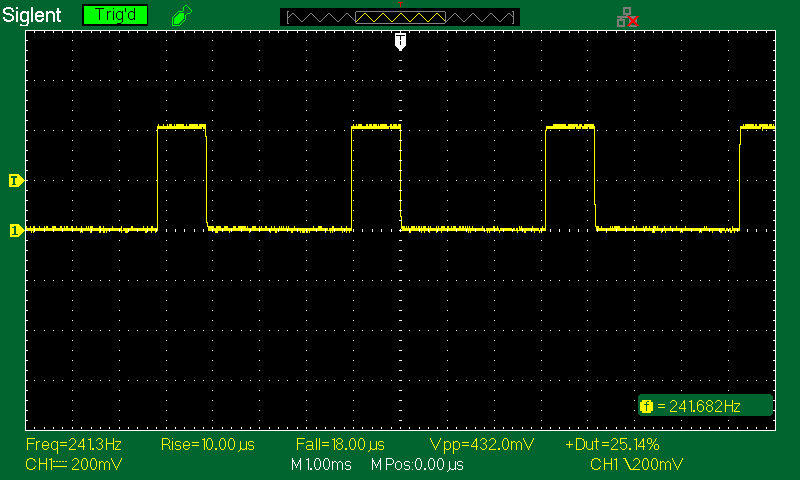
J5 on low, PWM at 241Hz, fall time 18us.
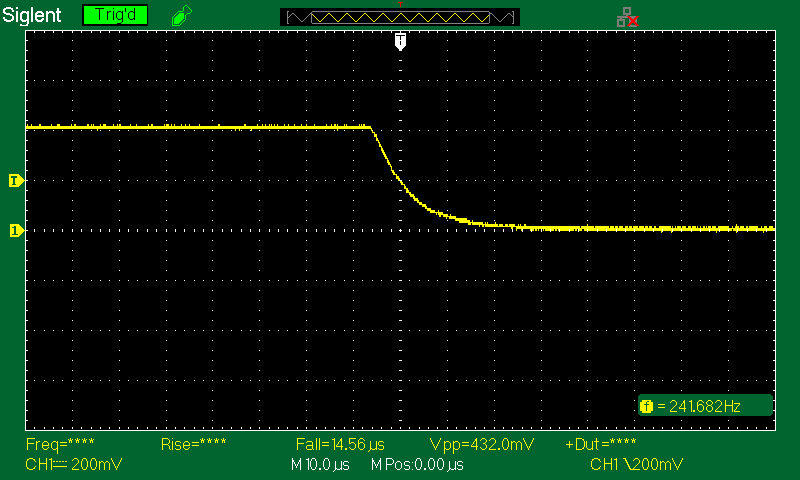
J5 on low, triggered on falling edge, zoomed in for accurate fall time. 14.6us is a bit slower than the fastest sensors tested.
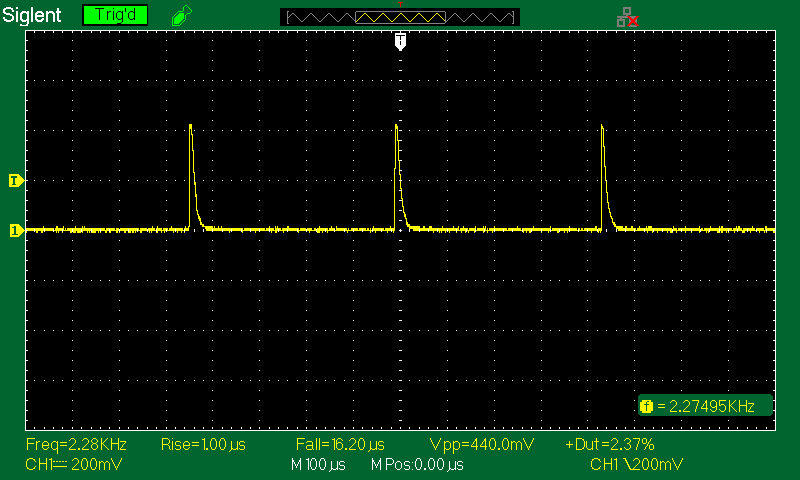
ConvoyS2+ at .1% output with a PWM of 2.26Khz
Convoy S2+ at 1% output with a PWM of 18.2Khz. An obvious slope on the waveform’s falling edge.
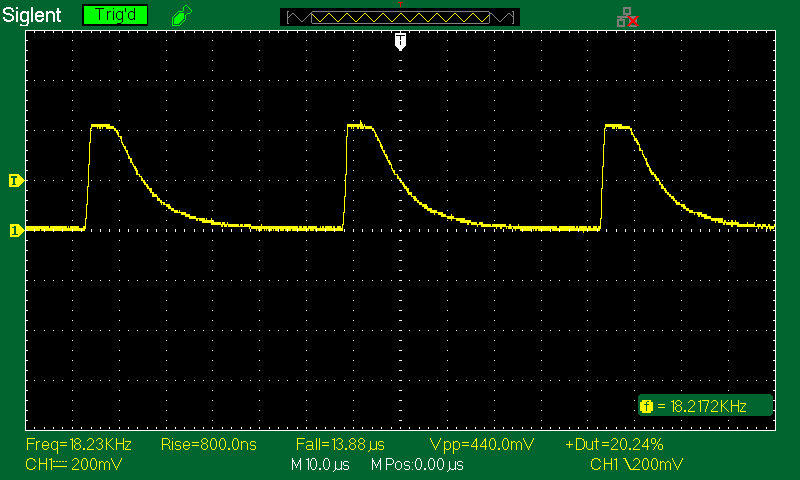
J5 at 10% brightness, PWM at 36.3Khz. Here we see some minor clipping towards baseline.
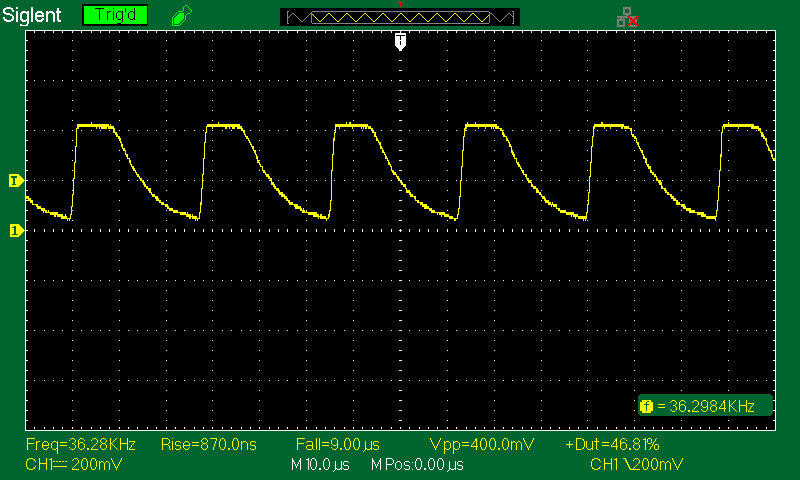
Convoy at 35% brightness, PWM at 36.6Khz. There is more noticeable clipping towards baseline.
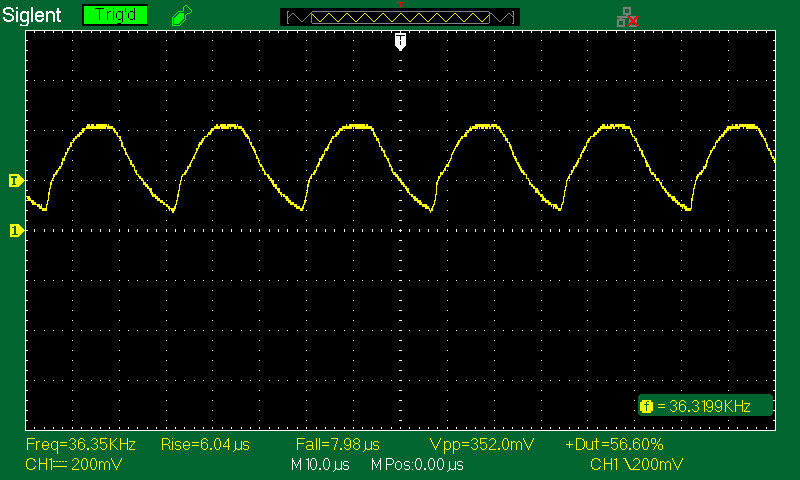
CONCLUSION: This sensor was marginally fast enough to measure the Convoy’s higher PWM frequency. There was some clipping towards baseline and the device required two resister values to achieve stable waveforms across all PWM frequencies.
Shine Gold Electronics SG1133 photodiode (link)
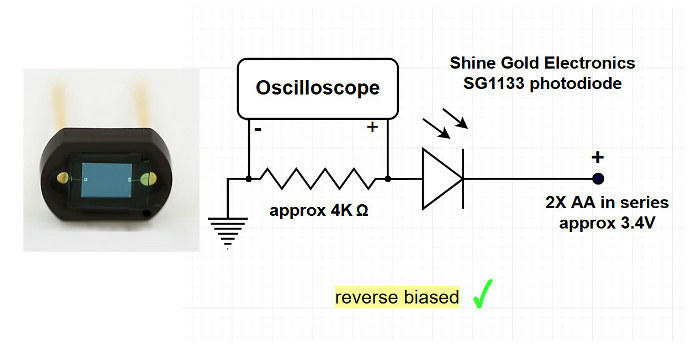
This will require a biasing resistor to convert current to voltage (4KΩ is a good starting point). This photodiode has a small marking hole on the cathode side (not easy to see), where the +supply will be attached. Remember, photodiodes are reverse biased. As stated before, if your output seems stuck on high, you may have it forward biased (incorrect), but it shouldn’t hurt anything (unless you try).
J5 on low with a decent fall time of 5.6us.
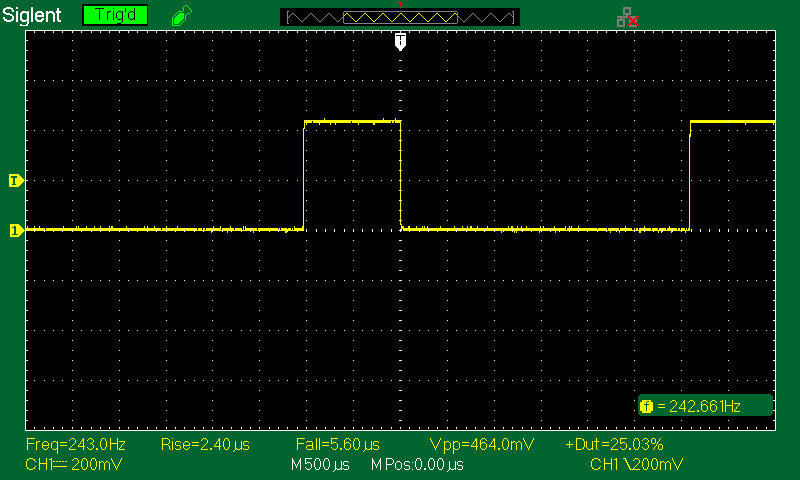
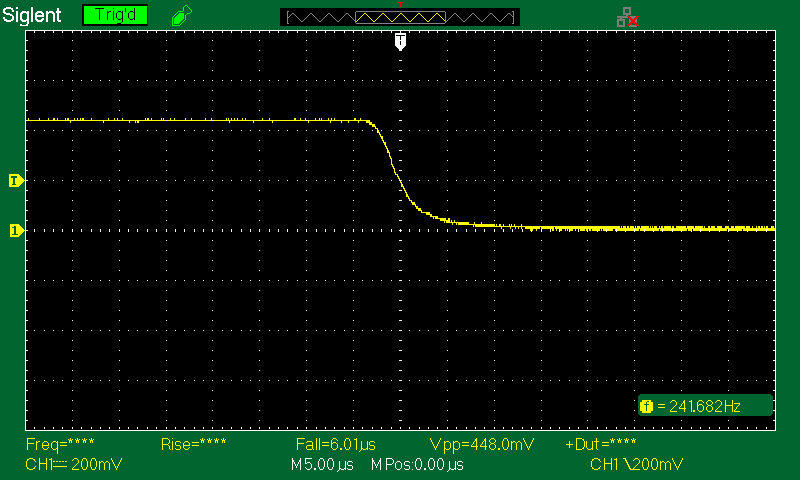
J5 on low, triggered on falling edge, zoomed in for accurate fall time of 6.0us.
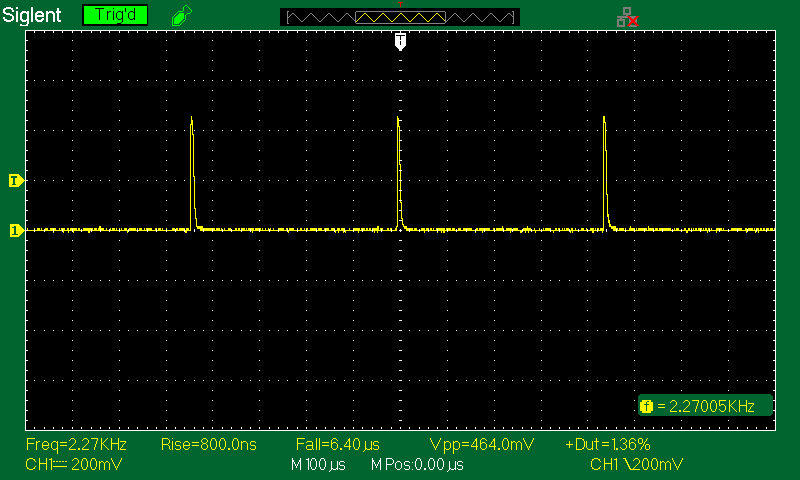
J5 at .1% brightness, PWM at 2.27Khz
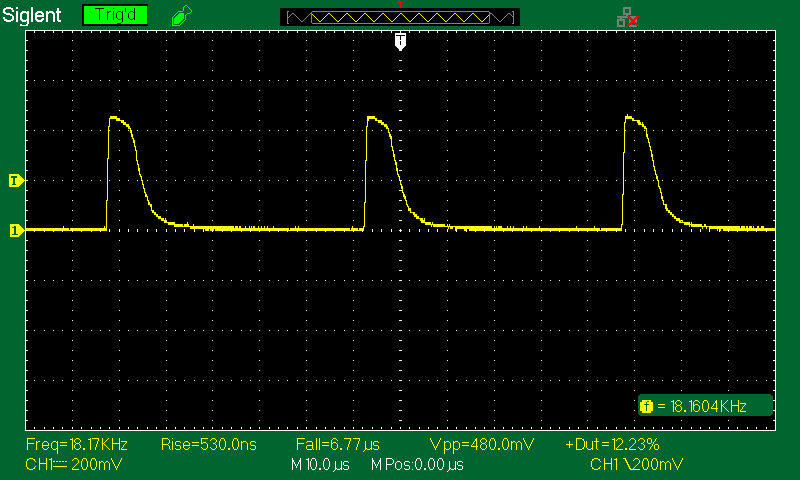
J5 at 1% brightness, PWM at 18.2Khz
J5 at 10% brightness, PWM at 36.2Khz. Fall time looking good at 5.4us.
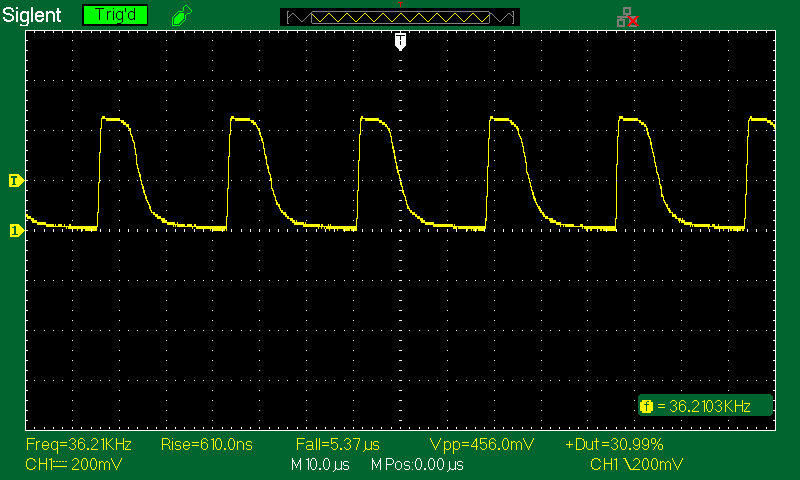
J5 at 35% brightness, PWM at 36.3Khz. Waveform is well-defined and the fall time still looks good. There is some very minor clipping towards baseline.
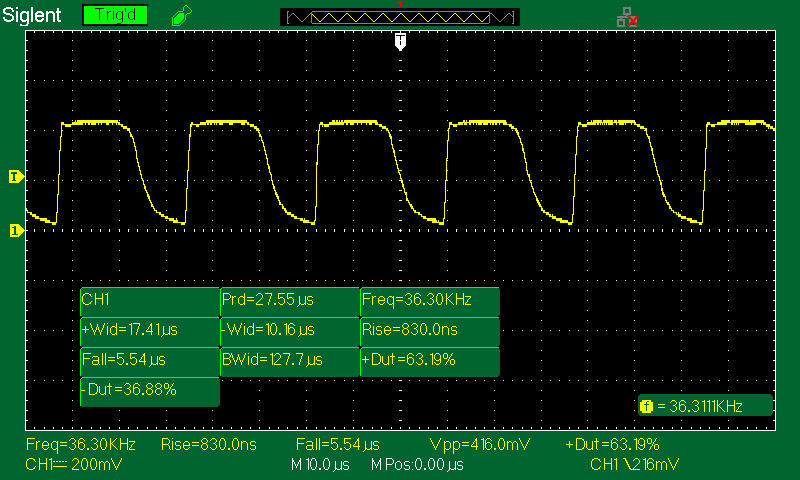
CONCLUSION: this sensor is adequate for measuring the Convoy’s higher PWM frequencies, although there is some minor clipping towards baseline.
Shine Gold Electronics SG5051 photodiode (link)
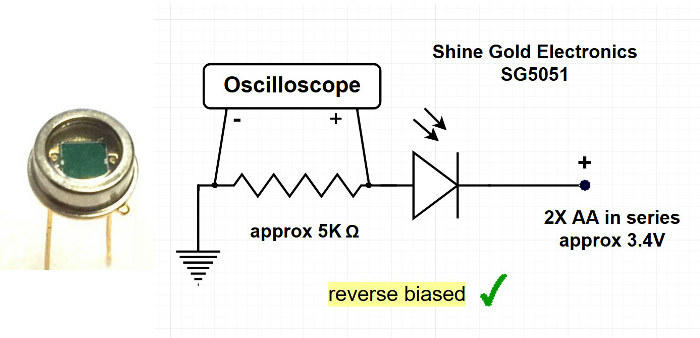
A biasing resister will be needed to convert current into voltage. 5K is a good starting point. The usual 2X AA in series power supply was used (3.4V). I also used a bench supply and varied the supply voltage from 3.4-6V, just to see if it made any difference. There was no difference in fall time or waveform shape at 6V, it only affected the amplitude of the waveform.
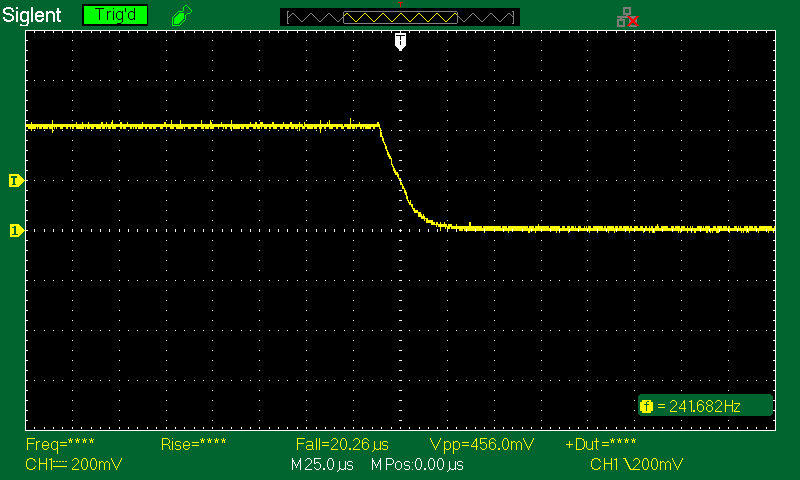
J5 on low, PWM at 242hz. Note the fall time of 24us (neither the slowest or fastest of the sensors tested).
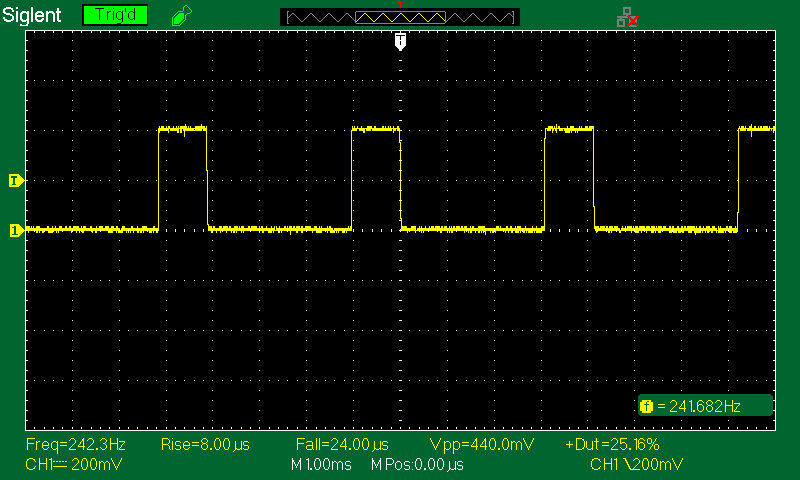
J5 low, triggered on falling edge, for a more accurate fall time.
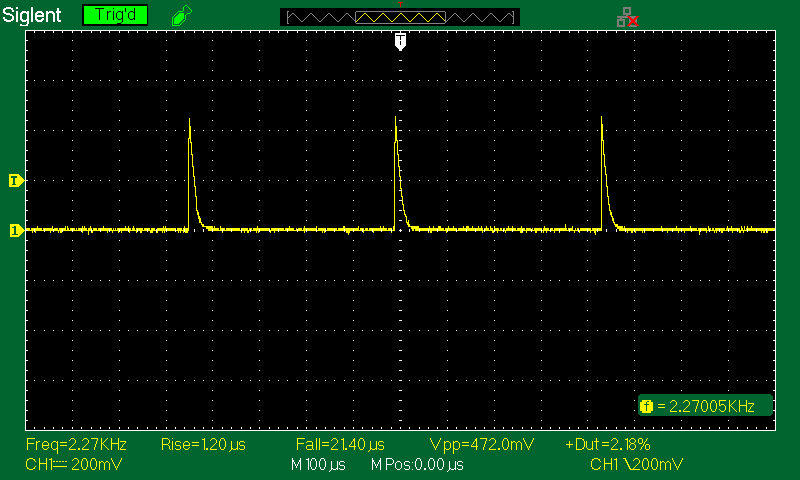
J5 at .1% brightness, PWM at 2.3Khz.
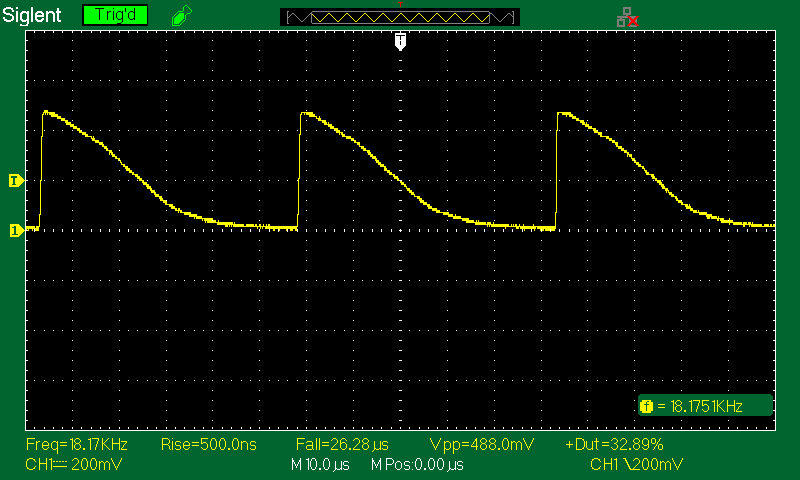
J5 at 1% brightness, PWM at 18.2Khz. Note the ski slope on the falling edge, due to its slower fall time.
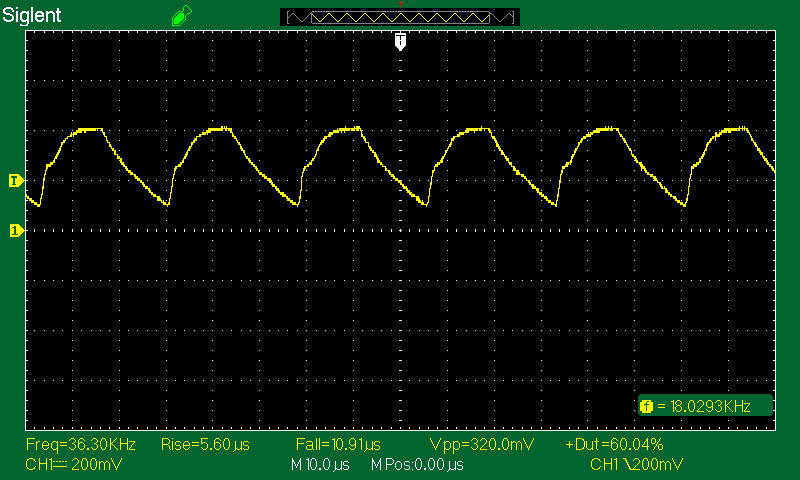
J5 at 10% brightness, PWM at 36.3Khz. Noticeable clipping towards baseline.

J5 at 35% brightness, PWM at 36.3Khz. There is significant clipping towards baseline and the waveform is not well-defined like the OSRAM.
CONCLUSION: This sensor is marginally fast enough to measure the Convoy’s higher PWM frequencies, but there is clipping and waveform distortion.
HAMAMATSU S1223 HIGH SPEED 30Mhz PIN photodiode (link)
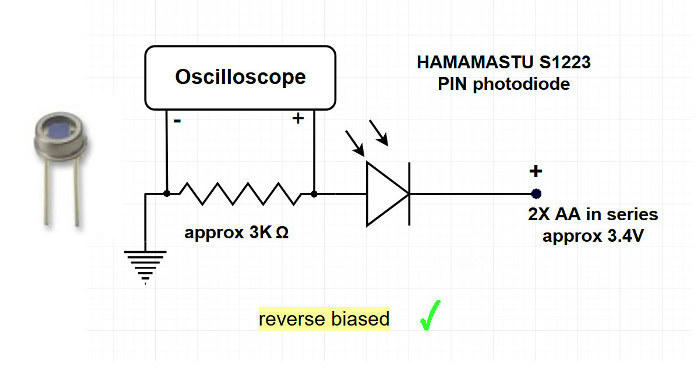
This PIN photodiode needs a biasing resistor to turn current into voltage, 3K is a good starting value.
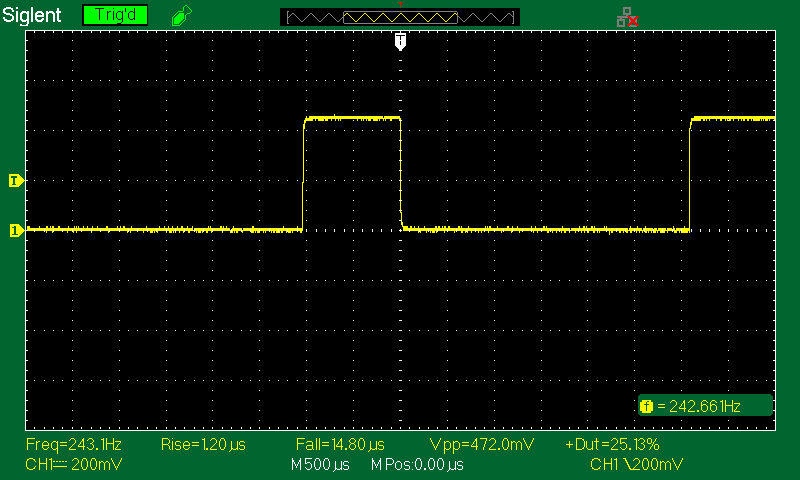
J5 on low, PWM at 243Hz. We see a fall time of 14.8us (neither the fastest or slowest tested). HOWEVER, something interesting is going to happen; the fall time will get much faster as the PWM frequency increases.
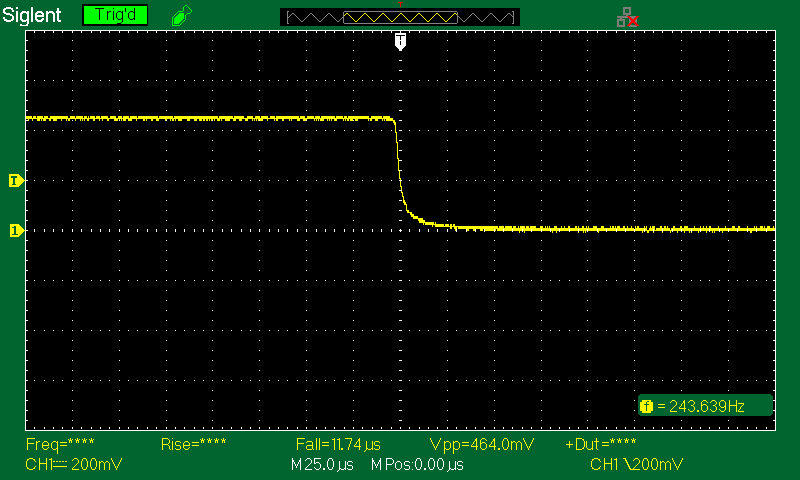
J5 on low, triggered on falling edge, zoomed in for an accurate fall time of 11.7us.
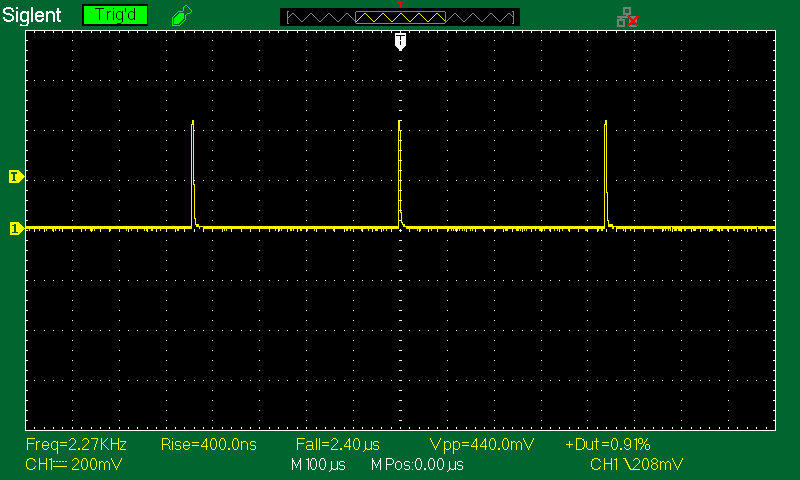
J5 at .1% brightness, PWM at 2.3Khz. Note how the fall time became faster at 6us. It will get even faster.
Convoy at 1% brightness, PWM at 18.2Khz. The sensor’s fall time continues to get faster at 1.8us.
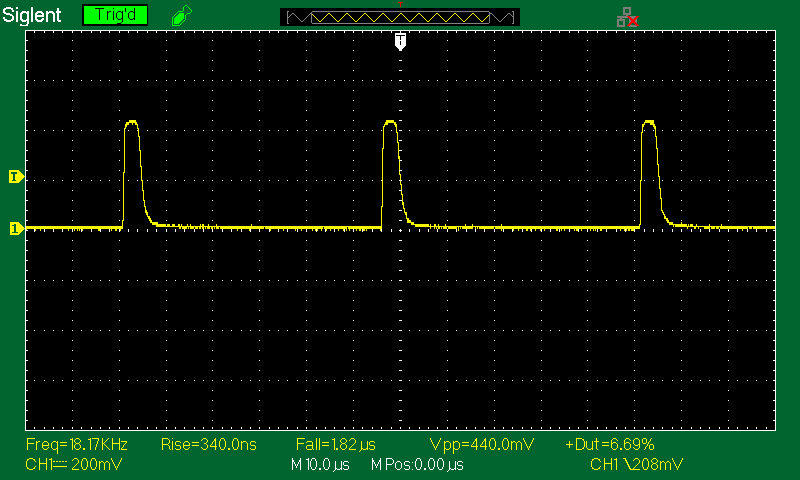
Convoy at 10% brightness, PWM at 36.2Khz. With the Convoy at its maximum frequency, note how the fall time became much faster at 2.8us
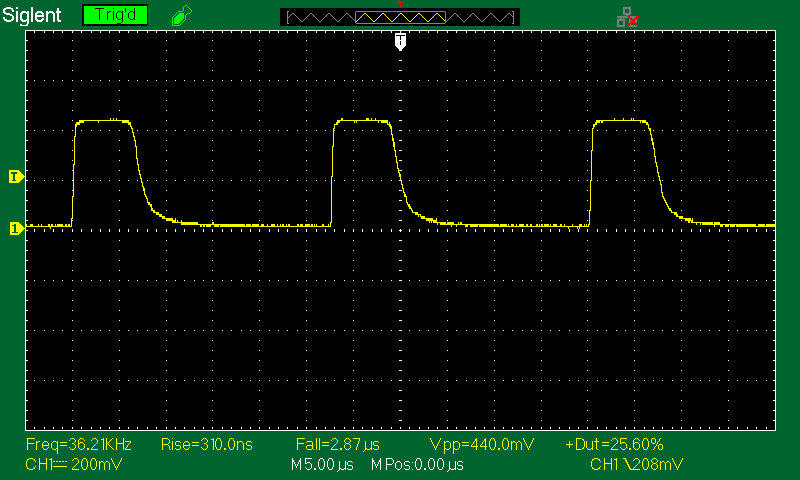
Convoy at 35% brightness, PWM at 36.3Khz. Fall time remains fast at 3.3us. Waveform has a well-defined pulse, like the OSRAM.
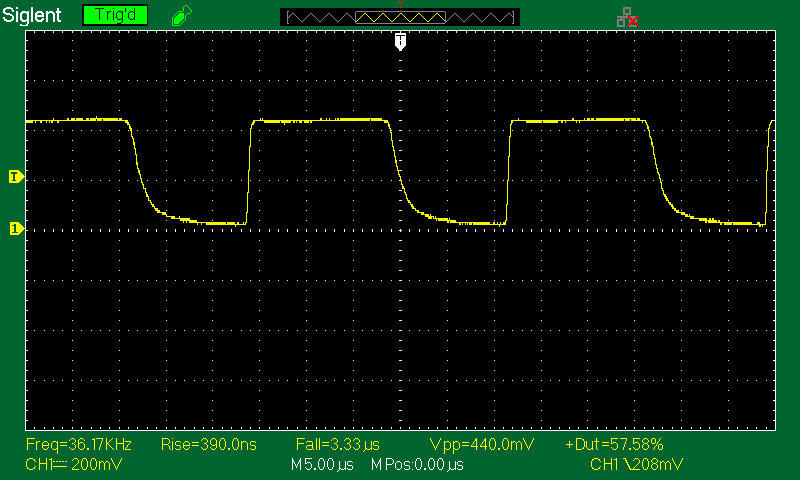
Because this sensor is doing so well, I will also test this sensor with my home-built PWM generator using a Koolertron signal generator (see details and photo I took when testing the OSRAM). Applying a 0-5V square wave, I will light up the white test LED with the following PWM frequencies, 100Khz, 200Khz, 300Khz, 400Khz.
Koolertron output at 100Khz. Waveform looks good.
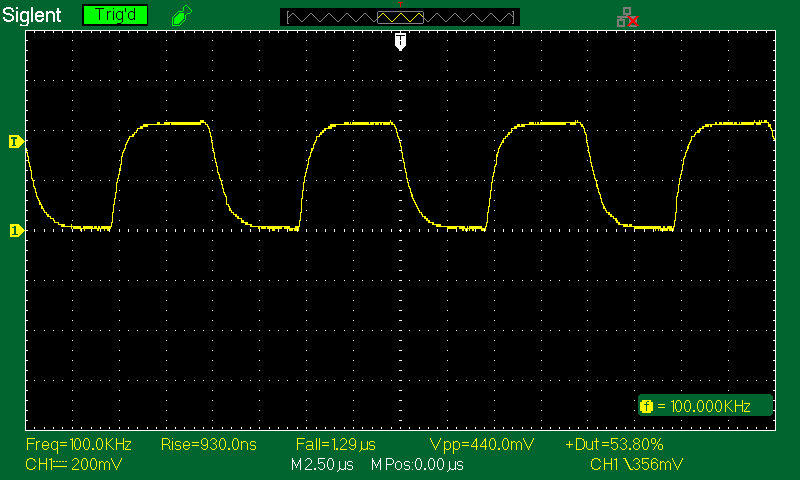
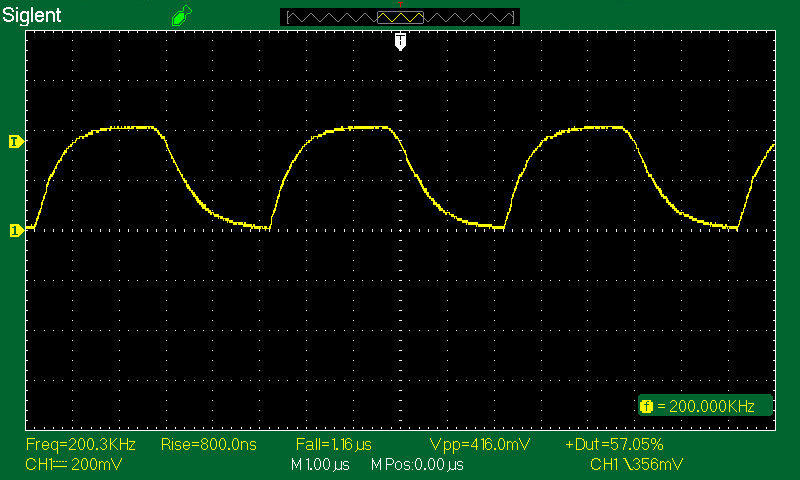
Koolertron output at 200Khz.
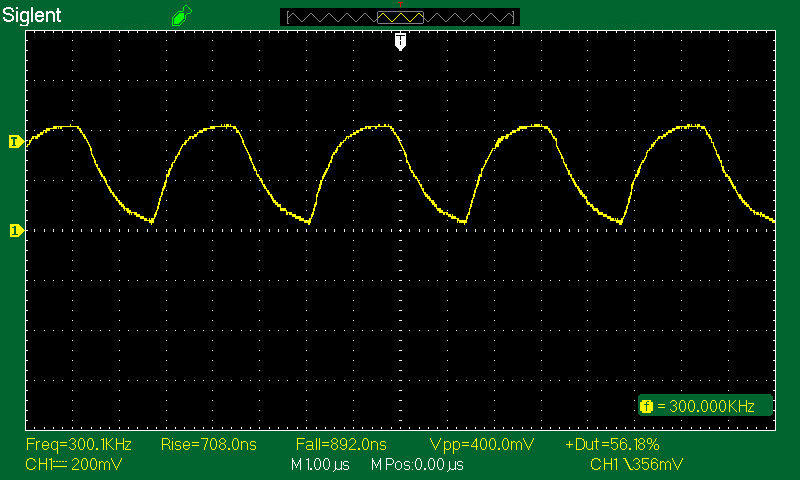
Koolertron output at 300Khz. Waveform looks similar to the OSRAM at the same frequency (excellent).
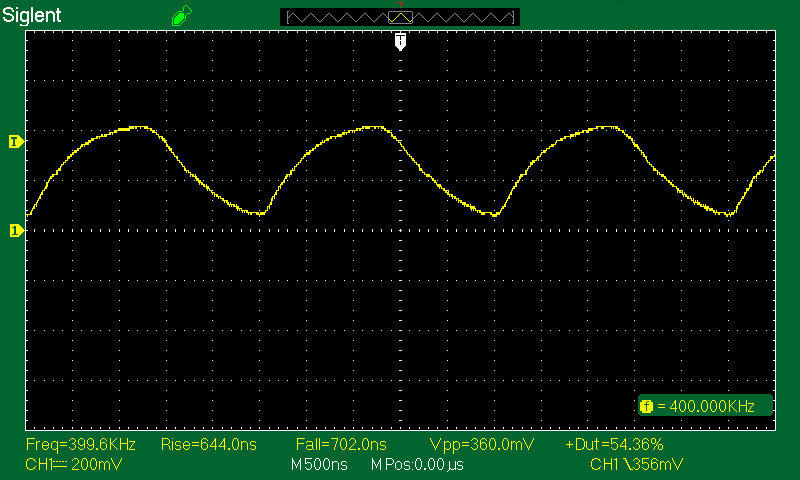
Koolertron output at 400Khz. We see some minor clipping towards baseline (as we did with the OSRAM). No need to try a higher frequency, it will only get worse. As stated before, I don’t know if we’re reaching the limit of the sensor, or the limit of how quickly the cheap white LED (PWM generator) can turn its light output ON/OFF.
Note the interesting characteristic of this sensor; the fall times became increasingly faster at the higher Convoy PWM frequencies. I believe this is an indication that the sensor was optimized for higher frequencies (my theory).
CONCLUSION: This is also an excellent sensor for measuring flashlight PWM, as good as the OSRAM (although more expensive).
HAMAMATSU S5973 HIGH SPEED 1Ghz PIN photodiode (link)
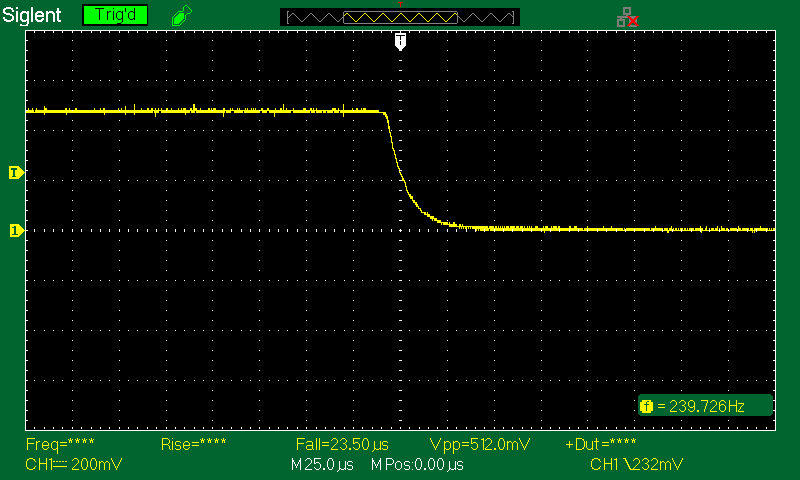
This was the most expensive sensor tested (approx $39). It’s expensive because of its 1GHz rated bandwidth. The data sheet says “suitable for optical communications and other high-speed photometry”. HOWEVER, that speed also creates a problem for our niche in measuring flashlight PWM. I was unable to find one biasing resister that worked across all the PWM frequencies. A value of 50K worked better for the Convoy’s higher frequencies, and 300K worked better for the J5’s lower PWM frequency. If I tried to use any one resister value, the waveforms would be highly unstable for either the lower or higher frequencies. My theory; this sensor was designed & optimized for high speed communications. Trying to optimize it for low and high frequencies doesn’t work so well. Well that’s my theory.
J5 on low, PWM at 239Hz (biasing resister 300K). Note the fall time is rather long (28us) compared to other recommended sensors. However, with a different resister value, those fall times will become much faster with the Convoy’s higher PWM frequencies.
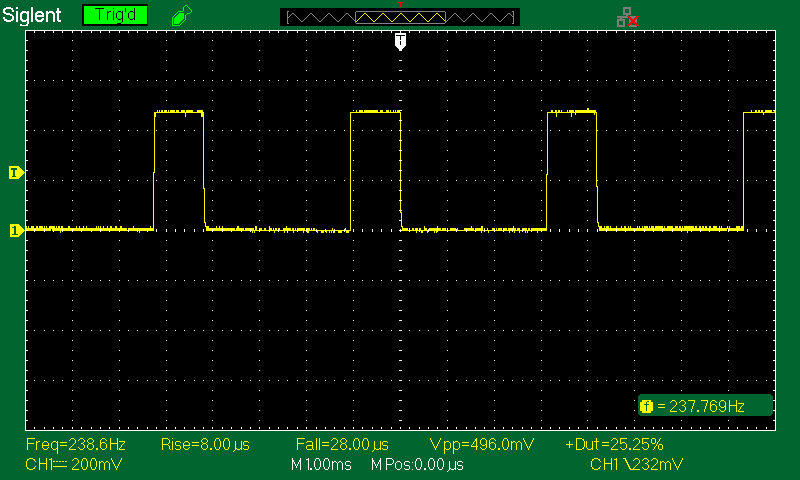
J5 on low, triggered on falling edge, zoomed in for accurate fall time (biasing resister is still at 300K). The fall time is a rather slow 23.5us but will get much faster with a lower resistor value, keep reading.
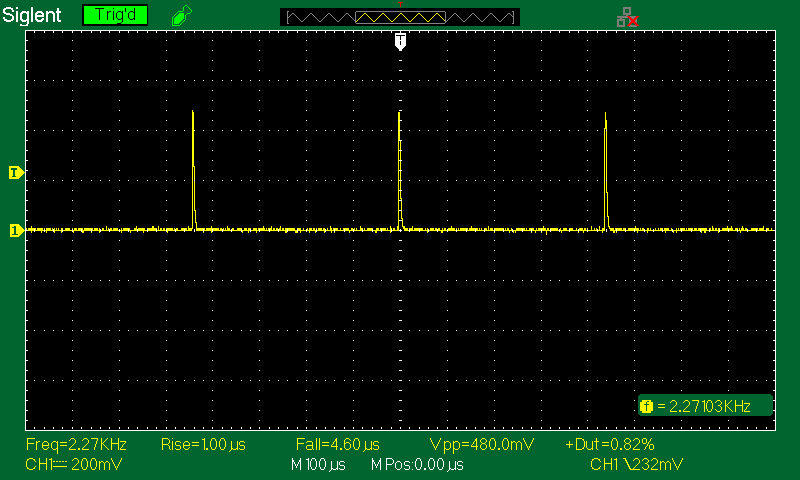
Convoy at .1% brightness, PWM at 2.3Khz (biasing resister is now a lower value, 50K). With the lower resistor value, the fall time is now much faster at 4-5us
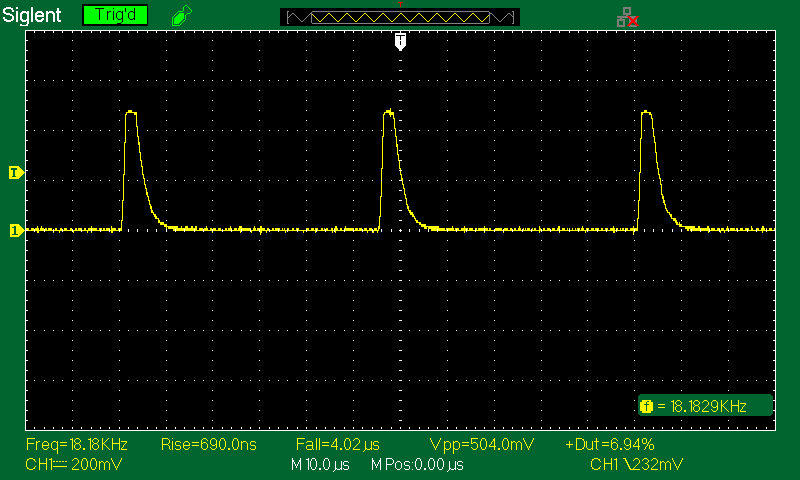
Convoy at 1% brightness, PWM at 18.2Khz (biasing resister is now 50K). A very good fall time of 4us
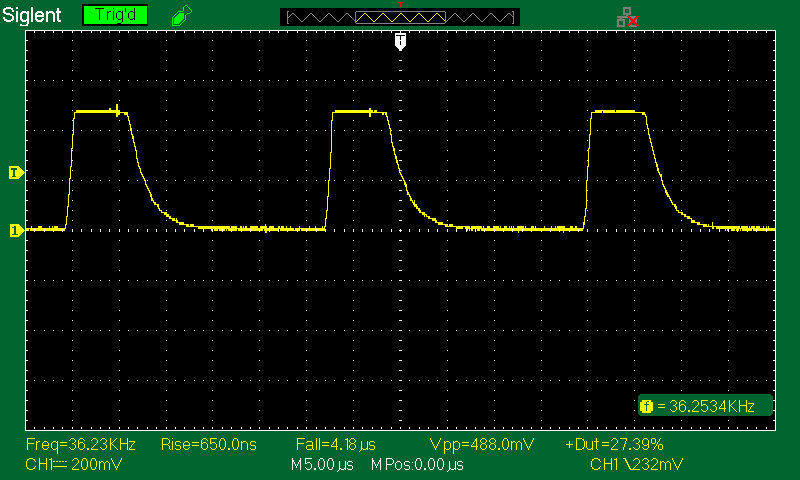
Convoy brightness at 10%, PWM at 36.2Khz (biasing resister is now 50K).
Convoy at 35% brightness, PWM at 36.3Khz (biasing resister 50K). Fall time below 5us. Waveform is well-defined, as was seen on the OSRAM.
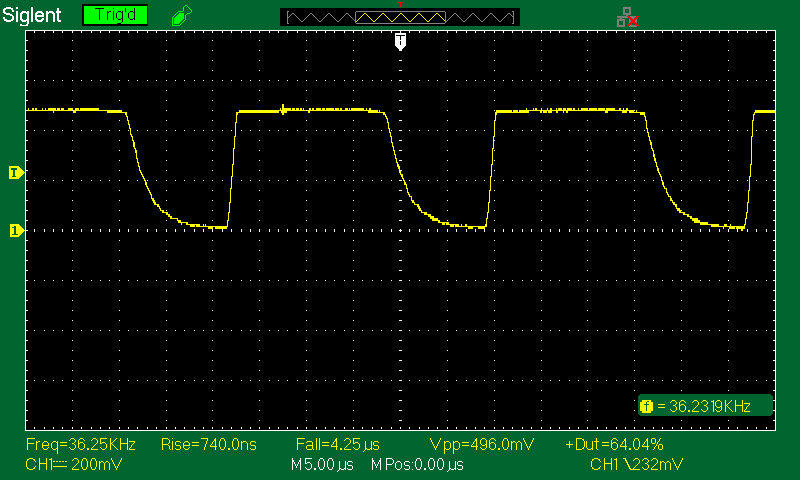
CONCLUSION: This sensor is definitely fast enough. However, I can’t recommend it, due to its high cost and the nuisance of requiring two biasing resisters to achieve stable waveforms across all PWM frequencies.
Thorlabs FDS100 PIN Photodiode (Thorlabs link)
This is the same PIN photodiode (approx $15) used in Thorlabs DET36A2 biased photodetector ($124), link. The DET36A2 is similar to the one used by BLF member maukka.
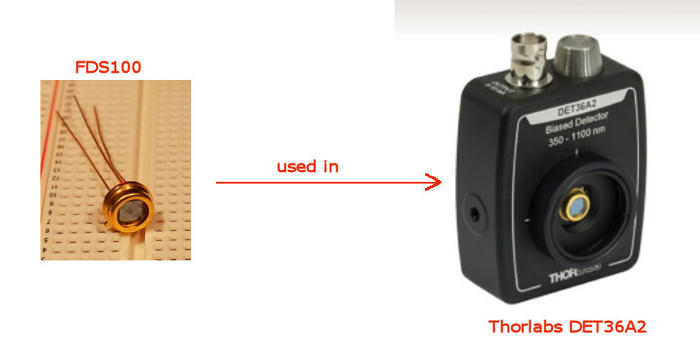
This PIN photodiode comes with Thorlabs Lab Snacks.

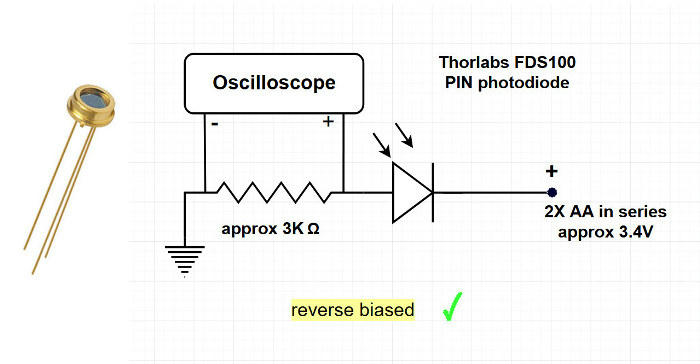
A biasing resistor of approx 3K is a good starting value. The third lead (case ground) can be left unattached.
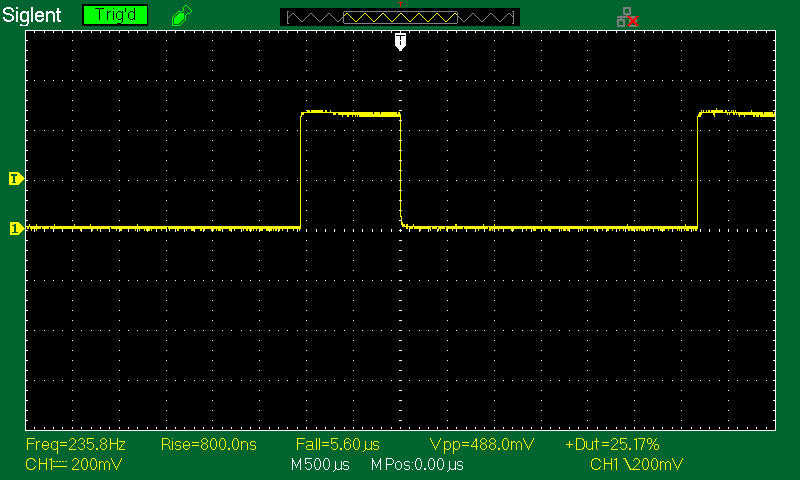
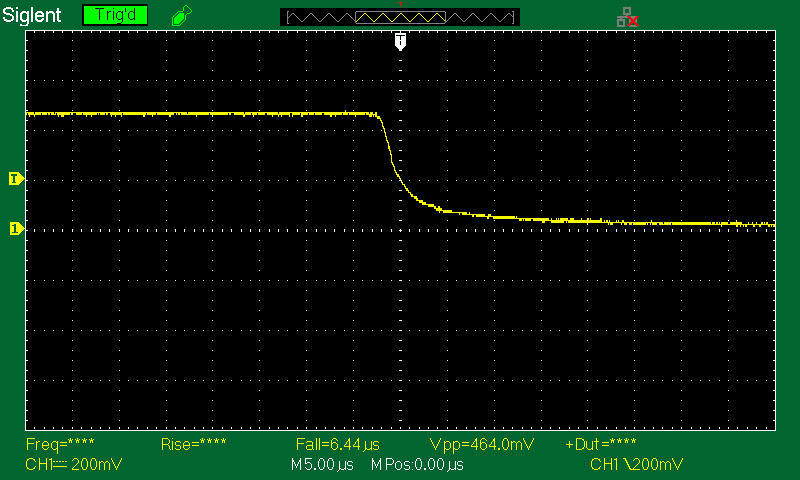
J5 on low, fall time 5.6us
J5 waveform triggered on falling edge, zoomed in for accurate fall time of 6.4us
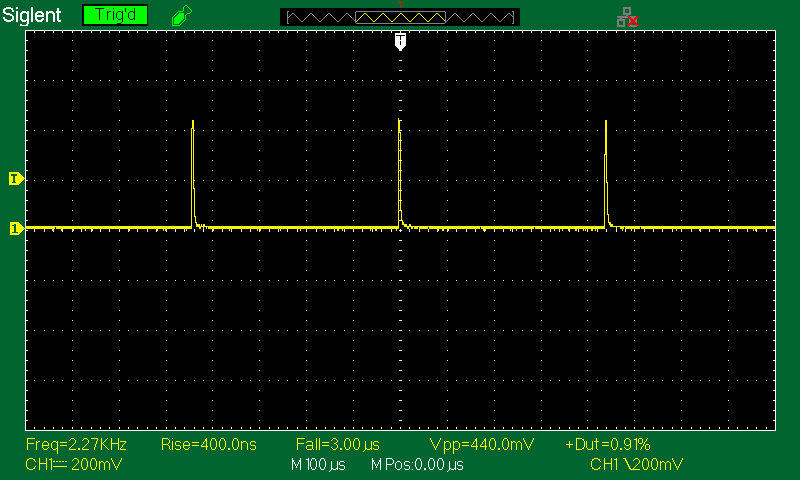
Convoy at .1% brightness, fall time 3us
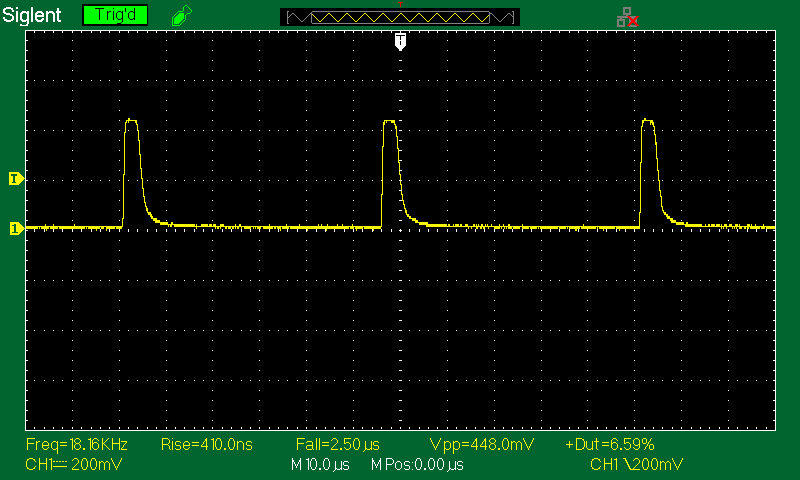
Convoy at 1% brightness, PWM at 18.1Khz, fall time 2.5us
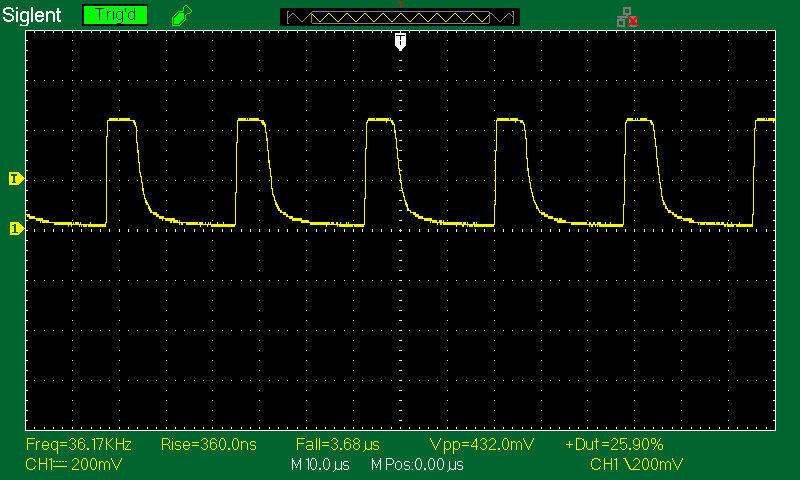
Convoy at 10% brightness, PWM at 36.2Khz, fall time 3.7us
Convoy at 35% brightness, no clipping and a stable waveform with a fall time of 3.3us
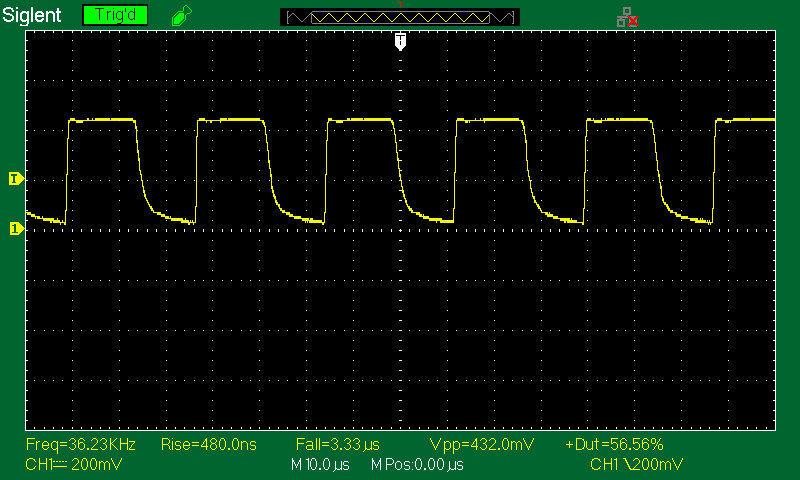
Since this sensor is also doing so well, I will once again use the Koolertron signal generator (and homemade PWM generator) and apply a PWM frequency of 100Khz. The FDS100 handled it well (waveform still looks good).
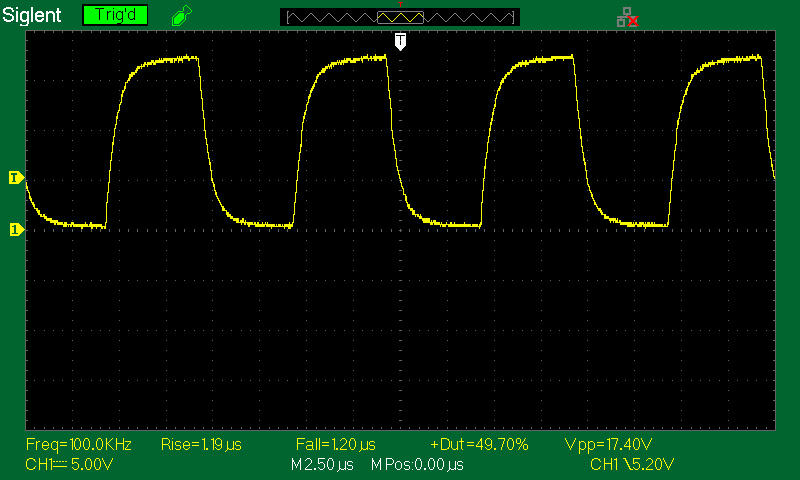
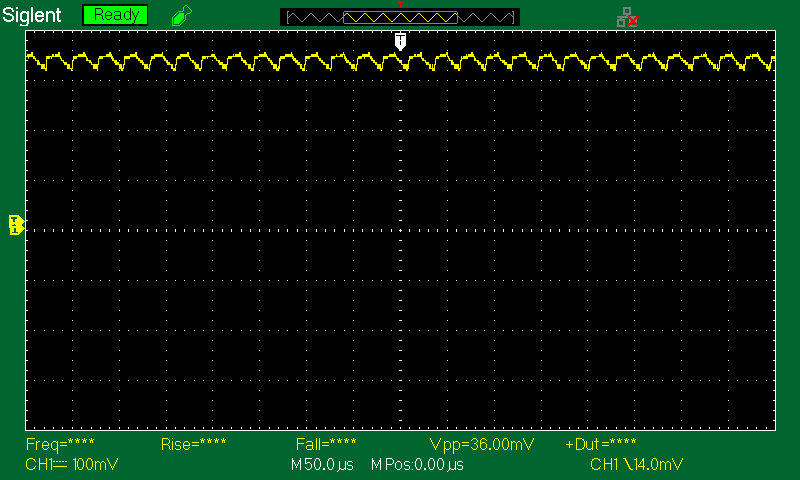
And finally, I’m going to sneak something in. Here’s the oscillations on a Zebralight SC53Fc (medium brightness). These oscillations have been discussed in other threads. I’m not invested in whether this is or isn’t PWM, I’m just showing what the scope sees, because I find it interesting, and because I can now see it myself.
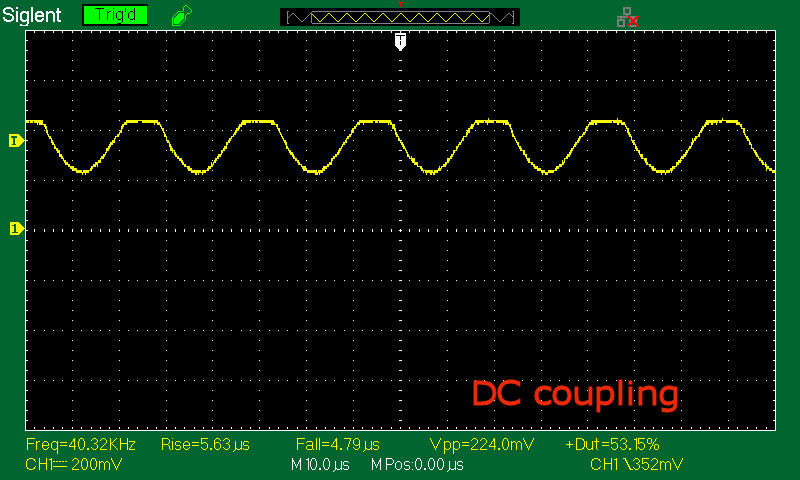
CONCLUSION: The FDS100 is also an excellent sensor for measuring flashlight PWM. It can easily track frequencies higher than you would see on a consumer flashlight. As a bonus, you get Thorlabs lab snacks.
Everlight PD438C-S46 PIN Diode (Amazon link) (Digi-Key link)
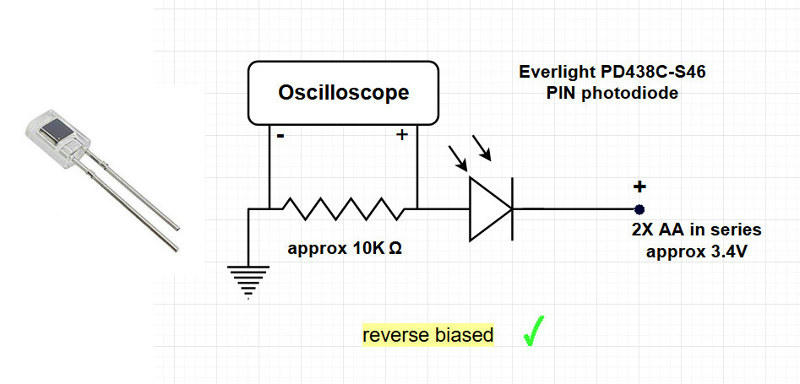
This photodiode needs a biasing resistor to turn current into voltage. 10K is a good starting value.
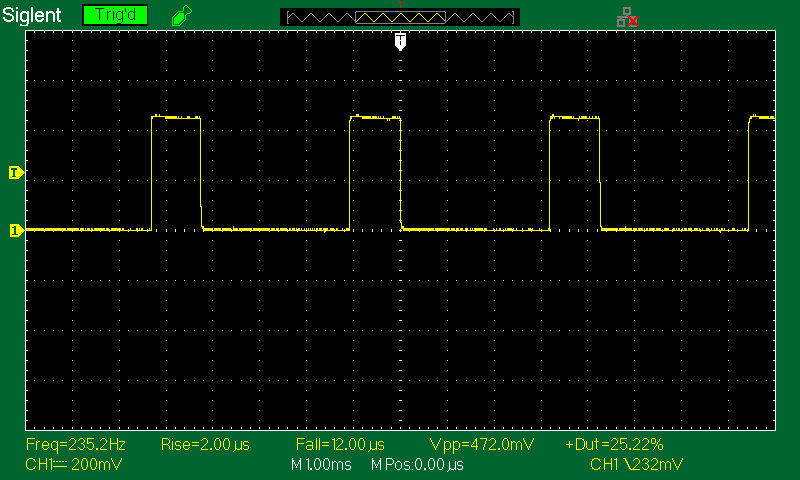
J5 on low, PWM at 243Hz. We see a fall time of 12us.
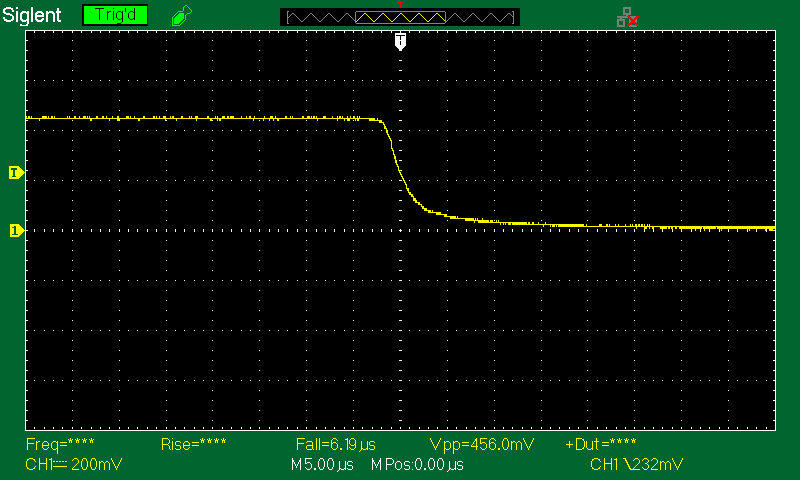
J5 on low, triggered on falling edge, zoomed in for an accurate fall time of 6us.
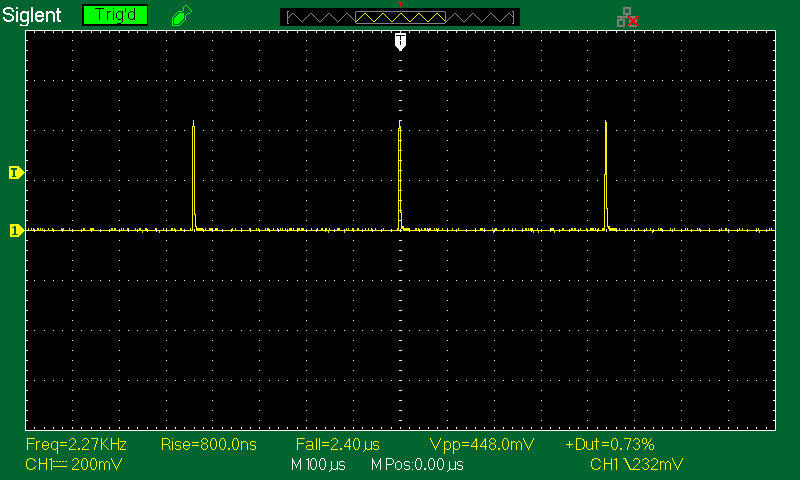
J5 at .1% brightness, PWM at 2.3Khz. Note the fall time is a little faster at 2.4us.
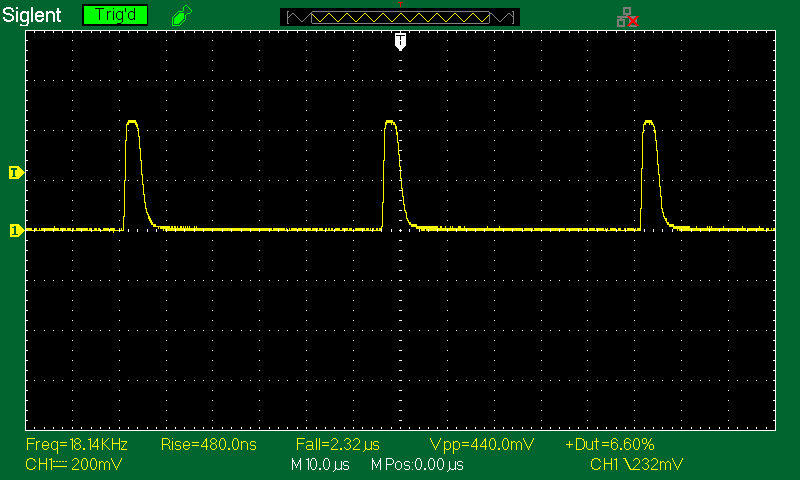
Convoy at 1% brightness, PWM at 18.2Khz. Fall time at 2.3us.
Convoy at 10% brightness, PWM at 36.2Khz. Fall time at 2.8us (good).
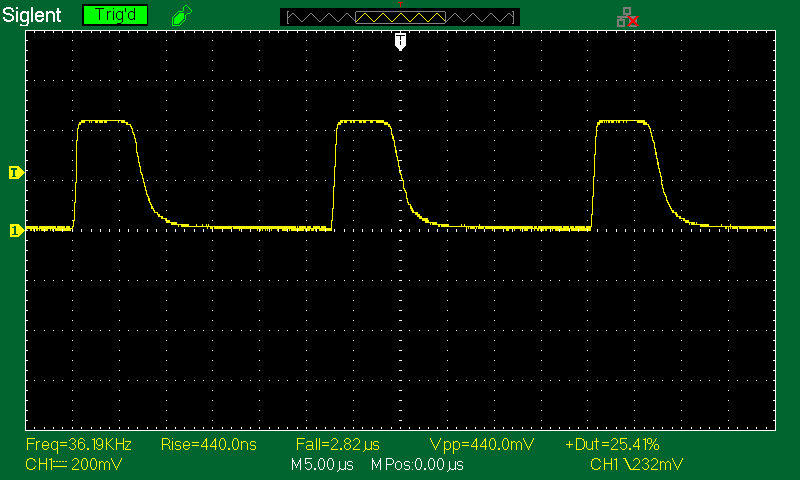
Convoy at 35% brightness, PWM at 36.3Khz. Fall time remains fast at 3.7us. Waveform has a well-defined pulse, like the OSRAM.
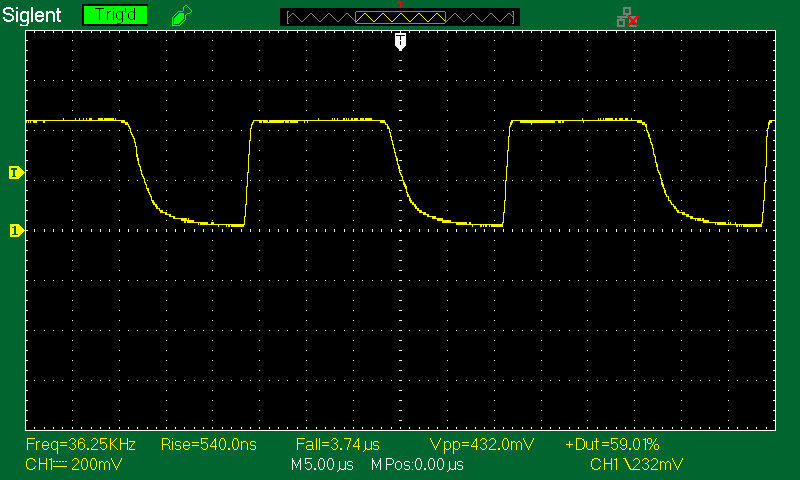
CONCLUSION: This is also an excellent sensor for measuring flashlight PWM, as good as the OSRAM. It's worth noting, that all four recommended sensors below are PIN photodiodes.
..FFINAL CONCLUSION...
In my opinion, any of the following four sensors would make excellent choices for measuring flashlight PWM:
- OSRAM BPW34S PIN photodiode (approx $6-$8) link
- HAMAMATSU S1223 30mhz PIN photodiode (approx $20) link
- Thorlabs FDS100 PIN photodiode (approx $14) comes with lab snacks link
- Everlight PD438C-S46 PIN photodiode (approx $4). link1 link2
These recommended sensors have fast fall times, are easy to bias with one resister, produce stable waveforms across all PWM frequencies, and are relatively inexpensive. PIN photodiodes in particular appear to excel at measuring flashlight PWM. In general, a sensor’s actual measured fall time should be about 5us or less to be effective at measuring flashlight PWM at higher frequencies (18khz-36Khz). It was also noted that the best sensors in this review had large sensor areas. The duty cycle was also consistent across all four sensors.
Also, the speed of some of these sensors could possibly be improved with more sophisticated (read complex) biasing than what I used. I attempted to keep it as simple as possible. Therefore, if a sensor’s listed fall-time spec is 10ns (faster than anything I saw), that doesn’t mean you will see that speed measuring flashlight PWM. There are many factors that affect the measured fall time. A listed spec of 10ns may require a 50Ω BNC cable that’s impedance matched with a 50Ω terminating resistor (for example). For our purposes, that would require an extra level of complexity most people won’t bother with (nor was it necessary). The simple/normal way most people will use a scope – is with a 1meg scope probe that’s impedance matched with the scope’s 1meg input. On a couple of the sensors, I actually did try using a 50Ω BNC cable matched to a 50Ω inline terminating resistor (replacing the scope probe), which is more commonly used with high frequencies. Although I saw improved sensor fall times, it also caused overshoot, ringing and distorted waveforms.
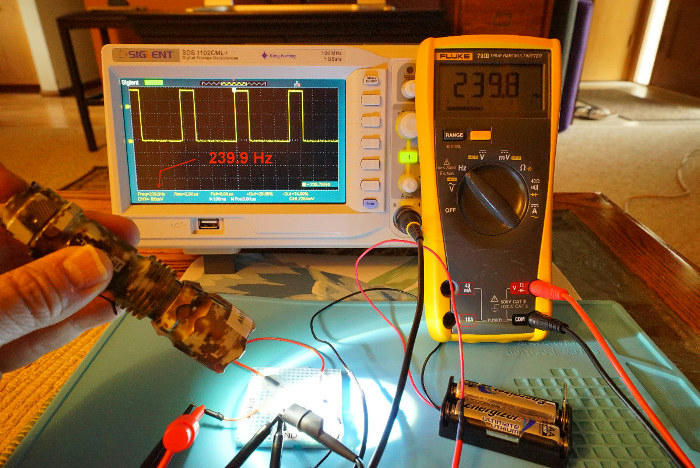
Before ending, let me make a side note here, as to whether a multimeter can be used to measure PWM. As you can see in the next photo, yes it can, if your multimeter has a good frequency function. HOWEVER, there’s a possible problem with this. One thing I’ve learned; at higher brightness levels, sensors can become sensitive to the angle the light was pointed at the sensor. These sensors can saturate easily at higher brightness levels, creating a flat waveform that’s stuck somewhere near high, until the light is pointed partially away from the sensor. That’s easy to see with an oscilloscope. But with a multimeter, you’re blind, and you wouldn’t know if the sensor was saturated – and you might erroneously conclude there is no PWM, when in fact there was.
Finally, you might be interested to know . . . every sensor went through at least three rounds of testing over many days. With each round of testing, I became a little smarter on the best way to test/bias each sensor, and what data to compile.
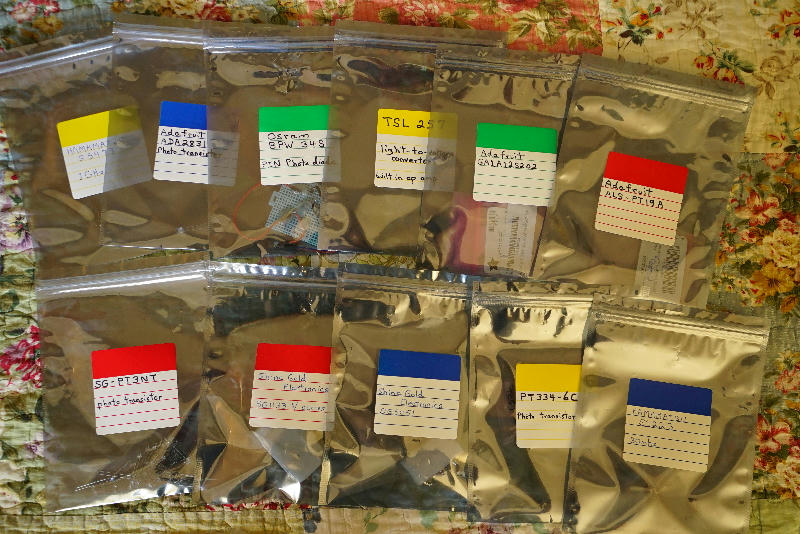
After testing was completed, all sensors were stored & labeled in anti-static bags.
