Review: Aleto / UltraOK 1x 26650 XM-L T6 Flashlight: An HD2010 challenger? (picture heavy)

85 replies [Last post]
relic38
relic38's picture
Offline
Last seen: 4 hours 43 min ago
Title: ★★★★★
Joined: 12/28/2012
Posts: 1736
Location: Toronto, Canada

On a whim, I ordered a 1×26650 XM-L T6 flashlight on ebay. At the time, I was looking for a single 26650 light. I had ordered an HD2010 already, and thought “why not have two?” So today, I received my second 26650 flashlight. I bought it as a mod host, and as you will see, I have some work to do…
Edit: Also known as UltraOK brand here on BLF.
It’s not a bad looking light with a good finish, decent ano, and a polished aluminum bezel. Heatsinking is decent and enough knurling on the body to add a visual feature but no grip enhancement.

the light comes with an 18650 adapter and a 4xAAA carrier. The output when using 4xNiMH is lower, but respectable. (note: the 18650 adapter is almost invisible on the left)

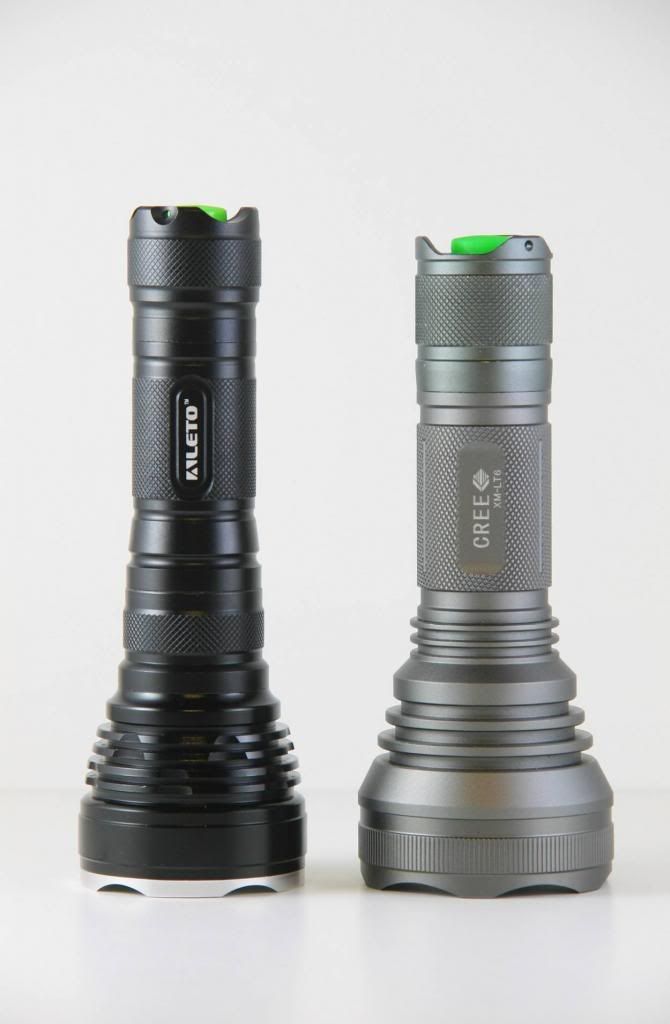
The size of the Aleto (left) is comparable to the HD2010, with a slightly smaller head and a slightly longer overall length.

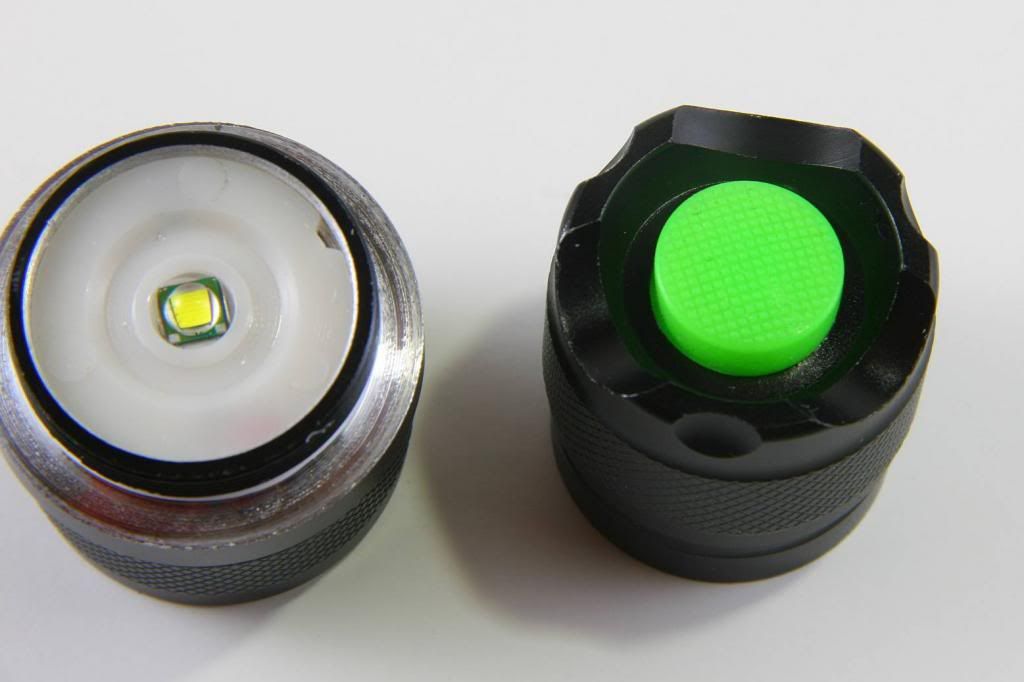
The reflector is aluminum SMO and the LED is perfectly centered, thanks to a very nice reflector spacer.

Tearing down the Aleto is fairly easy. Everything unscrews with relative ease.

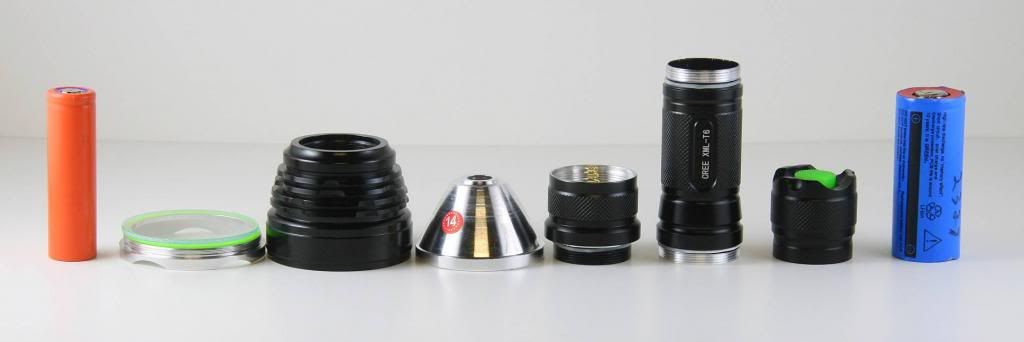
The threads are square-cut and nice and clean everywhere except for the tailcap.

There are o-rings at each joint, however most are inadequate, making the light splash-proof only.

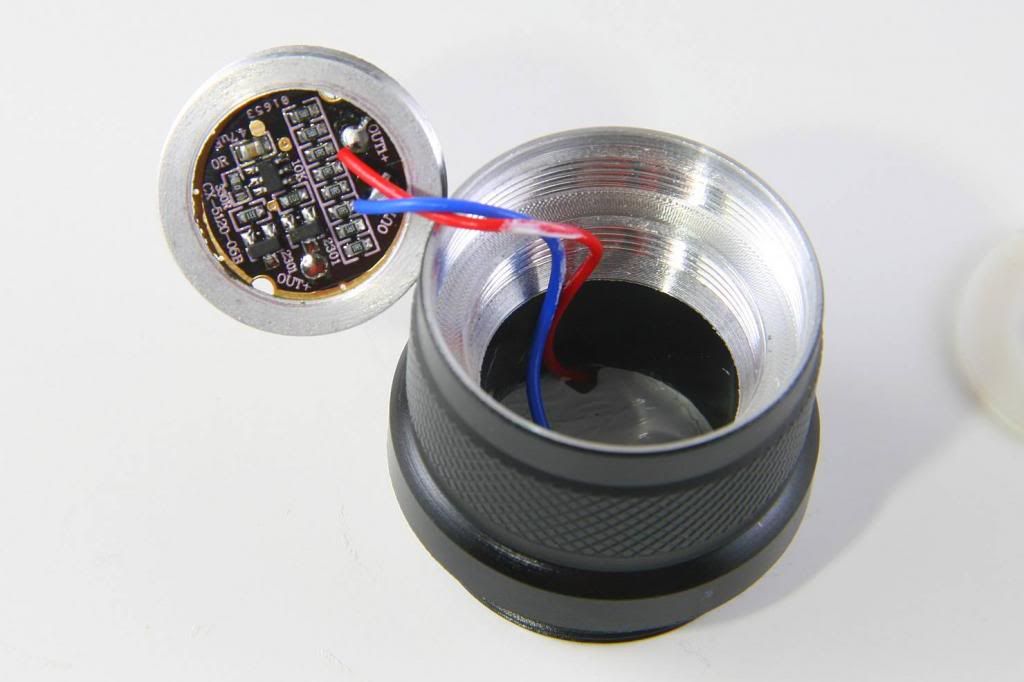
The pill is integrated into the front body piece with the 20mm driver mounted on a screw-in ring. Unlike the rest of the light, the tailcap has very rough threads.

The emitter is on a rather odd sized 25mm star and the pill is hollow. The switch boot is recessed allowing this light tailstand very nicely.

Popping off the emitter star reveals the hollow pill and the driver on the other side. There is lots of room in there for driver upgrades. There is thermal compound on the star, however most of it is in the middle where it doesn’t help. redistributing this to the outer edge will help with thermal coupling to the head.

Unscrewing the driver is an easy task. I’d rather see a 17mm driver here. This driver features five modes with the dreaded next-mode memory.

So, will this light stand up to the HD2010? Time for some beam shots!
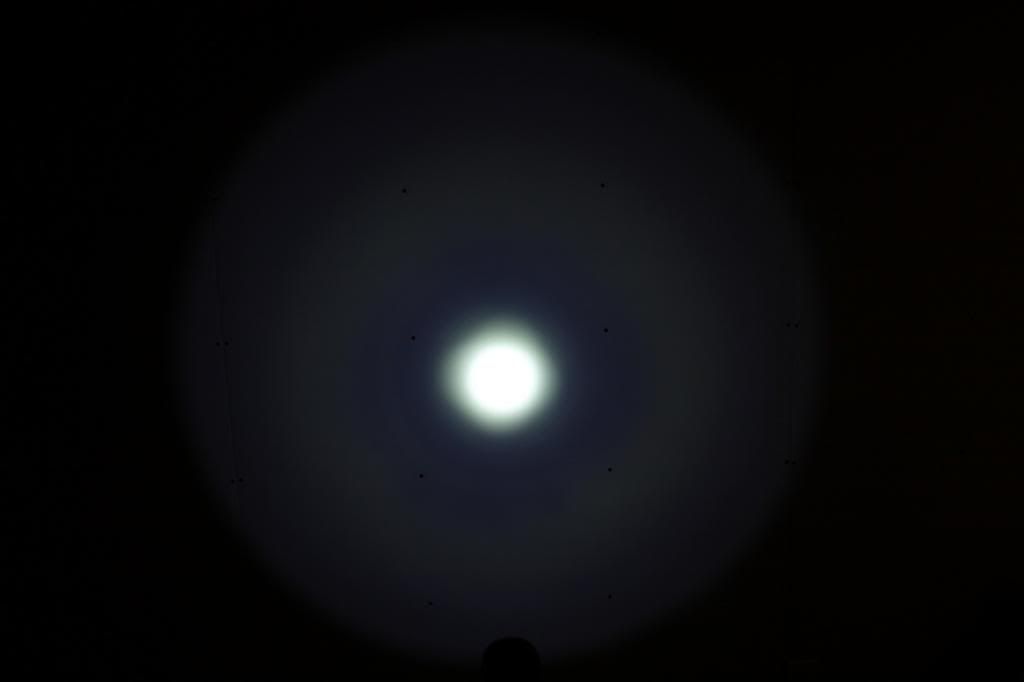
We’ll start with indoor shots taken at 1m on a white-ish wall. (f6.3, 1/30, ISO100, 5200K) the dots are 16” apart horizontally, 12” vertically.
Aleto 26650 XM-L:

HD2010:

As you can see, the Aleto has a very tight hotspot, mainly due to the emitter being quite far (maybe too far) back in the reflector. It doesn’t show well in the shots but the HD2010 hotspot is quite a bit brighter. (When my light meter arrives, I’ll update with cd readings.)
The Aleto is not quite as smooth as the HD2010 either.

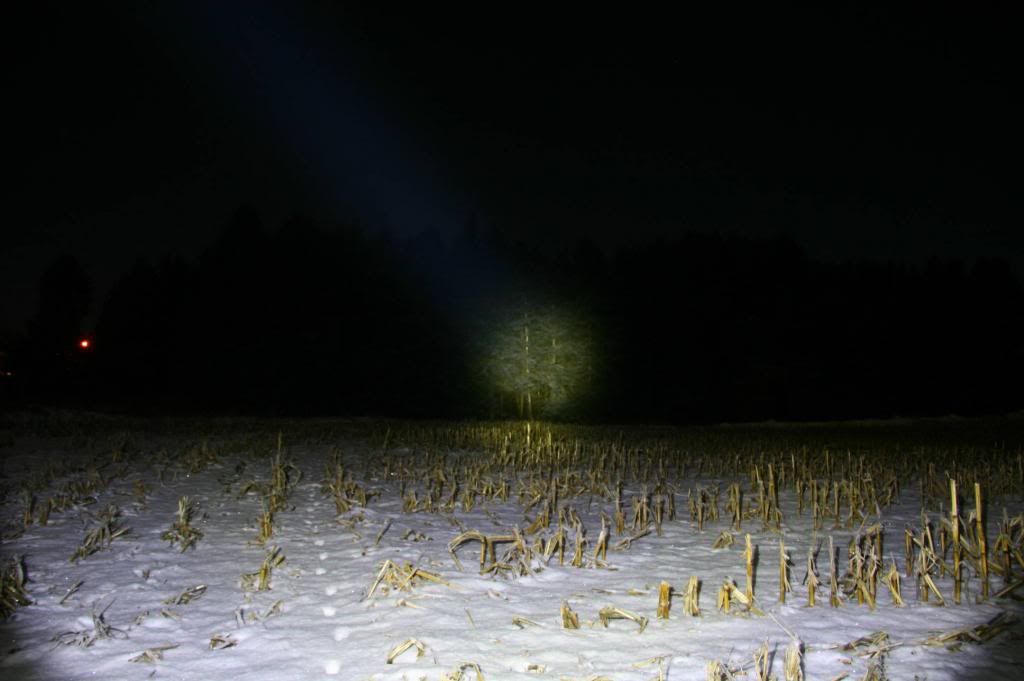
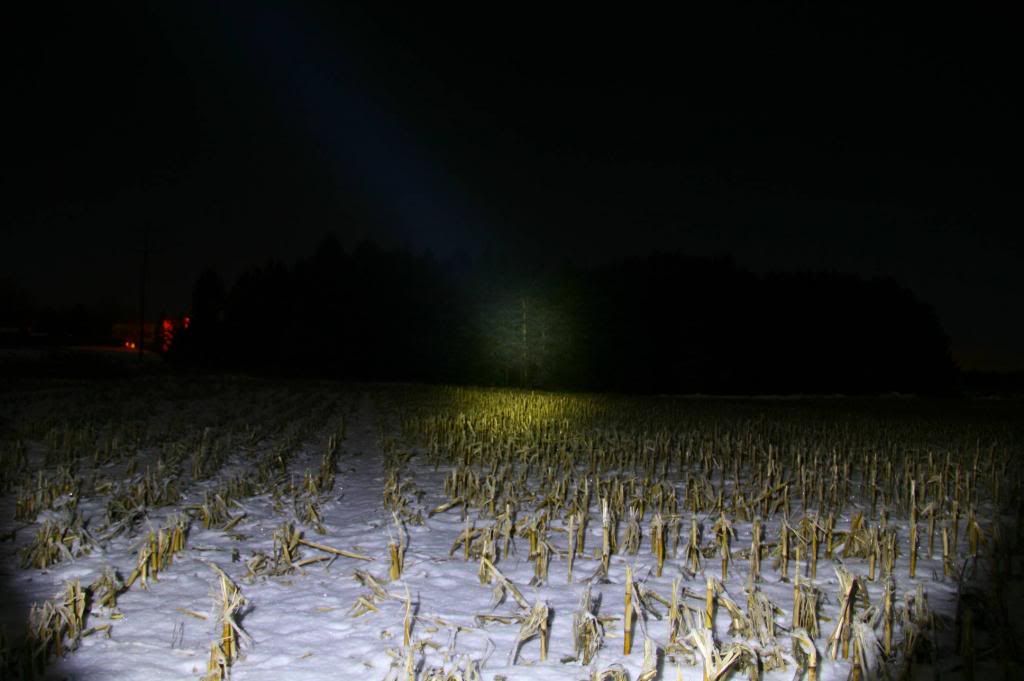
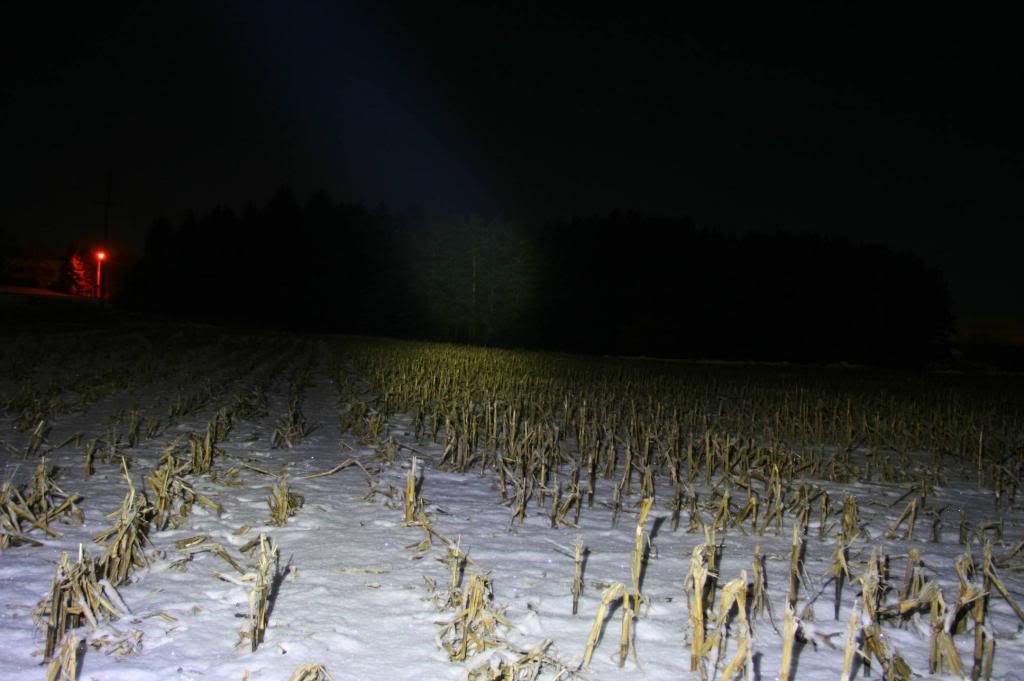
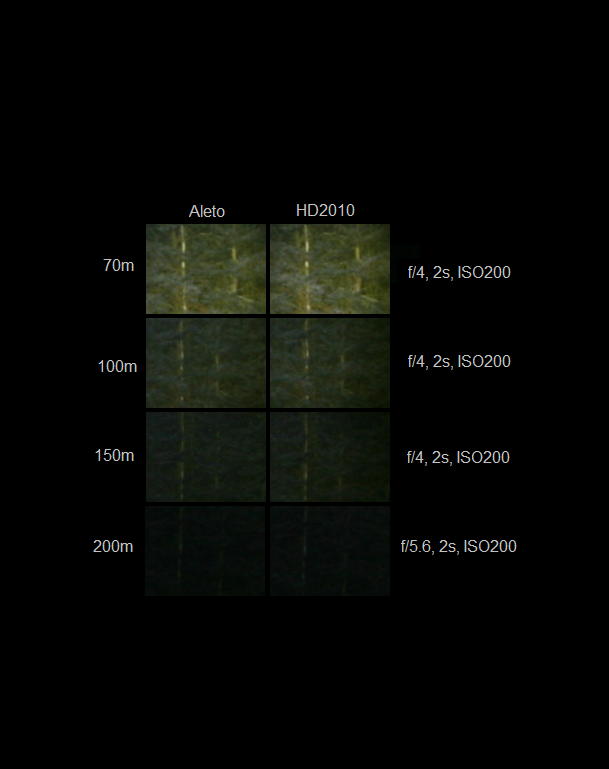
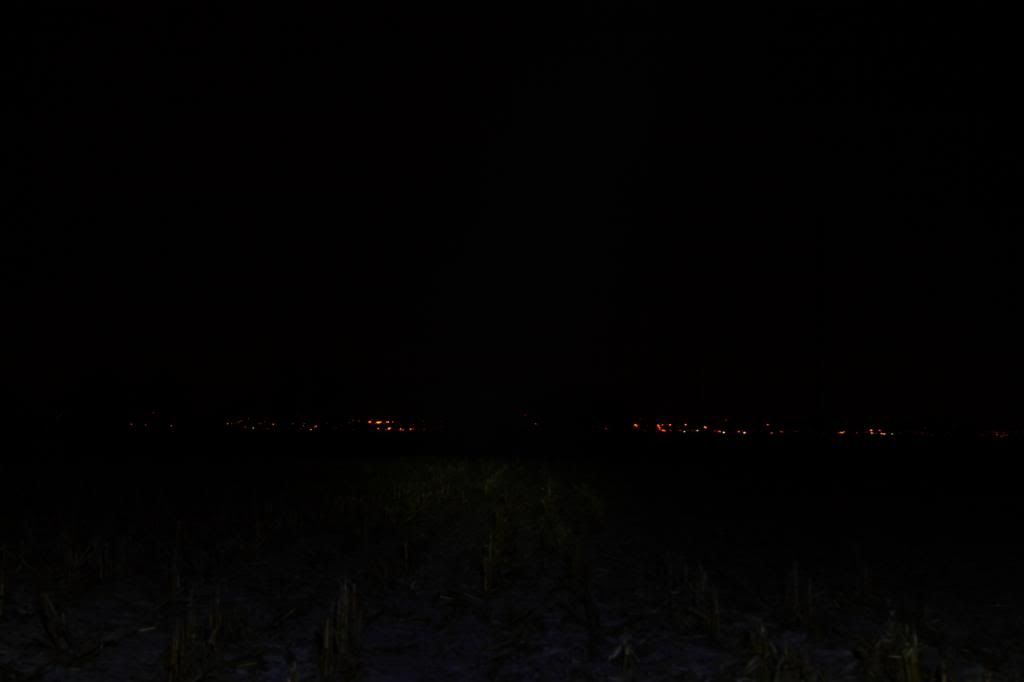
For outdoor shots, I was time limited due to -15C windy weather and I packed it in when I could no longer feel my hands.
I managed to get 200m shots only. In hindsight, I should have did 100m shots as well. (After I do my mods I’ll make sure and do a few ranges).
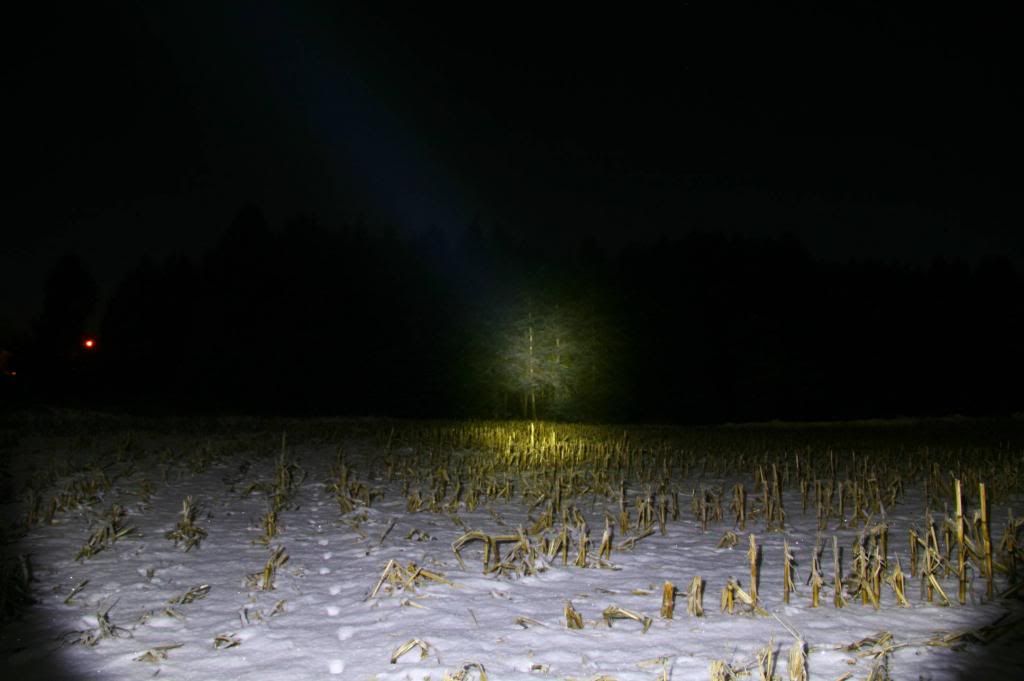
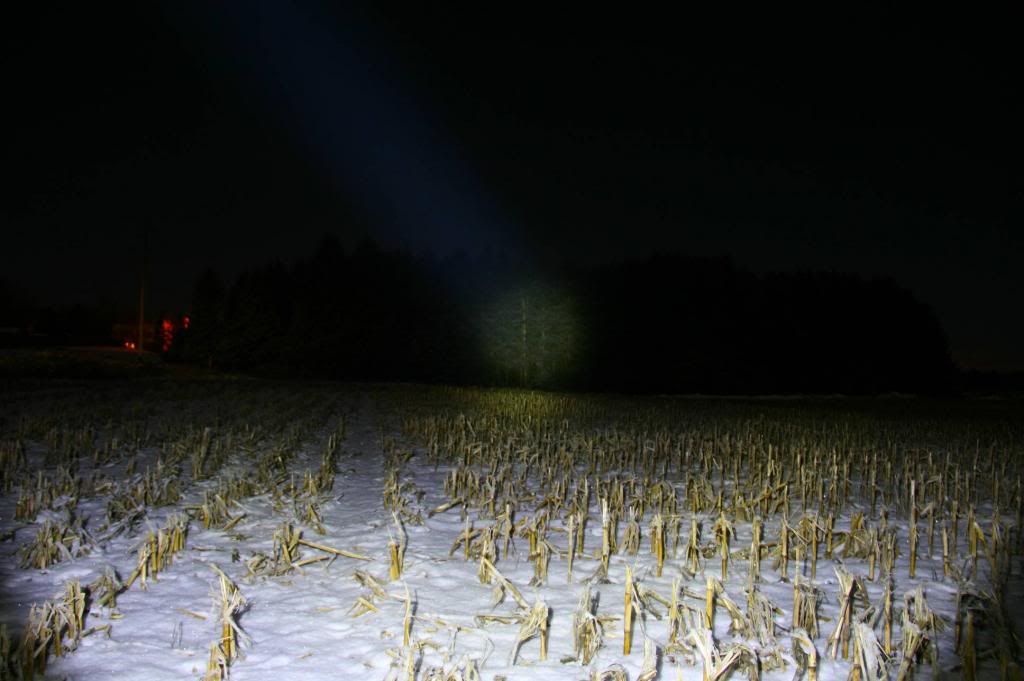
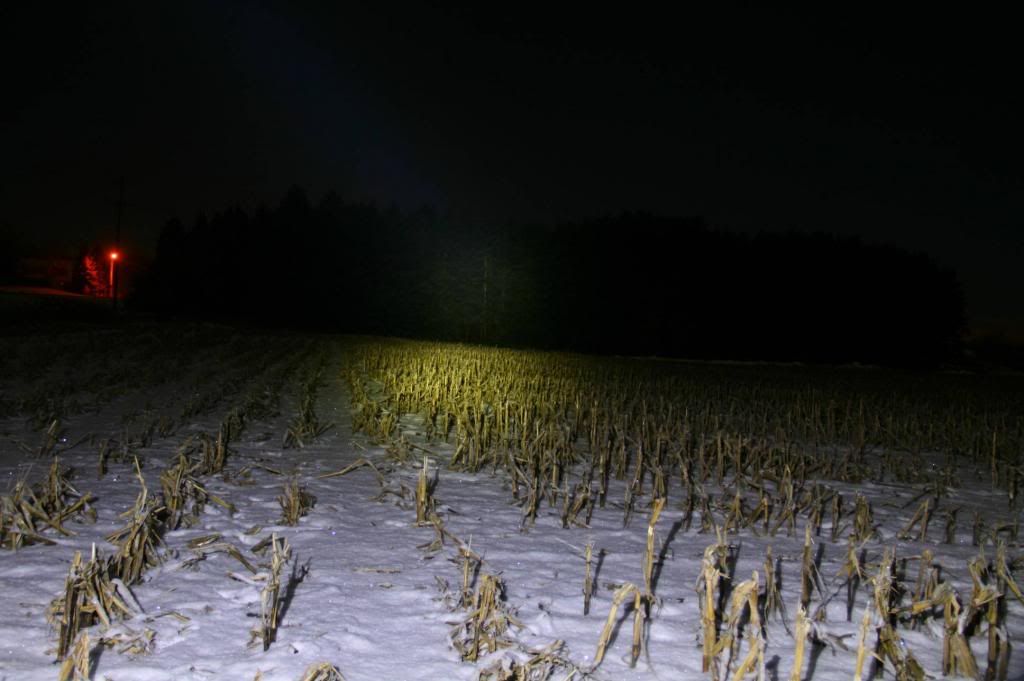
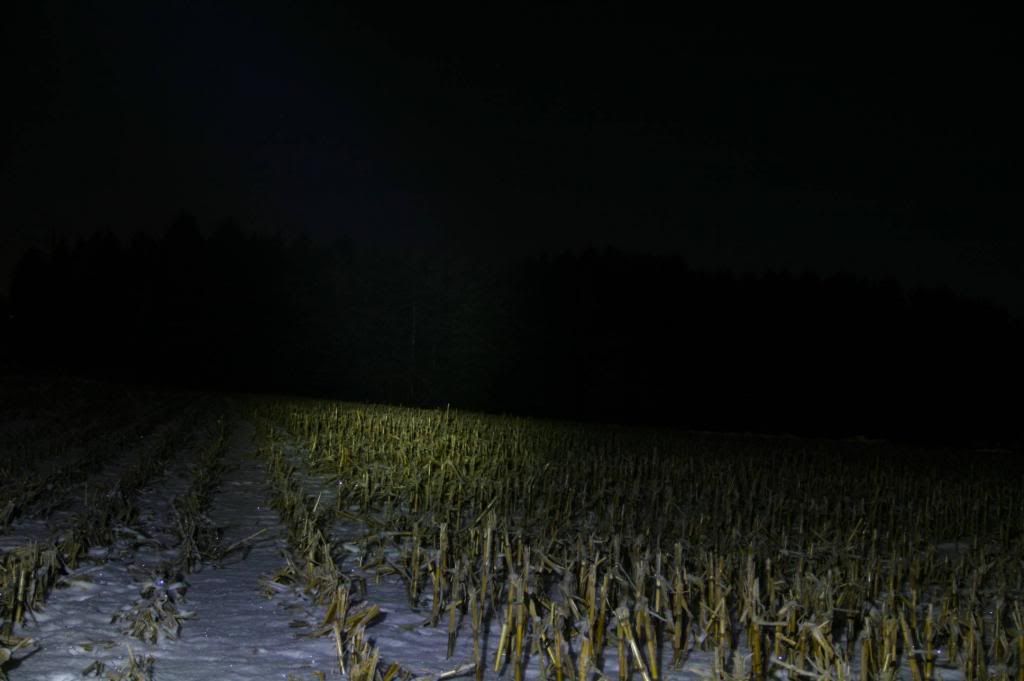
All three shots have the same settings: 22mm, f/4, 4s, ISO100, 5200K
First the control:

Aleto 26650 XM-L T6:

HD2010:

OK, it’s a clear win for the HD2010 (if the images show up OK for you; they look dim on one of my monitors). One big reason for this is the drive current; Aleto is putting out a meager 2.2A while the HD2010 is at 4.2A!
There’s obviously room for improvement here. The beam profile is nice, so increasing the emitter current should give some decent improvements. I’ll do an update once I’ve done some mods.

Good news:
- Nice machining and finish, the light looks good.
- decent threads everywhere but on the tailcap, which are not bad once lubed.
- Comes with a 4xAAA holder and an 18650 adapter
- very nice thrower-style beam profile
- No visible PWM
- Tailstands as good as a HD2010

Bad news:
- Most batteries will not make good contact, if any. Magnets may be required.
- Rough threads on the tailcap
- Hollow pill which is integrated into top body section
- Next-mode memory (with five modes)
- Emitter is underdriven with resistive regulation (output drops with battery voltage)
- Emitter may be mounted too far back in the reflector
- 20mm driver
- 25mm star
- Slightly different ano on the tailcap

Dimensions:

  • Length: 165mm
  • Head Diameter: 57.5mm
  • Body diameter: 31.1mm
  • Tailcap diameter: 33.5mm
  • Reflector output diameter: 51.1mm
  • Reflector inner diameter: 46.8mm
  • Reflector depth: 31.7mm
  • Lens diameter: 52.5mm
  • Driver diameter: 20mm
  • Emitter star diameter: 25mm

Weights (without battery or holders):

  • Total: 222g
  • Head: 110g
  • Body with pill section: 78g
  • Tailcap: 34g

Emitter: XM-L T6 1A bin
Emitter Star: 25mm aluminum MCPCB
Lens: uncoated glass
Reflector: aluminum SMO
Switch: reverse-clicky
Drive currents (4.2V): H=2.25A, M=1.50A, L=0.28A
Drive currents (4xAAA NiMH): H= 1.80A, M-1.22A, L=0.21A
PWM: High=none, Med and Low = audible ring only (similar to NANJG 105C)

As shipped, this light has issues. if you are looking for a mod host, there are several upgrades needed to get this light up to the task of being a good thrower. If you only plan on running 4XAAA NiMH, then you may be OK, since the holder works fine. Expect short run times on high and a gradual tapering of the output.

I plan to do some mods to this and will post the results when done.

Thanks for reading!

__________________

Welcome the night.

My Reviews   My Mods    My How-To's

relic38
relic38's picture
Offline
Last seen: 4 hours 43 min ago
Title: ★★★★★
Joined: 12/28/2012
Posts: 1736
Location: Toronto, Canada
Updates

Mod Update1: Emitter swap, XM-L U2, driver swap, NANJG 105C w 12×7135 (4.2A), beefier wire, copper braid on springs. I also moved the emitter slightly further into the reflector. Now the hotspot is a little larger but just as bright as the HD2010. This light has become my favorite ‘pocket’ thrower. The only issue is heat sag after about 5 minutes. That darm hollow pill isn’t quite cutting it. Maybe a direct copper U3 is in order… I’ll do a mod thread when I get a chance.
Edit: Beamshots for Mod Update 1, compared to my HD2010
I forgot a control shot. Angry It was a full moon so there was enough light to produce a dim light in the background. The shots are good enough to compare to one another.
Aleto 70m:

HD2010 70m:

Aleto 100m:

HD2010 100m:

Aleto 150m:

HD2010 150m:

Aleto 200m:

HD2010 200m:

100% crops of the hotspots. It’s a very tight race:

Both light are driving at 4.2A (HD2010 was probably closer to 4.5A). The HD2010 has the larger reflector, but the Aleto has a U2. I prefer the spot on the Aleto, it’s much more defined and uniform. I’m wondering if there is something wrong with my HD2010… alignment??? It does seem to be producing a lot of spill, which may mean it’s too deep in the reflector. I’ll have to mess around with it one of these days.
If I was forced to pick a winner, I’d give a very slight edge to the HD2010.

__________________

Welcome the night.

My Reviews   My Mods    My How-To's

gords1001
gords1001's picture
Online
Last seen: 4 min 38 sec ago
Title: ★★★★★
Joined: 05/07/2012
Posts: 3708
Location: wigan england
Nice review, a bit more info

Nice review, a bit more info on this light.

http://budgetlightforum.com/node/11421
MRsDNF
MRsDNF's picture
Offline
Last seen: 6 hours 53 min ago
Title: ★★★★★
Joined: 12/22/2011
Posts: 2147
Location: A light beam away from the missus in the land of Aus.
Thanks for the review

Thanks for the review relic38. If it was driven any harder the LED would more than likely have a very short life span. For $16.80 it is a real budget light though.

__________________

My current and or voltage measurements are only relevent to anything that I measure. Budget light hobby proudly sponsored by my Mastercard and unkowingly paid for by a hard working wife.

Tecmo
Tecmo's picture
Offline
Last seen: 5 hours 14 min ago
Title: ★★★★★
Joined: 09/30/2011
Posts: 1296
Location: Indiana
This never got a proper

This never got a proper review until now, thanks for doing one. I use my UltraOk as a AAA light only so I don’t worry about the heat.

garrybunk
garrybunk's picture
Offline
Last seen: 1 hour 42 sec ago
Title: ★★★★★
Joined: 10/31/2011
Posts: 3341
Location: Johnstown, PA
Tecmo wrote:This never got a

Tecmo wrote:
This never got a proper review until now, thanks for doing one. I use my UltraOk as a AAA light only so I don't worry about the heat.

Me too.  I haven't yet got around to modding the pill with a slug.  Interesting branding on your sample as mine (and many others) are an UltraOK version.  The current spacing sucks!  Medium is way too close to high! 

For comparison, my tailcap readings were:

King Kong 26650:
HI-3.80A
Med-1.85A
Low-0.90A

4AAA NiMh:
HI-2.80A
Med-1.57A
Low-0.83A

-Garry

relic38
relic38's picture
Offline
Last seen: 4 hours 43 min ago
Title: ★★★★★
Joined: 12/28/2012
Posts: 1736
Location: Toronto, Canada
I’m thinking of ordering the

I’m thinking of ordering the one linked in the other forum post as well. This one had issues with battery length that no one mentioned over there. I suppose I could fix that by adding a longer, stronger spring on the driver.
I’ve added copper braid to the springs and that increased the output a bit, especially the tail spring. I’ll post my mod details in the second post later on.
As for the heat, I just ran it around 2.6A for 10 minutes. The outer head temp was 48C and the emitter temp was 69C (running off power supply, the body was not installed). The head temperature starts rising within 10 seconds of turning the light on indicating thermal coupling is probably OK.
Based on this, I think it’s fine to leave the pill hollow and simply redistribute the thermal paste to the edge. You just have to make sure that the retaining ring is pushing down firmly on the star.

__________________

Welcome the night.

My Reviews   My Mods    My How-To's

garrybunk
garrybunk's picture
Offline
Last seen: 1 hour 42 sec ago
Title: ★★★★★
Joined: 10/31/2011
Posts: 3341
Location: Johnstown, PA
Did you catch the info in the

Did you catch the info in the other thread about replacing the tailcap switch with the Solarforce one? I bought the switch, but haven't replaced mine. 

-Garry

apt323
apt323's picture
Offline
Last seen: 7 hours 56 min ago
Title: ★★★★★
Joined: 03/19/2012
Posts: 1306
Location: North Texas
Nice review! I have the

Nice review!

I have the ultra ok version and have issues with my flat top 26650’s. I have stretched the spring and that has helped but if you shake it (not very hard) it will change modes. Still have not done much with mine since filling in the hollow spot. Been thinking lately that maybe it should get a new driver. Maybe this one from fasttech . But will still probably have the issue with battery contact. Just want to keep it capable of using the 4xAAA’s and liths.

relic38
relic38's picture
Offline
Last seen: 4 hours 43 min ago
Title: ★★★★★
Joined: 12/28/2012
Posts: 1736
Location: Toronto, Canada
Seconf post Updated

I added some mod updates to the second post. There is definitely a lot of potential in this host. I know the HD2010, with the same emitter and drive can probably outdo it, but there’s something I like about this light… I can’t put my finger on it. The HD2010 will get a turn too, when I can get my copper sinkpads Wink

__________________

Welcome the night.

My Reviews   My Mods    My How-To's

apt323
apt323's picture
Offline
Last seen: 7 hours 56 min ago
Title: ★★★★★
Joined: 03/19/2012
Posts: 1306
Location: North Texas
relic38 wrote:Mod Update1:

relic38 wrote:
Mod Update1: Emitter swap, XM-L U2, driver swap, NANJG 105C w 12×7135 (4.2A), beefier wire, copper braid on springs. I also moved the emitter slightly further into the reflector. Now the hotspot is a little larger but just as bright as the HD2010. This light has become my favorite ‘pocket’ thrower. The only issue is heat sag after about 5 minutes. That darm hollow pill isn’t quite cutting it. Maybe a direct copper U3 is in order… I’ll do a mod thread when I get a chance.

Nice mod! Tried putting a U2 in mine and it had a hole in the center of the hotspot.

So what did you do to hold the driver in place, anything special? Thanks

Post some drive pics thanks

relic38
relic38's picture
Offline
Last seen: 4 hours 43 min ago
Title: ★★★★★
Joined: 12/28/2012
Posts: 1736
Location: Toronto, Canada
When I put up my mod thread,

When I put up my mod thread, I’ll have some pics. Basically, I drilled two holes through the existing driver, Fujik’ed the NANJG to the battery side, and ran the LED wires through the holes.
This solved my battery contact problem too, by making the battery compartment about 7mm shorter Laughing out loud
@ 4 A, I should get about an hour of use with a decent 26650.
I need to solve the heat issue though. There’s about a 30 degree delta between the emitter and body… got to fill that pill.

__________________

Welcome the night.

My Reviews   My Mods    My How-To's

garrybunk
garrybunk's picture
Offline
Last seen: 1 hour 42 sec ago
Title: ★★★★★
Joined: 10/31/2011
Posts: 3341
Location: Johnstown, PA
Fill that pill with pieces of

Fill that pill with pieces of cut large gauge bare copper wire and fill it with solder. I've done it once and posted some pics. Cheap, simple and easy. Go to Home Depot and get one foot of ground wire used to ground a houses circuit breaker box. I got 4ga wire, 2 feet for a couple bucks. 

-Garry

relic38
relic38's picture
Offline
Last seen: 4 hours 43 min ago
Title: ★★★★★
Joined: 12/28/2012
Posts: 1736
Location: Toronto, Canada
Update with beamshots!

I’ve updated the second post with beamshots comparing the current mod to my (possibly badly aligned) HD2010.

__________________

Welcome the night.

My Reviews   My Mods    My How-To's

vēer
vēer's picture
Offline
Last seen: 1 day 3 hours ago
Title: ★★★★★
Joined: 01/07/2012
Posts: 1301
Location: Europe
Thanks for awesome review

Thanks for awesome review Wink!

Im all NiMh person, but I will be buying lithium powered lights for specific tasks such as cycling(have couple of cheapo C8 from Ebay) and for some mega throwers, so this review helped me figure out which of those sub 20$ lights from Ebay are worht it Wink!

__________________

http://www.apocalypsetools.com/ EDC, tools, devices and gadgets reviews

ryansoh3
ryansoh3's picture
Offline
Last seen: 3 hours 23 min ago
Title: ★★★★
Joined: 08/04/2012
Posts: 849
Location: Seoul, Korea
Nice review, thanks!

Nice review, thanks!

bibihang
Offline
Last seen: 2 hours 45 min ago
Title: ★★★
Joined: 11/10/2011
Posts: 318
Location: Malaysia
A bit of offtopic here: does

A bit of offtopic here: does anyone know where can I buy the 4 x AAA carrier alone?

relic38
relic38's picture
Offline
Last seen: 4 hours 43 min ago
Title: ★★★★★
Joined: 12/28/2012
Posts: 1736
Location: Toronto, Canada
I’m glad my review has

I’m glad my review has helped. I am having some fun with this host, so it was worth it for me, even with the issues.

As for a source for the 4xAAA holder, I’ve had no luck. I would like to have a couple as they do work well in 26650 lights.

__________________

Welcome the night.

My Reviews   My Mods    My How-To's

garrybunk
garrybunk's picture
Offline
Last seen: 1 hour 42 sec ago
Title: ★★★★★
Joined: 10/31/2011
Posts: 3341
Location: Johnstown, PA
Some of us looked, but can't

Some of us looked, but can't find them without being forced to buy a huge quantity. Someone tell FastTech to carry them. 

-Garry

sb56637
sb56637's picture
Offline
Last seen: 2 hours 11 min ago
Title: ==Administrator==
Joined: 01/08/2010
Posts: 3655
Location: The dark
Thanks very much! Frontpage’d

Thanks very much! Frontpage’d and Sticky’d.

__________________

Budget Light Forum ...where Frugal meets with Flashlight!

pretzy
pretzy's picture
Offline
Last seen: 1 week 5 days ago
Title: ★★★★★
Joined: 04/26/2012
Posts: 999
Location: Albury Australia
On sale under $16 AUD
__________________

The light shines in the darkness, and the darkness has not overcome it.

Dimbo The Blinky
Dimbo The Blinky's picture
Offline
Last seen: 1 week 4 days ago
Title: ★★
Joined: 11/27/2012
Posts: 150
Location: The Indigo State, USA, Earth
How Deep, Beauty?

relic38 wrote:
On a whim, I ordered a 1×26650 XM-L T6 flashlight

[…]
Quote:
Unlike the rest of the light, the tailcap has very rough threads.

[…]
Quote:
Popping off the emitter star reveals the hollow pill and the driver on the other side.

[…]
Quote:
Thanks for reading!

Thank YOU for taking the hit on this one!! Also thank you for the details!!! You just saved me (and others, I’m sure) whatever this torch might cost!

There should be no excuse for such horrible looking threading!! It is just too easy to keep the Machine Tools in calibration. Especially, (assuming there is any) QC should be more sensitive to the places that will wear most. The rest of the threading will likely not be used more than a few times ever. The tailcap gets a new grinding every time you change batteries! Looking at yours, how long would you expect them to last in regular use?

Also, the pill looks nearly impossible to mod, unless you have some way of turning MCPCBs… That overly-precise edge-only fit not only limits vital heat transfer, it kicks this one the rest of the way under the bus…

THANK YOU again for bringing this to the world!!

Dim

__________________

I only want to see what the Darkness looks like.

pretzy
pretzy's picture
Offline
Last seen: 1 week 5 days ago
Title: ★★★★★
Joined: 04/26/2012
Posts: 999
Location: Albury Australia
I have bought 4 of these so

I have bought 4 of these so far, all the threads on mine were good.

2 I have already gifted to friends as 4xAAA torches, I and they are more than happy with the lights. All in all, very decent for the money.

I guess there is always variation in production runs.

__________________

The light shines in the darkness, and the darkness has not overcome it.

Dimbo The Blinky
Dimbo The Blinky's picture
Offline
Last seen: 1 week 4 days ago
Title: ★★
Joined: 11/27/2012
Posts: 150
Location: The Indigo State, USA, Earth
So Much For "Machine Precision"...

pretzy wrote:
I guess there is always variation in production runs.

As I implied, depending on the tool operator (and his supervisor’s willingness to enforce QC rules) (and the factory’s willingness to impose QC rules!!)…

Lacking that, THANK YOU AGAIN for BLF and all who contribute here!!!

__________________

I only want to see what the Darkness looks like.

relic38
relic38's picture
Offline
Last seen: 4 hours 43 min ago
Title: ★★★★★
Joined: 12/28/2012
Posts: 1736
Location: Toronto, Canada
Regarding the tailcap threads

I say they are rough, but I should add that they do not feel as rough as they look. Because the threads on the body tube are smooth, threading the parts together are not too bad. I tried cleaning them up a bit, but it didn’t help much. The tailcap on my light was just not up to the quality level of the rest of the light. I’m thinking of ordering one from the other seller (UltraOK branded) just to see if it’s any different… and to have one to give away, since I’m liking this light enough that I will want to replace it when I do give it away Smile

__________________

Welcome the night.

My Reviews   My Mods    My How-To's

Rusty Joe
Rusty Joe's picture
Offline
Last seen: 1 hour 11 min ago
Title: ★★★★★
Joined: 07/23/2011
Posts: 1241
Location: San Antonio, TX
Excellent Review, but I think

Excellent Review, but I think the Aleto U2 won (look at the right edges of the comparative beamshots).

relic38
relic38's picture
Offline
Last seen: 4 hours 43 min ago
Title: ★★★★★
Joined: 12/28/2012
Posts: 1736
Location: Toronto, Canada
Rusty Joe wrote:Excellent

Rusty Joe wrote:
Excellent Review, but I think the Aleto U2 won (look at the right edges of the comparative beamshots).

I think you are right. It does seem slightly brighter in the Aleto shots. I didn’t notice that before.
My new FandyFire HD2010 beats both of them though, by another few hairs. And that’s without mods; yet. Wink

__________________

Welcome the night.

My Reviews   My Mods    My How-To's

ohaya
Offline
Last seen: 22 min 9 sec ago
Title: ★★★★★
Joined: 03/16/2013
Posts: 1237
Location: US
4xAA Carrier
relic38
relic38's picture
Offline
Last seen: 4 hours 43 min ago
Title: ★★★★★
Joined: 12/28/2012
Posts: 1736
Location: Toronto, Canada
Nice, but for 26650

Nice, but for 26650 replacement, it needs the brass nub on top to make it 65mm long. This would be an easy mod, so I’m glad the option is there. Thanks!

__________________

Welcome the night.

My Reviews   My Mods    My How-To's

ohaya
Offline
Last seen: 22 min 9 sec ago
Title: ★★★★★
Joined: 03/16/2013
Posts: 1237
Location: US
relic38 wrote:Nice, but for

relic38 wrote:
Nice, but for 26650 replacement, it needs the brass nub on top to make it 65mm long. This would be an easy mod, so I’m glad the option is there. Thanks!

A magnet might work? But, it looks like the top metal part is rounded. It’d be a lot better/safer if it was flattened so a magnet would stay still :(…

Jim

ohaya
Offline
Last seen: 22 min 9 sec ago
Title: ★★★★★
Joined: 03/16/2013
Posts: 1237
Location: US
How’s about this one? Would

How’s about this one? Would this work with a magnet on top (better)?

http://www.ebay.com/itm/5pcs-Cylindrical-type-AAA-Plastic-Battery-Holder…

Jim

relic38
relic38's picture
Offline
Last seen: 4 hours 43 min ago
Title: ★★★★★
Joined: 12/28/2012
Posts: 1736
Location: Toronto, Canada
Ohaya, that is a 3xAAA

Ohaya, that is a 3xAAA holder, which would not be a good option. A 4xAAA holder with a positive end brass plunger would work best. That is what the light came with, so we know they exist.

__________________

Welcome the night.

My Reviews   My Mods    My How-To's

tivo532
tivo532's picture
Offline
Last seen: 1 hour 42 min ago
Title: ★★
Joined: 02/21/2013
Posts: 162
Location: Bay Area
Relic, Re: NANJG 105C w

Relic,

Re: NANJG 105C w 12×7135 (4.2A), which one did you use? From Kaidomain?
Can’t find a 20mm from FastTech.

__________________

Comics, Action Figures, Zippos, Knives and now FlashLights!

relic38
relic38's picture
Offline
Last seen: 4 hours 43 min ago
Title: ★★★★★
Joined: 12/28/2012
Posts: 1736
Location: Toronto, Canada
It’s a standard 105C mounted

It’s a standard 105C mounted on the existing driver. Since there was so much space in the battery compartment, it made my unprotected cells fit perfectly. I think there’s a pic of it somewhere… if I find it I’ll post.
Edit: Here’s how I did it. I’ve read that the UltraOK does not have as much extra space on the battery side, so the drive could go in the pill on that model.

__________________

Welcome the night.

My Reviews   My Mods    My How-To's

PyTech
PyTech's picture
Offline
Last seen: 2 hours 31 min ago
Title: ★★★
Joined: 09/01/2012
Posts: 343
Location: Highland, California. USA
Thanks for the review. Just

Thanks for the review. Just ordered this light. Not bad for $16 Smile

__________________

-Sean

relic38
relic38's picture
Offline
Last seen: 4 hours 43 min ago
Title: ★★★★★
Joined: 12/28/2012
Posts: 1736
Location: Toronto, Canada
No problem! Glad I could help

No problem! Glad I could help you spend a little of your money, even if it’s only $16 of it. Wink

__________________

Welcome the night.

My Reviews   My Mods    My How-To's

PyTech
PyTech's picture
Offline
Last seen: 2 hours 31 min ago
Title: ★★★
Joined: 09/01/2012
Posts: 343
Location: Highland, California. USA
What comes around goes

What comes around goes around. Laughing out loud

__________________

-Sean

ImA4Wheelr
Offline
Last seen: 1 hour 38 min ago
Title: ★★★
Joined: 02/03/2013
Posts: 578
Location: Columbia, SC
Nice review and mods relic38.

Nice review and mods relic38. Dig that driver mod. This light looks like a really good deal.

ohaya
Offline
Last seen: 22 min 9 sec ago
Title: ★★★★★
Joined: 03/16/2013
Posts: 1237
Location: US
Hi, I just got one of these

Hi,

I just got one of these (late, I know). Was there ever a mod thread (that was mentioned above)?

For the driver, I understand to mount a Nanjg on top of the existing driver, but were there any pics about the emitter side?

Thanks,
Jim

apt323
apt323's picture
Offline
Last seen: 7 hours 56 min ago
Title: ★★★★★
Joined: 03/19/2012
Posts: 1306
Location: North Texas
ohaya wrote:Hi, I just got

ohaya wrote:
Hi,

I just got one of these (late, I know). Was there ever a mod thread (that was mentioned above)?

For the driver, I understand to mount a Nanjg on top of the existing driver, but were there any pics about the emitter side?

Thanks,
Jim


Here are some pics of the mod I did to fill the hole in the pill. Also this is also the origional thread. Give it a look a few modded the pill in different ways.
Link to post with info

ohaya
Offline
Last seen: 22 min 9 sec ago
Title: ★★★★★
Joined: 03/16/2013
Posts: 1237
Location: US
Here are some pics of the mod


Here are some pics of the mod I did to fill the hole in the pill. Also this is also the origional thread. Give it a look a few modded the pill in different ways.
Link to post with info]

Hi apt323,

Thanks.

One thing I don’t get. On that thread:

http://budgetlightforum.com/node/11421

they were reporting tailcap current like 3 – 4 amps, and seemed like with stock. As mentioned above, I’m only seeing 1.47 amps on the one I have. Were the driver and/or emitter on the light in that thread different than the light that I have?

I’d probably be happy if I was seeing 3-4 amps now Smile.

relic38
relic38's picture
Offline
Last seen: 4 hours 43 min ago
Title: ★★★★★
Joined: 12/28/2012
Posts: 1736
Location: Toronto, Canada
For the original driver, I

For the original driver, I think just left the components and drilled two holes in it. It’s just a backing plate for the NANJG now. I stopped at 4A, but with better heatsinking this host could handle 5A for 5 minutes or so anyway.
Good luck with the mods, I’ll try and answer questions if they come up.

__________________

Welcome the night.

My Reviews   My Mods    My How-To's

ohaya
Offline
Last seen: 22 min 9 sec ago
Title: ★★★★★
Joined: 03/16/2013
Posts: 1237
Location: US
relic38 wrote:For the

relic38 wrote:
For the original driver, I think just left the components and drilled two holes in it. It’s just a backing plate for the NANJG now. I stopped at 4A, but with better heatsinking this host could handle 5A for 5 minutes or so anyway.
Good luck with the mods, I’ll try and answer questions if they come up.

relic,

I saw what you did with the driver. Pretty clever Smile.

But, what about the emitter? According to a couple of posts (garry, I think) measured the hole where the original emitter PCB rests on top of as being ~22.5mm, but is there such a thing as a 22.5 mm+ emitter PCB? I thought that 20mm were the largest?

Also, any idea how come they were seeing 3+ amp tailcap current, whereas I’m only seeing 1.47 amps, even with an IMR battery?

relic38
relic38's picture
Offline
Last seen: 4 hours 43 min ago
Title: ★★★★★
Joined: 12/28/2012
Posts: 1736
Location: Toronto, Canada
I had to reuse the one it

I had to reuse the one it came with. It’s not bad, nice and thick. I just reflowed an XM-L U2 on it. You could leave it as is, the T6 is still throwing fine. If you go XM-L2 and want to punch it in the face with 5A+, you should do the pill filler from that other thread. I would rather have copper as a base for that electron flow rate though. The benefits roll off fast above 4A when not on a sinkpad.

__________________

Welcome the night.

My Reviews   My Mods    My How-To's

ohaya
Offline
Last seen: 22 min 9 sec ago
Title: ★★★★★
Joined: 03/16/2013
Posts: 1237
Location: US
relic38 wrote:I had to reuse

relic38 wrote:
I had to reuse the one it came with. It’s not bad, nice and thick. I just reflowed an XM-L U2 on it. You could leave it as is, the T6 is still throwing fine. If you go XM-L2 and want to punch it in the face with 5A+, you should do the pill filler from that other thread. I would rather have copper as a base for that electron flow rate though. The benefits roll off fast above 4A when not on a sinkpad.

So, just use the T6 emitter it came with, and change the driver to a Nanjg, and I’d see the higher currents (and performance)?

I have these drivers from FT coming in:

8* AMC7135 4-Group 2~5 Modes LED Flashlight Driver Circuit (Generic)11
https://www.fasttech.com/p/1127403

4* AMC7135 2-Group 3/5 Modes LED Flashlight Driver (Nanjg 101-AK-A1)
https://www.fasttech.com/p/1122401

I’m guessing you’d recommend the 2nd one above then, because it’s a Nanjg?

Edit: And basically just Fujik the new driver to the old driver, and run the wires from the new driver up to the emitter?

relic38
relic38's picture
Offline
Last seen: 4 hours 43 min ago
Title: ★★★★★
Joined: 12/28/2012
Posts: 1736
Location: Toronto, Canada
I’ve used the first driver.

I’ve used the first driver. Crappy modes, but it gets the job done.
The second one you will have to add a lot of chips to get 4A. Add four for 2.8A, which is respectable.
I keep forgetting that not everyone will automatically upgrade the tail spring and the emitter wire gauge. I always add copper braid to the tail spring. I also go with heavier gauge wire (20ga in this case). Without these mods, you may not get 4A. 2.8A maybe, but do the tailcap spring anyway, it keeps things in regulation longer.
Edit: I fujik’ed the new driver wight to the contact side of the original. This with the long spring was perfect for a 65-68mm cell. It was waaaaaay too sloppy before, would not even make contact.

__________________

Welcome the night.

My Reviews   My Mods    My How-To's

ohaya
Offline
Last seen: 22 min 9 sec ago
Title: ★★★★★
Joined: 03/16/2013
Posts: 1237
Location: US
relic38 wrote:I’ve used the

relic38 wrote:
I’ve used the first driver. Crappy modes, but it gets the job done.
The second one you will have to add a lot of chips to get 4A. Add four for 2.8A, which is respectable.
I keep forgetting that not everyone will automatically upgrade the tail spring and the emitter wire gauge. I always add copper braid to the tail spring. I also go with heavier gauge wire (20ga in this case). Without these mods, you may not get 4A. 2.8A maybe, but do the tailcap spring anyway, it keeps things in regulation longer.
Edit: I fujik’ed the new driver wight to the contact side of the original. This with the long spring was perfect for a 65-68mm cell. It was waaaaaay too sloppy before, would not even make contact.

Relic,

“Sounds like a plan”, I probably will go with the 1st one. I’m still kind of “mode” agnostic still, but I am now becoming more aware of tints.

Just out of curiousity, since I haven’t done this stuff before, going from 1.47 amp to 2.8 amps, is the difference in brightness really noticeable?

I’m trying to “set my expectations”, because I was expecting to, but haven’t been, blown over by this light so far, esp. reading the earlier posts about people seeing 3+ amps out-of-box.

relic38
relic38's picture
Offline
Last seen: 4 hours 43 min ago
Title: ★★★★★
Joined: 12/28/2012
Posts: 1736
Location: Toronto, Canada
Yeah, not sure why your amps

Yeah, not sure why your amps are so low, but you’ll fix that right up nice Wink
You will notice a difference between double the current from 1.4A to 2.8A, for sure.
At 3’ish Amps into a T6 on this light, expect 600-700 lumens and 40-45kcd of throw. Remember, you did it for under $20 Wink

__________________

Welcome the night.

My Reviews   My Mods    My How-To's

ohaya
Offline
Last seen: 22 min 9 sec ago
Title: ★★★★★
Joined: 03/16/2013
Posts: 1237
Location: US
relic38 wrote:Yeah, not sure

relic38 wrote:
Yeah, not sure why your amps are so low, but you’ll fix that right up nice Wink
You will notice a difference between double the current from 1.4A to 2.8A, for sure.
At 3’ish Amps into a T6 on this light, expect 600-700 lumens and 40-45kcd of throw. Remember, you did it for under $20 ;)

Ok, thanks.

So you thinking that it is odd that I’m not seeing the 3+ amps out-of-box? I keep wondering if, over time, the manufacturer might’ve changed the design/specs. I guess I should pull the driver out to see if it looks the same as the ones you all had back when?

I saw that there was some discussion about resistance in the switch, but the way that I’m measuring tailcap current, I don’t have the tailcap in the circuit, so resistance in the tailcap would come into play. Since the emitter is still T6, then the only other possiblity would be that the driver design has changed, I think?

If I pulled the driver, and took some pics, could you all be able to tell if it was different than the ones that you all had?

relic38
relic38's picture
Offline
Last seen: 4 hours 43 min ago
Title: ★★★★★
Joined: 12/28/2012
Posts: 1736
Location: Toronto, Canada
Post them, I can open mine up

Post them, I can open mine up and compare. I don’t recall the exact amperage I got, but I’m sure it was north of 2A. My main reason for changing the driver was PWM, lower low, and eliminating Disco modes.
Definitely do the tailspring braid mod. I didn’t have an issue with the switch itself, but YMMV.

__________________

Welcome the night.

My Reviews   My Mods    My How-To's

ohaya
Offline
Last seen: 22 min 9 sec ago
Title: ★★★★★
Joined: 03/16/2013
Posts: 1237
Location: US
relic38 wrote:Post them, I

relic38 wrote:
Post them, I can open mine up and compare. I don’t recall the exact amperage I got, but I’m sure it was north of 2A. My main reason for changing the driver was PWM, lower low, and eliminating Disco modes.
Definitely do the tailspring braid mod. I didn’t have an issue with the switch itself, but YMMV.

Hi,

Is the driver retainer ring threaded the opposite from normal, i.e., clockwise, instead of counter-clockwise, to unscrew the driver ring?

Comment viewing options

Select your preferred way to display the comments and click "Save settings" to activate your changes.