Ohh - can you be more specific? How many channels does the FT03 have, and what are the pin assignments?
I see the history on this back in October, post 380.
TA's Astrolux designs were mapping pins different, and think Astrolux/Mateminco stuck with it. I added support for it in Narsil way back, but Anduril didn't have the support for a while. Maybe the FT03 is a yet another different Astrolux/Mateminco variation.
I just found that I could use one option not present in any light I’ve seen so far.
But I’m not going to implement that because I think that adding yet another many-clicks-away option would just not work there.
We’re at the limit of what a single button light can reasonably do already.
But I mention because I think that in the future it may make sense.
Battery discharge mode.
Rationale?
I expected I might have a need to use a light this evening. I charged the cell fully. It turned out that the walk was short enough that I didn’t even turn it on.
So now the cell is sitting at 4.2V. I don’t have another use for this light at the horizon (and this is my only 21700 light). So it would be useful to discharge it to some storage voltage, say 3.7V to reduce unnecessary cell wear. I would be glad if I could put the light head down (so no turbo) and just have it self-discharge to some reasonable level.
Can Sunset Mode be used for this purpose, too? It does not automatically use the battery power and reduce the voltage to a certain level by itself. We need to figure it out. But, the light turns off itself at least.
My charger has the discharge function. It will make discharge to the programmed voltage at the programmed amps. I used it often. It is useful (for example, preparing the battery for storage as above).
I have not used Sunset Mode very much, so I am not familiar with it. But, the battery discharge function can be derived as a part of Sunset Mode, perhaps.
I found a problem.
In simple mode, the auto-lock does not work. This functionality is more important than in full mode.
In my opinion, in simple mode, OFF 2H should give a momentary turbo, just like in full mode. Turbo would only work at the push of a button in simple mode.
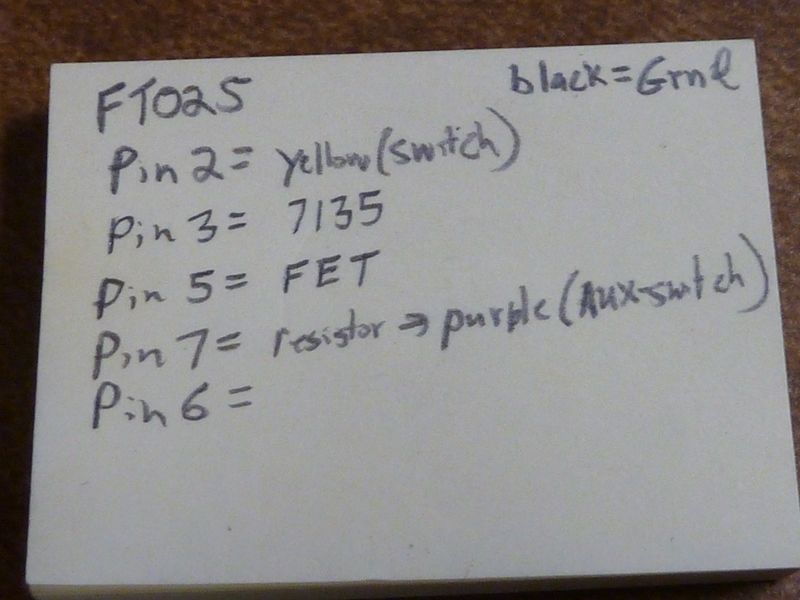
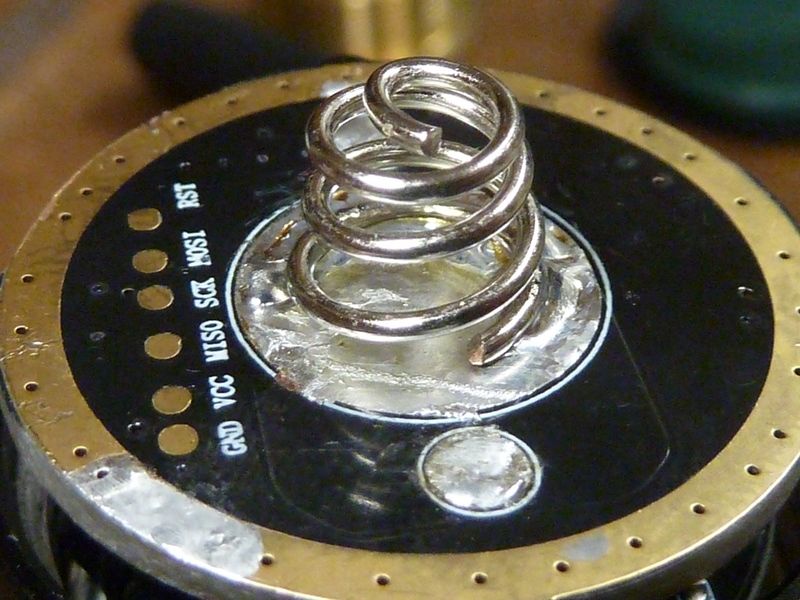
So… I went to flash Anduril2 on my copper FT03 and was met with an unexpected surprise. The flashing pads didn’t match what I expected - they’re closer together than in other images I’ve seen. And there’s a trace running around the outside that looks like it could be connecting a bunch of 7135’s. Without pulling the driver, does anyone recognize this? It looks like it could be a FET+7+1, but not sure about the pinout. Argh.
Uhhh, not sure, don't think I tore down a FT03, but I just modded a FT02S and was under the impression from SammysHP that the FT02 is the same driver. I had to mod, as SammysHP did, the FSM to support the pin config of the FT02S driver, but the FT02S driver is FET+1: 7135 on pin#3, FET on pin #5, AUX LED on pin #7.
My FSM mod is driven by the compile switches while his was hard coded.
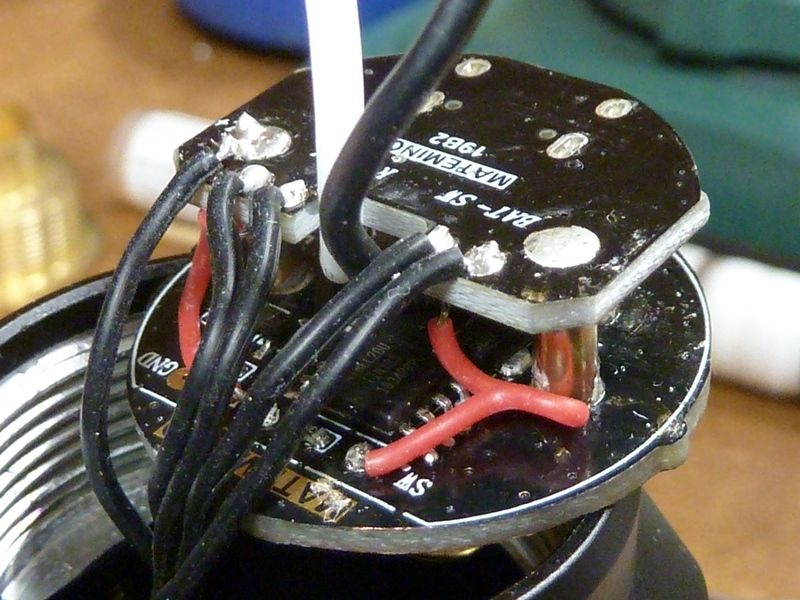
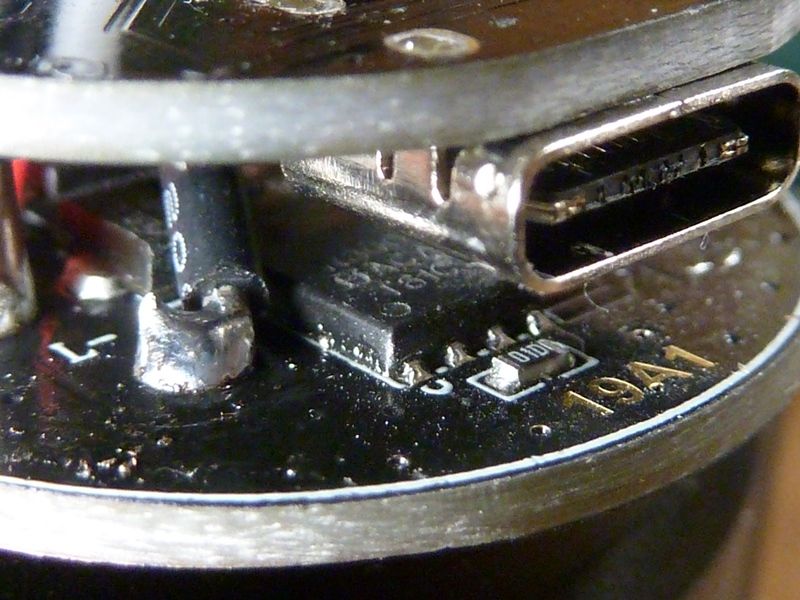
Update: Just check my FT02S (have it with me) and the backside of the driver looks totally different from yours. Flash pads on mine are exactly double the spacing from our standard flash pads, and mine says MATEMINCO, plus other differences. Mine is USB-C and has a USB-C chip on the backside, next to the center brass pad (no spring).
Hello. Anduril2 is great software, the way of writing the program and the content of the comments is amazing.
I read the descriptions in the files and found places that after the change made the firmware work as I want. So in simple mode I have autolock and 2H turbo.
Corrected file: off-mode.c
about line 80:
#ifdef USE_SIMPLE_UI //if (! simple_ui_active) { // no auto-lock in Simple UI if (11) { // always auto-lock</em></strong><br /><em> #endif</em></p>
<p> </p>
<p>about line 160: </p>
<p> </p>
<p><em> // click, hold: momentary at ceiling or turbo</em><br /><em> else if (event EV_click2_hold) { if (simple_ui_active) { //set_level(nearest_level(MAX_LEVEL)); set_level(MAX_LEVEL); //always turbo } else { set_level(MAX_LEVEL); } return MISCHIEF_MANAGED; }
Thank you to all the creators. I am attaching the firmware file for Astrolux ft03.
I think some people around here will be quite pleased to read this type of comment. If the structure and commenting is good enough that someone unacquainted with the firmware can come in and make a few tweaks with relative ease, that's a very good thing.
I posted earlier in a different thread about trying to get this firmware to work with a Texas Avenger 3 channel driver. I don’t own any of the lights that Anduril is set up for; I’m building my own using this 3 channel driver. Are there any precompiled hex files that should just work if I flash it? I’m not familiar with any of these lights so I don’t know what kind of drivers they have. Or if someone (“Tom E” mentioned it) could compile a triple channel hex I would really appreciate it! Or show me what to change in the code.
If you do a bit of searching in the TA thread you’ll come across this. I’ve used it to reflash one of Lexel’s drivers to run Anduril and I believe these are “just” TA drivers in disguise (with a bit more bells and whistles but most importantly the same pinout).
As for the PWM values, if you’re building a FET+7+1 you should be able to use the values for the FW3A. Some of the `cfg` files in the fsm repository have comments on the hardware the respective lights use, so you may be lucky in case you’ve got a different setup.
I re-flashed two of my lights (FW3A and FW4A) with the newest Anduril 2 (2020-09-27) from here and I think I’ve noticed two bugs:
Thermal regulation doesn’t kick in at all when going 2H from off (momentary turbo). After I held it on for about 20 seconds on the FW4A, I measured the temperature at above 70*C. I have calibrated the temperature sensor and the thermal regulation is set to 45*C. Now I’m a bit scared to use it when the light is already a bit hot as I don’t know if it’s going to bake itself - especially when I’m wearing gloves. I think it might be a good idea to enable thermal regulation even in momentary turbo, just in case.
The order of blinkies is Battery Check > Beacon > Temperature Reading, which is contrary to what’s in the manual (Battery Check > Temperature Reading > Beacon).
I also built my own ISP programmer because I didn’t have one at hand and couldn’t wait a month or two for it to arrive. I’ve used a NodeMCU (ESP8266 development board) as an ISP programmer that would wirelessly program the attiny85 using avrdude network upload. Thought it might be useful for somebody else as well, so here’s how I did it:
You need: A NodeMCU (or any other ESP8266 dev board), 6 thin wires, a soldering iron and a disassembled flashlight so you have access to the microcontroller.
Please note that this method is potentially destructive as you’ll be soldering wires directly to the ATTINY85 while it’s on its PCB so I’m assuming you have decent soldering skills, are familiar with Arduino and have no other options
In Arduino IDE, open Examples > ESP8266AVRISP (assuming you installed ESP8266 Arduino core)
Change the WiFi credentials in the code to fit your WiFi network credentials
Connect your NodeMCU to your computer via USB and upload the Arduino sketch to it
Open Serial Monitor in arduino to check if it’s connected to WiFi and to see the IP address and the port of the device.
Disconnect NodeMCU from your computer
Solder the following NodeMCU pins to the ATTINY85 pins in FW3A/FW4A/FW1A/etc:
ATTiny85
NodeMCU (ESP8266)
1 - RESET
D1 (GPIO5)
4 - GND
GND
5 - MOSI
D7 (GPIO13)
6 - MISO
D6 (GPIO12)
7 - SCK
D5 (GPIO14)
8 - VCC
3v3
Connect NodeMCU (with the attiny85 wired to it) to power (and maybe check if the IP address has changed)
Open terminal (MacOS) and run the following command to check if you’ve wired everything correctly:
./Applications/Arduino.app/Contents/Java/hardware/tools/avr/bin/avrdude -C /Applications/Arduino.app/Contents/Java/hardware/tools/avr/etc/avrdude.conf -v -c arduino -p t85 -n -P net:YOUR_NODEMCU_IP:YOUR_NODEMCU_PORT
You should see the attiny85 identified in your terminal
Now download the firmware .hex file that you want to use
Use the following command to upload the firmware:
./Applications/Arduino.app/Contents/Java/hardware/tools/avr/bin/avrdude -C /Applications/Arduino.app/Contents/Java/hardware/tools/avr/etc/avrdude.conf -v -c arduino -p t85 -P net:YOUR_NODEMCU_IP:YOUR_NODEMCU_PORT -Uflash:w:/PATH/TO/YOUR/ANDURILFIRMWARE.hex
Now carefully desolder the wires from attiny85 and make sure that there’s no solder shorting any two pins on it.
Assemble your flashlight and you’re done!
If you’re on PC, you’re going to have to change the paths, but it shouldn’t be too much of a hassle.
I’m also here if anybody who tries this needs some help.
Cheers!
In momentary turbo the thermal regulation is disabled by design. I also wish it had thermal regulation, but that’s not easy without huge refactoring of the code and another reason is to always have full turbo available if you need it.
2020-09-27 is not the latest version (just no binaries published afterwards). The order was changed later and you used the latest documentation.
Thank you, I had missed that post. I flashed the ROT66 file and it seems to work, except the light will shut off immediately after releasing the e-switch when ramping. I’ve also flashed a few versions of Narsil and other Anduril files and the same behaviour occurs. On Anduril, it can’t seem to get into the direct drive mode either; the top of the ramp is the 2nd channel on the 7135s. Kind of unsure about what to do next…
That sounds like a mechanical problem then. Are you sure it’s a regular electronic switch you’re using?
Does 2C (two quick clicks) from there take you to full FET? If yes, then it’s a matter of configuring the top of the ramp differently. If no, can you post the `cfg` file you’re using to compile?