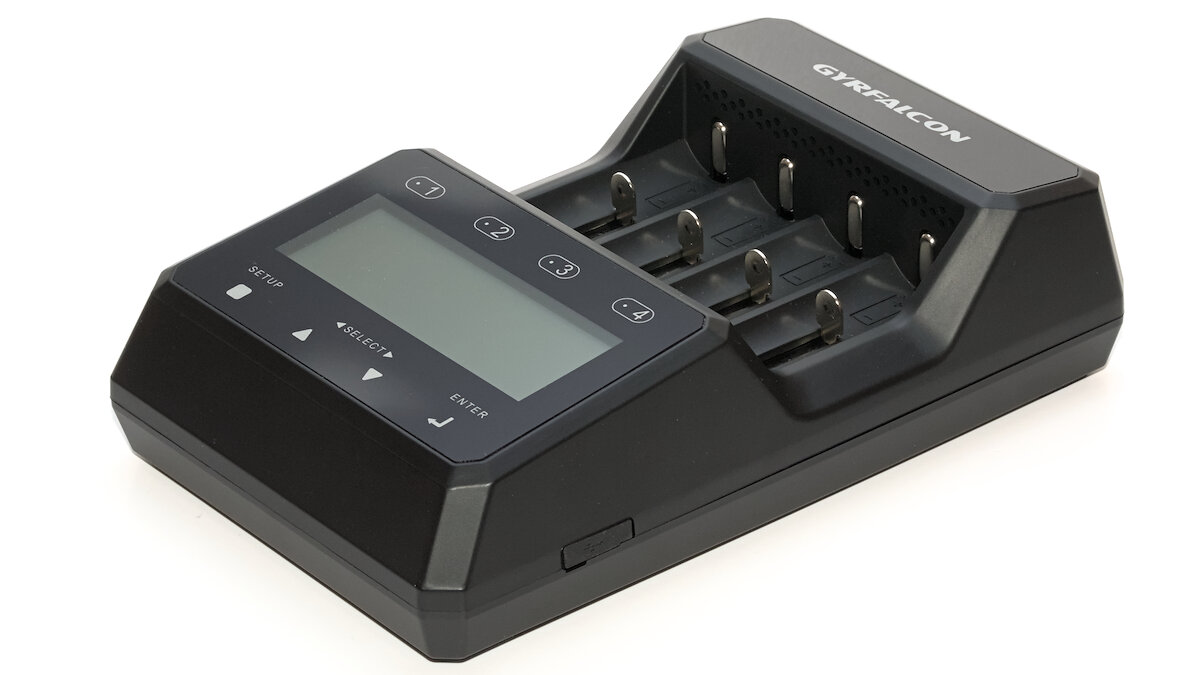
Enova was so kind to send me one of their new Gyrfalcon S8000 chargers. It’s a programmable analyzing charger with four slots, very similar to the famous SkyRC MC3000.
Testing chargers takes a lot of time. Setting up the measurement, waiting for it to finish, then analyzing the results. There are so many combinations of battery types with different properties, modes, settings etc. that it is almost impossible to test everything. I guess a lot of you are eager to see more details about this charger and I don’t want to let you wait several weeks until the review is finished.
Thus I decided to make this an incremental review. I will update it whenever I have new results. This also allows me to respond to your questions and suggestions.
Table of contents
- Changelog of review
- Unboxing and hardware
- User interface and documentation
- Li-ion batteries
- NiMH batteries
- Other functions
- Conclusion
Changelog of review
2024-02-10: Initial publish with section Unboxing and hardware
2024-02-18: Battery compatibility and inserting/removing batteries
2024-03-03: Added section User interface and documentation
2024-03-06: Added section Li-ion batteries
2024-03-07: Added section NiMH batteries
2024-03-10: Added sections Other functions and Conclusion
2024-03-12: Added link to S8000 manual
2024-03-16: Added link to TimMc’s review
2024-03-23: Added short video about the UI
Unboxing and hardware
When I received the package, I was surprised by its size. So much packaging? But no, it was just the box of the charger.
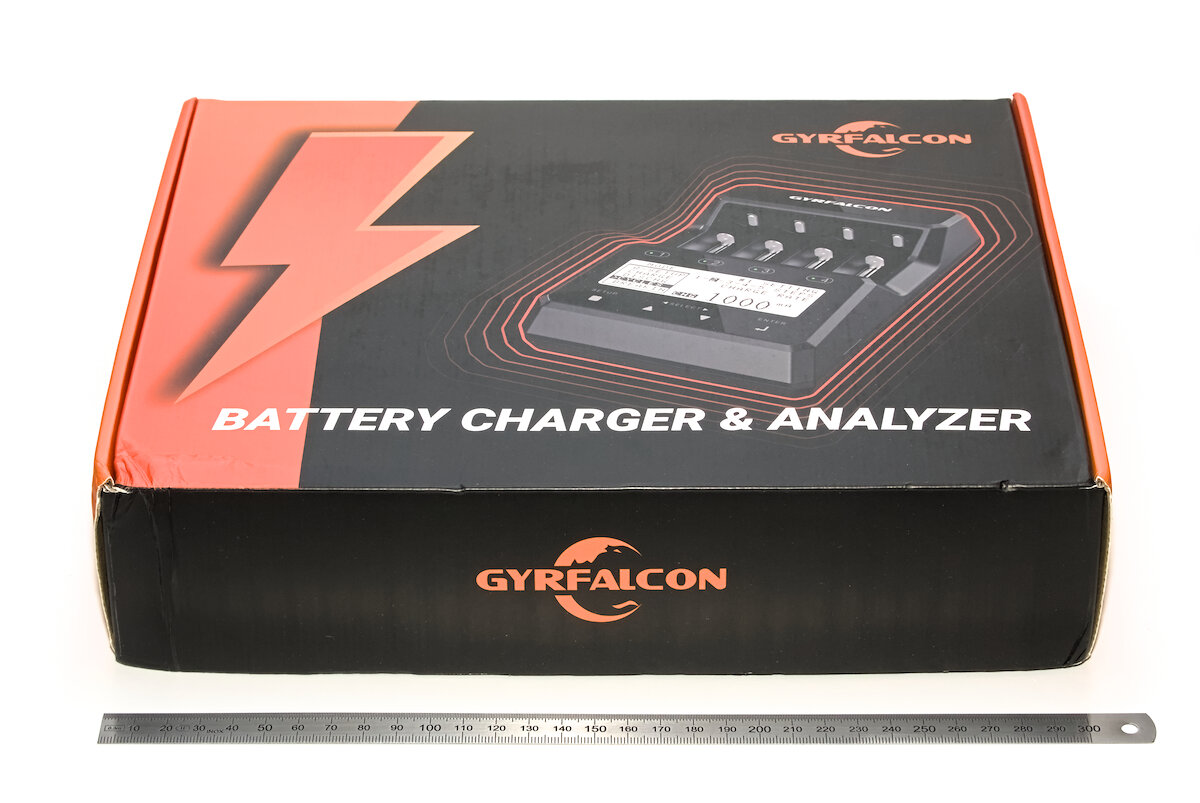
There’s no indication of the model number/name on the box (and the charger itself). So I just assume it’s the S8000. Let’s open the box.
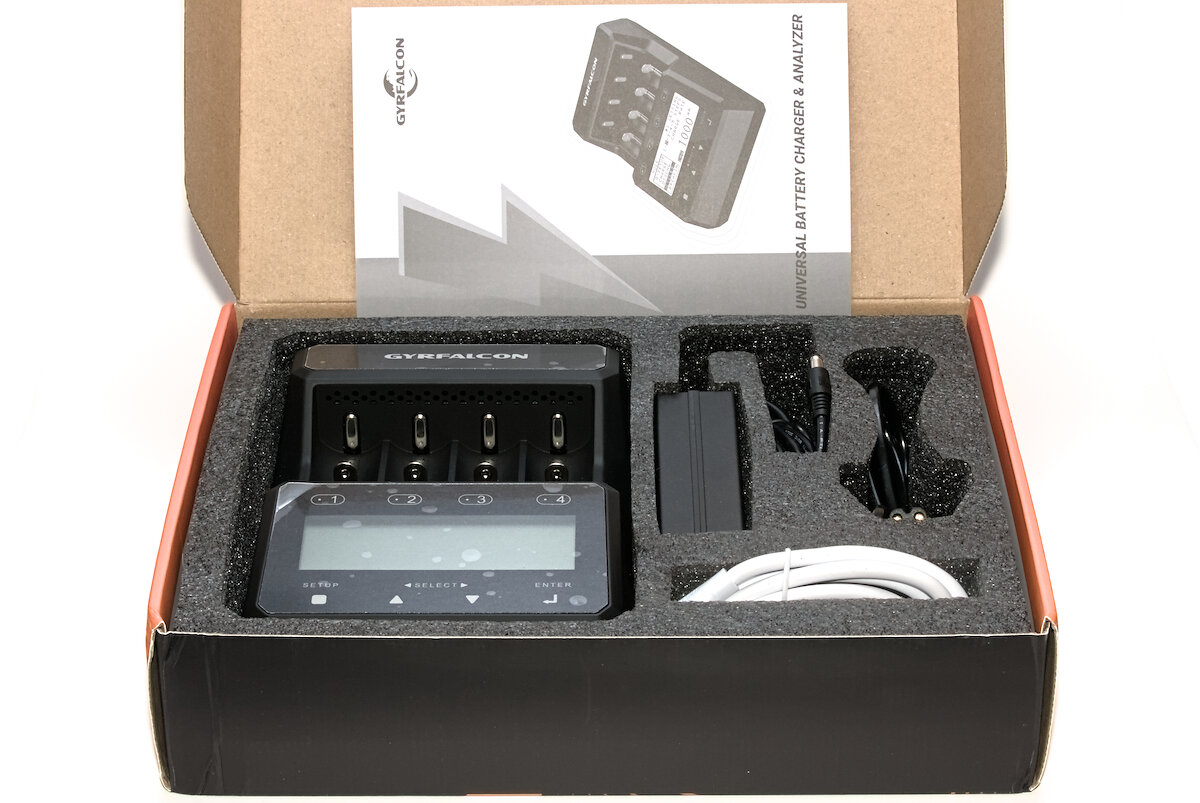
It comes with the following parts:
- Charger
- Power supply
- EU power cable
- Micro-USB cable
- Manual

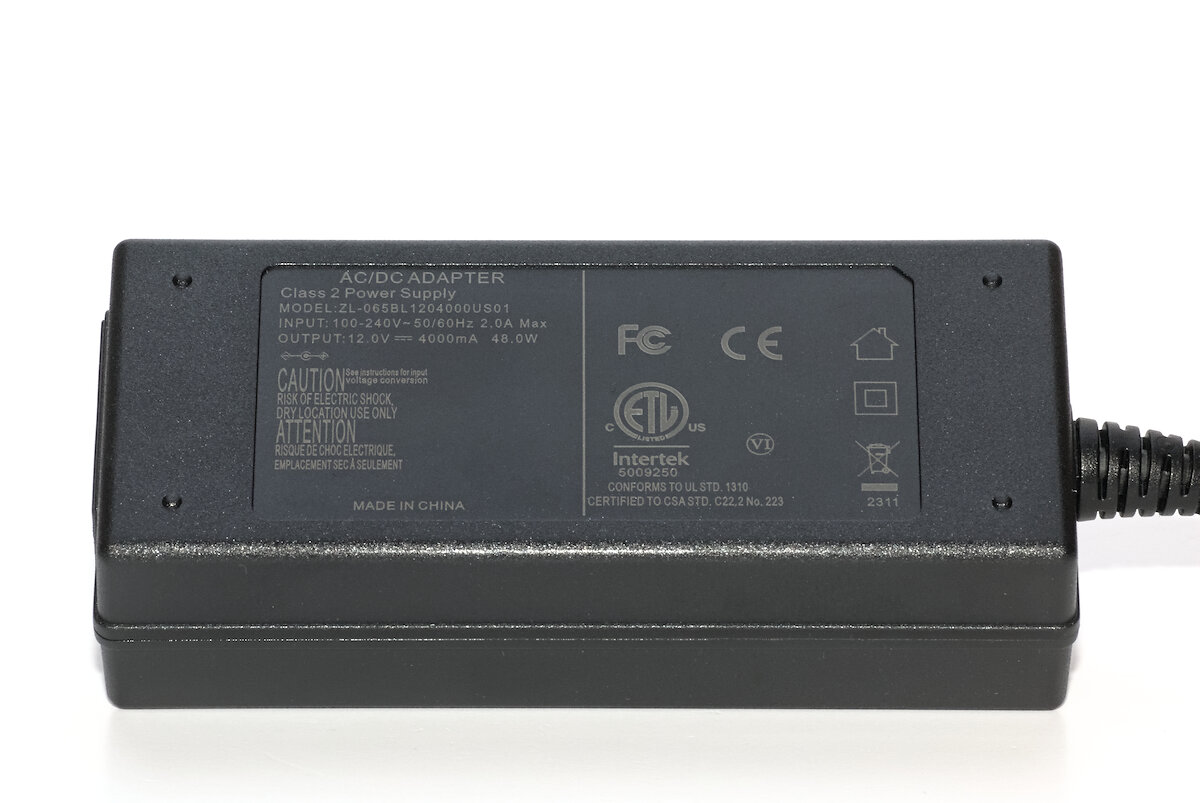
The power supply is rated at 12 V output at 4 A (48 W). This is something you could also achieve with a USB PD or QC4 power supply. But the S8000 is not a compact travel charger, so it might not matter that much. It has a universal input and can be used all around the world, though.
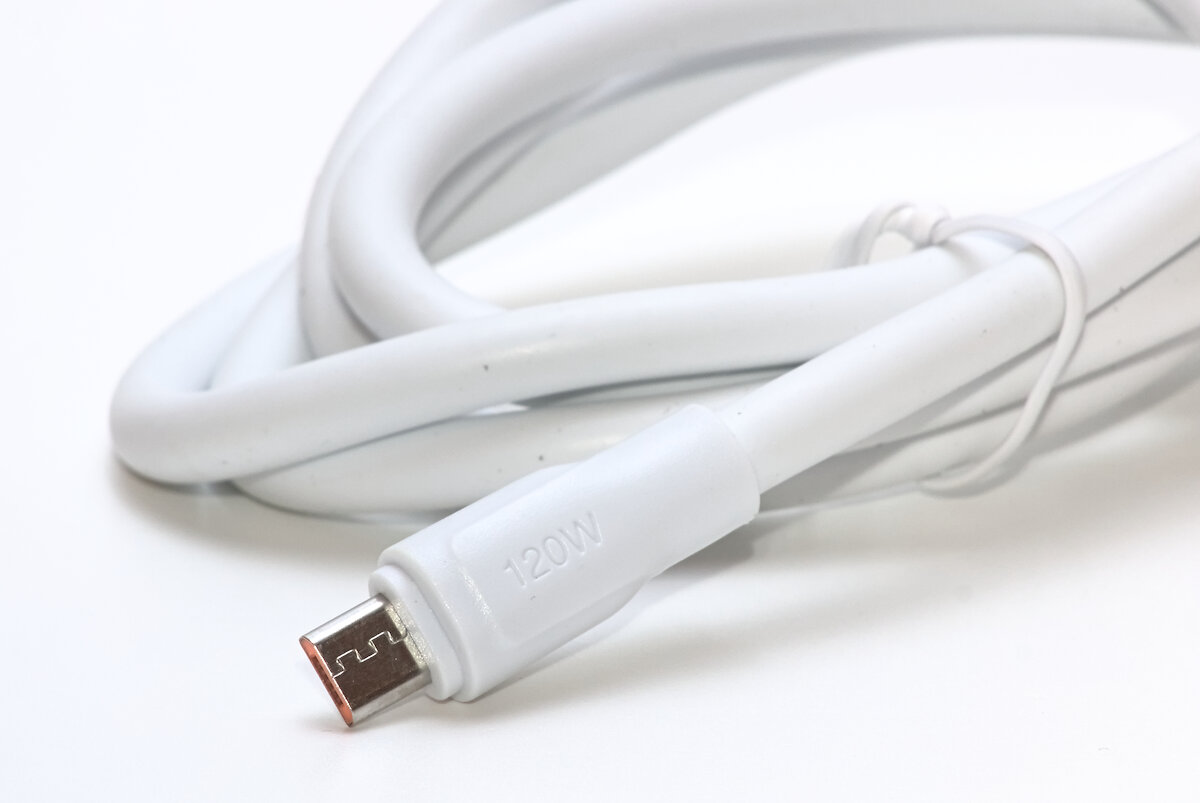
The supplied Micro-USB cable is very impressive. It claims to be rated for 120 W and has a diameter of 6 mm! I’m not sure the USB standard allows so much power over a Micro-USB connector. But again, probably doesn’t matter because it is only used to update the firmware as far as I can see.
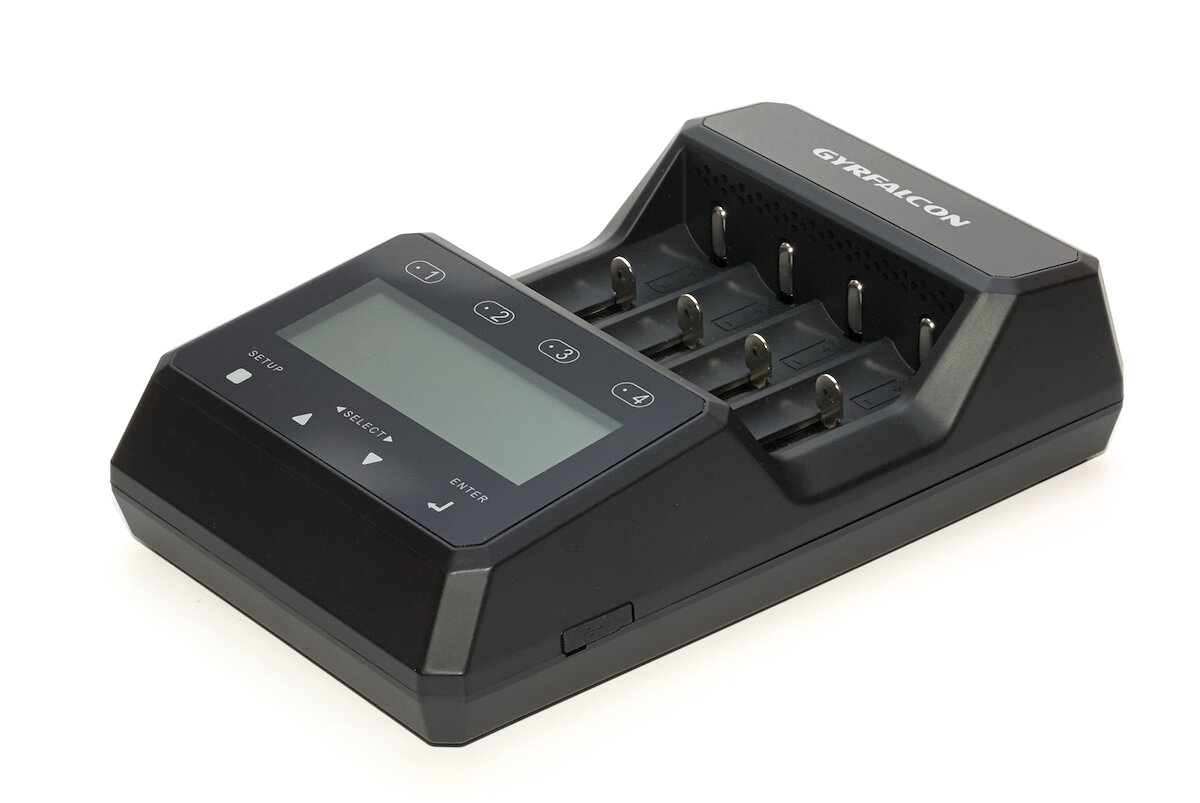
Enough about the accessories. Let’s have a closer look at the charger itself:
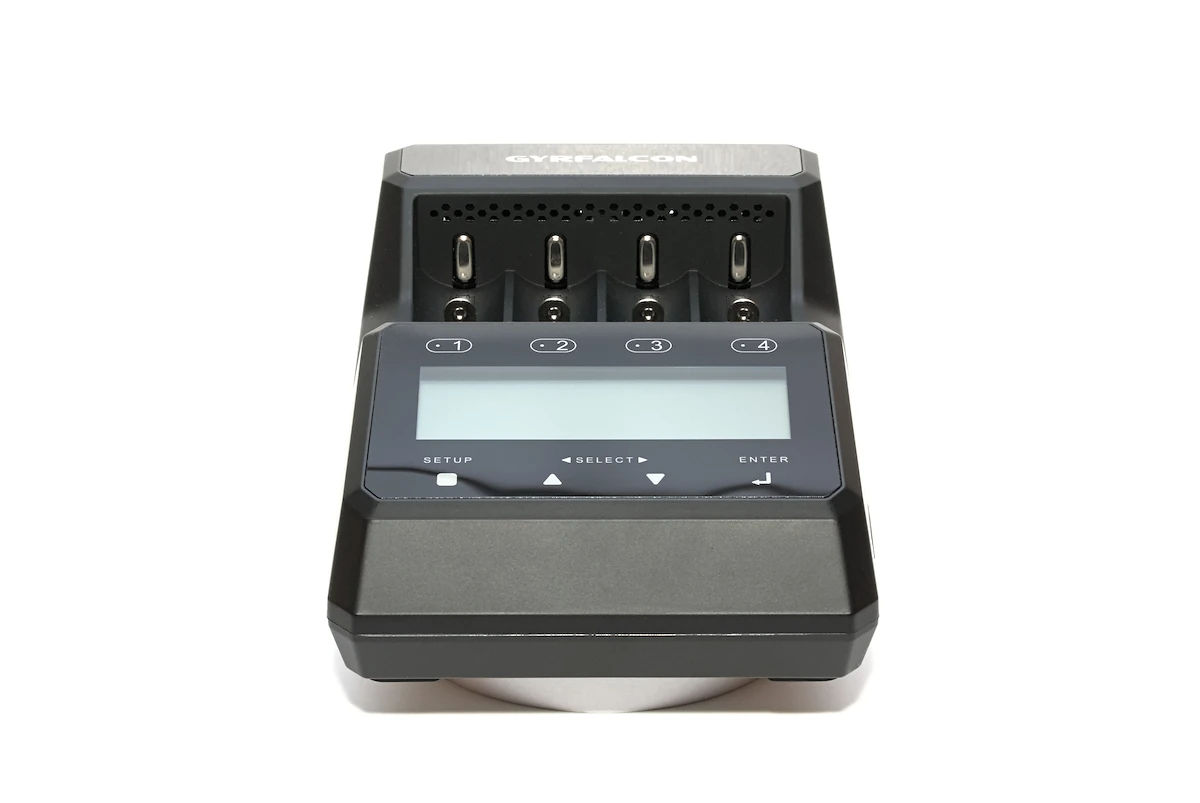
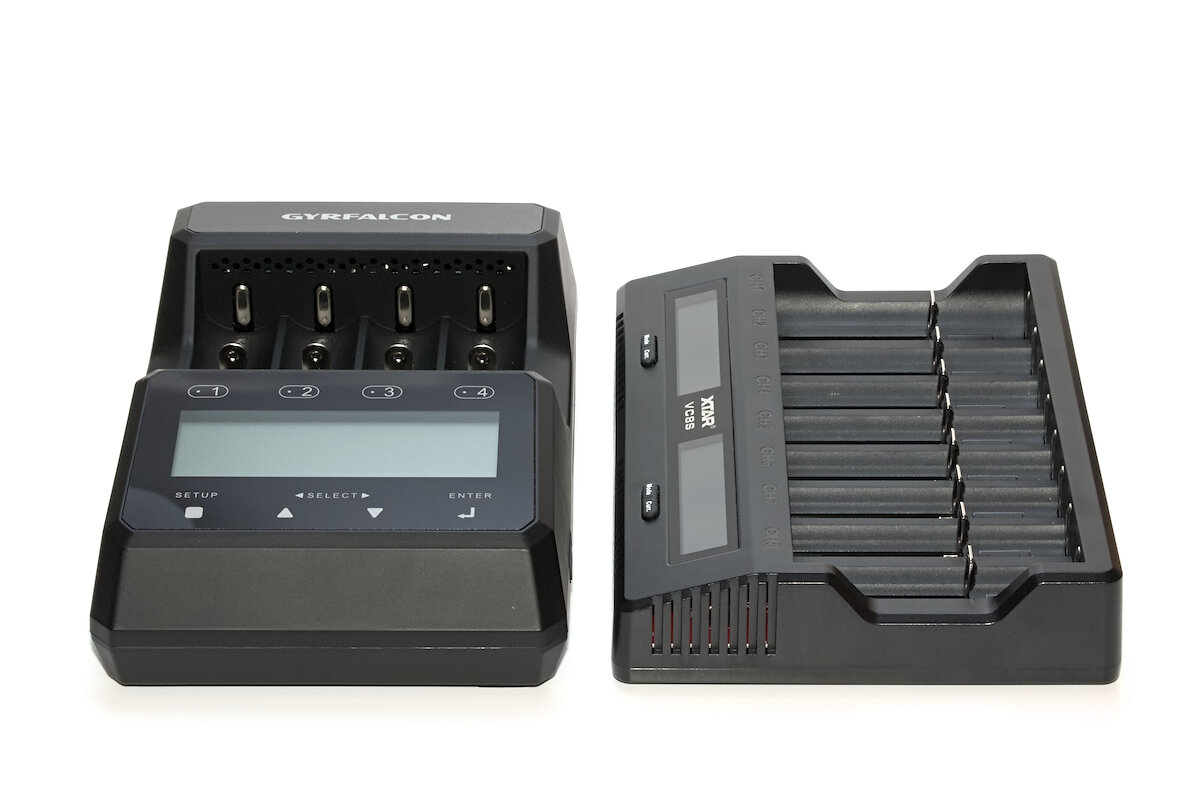
It’s massive! It has a size of 227 × 141 × 62 mm and a weight of 552 g. That’s more than the XTAR VC8S – which has eight slots instead of four.
At the underside you’ll find four rubber feet and a lot of ventilation to cool the electronics.
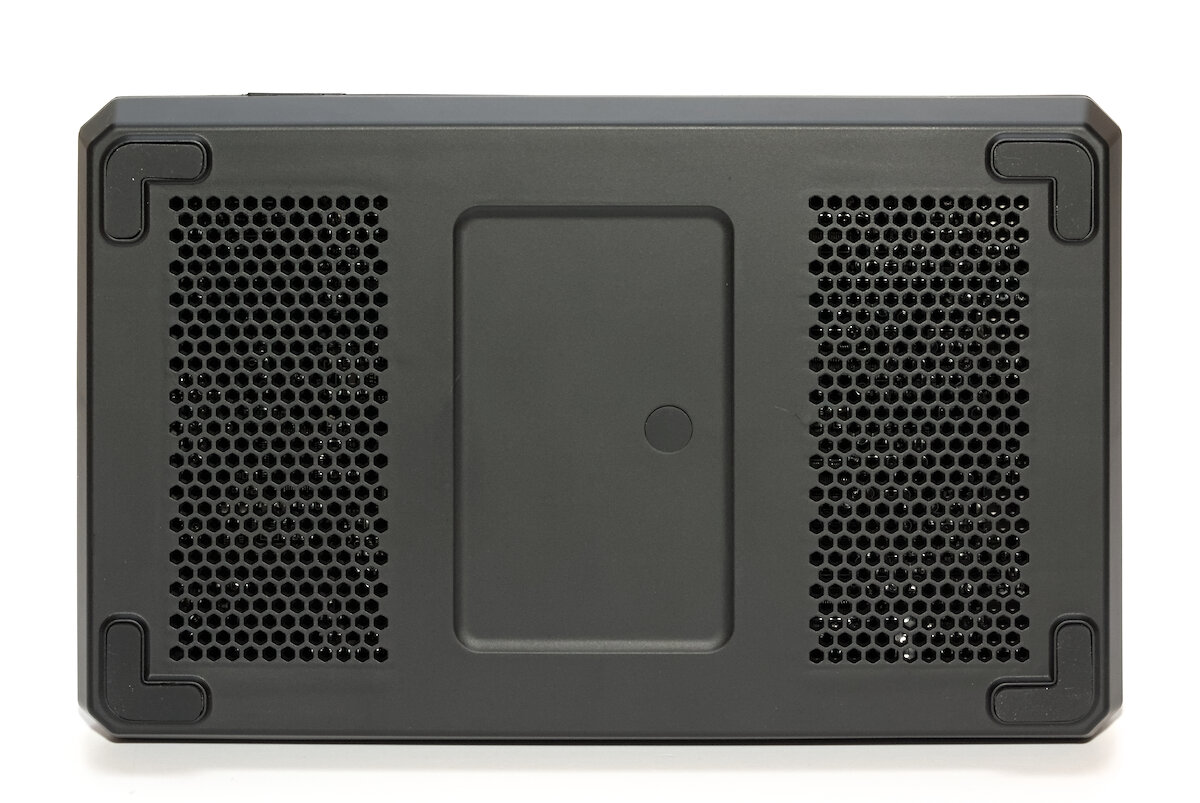
The backside is also well ventilated and includes two little fans that are active during discharge. Here you will also find the barrel connector for power.
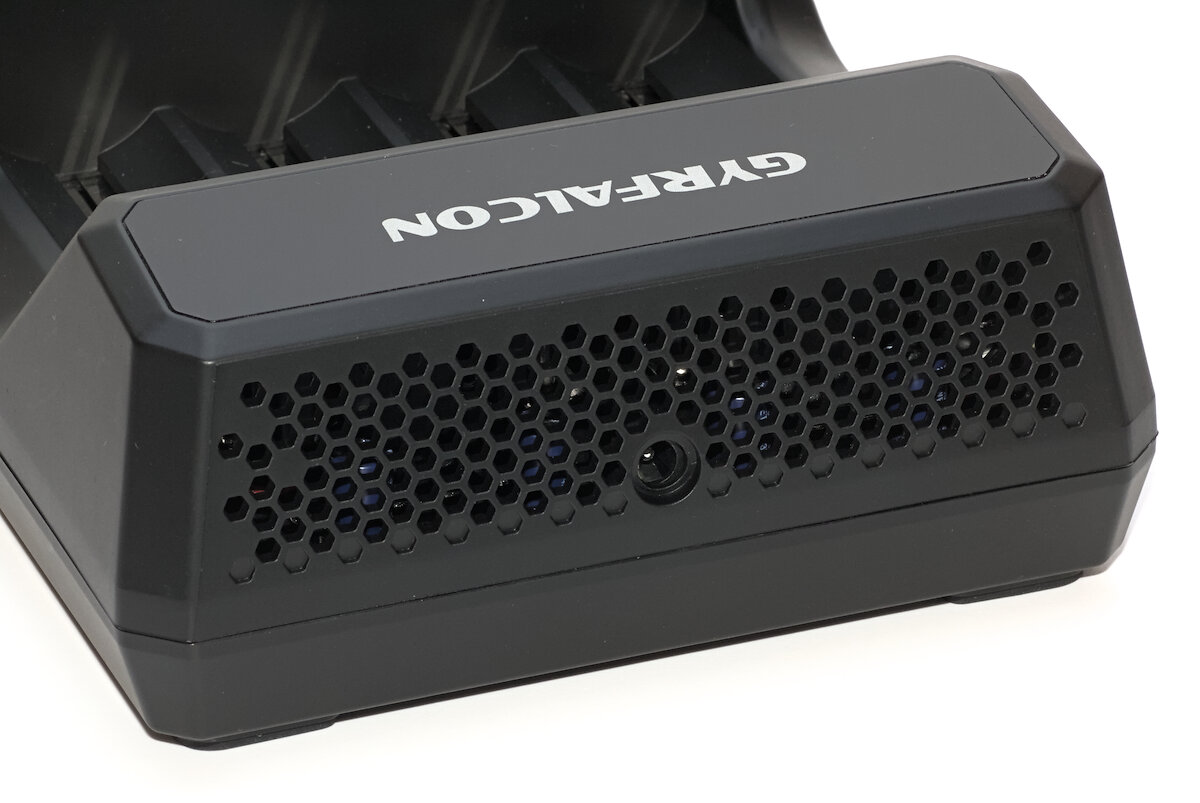
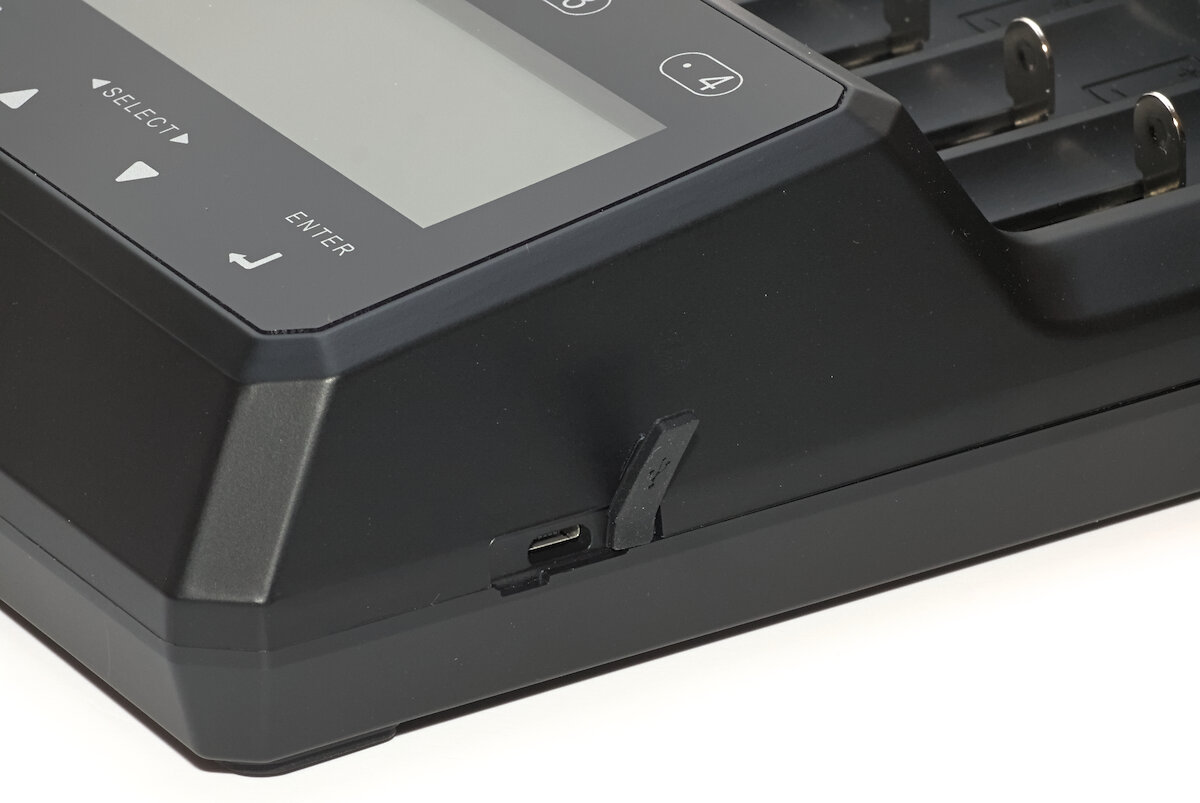
The Micro USB port to update the firmware is located at the right side at the front and is protected by a little silicone flap.
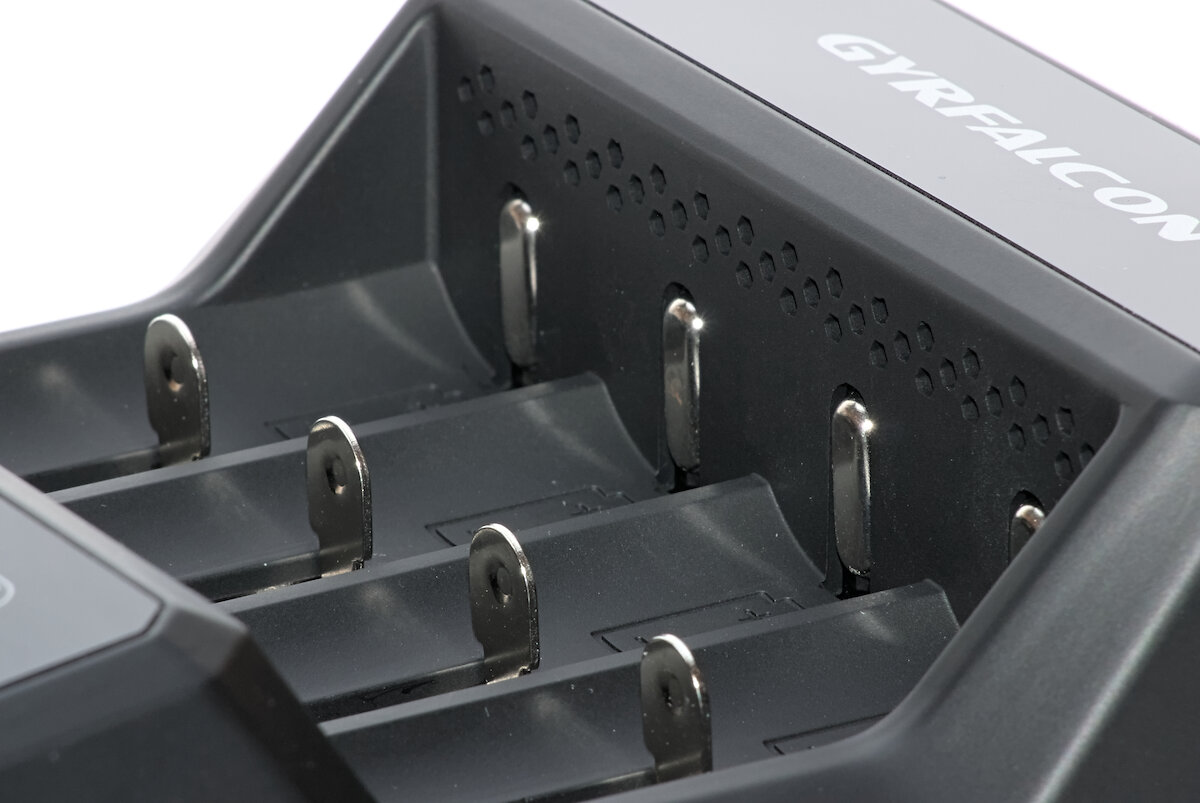
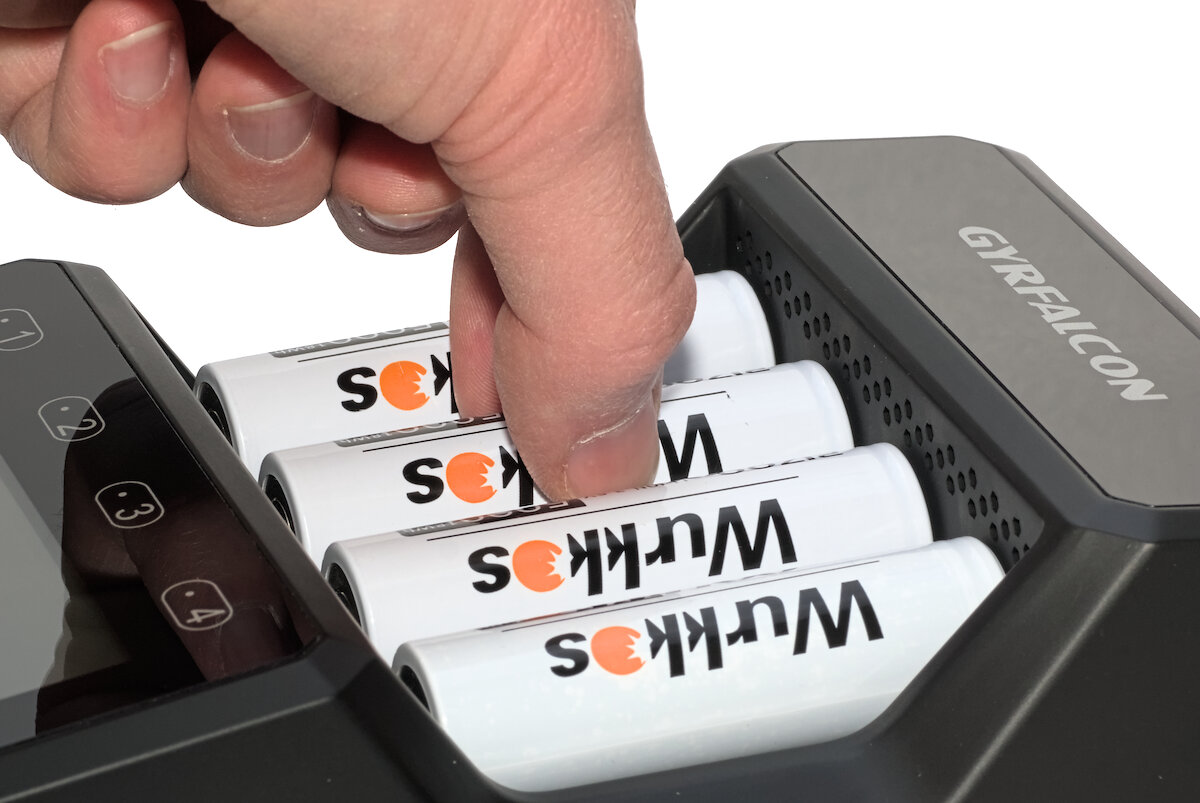
Battery contacts are what you expect from a charger. The negative sliders are spring-loaded and have a little nub. I wish there was also a nub on the positive contact, because many flat-top batteries might not make contact without it.
Here is an example with an AAA battery. The nub on the negative terminal still makes contact. Might be different, if the wrapper would be longer. No problems at the positive terminal due to the button.
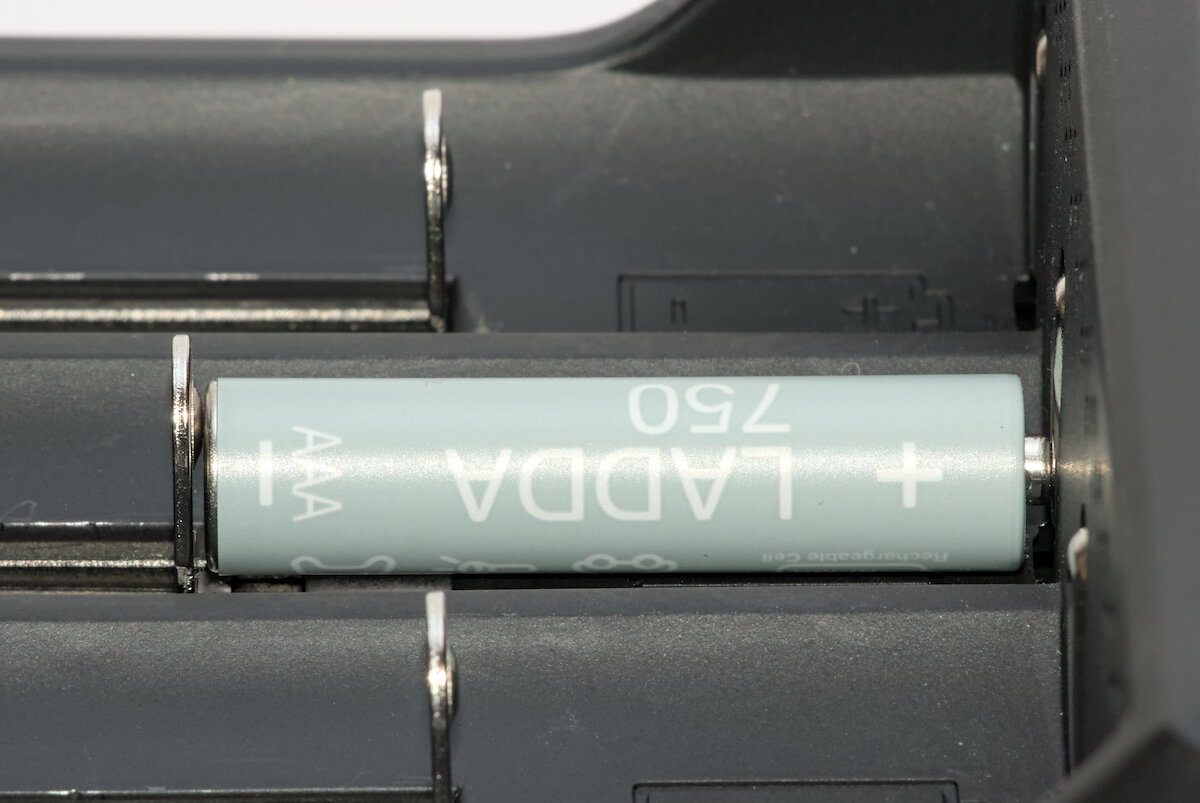
And here is a AA battery. It fits perfectly.
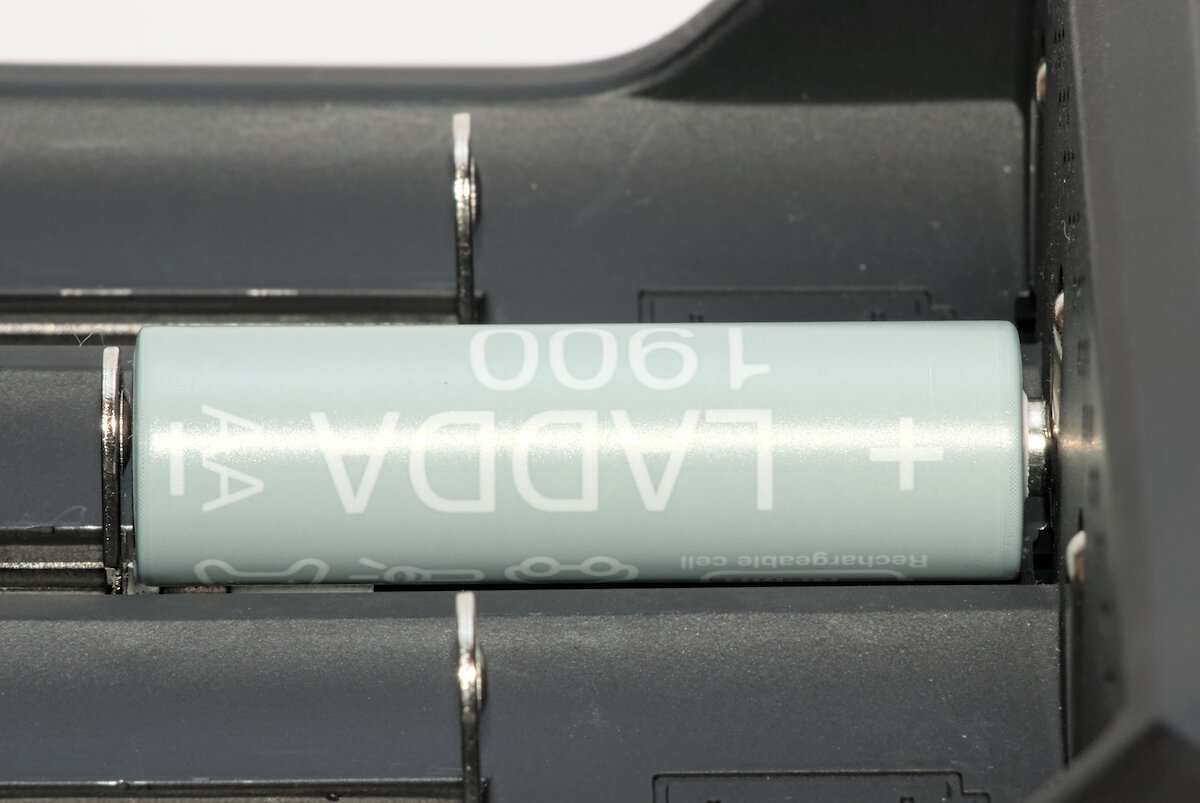
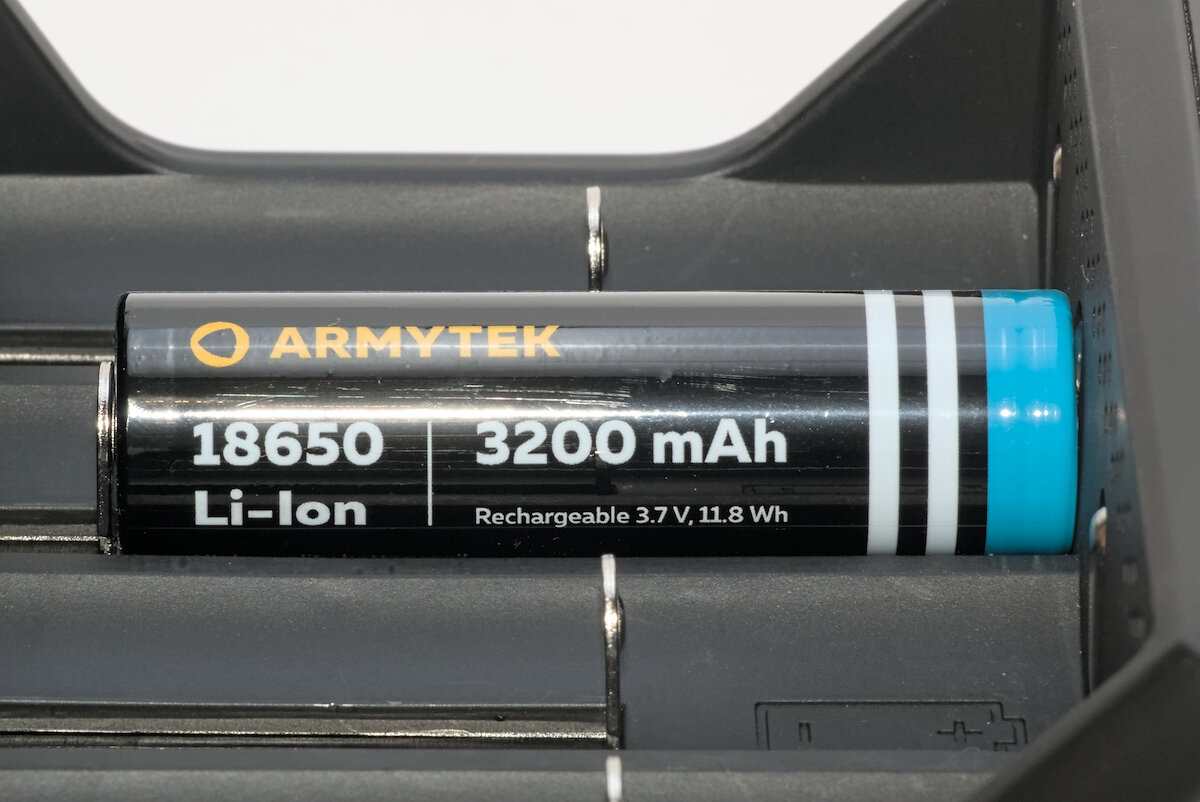
This flat-top 18650 makes bad contact. The positive terminal is not really recessed, but the stiff wrapper is enough to cause problems.
What battery sizes are supported by the charger? The slots have a length from 31 to 76 mm and an approximate width of 27 mm. That means you can fit up to four protected 21700 Li-ion batteries. Four 26650 will fit as well. 26800? Nope. The length is probably enough for all 21700 batteries, including protected button top with integrated charging (like the Nextorch 21700). Small batteries like 16340 will fit as well. Even shorter batteries are supported with a DIY spacer.
While using the charger I experienced a few problems with inserting and removing the batteries. The sliders are very rough and don’t slide easily. Because of the high case, batteries must be inserted at a steep angle, at which the sliders often don’t want to move at all.
You might think you could pull the sliders back with your finger. But then there’s not enough room for the battery!
Similar problem when you want to remove batteries. As usual there’s not enough space between the batteries to grab them from above. But because there’s also no space around the terminals, it is almost impossible to remove a battery from the middle without removing the outer batteries first.
Another problem I observed is that the nickel plating of the sliders starts to flake off. I haven’t abused the charger and it started after just a few uses. Overall the sliders and terminals need some improvement. It would be nice if they were a little longer, but changing the mold is a costly process.
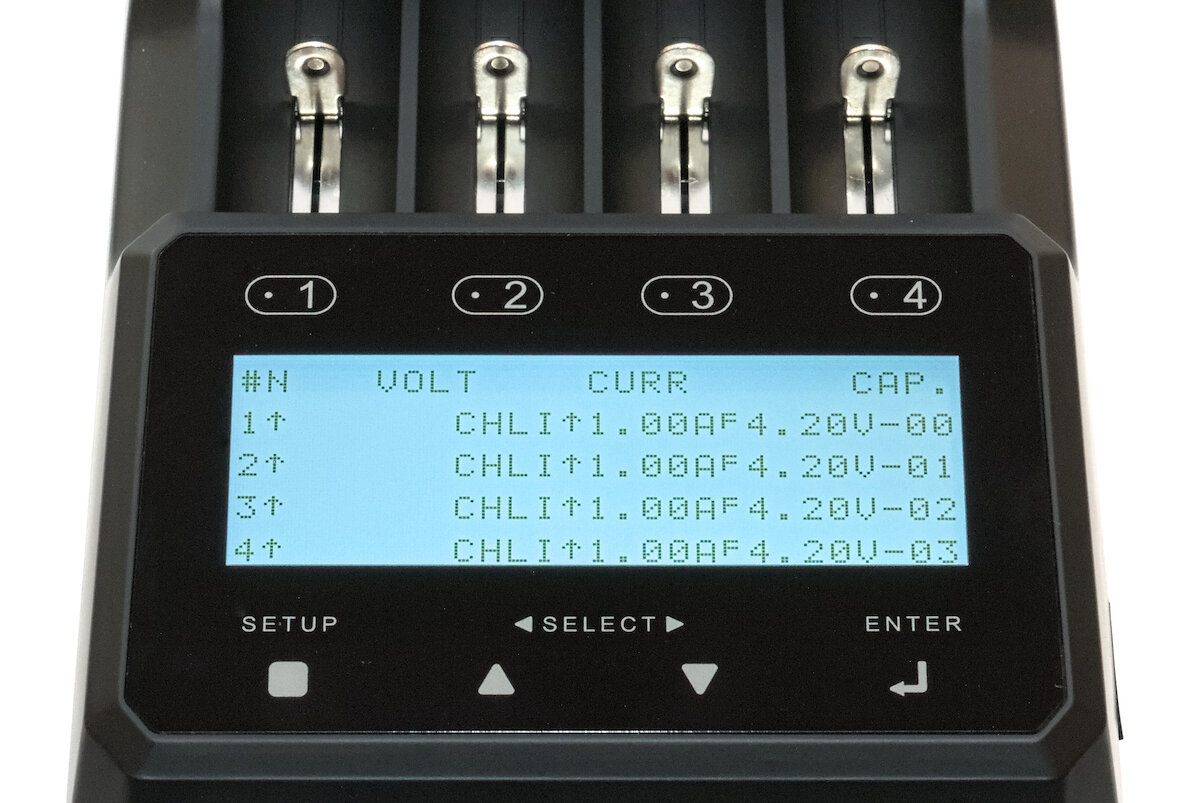
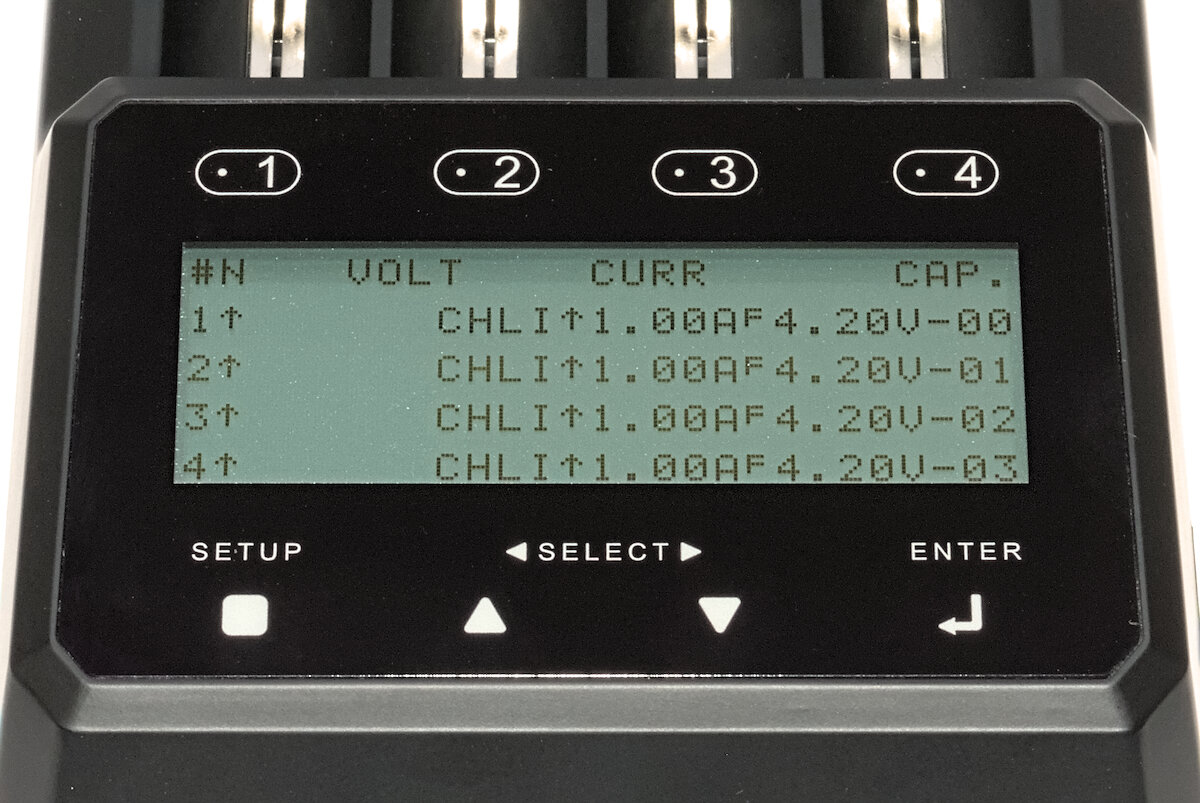
The dot-matrix LCD has a rather faint bluish backlight, but is also readable with external light, thus no problems with direct sunlight. It has a resolution of 192 × 64 px (no, I haven’t counted them, it’s mentioned in the manual).
That’s it for now! I’m still trying to understand the user interface and will then start doing some measurements. I also noticed a few things that could be improved and sent my feedback to Enova. Maybe they have a firmware update ready before I continue with my review of the user interface.
User interface and documentation
Please note: When I received the S8000, it was more like a prototype. The responsiveness of the UI was bad, options weren’t named consistently, some default values didn’t make any sense and several options weren’t available. Fortunately Enova was very helpful and updated the firmware several times to incorporate my suggestions. I think it now reached a level where it is ready to be reviewed.
What do I want to say with this? I’m sure there will be further updates, so everything I tell you about the UI might be invalid in the future.
The charger is controlled with eight capacitive touch buttons. I’d like to highlight capacitive touch, because I think it’s important: You get zero feedback (except from the beeping, that you can turn off). You can’t feel them, you don’t know if you’ve actually triggered them and it is easy to touch them by accident. It gets worse because for some actions you have to touch multiple buttons at the same time. Frequently my fingers weren’t recognized, probably due to static electricity (touching the charging terminals fixed it immediately). As nice as the touch buttons look, real buttons are much better regarding usability!
In the top row you have four buttons for the four slots (later renamed to “channels”). They are used to get information about the corresponding slot or change its settings. Each of them has a little RGB status LED that indicates the general status of the slot (like red while the program is active and green when it is finished). Below the display are four buttons for cancel/return (labeled “SETUP”), up/down and enter.
The general operation is menu based. Select a slot with one of the slot buttons, go up or down with the cursor buttons then select with enter or go back with the cancel button. In an early version of the firmware each button could be pressed short, long or double. Especially the double press was annoying because you weren’t able to quickly navigate through the menu and on each button press the UI had a short delay waiting for a possible second press. Thankfully the double press got removed per my suggestion and the overall timing got improved as well. Now the UI is more responsive and acceptable to use.
You start in the “total overview” (abbreviated as “TOV”) display. It shows a line for each slot with its current status or active program. An indicator at the top left tells you whether you are in “normal” (#N) or “professional” (#P) mode. The only difference is the way you change the program settings.
By holding cancel and enter at the same time you enter the “global setup view” (GSV). Here you can change some settings like display contrast, backlight timer (including always on and – after my suggestion – always off), default program for each slot or the operation mode (normal/professional). Several options were disabled when in the early firmware and later got removed because they aren’t implemented yet. Now it is also possible to restore the default settings.
Holding a slot button (called “SNB”) opens the “slot/channel programming view” (SPV/CPV). In normal mode you select an operation from a menu (like charging/discharging/cycle) and then progress through a menu with each step changing one (important) setting. In professional mode all options are listed as a table. Navigate to an option, press enter, change the value, confirm with enter. When you are ready, hold enter to save the program. There is a temporary program (“T”) as well as 32 memory slots.
Available options in the programming view have changed a lot during my testing. I will go into detail for each mode in the corresponding section.
When you want to charge a battery, the usual workflow is as follows:
- Setup your slot program
- Insert battery
- If autostart is disabled, hold enter to start the program
Make sure to setup your program correctly. There is no detection/verification of the battery type! If you just turned on the charger with the default Li-ion program and insert a NiMH battery, it will be charged as if it was a Li-ion battery! I suggested to check if the voltage is in an appropriate range (like 2.5–4.2V for Li-ion and 0–1.6V for NiMH) and ask for confirmation if the voltage is outside of that range.
Here is a short video demonstrating most of the UI features:

More information about the UI can be found in the 32-page manual. You can find it here on the product page.
Apropos manual: Maybe all the abbreviations like TOV, GSV or SPV were somehow familiar to you. That’s because the entire manual is based on the SkyRC MC3000 manual. An early version even included “MC3000” and “SkyRC” at a few places. I guess that is how it’s done, I won’t judge.
Li-Ion batteries
Charging Li-ion
Introduction:
Sometimes charging Li-ion batteries is described as a very complex and difficult thing. Actually it is fairly simple: Charge with a constant current until the battery has reached its target voltage, then keep that voltage by reducing the charging current until the current reaches a threshold, then charging is finished. This method is called “CC/CV” (constant current, constant voltage) and there are charging controllers available implementing this very well for just a few cents (that is what you find in most flashlights).
The devil is in the details: Most importantly, don’t overshoot the target voltage by much (otherwise the battery might be damaged). Actually most chargers are able to achieve this quite good with a fixed voltage of 4.20 V (the normal target voltage of most Li-ion batteries).
Depending on the battery capacity and electrical characteristics, you want a different charging current. As a rule of thumb, small batteries are charged with a low current, large batteries with a high current. Some chargers allow you to choose between 2 to 4 different currents, often not low enough for very small batteries. Some chargers also come with an auto mode which automagically determines the best charging current (usually depending on the internal resistance of the battery).
Always charging a battery to its maximum capacity will shorten its lifetime. If you can spare 20% capacity, the lifetime will be increased dramatically. Nice, but most chargers won’t allow you to set a different target voltage. D’oh!
So while the actual charging process is fairly simple, you might want to have more control over the charging parameters. This is when you want a programmable charger like the S8000.
In this review I mostly focus on the “professional mode” where you can change all settings. I will summarize the simple mode later in the review.
Holding a slot button opens the “slot/channel programming view” (SPV/CPV) where you first select the chemistry (“Lithium-ion” in this case) and a program type (“Charge”). Then you can adjust these options:
| Option name | Range | Resolution | Description |
|---|---|---|---|
| PRECHARGE CURRENT | 0.030 – 0.200 A | 1 mA, 20 mA | Reduced charging current used below threshold defined by PRE TO FAST VOLT |
| CHARGE CURRENT | 0.050 – 2.000 A | 1 mA, 50 mA | Regular charging current |
| END VOLTAGE | 3.000 – 4.260 V | 1 mV, 50 mV | Target voltage |
| END CURRENT | 0.010 – 0.150 A | 1 mA, 20 mA | Termination current |
| PRE TO FAST VOLT | 2.400 – 3.200 V | 1 mV, 50 mV | Threshold to switch between precharge and regular charging current |
| RESTART VOLTAGE | 0.000 V, 2.500 – 4.259 V | 1 mV, 50 mV | Restart charging once the battery voltage falls below this value |
| PRECHARGE TIME | 0 – 300 min | 1 min, 20 min | Maximum time spent in precharge mode |
| CHARGE TIME | 0 – 1000 min | 1 min, 50 min | Maximum charging time |
Select an option with up and down, press enter to edit it. The value will start flashing. Up and down will change the value by the first number in the “resolution” column, holding it will scroll by the second value. (In the first firmware version it was almost impossible to use the scrolling mode because it was too fast and scrolled by 1.) Then return by pressing either enter or cancel. At the end, holding enter will save the options, cancel will discard the changes.
Short excursion: Program slots. There are 32 memory slots that you can use to store you preferred settings. You can quickly access the first 10 of them from the “total overview” (TOV) screen by simultaneously holding cancel and the corresponding slot button. To access programs 10 – 31 open the SPV and change the first option (PROGRAM[n]). There is also a temporary program slot (T) for the currently made changes when not saved to a program slot. To save your changes to a program slot, navigate to the last option in SPV (“SAVE TO”), select a slot and press enter.
Now that we have chosen our options (charge to 4.200 V with 1.500 A with a termination current of 100 mA), let’s have a look at the performance of the charger:
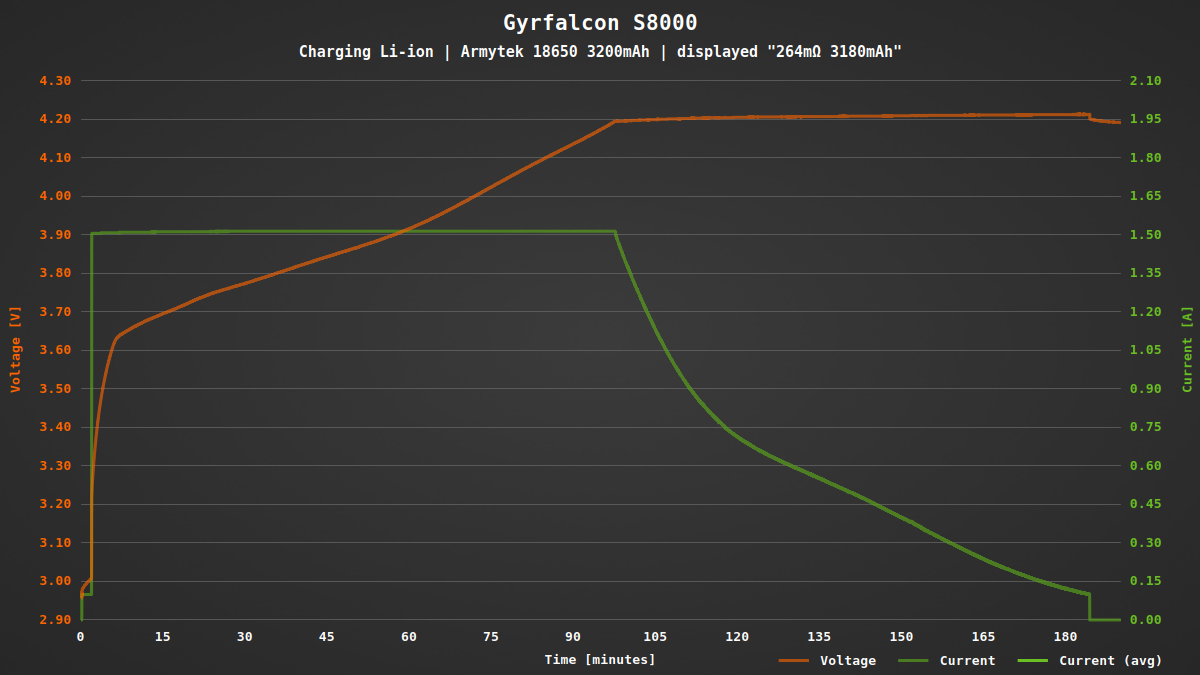
It starts with a reduced charging current of 100 mA as set in the options. When it reaches the configured 3.000 V, the current is increased to 1.500 A. At 4.200 V it switches to the CV phase until charging is stopped at 100 mA. Overall the graph looks very pretty! I’ve seen chargers with a wildly oscillating charging current or overshooting the target voltage. The S8000 does what it was instructed to do and it does it in a (mostly) nice way.
You can see that the target voltage isn’t precisely constant. It slightly increases when the current decreases. So there is a slight correlation between voltage and current, also known as Ohm’s law (at least that’s what I think is going on here). There might be additional resistance outside of my measuring setup which “consumes” some voltage.
Is this a problem? Not in my eyes. Although Enova always emphasizes the high precision of the charger and displays all values with three decimal places, these small deviations are acceptable in practice and won’t have a negative impact on the charging. It is much better than most other chargers.
What I really like about the available options is that you can freely change the target voltage. Set it to 4.100 V and get more lifetime out of your batteries. Or even to 4.000 V. Do you need three decimal places? No, but it is nice to have this level of control if you want it.
You can charge four batteries in parallel with 2 A each. Would be great if you could charge two batteries with 3 A each.
In “normal mode” you can only set the charging current (1 mA resolution) and target voltage (1 mV resolution). Not sure where the other values come from.
What I haven’t tested so far: At which voltage will the charger start to charge a battery? Will it charge a deeply discharged battery (which can be dangerous!) or can it “activate” a protected battery? I already noticed that it does not have a verification of the battery type, so it will try to charge a NiMH battery like a Li-ion battery if you forgot to change the battery type in the menu!
Update: Enova implemented a voltage verification based on my suggestion. When you insert a NiMH battery in Li-ion mode or vice versa, it shows “confirm again!” and doesn’t start to (dis)charge until you press enter.
Discharging Li-ion
Discharging your batteries can be useful to measure their capacity or prepare them for recycling. Setting the mode to “discharge” gives you the following options:
| Option name | Range | Resolution | Description |
|---|---|---|---|
| CUT VOLTAGE | 2.500 – 4.350 V | 1 mV, 50 mV | Target voltage |
| DISCHARGE CURRENT | 0.030 – 1.000 A | 1 mA, 50 mA | Discharge current (CC discharge) |
| DISCHARGE REDUCE | 0.020 – 1.000 A | 1 mA, 50 mA | Termination current (CC/CV discharge) |
| CUT TIME | 0 – 1000 min | 1 min, 50 min | Maximum discharging time |
What this means: It can either discharge the battery using a constant current (CC) and terminating once the target voltage was reached, or it can discharge with CC/CV by reducing the current at the target voltage until a termination current was reached. This is helpful because the battery voltage will always sag under load. With a CC/CV discharge method you can compensate that partially.

As you can see in the graph, the voltage still recovered after the discharging was stopped. This is a property of the battery. The additional resistance inside the charger is visible here as well (the voltage in the CV phase isn’t constant), but again: we’re talking about some mΩ!
During discharging the two integrated cooling fans will turn on. Not to cool the batteries, but the electronic load in the charger. They are not loud, but also not quiet. Just on a level that you will notice them when you are in the same room. These small fans will always cause some noise, especially when controlled by PWM (here, presumably). Their speed depends on the load, for example they will turn off when the power is below 1 W.
Maximum discharge current is 1 A per slot, but you can use all four at the same time. It would be great to have the option to use two slots with 2 A each. I still have to find out how much heat is generated under full load (roughly 16 W).
In “normal mode” you can set discharge current and target voltage.
Storage Li-ion
Introduction:
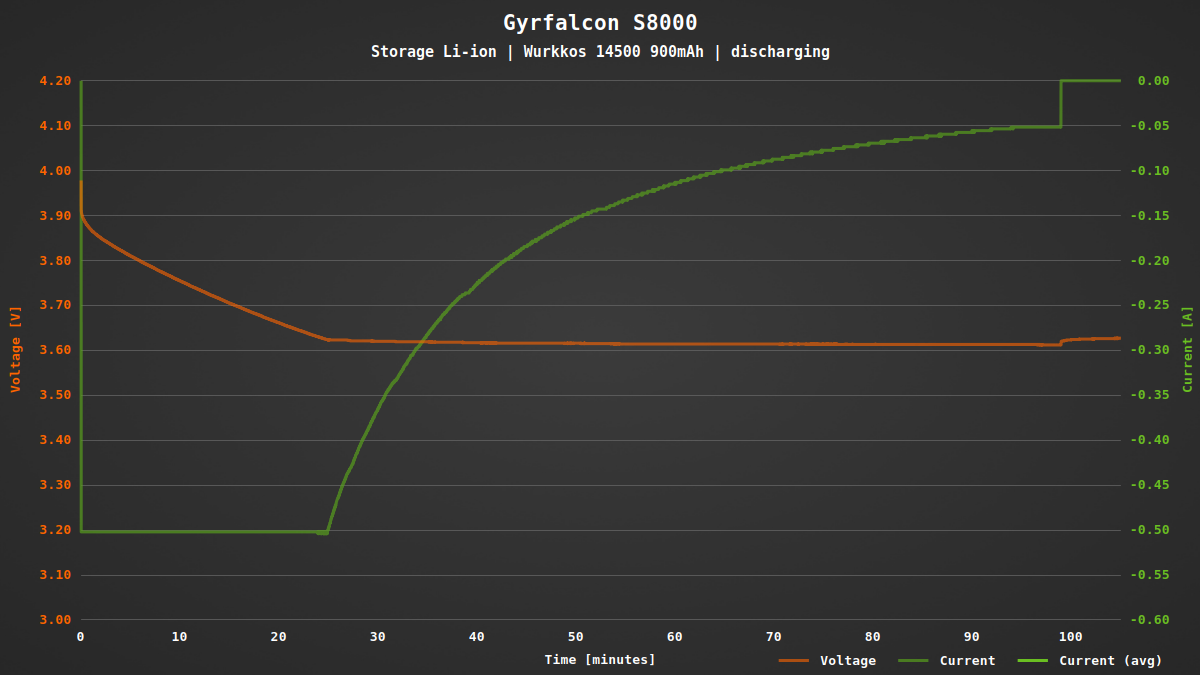
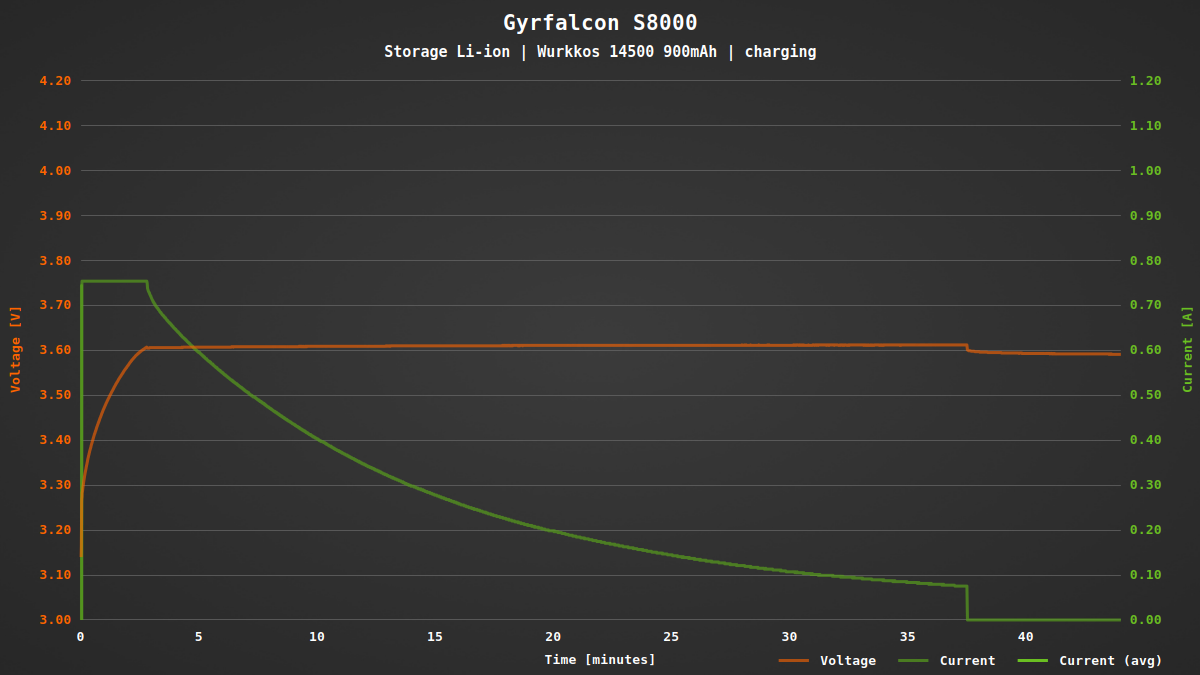
You can extend the shelf life of your Li-ion batteries when you store them about halfway charged in a cool environment. It doesn’t have to be an exact voltage, just something in the 3.6 – 3.8 V ballpark. Of course you don’t want to sit next to the charger all the time and wait until the battery has reached that voltage. Also the voltage depends on the current, so it will be different when you take out the battery while the current isn’t zero. This is when a storage mode comes in handy.
Select the “storage” mode and you have these options available. A target voltage, a charging current in case the battery voltage is lower and a discharge current when it is higher.
| Option name | Range | Resolution | Description |
|---|---|---|---|
| CHARGE CURRENT | 0.050 – 2.000 A | 1 mA, 50 mA | Charging current |
| END VOLTAGE | 3.000 – 4.260 V | 1 mV, 50 mV | Target voltage |
| DISCHARGE CURRENT | 0.030 – 1.000 A | 1 mA, 50 mA | Discharge current |
Here are two graphs, one where the battery voltage was higher than the target voltage and had to be discharged, and one with a lower starting voltage. The termination current cannot be set, looks like 1/10 of the regular current. With the previously mentioned voltage sag this should be good enough.
The storage function isn’t available in “normal mode” directly. But you can save it to one of the first then program slots, which are accessible in normal mode (but cannot be edited in normal mode).
In earlier firmware versions storage mode always discharged the battery first and then charged it to the target voltage. This caused unnecessary delay and battery wear. Thankfully it was changed after I suggested the new behavior.
NiMH batteries
Charging NiMH
Introduction:
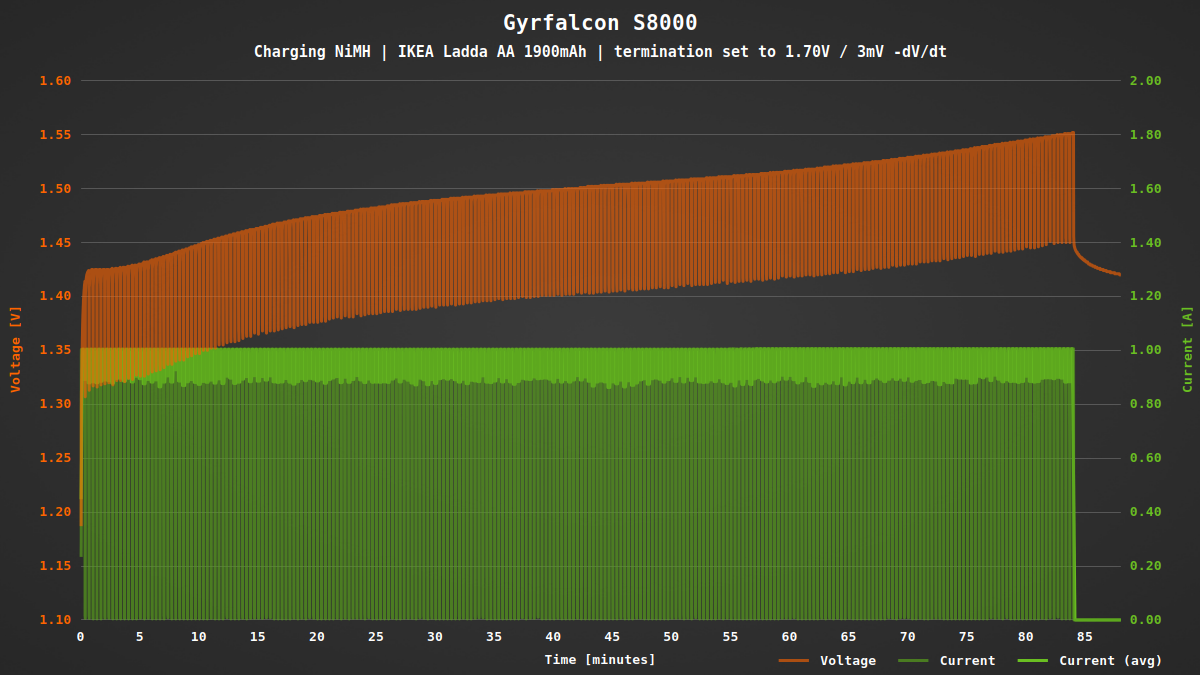
Charging NiMH is a bit more tricky than charging Li-ion. Well, not the charging itself, but finding the correct moment for termination. NiMH batteries have a complex chemical structure and it is not as simple as charging to a specific voltage. The charger has to observe the charging process and decide when it is time to stop charging depending on various parameters.
One method of finding the proper moment is the so called “-dV/dt” method. This means “a negative change of voltage over time”. During charging the voltage increases most of the time, but when the battery is full, it drops slightly. This does not always happen, especially if you have old and worn batteries, if the charging current is too low or if the battery was already almost full when you started charging it.
The voltage is measured without load (open circuit voltage, OCV). This means that the charging has to be interrupted every few seconds to measure the voltage of the battery. In the charging graph this can be seen by the frequent pulses, that almost look like a wide band.
Before you start charging NiMH batteries with the S8000, make sure to select the proper battery type in SPV. Otherwise it might start charging it like a Li-ion battery. You have these options available in the SPV configuration:
| Option name | Range | Resolution | Description |
|---|---|---|---|
| PRECHARGE CURRENT | 0.030 – 0.200 A | 1 mA, 20 mA | Reduced charging current used below threshold defined by PRE TO FAST VOLT |
| CHARGE CURRENT | 0.050 – 2.000 A | 1 mA, 50 mA | Regular charging current |
| TARGET VOLTAGE | 1.000 – 1.700 V | 1 mV, 50 mV | Maximum allowed voltage |
| DELTA PEAK | Advice, 0 – 9 mV | 1 mV | Automatic or -dV/dt termination |
| PRE TO FAST VOLT | 0.800 – 1.300 V | 1 mV, 20 mV | Threshold to switch between precharge and regular charging current |
| RESTART VOLTAGE | 0.000 – 1.650 V | 1 mV, 50 mV | Restart charging once the battery voltage falls below this value |
| PRECHARGE TIME | 0 – 300 min | 1 min, 20 min | Maximum time spent in precharge mode |
| CHARGE TIME | 0 – 1000 min | 1 min, 50 min | Maximum charging time |
Initially the S8000 came with an algorithm that evaluated various parameters to decide when a battery was full. Unfortunately this never worked correctly in my tests. Here is an example:
This was way too early after only about 1200 mAh instead of 2000 mAh that I expected. Also the voltage was still rising, or was it? Let’s have a closer look at the last few minutes:
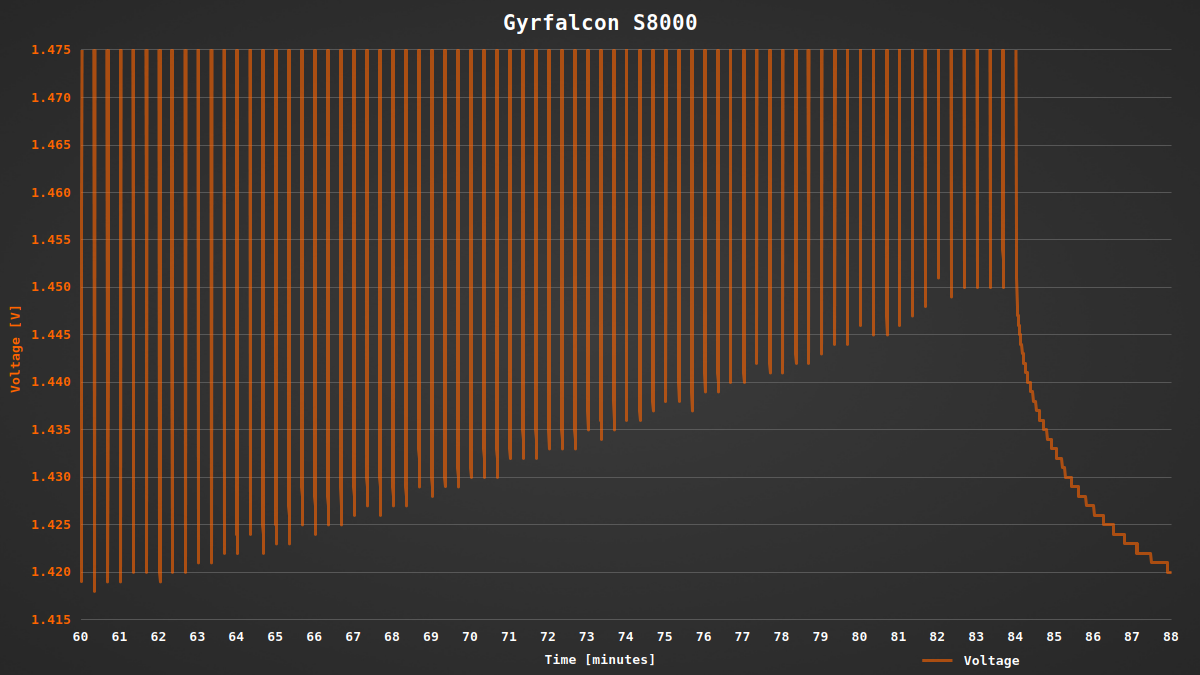
There were a few consecutive measurements with the same voltage at the end. Checking the status display of the charger confirms: “Done 0dV”. This was way too sensitive and made it impossible to completely charge NiMH batteries.
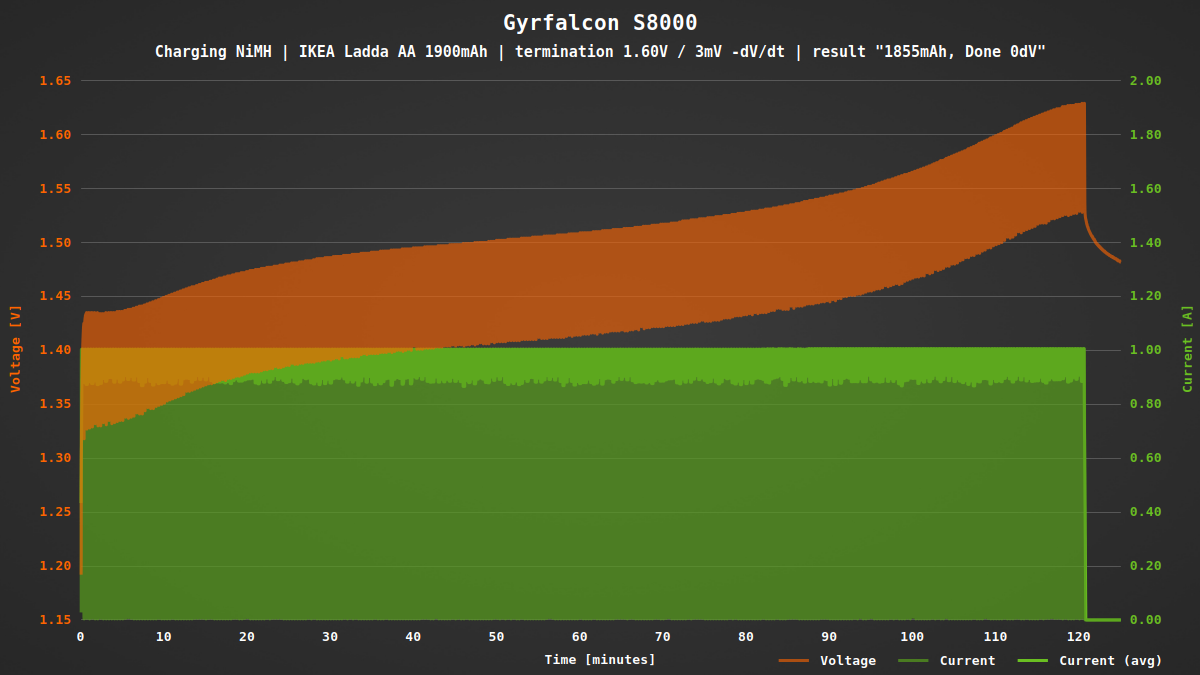
After some back and forth with Enova, I received a new firmware with an improved algorithm. And indeed, the battery was charged more, but still not the expected -dV/dt termination:
It took another round of mail exchange with some suggestions and finally I received a firmware that had the option to force -dV/dt termination!
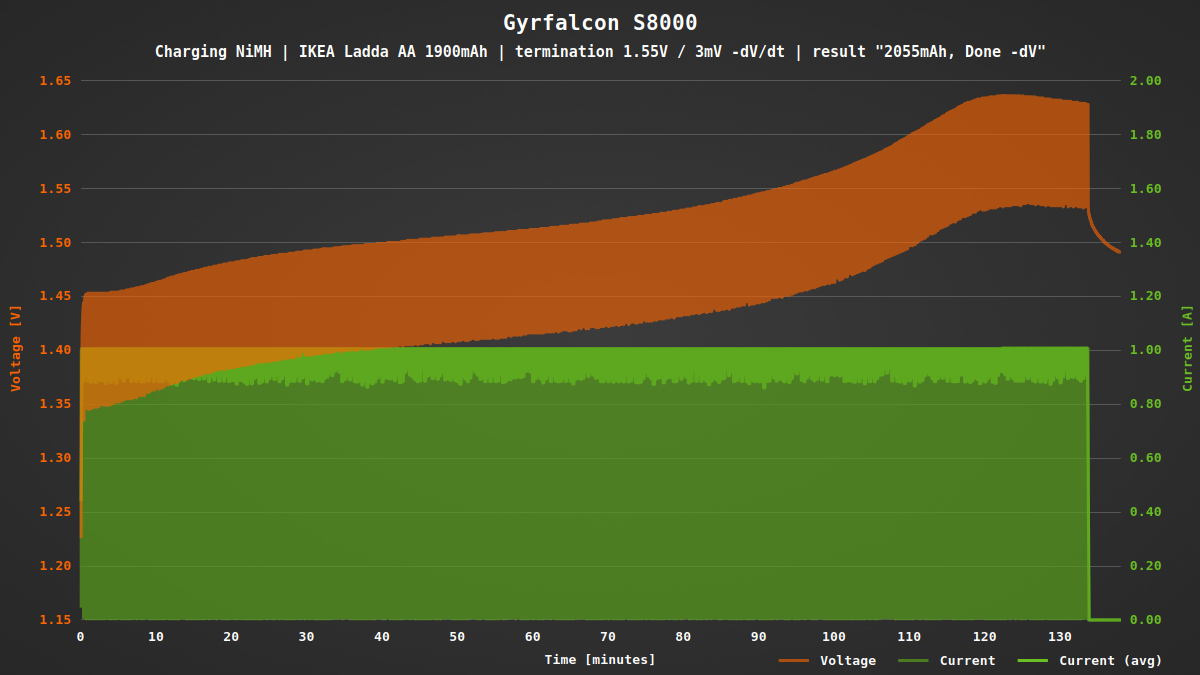
A closer look at the finish line:

Yep, that is -dV/dt termination! You can still choose the automatic mode by selecting “Advice” in the DELTA PEAK option. Which mode to choose depends on the batteries and the charging current. It needs some experience and knowledge to find the best parameters for your batteries, but with healthy batteries a “high” charging current and -3 mV -dV/dt termination should work in most situations.
As a safety, charging will be stopped if the battery reaches the target voltage. Before that they will heat up a lot! Unfortunately there is no temperature sensor in the S8000, so it won’t detect an overheating battery. A second safety is the max charging time which should be set close to the expected charging time (a capacity limit would be helpful as well, but you can use the max time limit with some calculations involving the charging current).
There is no trickle charging after charging has finished. That is, charging with a low current (just some mA usually) after the regular charging has stopped. It is used by many chargers to “top them off”, especially helpful for older types of NiMH batteries. Modern LSD (low self discharge) batteries keep their charge for a much longer time and don’t like being trickle charged.
The voltage is measured every 20 seconds, in between the current is absolutely constant. The slots work independently from each other and the current isn’t switched between them as it can be seen in some cheap chargers.
In normal mode you can set the charging current and target voltage. If this is enough depends a lot on your batteries.
Overall NiMH charging was the most difficult topic so far and the reason for most of the delays of this review. At the beginning it was impossible to charge NiMH batteries correctly, but after improving the firmware it now works great.
Discharging NiMH
Discharging NiMH is equally simple as discharging Li-ion batteries. Just add a load and wait until the voltage has reached the cutoff threshold.
| Option name | Range | Resolution | Description |
|---|---|---|---|
| CUT VOLTAGE | 0.500 – 1.550 V | 1 mV, 50 mV | Target voltage |
| DISCHARGE CURRENT | 0.030 – 1.000 A | 1 mA, 50 mA | Discharge current (CC discharge) |
| DISCHARGE REDUCE | 0.020 – 1.000 A | 1 mA, 50 mA | Termination current (CC/CV discharge) |
| CUT TIME | 0 – 1000 min | 1 min, 50 min | Maximum discharging time |
Again you have the choice between CC only discharging and CC/CV.
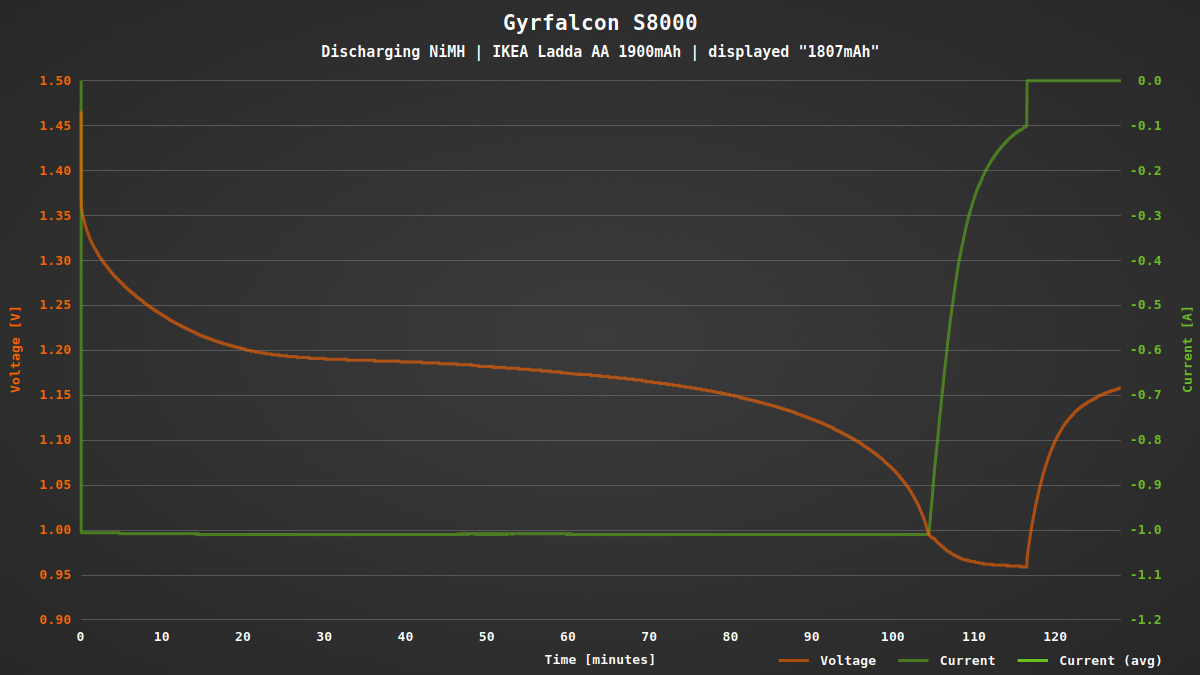
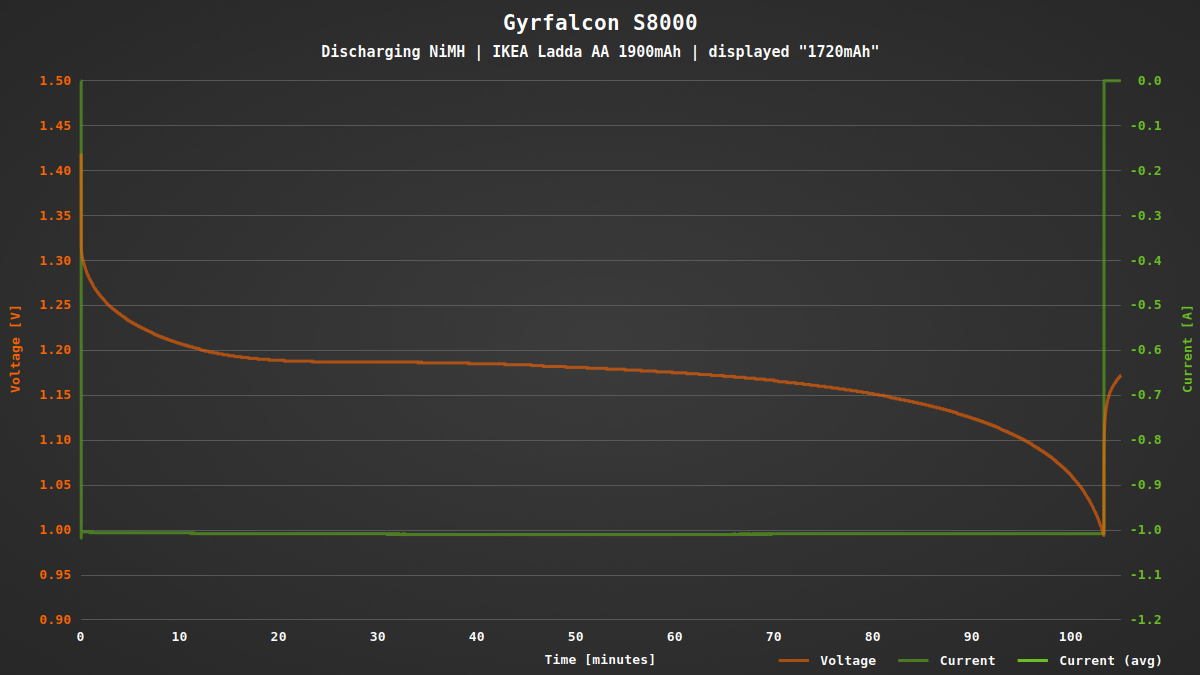
In “normal mode” you can set discharge current and target voltage.
Other functions
Internal resistance measurement
When you insert a battery, the charger will automatically measure the internal resistance (IR) of the battery. This information can be used to rate the performance or aging of the battery. Some flashlights require high performance batteries to achieve their advertised brightness. A low IR means that the battery can deliver a high current, while a high IR means a significant voltage drop under load and heating up of the battery.
The IR we expect from our batteries is usually somewhere between 10 and 200 mΩ. That is a very small value and needs careful preparation and a precise setup to measure reliably. More specific you want four wire sensing to eliminate the effect of contact resistance between the battery and the measurement setup.
The S8000 tries to measure the IR with the regular charging terminals. This can only give a rough estimate because any contamination of the terminals – even touching them while inserting the battery – will change the results. In the following diagram you can see the results of inserting the battery and measuring the IR five times in a row in each slot. Some results form a very tight cluster, especially the Vapcell F52. Other batteries have values all over the place.
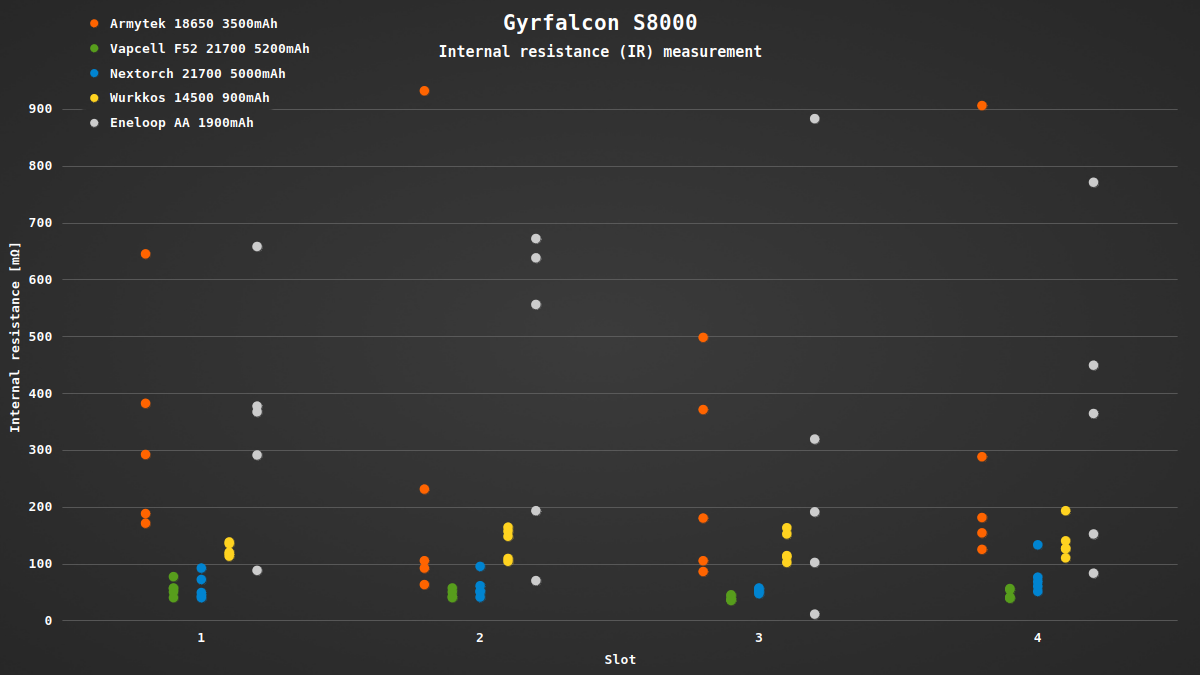
What does this tell us about the IR measurement? That we can’t trust its results. Even the outliers will let you doubt any result. If you want to carefully monitor your batteries in this level of detail, get a dedicated IR meter.
The measurement will take a few seconds, checking the response of the battery with some discharge pulses. If you don’t need this feature, you can turn it off in the GSV settings.
Cycle mode
When you want to check the actual capacity of your batteries, you first have to fully charge them, then discharge them while measuring the capacity. And afterwards you might want to charge them again. This can be simplified by using the cycle mode of the S8000. You can choose between these cycle patterns:
- charge → discharge → charge
- charge → discharge
- discharge → charge
- discharge → charge → discharge
The available options are a combination of the charge and discharge options from above. There are additional CHARGE RESTING and DISCHARGE RESTING options that let you add a delay between discharge and charge stages so that the battery can recover from the previous operation. You can also set the cycle count.
The special “refresh” mode is a C>D>C cycle program that shows you the capacity afterwards.
And more
There are more features that I haven’t tested so far. For example, for NiMH batteries it has a “break-in” mode as defined in IEC 61951. Not something you need for modern LSD batteries.
Other supported battery types next to “Lithum-ion” (sic!) and “NiMh” (sic!) are “Liio4.35”, “Liio4.30” and “LiFepo4” (sic!). Especially the LiFePo4 mode might be interesting. I don’t know if there is a difference to the Li-ion mode except for different default options and I don’t have any LiFePo4 batteries to test it.
When batteries are inserted while the charger is not powered, the batteries will not be discharged. But this isn’t a portable charger that you will use with a small PV cell, so a reliable power supply can be assumed.
The firmware can be updated by the user via USB. It uses an integrated CH340 USB-TTL serial converter and the firmware is sent via the YMODEM protocol. I had trouble to do it under Linux, mostly because there are multiple variants of YMODEM and the one I tried didn’t work. But if you follow the instructions and use Xshell under Windows it works fine. For a beginner it might be difficult to follow all the steps, but it is possible if you only do what is instructed and ignore the thousands of other options available in the software. For the end user a little self-contained updater would be nice.
So far the serial connection won’t do more than to drop you in a shell or wait for a firmware update. I hope that Enova will extend its functionality, for example allow you to program the charger or receive realtime data of the charging process. Maybe something like an SCPI implementation?
Conclusion
The Gyrfalcon S8000 is a powerful charger that targets professional users. It allows you to set many detailed options to adjust the charging and discharging process. And it performs really good in charging and discharging batteries!
On the other hand it doesn’t feel quite finished. The firmware got improved a lot over my testing period, but there’s still room for improvement and extension. There are a few mechanical usability problems with the terminals as well.
It is quite obvious that Enova took more than a single look at the SkyRC MC3000 when designing the S8000. It has a similar appearance, similar menu and the manual is almost identical. However it still lacks some features to be a real competitor. So far it is more like an “MC3000 light” – but with the potential for improvement!
Like to see another opinion about this charger? Then check out the awesome review by @TimMc!