Note: Descriptions and some of the pictures in this thread were previously posted in the thread Super-small 18650 zoomie - quick review and mod This thread contains additional pictures and beamshots and more description of some of the later steps in the mod. I also removed descriptions of some early changes that I reverted.
I purchased this gold Aleto N8 on Ebay. There are several different 14500 versions of this light, but the one on Ebay was the only 18650 version I could find.

The gold one on EBay is the only version of this light I could find. I was unable to find a black version. I received the light about a week after I ordered… impressively fast shipping for a light from China to the U.S.
In stock form it has:
- Hollow aluminum pill. O-ring on the pill to give a smooth bezel slide.
- XML T6 cool white emitter on thin aluminum star.
- multi-mode 17mm driver (looked like 3 brightness levels plus 3 different strobe/flashy modes)
- Lens is properly focused. About as wide as a Sipik 68 in flood, with a focused projection of the emitter in spot. The flood is much brighter than a Sipik 68, but the spot mode is relatively dim…. huge wide image of the XML emitter, but with far less throw than a Sipik 68. This is to be expected of any zoomie using an XML.
- Tailcap switch has a loud click and looks like it uses a 14mm or 16mm switch boot…. larger than the 12mm of a Sipik 68 or the AA version of this light. Unclear if this switch is a one-piece uinit like the AA version or a multi-part unit consisting of a clicky, spring and plastic retaining ring like the Sipik 68.
- Heatsinking is not great. Note that the pill sits under the grooved sliding bezel. The heatsink fins on the body are well below the pill. Also the entire light is very lightly built with thin aluminum… this light is built for small size. Everything else is secondary.
This is the smallest 18650 zoomie currently available. I measured it at 24 mm wide x 108 mm long. It’s much larger than the AA version, but still smaller than a Sipik 98. Overall, it’s about the same size as a Convoy S6, but less solidly built.
… but how about making it even smaller? J) J) J)
First up was to replace the emitter and build a platform and heatsink for the star. I did the following:
- Built heat sink and LED platform of 4 copper disks soldered together, with notches for LED wires. Attached the heatsink to the hollow pill with Arctic Alumina.
- Replaced star with 16mm Noctigon direct copper star
- Reflowed dedomed cool white XM-L2 onto new star.
- Replaced driver with Nanjg 105c with Comfychair’s FET mod and DrJones Lumodrv.
Then I needed to adjust the focus
- Filed down bottom of of pill’s lip so lens can extend further. It needed to extend further because the Noctigon and copper platform raised the LED higher than stock.
- Filed down top of the pill and bottom of the bezel. This allowed the lens to retract till its almost touching the wires on the star. This gives maximum possible flood… I measured it at 89.5 degrees. Here are some screenshots of the flood and spot.
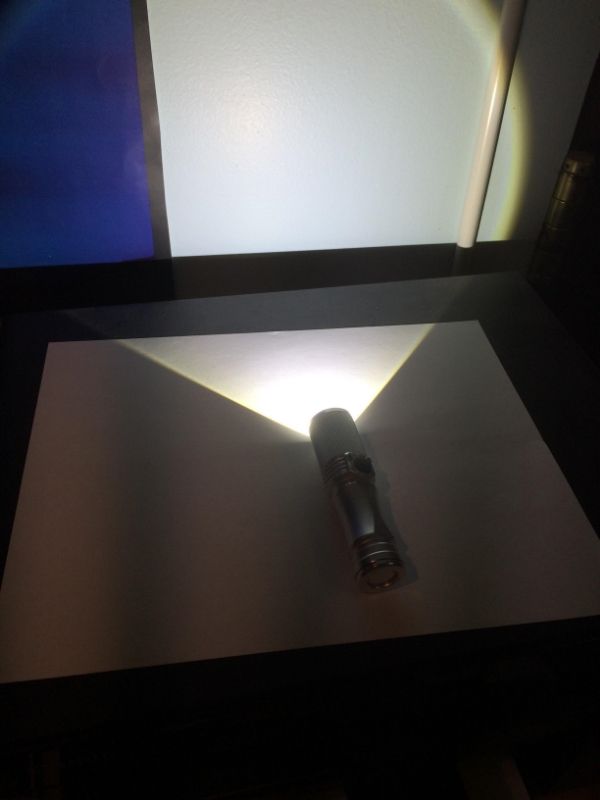
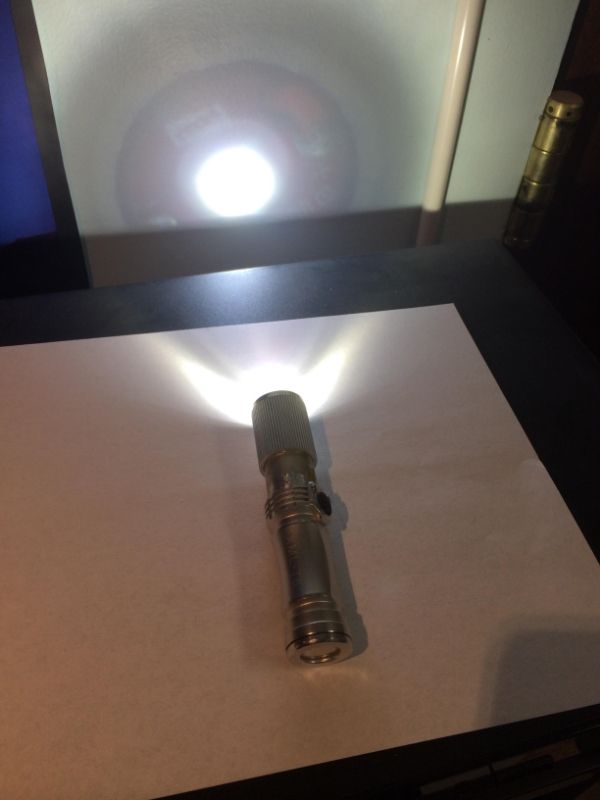
Note that in this short distance picture of the spot mode, you can see an image of the Noctigon star around the beam. The real beam image is far more intense so the Noctigon is much less noticeable. This is caused by reflections off the inside of the bezel illuminating the star. Since the inside of the bezel isn’t black, some reflections are unavoidable.


Anodizing - I wasn’t a fan of the gold anodizing and removed it with a Greased Lightning bath.
Sideswitch - I wanted to install a sideswitch so I could use DrJones awesome Lumodrv driver and so I could remove the tailcap switch and shorten the light. I needed to rig an electrical contact from either side of the driver to an external momentary switch and then to the body of the light. Not so easy on a light with a pill. And except for a rechargeable hand drill, I have no power tools. This is what I did:
- Drilled and filed a hole approximately half a cm wide in the body just below the sliding bezel. This hole is revealed when the bezel is extended. It passes complete through the body into the battery compartment just below the driver.
- Soldered a short piece of old solid-core wire to the “4” star on the driver. When the pill is screwed in, this piece of wire lines up with the hole and can be fished partially through with tweezers. I put a little arctic alumina over the wire around and below the 4-star so that if the wire gets torqued screwing or unscrewing the pill it won’t damage the driver.
- Filed down part of the outside of the body in a line between the hole and the heatsink fins. This is so I could rig an electrical contact on the outside of the body without having the sliding bezel hit it when the bezel is retracted into flood mode.
- I needed a flat contact, so wire was out. I used kapton tape on the bottom, then a strip of thin tin sheet (chosen because it solders easily), and another layer of Kapton tape on top. Super-glue gel around the edges to make sure the tape stays put. One end of the tin strip goes into the hole and angles down. The other end goes to the heatsink fins and rides up over them before stopping.
- The small piece of wire connecting to the 4-star goes into the hole, then turns 90 degrees towards the tailcap before touching the tin strip. Soldered it in place.
- Filed off the top of the heatsink fins below the switch. Put down some Kapton tape for insulation then used arctic alumina to glue on a tiny momentary tact switch I got on Ebay.
- One of the contacts at the front of the switch was soldered with a short piece of wire to the tin strip.
- To connect the switch to the body I drilled 2 small holes in the body, bent the rear switch pins downward and loaded them up with solder, then wedged the pins into the small holes.
- Anchored the switch in place with more actic alumina.
- I then made a switch cover using the rubber boot from a cheap plastic Duracell flaslight from the local drugstore and a piece of aluminum sheet. Screwed it down with some small screws I had. The rear of the switch plate is also glued on with superglue gel, but can easily be removed to service the switch if needed. I tried different stuffing in the switchboot to fine-tune the pressure required to activate the switch.
- I sealed up the contact wire hole with more Kapton tape and a little arctic alumina. Servicing the pill o-ring will be a pain, but isn’t impossible. I’d have to unseal the Kapton tape and arctic alumina over the hole to reveal the solder, desolder the contact wire, then unscrew the pill. Then repeat the process in reverse. Fortunately, the o-ring is large, so I don’t expect frequent servicing to be needed.
Here is an interim picture of the light with the sideswitch standing next to a stock Sipik 68. The tailcap has not yet been shortened. In this interim form it is now 102mm long.

 Picture of the inside of the battery tube… it’s blurry but you can see the red wire connecting the 4-star to the sideswitch. The positive contact at the bottom of the driver keeps the battery off the wire.
Finally, I removed the rear switch and shortened the tailcap This reduced the length of the light to 95mm. I used a handfile to file off the back off the tailcap above the button boot, and the bottom of the threads. I also sawed and filed off the top of the threads on the body. Then I built a simple contact plate and installed a solder-braided spring. This reduced the length to 95mm. Here are some pictures of the shortened light:
 Modded Aleto N8 standing next to a Zebralight SC62d. As you can see, both lights are about the same size!
 Beauty shot!
  Tailcap open standing next to Samsung 25r INR cell. The light works perfectly with Samsung 20r and 25r. However, Zebralight 3100 mAh protected are a little too long. The light still works and is secure, but the tailcap won’t quite screw on all the way. Not a problem for me as I’d planned on using the INR cells, however in retrospect I probably shouldn’t have filed down the back of the body so much. I could’ve left it 1mm longer and had no issues with protected cells.
 Picture showing the back of the endcap.
Still to do:
- The light works great, but the switch is a little further back than I’d like. If I replace the stock lens with a fresnel with a shorter focal length, then I could file off the top of the bezel as it wouldn’t need to extend as far. This wouldn’t shorten the overall light anymore, but would allow me to reduce the length of ribbed portion, exposing more of the body in flood mode. Then I could move the switch forward maybe as much as 1 cm. Note that in this mod, the sideswitch is mounted on the outside of the battery tube… unlike sideswitch lights on the market, the battery goes completely under the switch. I’ve ordered some fresnel lenses and will examine this option further when they arrive.
- The tailcap and body could use something to increase grip. My checkering file should arrive next week.
- I slightly damaged the corner of the emitter trying to remove some debris. As soon as my new emitter arrives I’ll do an emitter swap to a replacement emitter.


